Quantcast
Channel: Help & How To
Viewing all 5861 articles
Browse latest View live

Oculus Rift Troubleshooting Guide

$
0
0

How to fix pretty much everything.

Even a system as good as the Oculus Rift can run into problems, both in the hardware and software ends. To make troubleshooting as simple as possible, we have assembled all articles into this one handy guide. Here's how to fix pretty much every problem you'll run into with your Rift.

Read more at VRHeads!


4 good reasons you should NOT buy a touchscreen laptop (and 2 reasons you should)

$
0
0

3 reasons you shouldn't buy a touchscreen laptop (and 2 reasons you should)

Does your new laptop really need a touchscreen?

Buying a laptop these days is a process that usually has a lot of questions involved. Does it have the newest hardware and will it put up with my workload? How much storage does it have? Does it have a touchscreen? Regarding the final question, there is an ongoing debate over whether or not touchscreens are worth buying on Windows 10 laptops. We're not talking about 2-in-1s with detachable keyboards like the Surface Pro— we're talking laptops, whether convertible or notebook, like the Dell XPS 15. To help you decide, here are four reasons why you shouldn't buy a laptop with a touchscreen, and two reasons you should.

Why you shouldn't buy a touchscreen laptop

Here's the first part of the argument.,

Touchscreens drain batteries faster

Don't forget your charger

Touchscreens come with a whole other set of processing jobs for the hardware inside your PC, mainly due to the touch panel constantly checking to see if any of your digits are touching the display. The difference in battery life can be quite drastic, sometimes cutting out up to hours of life.

Laptops are meant to be used on the go, and if you think you'll often use yours while traveling, commuting, or in the field, consider staying away from a touchscreen. You never know when you'll need an extra few minutes (or hours) of battery life.

See the laptops with the best battery life

Touchscreens are more expensive

Since you need a special display with a touch panel built into it, expect to pay more overall for a laptop. Many manufacturers will also offer the touchscreen in a higher resolution, further upping the price.

If you're searching for the best laptop for the lowest price, avoiding a touchscreen can save you a few hundred dollars.

Touchscreens make laptops heavier

Dell XPS 13

That extra technology baked into the display takes up space and will usually make the laptop heavier. The difference in weight is often in mere grams, but part of the allure of a laptop is how light it is.

The difference in the Dell XPS 13, for example, is about 0.2 pounds. That's really not a lot, but in a laptop that already weighs under three pounds, it is noticeable.

Touchscreens are harder to see in direct light

Using a touchscreen in the dark or in a room with dim lighting won't cause many problems, but have you ever tried using one in direct light? Since most touchscreens have a glossy finish (the alternative is a matte finish, which is much better in the sun but not often used on touchscreens), fingerprints, smears, and smudges show up in a major way.

Using a PC in places other than a desk is really what laptops are all about, so you'll no doubt encounter some sun or direct light. If a dirty phone screen or smudged eyewear already drive you nuts, consider whether you want to be cleaning another display.

Why you should buy a touchscreen laptop

On the flipside, we have some good reasons why you should pay a little bit extra for a notebook with touch.

Touchscreens add versatility

Lenovo ThinkPad X1 Yoga

In the case of a standard notebook — a laptop that doesn't convert into tablet, stand, and tent modes — it's not as easy to use a touchscreen. You have to reach over a perfectly usable keyboard and touchpad, and the whole operation is a bit awkward with the bottom portion of the laptop in the way.

A convertible laptop, however, lets you rotate the display around so that the touchscreen is front and center. Lenovo's ThinkPad X1 Yoga is a laptop designed with business productivity in mind, but it can also be turned into a tablet for watching TV and movies, reading books, or swiping through social media sites. Many apps available for Windows 10 are designed with touch in mind, and Windows 10's tablet mode is really half the fun of the OS.

See the best convertible laptops

Touchscreens add pen options

HP Spectre x360

The 2-in-1 Surface Pro is a prime example of what a laptop with a pen can achieve, but something like the HP Spectre x360 is not far behind, albeit in a convertible form. You have a standard laptop for typing and productivity, but you can also flip the display around and use the impressive HP pen.

Many Lenovo laptops also feature an active stylus, and while they don't deliver quite the same experience as a full-fledged pen, they still do a great job of making you believe that you're writing or drawing on real paper. If you like the idea of jotting down notes or quickly annotating documents, a touchscreen combined with a pen and Windows Ink is something to behold.

Do you use a laptop with a touchscreen?

Which side of the debate are you on? Do you prefer a laptop with a touch display or one without? Let us know! Also, be sure to check out our Laptop Buyer's Guide for way more information about what laptops currently reign supreme.

See our Laptop Buyer's Guide

How to manage wireless network connections on Windows 10

$
0
0

Here are eight tips everyone should know to manage Wi-Fi network connections on Windows 10.

Although, for the most part, setting up a wired network connection on a Windows 10 device is as easy as plugging in an Ethernet cable, connecting using a wireless adapter requires some additional steps depending on the security of the network.

Windows 10's Settings app that makes it super easy to manage many aspects of a Wi-Fi connection. Using the "Wi-Fi" page in the "Network & Security" section, you can connect and disconnect from a network, view configuration properties, change the network profile, manually add and remove network connections, set your connection as metered to reduce data usage on capped internet plans, and a lot more.

In this Windows 10 guide, we'll walk you through many ways you can manage wireless network connections on your device using the Settings app.

How to connect to a Wi-Fi network

Connecting to a wireless network is an easy process, you only need to know the network you want to connect and the security key to authenticate (sometimes also referred as a Wi-Fi password).

  1. Click the wireless icon in the notification area.
  2. Select the network you want to connect.
  3. Check the Connect automatically option.
  4. Click the Connect button.

  5. Enter the network security key.
  6. Click the Next button.

If the network flyout is not reporting any wireless network, you can try the steps shown below to turn off and on again Wi-Fi to see if that fixes the problem.

How to disconnect from a Wi-Fi network

Removing your device from a wireless network is also a straightforward process that can be done in a few different ways.

Disconnecting using the flyout menu

The easiest way to disconnect is using the network flyout menu.

  1. Click the wireless icon in the notification area.
  2. Select the network you're currently connected.
  3. Click the Disconnect button on the network connection.

Alternatively, you can click the quick action Wi-Fi button at the bottom to turn off the adapter and disconnect from the network using flyout menu.

Quick Tip: The same Wi-Fi button can also be found in the Action Center's Quick Actions section (Windows key + A).

If you don't select a schedule, then you'll need to enable the adapter manually by clicking the Wi-Fi button again from the flyout menu. Also, note that using the flygout menu, it's possible to turn on or off Airplane mode and Mobile hotspot.

Disconnecting using the Settings app

Alternatively, you can enable or disable Wi-Fi using the Settings app.

  1. Open Settings.
  2. Click on Network & Security.
  3. Click on Wi-Fi.
  4. Turn off the toggle switch for the adapter you want to disconnect.
  5. Use the drop-down menu to select an option to turn on the wireless adapter on schedule.

How to view a Wi-Fi connection properties

Sometimes, in order to troubleshoot a problem or set up an application, you'll need to know your network hardware information, such as network band, IP address, the name of the adapter and others. While there are a number of ways to find out this information, you can quickly identify these and other information about your wireless connection using the Settings app.

  1. Open Settings.
  2. Click on Network & Security.
  3. Click on Wi-Fi.
  4. Under the wireless network, click the Hardware properties link.

In the properties page, you'll find information, such as SSID, protocol, security type, network band and channel, IP and MAC address.

How to connect to a Wi-Fi network on range automatically

If you didn't select the option to connect to a wireless network automatically while setting up a new connection, or you enabled the option, but you don't need the configuration anymore, it's possible to control this feature using the Settings app.

  1. Open Settings.
  2. Click on Network & Security.
  3. Click on Wi-Fi.
  4. Click your current Wi-Fi connection.

  5. Turn on or off the Connect automatically when in range option.

How to change the Wi-Fi connection network profile

In order to increase network security, starting with the Windows 10 Fall Creators Update, you can now more easily set your wireless connection as Private on a network you trust, or Public on the network you don't trust, such as at a coffee shop or airport.

  1. Open Settings.
  2. Click on Network & Security.
  3. Click on Wi-Fi.
  4. Click your current Wi-Fi connection.

  5. Under "Network profile," select one of the two options:

    • Public– makes your PC hidden from other devices on a public network and disables file and printer sharing.
    • Private– makes your PC discoverable by other devices in a local network and allows them to use printer and file sharing (if it was configured).

If you're not running the Windows 10 Fall Creators Update, you'll see a Make this PC discoverable option, which works in the same way as the options shown in the above steps (toggle switch off means Public, and toggle switch on means Private).

How to set a Wi-Fi connection as metered

Out of the box, Windows 10 has unlimited access to the internet to download system and app updates, sync settings across your devices, connect to cloud services, and to connect you to the mighty internet.

The problem is that if you're on a limited internet connection, it's possible to go over the data cap very quickly. A metered connection helps to reduce Windows 10's data usage to prevent exceeding your data plan.

If you're connected to a limited data plan, you can use the Settings app to set your wireless connection as metered.

  1. Open Settings.
  2. Click on Network & Security.
  3. Click on Wi-Fi.
  4. Click your current Wi-Fi connection.

  5. Under "Metered connection," turn on the Set as metered connection toggle switch.

After completing the steps, Windows 10 will only have restricted access to an internet connection, which also prevents it from downloading updates. However, some critical updates may download over this type of connection.

In addition, using a metered connection will prevent the Start menu from downloading Live Tiles updates, and some apps will no longer receive updates automatically.

How to add or remove Wi-Fi connections

Using the Settings app is also possible to add or remove a Wi-Fi network manually in those cases when you may need to connect to a network that doesn't broadcast its SSID (Service Set Identifier), or when you need to set up a wireless connection beforehand to save time.

Adding a Wi-Fi network

  1. Open Settings.
  2. Click on Network & Security.
  3. Click on Wi-Fi.
  4. Click the Manage known networks link.

  5. Click the Add a new network button.

  6. Enter the network name.
  7. Using the drop-down menu, select the network security type.
  8. Check the Connect automatically option.
  9. Check the Connect even if the network is not broadcasting option.
  10. Click Save.

Once you've completed the steps, whenever your device is within range of the network, it'll connect automatically without any further steps.

Removing a Wi-Fi network

If you must remove (forget) a Wi-Fi network, the Settings app makes it a very straightforward process.

  1. Open Settings.
  2. Click on Network & Security.
  3. Click on Wi-Fi.
  4. Click the Manage known networks link.

  5. Select the Wi-Fi connection you want to remove.
  6. Click the Forget button (there is no confirmation dialog using this button, so make sure that you really want Windows 10 to forget this connection before clicking the button).

After completing the steps, your device will no longer try to connect with the network you've removed.

How to manage wireless services

The Wi-Fi settings page also offers a few nifty features for users that are always on the move.

Wi-Fi services

Windows 10 offers two additional features to help you get connected no matter where you are located. If you turn on the Find paid plans for suggested open hotspots near me toggle switch, then you'll be able to purchase data plans from the Windows Store form affiliated networks.

In addition, you can also turn on the Connect to suggested open hotspots toggle switch, which allows Windows 10 to connect automatically to open wireless networks, even connecting through landing pages thanks to a database of known networks.

While using suggested open hotspots is a good option, remember that some networks can be reliable but not secure.

Hotspot 2.0 networks

Hotspot 2.0 is a relatively new networking standard that makes connecting to public Wi-Fi networks a simple and secure process.

If you're in a public place like at a coffee shop, airport, or hotel, Hotspot 2.0 will identify and connect to the right network automatically without having to go through a list of networks which can be fake or malicious.

Hotspot 2.0 networks is enabled by default on Windows 10, but if you're planning to make use of this feature, you can go to Settings> Update & Security> Wi-Fi to make sure is enabled. You can also check this guide for more details.

Wrapping things up

While it's now possible to configure many wireless options using the Settings app, Windows 10 has yet to include every networking feature in this experience. This means that to change some options, such as advanced network adapter settings, power management, and set up specific protocols, you still need to use Control Panel.

More Windows 10 resources

For more helpful articles, coverage, and answers to common questions about Windows 10, visit the following resources:

How to open ports in Windows Firewall

$
0
0

How to open a port in Windows Firewall

How do you open ports in Windows Firewall?

When dealing with certain apps and processes on your Windows 10 PC, you might run issues if you aren't connecting properly to the internet. If you've come across a potential fix that involves opening a certain port in your firewall, you might be wondering what exactly that process entails. This is a problem that can arise in plenty of situations, but especially when attempting to set up a VPN. If you suspect Windows Firewall is part of your connectivity issue, here's how to open ports.

How to open a port for incoming traffic in Windows Firewall

Windows Firewall is designed as a security measure for your PC. To put it simply, a firewall analyzes incoming and outgoing connections to determine whether or not they're threats. If you suspect that your Windows Firewall is causing connectivity issues, you can open a port for incoming traffic. Here's how:

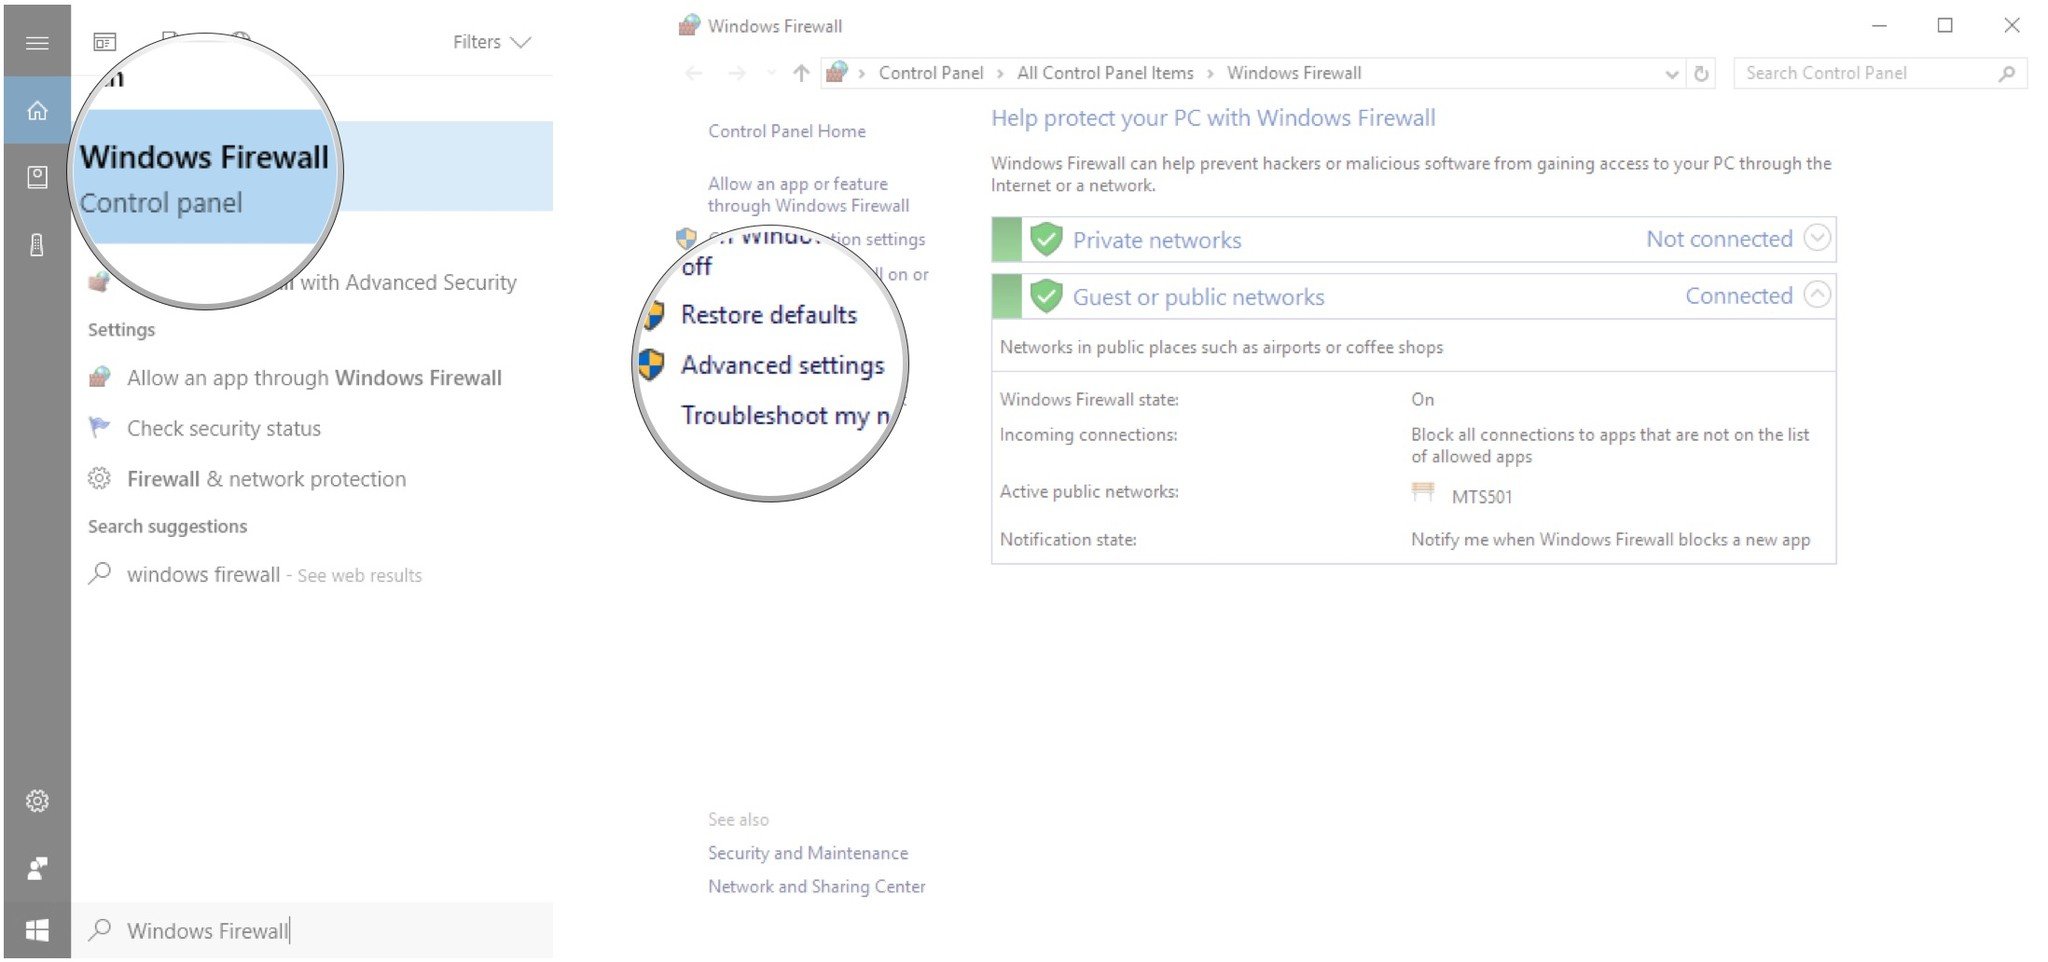
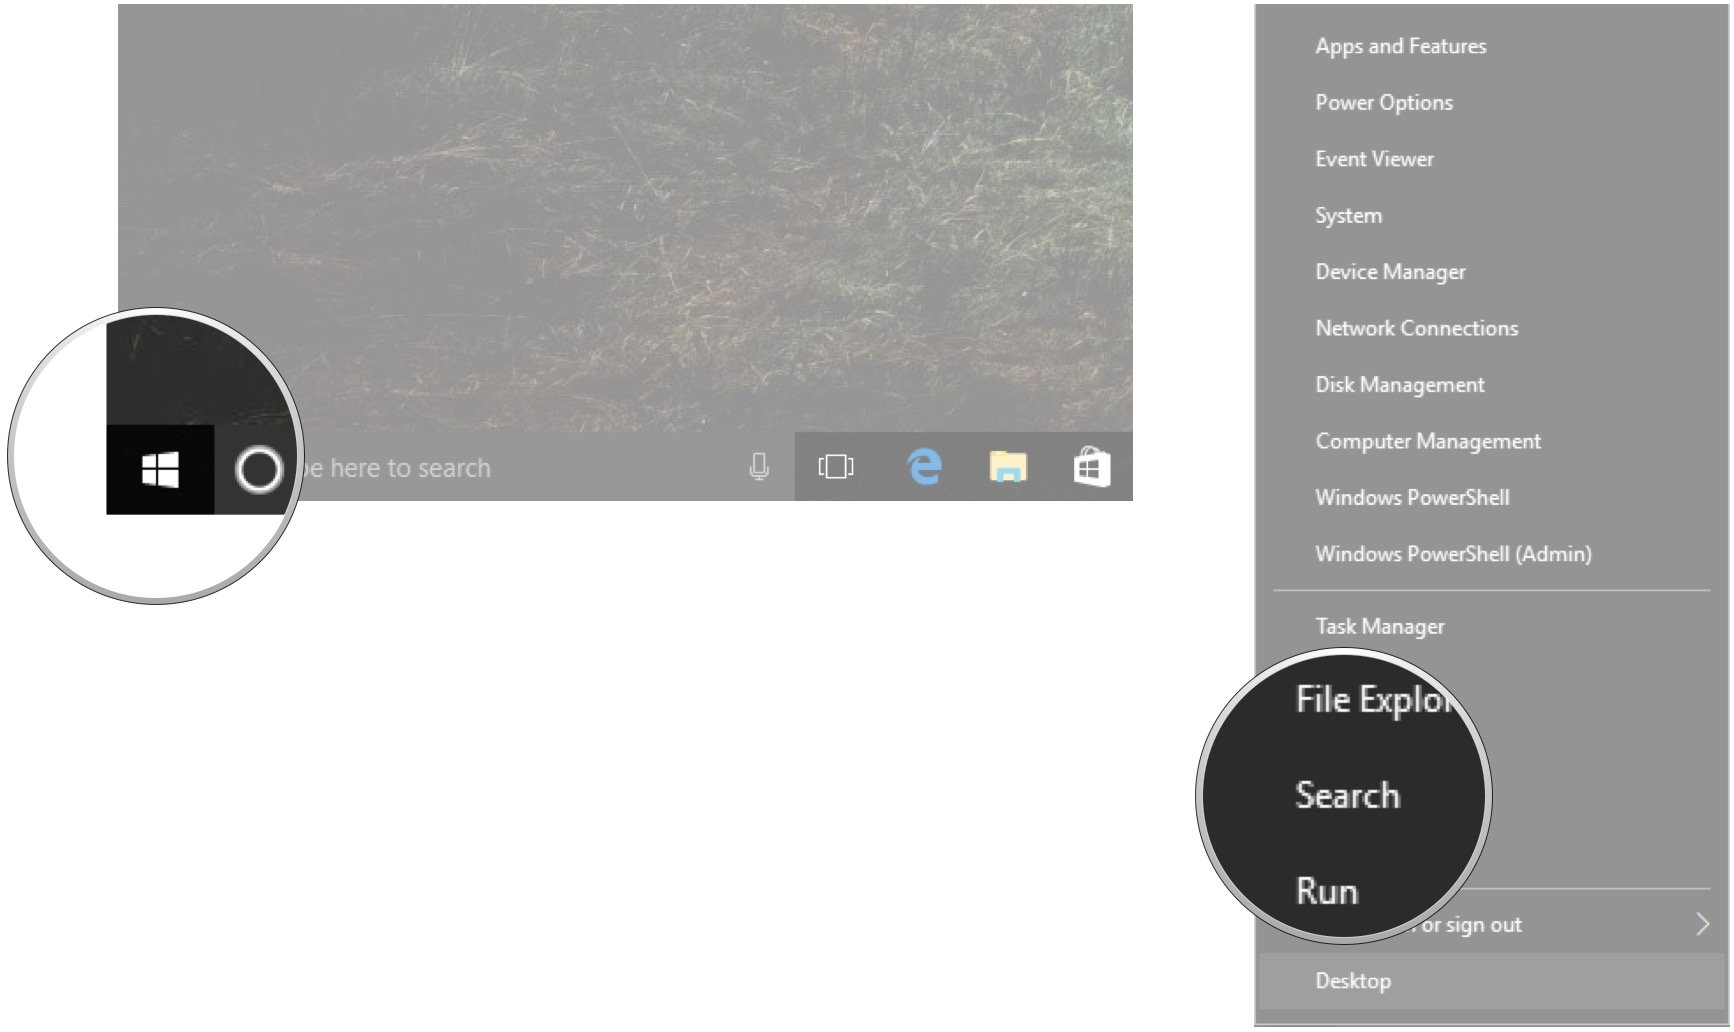
  1. Right-click the Start button.
  2. Click Search.
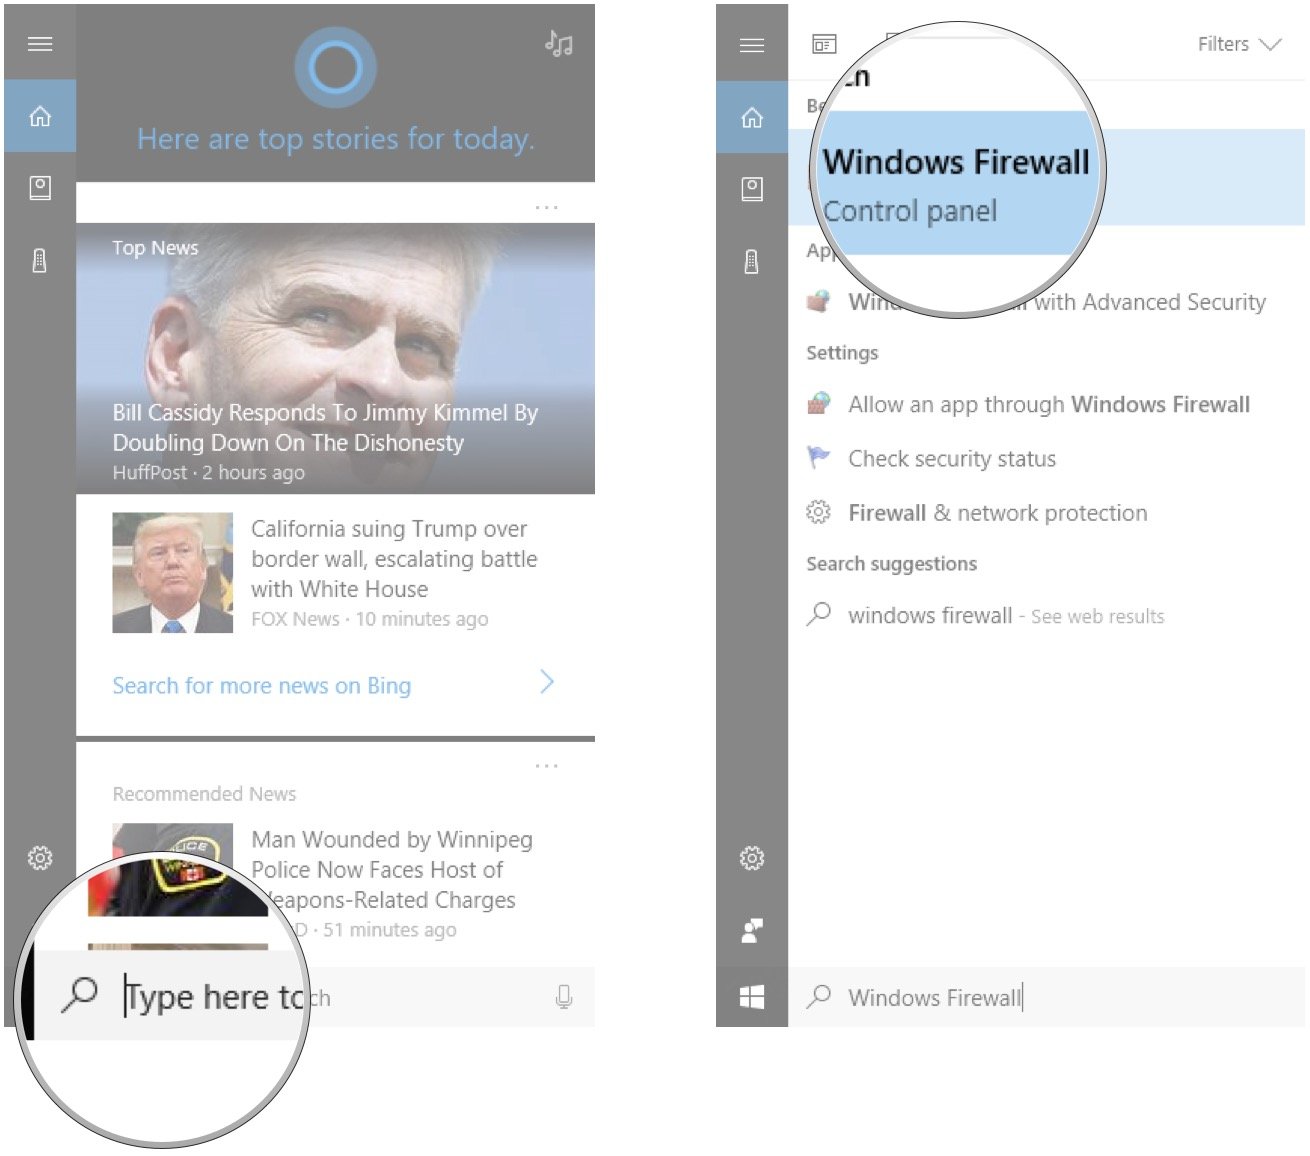
  3. Type Windows Firewall.

    Click Search. Type Windows Firewall.

  4. Click Windows Firewall.
  5. Click Advanced settings.

    Click Windows Firewall. Click Advanced settings.

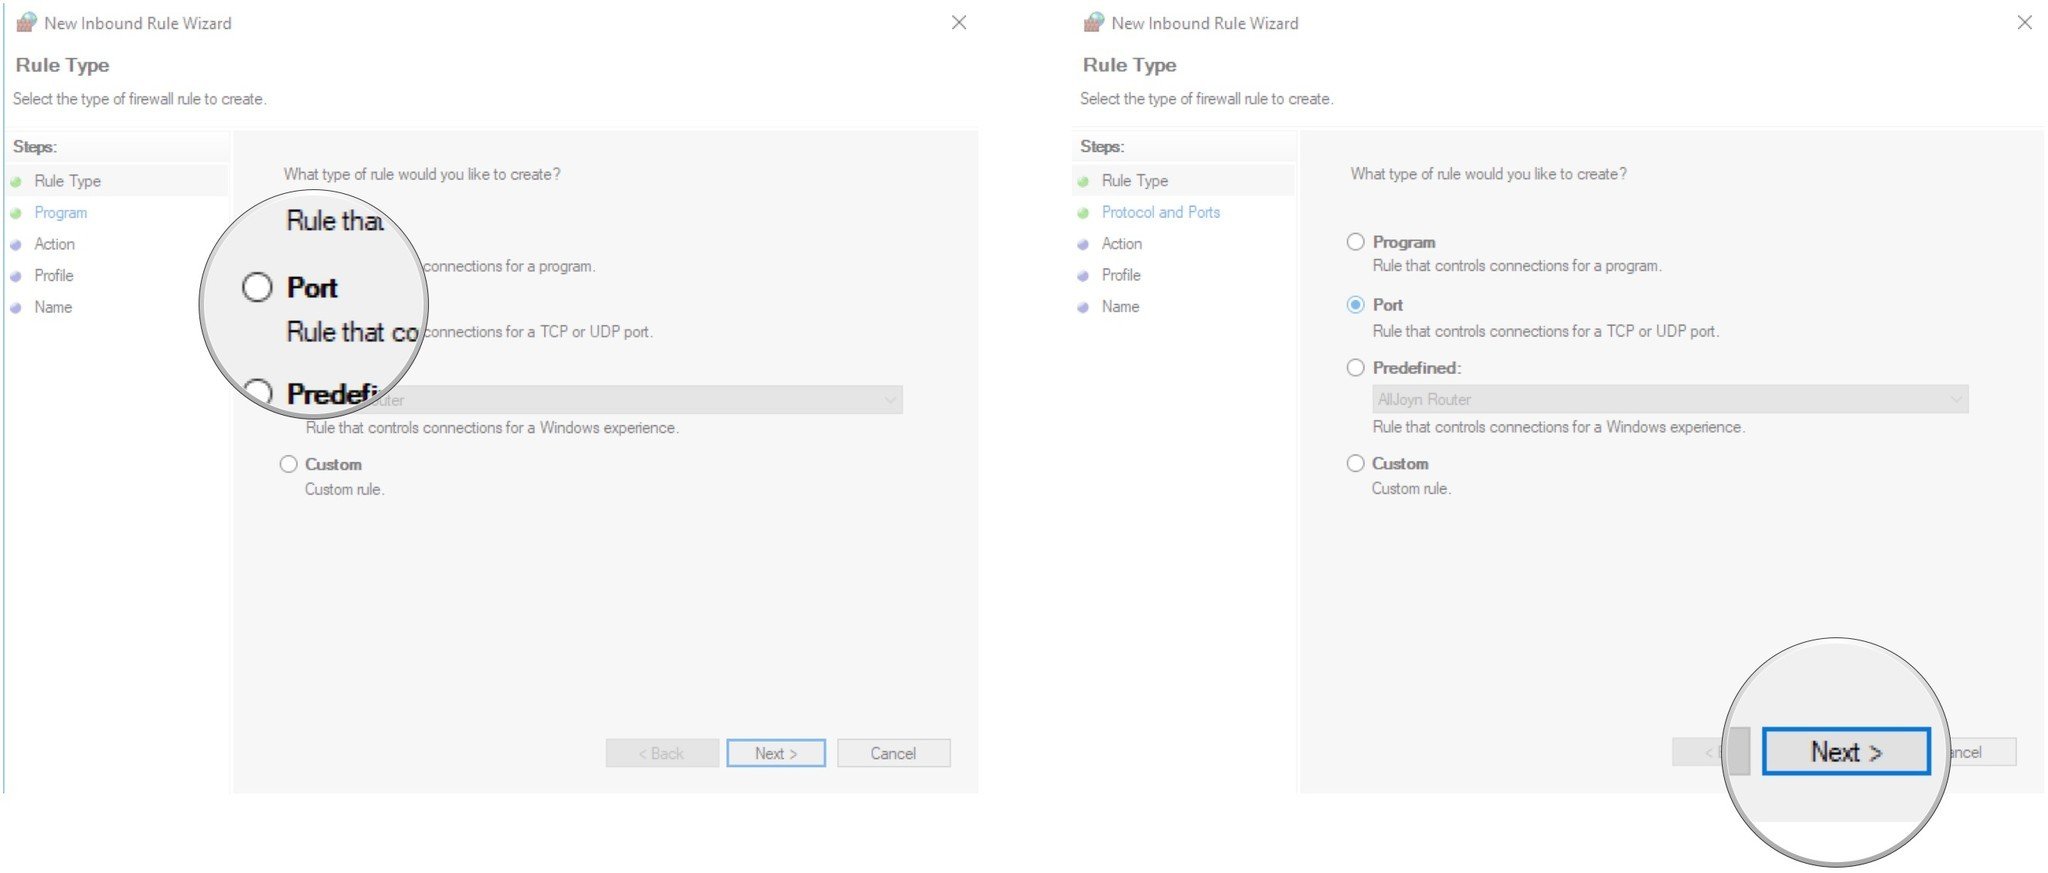
  6. Click Inbound Rules in the left frame of the window.
  7. Click New Rule… in the right frame of the window.

    Click Inbound Rules. Click New Rule.

  8. Click Port.
  9. Click Next.

    Click Port. Click Next.

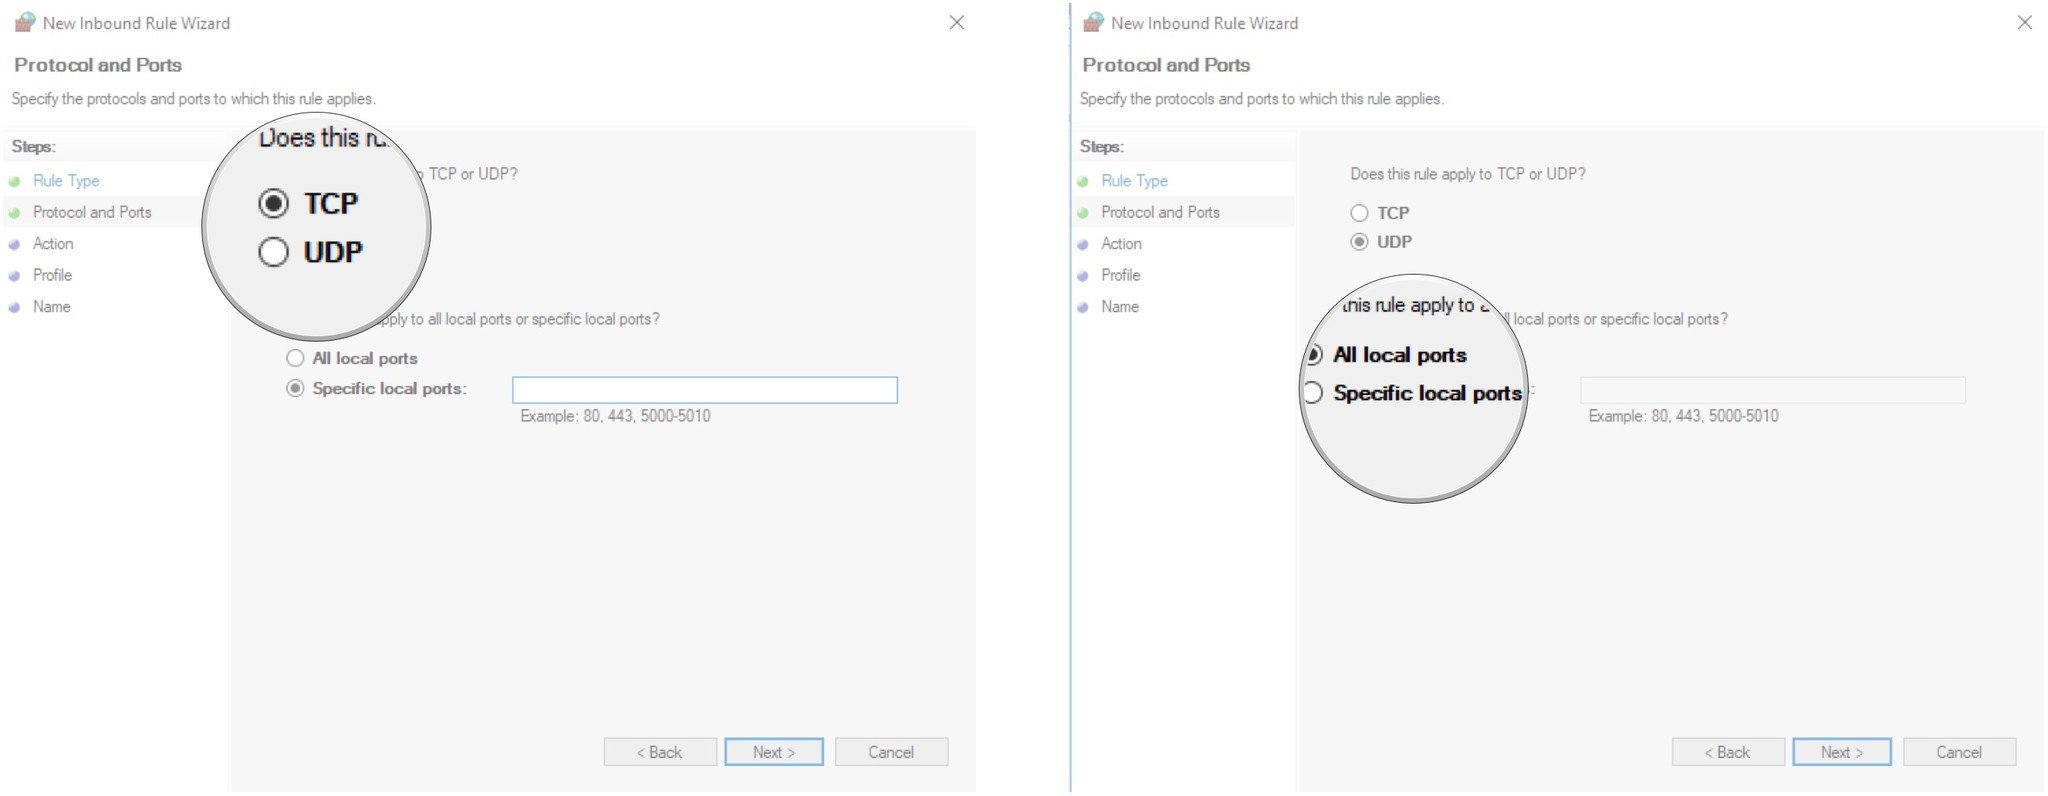
  10. Click either TCP or UDP.
  11. Click Specific local ports.

    Click either TCP or UDP. Click Specific local ports.

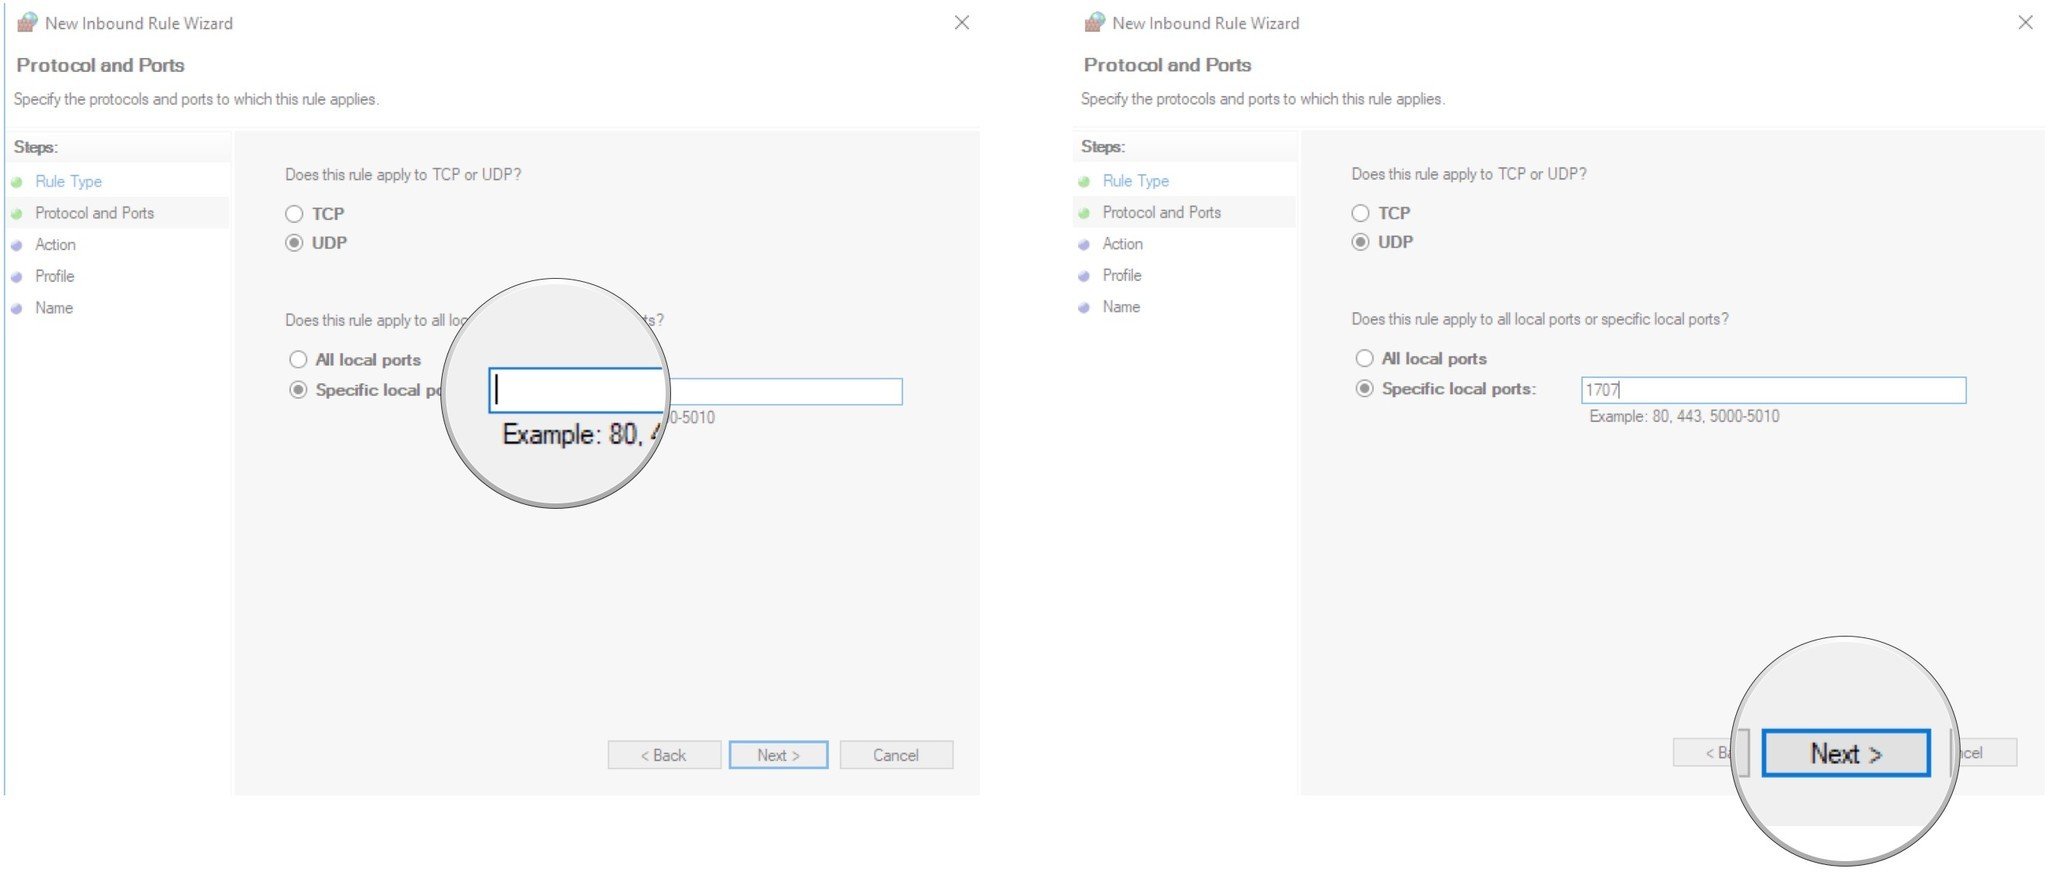
  12. Type a port number. (In this case, we will open port 1707.)
  13. Click Next.

    Type a port number. Click Next.

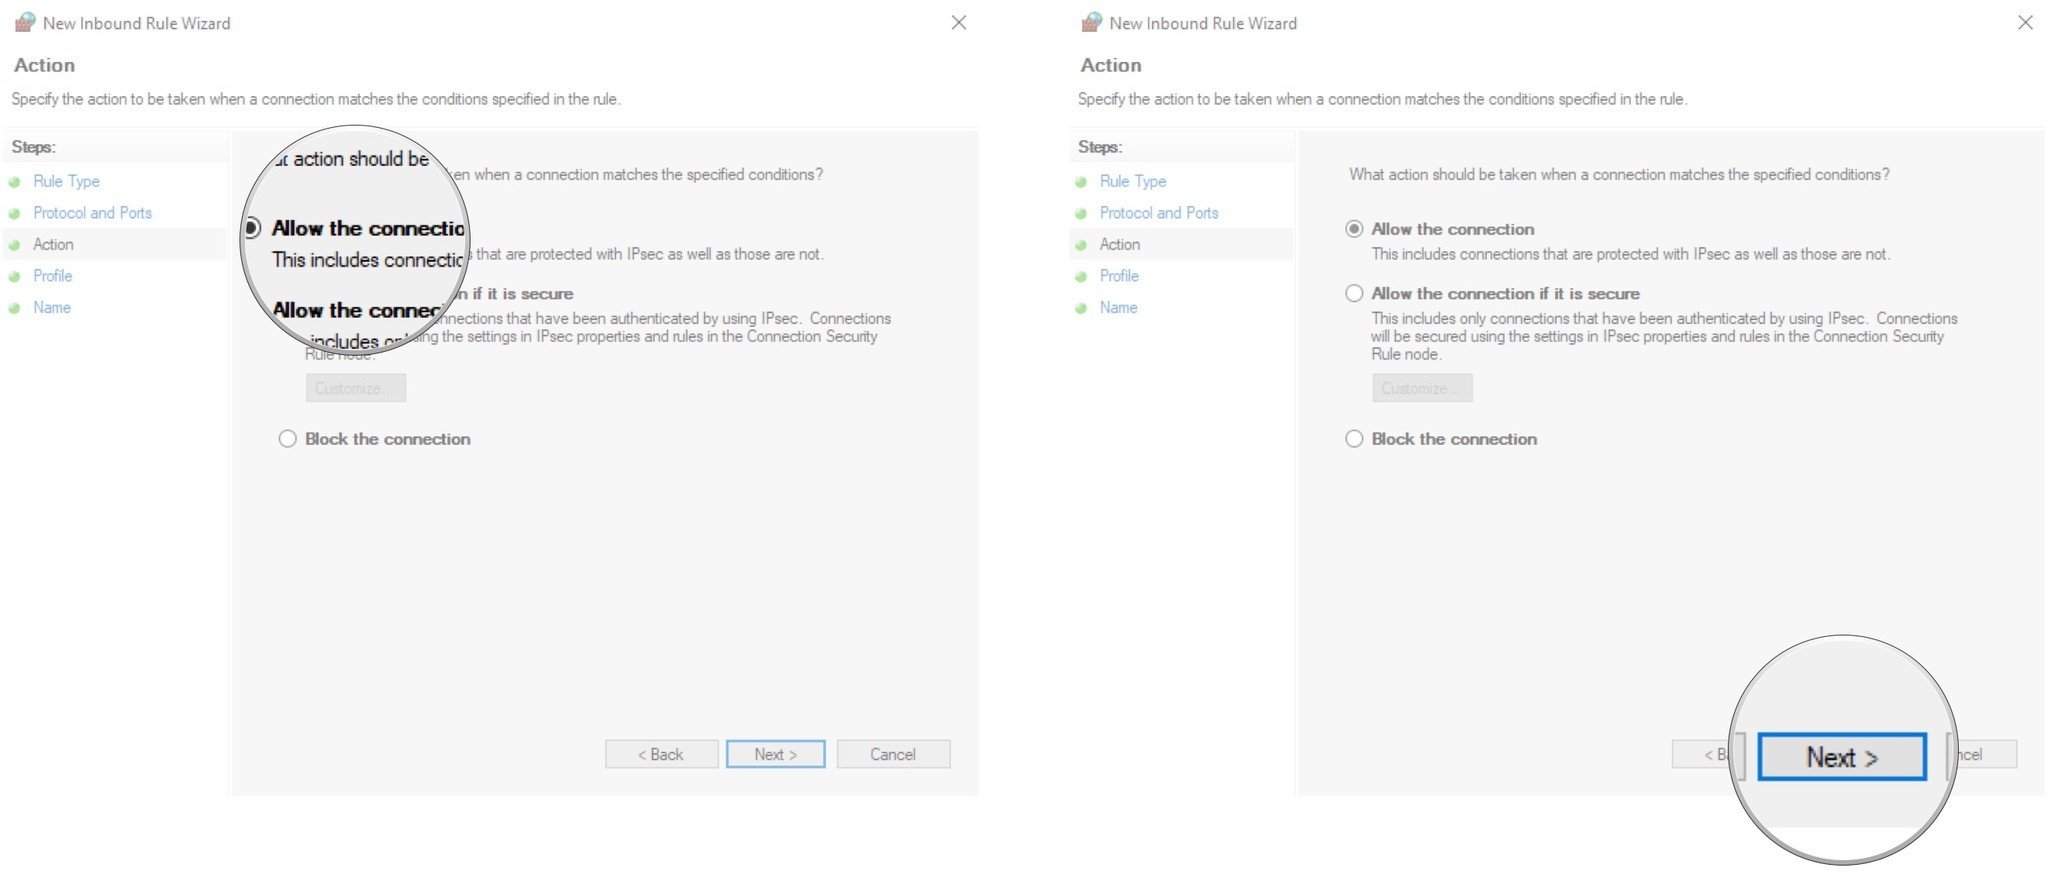
  14. Click Allow the connection.
  15. Click Next.

    Click Allow the connection. Click Next.

  16. Click any network types you'd like to allow the connection over.
  17. Click Next.

    Click any network types. Click Next.

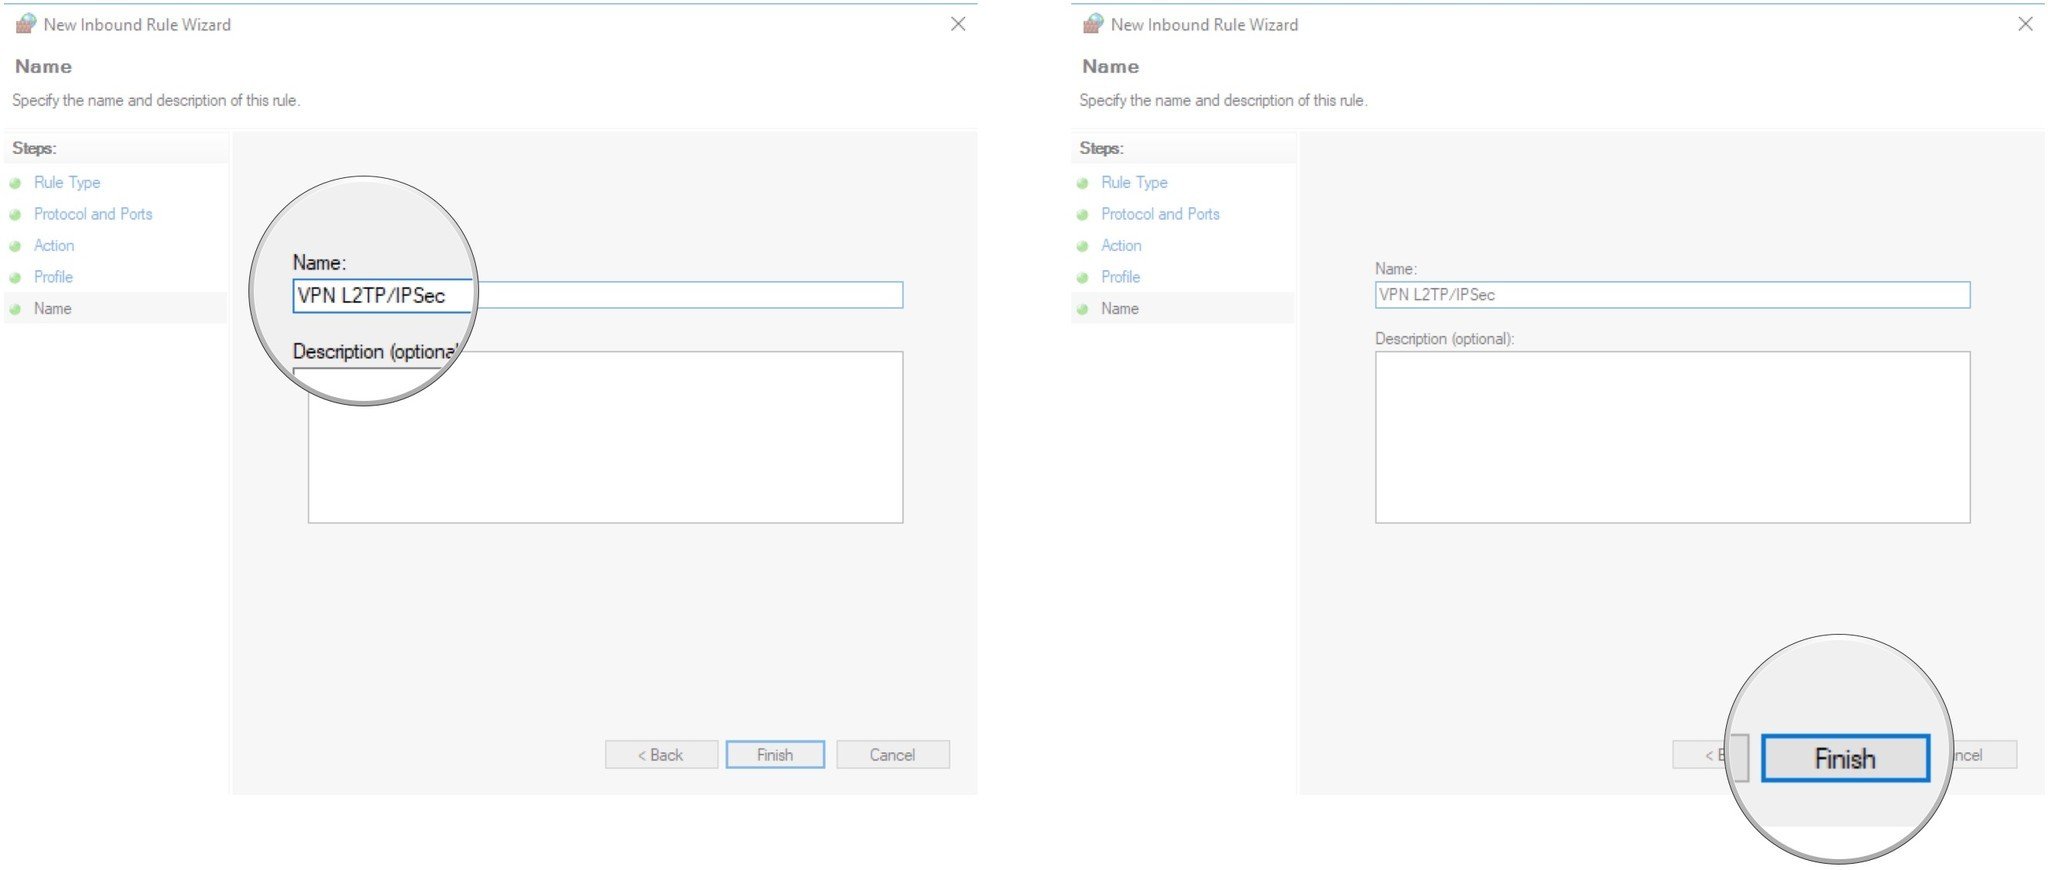
  18. Type a name for the rule.
  19. Click Finish.

    Type a name for the rule. Click Finish.

How to open a port for outgoing traffic in Windows Firewall

The same set of steps listed above can be used to create a rule for outgoing traffic. In step No. 6, instead of clicking Inbound Rules, you'll want to click Outgoing Rules. The rest of the steps are the same, and you can disable the rule in the same manner by using the steps in the next section.

How to close a port in Windows Firewall

Want to disable the rule you created to open a port in the Windows Firewall? Here's how:

  1. Right-click the Start button.
  2. Click Search.

    Right-click the Start button. Click Search.

  3. Type Windows Firewall.
  4. Click Windows Firewall.

    Type Windows Firewall. Click Windows Firewall.

  5. Click Advanced settings.
  6. Click Inbound Rules or Outbound Rules in the left frame of the window, depending on what type of rule you created.

    Click Advanced settings. Click Inbound or Outbound Rules.

  7. Click the rule you created.
  8. Click the name of the rule in the right frame of the window.

    Click the rule. Click the name of the rule.

  9. Click Disable Rule.
  10. Click Delete if you want to completely delete the rule.

    Click Disable Rule. Click Delete.

More resources

Need a bit more help with Windows Firewall and Windows 10? We have plenty of resources covering a wide range of topics.

Here's a breakdown of common SteamVR error codes

$
0
0

Encountering SteamVR issues? Here's where to get started!

If you've encountered any issues while using SteamVR, you'll know just how hard it can be to find a solution to your problem. With support for multiple headsets and a range of complex features, fixing any issues can be hugely daunting.

Luckily, error codes are one of the easiest ways to diagnose a problem. If you're having issues, here's a breakdown of some common SteamVR error codes.

Read more at VRHeads

5 easy ways to save money when buying a laptop

$
0
0

5 easy ways to save money when buying a laptop

How can you save money when buying a laptop?

There are thousands of laptops to choose from, each with its own set of pros and cons and each with its own price tag. If you're wondering how you can grab a laptop that suits you without spending more than you planned, we put together five ways you can save money and still get the laptop you want.

1. Decide on the type of laptop you need

ThinkPad X1 Yoga in tablet mode

Laptops traditionally come in one of three different forms. Standard notebooks are your usual clamshell design with a lid that doesn't rotate. Fine examples of standard notebooks are Microsoft's Surface Laptop and Dell's XPS 13.

Convertible laptops look similar to standard notebooks, but they have a lid that rotates 360 degrees to allow for stand, tent, and tablet modes. Examples of convertible laptops are Lenovo's ThinkPad X1 Yoga and HP's Spectre x360.

Finally, 2-in-1 devices, sometimes referred to as "convertibles" (it can be confusing), have a keyboard and touchpad that detach from the tablet portion. Microsoft sets the 2-in-1 bar high with the Surface Pro.

Surface Pro with removable keyboard

Different types of laptop often have a different level of price. Standard notebooks can usually be found cheapest, whereas convertible and 2-in-1s usually vie for priciest. If you don't think you'll need the added versatility of a convertible or 2-in-1, you can often save some money by going with a standard notebook.

See the best Ultrabooks of 2017

2. Skip the features you don't need

Deciding on the type of laptop you need is a good starting point, but now you must decide which features are required and which ones aren't.

If you are going with a standard notebook, think whether a touch display really makes sense. Will you enjoy reaching over a keyboard and working on a touchpad? Do you hate smudges on your display? Foregoing a touchscreen can often save you hundreds of dollars. Likewise, keep an eye out for the resolution of a display. Unless you plan on tackling specialized tasks, 1080p is a great starting point for most people.

Do you want to reach across the keyboard every time?

On the dedicated tasks topic, if you don't plan on any heavy gaming or multimedia editing, don't buy a laptop with a dedicated graphics card (GPU). Your processor (CPU) and RAM should also match your workload. Only performing standard, everyday tasks like word processing and web browsing? An Intel Core i5 is more than enough power, and either 4GB or 8GB of RAM is enough.

Finally, the hard drive. If you don't mind a bit of a dip in performance, go with a hard-disk drive (HDD). You can get more storage for cheaper when compared to a solid-state drive (SSD). Check out our article explaining HDDs and SSDs for more information about the storage in your laptop.

Dealing with RPM: Why laptops are still using slow hard drives

3. Buy low specs and upgrade yourself

Upgrading yourself can really pay off

Continuing the hard drive discussion, you can potentially buy a laptop with a small or slow drive and upgrade it yourself later. This depends on the laptop and whether or not it is upgradeable. Other than the hard drive, the RAM in your laptop is also often easy to upgrade. Again, it depends on the manufacturer. We put together a handy guide to help you figure out whether or not your laptop is upgradeable.

Also, be sure to check out the links below for more helpful resources on upgrading your laptop.

4. Wait for the right time to buy

CamelCamelCamel chart showing XPS 13 prices

There are a few set times over the course of a year when you might be able to find the laptop of your dreams at a reduced price. The back-to-school season will often see prices drop at the end of July and start of August, while holiday deals occur at the end of November and start of December.

If you don't find a deal during those times, you can always wait for a newer version of the laptop in question to be released. Manufacturers often slash prices on the older models, which have nothing wrong with them other than slightly outdated hardware. Watch for announcements at the big tech conferences — including IFA, Microsoft Build, and CES— and wait for new models to hit the market before you start shopping.

How to buy a laptop at the right time (and be much happier with your purchase)

5. Buy a used or refurbished laptop

Windows Central Marketplace

Most of us have a friend who likes to always have the latest piece of technology. That means that there are plenty of used laptops out there waiting for a new home. These laptops often have nothing wrong with them, other than being slightly outdated. You can always check out local marketplaces, but Windows Central has its own marketplace full of great devices.

If you'd rather put your trust in a refurbished laptop — basically one that has been re-guaranteed to work — you can check out Amazon (add "refurb" to your search term) or Refurb.io. The latter market is a great place to find all sorts of laptops, but especially ThinkPads and Dell devices.

Not sure if a refurbished laptop is the right fit? Check out our guide on whether or not you should buy a new, used, or refurbished laptop.

Should you buy a new, used, or refurbished laptop?

More resources

Check out these guides for further help when buying a new laptop.

How to use any USB webcam with Skype for Xbox One

$
0
0

With support for USB webcams on Xbox One now live, here's how to take advantage of the feature through Skype.

Microsoft recently added support for USB cameras on Xbox One, opening the console to a range of new accessories. While previously, the only camera compatible with the console was the Xbox One's ill-fated Kinect sensor, practically any third-party webcam can now be used on Xbox One after the update.

One of the best uses of this functionality is the Skype application for Xbox One, which now supports cameras over USB. Video calls have been a main pillar for the service for some time now and provided you have a compatible camera, this can now be used on your console. These are the steps to enable webcam support on your console for use with Skype.

Note: For now, USB webcam support is still in testing, with the functionality restricted solely to those in the Alpha ring of the Xbox Insider Program.

How to use a USB webcam with your Xbox One

A clear effort has been made to streamline the process for using webcams on Xbox One, with no advanced steps to set up a new device. By hooking up a webcam (we tested with a Logitech C922), the Xbox One will automatically set up the device for use across various apps. To get started, simply connect a webcam to your console's USB port. No notification of any kind will be displayed to confirm its detection.

Right now, the only major limitation of webcams on Xbox One is the lack of microphone capabilities. With many webcams not offering any form of echo cancellation, Microsoft has made the decision to disable webcam microphones, assumedly in a move to maintain higher audio quality across the platform. As a result, you'll still need to connect an external microphone for voice input.

How to use a webcam on Skype for Xbox One

After hooking up a webcam to your console, you need to manually select your webcam as a video input device. This can be achieved by navigating to the Skype app Settings page and selecting your camera from the available devices.

  1. Open Skype on your Xbox One.
  2. Press left on the left thumbstick to open the menu.
  3. Scroll down to Settings.
  4. Navigate to the Video section of Settings.
  5. Select your webcam from the drop-down box.

If experiencing issues with your video being displayed, ensure Skype has permission to access your webcam. To check, select "Change camera permissions" below the drop-down box and make sure Skype has been given access.

And with that, you'll be equipped for Skype video calls on Xbox One. Have you used Skype on Xbox One with a third-party webcam? Let us know how third-party webcam support is working for you.

How to use any USB webcam with Mixer for Xbox One

$
0
0

Add a personal edge to Mixer streams with any USB webcam on Xbox One.

Support for webcams recently rolled out to a subset of Xbox One users, allowing nearly any USB-based camera to be used on the console. While up until now, the console has relied on the Kinect sensor as the sole compatible camera, today's update significantly widens the range of devices that can be used.

Kicking off its arrival, Microsoft is pushing webcam support for streamers – specifically through the company's own live streaming service, Mixer. With the service now built directly into the "Broadcasting" tab of Guide menu, setting up a webcam to stream proves to be relatively simple and integrates into the existing streaming tools of the console. Here are the steps to configure your webcam for live streaming use.

Note: For now, USB webcam support is still in testing, with the functionality restricted solely to those in the Alpha ring of the Xbox Insider Program.

How to use a USB webcam with your Xbox One

A clear effort has been made to streamline the process for using webcams on Xbox One, with no advanced steps to set up a new device. By hooking up a webcam (we tested with a Logitech C922), the Xbox One will automatically set up the device for use across various apps. To get started, simply connect a webcam to your console's USB port. No notification of any kind will be displayed to confirm its detection.

In a move to maintain quality across the platform, the only shortcoming of webcams in their current implementation is a lack of microphone support. Microsoft cited a lack of echo cancellation on many devices as the main reason for its exclusion, however, it's unclear if this will change later down the line. For now, you'll need to use an Xbox One headset, or an external microphone like the Turtle Beach Stream Mic to broadcast your voice on streams.

How to use a webcam on Mixer for Xbox One

Once your webcam has been connected, you'll need to enable your camera for it to be displayed as a part of your live stream. When initializing a broadcast from the Guide menu, your webcam should be automatically detected, enabling the ability to turn your camera on.

  1. Press the Xbox button to open the Guide menu.
  2. Scroll right to the Broadcast & capture tab.
  3. Select Broadcast to open your broadcasting options.
  4. Enable the switch labeled Turn on Camera.

Your camera overlay can also be configured to your liking, with options to change the positioning and zoom of your camera feed on-stream. These options, alongside a preview of your camera, can be found on the Broadcast tab under "Change camera settings."

After turning on your camera, tweak all other streaming settings ahead of starting a broadcast. You'll now be free to stream on Mixer as usual, with your camera embedded as a part of your stream. Have you used a USB camera on Xbox One yet? How does it hold up for streaming? Make sure to let us know in the comments section below.

How to use Xbox One to broadcast games on Mixer


How to create animations in PowerPoint 2016

$
0
0

Your presented data may be deathly boring but your presentation of it doesn't have to be. Animations can be used to bring a bit of life to your report.

Let's face it, not everything you share will be tantalizing to keep the attention of your audience. Just as transition effects or images can complement the information, animations help to increase the "wow" factor.

Here's how you can add animation effects to text, shapes, and images.

Animation effects can be applied to text, shapes, and objects on any slide in PowerPoint 2016. When you explore the number of animation effects, you will notice that they are grouped into four types. Let's see what they are and how to use them.

  • Entrance — This group of effects serves to introduce text or objects into a slide during a presentation.
  • Exit — This group helps to mark the end of the text or object's time on the slide.
  • Emphasis — This group provides you the option to draw attention to text or objects. It can be used to highlight important details.
  • Motion Paths — This group allows you to move text and objects along a predetermined path. These can be used as transitions of sorts on a slide.

With the exception of Motion Paths, most of the animation types contain subgroups of effects. They include Basic, Subtle, Moderate and Exciting effects.

How to add and remove animation effects in PowerPoint

How to add an animation effect to text or objects

  1. Select the text or object you need to animate
  2. Click on the Animations tab in the navigation ribbon.
  3. Click Add Animation.
  4. Select an animation effect from the list.

You can apply more than one effect to the same object. This can only be done by clicking on Add Animation. If you try to add another animation by any other means, you will only replace the previous effect.

The default naming convention for animation effects could be somewhat confusing to look at. The ability to rename animations to clarify target objects is available in the Selection pane from the Home tab. Double-click on a name to be able to edit it.

How to remove an animation effect

  1. Select Animation Pane from the Advanced Animation group.
  2. Select the animation effect from the pane on the right side.
  3. Click the Down Arrow to open a drop-down list.
  4. Select Remove.

How to edit and manage animation effects in PowerPoint

How to change the order of the animation effects

  1. Click the Animations tab in the navigation ribbon.
  2. Select the Animation pane from the Advanced Animation group.
  3. Select the Animation you wish to move in the Animation pane.
  4. Select either the up and down arrow, next to the Play From button, to move the animation earlier or later in the sequence.

How to set the start time and duration of an effect

  1. Navigate to the Animation pane.
  2. Select an animation effect from the list.
  3. Click the Down Arrow to the right of the effect listing.
  4. Select Timing from the drop-down list.
  5. Select Start from the Timing tab to select an option.
  6. Choose a value under the Delay option.
  7. Choose the length of the animation effect under the Duration section.

By adjusting the duration, you are altering the speed of the animation, which can potentially alter the impact the effect has on the audience.

How to activate an animation effect by clicking on it

  1. Click on the object or text in question.
  2. Click on the Animations tab.
  3. Add the animation as described in How to animate text or objects in PowerPoint 2016.
  4. Locate the Advanced Animation group.
  5. Select Animation pane.
  6. Select the object or text to be triggered with a click.
  7. Select Trigger from the Advanced Animation group.
  8. Select On Click from the drop-down.
  9. Select the object to confirm.

How to begin an animation during audio and video content

  1. Select the audio or video clip on a slide.
  2. Click Play from the media controls.
  3. Click Pause where you want to add a bookmark.
  4. Locate the Playback tab in the Video Tools section.
  5. Select Add Bookmark from the Bookmark group.
  6. Select the Animation tab.
  7. Select Advanced Animation.
  8. Select Animation pane.
  9. Select an animation effect.
  10. Select Trigger under Advanced Animation.
  11. Select On Bookmark from the drop-down list.
  12. Choose the bookmark you have set.

How to Repeat and Rewind an animation effect

  1. Select the Animations tab.
  2. Select the Show Additional Effect Options icon.
  3. Select the Timing tab.
  4. Select an option from the Repeat drop-down.
  5. Click the Rewind when done playing checkbox.

How to use motion path animation effects in PowerPoint

How to add a motion path to text or objects

  1. Select the Animations tab.
  2. Click Add Animation under the Advanced Animation group.
  3. Navigate to the Motion Path group of effects.
  4. Select a path.

If you were to select the Custom Path option, you will be required to draw out the path to be taken. Click and drag to create a visible, freehand path or just point and click to create lines with connection points. Double-click the left mouse button to mark the end of the path and see a preview of the movement.

How to modify a motion path

  1. Select Effect Options in the Animation group.
  2. Select from the presented motion alternatives to change the path.
  3. Navigate to the Path group in the drop-down.
  4. Click on Edit Points.
  5. Click on any points on the path and drag to a new location.
  6. Click Preview to see the revised animation in action.

Wrapping up

Now that you understand the basics, you can delve into the animation options for your own report. Just remember to make sure the effects are not disruptive. Your audience will remember the information and the importance you place on it. Do you have any favorite animation effects? Let us know in the comments!

Microsoft Office 101: Help, how-tos and tutorials

6 mistakes that will get you killed in PlayerUnknown's Battlegrounds

$
0
0

6 mistakes that will get you killed in PlayerUnknown's Battlegrounds

Here's how you can live longer in PUBG!

PlayerUnknown's Battlegrounds (PUBG), the battle royale sensation that's taken the PC gaming world by storm, is headed to Xbox One in the near future. Whether you're playing on PC or Xbox, there are certain mistakes that everyone makes that get them killed faster than they can say chicken dinner. Let's take a look at these common mistakes and how to avoid them.

See at GreenManGaming (PC)

Shooting at enemies out of range will get you killed

Be patient with your shot

PUBG places you on an enormous island with varying elevations and environments. You can start the game on a heavily forested hilltop, make your way across wide fields of wheat, and end the game in the middle of a crowded city.

Along the way to the final circle and the final showdown between players, you'll no doubt encounter various other enemies vying for top spot. You might stumble upon a convention and you'll have no choice but to open fire immediately, or you might be stopped, scanning the horizon, when you see a player or group of players moving in the open.

No matter what weapon you're using — even a sniper rifle, silenced or otherwise — firing at enemies out of range will likely get you killed. Others in the vicinity can hear all gunfire, even suppressed if close enough, and they'll be alerted to your position.

If an enemy is out of range, there's really no sense shooting at them. Save your ammunition, keep your position a secret, and wait for the right time to engage.

Underestimating the circle will get you killed

Don't underestimate the circle

At the start of a round, the encroaching circle of death doesn't do very much damage. As the round wears on, however, it does more and more damage, to the point where, if you're caught outside, you'll start losing large chunks of health every second.

Underestimating the killer effect of the circle at the end of the round will almost always get you killed. Take this scenario as an example: There are five players left, and you're pinned down behind a tree. The circle is right behind you, and it's about to close in further. Instead of staying behind the tree, you might as well jump out and put your chances in your ability to shoot straight. The circle will always damage you, no matter what; the enemy has a chance to whiff the shot.

Likewise, don't spend too much time looting outside the circle. You might be tempted to stop at one more compound to check for first aid, but if you're already outside and the circle has moved a few times, the health penalty is going to climb to a point where you can't keep up with stims. Even if you do make it to safety, you'll no doubt have less first aid than when you stopped to loot.

Unnecessary looting will get you killed

Some nice loot that's in cover

Not only should you not loot that last compound on the way to the circle, you should also not loot downed players when there's a chance of being killed. If you just killed a player who was running out if the open, you running down to loot their gear is putting you in the exact same position they were just in. You're now out in the open, plus the sound of the gunfire has attracted other players to the location.

Loot smart, and you'll stay alive much longer. At the start of a round, hit as many places as you can without ignoring the circle. During the mid-game, only loot players who were killed in cover. At the end of the game, don't loot at all unless your armor is badly damaged, you're completely out of first aid, or you're completely out of ammo. Entering the loot screen leaves you vulnerable and takes your head out of the game, and you'll end up dead more often than not when you loot unnecessarily.

Rushing for the supply drop will get you killed

Approach supply drops carefully.

You hear the plane flying overhead, you see the crate falling with parachute overhead, and you realize it's going to drop close to your position. Unless you're absolutely certain there are no other players around, don't rush for the red smoke once the crate lands.

Other players in the vicinity are no doubt also aware of the drop, and they might also be rushing for it. We've seen plenty of scenarios where the player(s) who keep back and wait for most of the lead to stop flying end up with the supply drop loot.

Instead of running for the crate and standing in the open next to it, watch what happens, plan out an attack on whoever ended up with the gear, and take it by force for yourself, away from the action. If you're sitting around and no one arrives, continue to tread carefully; someone else might have the same strategy in mind.

Not watching your flank will get you killed

Always watch your flank

In third-person mode, holding down the Alt key and moving the mouse lets you see all around you without actually moving the avatar's body. This is the best way to keep an eye on your flank, which is what you should be checking often.

Head-on encounters in PUBG are not wise, and you have a much better chance of eliminating enemies when they don't see you coming. Players who fail to watch behind them will have a much harder time earning a chicken dinner. Keep your head on a swivel and make sure no one is sneaking up behind you.

Not keeping track of remaining players will get you killed

Only 6 players left!

Near the start of a round, keeping track of the remaining players isn't very important. Near the end, however, especially when there are ten or less players alive, not keeping track of the exact number can get you killed. This mistake has to do with having a good set of headphones, as you'll no doubt also need to hear properly.

Say there are two people shooting at each other to your right, and to your left, another player shooting away from your position. There are five people left alive, including you, so that means you can pretty safely assume that there's no one behind you or close to your position. This scenario will of course change drastically, but keeping track of the remaining players and paying attention to your surroundings can really help you get an edge on the competition.

More PUBG!

For more PUBG help, tips, and tricks, be sure to have a look at our ultimate guide.

See our PlayerUnknown Battleground Ultimate Guide

How to enable NVIDIA G-Sync on your PC

$
0
0

G-Sync

Just got a hot new G-Sync monitor? Here's how to enable sweet, tear-free gaming.

NVIDIA G-Sync is a technology licensed out by the GPU maker to companies making displays for PCs and laptops.

In a nutshell, it provides silky smooth, tear-free gaming by allowing the monitor and GPU to talk to each other. The display draws every frame drawn by the GPU, and this variable refresh rate ensures no tears during gameplay.

It is, however, not enabled by magic as soon as you hook up a G-Sync display. Here's what you need to do.

G-Sync

  1. Right click on your desktop.
  2. Select NVIDIA Control Panel.
  3. Expand the display item in the sidebar.
  4. Click on set up G-Sync.
  5. Check the box next to enable G-Sync.
  6. Below this choose whether you want G-Sync enabled for only full screen or full screen and windowed modes.

To use G-Sync in your games, you'll also need to set your monitor as your primary display in this same control panel if you're using multiple monitors.

  1. In the same window as above click on set up multiple displays.
  2. Ensure that the G-Sync monitor is in the correct location and highlighted as primary.

If you need to make it your primary display then follow these steps.

  1. Open the Windows 10 settings app.
  2. Click system.
  3. Now click on display.
  4. Highlight the box corresponding to the display in question.
  5. Scroll down and check the box next to make this my primary display.

Now when you game you'll have crisp, tear-free on-screen action. Simple!

More: Best G-Sync monitors

Why Insiders should opt-out of the program when Windows 10 Fall Creators Update launches

$
0
0

If you're an Insider, you should consider leaving the program after the Windows 10 Fall Creators Update releases — here's why and how to do it.

After a short few months of development, Microsoft is now ready to unleash the Windows 10 Fall Creators Update on the world — and that also means that it's time for Windows Insider Program members to consider opting out.

If you're presently enrolled, then you know what it's like to get developer preview builds of Windows 10 to test upcoming features and changes. While the most recent preview releases have been great, with the Fall Creators Update out of the way Microsoft is now moving on to the next version of Windows 10, which will result in buggy, incomplete, unstable early releases for willing Insiders.

If that's not something you want, you can gracefully opt-out of the Insider Program without having to reinstall Windows 10 like you did on enrollment. This is thanks to the confluence of version numbers — the preview releases and the public release are all the exact same version of Windows 10.

In this Windows 10 guide, we'll walk you through the steps to safely opt-out of the Windows Insider Program without having to erase your files, settings, and apps -- even if you install a new build after the Fall Creators Update releases.

How to gracefully opt-out of the Windows Insider Program

You can follow these easy steps to leave the program:

  1. Open Settings.
  2. Click on Update & Security.
  3. Click on Windows Insider Program.
  4. Click the Stop Insider Preview builds option.

  5. Select the Keep giving me builds until the next Windows release option.

  6. Click the Confirm button.

  7. Click the Restart Now button.

Once you've completed the steps, your computer will continue to receive previews but only until the Windows 10 Fall Creators Update is finalized. After the new version is available to everyone, it will continue to receive security and maintenance patches.

Just remember not to take too long to opt-out, as the program doesn't conclude because of a new release. If you keep your device enrolled, it'll continue to receive previews for the next version as soon as they're available, and you won't be able to use these steps to stay in the version 1709.

How to opt-out even after installing a new preview for different version

If you didn't leave the Windows Insider Program on time, it's still possible to go back without losing your files and system configuration.

However, it can only be done during the first ten days since the first new build was installed on your device. Otherwise, Windows 10 will automatically delete the Windows.old folder that contains a copy of your previous installation to free up storage space, and doing so, it'll also remove the option to roll back.

You can follow these steps to go back to the previous version and gracefully opt-out of the Windows Insider Program:

  1. Open Settings.
  2. Click on Update & security.
  3. Click on Recovery.
  4. Under "Go back to the previous version of Windows 10," click the Get started button.

  5. Select a reason you're removing the current build and click Next.

  6. Click the No, thanks button.

  7. Click the Next button.

  8. Click the Next button again.

  9. Click the Go back to earlier build button.

  10. Open Settings.
  11. Click on Update & security.
  12. Click the Stop Insider Preview Builds button.
  13. Select the Keep giving me builds until the next Windows release option.

  14. Click the Confirm button.
  15. Click the Restart Now button.

After completing the steps, your computer will no longer receive Insider builds after the Windows 10 Fall Creators Update releases, and you can keep your installation without having to reinstall anything.

If the option to go back to the previous version isn't available, the only way to go back and unenroll is performing a clean install of Windows 10 with the Creators Update.

Of course, when you're ready, you can always enroll your device again in the program to help Microsoft shape the future of Windows.

Are you staying enrolled or you're planning to enjoy the new update for a while? Tell us in the comments.

More Windows 10 resources

For more helpful articles, coverage, and answers to common questions about Windows 10, visit the following resources:

How to use new Edge favorites in the Windows 10 Fall Creators Update

$
0
0

How to use new Edge favorites features in Windows 10 Fall Creators Update

How have Edge favorites changed in the Fall Creators Update?

The Windows 10 Fall Creators Update is well on its way, and with it comes a bunch of new improvements. One area Microsoft focused on is the company's own browser, Microsoft Edge. Improvements to PDF compatibility, ePUB compatibility, reading mode, and the favorites list are all here.

Let's take a closer look at some of the improvements to your favorites list, including how to organize your favorites in a number of new ways, how to save multiple tabs at once to favorites, how to edit the URLs of favorites, and what's changed when importing favorites from other browsers.

How to organize your folders in the dropdown menu

Edge's main favorites section — the one accessible through the Edge Hub — lets you organize single favorite URLs as well as the folders containing URLs. This allows for a bit or organization after you go on a spree of adding pages to favorites, but what about keeping everything organized as you move around the internet?

The Fall Creators Update has tweaked the dropdown favorites menu — the one found right in the address bar — to be more intuitive. You can now order new or existing folders how you'd like; instead of quickly saving your favorites and worrying about organization later, you can tackle both right now.

Here's how to create a new folder, save a URL in the new folder, and finally reorder your custom folder.

  1. Launch Edge from the Start menu, desktop, or taskbar.
  2. Navigate to a website you'd like to add to your favorites.

    Launch Edge. Navigate to a website.

  3. Click the Add to favorites button in the address bar. It looks like a star.
  4. Click the dropdown menu below Save in.

    Click the Add to favorites button. Click and dropdown menu.

  5. Click Create new folder.
  6. Type a name for the folder and hit Enter on your keyboard.

    Click Create a new folder. Type a name and hit Enter.

  7. Click the custom folder you just created.
  8. Click Add.

    Click the custom folder. Click Add.

  9. Click and hold the custom folder. You can also click and hold a single URL.
  10. Drag and drop the custom folder where you'd like it.

    Click and hold the custom folder. Drag and drop the folder.

How to organize your favorites in the favorites bar

Not only can you change the order of folders in the dropdown menu, you can now also reorder folders and single URLs straight from the favorites bar. In the past, this was only accessible through the main favorites section in the Edge Hub.

  1. Launch Edge from the Start menu, desktop, or taskbar.
  2. Click a folder in the favorites bar.

    Launch Edge. Click a folder.

  3. Click and hold a single URL or folder.
  4. Drag and drop the single URL or folder to change the order.

    Click and hold a URL or folder. Drag and drop the URL or folder.

How to edit the URL of a saved favorite

Instead of having to revisit a certain URL and add it to favorites, you can now directly edit the URL. This can be accomplished in a number of ways, which we'll take a look at here.

If you have a favorites bar in Edge, you can edit the URL straight from there.

  1. Launch Edge from the Start menu, desktop, or taskbar.
  2. Right-click a website in your favorites bar.

    Launch Edge. Right-click a website in your favorites bar.

  3. Click Edit URL.
  4. Type a new or adjusted URL and hit Enter on your keyboard.

    Click Edit URL. Type a new URL and hit Enter.

The URL can also be edited from the dropdown favorites menu.

  1. Click the Add to favorites button in the address bar. It looks like a star.
  2. Click the URL field.

    Click the Add to favorites button. Click the URL field.

  3. Type a new or adjusted URL.
  4. Click Save.

    Type a new URL. Click Save.

Finally, the URL can be edited from the main favorites menu in the Edge Hub.

  1. Click the Hub button.
  2. Right-click the URL you want to change.

    Click the Hub button. Right-click the URL.

  3. Click Edit URL.
  4. Type a new or adjusted URL and hit Enter on your keyboard.

    Click Edit URL. Type a new URL and hit Enter.

How to add multiple tabs as favorites

Edge now lets you save the URLs from multiple tabs. By default, these URLs are placed into a folder labeled with the current date at the time of saving. Here's how to do it.

  1. Launch Edge from the Start menu, desktop, or taskbar.
  2. Navigate to multiple websites in multiple tabs.
  3. Right-click a tab.

    Navigate to multiple websites. Right-click a tab.

  4. Click Add tabs to favorites. The main favorites menu in the Edge Hub will automatically open.
  5. Right-click the folder with the current date.

    Click Add tabs to favorites. Right-click the folder.

  6. Click Rename.
  7. Type a name and hit Enter on your keyboard. If you don't mind leaving the folder's name as the date, you can skip steps 5-7.

    Click Rename. Type a name and hit Enter.

You can now import more from other browsers

When making the change from a different browser, say the aging Internet Explorer (IE) or Google Chrome, you want the switchover to be as painless as possible.

In the past, when you imported info from Chrome or IE, only your favorites, browsing history, and saved passwords were transferred into Edge.

Now, however, if you import info from either of the two browsers, you'll also pull in cookies, settings, and form data (from IE). This makes the change much easier, and the process to import is still the same as before. Here's how to do it.

  1. Launch Edge from the Start menu, desktop, or taskbar.
  2. Click the Settings and more button in the top-right corner of the window.

    Launch Edge. Click the Settings and more button.

  3. Click Settings.
  4. Click Import from another browser.

    Click Settings. Click Import from another browser.

  5. Click a browser. In this case, we will choose Chrome.
  6. Click Import. It may take a few moments to import everything.

    Click a browser. Click Import.

More resources

Want to know what else is coming with the Windows 10 Fall Creators Update? Check out these links!

How to create a Windows 10 USB bootable media with UEFI support

$
0
0

If you have a PC using UEFI (Unified Extensible Firmware Interface), you can use these steps to properly create a bootable USB media to install Windows 10.

When you're getting ready to install a new release of Windows 10, or you're planning to set up a dual-boot system, you first need to create a bootable USB media to start the setup and proceed with the installation. However, if you have a newer device that uses UEFI mode, instead of the legacy BIOS (Basic Input/Output System) firmware, you need to make sure the installation media includes the correct firmware support.

Thankfully, you have multiple choices to get this done properly. You can use the Microsoft Media Creation Tool, which makes it easy to prepare a removable drive with support for both firmware modes (BIOS and UEFI). And if the tool doesn't work, it's also possible to use the popular Rufus tool to create a bootable media specifically to work on UEFI devices.

In this Windows 10 guide, we'll walk you through the steps to create a USB bootable media with UEFI support using the Media Creation Tool and Rufus.

How to create a USB bootable media using Media Creation Tool

You can use the Microsoft Media Creation Tool to quickly create a USB media that will boot on a device using UEFI.

  1. Download the Media Creation Tool from Microsoft.
  2. Double-click the MediaCreationTool.exe file to launch the tool.
  3. Click Accept.
  4. Select the Create installation media (USB flash drive, DVD, or ISO file) for another PC option.

  5. The language, architecture, and edition will be selected automatically based on your computer configuration, but you can clear the Use the recommended options for this PC option to select the appropriate settings if you're trying to use the media on another device.

  6. Click Next.
  7. Select the USB flash drive option.

  8. Click Next.
  9. Select the removable drive from the list.

  10. Click Next.

After completing the steps, the Media Creation Tool will download the files to install Windows 10, and it'll proceed to create the bootable media, which should work on devices using legacy BIOS as well as on those newer machines using UEFI.

How to create a USB bootable media using Rufus

Alternatively, if the bootable media created using the Media Creator Tool isn't working on your computer. Or you've already downloaded the Windows 10 ISO file from another source, such as from MSDN, you can use the Rufus tool, which allows you to create a USB bootable with support for UEFI.

  1. Download Rufus from the official site.
  2. Double-click the Rufus-x.xx.exe file to launch the tool.
  3. Under "Devices," select the USB drive with at least 4GB of space.
  4. Under "Partition scheme and target system type," select the GPT partition scheme for UEFI option from the drop-down menu.
  5. Under "File system" and "Cluster size," leave the default settings.
  6. On "New volume label," type a descriptive label for the drive.
  7. Under "Format Options," check the Create a bootable disk using "ISO image" option.
  8. Click the drive icon.

  9. Select the Windows 10 image.
  10. Click Open.
  11. Click the Start button.
  12. Click OK to confirm that the USB drive will the erased.

Once you've completed the steps, Rufus will proceed to create the USB bootable media with support for UEFI systems.

Wrapping things up

After creating the bootable media with support for UEFI, you can boot your UEFI-based device with the USB flash drive to upgrade your device or perform a clean installation of Windows 10 using this guide.

More Windows 10 resources

For more helpful articles, coverage, and answers to common questions about Windows 10, visit the following resources:

How to create a Windows 10 account using any email address

$
0
0

Windows 10 allows to use any email address to create an account, including Gmail, but it's not an obvious option.

When setting up your Windows device for the first time, or when adding a new person, every time you go through the process to create an account, Windows 10 always forces you to use a Microsoft account using an Outlook.com address. However, if you prefer another email provider, it's possible to use an email address from other services, such as Google's Gmail, to create your Windows 10 account.

Using a non-Microsoft address, you still get many of the same benefits people using a Microsoft account get, such as settings sync and access to a number of Microsoft services.

If you must create a new account on your device but you don't want to leave your email service provider, and you want to keep using your familiar email address, the Settings app can help you to create a new account with a non-Microsoft address.

In this Windows 10 guide, we walk you through the steps to set up a new account on your PC using a Gmail address instead of a Microsoft account.

How to create a Windows account with a Gmail address

In order to create an account on Windows 10 using your Gmail email address, use the following steps:

  1. Open Settings.
  2. Click on Accounts.
  3. Click on Family & other people.
  4. Under "Other people," click the Add someone else to this PC button.

  5. Click the I don't have this person's sign-in information link.

  6. Type your existing Gmail account.
  7. Type a strong password. (You could use the same Google account password, but for security reasons, you always want to have a different password for every account.)
  8. Select your region using the drop-down menu.
  9. Select your birthday information.
  10. Click the Next button.

  11. Choose your marketing preferences.
  12. Click the Next button.

  13. Sign-in to your Gmail account on your web browser.
  14. Check for the Microsoft account email and verify your email address.

Once you complete these steps, you can use Windows 10 with your preferred email address instead of a Microsoft account.

It's worth pointing out that through this process you'll actually be creating a Microsoft account using a Google address, but it'll not interrupt any Google services associated with your account.

After creating the account, your Windows 10 settings will transfer to your other devices that use the same account. In addition, you'll have access to other Microsoft services, such as OneDrive and Office Online, but for obvious reasons, Outlook.com won't be configured through this process.

While this guide is focused on using Google's Gmail service, you can also use these steps with other email services, including Yahoo, AOL, and other email providers.

More Windows 10 resources

For more helpful articles, coverage, and answers to common questions about Windows 10, visit the following resources.


The ultimate Xbox One buyer's guide

$
0
0

Xbox One S

Just what should you get if you're looking to buy a new Xbox One? This is our full buyer's guide.

After E3 2017 there is a whole family of Xbox One consoles to enjoy. Three different consoles, with different perks to each, but all with the same shared value: playing all the great Xbox One games available today and in the future.

The buying decision is therefore now more difficult. Should you drop the extra cash on an Xbox One S when there are still other, perhaps cheaper, options to spend your money on? Or start saving for the newest and most powerful console yet, the Xbox One X?

Hopefully, that's where we can help. This is our Xbox One buyers guide.

Xbox tech specs

CategoryXbox One XXbox One S
ProcessorEight-core CPU at 2.3GHzEight-core custom AMD CPU at 1.75GHz
Storage1TB (more options could be announced)500GB, 1TB or 2TB launch edition
Memory12GB of GDDR5 RAM at 6.8GHz with 326 GB/s bandwidth8GB DDR3 RAM
GraphicsSix teraflop GPU at 1,172MHz, 40 compute unitsCustom Radeon GPU with 1.23 teraflops
PortsHDMI-in; HDMI-out; one front-facing USB 3.0; two rear-facing USB 3.0; IR receiver/blaster; SPDIF digital audio; EthernetHDMI-in; HDMI-out; one front-facing USB 3.0; two rear-facing USB 3.0; IR receiver/blaster; SPDIF digital audio; Ethernet
Optical drive4K UHD Blu-ray4K UHD Blu-ray
Price$499From $249

The Xbox One X

Xbox One X

The first thing you should know about the Xbox One X is that it is an unrivaled beast of a console. It;s the most powerful games console ever made, by a fairly big margin.

The second thing is that it doesn't come out until November 7, 2017. So you either wait or you buy one of the other versions of the Xbox One that are currently available.

The Xbox One X will handle games at 4K resolution at up to 60 frames per second (FPS), which for a console is a staggering achievement, and Forza Motorsport 7 will be the poster child achieving just this. Add in generally enhanced graphics, better textures and more, and you have games at a quality that until now were unheard of on a console.

The Xbox One X is also the smallest Xbox console ever made, while retaining things like an internal power supply and 4K UHD Blu-ray player first brought with the Xbox One S. The IR blaster is also retained. And 4K isn't just for games and Blu-ray discs, either, with streaming content from sources like Amazon and Netflix available, and everything can be had in glorious HDR.

The base model will have a 1TB hard drive and will cost $499. We expect other sizes to be available for an additional cost, but those details are unknown. Preorders for the special Project Scorpio edition sold out very quickly, but the regular version is now available for preorder. But get it while it's hot, they're selling fast.

See at Microsoft

The Xbox One S

Xbox One S

The 2016 addition to the Xbox family is going to become the new entry-level model. It's half the price of the Xbox One X yet still offers some of the benefits you get on the forthcoming monster console.

The Xbox One S is 40 percent smaller than the original Xbox One and while there are no internal upgrades in a sense of "better" games and graphics, there are some important bits and pieces that make it stand out.

The first is 4K video output. The Xbox One S was the first console to output at native 4K resolution, though it's limited to video content. Games can be upscaled from 1080p, but true 4K gaming is reserved for the Xbox One X.

With that you also get to watch 4K UHD Blu-ray discs. The Xbox One S is about the cheapest 4K Blu-ray player on the market, which in itself is remarkable. It's also got an IR blaster for easier remote control of other AV components.

The Xbox One S can be used vertically, which is new over the original model, and the enormous power brick was banished. The controller was also refreshed for 2016, with an amended design featuring rear grippy parts and Bluetooth for use with non-Xbox things more easily.

There's little doubt the Xbox One S is worth its asking price, if even just to be a 4K Blu-ray player. Throw in a games console with that, and you've got one hell of a package.

New for 2017 is the limited edition Minecraft Xbox One S, with a custom paint job including a see-through base panel, custom controller, Minecraft game download, 1TB hard drive and an included vertical stand for $399. It's probably only of appeal to a Minecraft fan, but it looks so damn good!

See at Microsoft

The 'old' Xbox One

Xbox One

The "old" Xbox One is large, it's less attractive and has fewer features than the sleek upgraded models. But that doesn't mean it's bad. Sfter all, it's served us pretty well for long enough now. It's also going to cost a bit less than the Xbox One S, which could be the clincher for some.

You still get a Blu-ray drive for all the HD movies you could want, the same exact software and games experience, and you can even get it in white if the color is important.

You're "limited" to 1080p output for video on this console, and you can't use it vertically. You also have to account for the enormous power brick you have to find a home for, too. The original version of the Xbox One has comes in many bundles, some including Kinect, some including games. You can pick up either 500GB or a 1TB of storage.

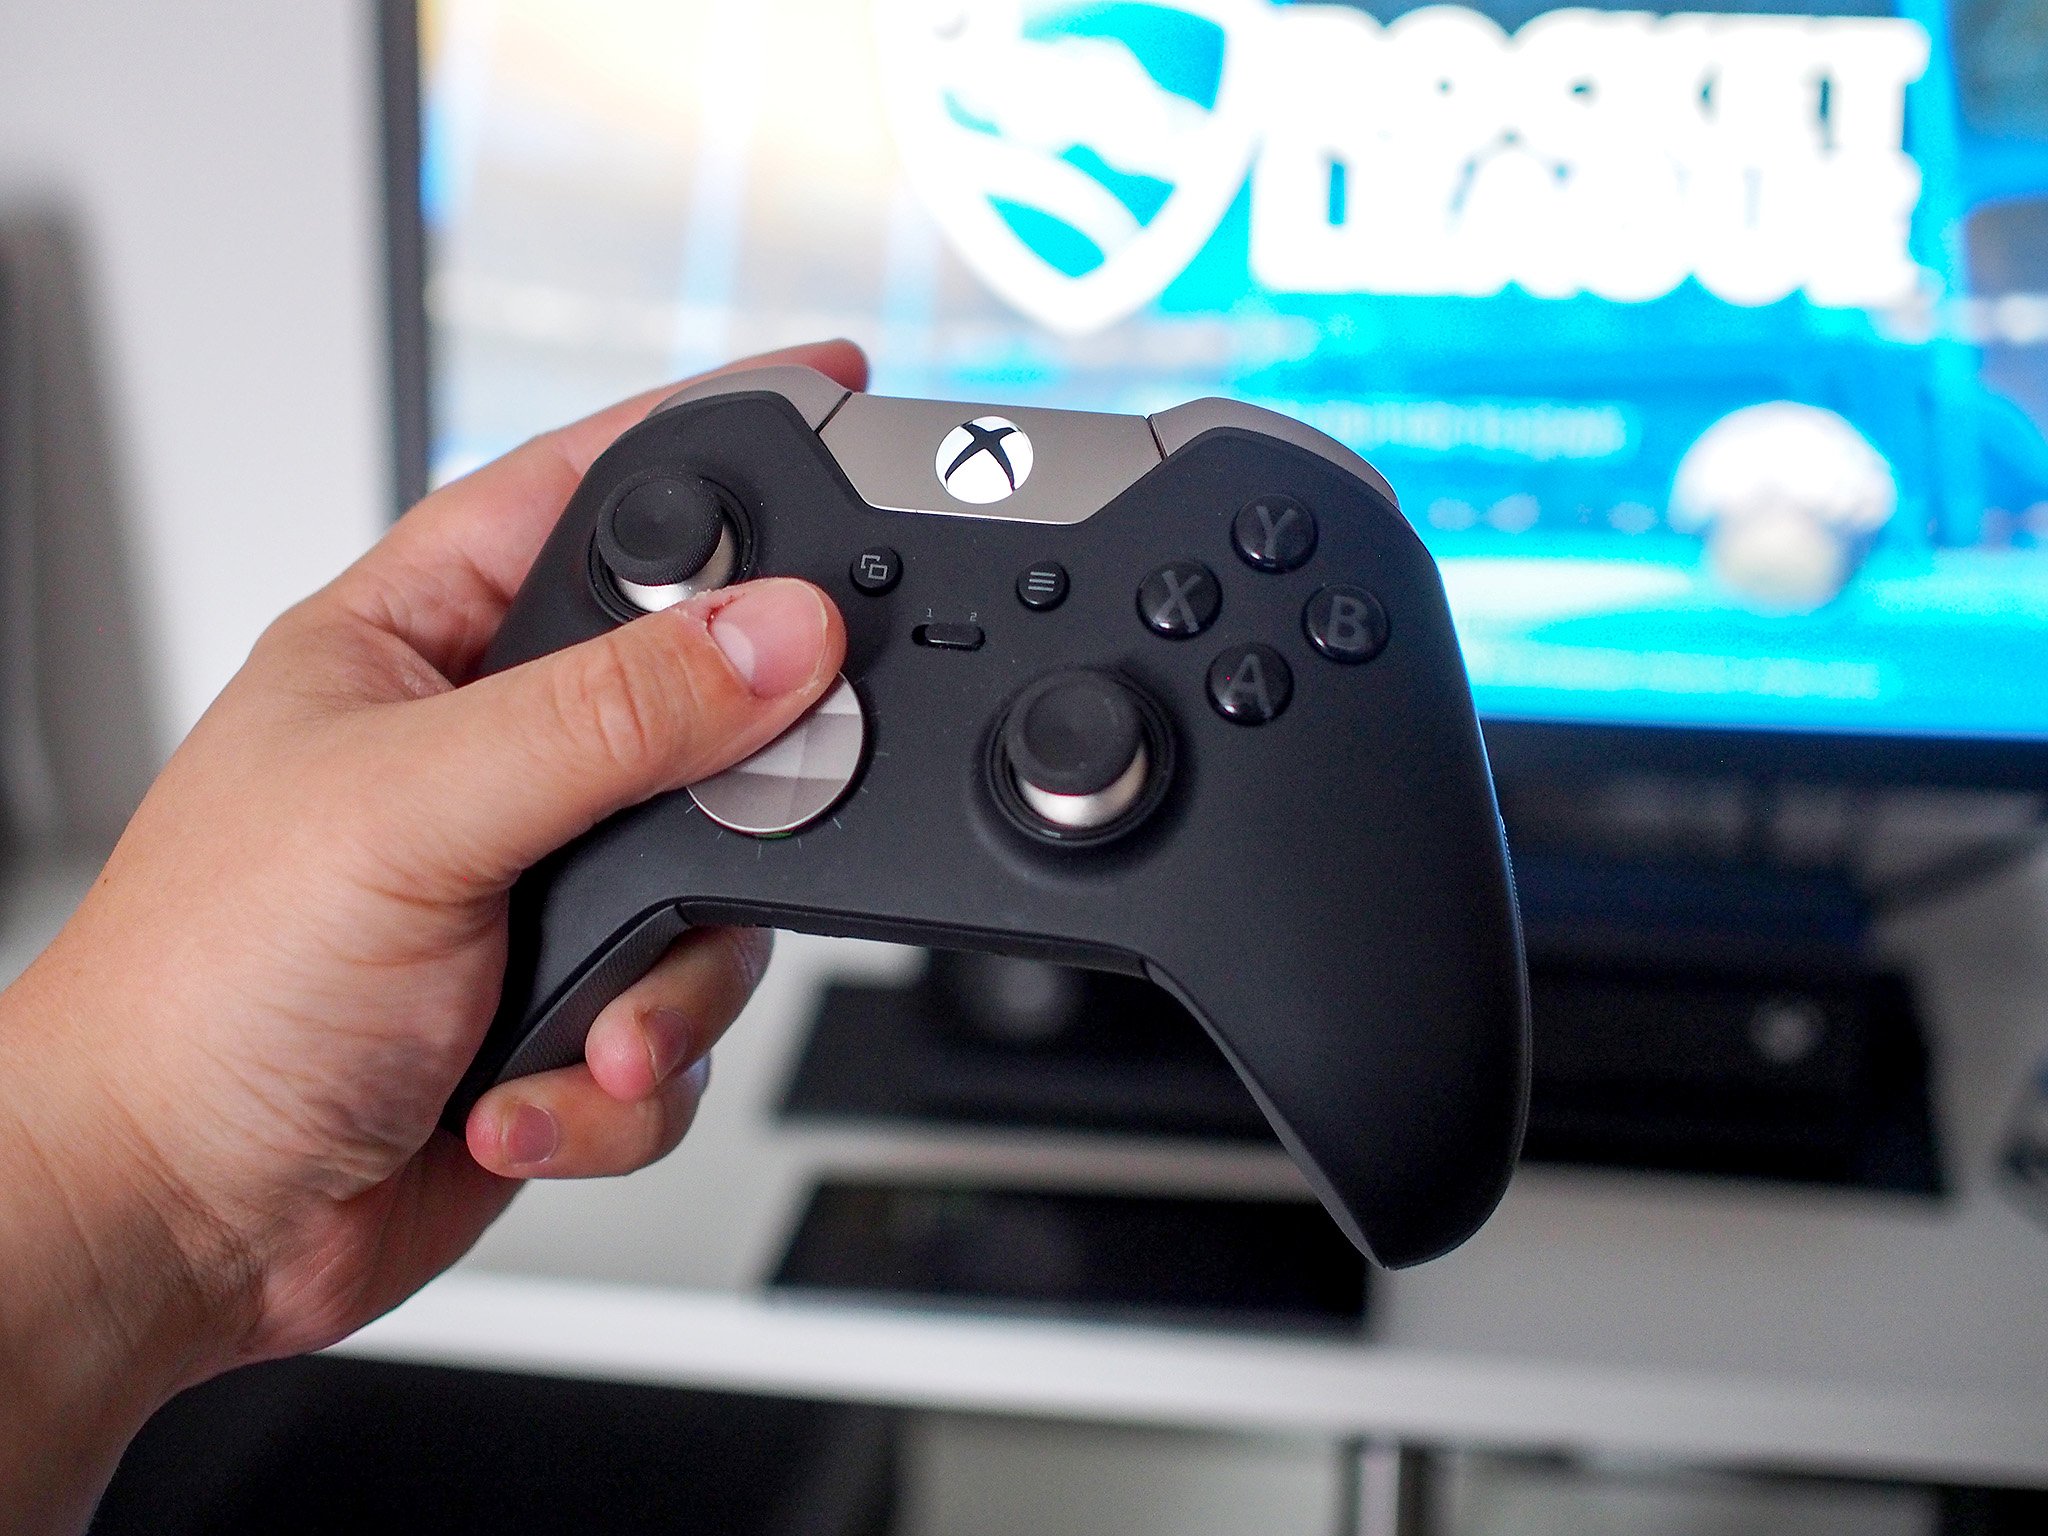
One that stands out is the Elite bundle, which includes a hybrid hard drive inside at 1TB, but also the incredible Xbox Elite Controller, an expensive item on its own.

With the One S announcement, the original Xbox One enjoyed some deal pricing almost immediately. Microsoft sells refurbished units for $179 currently. This is the cheapest way to get an Xbox One.

See at Microsoft

Which console should you buy?

Xbox One

Only you can make that decision, but we can make some handy recommendations. Here goes:

  • If you want to play the latest games like never before, with enhanced graphics (even at 1080p), Ultra HD resolution and general all-around badassery, you might want to hold out for the Xbox One X.
  • If you're keen on 4K video, the Xbox One S or Xbox One X are for you. The Xbox One S is also about the cheapest 4K UHD Blu-ray player on the market right now with the added bonus of being a games console.
  • If space is at a premium, you'll be happier going for the Xbox One S or One X, too. You can stand them up vertically, they're notably smaller, and don't have a gigantic external power supply to also stash somewhere.
  • If you want to spend as little as possible, go for the original console. There's nothing wrong with it, but it's big and lacks any sort of 4K output.

Accessories

Kinect

Now that you've decided to buy an Xbox One, the decision making process doesn't necessarily end. What about accessorizing your new console? The Xbox One has a host of additional bits of hardware available to it that can improve your personal experience. Hard drives, controllers, the Kinect, there's some cool stuff to look at.

The Kinect isn't available bundled with the Xbox One S, and to use one you'll need an adapter. This is free to current owners who are upgrading, but everyone else will need to pay $40 in addition to the price of a Kinect. Microsoft sells them new, but they're a lot more expensive than it's probably worth paying right now. Check out places you can find a pre-owned one, and you'll save a whole chunk of change on it.

If you're buying a 500GB console we highly recommend investing in an external hard drive. Xbox One games are getting bigger and bigger, especially with all the downloadable content (DLC) available. Halo 5: Guardians will take up approaching 90GB which is a big chunk of any internal storage, for example. The Xbox One can utilize multiple USB 3.0 hard drives (so long as they're at least 256GB), and if you shop around you'll always find a deal somewhere. With drives readily available in 4TB sizes, too, this is an easy way to make sure you don't have to worry about deleting games to make room for new ones.

Check out our full guide on using USB hard drives for the Xbox One for everything you need to know.

How to choose and use a USB hard drive with the Xbox One

Elite Controller

There's also a world beyond the controller that comes in the box. Check out our roundup of the best Xbox One controllers to see what else is out there.

The best Xbox One controllers

Games

There are far too many games in the Xbox One Store to go through in one post. But if you're looking for something new to play, check out the links below where we should be able to help.

Hopefully this helps you in your decision making, but if you've got any tips to share with prospective buyers be sure to drop them in the comments. And to keep up with all things Xbox, be sure to bookmark our new dedicated gaming page.

Updated September 25, 2017: We removed some older console information, added a specs comparison for the current consoles and included current preorder links for the Xbox One X.

How to create VideoScribe and whiteboard animations in PowerPoint 2016

$
0
0

Whiteboard animation has been used in a variety of situations, from internal training to commercial advertising. It's effective in its organic and natural flow that humanizes the content and creates a connection with the audience.

When it comes to presentations in PowerPoint 2016, basic animation effects are one way to catch someone's attention. Advanced animations, however, can make a lasting impression. One of the best uses of animation effects is the whiteboard animation, the means to bring detailed depth to content on your slides. VideoScribe is a popular software many users go to in order to create whiteboard animations. Here's how you can create whiteboard animations in PowerPoint 2016.

What is a Whiteboard Animation?

VideoScribe is a service used to create whiteboard animations. You may have seen this in use, where a narrator is recording them drawing on a whiteboard or screen to convey the story or message. This type of animation has been used in a variety of situations, from internal training to commercial advertising. It's effective in its organic and natural flow that humanizes the content and creates a connection with the audience. While it is possible to upload a file created from VIdeoScribe into PowerPoint, you're not limited to using the software. In PowerPoint 2016, you can use free images, your own or external content, and add the whiteboard animation effect at no additional cost.

How to add a Videoscribe file to Powerpoint 2016

If you have used VideoScribe to create a scribe, you can use it in PowerPoint. You need to ensure that it is rendered as a video file. The rest is handled in PowerPoint 2016.

To add the video file:

  1. Select a Slide to place your video on.
  2. Select the Insert tab in the navigation ribbon.
  3. Navigate to the Media group.
  4. Select Video.
  5. Click Video on my PC from the drop-down list.
  6. Select the video file.
  7. Select Insert.

For presentation purposes, you do have options to automatically play when transitioning to its home slide or to play at a specific time.

VideoScribe is a premium software, that offers a free trial period. If you are already an Office 365 user, you can achieve similar effects by using your PowerPoint know-how. For this to work, you need to be working with images in WMF format.

How to add a VideoScribe- type animation in PowerPoint 2016

How to add the WMT file to the slide

To add the WMT file:

  1. To add an image to the slide
  2. Click on the Insert tab in the navigation ribbon
  3. Navigate to the Images group.
  4. Select an image to add
  5. Click Add.

How to create the animation

To create an animation:

  1. Right-click on the image.
  2. Select Group from the drop-down list.
  3. Select Ungroup from the corresponding list.
  4. Click Yes in the dialog box to proceed.
  5. Repeat steps 5 – 8 until all ungroupings have been completed.
  6. Select the edge of the image.
  7. Select Cut to remove the boundary box, leaving the image.
  8. Select all ungrouped portions of the image.
  9. Select the Animations tab.
  10. Select Wipe from the Animation group.
  11. Navigate to the Timing group.
  12. Select After Previous in the start section.
  13. Set an animation speed under duration, the shorter the time, the better the effect.
  14. Navigate to the Animation Pane.
  15. Select the first image.
  16. Change the timing to On Click.

How to add a handwritten effect in PowerPoint 2016

How to add a hand to the slide

To insert and edit a hand image:

  1. Insert a picture of your hand holding a pen or marker into a slide.
  2. Click on Picture Tools – Format in the navigation ribbon.
  3. Click on Remove Background under the Adjust group. PowerPoint will mark background portions of the image in a fuschia color.
  4. Click on Mark Areas to Keep in the Refine group of the Background Removal tab.
  5. Click on points in the fuschia area to add them to the final image.
  6. Click Keep Changes in the Close group to finish.

How to create the handwritten effect

To add a handwriting effect:

  1. Enter text into a slide.
  2. Click on the text.
  3. Click the Animations tab.
  4. Select Wipe from the Animation group.
  5. Select the Effects option.
  6. Select From Left to have the text appear from left to right.
  7. Click on the hand image that you have added.
  8. Click the Animations tab.
  9. Select Custom Path from the Animation group.
  10. Click and draw a path along the text that you have entered.
  11. Click With Previous to have the two animations play at the same time.

You may have to adjust the timing of each animation in order to properly sync. This can be done by clicking on individual animations in the Animation Pane and then changing values under the Duration field of the Timing group. You'll end up with an animation that appears to create itself.

Wrapping Up

With time and patience, you can create a unique and creative way to share your message. From storyboard to a meeting with the board, whiteboard animations brings energy to your content. Have you used whiteboard animations or VideoScribe in your PowerPoint presentations? Let us know in the comments.

Microsoft Office 101: Help, how-tos and tutorials

How to upgrade the RAM, SSD and HDD in the HP Omen 15

$
0
0

HP Omen 15

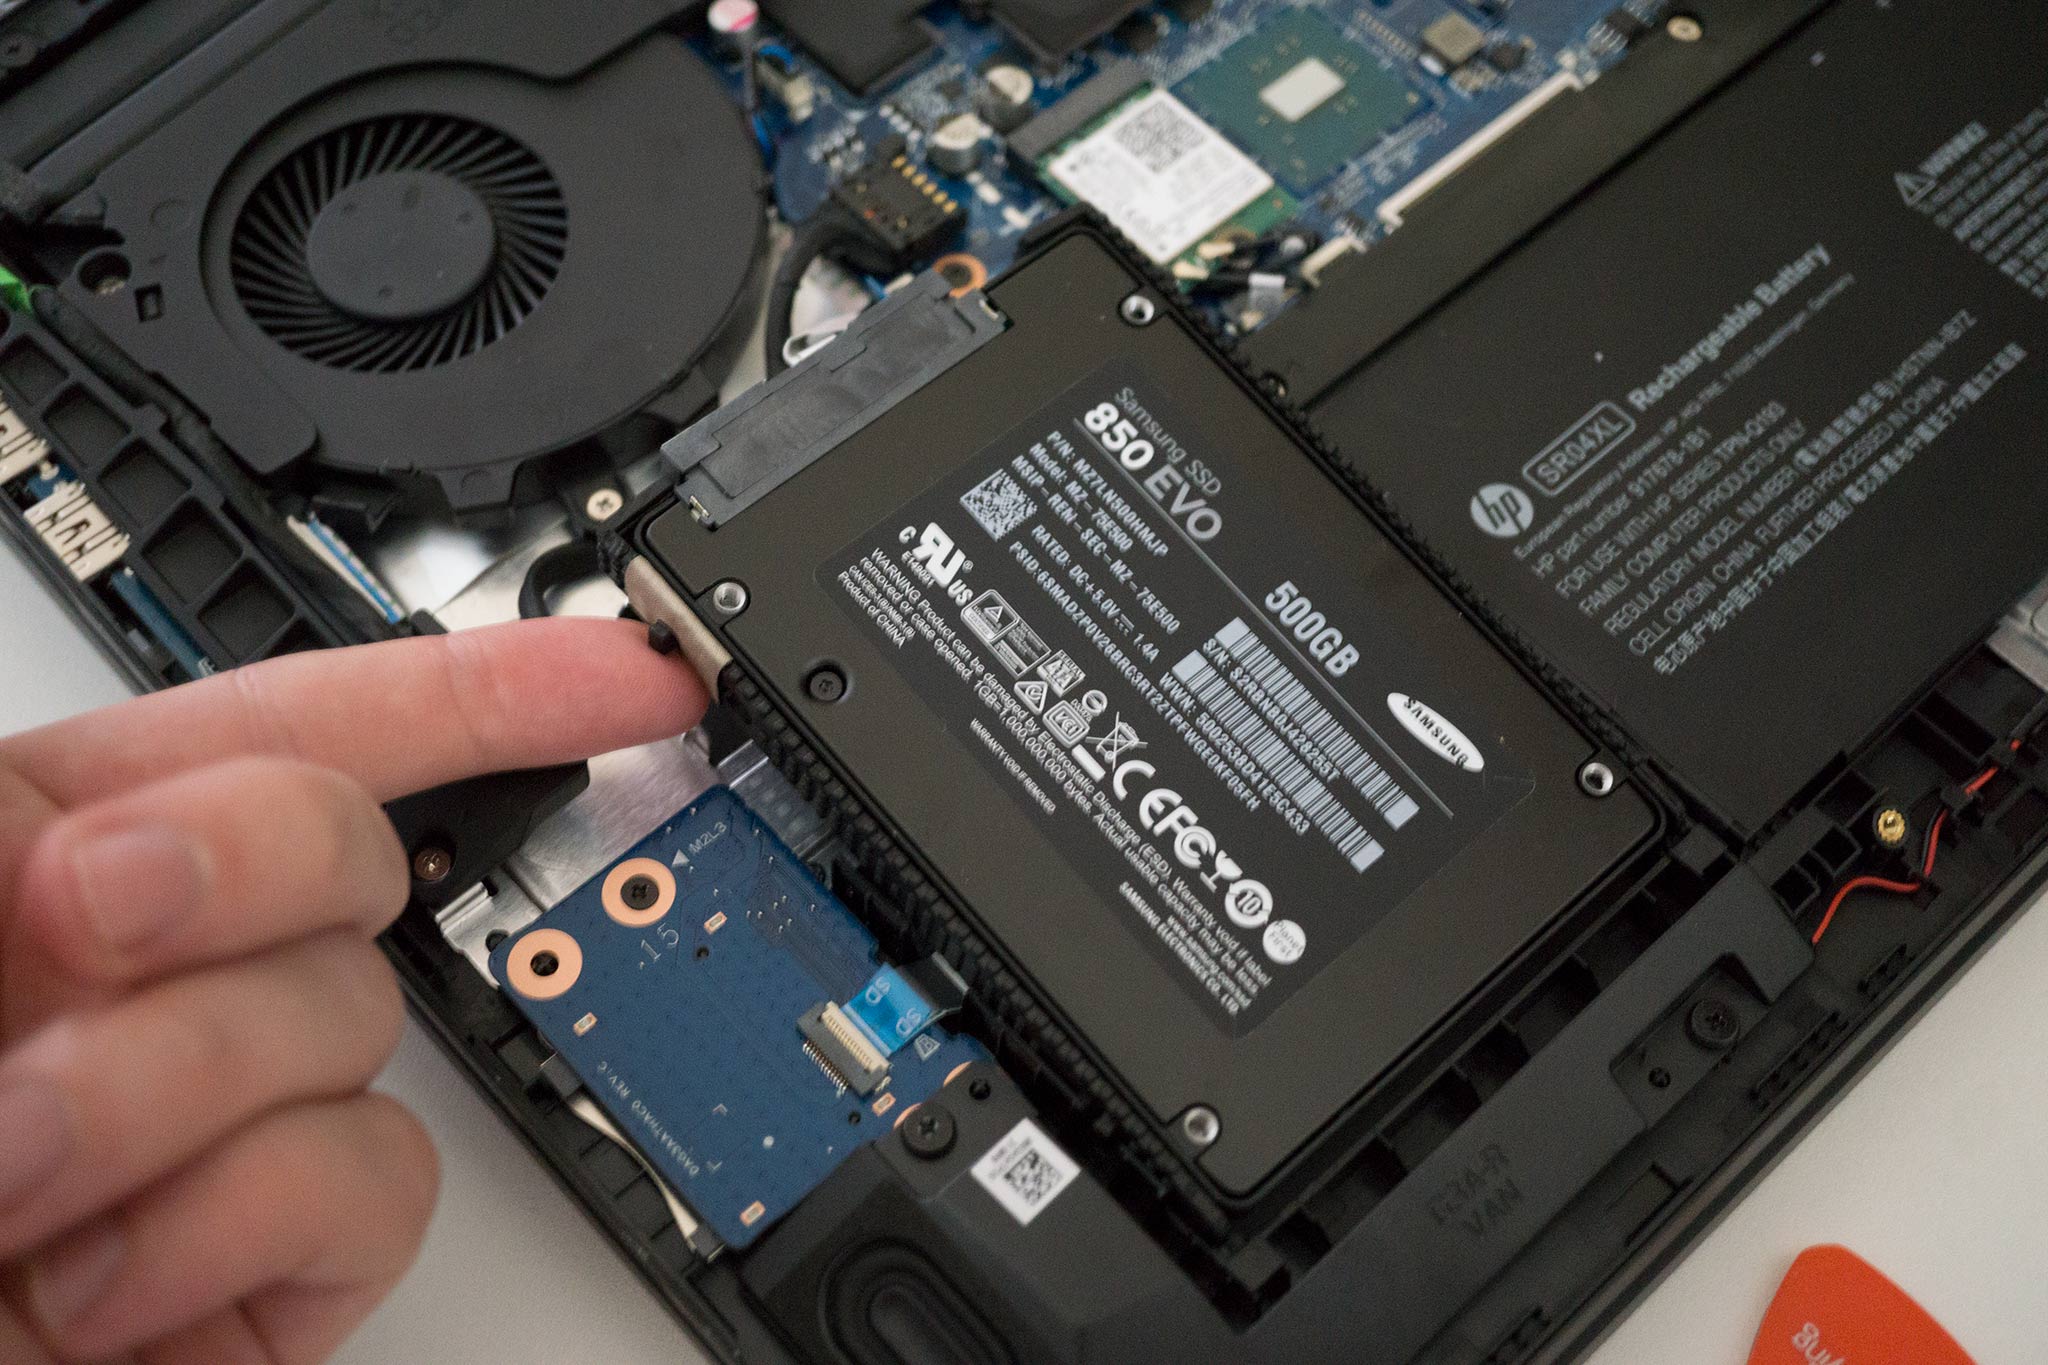
The HP Omen 15 is already a powerful gaming laptop, but if you need more oomph here's how to change out the M.2 SSD, RAM, and HDD.

Gaming laptops like the HP Omen 15 are killer mobile computers. Configurations can pack an Intel Core i7 processor, GTX 10 series GPU, 16GB of RAM, and solid storage performance thanks to M.2 technology. That said, even with the available horsepower, it's possible to add even more power to the notebook.

Today, we'll be taking a look at how you can add (or change out) the RAM, replace the mechanical HDD, and even replace the M.2 stick that houses the Windows OS.

See at Amazon

Before upgrading

This guide will run you through how to change out the three components, which should take around 15 minutes per component, or around 20 minutes if you're doing all three in a single session. It's better to go slow with the HP Omen 15 as it's pretty easy to thread screws, damage the chassis by attempting to force it open, and accidentally hitting the main board with a screwdriver. Slow and steady wins the race to a more awesome laptop.

There are a few items you will need:

  • Philips screwdriver.
  • Small pry tool.
  • Tray for the screws.

If you have none at hand, I would recommend picking up the Kaisi Repair Kit Magnetic Screwdriver Set for $12.99. This has not only the right size Philips screwdriver bit but also a pry tool that works flawlessly.

You should use an Anti-Static Wrist Strap when touching the internal components. This isn't required but is highly recommended. (We always use one.)

Opening the Omen

HP Omen 15

Before you even think about opening the laptop, you must shut down (not sleep or hibernate) the computer first. Also, unplug the power adapter if it's charging.

Here's how to open up the Omen 15:

  1. Place the laptop on a flat surface bottom up. (It's recommended you use a soft cloth to avoid scratching the lid.)
  2. Remove the eight Philips screws. Take extra care with this as some may be difficult to unscrew.

    HP Omen 15

  3. Unscrew the two central Philips screws located towards the rear of the laptop. These are not retrievable.

    HP Omen 15

  4. Carefully pry open the case using a credit card or non-abrasive plastic pry tool.

Remember to place the eight screws removed from the laptop in a safe place.

Changing the M.2 SSD

HP Omen 15

For the system disk, HP opted to employ M.2 SSD technology. This means the storage device housing Windows is already super-fast. You should only really look to replace the card if you require more space. If you have a new one to replace what's already installed, here's how to do it:

  1. Remove the placement screw at the base of the SSD.

    HP Omen 15

  2. Gently lift the old SSD at a 20-degree angle and slide it out.
  3. Insert the new SSD firmly into the slot at the same 20-degree angle.
  4. Lay down the new SSD flat and replace the placement screw.

Pay extra attention when using a screwdriver inside the laptop as to not cause any damage to nearby components.

Changing the HDD

HP Omen 15

The Omen 15 laptops come packing a mechanical 7200RPM hard-disk drive. This keeps costs down and provides ample amounts of storage space (1TB in our particular model), but no spinning platter hard drive will ever beat an SSD for speed. We opted for a Samsung EVO 500GB SSD, which runs around $150.

See Samsung EVO 500GB

Here's how to replace the HDD in the Omen 15:

  1. Gently pull up on the clip to detach the SATA cable from the main board.

    HP Omen 15

  2. Extract the HDD by pulling up from the side of the SATA connector.

    HP Omen 15

  3. Remove the two runners from the HDD. (HP blessed everyone by not requiring any screws to be removed here.)

    HP Omen 15

  4. Remove the SATA connector from the HDD.
  5. Attach the SATA connector to the new SSD.
  6. Attach the two runners to the new SSD.
  7. Lay the SSD in bottom side first.
  8. Push down on the other end (with the SATA connector) to lay it flat.
  9. Re-attach the SATA cable to the main board, making sure the blue bumps that hold it in place are past the grove. (You shouldn't be able to simply slide it out without lifting it up.)

    HP Omen 15

  10. Push down the clip to hold the cable in place.

Formatting the new drive

In order to use the new drive, you first need to initialize it and have Windows create a partition. Luckily, Microsoft has made this a fairly straightforward process and you'll be installing games in no time at all.

Here's how to get the new SSD working in Windows 10:

  1. Use the Windows key + X keyboard shortcut to open the Power User menu
  2. Select Disk Management.

    HP Omen 15

  3. An alert should ask you to initialize the drive. If not, right-click the "unknown" SSD and select initialize.
  4. Select one of the partition styles:

    • MBR (Master Boot Record) for a hard drive smaller than 2TB in size.
    • GPT (GUID Partition Table) for a hard drive larger than 2TB in size.

    HP Omen 15

  5. Right-click the newly created space and select New Simple Volume.
  6. Click Next.

    HP Omen 15

  7. Leave allocated space as is to take up the entire drive.
  8. Click Next.

    HP Omen 15

  9. Select a drive letter.
  10. Click Next.

    HP Omen 15

  11. Select a file system from the drop-down menu. In the case of Windows 10, it's recommended to use the NTFS file system.
  12. On "Allocation unit size," leave the Default option.
  13. Type a descriptive name.
  14. Clear the Perform a quick format option.
  15. Unless necessary, you don't need to check the Enable file and folder compression option.
  16. Click Next.
  17. Click Finish.

We deselected the option to perform a quick format so Windows will do a more thorough format. While this option is handy for times when you need to quickly clear the drive and start afresh, it's better to disable it with a new drive to ensure there are no issues with it. And if you're running into issue formatting the drive for whatever reason, you can give the DiskPart command-line tool a try to see if that fixes the problem.

How to format a new hard drive in Windows 10

Changing the RAM

HP Omen 15

Sometimes 8GB just isn't enough. Other times 16GB even causes a bottleneck. Ideally, when changing the RAM even if the laptop already comes with 8GB you want to replace that stick with a new 2 x 8GB kit. Sure, this means we're replacing an 8GB stick with another 8GB stick, but it saves the trouble of potentially experiencing issues if the CAS latency, timings, and/or voltages are off.

The HP Omen takes DDR4 2400RAM (PC4-19200) SODIMM.

See Crucial 16GB (2 x 8GB)See Ballistix Sport LT 32GB (2 x 16GB)

Here's how to change the RAM in the Omen 15:

  1. Push clamps to the side for each RAM stick.

    HP Omen 15

  2. Extract the RAM module.

    HP Omen 15

  3. Match the notch in the new RAM module to the grove in the slot.

    HP Omen 15

  4. Slide in the new module.
  5. Carefully press down on the module until it's locked into place.
  6. Repeat for the second module if installing.

Job done. You should be able to boot Windows and enjoy a responsive experience in gaming and intense workloads, especially if jumping from 8GB to 16GB or higher.

Questions?

Have a HP Omen laptop but are experiencing issues with upgrading a component? Perhaps you've made the upgrade to a faster SSD for gaming and are stunned by the performance increase. Sound off in the comments.

Oculus Touch troubleshooting guide

How to annotate EPUB files in Microsoft Edge

$
0
0

How to annotate EPUB files in Microsoft Edge

The Fall Creators Update brings annotation to EPUB files in Microsoft Edge.

The Windows 10 Creators Update gave Microsoft Edge the ability to open EPUB files stored on your PC. It immediately became easier to read your favorite books without having to download a separate app. The Windows 10 Fall Creators Update is on its way, and it adds an annotation feature to Edge's EPUB reader, effectively allowing you to mark up your books. Let's get annotating your favorite books with this handy guide.

How to open an EPUB file in Microsoft Edge

Edge should be the default program that's used to launch EPUB files. If you have used EPUBs on your PC in the past and have a different app set as default, you can still set Edge to be the default viewer.

  1. Right-click the Start button.
  2. Click Settings.
  3. Click Apps.

    Click Settings. Click Apps.

  4. Click Default apps.
  5. Click Choose default apps by file type. You might have to scroll down to find it.

    Click Default apps. Click Choose default apps by file type.

  6. Click the app next to .epub. You'll have to scroll down to find it. In this case, Edge is our default app, but you might see a different app in this spot.
  7. Click Microsoft Edge.

    Click the app next to .epub. Click Microsoft Edge.

When you open EPUB files from now on, Edge will launch and you'll be able to use the new features.

How to annotate an EPUB file in Microsoft Edge

The biggest addition to Edge's EPUB mode in the Fall Creators Update is the ability to highlight and underline words or chunks of text and add notes to certain sections. When you close Edge and the EPUB file, any annotations will remain and will be visible the next time you open the file in Edge. Nice! Here's how to use the different annotations methods.

How to highlight text in EPUB files

  1. Launch an EPUB file with Microsoft Edge.
  2. Click and drag your cursor over text to select it. A small box of tools will appear above your selection.
  3. Click the Highlight button. It looks like the tip of a marker with an uppercase A next to it.

    Click and drag your cursor to select text. Click the Highlight button.

  4. Click a color to highlight with. Continue the steps to remove the highlighted portion.
  5. Click the highlighted text to select it. You don't have to click and drag.

    Click a color to highlight with. Click the highlighted text.

  6. Click the Highlight button.
  7. Click the None option. It is located below the color options.

    Click the Highlight button. Click the None option.

How to underline text in EPUB files

If highlighting feels a bit too aggressive, you can simply underline words or blocks of text.

  1. Launch an EPUB file with Microsoft Edge.
  2. Click and drag your cursor over text to select it. A small box of tools will appear above your selection.
  3. Click the Underline button. It looks like an uppercase U with a line below it. Continue the steps to remove the underlined portion.

    Click and drag your cursor to highlight text. Click the Underline button.

  4. Click the underlined text. There's no need to click and drag to select it.
  5. Click the Underline button.

    Click the underlined text. Click the Underline button.

How to add a note in EPUB files

Reading often inspires thought. While working your way through the prose of your favorite author, you might be inspired to jot down a note based on some text in a book. This features also works very well when studying if you happen to have your textbooks in EPUB format.

  1. Launch an EPUB file with Microsoft Edge.
  2. Click and drag your cursor over text to select it. A small box of tools will appear above your selection.

    Launch an EPUB file. Click and drag your cursor to select text.

  3. Click the Add a note button. It looks like a speech bubble. A box with a blinking cursor within will appear.
  4. Type your note.

    Click the Add a note button. Type your note.

  5. Click the Save button in the top-right corner of the note window. It looks like a checkmark. Continue the steps to remove the note.
  6. Click the text with a note attached to it. It will have a light yellow highlight and a miniature speech bubble next to it.

    Click the Save button. Click the text with a note attached.

  7. Click the Add a note button.
  8. Click the Delete button in the bottom-right corner of the note window. It looks like a trash can.

    Click the Add a note button. Click the Delete button.

More resources

For more information about Microsoft Edge, be sure to check out our hub, as well as some other guides to using new Fall Creators Update features.

Viewing all 5861 articles
Browse latest View live


Latest Images