Quantcast
Channel: Help & How To
Viewing all 5861 articles
Browse latest View live

How to be an ace pilot in Battlefield 1

$
0
0

How to be an ace pilot in Battlefield 1

How do I get better at flying in Battlefield 1?

Battlefield 1 is a complex game, especially when you get into multiplayer. You can run around with a gun in-hand, you can drive a tank, you can ride a horse, and you can fly. There's more than meets the eye with each of these play-styles — here's how to get the most out of the pilot class.

See at Microsoft Store

Get to know the three different types of aircraft

There are three different types of aircraft available in Battlefield 1: attack plane, bomber, and fighter. Here are the differences between each, and which one to use in certain scenarios.

Attack plane

Attack plane loadout screen.

The attack plane is sort of like a mix between the bomber and the fighter in that you can have a gunner with you while still keeping some sense of speed and agility. The attack plane works great against infantry, armor, and the airship behemoth.

There are three different loadouts you can choose for your attack plane.

  • Ground support: You and a rear gunner can drop fragmentation bombs on infantry below, and can also take out enemy aircraft with the LMGs mounted to front and back. Use the special spotting flares to help your team see the enemy.
  • Tank hunter: This loadout comes with high-explosive bombs that will make short work of enemy armor. You also have a front-mounted 37mm cannon and a rear-mounted LMG for taking out enemy aircraft. Take advantage of an emergency wing repair kit that will get your plane back to flying shape in no time.

  • Airship buster: Strap some rockets to your wings and get busy taking out the enemy's behemoth airship. A heavy machine gun is strapped to the front, and the rear gunner has the standard LMG. A speed boost is available for getting away swiftly after you launch your rockets.

Bomber

Bomber loadout screen.

The bomber is slow, can take quite a bit of damage, can deal quite a bit of damage, and has room for three people. Use it to keep enemy infantry off of objectives or to take out enemy dreadnoughts ships.

There are three different loadouts you can choose from for your bomber.

  • Barrage: You get four high-explosive bombs and two demolition bombs to drop on the enemy, and the two gunners can use an LMG and an HE auto-cannon to fend off enemy planes. The spotting camera makes it easy to tag multiple enemies at once.
  • Firestorm: This bomber is equipped with nine incendiary bombs and six fragmentation bombs — this is the ultimate anti-infantry loadout. The gunners get an LMG and an HE auto-cannon to use against enemy fighters. An emergency wing repair will keep you in the sky longer.

    Bomber scope view.

  • Torpedo: The torpedo is used against enemy ships — especially the dreadnought — and you also get two demolition bombs for other vehicles. The gunners can use an LMG or an HE auto-cannon to keep you safe from enemy planes. The emergency wing repair option lets you repair fast.

Fighter

Fighter loadout screen.

The fighter puts you all alone in the sky. No gunner, no support. Fighters are best suited for taking out enemy aircraft and infantry thanks to their high speed and incredible agility.

There are three different loadouts you can choose from for your fighter.

  • Dogfighter: Twin heavy machine guns strapped to the front of your fighter will make mincemeat of your enemy's aircraft. Take advantage of the emergency repair perk to stay in the air longer.
  • Bomber killer: The HMGs on the front of this plane do a bit more damage but have a slower rate of fire. You also get six rockets for dealing with the increased durability of bombers. A speed boost helps you get away from bombers' defences.

    View from a fighter's cockpit.

  • Trench fighter: Sporting the same HMGs as the dogfighter loadout, this plane also comes with explosive darts that can be dropped on enemy infantry. Yikes. Use the spotting flare as you strafe to help your friends spot the enemy.

More great flying tips

There are a few more things you should know about flying before jumping in.

Play the Friends in High Places campaign

The first two chapters of the Friends in High Places campaign are a great place to learn flight basics, tweak your settings to best suit you, and to get used to dogfighting.

These chapters help!

Jumping into multiplayer and waiting to get a plane can take awhile, and getting shot down while you're trying to figure things out will only compound your frustration. Give these two chapters a shot before testing your luck against real opponents.

Don't use planes as disposable transportation

Battlefield veterans will unanimously agree: hopping into a plane, flying it to the first objective you see, and bailing out to let your plane crash is wrong. Very, very wrong.

Planes, when used correctly, can really wreak havoc. They are the best counter against other enemy aircraft — especially the behemoth airship — and can contribute to capturing objectives. The respawn time for planes is lengthy, so wasting one puts your team at a disadvantage. If you get into the pilot seat, expect to stay there until your plane is shot down.

Join your friends

Playing as a rear gunner.

A plane without gunners is a sitting duck. If you see a teammate, especially a squad member, in a bomber or attack plane, do your best to join them. Having even a rear-gunner can make a huge difference, especially if the other team has a skilled pilot amongst their ranks.

Playing together in a plane is a ton of fun and can lead to some genuine laughs when you all accidentally go up in flames after hitting a flagpole on a strafing mission.

Use the dynamic environment to your advantage

Fog, rain, and sandstorms can drastically change the map. Using the environment to your advantage is key — fly above storms and keep a lookout for enemy aircraft. Dive, attack, disappear into the storm, and return to your spot high above once the enemy loses track of you.

A pilot who can fly in any scenario will fare way better than a pilot who bails out at the first sign of trouble.

Throttle up and down accordingly

You will no doubt eventually find yourself in a dogfight. Your objective is to get behind your enemy in order to line up a shot while at the same time keeping your enemy from getting behind you. The key to this is throttle control.

When heading into a turn, throttle down — as you come out of the turn, throttle up. This ensures you make the tightest turn possible. Don't worry if your opponent also makes tight turns and ends up behind you. Practice makes perfect.

Spot enemies

Spot your enemies, close or not.

This rule applies not only to other aircraft; you are the eyes in the sky for your teammates. Spot everything you can. Your points will go up and your teammates will love you.

Spotting enemy aircraft and having them show up on your radar makes dogfighting so much easier and anti-aircraft on the ground will have a much simpler time hitting their mark.

Set an attack priority

Having dominion over the entire battlefield can be a little overwhelming. There is armor over there harassing friendlies, there's an AA gun spitting flak into the sky, and there's an enemy fighter buzzing around nearby.

This order might change depending on your loadout and aircraft, but it will generally remain the same. You'll want to first take out the enemy aircraft, move on to anti-aircraft guns, take out tanks, then focus on infantry. This order is based on your vulnerabilities and also your ease of access to these units.

Fly high

Fly high!

Try to spend most of your time high in the air. This makes you much harder to hit by the AA guns on the ground, and it also gives you a much better vantage to plan your next attack.

Swoop down when you have a target in sight, eliminate the target, then return to your position.

Do you fly?

Have you invested a substantial amount of time into flying in Battlefield 1? What is your pilot rank? What is your favorite plane? Let us know in the comments section below!


Where to find all field manuals in the Battlefield 1 Through Mud and Blood campaign

$
0
0

Where to find all field manuals in the Battlefield 1 Through Mud and Blood campaign

Where are the field manuals in Battlefield 1's "Through Mud and Blood" campaign?

Through Mud and Blood is one of the best single player campaigns in Battlefield 1, and it also happens to contain 20 field manuals collectibles across its four chapters. Here's where to find each one!

Over the Top chapter field manuals

There are five field manuals in total to find in the Over the Top chapter. Here's how to find each one.

First field manual

  1. Play the objective until you can exit your tank on the way to destroy some artillery.

    Play the objective until you can exit your tank to destroy some artillery.

  2. You will see a green tent on your way to the artillery. Head toward it.

    You will see a green tent on your way to the artillery. Head toward it.

  3. The field manual is located to the right of the green tent.

    The field manual is located to the right of the green tent.

Second field manual

  1. Continue the mission until you arrive at the bombed-out church. Exit the tank.

    Continue the mission until you arrive at the bombed-out church. Exit the tank.

  2. Enter through the side door of the church and turn left.

    Enter through the side door of the church and turn left.

  3. The field manual is located next to some boilers.

    The field manual is located next to some boilers.

Third field manual

  1. Exit the church through the door on the opposite side of the one you entered through.

    Exit the church through the door on the opposite side of the one you entered through.

  2. Turn right and walk along the wall.

    Turn right and walk along the wall.

  3. The field manual is located just around the first corner.

    The field manual is located just around the first corner.

Fourth field manual

  1. Continue playing the mission until you take objective D. Exit the tank.
  2. Run toward the large stone building to the right of the flag.

    Run toward the large stone building to the right of the flag.

  3. The field manual is located along the outside wall of the building.

    The field manual is located along the outside wall of the building.

Fifth field manual

  1. Continue the mission, heading down the main road toward the bridge until you see some artillery to the right of the road. Exit the tank.

    Continue the mission, heading down the main road toward the bridge until you see some artillery to the right of the road. Exit the tank.

  2. The field manual is located behind the first artillery gun.

    The field manual is located behind the first artillery gun.

Fog of War chapter field manuals

There are five field manuals in total to find in the Fog of War chapter. Here's how to find each one.

First field manual

  1. Play the mission until you take the first objective.
  2. Pass through the barbed wire that the tank knocks down.

    Pass through the barbed wire that the tank knocks down.

  3. Turn right immediately and head up the hill.

    Turn right immediately and head up the hill.

  4. The field manual is located at the top of the small incline.

    The field manual is located at the top of the small incline.

Second field manual

  1. Follow the main road until you reach the next enemy encampment.

    Follow the main road until you reach the next enemy encampment.

  2. Drop down into the tunnels at the front of the building.

    Drop down into the tunnels at the front of the building.

  3. Enter the basement and turn left.

    Enter the basement and turn left.

  4. The field manual is located amongst some cots in the back-left corner of the basement.

    The field manual is located amongst some cots in the back-left corner of the basement.

Third field manual

  1. Continue the mission until you reach the bridge.
  2. Take the path to the left of the bridge.

    Take the path to the left of the bridge.

  3. Run across the gulley.

    Run across the gulley.

  4. The field manual is located beneath the bridge behind a small set of rocks.

    The field manual is located beneath the bridge behind a small set of rocks.

Fourth field manual

  1. Continue the mission until you reach the large enemy base.
  2. Head toward the bunker on the left side of the base.

    Head toward the bunker on the left side of the base.

  3. Enter the bunker.

    Enter the bunker.

  4. The field manual is located straight ahead, inside the bunker.

    The field manual is located straight ahead, inside the bunker.

Fifth field manual

  1. After collecting the fourth field manual, exit the bunker and turn to your right.

    After collecting the fourth field manual, exit the bunker and turn to your right.

  2. Run along the road at the back of the base until you arrive at the small weapons cache in a green tent.

    Run along the road at the back of the base until you arrive at the small weapons cache in a green tent.

  3. The field manual is located next to some wooden crates.

    The field manual is located next to some wooden crates.

Breakdown chapter field manuals

There are five field manuals in total to find in the Breakdown chapter. Here's how to find each one.

First field manual

  1. Play the objective until your reach the first enemy base.
  2. Run around the base, keeping it on your right side.

    Run around the base, keeping it on your right side.

  3. Take a right at the small woodshed.

    Take a right at the small woodshed.

  4. The field manual is located inside the woodshed.

    The field manual is located inside the woodshed.

Second field manual

  1. After grabbing the first field manual, back up and run toward the windmill in the distance.

    After grabbing the first field manual, back up and run toward the windmill in the distance.

  2. Enter the windmill and climb the stairs.

    Enter the windmill and climb the stairs.

  3. The field manual is located at the top of the stairs.

    The field manual is located at the top of the stairs.

Third field manual

  1. After grabbing the spark plug to the right of the town, go straight toward the two-story house.

    After grabbing the spark plug to the right of the town, go straight toward the two-story house.

  2. Enter the house through the door and head upstairs.

    Enter the house through the door and head upstairs.

  3. The field manual is located in the room with the covered sofa.

    The field manual is located in the room with the covered sofa.

Fourth field manual

  1. After grabbing the third field manual, jump off the balcony and turn to your left.
  2. Head toward the building with the red and yellow sign.

    Head toward the building with the red and yellow sign.

  3. Enter the side door and run up both sets of stairs.

    Enter the side door and run up both sets of stairs.

  4. The field manual is located in the left corner of the attic. It is very dark up there.

    The field manual is located in the left corner of the attic. It is very dark up there.

Fifth field manual

  1. Continue the mission until you locate the farthest and final tank repair spot.

    Continue the mission until you locate the farthest and final tank repair spot.

  2. Run toward the shack at the top of the hill behind the tank repair spot. You will pass a flag.

    Run toward the shack at the top of the hill behind the tank repair spot. You will pass a flag.

  3. The field manual is located inside the small shack.

    The field manual is located inside the small shack.

Steel on Steel chapter field manuals

Each of the five field manuals is located in the same spot on the ground floor of a windmill. You can run through the level without your tank, grabbing each one, but you can also take the tank with you for extra protection. Here's how to find each one.

First field manual

  1. Exit the tank and head for the windmill to your right.

    Exit the tank and head for the windmill to your right.

  2. The field manual is located on the main floor of the windmill.

    The field manual is located on the main floor of the windmill.

Second field manual

  1. Exit the first windmill and turn to your right. Head toward the windmill in front of you.
  2. The field manual is located on the main floor of the windmill.

    Exit the first windmill and turn to your right. Head toward the windmill in front of you.

Third field manual

  1. Exit the second windmill and turn to your left. Head for the windmill in front of you.
  2. The field manual is located on the main floor of the windmill.

    Exit the second windmill and turn to your left. Head for the windmill in front of you.

Fourth field manual

  1. Exit the third windmill and turn right. Head for the windmill in the center of the town below you.
  2. The field manual is located on the main floor of the windmill.

    Exit the third windmill and turn right. Head for the windmill in the center of the town below you.

Fifth field manual

  1. Exit the fourth windmill and turn right. Head for the windmill at the top of the hill.
  2. The field manual is located on the main floor of the windmill.

    Exit the fourth windmill and turn right. Head for the windmill at the top of the hill.

Your collection

Were you able to locate and collect all field manuals in the Through Mud and Blood campaign? Let us know in the comments section below!

See at Microsoft Store

Guide Default Menu: 
menu-battlefield-1-ultimate-guid

How to fix lag spikes and micro-freezes in Battlefield 1 on Windows 10

$
0
0

How to fix lag spikes and micro-freezes in Battlefield 1 on Windows 10

A quick fix for a frustrating problem.

Many Battlefield 1 players on PC have reported that their game suffers from what they're calling lag spikes and micro-freezes in both singleplayer and multiplayer. You're running along fine one minute, and then, for about two or three seconds, everything freezes up before returning to normal.

The likely problem is that there's a service running in the background that doesn't agree with Battlefield 1. It causes your disk usage to spike, resulting in the micro-freeze. Here's how to determine if this is indeed the problem and how to fix the problem once and for all on Windows 10.

How to determine the problem

Some people might be confusing high network latency with this disk usage problem. A good clue is if it persists while you play the campaign.

Another way to determine if this problem is separate from your internet is by using the built-in network graph during online play. Here's how to enable it.

  1. Hit Esc on your keyboard while you're in a multiplayer game.
  2. Click Options.
  3. Click Gameplay.

    Click Options. Click Gameplay.

  4. Click Advanced.
  5. Click the Show button next to Network Performance Graph.

    Click Advanced. Click the Show button.

Return to your game. You will see the graph on the right side of your screen. The lines should all be relatively calm with minor spikes here and there.

Pay attention to the graph the next time you experience a micro-freeze. If the Extr Offset line spikes during the freeze, you'll know you're suffering from this specific disk usage problem. Disabling non-Microsoft services should clear things up and get you back to smooth gaming.

A big spike in the Extr Offset line.

How to disable non-Microsoft services

There are countless suggestions across the Battlefield forums on how to fix this problem, including disabling SuperFetch, disabling tips about Windows, re-installing GPU drivers, and re-installing the game. Only one method has so far fixed this problem: disabling non-Microsoft services. It's unclear which service (or services) doesn't agree with Battlefield 1, so disable them all. Here's how to do it.

  1. Click the Cortana / Windows Search field.
  2. Type msconfig and hit Enter on your keyboard.

    Click the Cortana field. Type msconfig.

  3. Click the Services tab.
  4. Click the checkbox next to Hide all Microsoft services so that a checkmark appears.

    Click the Services tab. Click the checkbox.

  5. Click Disable all.
  6. Click Apply.

    Click Disable All. Click Apply.

  7. Click OK.
  8. Click Restart.

    Click OK. Click Restart.

Your PC will now reboot with only the necessary Windows services. Start Battlefield 1 and join a game. You should see no spikes in the Extr Offset line, and your gameplay should be smooth.

This is what your network graph should look like!

How to enable services

If you later go to run an app and you receive an error, it's most likely because you disabled a key service. Don't fret! You can return to the msconfig menu and restart any services as you need them. Here's how to do it.

  1. Click the Cortana / Windows Search bar.
  2. Type msconfig and hit Enter on your keyboard.
  3. Click the Services tab.

    Type msconfig. Click the Services tab.

  4. Click the checkbox beside any services you'd like to run so that a checkmark appears.
  5. Click Apply.

    Click the checkbox. Click Apply.

  6. Click OK.
  7. Click Restart.

    Click OK. Click Restart.

If the problem reappears

If you discover that Battlefield 1 is suffering again from micro-freezes following the restart of a service, return to the beginning of these steps and repeat the process.

If you can pinpoint the service causing problems, you can restart all others while leaving it out.

Your problem

Did this solve the Battlefield 1 micro-freeze problem? Which service was causing problems on your PC? Tell us in the comments section below!

Guide Default Menu: 
menu-battlefield-1-ultimate-guid

How to enable secret Share page in the Settings app on Windows 10

$
0
0

Windows 10 includes a secret Share page in the Settings app, and in this guide, we'll show you the steps to enable it with a tweak in the Registry.

Although you can also configure a number of options using Settings, you'd think that you'd be able to customize sharing options from within the Share page, right? Nope. For whatever reason, that option is hidden in Windows 10. If you want to customize the flyout that you get when you click the Share button on Microsoft Edge, Windows Store apps, or File Explorer, you're going to have to enable the secret hidden Share page settings.

In this Windows 10 guide, we'll walk you through the steps to edit the Registry to enable the secret Share page, which you can use to customize various sharing options.

How to enable hidden Share page on Settings

Important: As always, this is a friendly reminder warning you know that editing the registry is risky, and it can cause irreversible damage to your installation if you don't do it correctly. It's recommended to make a full backup of your computer before proceeding.

  1. Use the Windows key + R keyboard shortcut to open the Run command.
  2. Type regedit, and click OK to open the registry.
  3. Browse the following path:

    HKEY_CURRENT_USER\Control Panel

  4. Inside the Control Panel (folder) key, right-click on the right side, select New, and click on DWORD (32-bit) Value.

  5. Name the new DWORD EnableShareSettings and press Enter.
  6. Double-click the newly created DWORD and change its value from 0 to 1.

  7. Click OK.
  8. Close the Registry to complete the task.

Once you completed the steps, inside the Settings app, you should now see the new Share page.

To change the sharing options, do the following:

  1. Open Settings.
  2. Click on System.
  3. Click on Share.

Inside the Share page, you'll be able to control which apps are allowed to share, the number of items that appear in the flyout, and whether to show the most often apps you use to show at the top of the list.

To see the new changes, simply use any Windows Store app, Microsoft Edge, or File Explorer and click the Share button.

If you change your mind you can always revert the changes by following the same steps mentioned above, but on step 6 change the value from 1 to 0.

Do you think Windows 10 should include this page by default in the Settings app? Tell us in the comments below.

More Windows 10 resources

For more help articles, coverage, and answers on Windows 10, you can visit the following resources:

Thanks to kw259 at MDL for surfacing this tweak!

Battlefield 1 ultimate guide

$
0
0

Battlefield 1 ultimate guide

Battlefield 1 takes players back to the Great War and places them amidst the bloody, brutal fighting. Here's how to get the most out of DICE's best shooter yet.

Featuring a new take on singleplayer mode, featuring character-driven plots split up over several different stories, and a brutally immersive multiplayer mode, Battlefield 1 has impressed players with its pacing and solid gameplay.

From our review:

After years of creating expansive warzones, Battlefield 1 has emerged as one of DICE's greatest titles to date. In terms of raw gameplay mechanics, a range of new concepts has been put in play, shaping a truly outstanding first-person shooter.

This ultimate guide aims to give you an insight into multiplayer classes, achievements, and collectibles so that you don't miss a thing. Don't have Battlefield 1 yet? It's never too late!

Battlefield 1 for Xbox One

Battlefield 1 for PC

Guide Default Menu: 
menu-battlefield-1-ultimate-guid

How to install mods for Skyrim Special Edition on Xbox One

$
0
0

How easy is modding Skyrim on Xbox One? Too easy!

With the recent release of Skyrim: Special Edition came the ability to mod your game, giving the player a whole wagon full of new content to play around with and build the Dragonborn of their dreams.

Here's how to get set up for using mods on Skyrim Special Edition for Xbox One!

How to set up a Bethesda account

The first thing you're going to need is a Bethesda account. A Bethesda account is needed to do this thing and that thing and these other things. If you've played Fallout 4 and used mods on your Xbox One, then you've already got a Bethesda account. You can do this on your PC:

  1. Go to account.bethesda.net.
  2. Click Create Account.
  3. Enter your account information in the fields, agree to the terms and conditions, and verify that you're not a robot.
  4. Click Create Account
  5. Verify your email! If you don't verify your email, then you won't be able to use mods until it's done.

Link your Bethesda and Xbox One accounts

When you sign in to your Bethesda account on your Xbox One, you are linking your account to your Xbox One so you can download mods from Bethesda's mod hub directly and they'll go straight to your console. Here's how to link the two:

  1. Start the Skyrim on your Xbox.
  2. Press any button to open the main menu.
  3. Select Mods halfway down the list.
  4. Enter the username and password you created for your Bethesda account.

Finding and downloading a mod

Once you're signed in with your Bethesda account, you'll be confronted with all the available mods. You can also search mods to narrow your selection down. Scrolling up and down the mod page separates the mods by type.

  1. Hit X to bring up the search menu.
  2. Enter your search term. For example, if you want to see what type of rings there are, type 'rings'.

    Once you have found a mod:

  3. Press A to select a mod.
  4. Read the description, and check whether it has any load order requirements. If it does, we'll cover that in the next section.
  5. Select Favorite to add it to your list to find again later.
  6. Select Download to begin installing it to your console.

Enabling or disabling mods once they're installed

Downloaded mods go into your Mods list, which details which ones you have installed on the console.

  1. On the main mod hub screen, hit Y to access your Load Order.
  2. To enable or disable a mod: select the mod and press A. If you want to play and get achievements, all mods will needs to be disabled before you start a game.
  3. Delete a mod you no longer want by pressing Y.
  4. Pressing the View button will enable you to delete or disable all mods.

Changing the Load Order of your mods

Certain mods may require being in a certain position in the Load Order to be enabled. This determines the importance of which mods should be applied first when the game is loaded. For example, some mods like the Unofficial Skyrim Patch need to go first, as some other patches are dependent on it to work.

  1. On the main mod hub screen, hit Y to access your Load Order.
  2. Select the mod you need to reorder.
  3. Press X.
  4. Move the mod up or down the list using the directional pad.
  5. Press X again when it is in place.

And that's it! Once you head back to the main menu to start your game, you'll be ready to fulfill your Dragonborn destiny with all the mods and tweaks your console can carry!

Check our Skyrim Review

Have a look at our list of our best Skyrim mods

See on the Xbox Store

When to upgrade your PC — or when to start over from scratch

$
0
0

Insomnia 58

When should you upgrade components inside your PC or start from scratch? We take a look at a few helpful points to aid your decision when it comes to wanting a little more from your desktop.

The first thing one has to ponder is whether or not an upgrade or new system build is actually worth the effort. What do you need the extra power for? If there's a component, like the hard drive with Windows installed for example, that has ground to a halt and no longer performs well enough, then a replacement is likely in order.

That said, just because your PC may be running slow or is sluggish at times, it doesn't necessarily require new hardware, but could mean you need to use some tools to clear any clutter out, clean the insides of dust, or run some scans just in case you've somehow managed to pick up a virus or two while browsing online.

Fractal R3

There's also the consideration based on who actually built the rig. Was it yourself or did you purchase the PC pre-built? Should the answer be the latter you'll likely need to open the unit up and investigate to see just how easy it's going to be to upgrade components. For systems you build yourself, this opens up new options for upgrades as you should know how everything has been put together.

Even if you opt to build a new system from scratch, it's certainly worth looking into all the parts already installed in the old PC to see what can be re-used. You wouldn't want to throw away that GTX 1080 GPU simply because you're building a new PC, right? I'd recommend leaving a full re-build as an absolute last resort. If there are various components that are old and everything is just dated, then extracting everything for the dump may be a solid option.

ZOTAC GTX 1070

Taking us back to an aforementioned point, just what do you need to the PC to do? If you're wanting to crack on with some video editing but the PC struggles when it comes to actually rendering everything for output, you'll likely need to take advantage of the latest CPU, but that means you're going to likely need a new motherboard, which then could lead to new RAM being purchased.

You'll also need to make sure that anything new you add to the PC won't be hindered by under-performing components. As another example, throwing in a new CPU won't make your games run faster if your GPU is still sub-par. There's no easy answer to whether or not you should start from scratch when it comes to PC building. It all depends on what you have, what you need, and money.

How to secure your Skype account against Baidu and LinkedIn spam

$
0
0

Your Skype account maybe vulnerable to hacks. Here are the steps to properly make it more secure.

Lately many Skype users are finding out that their accounts have been used to send numerous spam messages to their contacts and other users. However, this isn't a security breach problem on Microsoft's side. Instead, hackers have managed to steal old Skype credentials from users, which doesn't feature all the security technologies found on a Microsoft account.

It's been some time since Microsoft has been offering the ability to link Skype with a Microsoft account to make sign-in easier and more secure. Unfortunately, after merging both accounts, Microsoft will keep your original Skype ID and password active, in case you want to access the service using your old credentials.

However, if you used a weak password or someone managed to steal your Skype information, anyone can use that information to gain access to your account.

Thankfully, there is a way to fully merged your Skype ID with a Microsoft account (even if they're already linked) to prevent hackers from gaining access to your account, and on the steps below we show you how.

How to fully merge a Skype with a Microsoft account

  1. Open your web browser and go to https://account.microsoft.com/.
  2. If you're currently signed in with your Microsoft account, then sign out.
  3. Click the Sign-in button.
  4. Enter your Skype ID and Skype password to begin the process.
  5. Click Next.
  6. If you have already linked the accounts in the past, you'll get asked to update your information by entering your Microsoft account password.
  7. Click Next.
  8. Click OK to complete the process.

After completing the steps, your Skype account will be fully merged with your Microsoft account. Also, during the process, a Skype alias has been created to allow you to keep using your old username to sign into the service. However, as a result of the merge, you'll now have to use your Microsoft account password to sign in.

Keep in mind that if your Microsoft account happens to be using the same old Skype password, it's also highly recommended to change it as hackers will still be able to access your account.

In case you're not thinking of using the Skype name anymore, you can go to your Microsoft account and disable your current alias (Recommended).

If you want to make your account extra secure, remember that you need to set up two-factor authentication on your Microsoft account manually.

More Windows 10 resources

For more help articles, coverage, and answers on Windows 10, you can visit the following resources:


Get to know the six Titans of Titanfall 2

$
0
0

Get to know the six Titans of Titanfall 2

How do the Titans work in Titanfall 2?

Titanfall 2 is a fast-paced, futuristic shooter where you're backed up by giant robotic mechs. These mechs, known as Titans, come in six varieties, each with its own set of weapons and perks. Here's a quick overview of each Titan to help you decide which one you want to use.

Titan kits

All Titans have six different Titan kits to unlock and use. These perks, when combined with your Titan's unique abilities, can make for a powerful machine.

Assault chip: If you like to call down a Titan and let it roam around without you inside, use the assault chip to improve accuracy and to enable your Titan's secondary abilities. Assault chip is immediately available.

Stealth auto-eject: When your Titan is about to explode, you'll eject, invisible, high into the air. Stealth auto-eject is immediately available.

Turbo engine: This gives your Titan one extra dash. If you like to move quickly or you're using a slow Titan, the turbo engine isn't a bad idea. Turbo engine is available immediately.

Overcore: Your Titan starts with a core that's already 20% built. When your core is complete, you get to use a special attack that does a ton of damage. Overcore is available at Titan-level 2 or can be purchased for 5 credits.

Nuclear ejection: When your Titan receives critical damage, you can choose to eject and set off a nuclear explosion that damages all enemy Titans and pilots in the vicinity. Nuclear ejection is available at Titan-level 3 or can be purchased for 5 credits.

Counter ready: When an enemy pilot jumps onto your Titan, you can set off electric smoke to cause them damage. This kit gives you one extra charge of the smoke. Counter ready is available at Titan-level 4 or can be purchased for 5 credits.

Titanfall kits

When you call in a Titan, a dropship hovers over the map and lets it fall. There are two Titanfall kits you can unlock and use with all Titans.

Dome shield: When your Titan falls, it is enveloped in a shield that protects it from enemy projectiles. Any enemy Titans or pilots who enter the dome receive constant damage. Dome shield is immediately available.

Warpfall: There is a usually a five second delay between you calling in your Titan and it falling to the ground. Warpfall cancels the delay, but you also don't get the protective dome. Warpfall is available at Titan-level 5.

Ion

Ion

Ion is a Titan that deals low damage, has medium health, and has medium mobility. This is a good Titan for beginners to start with thanks to its rounded stats. Ion is immediately available to all pilots.

Here is the weapons and gadget loadout:

  • Primary weapon: Ion uses a splitter rifle that shoots energy projectiles at a high rate of fire.
  • Offensive: The laser shot drains the enemy's energy.
  • Defensive: A vortex shield can be deployed to block and send projectiles back at the enemy.
  • Utility: The tripwire uses three small stands that will explode if an enemy trips them.
  • Laser core: This special weapon launches a wide laser beam that does significant damage to the enemy.

Ion loadout

There are also four Ion kits to unlock and use:

  • Entangled energy: Hitting the enemy with the splitter rifle and scoring critical hits will replenish your Titan's energy. Entangled energy is immediately available.
  • Zero-point tripwire: Using your tripwire won't deplete any of your energy. Unlocked at Titan-level 6 or can be purchased for 24 credits.
  • Vortex amplifier: When your shield reflects projectiles, their damage is increased by 20%. Unlocked at Titan-level 7 or can be purchased for 24 credits.
  • Grand cannon: Your laser core will last longer. Unlocked at Titan-level 8 or can be purchased for 24 credits.

Scorch

Scorch

Scorch is a Titan that does high damage, has high health, and has low mobility. Use this Titan to block off certain areas of the map with damaging thermite. Scorch is immediately available to all pilots.

Here is the weapons and gadget loadout:

  • Primary weapon: The T-203 thermite launcher is a single-shot weapon that launches a thermite grenade. It creates an area of splash damage when it hits something.
  • Offensive: A firewall is deployed in a straight line toward a target. Any enemies touching the firewall take damage.
  • Defensive: The thermal shield will melt any incoming projectiles and, if touching an enemy, will cause damage.
  • Utility: A canister can be launched and will begin emitting gas as soon as it lands. Hit it with some thermite to create a large, fiery area that will kill anything that touches it.
  • Flame core: Launch a wide thermite wave toward enemies.

Scorch loadout

There are also four Scorch kits to unlock and use:

  • Wildfire launcher: The amount of thermite emitted by your primary rifle is upped. Wildfire launcher is available immediately.
  • Tempered plating: Your Titan is covered in armor that prevents damage from your own thermite. Unlocked at Titan-level 6 or can be purchased with 24 credits.
  • Inferno shield: Your thermal shield lasts longer and will do more damage when hitting an enemy. Unlocked at Titan-level 7 or can be purchased for 24 credits.
  • Fuel for the Fire: Use this to make your firewall burn longer. Unlocked at Titan-level 8 or can be purchased for 24 credits.

Northstar

Northstar

Northstar is a Titan that deals high damage, has low health, and has medium mobility. Use Northstar on the edges of a map, picking off enemies from afar. It is immediately available to all pilots.

Here is the weapons and gadget loadout:

  • Primary weapon: The plasma railgun is best used at long-range. Charge it up and let loose a powerful shot.
  • Offensive: Launch a cluster of missiles at your enemy that explode multiple times for high damage.
  • Defensive: Put down a tether trap that locks Titans in place if they pass over it.
  • Utility: Use your engines to hover in place — use this to get a better view of your enemy.
  • Flight core: Take off, hover, and shoot missiles at any enemies within reach.

Northstar loadout

There are also four Northstar kits to unlock and use:

  • Piercing shot: Your plasma gun shoots projectiles that pierce through Titans, dealing damage to anyone in its path. Piercing shot is immediately available.
  • Enhanced payload: When your cluster missiles explode again after the first explosion, they do more damage to a larger radius. Unlocked at Titan-level 6 or can be purchased for 24 credits.
  • Twin traps: You can throw down two tether traps instead of just one. Unlocked at Titan-level 7 or can be purchased for 24 credits.
  • Viper thrusters: Your movement speed is increased when you have your flight core enabled. Unlocked at Titan-level 8 or can be purchased for 24 credits.

Ronin

Ronin

Ronin is a Titan that deals medium damage, has low health, and has high mobility. Use it to get around the map quickly, dealing melee damage to enemy Titans. Ronin is unlocked at pilot-level 7.

Here is the weapons and gadget loadout:

  • Primary weapon: Leadwall is a shotgun that shoots three projectiles in a horizontal line.
  • Offensive: Launch a wave of energy that slows down enemy Titans while also dealing damage.
  • Defensive: Use your sword to block incoming enemy projectiles.
  • Utility: Use phase shifters to quickly move in one direction.
  • Sword core: Your sword is electrified, dealing more damage and blocking more incoming projectiles.

Ronin loadout

There are also four Ronin kits to unlock and use:

  • Ricochet rounds: Your shotgun's rounds will bounce after hitting something, dealing damage to multiple targets in the area. Ricochet rounds are immediately available.
  • Thunderstorm: You can launch your arc wave twice. Unlocked at Titan-level 6 or can be purchased for 24 credits.
  • Temporal anomaly: Your phase dash has a shorter recharge time, meaning you can use it more often. Unlocked at Titan-level 7 or can be purchased for 24 credits.
  • Highlander: Any time you kill an enemy Titan, you'll get more time with your sword core. Unlocked at Titan-level 8 or can be purchased for 24 credits.

Tone

Tone

Tone is a Titan that deals medium damage, has medium health, and has medium mobility. This is a great Titan for teamwork thanks to tracking and sonar utilities that reveal enemies. Tone is unlocked at pilot-level 11.

Here is the weapons and gadget loadout:

  • Primary weapon: The 40mm tracker cannon fires explosive rounds that also provide tracking for the tracking rockets.
  • Offensive: Once you have a lock-on, fire your rockets for heavy explosive damage.
  • Defensive: Throw up a particle wall that you can shoot through but blocks enemy projectiles.
  • Utility: Launch a projectile that emits sonar to reveal enemies.
  • Salvo core: Shoot an enormous barrage of missiles that go wherever you aim.

Tone loadout

There are also four Tone kits to unlock and use:

  • Enhanced tracker rounds: Getting a critical hit with your 40mm rifle is the equivalent of two tracker marks on enemy Titans. Enhanced tracker rounds are available immediately.
  • Reinforced particle wall: Your particle wall will stay up longer and it can block more damage. Unlocked at Titan-level 6 or can be purchased for 24 credits.
  • Pulse-echo: Your sonar projectile will emit a second pulse, revealing again any enemies in the area. Unlocked at Titan-level 7 or can be purchased for 24 credits.
  • Rocket barrage: You will fire two extra tracking missiles. Unlocked at Titan-level 8 or can be purchased for 24 credits.

Legion

Legion

Legion is a Titan that deals high damage, has high health, and has low mobility. Thanks to close- and long-range weapon modes, use Legion up close or from afar. This Titan is unlocked at pilot-level 11.

  • Primary weapon: Legion's minigun, known as the predator cannon, shoots a large number of powerful rounds but has a long spin-up time.
  • Offensive: Launch a wide power shot that knocks back all enemies at close range, and damage any enemies that are far away but are still hit.
  • Defensive: Throw up a shield around the barrels of your minigun.
  • Utility: Choose between either close-range mode or long-range mode depending on your target.
  • Smart core: You will automatically target enemies while your minigun is up and spinning.

Legion loadout

There are also four Legion kits to unlock and use:

  • Enhanced ammo capacity: Your minigun holds more ammo. Enhanced ammo capacity is immediately available.
  • Sensor array: Your Smart core will stay on longer. Unlocked at Titan-level 6 or can be purchased for 24 credits.
  • Bulwark: Your shield can take twice as much damage before disappearing. Unlocked at Titan-level 7 or can be purchased for 24 credits.
  • Light-weight alloys: While your minigun is firing, you can move faster. Unlocked at Titan-level 8 or can be purchased for 24 credits.

The Titans

Let us know which Titan is your favorite to use in the comment section below!

How to set up multiple time zone clocks on Windows 10

$
0
0

Windows 10 lets you view up to three different time zone clocks — here's how to set up and keep track of even more.

Displaying multiple time zone clocks comes in handy when you're dealing with work, friends, or family across the world. Heck, it can even be useful in figuring out when a live event (like a Microsoft Build keynote) is when it's in a different time zone.

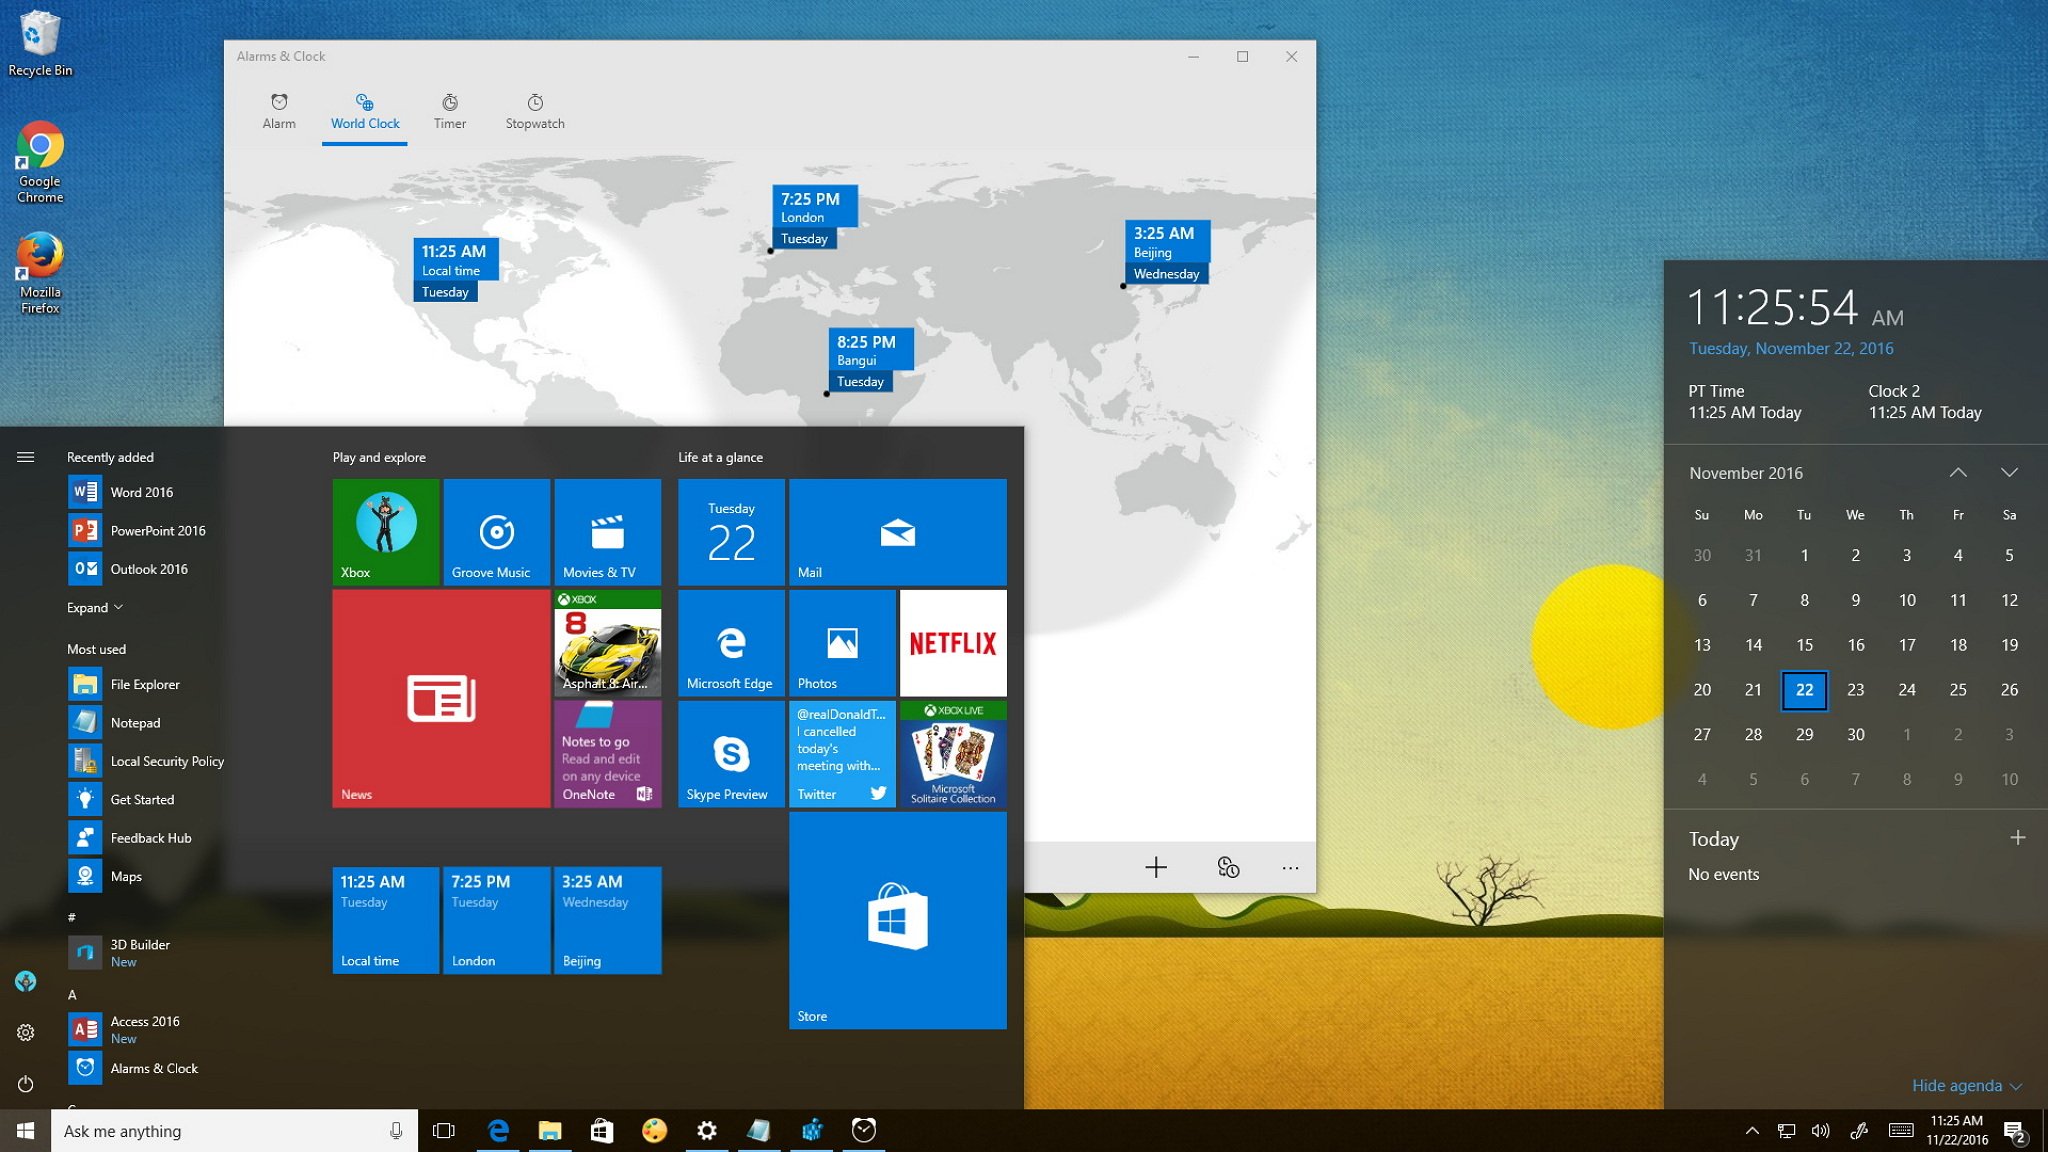
Windows 10 allows you to configure up to three different clocks: the primary clock set to your local time, plus two additional clocks with different time zones. You can view all three by clicking or hovering over the clock in the system tray.

In this Windows 10 guide, we'll show how to set up time zone clocks, and also how you can track even more time zones using the Alarms & Clock app.

How to add multiple time zone clocks to Windows 10

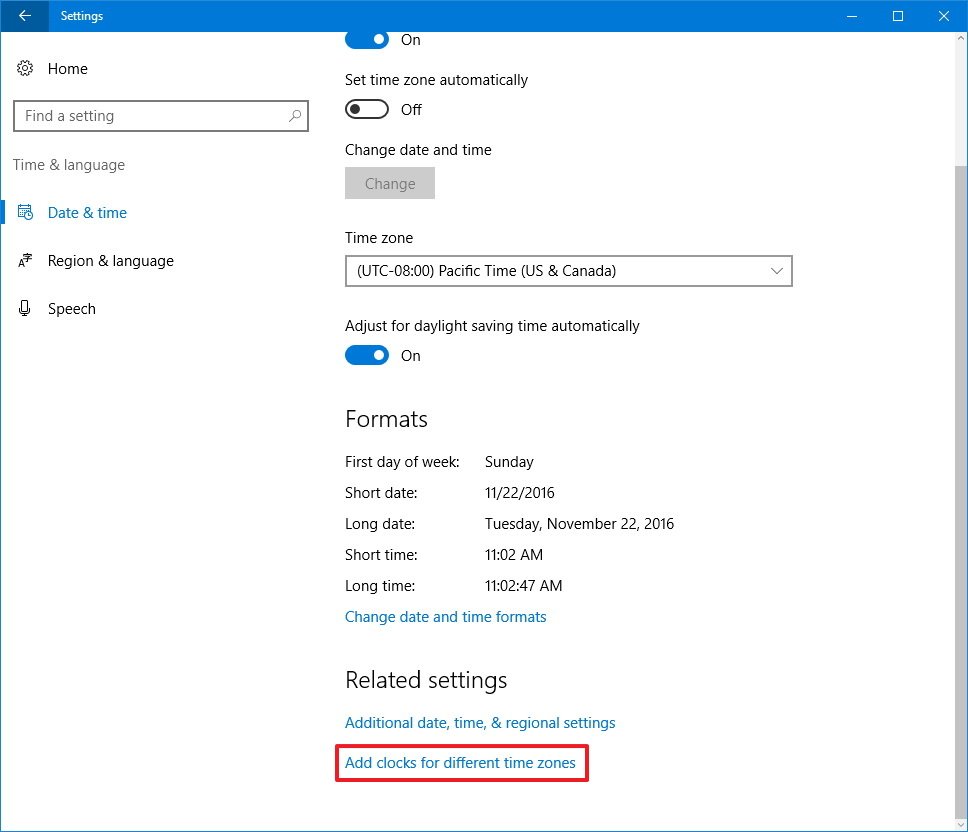
  1. Open Settings.
  2. Click on Time & language.
  3. Click the Add clocks for different time zones link.

  4. In Date & time, under the "Additional Clocks" tab, check Show this Clock to enable Clock 1.
  5. Select the time zone from the drop-down menu.
  6. Type a descriptive name for the clock.

  7. Repeat steps 4, 5, and 6 to enable Clock 2.
  8. Click Apply.
  9. Click OK to complete the task.

After completing the steps, you can hover over or click the clock in the system tray to view the additional clocks.

How to view even more time zone clocks on Windows 10

While Windows 10 offers a quick and straightforward way to view multiple time zones, you're still limited to only three clocks. If you want to keep track of even more time zones, you can easily do this by using the Alarms & Clock apps on Windows 10.

To keep track of more time zones, do the following:

  1. Open the Alarms & Clock app.
  2. Click on World Clock.
  3. On the bottom-right, click the "+" button.

  4. On the top-left, you'll see a search box, type the location you want to see its time, and click the result to added to the map to complete the task.

Perhaps the only caveat is that you need to open the app every time you want to see the clocks, but here is a quick tip to fix that: Right-click the time zone in the map, select Pin to Start, and voilà now you have multiple time zones at your fingertips.

How often do you check different time zone times? Tell us in the comments below.

More Windows 10 resources

For more help articles, coverage, and answers on Windows 10, you can visit the following resources:

Top 10 things you should know before playing Titanfall 2 multiplayer

$
0
0

Top 10 tips to know before playing Titanfall 2 multiplayer

What are some multiplayer tips for Titanfall 2?

Titanfall 2 takes your standard twitch shooter and adds enormous mechanized robots, known as Titans, piloted by you and other players. The thrilling campaign is a perfect place to learn the game's basics, but some of you might want to jump straight into multiplayer. Here are 10 things you should know to immediately succeed in Titanfall 2's multiplayer.

Master pilot movement

Wall running will get you around faster.

Playing as a pilot means you're relatively susceptible to damage, especially if there are already Titans roaming the map. One of the best things you can do to elongate your lifespan is master the wall-run and slide. A lot of Titanfall 2 is based on speed, and wall-running allows you to move way faster than usual. Likewise, sliding into cover or around corners makes you harder to hit while you can still aim and shoot with precision.

If you're using the Grapple tactical kit, make use of the grappling hook to chain together wall-runs. You'll get around faster, and you'll also be incredibly hard to hit by both enemy pilots and enemy Titans. It will also make for an impressive highlight reel.

Experiment with pilot kits and weapons

There are seven different tactical kits to choose from for your pilot:

  • Cloak: Limited invisibility.
  • Pulse blade: Toss a throwing knife that emits a sonar pulse.
  • Grapple: Latch onto surfaces and pull yourself through the air.
  • Stim: Run incredibly fast and heal quickly for a limited time.
  • A-wall: Toss down a small disc that puts up a shield. It blocks incoming shots and increases the damage of outgoing shots.
  • Phase shift: Teleport to a new location.
  • Holo pilot: A holographic copy of you will mimic your actions on the battlefield.

Each of these pilot kits can be used with any loadout, so experiment with each and see which weapon you prefer. Once you've figured out your preferred playstyle, consider spending some hard-earned credits on a high-level weapon.

Use your grappling hook to rodeo Titans

Heading for a Titan with the grappling hook.

If you find yourself using the Grapple pilot kit, don't forget to use the grappling hook on enemy Titans. Get in range, launch the hook, and you'll go flying through the air to land on its back. Try attaching the hook to the back of the Titan so that the pilot doesn't see you coming until it's too late.

While you're riding around on the Titan, also known as rodeo, you will pull out the battery, effectively lowering the Titan's energy. Watch out for countermeasures in the form of electrified smoke, and make sure you hightail it away once you've removed the battery, as the Titan will be looking for you.

If you land on a Titan who's had its battery removed already, toss an explosive into the port to deal significant damage.

Let your Titan roam

When you call down a Titan, it will wait for a few seconds for you to hop in and take control. If you don't embark, the Titan will eventually begin operating on its own.

You can hop in and out of the Titan as many times as you want as long as it's alive, and it will follow you around when you're not in it. Use this knowledge to your advantage while playing Amped Hardpoint, as your Titan normally won't fit into the area necessary for capture.

While your Titan isn't nearly as effective on its own, you can equip it with the assault chip Titan kit that increases its precision and enables all secondary and utility attacks.

Use batteries in your Titan

About to pull a battery from an enemy Titan.

When a battery is pulled from a Titan or picked up off the ground, it remains on the pilot until they die or it is placed into another Titan.

If you have a battery on your back, jumping into your own Titan will automatically add a secondary layer of energy. This goes an incredibly long way, as you're essentially getting two lives.

If you have a battery on you but don't have your own Titan in the vicinity, you can jump onto another friendly Titan — you will automatically insert the battery. Talk about teamwork!

Purchase a powerful boost

There are 12 boost options available to all pilots — they are unlocked as you level up, or are available for purchase with 125 credits.

These boosts can be used multiple times in a match, and can really change the tide of battle if used properly. Depending on your playstyle, you might want to purchase a powerful boost before you reach the level required to unlock it.

Boost menu

For example, if you love playing Last Titan Standing, investing in a battery backup will automatically double your Titan's energy at the start of every round. This boost is unlocked at pilot-level 28, which normally takes quite a while to reach.

Contribute to taking out enemy Titans

When it comes to removing enemy Titans from the battlefield, every little bit of damage counts. If you're in a Titan and see a friend engaged in combat, do your best to help them out. Two Titans will always beat one Titan.

You can still contribute even if you're just a pilot. The anti-Titan secondary weapons available actually do a significant amount of damage and are a great way to earn points toward your own Titanfall.

If you don't have an anti-Titan weapon in your loadout, don't forget about jumping onto an enemy Titan and removing its battery.

Use your Titan's melee attack

Your Titan has a powerful melee attack that is triggered using the R3 button. This is especially important when using the Ronin Titan, as it has a powerful sword attack.

Pilots can be hard to hit with your primary weapon — especially if they're wall-running and grappling — so hit them with a melee attack for a guaranteed one-hit kill.

When an enemy Titan has reached critical damage, you'll notice that their health bar becomes striped. Performing a melee attack at this point will result in a powerful finishing move you can watch from a third-person perspective. Careful! Some Titans have a self-destruct feature that, if triggered in time, will literally blow up in your face.

Drop your Titan strategically

Blocking off a chokepoint with a Titan.

Using the dome shield for your Titanfall kit protects your Titan for a few seconds, allowing you to get to it before it starts taking damage.

This dome shield will deal damage to any enemies inside of it, and will also reflect any projectiles. While it's tempting to drop your Titan in a safe area, dropping it onto an objective or a chokepoint can seriously hinder your enemy's ability to operate.

They won't be able to get close to the objective, nor will they be able to launch any projectiles past your Titan. Beware — when your Titan's dome shield falls, it will most likely be targeted immediately.

Use defensive kits for your Titan

Most veterans of the Titanfall series will agree that the Titans in Titanfall 2 are significantly squishier than those in the first game.

For this reason, it's a good idea to choose defensive kits to better protect your killing machine. The counter ready kit is available to all Titans and provides you with an extra electric smoke countermeasure.

Your Titan's specific kits will usually also have a kit that bolsters your defensive ability, like Scorch's thermal shield or Tone's Particle wall.

Your tips

Do you have any tips or tricks to pass on to newcomers to Titanfall 2? Drop them in the comments section below!

Don't have Titanfall 2 yet? It's never too late.

See at Microsoft Store

How to edit the Registry using Command Prompt on Windows 10

$
0
0

Did you know that you can use Command Prompt to edit the Registry? In this guide, we'll teach you to use the reg.exe tool to modify the Registry on Windows 10.

The Registry is a big part of Windows. It's the database that stores the most important settings that help the operating system and certain applications to work.

You typically use the "Registry Editor" to modify the database when you need to fix an issue, enable a secret feature, or improve a particular functionality. However, you probably may not know that Windows 10, similar to previous versions, includes reg.exe, which is a command-line tool that allows you also to edit the Registry using Command Prompt.

Reg.exe comes built into the operating system, and it includes the same functionalities found in the Registry Editor (GUI). You can even edit entries faster, as you don't have to manually browse the confusing tree database. And you get the flexibility of being able to implement tweaks in the Registry using scripts.

In this Windows 10 guide, we'll walk you through the steps to get started using Reg.exe to edit the Registry using Command Prompt.

How to edit the Registry using Command Prompt

Important: If you're planning to use these commands on your computer, make sure to understand that modifying the Registry is risky, and it can cause irreversible damage to your installation if you don't do it correctly. It's recommended to make a full backup of your computer before proceeding.

To run reg.exe, you first need to start Command Prompt as an administrator with the following steps:

  1. Open Start.
  2. Search for Command Prompt.
  3. Right-click the result and select Run as administrator.
  4. To run the tool, type the following command and press Enter:

    reg /?

This command will display all the operation types you can use, including:

  • REG Query
  • REG Add
  • REG Delete
  • REG Copy
  • REG Save
  • REG Load
  • REG Unload
  • REG Restore
  • REG Compare
  • REG Export
  • REG Import
  • REG Flags

Note: You can also use REG followed by the operation type and /? to get more help. For example, REG QUERY /? or REG ADD /?.

You'll also get the return codes: 0 meaning that the operation completed successfully, and 1 indicating that the operation failed. However, you won't get any return codes using the Compare switch.

While there a long list of possible command combinations, below we'll be listing the most useful commands to get started using reg.exe with Command Prompt.

How to add and delete registry entries

Syntax

  • Add: REG ADD KeyName [{/v ValueName | /ve}] [/t Type] [/f]
  • Delete: REG DELETE KeyName [{/v ValueName | /ve | /va}] [/f]

Command description

  • KeyName: Defines the path to the subkey or entry. Valid registry key shortcuts include HKLM, HKCU, HKCR, HKU, and HKCC. If you're trying to edit the registry on a remote computer, you can only use these shortcuts: HKLM and HKU.
  • /v ValueName: Specifies the name for the registry key to be added or deleted.
  • /ve: Defines if you're adding or deleting an entry that has a null value.
  • /t Type: Specifies the type of registry entries. Here's the list of valid types:

    • REG_SZ
    • REG_MULTI_SZ
    • REG_DWORD_BIG_ENDIAN
    • REG_DWORD
    • REG_BINARY
    • REG_DWORD_LITTLE_ENDIAN
    • REG_LINK
    • REG_FULL_RESOURCE_DESCRIPTOR
    • REG_EXPAND_SZ
  • /f: Adds or deletes registry content without prompting for confirmation.

REG ADD examples

To add a subkey named MySubkey under HKEY_LOCAL_MACHINE\Software, use the following example:

REG ADD HKLM\Software\MySubkey

To add a new DWORD (32-bit) value entry named AppInfo with the value of 1, use the following example:

REG ADD HKLM\Software\MySubkey /v AppInfo /t REG_DWORD /d 1

To add a new DWORD (32-bit) value entry named AppInfo with value of 1 on a remote computer, use the following example:

REG ADD \\ComputerName\HKLM\Software\MySubkey /v AppInfo /t REG_DWORD /d 1

To add a new Binary Value entry named Data with data of fe340ead, use the following example:

REG ADD HKLM\Software\MySubkey /v Data /t REG_BINARY /d fe340ead

REG DELETE examples

To delete the subkey named MySubkey, use the following example:

REG DELETE HKLM\Software\MySubkey /f

To delete the subkey named MySubkey on a remote computer, use the following example:

REG DELETE \\ComputerName\HKLM\Software\MySubkey /f

To delete the registry entry named AppInfo within the MySubkey subkey, use the following example:

REG DELETE HKLM\Software\MySubkey /v AppInfo /f

To delete only the registry entries that have no value inside the subkey named MySubkey, use the following example:

REG DELETE HKLM\Software\MySubkey /ve

To delete all the registry entries from the MySubkey subkey, use the following example:

REG DELETE HKLM\Software\MySubkey /va

How to export and import registry entries

Syntax

  • Export: REG EXPORT KeyName FileName [/y]
  • Import: REG IMPORT FileName

Command description

  • KeyName: Defines the path to the subkey or entry. Valid registry key shortcuts include HKLM, HKCU, HKCR, HKU, and HKCC.
  • FileName: Specifies the name and path of the .reg file to be exported or imported.
  • /y: Overwrites the registry content without prompting for confirmation.

REG EXPORT examples

To export all the content within the subkey MySubkey, use the following example:

REG EXPORT HKLM\Software\MySubkey C:\RegKeyBackup.reg

To export and overwrite any existing file, use the following example:

REG EXPORT HKLM\Software\MySubkey C:\RegKeyBackup.reg /y

REG IMPORT examples

To import all the content, including subkeys, entries, and values within the subkey named MySubkey, use the following example:

REG IMPORT C:\RegKeyBackup.reg

How to save and restore registry entries

Syntax

  • Save: REG SAVE KeyName FileName [/y]
  • Restore: REG RESTORE KeyName FileName

Command description

  • KeyName: Defines the path to the subkey or entry. Valid registry key shortcuts include HKLM, HKCU, HKCR, HKU, and HKCC. If you're trying to edit the registry on a remote computer, you can only use these shortcuts: HKLM and HKU.
  • FileName: Specifies the name and path of the .hiv file to be saved or restored.
  • /y: Overwrites the registry content without prompting for confirmation.

REG SAVE examples

To save a copy of subkeys, entries, and values within the subkey named MySubkey, use the following example:

REG SAVE HKLM\Software\MySubkey C:\RegKeyBackup.hiv

To save and overwrite any existing file, use the following example:

REG SAVE HKLM\Software\MySubkey C:\RegKeyBackup.hiv /y

REG RESTORE examples

To restore all the content, including subkeys, entries, and values within the subkey named MySubkey, use the following example:

REG RESTORE HKLM\Software\MySubkey C:\RegKeyBackup.hiv

Wrapping things up

While you can always use the Registry Editor, you'll find that it's sometimes easier and faster to use the reg.exe command-line tool. However, at the end of the day, you will still be editing the Registry, which is dangerous no matter which tool you use.

Also, make sure to double-check your commands before executing, as you can make mistakes. For example, REG ADD HKLM\Sofware\MySubkey is not the same as REG ADD HKLM\Software\MySubkey. A mistake like that might not do anything, or it could wreck your entire system. So be careful.

If you're wondering, yes, there is a big difference between Export and Save. The command EXPORT exports registry content into a text format that you can easily distribute as a .reg file to other computers.

On the other hand, SAVE saves the registry content into a hive file format (.hiv), which preserves ownership and other important information. You should only use this command if you're restoring entries to the same computer.

It's also important to note that while you can use many of these commands on a remote computer, IMPORT and EXPORT only work on a local computer (not over the network).

Although, we're focusing this guide for Windows 10, keep in mind that reg.exe has been part of the operating system for a long time, as such this should also work on Windows 8.1 and Windows 7.

Do you prefer using the Registry Editor or reg.exe to modify the Windows Registry? Tell us in the comments below.

More Windows 10 resources

For more help articles, coverage, and answers on Windows 10, you can visit the following resources:

You can learn about more at Microsoft TechNet

How to get started with Networks in Titanfall 2

$
0
0

Find an unmatched squad of pilots with Networks for Titanfall 2!

Alongside the recent release of Titanfall 2, a new layer of teamwork and player collaboration has been introduced in the form of Networks. While Networks don't necessarily introduce any hugely innovative ideas, their inclusion significantly adds to the game's multiplayer experience. But what exactly is a Network? Here's what you need to know!

What is a Network?

Debuting for the first time in Titanfall 2, Networks are a simple built-in grouping feature, designed to bring similar players together into a single location. Comparable to clans and guilds in other multiplayer titles, players from across the world can create and manage their own Networks. Built directly into the game's multiplayer menu, Networks are a fast and easy way to bring together players with similar interests and preferences.

Why should you join a Network?

If you're familiar with Looking for Group services, you'll already be accustomed to the basic idea behind Titanfall 2's Networks. Networks serve as a great place to meet like-minded gamers, with the ability to sort groups based criteria such as interests, regions and play styles.

Playing as a part of a Network is strongly encouraged in Titanfall 2, with rewards available for those who partake in group activities. Happy Hour is a key component of this, offering increased merit for those who play during a certain one-hour period every day. This, in turn, encourages players to play alongside their Network, netting them faster progression for that period of time.

How to join an existing Network

If you're just getting started with Titanfall 2, we recommend joining an existing Network before creating your own. This will help you meet similar players while new to the game, but instantly provide access to the benefits of being in a Network. Here's how to join an existing Network in Titanfall 2!

  1. Select Multiplayer from the Titanfall 2 main menu.
  2. Navigate to the Comms tab.
  3. Select Networks.
  4. Choose Browse from within the Networks page.
  5. From the browser, search for a Network of your choosing. For a more precise search, results can also be restricted to certain player preferences and Network criteria.
  6. After finding a Network, press A to join.

How to create a new Network

Starting up your own Network is also a great choice for those wanting to tweak a group to their own preferences. Creating a Network is also an easy way to build your own unique Titanfall 2 community, with similar interests and play styles to you! Here's how to get started with a new in-game Network!

  1. Select Multiplayer from the Titanfall 2 main menu.
  2. Navigate to the Comms tab.
  3. Select Networks.
  4. Scroll down to Admin sub-section.
  5. Select Create.
  6. Fill out the information relating to your Network and your preferred approach to gameplay. After filling in the required fields, you'll be ready to go!

Make sure to join us on Titanfall 2!

If you're looking to find an existing network, make sure to check out the official Titanfall 2 Network for Windows Central! To join our Network, search for Windows Central or use the WC clan tag!

How to dominate with Ion in Titanfall 2

$
0
0

How to dominate with Ion in Titanfall 2

What are some tips for playing as Ion?

Titanfall 2 puts you in the role of a pilot of an enormous mechanized killing machine known as a Titan. Ion, the first Titan on the list, is well-rounded and is a great starter for anyone still getting used to the game. When played correctly, it is a formidable opponent. Here's how to get the most out of Ion.

Ion's weapons and utilities

While you deal relatively low damage compared to Titans like Scorch and Legion, you do have a medium amount of health and mobility. To get the most out of Ion, you must play smart and choose a suitable set of weapons and utilities.

Ion menu

This loadout is fixed to Ion:

  • Primary weapon: Ion uses a splitter rifle that shoots energy projectiles at a high rate of fire.
  • Offensive: The laser shot emits an instant beam of energy that can kill pilots in one shot.
  • Defensive: A vortex shield is deployed that blocks and absorbs enemy projectiles. When you release the shield, the projectile are hurled back at the enemy.
  • Utility: The tripwire uses three small stands that will explode if an enemy trips them.
  • Laser core: This special weapon launches a wide laser beam that does significant damage to the enemy.

Ion also has five specific kits available to unlock that tweak the fixed loadout:

  • Entangled energy: Hitting the enemy with the splitter rifle and scoring critical hits will replenish your Titan's energy. Entangled energy is immediately available.
  • Zero-point tripwire: Using your tripwire won't deplete any of your energy. Unlocked at Titan-level 6 or can be purchased for 24 credits.
  • Vortex amplifier: When your shield reflects projectiles, their damage is increased by 35%. Unlocked at Titan-level 7 or can be purchased for 24 credits.
  • Grand cannon: Your laser core will last longer. Unlocked at Titan-level 8 or can be purchased for 24 credits.
  • Refraction lens: Your splitter rifle will now split into 5 beams.

Ion's energy bar

Energy bar is to the left of the crosshair

Unlike other Titans, Ion has a unique energy bar that is displayed diagonally to the left of your crosshair — it is orange and blue. Using the alt-fire on your splitter rifle, deploying your vortex shield, using laser shot, or dropping a tripwire all deplete the energy bar.

It's important to keep a close watch on the bar, as you don't want to get stuck in a situation where you have an enemy Titan cornered but have no energy to deal significant damage. Incorrect management of the energy bar will almost always lead to a fiery death.

How to use the splitter rifle and laser core

Your splitter rifle, as your primary weapon, will get the most use while using Ion. It has an automatic rate of fire that deals a steady stream of damage, and it also has an alternate fire-mode that splits your projectile horizontally. Firing a split shot drains a bit of your energy bar, so use it wisely. It is best used against a tight group of Titans or a squad of grunts.

Laser core

Ion's core is a massive laser that deals some pretty significant damage. The core is built quite quickly, so don't be worried about saving it for the opportune time. If you have an enemy lined up and the core is built, let it rip. Try to use it on an enemy who doesn't have anywhere to go, like within a tight chokepoint. Laser core does not use any of Ion's energy.

A good tactic when using the laser core is to engage it behind cover so that it begins to charge. During the charge time — just a couple seconds — you can still use your dash function to pop out right when the laser starts doing damage. You'll catch your opponent off guard and will deal more damage before they pop up a shield or dash behind cover.

How to be successful as Ion

Due to the energy pool that Ion uses, you must pay close attention to which utilities and weapons you use — there's no cycling through them like other Titans who have a cooldown for each.

As a general rule, you want to engage enemy Titans from a distance. Getting in too close will cause you to use too much of your energy either defending or attacking, and you'll end up dead. Focus on using cover and staying three steps ahead of your enemy.

Deployed tripwire

If you plan on using your tripwire, ensure you do so while allowing enough time to recharge before engaging any enemies — the tripwire takes a significant amount of energy to deploy. Set traps in close areas where your wires are less likely to be noticed, but ensure nothing sits between the posts, blocking the sightline.

Laser shot

When it comes to using the laser shot, there's one technique that seems to work the best. It is an instant hit, so there's no need to lead your target. For this reason, you can peek out of cover, launch a laser, and jump back behind cover before the enemy has time to react. This will frustrate your opponent and might even cause some confusion as to where the shot came from. Anything to knock your opponent off their gameplan is a bonus on the battlefield.

Vortex shield

Your defensive ability, the vortex shield, sucks in enemy projectiles (including Scorch's thermite grenades) and, when you release the shield, launches them back at the enemy. Having the shield up does deplete your energy, so use it sparingly. Running at the enemy with it deployed isn't a good idea, as you will have no energy left to deal any damage when you arrive. The vortex shield is best used when you can't get behind cover, or when a large projectile is inbound.

Your career with Ion

Is Ion your first choice when it comes to Titans? Do you play aggressively or defensively? Let us know in the comments section below.

Don't have Titanfall 2 yet? It's never too late!

See at Microsoft Store

How to check your computer's full specifications on Windows 10

$
0
0

When you need to know more details about your computer configuration, use this guide to get a complete overview of your system information on Windows 10.

Most of the time you can get by without know exactly what's inside your computer box. It just works. Until it doesn't… and then you need to know exactly what you've got. When you need to troubleshoot a problematic component, then you need to know what that component is.

On Windows 10 you can check your system information, including BIOS detail, computer model, processor, hard drive, graphics, operating system, and other specifications in a number of ways. Depending on the tool you use, the information available will be slightly different.

In this Windows 10 guide, we'll walk you through the steps to view the complete system information of your computer.

How to check system information using Settings app

If you're looking to get a basic overview of your system configuration, the Settings app can provide various pieces of information about your hardware and software.

To see basic system information using the Settings app, do the following:

  1. Open Settings.
  2. Click on System.
  3. Click on About.

In this settings page, you'll find the exact version of Windows 10 and build number, which increments every time Microsoft releases a cumulative update or feature update (e.g., Windows 10 Anniversary Update).

You can also see the system type, exact processor, and memory installed on your system.

Quick Tip: Similar information can be found on Control Panel > System.

How to check system information using System Information

System Information is not exactly a new tool on Windows 10, but it's still one of the best tools you can use to view the complete system specifications of your PC.

To open the System Information, do the following:

  1. Open the Start menu.
  2. Search for msinfo32 or System Information and press Enter.

Whatever hardware is on your computer, chances are that you'll be able to find it in System Information. As you open the tool, you'll see the System Summary, which includes information like system model, system type, processor, BIOS information and last firmware update date, and installed memory.

The graphics card information isn't available in the System Summary, but if it's something you want to find out, you can quickly view this information by expanding Components and selecting Display.

Alternatively, you can use the search box to find the information you need, but just remember to be specific, as this is not your typical search on Google or Bing.

How to generate a complete system information report

One interesting feature about System Information is the ability to create a report with your entire system specifications. This is particularly useful if you run into a hardware failure and the computer won't boot; if you've run a complete report and stored it up on OneDrive it'll still be accessible so you know what all is inside your computer, even if the computer itself can't tell you anymore.

To generate a report, do the following:

  1. Open System Information.
  2. Select the information you want to export. For example, if you select System Summary, you'll be exporting every piece of information. However, if you only want to export your computer's graphic card details, you can simply select Display.
  3. Click on File.
  4. Click on Export.
  5. Browse the location to save the file.

    Note: It would be probably a good idea to save this information on OneDrive or on an external drive in case your can't boot your computer and you need to get to this information.

  6. Enter a descriptive name and click Save to complete the task.

The report is a text file that you can open with any text viewer, even on your phone.

How to check system information using Command Prompt

You can also use systeminfo.exe, which is a command-line tool that allows you to get a great deal of information about your system. This tool will even tell you when the operating system was installed!

To see your system information using this utility, do the following:

  1. Open the Start menu and do a search for Command Prompt.
  2. Right-click the result and select Run as administrator.
  3. Type the following command and press Enter:

    systeminfo

Once you run the command, you'll get detailed configuration about the hardware and operating system, including Windows and update information, architecture, BIOS version, memory and network adapter details, and other pieces of information.

Quick Tip: For additional help using the utility, you can run the systeminfo /? command.

Which tool do you do prefer to learn more about your system specifications on Windows 10? Tell us in the comments below.

More Windows 10 resources

For more help articles, coverage, and answers on Windows 10, you can visit the following resources:


How to dominate with Scorch in Titanfall 2: loadouts, kit list, battle tips and more

$
0
0

How to dominate with Scorch in Titanfall 2

What are some tips for playing as Scorch?

Titanfall 2 gives you six Titans — enormous, mechanized killing machines — to choose from. Scorch, as the name implies, is all about fire, from the thermite-launching primary weapon to the Flame Core that sends a wave of fire across the battlefield. Here's how to do the most damage with Scorch.

Scorch's weapons and utilities

Scorch's loadout

Scorch is a Titan that deals a lot of damage, has high health, but is a slow, lumbering target on the battlefield. In order to play successfully as Scorch, you must first learn its fixed loadout:

  • Primary weapon: The T-203 thermite launcher is a single-shot weapon that launches a thermite grenade. It creates an area of splash damage when it hits something.
  • Offensive: A firewall is deployed in a straight line toward a target. Any enemies touching the firewall take damage.
  • Defensive: The thermal shield will melt any incoming projectiles and, if touching an enemy, will cause damage.
  • Utility: A canister can be launched and will begin emitting gas as soon as it lands. Hit it with some thermite to create a large, fiery area that will kill anything that touches it.
  • Flame Core: Launch a wide thermite wave toward enemies.

Scorch also has five kits available to unlock and use that will tweak the set loadout:

  • Wildfire launcher: The amount of thermite emitted by your primary rifle is upped. Wildfire launcher is available immediately.
  • Tempered plating: Your Titan is covered in armor that prevents damage from your own thermite. Unlocked at Titan-level 6 or can be purchased with 24 credits.
  • Inferno shield: Your thermal shield lasts longer and will do more damage when hitting an enemy. Unlocked at Titan-level 7 or can be purchased for 24 credits.
  • Fuel for the Fire: Use this to make your firewall burn longer. Unlocked at Titan-level 8 or can be purchased for 24 credits.
  • Scorched earth: Your flame core wave now leaves a wide swath of thermite in its wake.

How to use the thermite launcher and flame core

Scorch's primary weapon, the T-203 thermite launcher, is the weapon you'll use most. It launches a single grenade each time you pull the trigger and must be reloaded each time you fire. You want to pick your shots carefully, compensate for your target's speed, and also compensate for the drastic projectile-drop. There is a small area of splash damage when a thermite grenade goes off.

The first time you fire the T-203, you'll start your journey toward becoming a marksman. With enough practice, you'll be shooting pilots out of the sky when they eject from their doomed Titan.

Flame core

The Flame Core Scorch employs launches a wide wave of thermite toward the enemy. This wave kills pilots immediately and does significant damage to Titans. The Flame Core can be bolstered by enabling the scorched earth kit, which leaves thermite burning in the wave's wake.

To maximize your Flame Core's effectiveness, ensure you release it when you have multiple enemies in sight — if they're in a crowded space, even better. It will pass through all enemies until it reaches its maximum distance. As you become accustomed to the Flame Core, you'll know exactly where it ends and you'll be able to plan shots accordingly.

The Flame Core does take a significant amount of time to build, so use it wisely. Launching it at a single Titan, while sometimes necessary, generally isn't good practice.

How to be successful as Scorch

There's one thing that Scorch really excels at on the battlefield — area control. This big, slow machine lays down thermite like you wouldn't believe, and while it's down, no one can touch it without taking heavy damage.

Every attack Scorch has will inflict some sort of splash damage. Even the T-203 launcher, especially with the wildfire launcher kit enabled, will put down a small pool of thermite. When engaging the enemy, you usually want to be at a close or medium range. If you're too far away, your Firewall and Incendiary Trap will be useless.

Firewall

Firewall extends in a straight line ahead of you. Try using it in a crowded area, or use it to block an entrance. It's also super effective against Grunts and Spectres, as they're usually grouped together. Firewall, like all thermite, can be used to ignite the incendiary trap.

Thermal shield

Your Thermal Shield is a dual-purpose item. When deployed, it melts any incoming projectiles, rendering them harmless. If you're close enough to an enemy to touch the shield to them, it also does quite a bit of damage. You can pretty much deplete a Ronin or Northstar's health completely with one deployment of the shield.

Incendiary trap

The Incendiary Trap is where things get really good. Launch up to two canisters — the cooldown kicks in after launching the second one — that start spraying flammable gas as soon as they land. When you hit them with thermite from any source, they'll immediately create an enormous pool of fire. Launching a couple of these into an intersection and igniting them will almost always throw off the enemy team's strategy. Likewise, if you see a group of enemy Titans backed into a corner, throw down your gas and ignite it — watch as they melt.

Avoiding self-damage

Scorch's weapons lend themselves to close-range fighting, and one of the biggest threats to you is inflicting self-damage by thermite. That's right — thermite doesn't care about friendly fire.

If you throw down a Firewall and proceed to take a step forward, you're going to start taking serious damage. Likewise, if you launch your Incendiary Traps and get stuck in the mix, you'll take the same damage as your enemies.

It's important always to keep a safe passage open. Yes, you'll be fighting face-to-face, but never let yourself get backed into a corner. Scorch doesn't have a dash function without the turbo engine kit, so there's no quick exit.

One of the best ways to negate self-inflicted damage — other than playing smart — is to use the tempered plating kit. It will significantly reduce the damage you take from your own thermite.

Your career with Scorch

Does Scorch appeal to you? Have you already started a career with this Titan? Let us know in the comments section below!

Don't have Titanfall 2 yet? It's never too late!

See at Microsoft Store

How to get every achievement in Skyrim Special Edition on Xbox One

$
0
0

Skyrim is the fifth installment of the high fantasy series, Elder Scrolls by Bethesda. It has a grand total of 1550 for your gamerscore and a hefty 75 achievements, spanning the main game and three DLCs. Are you getting Dovah-keen to unlock them all?

Quests with rare achievements will be denoted with a double asterisk (like so: Dragonslayer - 50G**). Happy hunting!

See on the Xbox Store

Main Quests

Complete these Main Quests to be awarded an achievement at the end of each one.

  • Unbound - 10G: Complete "Unbound".
  • Bleak Falls Barrow - 10G: Complete "Bleak Falls Barrow".
  • The Way of the Voice - 20G: Complete "The Way of the Voice".
  • Diplomatic Immunity - 20G: Complete "Diplomatic Immunity".
  • Alduin's Wall - 20G: Complete "Alduin's Wall".
  • Elder Knowledge - 20G: Complete "Elder Knowledge".
  • The Fallen - 20G**: Complete "The Fallen".
  • Dragonslayer - 50G**: Complete "Dragonslayer".

Companions Quest Achievements

The Companions can be found in Jorrvaskr, which is in the upper part of Whiterun.

Take Up Arms - 10G: Join the Companions.

Go downstairs in Jorrvaskr, and talk to Kodlak who will initiate your training.

Blood Oath - 10G: Become a member of The Circle.

Complete the quests Hired Muscle and The Silver Hand, and talk to Skjor outside Jorrvaskr in the evening.

Glory of the Dead - 30G**: Complete "Glory of the Dead".

Complete the remaining Companions quests.

  • Retrieval
  • Stealing Plans
  • Blood's Honor
  • Purity of Revenge
  • Glory of the Dead

The College of Winterhold Achievements

The College of Winterhold is found in the far north of Skyrim, in the snowiest areas of the coast.

Gatekeeper - 10G: Join the College of Winterhold.

Join the College of Winterhold. Approach the bridge to cross from the mainland to the island that the college is situated on. You'll be met by Faralda, who tests your magickal competence. Speak with Tolfdir once granted admission, and complete the quest "The First Lessons".

Revealing the Unseen - 10G**: Complete "Revealing the Unseen".

Complete the following quests to unlock this achievement:

  • Under Sarthaal.
  • Hitting the Books.
  • Good Intentions.
  • Revealing the Unseen.

The Eye of Magnus - 30G**: Complete "The Eye of Magnus".

Complete the following quests to unlock this achievement:

  • Containment.
  • The Staff of Magnus.
  • The Eye of Magnus.

Thieves Guild Achievements

The Thieves Guild is in the South East of Skyrim beneath the streets of Riften. You can approach them from the Ratways, backtracking on yourself to open the path so you can come and go freely, or once you're an established member, you can access the Guild from the cemetery next to the Temple of Mara. The Mausoleum has a button within the sigil on the stone coffin which you can press for it to slide back and reveal a secret entrance.

Taking Care of Business - 10G: Join the Thieves Guild.

Entering Riften marketplace during daylight hours will have you accosted by Brynjolf, a scout for the Thieves Guild. He'll make a comment on the contents of your purse, and asks whether you'd like to make some extra coin. If you agree to listen to him, he wants you to steal a ring from one of the market stalls, and place it in one of the onlooker's pockets. Whether you pass or fail, Brynjolf will offer you an invitation to join him at the Raggen Flagon in the Ratway's beneath the city. The Ratways are where the city's thugs and destitute hang out, so there is the risk of harm if you're low level or unprepared. Find the Ragged Flagon, enter it and speak to Brynjolf to finish this quest and get the achievement.

Darkness Returns - 10G**: Complete "Darkness Returns".

Complete the following quests to unlock this achievement:

  • Loud and Clear
  • Dampened Spirits
  • Speaking with Silence
  • Hard Answers
  • Darkness Returns

One with the Shadows - 30G**: Return the Thieves Guild to its former glory.

This is a fairly complex but very rewarding achievement. With Mercer Frey gone and no longer paupering the Guild, you can get on and do some real criminal damage.

After you have completed Darkness Returns, you'll need to complete 40 jobs for Vex and Delvin - five jobs for both parties in each of the four main Holds.

The jobs you can undertake are:

  • Vex - Shill: plant an item on someone or in their home
  • Vex - Sweep: steal specified items from someone's home
  • Vex - Burglary: steal a certain item from someone's home
  • Vex - Heist: steal from a shop
  • Delvin - Bedlam: steal items totaling 500 gold in a specified Hold
  • Delvin - Numbers: forge the numbers of the business ledger of a shop
  • Delvin - Fishing: pickpocket a specified item from someone

After you have completed five jobs in one hold, you are given a Radiant Quest. The Radiant quests are more difficult than regular quests and require you have higher skills as they progress to ensure successful completion; they are :

  • Imitation Amnesty: Whiterun.
  • Silver Lining: Markarth.
  • Sumerset Shadows: Windhelm.
  • The Dainty Sload: Solitude.

After each of these Radiant Quests are complete, a new stall will open in the Ragged Flagon. Since the jobs given are random, it may take a while to fulfill the criteria of hitting each of the 5 holds.

Dark Brotherhood

The Dark Brotherhood are a band of assassins who 'ethically kill' those who 'deserve to be killed'.

With Friends Like These... - 10G: Join the Dark Brotherhood.

Aventus Aretino is in his home in Windhelm summoning the Dark Brotherhood. The neighbors are standing outside discussing his actions, and you may hear a rumor as you're passing through other cities. Lockpick his door and talk to him. Complete the task he sets you, take your reward and you'll be met with a courier who hands you a suspicious message. Find somewhere to sleep, even if it's just for an hour. On waking, you'll find yourself somewhere that isn't the place you went to sleep in, and you're confronted by a figure who informs you that you have stolen a contract from the Dark Brotherhood and you now owe a life in return. Make your choice, and you're welcomed into the fold.

Bound Until Death - 10G**: Complete "Bound Until Death".

Complete the following quests to unlock this achievement:

  • Contract - Kill Narfi.
  • Contract - Kill Beitild.
  • Contract - Kill Ennodius Pappius.
  • Mourning Never Comes.
  • Whispers in the Dark.
  • Contract - Kill Lurbuk.
  • Contract - Kill Hern.
  • The Silence has been Broken.
  • Bound Until Death.

Hail Sithis! - 30G**: Complete "Hail Sithis!"

Complete the following quests to unlock this achievement:

  • Breaching Security.
  • The Cure for Madness.
  • Recipe for Disaster.
  • To Kill an Empire.
  • Death Incarnate.
  • Hail Sithis.

Civil War

These quests take place across the cities of Skyrim. Depending on which side you take depends on which Holds and cities you attack. Stormcloaks or Imperials?

Taking Sides - 10G: Join the Stormcloaks or the Imperial Army.

If you wish to join the Stormcloaks, go to Windhelm and speak to Ulfric Stormcloak and Galmar Stone-Fist within the Palace of the Kings. If you want to join the Imperials, head to Solitude and speak to Legate Rikke. Both will give you a quest, and upon completion and your return, you'll be rewarded with this achievement.

War Hero - 10G**: Capture Fort Sungard or Fort Greenwall.

Depending on which side you chose, the quests you'll need to complete in order to get this achievement are as follows:

Capture Fort Sungard (Stormcloaks)

  • The Jagged Crown
  • Message to Whiterun
  • Battle for Whiterun
  • Reunification of Skyrim
  • Compelling Tribute
  • Battle for Fort Sungard

Capture Fort Greenwall (Imperial)

  • The Jagged Crown
  • Message to Whiterun
  • Battle for Whiterun
  • Reunification of Skyrim
  • Compelling Tribute
  • The Battle for Fort Greenwall

Hero of Skyrim - 30G**: Capture Solitude or Windhelm.

Depending on which side you chose, the quests you'll need to complete in order to get this achievement are as follows:

Battle for Solitude (Stormcloaks)

  • A False Front
  • The Battle for Fort Snowhawk
  • The Battle for Fort Dunstad
  • The Battle for Fort Greenwall
  • The Battle for Fort Kastav
  • The Battle for Fort Hraggstad
  • The Battle for Solitude

Battle for Windhelm (Imperials)

  • A False Front
  • The Battle for Fort Dunstad
  • The Battle for Fort Sungard
  • The Battle for Fort Kastav
  • The Battle for Fort Snowhawk
  • The Battle for Fort Neugrad
  • The Battle for Fort Amol
  • The Battle for Windhelm

DLC: Hearthfire

Proud Parent - 10G: Adopt a child.

You can adopt a child from the Riften orphanage, or adopt one of the children wandering around the streets parentless. In order to adopt a child, you must have a house of your own that has a bedroom for the child.

Land Owner - 10G: Buy a plot of land.

To buy a plot of land, you must be on good terms with the Jarl of the hold. You can get on their good side by doing small quests for the community, or ask their Steward if they have any work.

Land Baron - 10G**: Buy three plots of land.

In order to have plots in all three areas, you must be in good standing in Markarth, Falkreath, and Morthal.

Architect - 10G**: Build three wings on a house.

You can do this on the plots of land that you buy by going to the desk at the plot and using the plans.

Master Architect - 10G**: Build three houses.

Buy the plot of land from each of the Jarls of Markarth, Falkreath, and Morthal.

DLC: Dragonborn

Outlander - 20G: Arrive on Solstheim.

You can get to Solstheim from the docks in Solitude.

Dragon Aspect - 20G: - Learn all 3 words of Dragon Aspect.

The word walls for this shout are all located within locations on Solstheim, and you'll be able to collect them all in one go as part of the Dragonborn questline.

Hidden Knowledge - 40G: - Learn the secrets of 5 Black Books.

Stahlrim Crafter - 20G**: Craft an item out of Stahlrim.

This is a rare mineral, and in order to craft it, you need to speak to Glover Mallory at Raven Rock.

Dragon Rider - 20G**: Tame and ride 5 dragons.

Use the Shout Bend Will to bring Dragons to land and mount them.

Raven Rock Owner - 20G**: Own a house in Raven Rock.

The house is free as a reward for completing quests, the first of which is given to you by Captain Veleth of the Raven Rock guards.

Solstheim Explorer - 20G**: Discover 30 locations on the island of Solstheim.

The Temple of Miraak - 20G: Complete "The Temple of Miraak".

The Path of Knowledge - 20G**: Complete "The Path of Knowledge".

At the Summit of Apocrypha - 40G**: Complete "At the Summit of Apocrypha".

DLC: Dawnguard

Awakening - 20G: Complete "Awakening".

After joining the Dawnguard, Isran sends you on your first quest which is to locate a rumored source of power. Entering the cave will be dangerous as it's full of vampires, so if you don't wish to succumb to Vampirism Sanguinis, be sure to carry some Cure Disease potions with you (if you catch Vampirism while questing and don't have any potions, you can worship at any shrine or altar to rid yourself of the disease and others). You'll reach a significantly large chamber, with a circular dias in the middle with small podiums. Move each one into position until they light up. When all are lit, a stone sarcophagus comes from the ground, holding an ancient secret.

Beyond Death - 20G**: Complete "Beyond Death".

This quest follows on from "Chasing Echoes". Obtain some Purified Void Salts and Ground Bone Meal and use them to enter the Soul Cairn. Obtain the Shout to call Durnheviir from the Soul Cairn into your world before leaving. This is one part towards getting the Soul Tear Achievement.

Kindred Judgment - 40G**: Complete "Kindred Judgment".

The last quest in the Dawnguard DLC; obtain Auriel's Bow and face off against Vampire Lord Harkon.

A New You - 20G**: Change your face.

Visit the Face Changer in The Ragged Flagon in Riften and change your appearance. She is sitting on the wooden circular platform on the water's edge.

Legend - 40G**: Defeat a Legendary Dragon.

If you're around Level 70, you're more likely to come across a Legendary dragon.

Vampire Mastered - 20G**: Aquire 11 Vampire perks.

As you progress in your developing Vampirism, you can upgrade your vampiric skills to enhance your abilities.

Werewolf Mastered - 20G**: Aquire 11 Werewolf perks.

As you progress as a Werewolf, you can upgrade your werewolf skills to enhance your abilities.

Auriel's Bow - 20G**: Use the special power of Auriel's Bow.

Shoot a Sunhallowed Arrow into the sun. See what happens.

Soul Tear - 20G**: Learn all three words of Soul Tear.

Summon Durnheviir to Skyrim from the Soul Cairn, each time he will teach you a new word of the Shout. Call upon him three times and unlock the achievement.

Lost to the Ages - 30G**: Complete "Lost to the Ages".

This is a large quest which will take some time and patience to complete. You can start the quest one of two ways, by picking up the book The Aetherium Wars, or by running into a ghost called Katria. It is a good idea to make sure you have a lot of spare lockpicks (unless you have the Key of Nocturnal) and a crossbow for the entire quest.

The book can be found here:

  • Fort Dawnguard
  • Ruunvald Temple
  • Bard's College
  • Hall of the Vigilant
  • Castle Volikhar Undercroft.

Miscellaneous Achievements

Sideways - 20G: Complete 10 Side Quests.

These are quests that are not considered to be part of any Main or Faction Questline. Quests like obtaining the Daedric artefacts will fulfill this requirement.

Hero of the People - 30G: Complete 50 Misc objectives.

These can be things like collecting someone's abandoned gear from a cave, or clearing out an area of bandits. You can find your Miscellaneous objectives in your quest tracker.

Hard Worker - 10G**: Chop wood, mine ore and cook food.

  • Chopping blocks are found in most towns and rural areas of Skyrim. To chop wood, you must have an axe in your inventory.
  • Ore can be mined in many areas, but you should have a pickax to do so. The easiest way to fulfill this requirement is to buy a plot of land from the Jarl in Falkreath, as there is an iron ore mining spot on your land!
  • Cooking food is simple - if you have your own home, you can approach the cooking pot on the fire or use a communal pot in a tavern. The simplest meals to cook would be cabbage, salt pile and red apple - all of which are easily found.

Blessed - 10G: Visit a Standing Stone.

See the following achievement for more in depth on locations of the Standing Stones.

Standing Stones - 30G:** Visit 13 Standing Stones.

The Standing Stones locations and their uses are:

  • The Thief Stone: Learn Stealth skills 20% faster. West of Riverwood.
  • The Mage Stone: Learn Magick skills 20% faster. West of Riverwood.
  • The Warrior Stone: Learn Combat skills 20% faster. West of Riverwood.
  • The Ritual Stone: Reanimate a corpse to fight for you once a day. If you head east from Whiterun toward Valtheim Towers, you'll find it along the path over the river.
  • The Atronach Stone: Have a larger magicka pool, and absorb spell damage, but your magicka takes longer to restore. Near Eldergleam Sanctuary, in the South Eastern marshy area.
  • The Shadow Stone: Become invisible for an extended period of time once a day. This stone is located South of Riften.
  • The Steed Stone: Increased carry weight, and armor doesn't slow your movement speed. Northwest of Solitude, on top of the highest mountain.
  • The Lady Stone: Regenerate health and stamina faster. This stone is in the lake west of Riverwood.
  • The Apprentice Stone: Recover magicka faster, but take more magicka damage. Found within the marshes south of Solitude.
  • The Tower Stone: Automatically opens any lock up to Expert level. Found in the mountains between Winterhold and Dawnstar.
  • The Lover Stone: All skills improve faster. East of Markarth, on the way to Solitude.
  • The Lord Stone: More resistance to physical and magicka damage. On a mountain peak southwest of Dawnstar.
  • The Serpent Stone: Use a paralysing poison once a day. In the sea of floating icebergs north of Windhelm.

Married - 10G** - Get married.

In order to get married, you'll need to head to Riften to the Temple of Mara and speak to Maramal. Ask him about getting married, and he will offer to sell you an Amulet of Mara. Wearing one of these while talking to certain people will open up a dialogue that asks if they're interested in getting married.

Master Criminal - 20G** - Get a bounty of 1000 gold in all nine holds.

Going on a mad killing spree in each of the main cities ought to do the trick.

Delver - 40G** - Clear 50 dungeons.

Dungeons and caves are found everywhere on your travels. Duck into any that you find on your wanderings, because they all count.

Daedric Influence - 10G - Acquire a Daedric artifact.

See the next achievement for more information.

Oblivion Walker - 30G** - Collect 15 Daedric artifacts.

The various daedric artifacts and their respective quests are:

  • The Mace of Molag Bal - Markarth: "The House of Horrors".
  • Dawnbreaker - Dawnstar: "The Break of Dawn".
  • Spellbreaker - The Shrine to Peyrite: "The Only Cure".
  • Sanguine's Rose - Vilemyr Inn, Ivarstead: "Night to Remember".
  • Azura's Star - Azura's Shrine, south of Winterhold: "The Black Star".
  • Wabbajack - Solitude: "The Mind of Madness".
  • Mehrune's Razor - Dawnstar: "Pieces of the Past".
  • The Ring of Hircine - Falkreath: "Ill Met by Moonlight".
  • Masque of Clavicus Vile - Falkreath: "A Daedra's Best Friend".
  • Ohgma Infinium - North of Winterhold: "Discerning the Transmundane".
  • Volendrung - Largashbur: "The Cursed Tribe".

Skill Master - 40G - Get a skill to level 100.

You increase a skill when you legitimately use it. For example, if you wanted to increase your Destruction magic skill, you would need to cast destruction magic against an enemy (and hit them) for it to count as the skill having been used.

Reader - 20G** - Read 50 skill books.

Dragon Soul - 10G - Absorb a dragon soul.

Your character will automatically do this after defeating a dragon.

Dragon Hunter - 20G** - Absorb 20 dragon souls.

Words of Power - 10G - Learn all three words of a Shout.

The easiest way to do this is to go through the main questline and learn the Shouts from the Greybeards.

Thu'um Master - 40G** - Learn 20 Shouts.

You will learn new Shouts from Word Walls that you find within ancient ruins.

Apprentice - 5G - Reach level 5.

Leveling up isn't done via collecting XP, you level up by using your skills. As a skill increases it also pushes your character level progress bar up. The best way to level quickly is to utilize many skills, and use them often.

Adept - 10G - Reach level 10.

Expert - 25G - Reach level 25.

Master - 50G** - Reach level 50.

Artificer - 10G - Make a smithed item, an enchanted item and a potion.

  • Make a potion: The simplest potion to make would be a restore potion which uses wheat, blue mountain flowers and butterfly wings. If you need help with learning how to make potions, head to any apothecary where they can point you in the right direction.
  • A smithed item: stopping by and seeing Alvor at Riverwood will give you a free smithing lesson, which will go towards this achievement. You'll also get to keep (and sell) any items you make in this training.
  • Enchant an item: If you find an enchanted item, you can learn the enchantment by disenchanting it. You can then apply the enchantment to something else, as long as you have high enough level soul gems to make it worth it. Farengar in Whiterun's Dragonsreach should be able to help you if you need more information on enchanting.

Citizen - 10G - Buy a house.

The easiest way to get a house early on is to continue through the Main questline, until you are rewarded for your deeds in the city of Whiterun with the permission to buy a house.

Wanted - 10G** - Escape from jail.

Get caught for something petty in Solitude or Whiterun (they're the easiest to escape from) and allow yourself to be taken to jail. The only thing you'll have with you is a single lockpick, and there will be a grate on the floor with a Novice lock. If you successfully pick it, you'll drop into the crawl space below. Sneak the entire time so you don't get caught by guards back on your way out. Once you're back outside, the achievement will unlock. Now there's the little matter of getting your things back.

Thief - 30G** - Pick 50 locks and 50 pockets.

This might seem like a tall order, but if you take the time to unlock all of the chests you find, and practise your pickpocketing on sleeping guests somewhere like Haelga's Bunkhouse in Riften, and you'll unlock this in no time.

Snake Tongue - 10G - Successfully bride, persuade and intimidate.

These go off of your speech skill. You can wear certain amulets or jewelry to boost this skill to make these attempts easier. Bartering goods of high value will increase your speech skill faster.

Golden Touch - 30G** - Have 100,000 gold.

If you select the Imperial race when you create your character at the beginning, your racial perk will be to find more gold in containers. Reach level 60 in lockpicking and you can get the perk Golden Touch which enables you to find even more gold.

Explorer - 40G** - Discover 100 locations.

It sounds like too many to every get around to, but if you manage your time between exploring and quests, you should obtain this achievement within 20 hours of game play.

Conclusion

There you have it! These are all pretty easy achievements to get, if you're willing to spend the time on getting the ones that are worth more. Which ones are you aiming for right now? Let us know in the comments!

See on the Xbox Store

How to enable 'Remaining Battery Time' for the HP Spectre x360 13 (Late-2016)

$
0
0

A few days ago, we published my in-depth review of the new HP Spectre x360 with the new redesign and Intel Kaby Lake CPU. One of my nitpicks was that the OS does not reveal the estimated remaining battery time in the taskbar.

As it turns out, you can now easily enable that feature through the system BIOS setting. Here is how it is done.

Latest firmware

Before we begin, it is imperative that you are on the latest firmware/BIOS from HP.

The Spectre x360 ships with BIOS version F04, but there have been a few updates since through the HP Support Assistant app. As such, you'll need at least BIOS version F10a or F11 to turn on remaining battery time as the option was not part of the earlier firmware.

HP Support Assistant with new driver and BIOS updates

To check for updates simply open HP Support Assistant (the question mark icon in the task bar) and have it check for updates. If your Spectre x360 is new, there are likely other drivers updates that will be downloaded as well.

Turn on remaining battery time

Enabling remaining battery time is very easy and will take less than a minute. Here is what to do.

  1. Restart the PC
  2. Rapidly hit the ESC key before the HP logo appears
  3. From the menu choose F10 BIOS Setup
  4. Use the right arrow key to tab over to System Configuration
  5. Choose Battery Remaining Time and hit Enter
  6. Select Enabled
  7. Hit F10 to save and exit BIOS

The Spectre x360 will then boot as normal. This time once Windows 10 boots up the remaining battery time will be available from the battery taskbar.

Note, however, that it will take some time for the estimate to calibrate and that it varies heavily depending on the immediate task. So, if you're playing a game, or the PC is coming out of an OS reboot the estimate will be quite short versus letting the computer idle at 1%.

Success! We now have a battery estimate on the Spectre x360 13

There are some other options there too including default System Power Scheme e.g. Performance (default) versus Balanced. If battery life is more important to you enabling Balanced may get you some extra longevity.

Read my review of the HP Spectre x360

That's it! Now you'll have a rough estimate of your remaining battery life. If such battery micro-managing bothers you, you can always disable the feature and go back to the default percentage value.

Thanks to Marshall B. in comments for the tip!

How to fix screen flickering problem on Windows 10

$
0
0

Is your PC display always flickering? It could be an issue with an incompatible app or device driver -- Here's what you can do to fix it.

Generally speaking, the majority of users won't experience significant difficulties installing or upgrading to Windows 10. However, building an operating system that runs across thousands of hardware configurations is a complex task, as such it's expected that some PCs may run into issues.

One common problem that many users typically come across on Windows 10 is flashing or flickering on the screen, which is likely to be caused by incompatible applications or display drivers.

In this Windows 10 guide, we'll walk you through the steps to troubleshoot and fix the flickering problem you may be experiencing on your computer.

How to troubleshoot screen flickering

The first thing you need to do is to figure out what's actually causing the screen to flicker.

You can quickly find this out by opening the Task Manager by right-clicking the Taskbar and selecting Task Manager, or you can use the Ctrl + Shift + Esc keyboard shortcut.

The next step is to pay attention to the screen and see if the Task Manager flickers.

If everything on the screen flickers, but Task Manager doesn't, then you're dealing with an incompatible application. In the case that Task Manager flickers along with everything else on the screen, then the problem is most likely to be the graphics drivers.

Once you've figured out what is generally causing the issue you went through the troubleshooting steps, you can follow the steps below to tackle the problem.

How to uninstall incompatible applications

While there is a large number of applications that could cause issues, usually you can narrow it down to your third-party antivirus and applications designed for previous versions of Windows.

If you have installed Norton Antivirus, iCloud, and IDT Audio, these are applications known in the past to cause problems.

To uninstall incompatible applications, do the following:

  1. Open Settings.
  2. Click on System.
  3. Click on Apps & features.
  4. Select the app causing the problem and click Uninstall.
  5. Click Uninstall again to confirm.

If you're uninstalling an app from the Store, there are not further actions to take. However, if you're uninstalling a traditional desktop application, you'll have to go through the uninstall process.

Alternatively, you can use Control Panel to uninstall a problematic desktop application.

  1. Open Control Panel.
  2. Click on Uninstall a program.
  3. Select the application you want to remove.
  4. Click Uninstall and go through the uninstall process.

Once you uninstall the applications that may be causing the problem, reboot your computer, and see if that fixes the problem.

If you have successfully addressed the issue, but you need the application, make sure to check the software company's support website for more information, an updated version, or alternative options that will work on Windows 10.

How to update graphic drivers

If the Task Manager was flickering along with everything else on the screen, then chances are that the problem is with the video driver.

In this case, it's recommended to remove your current video driver while your computer is in safe mode and then reinstall the latest driver update.

To start your computer in safe mode, do the following:

  1. Open Settings.
  2. Click on Update & security.
  3. Click on Recovery.
  4. Under Advanced startup, select Restart now.

  5. Click on Troubleshoot.
  6. Click on Advanced options.
  7. Click on Startup Settings.

  8. Click on Restart.
  9. After your computer reboots, select the option 4 to start in Safe mode. Alternatively, you can choose option 5 to start on Safe Mode with Networking.

To uninstall your video card driver, do the following:

  1. Use the Windows key + X keyboard shortcut to open the Power User menu and select Device Manager.
  2. Click to expand Device adapters.
  3. Right-click the adapter and select Uninstall.

  4. Select the Delete the driver software for this device check box.
  5. Click OK to confirm.

  6. Restart your computer.

To reinstall the video drivers, do the following:

  1. Open Settings.
  2. Click on Update & security.
  3. Click on Windows Update.
  4. Click the Check for updates button to download and install the latest video driver.

Windows Update always delivers the most compatible device drivers, but it doesn't mean that they're the most recent version available. Alternatively, instead of using Windows Update, you can download and install the required driver manually from your graphics card manufacturer's website — of course, you'll need to know which graphics card is installed in your computer, which you can find by looking up your system information.

Here's a list of the most popular support sites to download the latest video drivers:

In case the latest driver doesn't fix the flickering problem on your computer, as a last resort you can try to download and install an older version of the driver from your manufacturer's support website (if available). While you may miss out on new improvements and features, sometimes an older version of the driver may work better on your computer.

The caveat installing an older version of the driver is that Windows Update may try to replace it with a newer version. If the previous version is working on your computer, you can temporarily prevent the operating system from updating a particular driver.

Were you able to fix the screen flickering on Windows 10? Did you use a different method? Tell us in the comments below.

More Windows 10 resources

For more help articles, coverage, and answers on Windows 10, you can visit the following resources:

How to sync your Windows 10 Desktop, Documents, and more to OneDrive

$
0
0

Windows 10 doesn't protect files stored in your default folders, but you can use this guide to make sure they're always backed up in OneDrive.

Every account on Windows 10 comes with a default set of folders — you know them: Desktop, Documents, Downloads, Music, Pictures, and Videos — to organize your files. In addition, the operating system includes a OneDrive folder to store your synced files locally, which are always kept up to date automatically.

But what if we could merge the two, so your Desktop is still your Desktop, but it's constantly synced to the OneDrive cloud instead of manually backed up? Thankfully you can do just that, and it's easier than you might expect.

In this Windows 10 guide, we'll walk you through the easy steps to move the default user folders in your profile to OneDrive to keep all your files protected and backed up in the cloud.

How to move default user folders to OneDrive

  1. Open File Explorer.
  2. Navigate the following path:

    C:\Users\<AccountNane>

    Quick Tip: Alternatively, you can always use the Windows key + R to open the Run command, type %HOMEPATH%, and click OK to open the current home folder location.

  3. Open the OneDrive folder.
  4. Create a folder with a descriptive name (e.g., MyFiles) to group your folders you're about to move.
  5. Inside the newly created folder, create a folder for each location you want to move to OneDrive. For example, if you're moving the Documents folder, then create a new Documents folder inside of OneDrive.

  6. Go back to your account name the folder where all the default folders are currently located.
  7. Right-click Documents and select Properties.

  8. Click the Location tab.
  9. Click the Move button.

  10. Browse the OneDrive folder and open the newly created Documents folder.
  11. Click the Select Folder button, and you'll notice that the default location path has now changed.

  12. Click Apply.
  13. You'll be prompted to move any content from the old to the new location. Click Yes to continue.

  14. Click OK to complete the task.

It's that simple. You can now repeat the same steps mentioned above to move remaining folders, including Desktop, Downloads, Music, Pictures, and Videos to the new location.

If you download a lot of stuff from the internet, you probably may want to consider to skip moving the Downloads folder, as usually, they're not very important, and most of the time you can download them again.

You can always revert the process if you change your mind using the following steps:

  1. Open OneDrive.
  2. Navigate to the folders you want to restore their old location.
  3. Right-click the folder and select Properties.
  4. Click the Location tab.
  5. Click the Restore Default button.
  6. Click Apply.
  7. You'll be prompted to recreate the original folder in the old location. Click Yes to continue.

  8. Click Yes to confirm that you want to move the folder and its content from the old to the new location.

  9. Click OK to complete the task.
  10. Repeat the steps for each folder you want to move back to its original location.

Wrapping things up

There are a number of advantages using this solution. You will not only be able to keep all your files in the default folders seamlessly backed up in the cloud, but if you have the same configuration on other computers your files will be organized and synced across devices too, and accessible from any web browser through <OneDrive.com>.

Additionally, this will help you to prevent file duplication (which sometimes can be a nightmare) and apps that use the default save storage locations will now save directly to OneDrive without extra steps on your part.

While anyone with a free OneDrive account can follow these steps, the free 5GB will get eaten up quickly — so those with an Office 365 subscription or paid OneDrive storage plan will be best able to take advantage.

Do you think Microsoft should include an option in the Settings app to automate this process on Windows 10? Tell us in the comments!

More Windows 10 resources

For more help articles, coverage, and answers on Windows 10, you can visit the following resources:

Viewing all 5861 articles
Browse latest View live


Latest Images