![]()
Windows 10 represents a major upgrade for Microsoft as well as for the millions of people who use the operating system every day. This new version makes a step back by bringing many of the familiarity of Windows 7 combined with the innovations included in Windows 8. You also get some new features and improvements, and it also prepares the operating system for the future.
Perhaps one of the biggest strengths of Windows is the ability to customize virtually anything; users can customize their experience with the available options in the operating system and even through tweaks in the registry and policies.
The ability to customize the experience allows you to make Windows 10 more personal and it can even help you to be more productive. As such, today we'll go through some customizations everyone should know to enhance your Windows 10 user experience.
Getting the Start menu just the way you like it
The Start menu in Windows 10 is very similar to what you been using in Windows 7. However, it also combines parts of the Start screen from Windows 8.1, and it's one of the first features you want to customize.
There are number of ways you can use the Start menu:
You can use the small default version of the menu, which is the menu most people will comfortable using. In this experience, you'll have a menu with Live Tiles on the right with a left side with access to all your apps, and a list of your most used and recently installed apps.
![]()
You can also re-size the Start menu horizontally and vertically, but how far the menu can be re-sized will depend on the screen resolution. For example, on 1366 x 768 screen resolution you'll only get up to 3 columns. While in a Surface Pro 3, you'll be able to grow horizontally up to 4 columns, and up to 5 columns on a 4K display. Re-sizing the Start menu is easy, simply drag the edges to the right or toward the top.
![]()
You can also have a Start menu without Live Tiles, which will be the closest to having a Windows 7 Start menu experience.
How to remove the Live Tiles section in Windows 10 Start
How to create custom Start menu Tiles in Windows 10 using TileCreator
However, Windows 10 doesn't include an option to hide all the tiles; you'll have to manually, right-click each tile, and click Unpin from Start. Then shrink the menu to the left from the edge.
![]()
Now, you can always use the Start menu in full-screen mode. If you prefer this mode, go to Settings > Personalize > Start and enable the "Use Start full screen".
In full-screen mode, the Start menu will cover the entire real estate of the display, very similar to the Start screen in Windows 8.1. You'll still have access to the desktop and apps will run windowed.
![]()
Finally, there is Tablet mode, which Microsoft has designed specifically for 2-in-1 devices. This is a feature that should appear automatically when removing the keyboard and mouse from a touch-enabled device. The major drawback using Tablet mode is that you can't access the desktop, but apps, File Explorer, and everything will appear in full screen.
![]()
Tablet mode can be enabled from the Quick Actions button located in Action Center, or by going to Settings > System > Tablet mode and enabling the feature.
How to manually enable tablet mode in Windows 10
You can also customize what happens when you sign in and if the operating system should prompt you when it needs to switch automatically to Tablet mode. Also, you have the option to hide or show app icons in taskbar when in Tablet mode.
![]()
Customizing Live Tiles and groups
Like in Windows 8.1, Windows 10 offers the ability to drag and group Live Tiles any way you like. If want to name a group, simple click right at the top edge of a group, and name the group anything you like.
![]()
You can also click and hold a group title with your mouse pointer to drag the group of tiles anywhere you like in the Start menu.
Live Tiles display at glance up-to-date information without you needing to open an app. But sometimes, you may not like, or you don't need to see certain information. While you can't disable this feature globally, you can right-click each tile, and select Turn live tiles off.
In the same way, you can re-size each tile to any of the supported sizes (small, medium, wide, and large). Furthermore, from the same menu, you can pin an app to the taskbar, or you can also uninstall any app, including universal Windows apps and desktop applications.
![]()
How to use Live Tiles in Windows 10
Quick Tip: Because desktop app tiles don't generate any live information, you can better utilize the Start menu space by using the small tile size for these applications.
Customizing which folders appear on Start
Windows 10 also allows you to customize the folder locations that appear above "All apps", to do this simply go to Settings > Personalization > Start > Choose which folders appear on Start.
How to change which folders appear in the Windows 10 Start Menu
There you can remove File Explorer and Settings, but you can also add other folders, such as Documents, Downloads, Music, Pictures, Videos, Network, and more.
![]()
Making the most out of the left side of Start
Microsoft is focused on making the Start menu a very customizable experience, so much that on Settings > Personalization > Start, you can also remove the list of most used and recently added apps. This change will give you more room to add as many folders as you like, as you can see in the image below.
![]()
Getting Cortana ready to work for you
Perhaps one of the biggest features in Windows 10 is Cortana, Microsoft's personal assistant. After upgrading or doing a clean install of Windows 10, you'll notice a new search box, here is where Cortana lives. If you're launching the feature for the first time, you'll have to go through the initial setup, which is super easy, click Next, Agree to the term, type the name you want it to call you, and that's it.
![]()
Now, if you want to customize further the experience, use the Windows + S to launch Cortana. From the left rail, click the Notebook icon, there you'll find some preferences you can customize. These features include traffic alerts, news, package tracking, meeting, and reminders, weather, and much more.
![]()
Then, you can click on Settings to enable or disable Cortana, you can also enable the "Hey Cortana" feature, which will require for you to have a microphone already setup.
![]()
Quick Tip: If you want to disable completely Cortana, refer to my previous Windows 10 tutorial.
When you enable the hands-free feature, you can also customize the assistant to respond to anyone or only you. If you prefer to respond only to you, you'll have to click the Learn my voice button to teach Cortana to learn your voice. (Remember that you may have to re-train the feature for better results.)
Do you need help setting your first reminder? Check out this previous Windows 10 tutorial.
![]()
If you're in a country where the native language isn't your first language, you can go to Settings > Time & language. Now make sure you check the Recognize non-native accents for this language option to have a better experience using the assistant.
![]()
Setting up a wallpaper
Similar to previous versions, Windows 10 also includes the ability to personalize your desktop using your own wallpaper.
How to change your Windows 10 wallpaper
How to add wallpaper to the Windows 10 Mail app
Simply go to Settings > Personalize > Background, and there you can pick from one of your recent wallpapers, you can browse for a new image, and choose the image fit. (Alternatively, you can access the same settings, by right-clicking on the desktop and selecting Personalize.)
![]()
Quick Tip: You can find great wallpapers and themes for your desktop at the Microsoft's Personalization page.
Personalizing Start, taskbar, Action Center
The personalization options in Windows 10 are more flexible than in previous releases. In the new version of the operating system, Microsoft is including a new default dark theme for Start, Taskbar, and Action Center. Also, you can pick a custom accent color or you can let Windows pick an accent color for you from the background, and you can enable or disable transparency. To customize these settings go to Settings > Personalize > Colors and pick your desired preferences.
![]()
Quick Tip: You can create your own accent color by using "Color and Appearance" settings from Control Panel. To access these settings open the Run command type control color and hit Enter. Then pick a color, use the color mixer to create your own color, and click Save changes.
![]()
Personalizing the Lock Screen
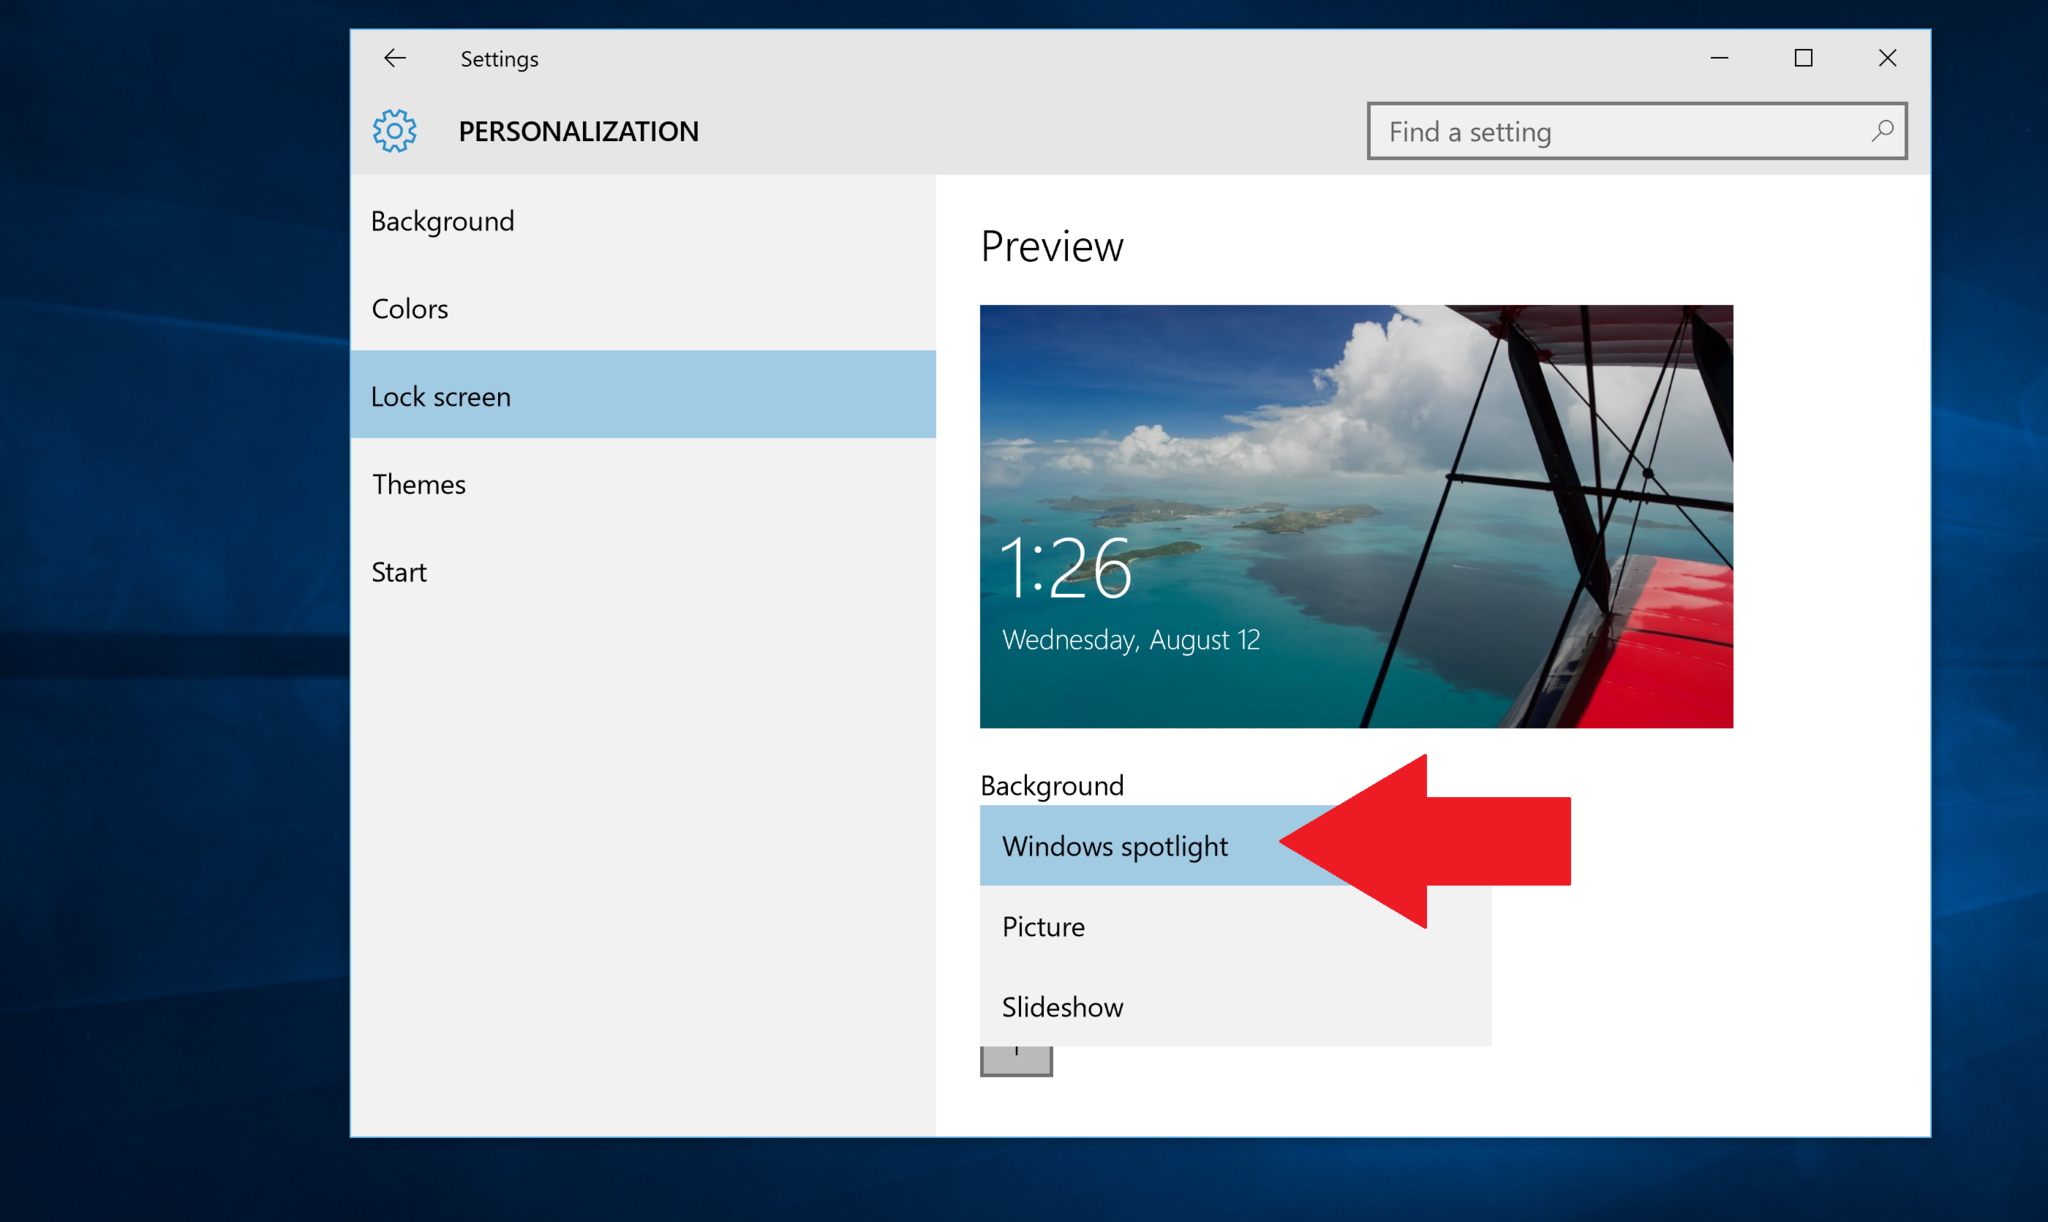
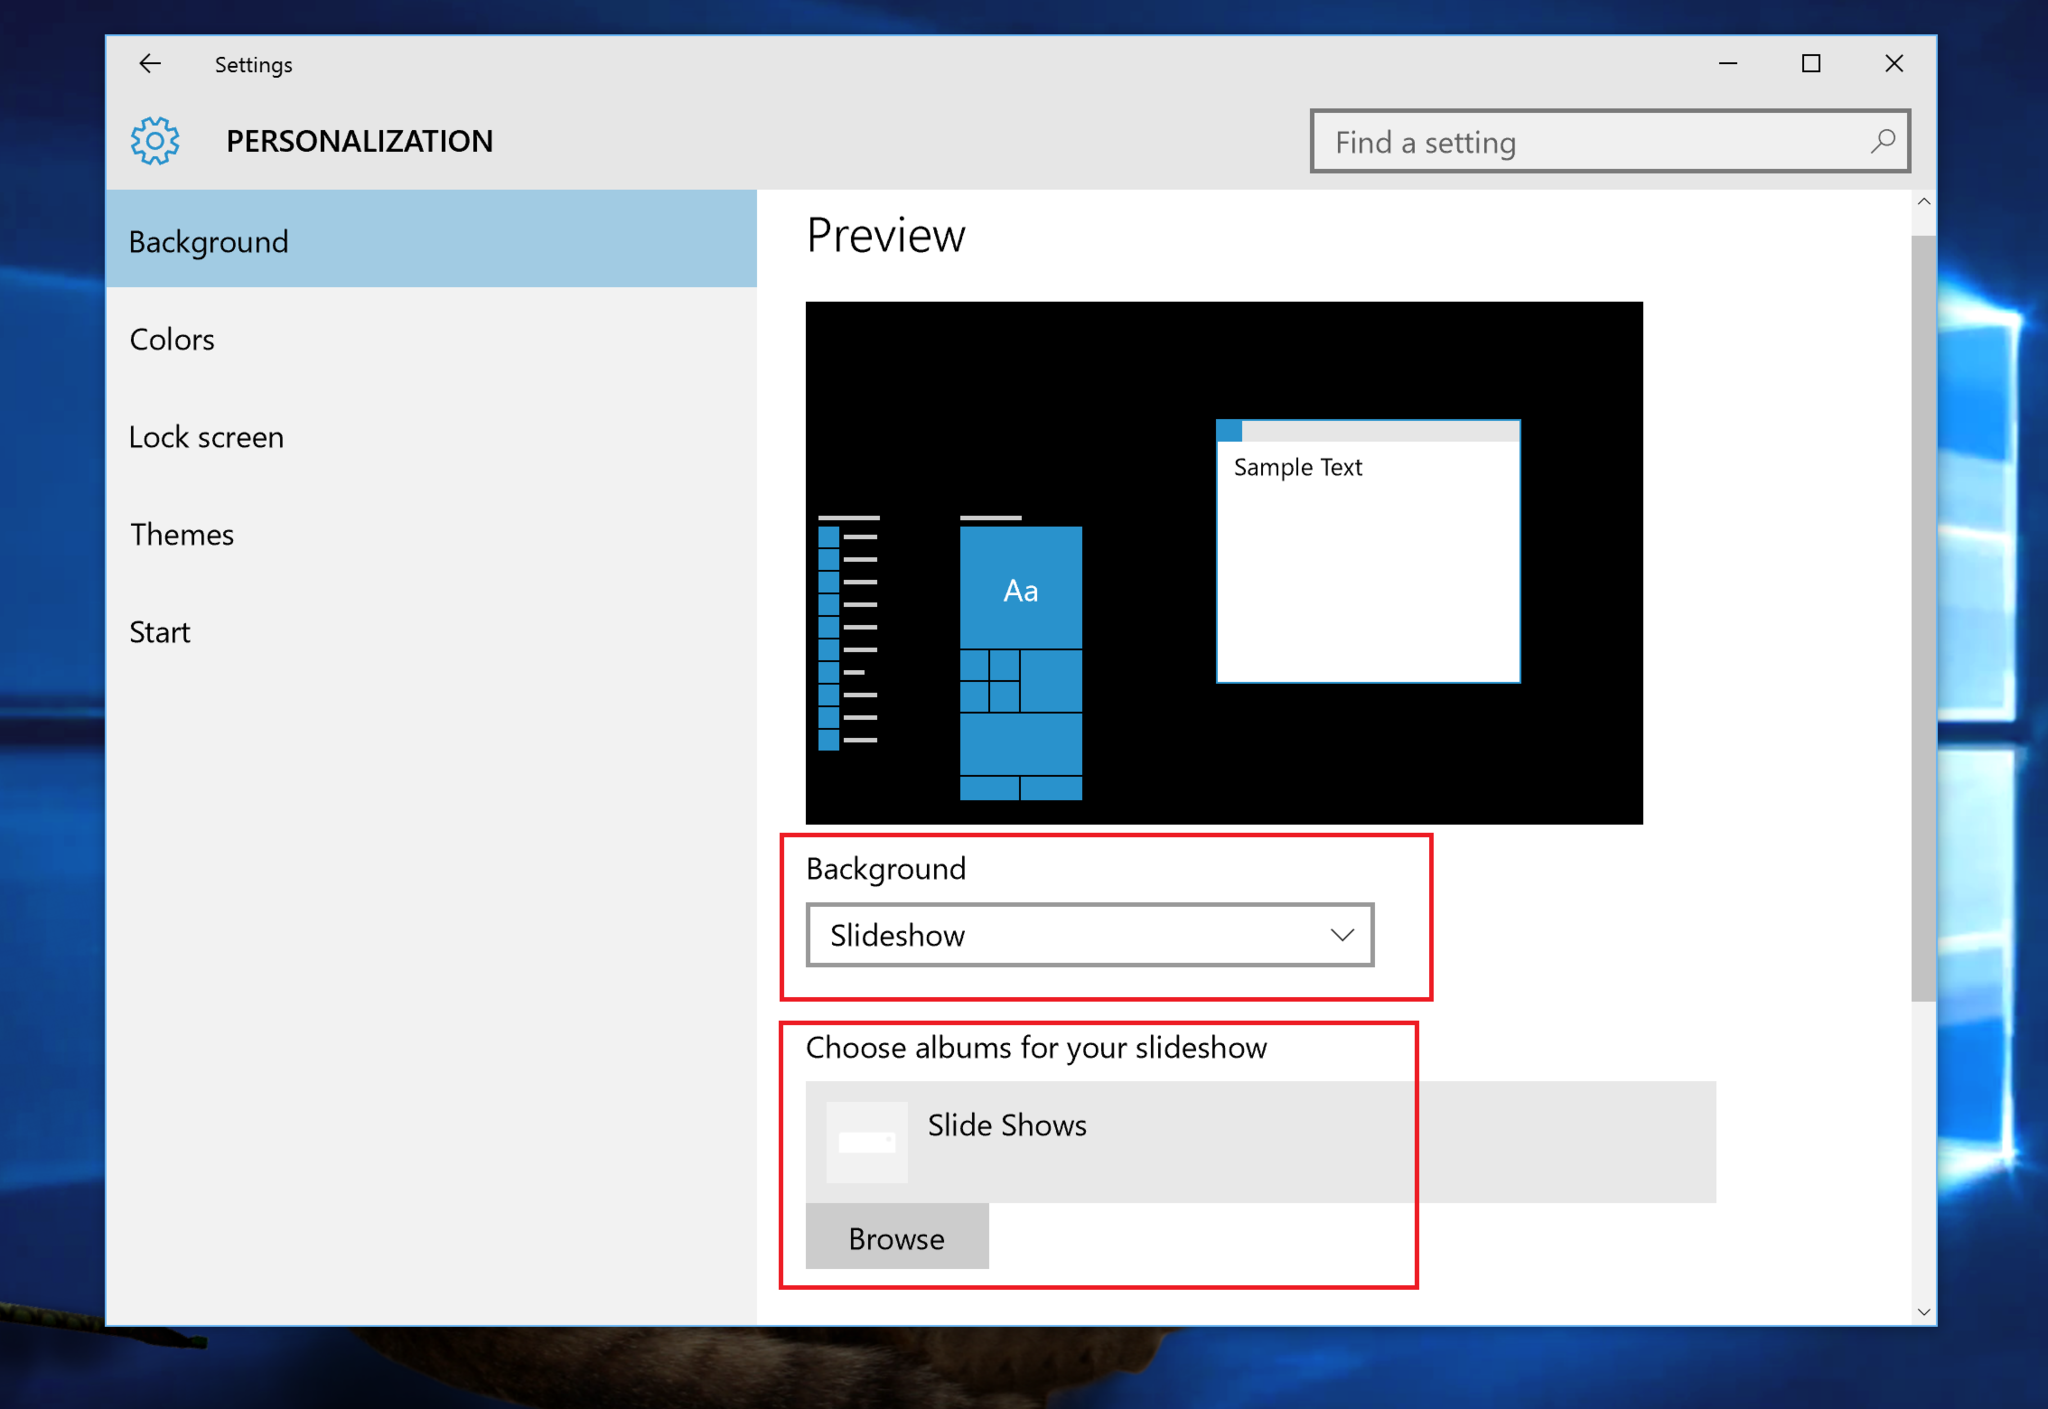
Pretty much unchanged since Windows 8, the new version of Windows offers the ability to customize the Lock screen, which is the first screen you'll see when you start your computer and before you sign in. Personalizing the Lock screen is pretty straightforward, go to Settings > Personalization > Lock screen. In the settings page, you can choose your own picture or from the "Background" drop-down menu, you can select Slideshow to a folder with images to display on the Lock screen.
![]()
If you click the Advanced slideshow settings, you can customize various options. For example, you can choose to include Camera Roll folders from your PC and OneDrive, whether the slideshow should play while using battery, for how long the slideshow can run, and more.
Those users running Windows 10 Home will notice the Windows Spotlight option, which is a feature that brings Bing images of the day to your Lock screen.
How to enable Windows Spotlight in Windows 10 Home
![]()
Also, you can choose an app to show detailed status on the Lock screen, and up to seven apps to show quick status. To add a new app, simply click the "plus" button to select the Windows app, if you want to change an app, click on it and pick another.
While we're talking about personalizing the Lock screen, we should also mention that if you want to sign-in even faster and more securely, you'll better off using PIN password, instead of a password. To do this go to Settings > Accounts > Sign-in options, under PIN click Add. You'll be asked to enter your current password, and then enter your numeric PIN, and click OK.
![]()
The PIN only works locally, and you can't use a PIN to remotely sign-in to your computer. In this circumstance, you'll need to use your long, complicated password.
Personalizing the taskbar
Although it feels very familiar, the taskbar in Windows 10 has changed quite a bit, but like before you can still customize the experience. For example, if you feel that Cortana is taking valuable space in the taskbar, you can hide the feature completely or show only the icon. To do this, right-click on the taskbar, select Cortana, and pick your option.
![]()
From the same right-click menu, you can also hide the Task View (virtual desktops) button, as you can always use the Windows + Tab shortcut to access the feature.
More virtual desktops options can be found going to Settings > System > Multitasking. There you can customize whether you want to see windows open only in the desktop you're using or on all desktops and what appears when using the "Alt + Tab" when you're using Task View.
![]()
If you're in Tablet mode, you'll notice that app icons won't appear in the taskbar by default. Nonetheless, if you want to see them, simply right-click the taskbar, and from the menu click Show app icons.
![]()
Personalizing Quick actions buttons for Action Center
Quick actions buttons are a faster way to access certain features in Windows 10, and while you can't add more buttons of what is available, you can change the priority order.
How to change your Quick Action buttons in Windows 10
To do this, go to Settings > System > Notifications & actions and under "Quick actions" you can pick what feature you can access in the first row.
![]()
From the same settings page, you can control which icons and system icons appear on the taskbar. Also, you can control system notifications, including whether Windows 10 should show you tips.
How to customize your Windows 10 notifications
Finally, you can also control app and lock screen notifications and more.
Setting up OneDrive
Another great feature in Windows 10 is the integration of OneDrive. While in Windows 8, the feature will work automatically, many users were confused about what was available offline. So, in Windows 10, Microsoft is going with selective sync, which means that you need to setup what to you want to sync before you can use the service.
How to select which OneDrive folders to sync in Windows 10
To start with OneDrive, open File Explorer, click the OneDrive folder and customize what to sync, you can choose everything or a few folders and files. Also, from the same setup, you can change the default location to store your files.
Once you select your settings, click OK to finish. You can also refer you my previous guide on configuring OneDrive, and you can read this Windows 10 tutorial on how share files and folder with the cloud storage service.
![]()
Personalizing Quick access
Other than a few tweaks and new icons, File Explorer in Windows 10 remains the same. However, "Quick access" is a new addition that replaces "Favorites". It's the default access when clicking the File Explorer icon on the taskbar; it lists your frequent files and folders, and if you want, you can also pin folders to the new Quick access.
![]()
While the software giant isn't adding a lot of customization to the feature, there are a few things you can tweak. For example, you can:
- Disable recently viewed files and folders
- Clear File Explorer history
You can change the behavior whether clicking the File Explorer icon, open "Quick access" or "This PC"– to accomplish these tweaks check out this guide. You can even disable Quick access completely.
On a related topic, you can also add quick access to Settings to the right-click desktop menu, such as to Power, Wi-Fi, Windows Update, and more. To learn how to do this, check this previous Windows 10 tip.
Personalizing your default apps
Whatever the operating system you use, there will always be more than one app to browse the internet, open a file, or edit a document. Windows 10 includes the ability to for users to set their default programs. As such, if you don't like Microsoft Edge as your default browser or Groove as your default music player, you can easily go to Settings > System > Default apps to change all the default settings, choose what apps open what files, reset to the Microsoft default settings, and more.
![]()
Personalizing Microsoft Edge
In Windows 10, Microsoft is also bringing Edge, the new default web browser, which still a work in progress, but it's a usable piece of software. While extensions and other features are planned to come on a later date, if you're testing the browser now, you can customize a few things. For example, you click the "more actions" (…) button in the top-right corner of the screen and click on Settings. In the settings page, you can:
- Choose to use the "Light" or "Dark" theme
- Configure whether you like Edge to open on the "start page", "new tab", "previous pages", or "specific page or pages".
![]()
Going to View advanced settings, you can choose to show the home button on the address bar with a custom URL. You can disable Adobe Flash Player, and more importantly for many users, you can also change your default search engine from Bing to Google or anything you like. That is, of course, if the search engine uses OpenSearch standard.
![]()
To change the default search engine:
- First visit the search engine web page
- Return to Edge advanced settings
- Click the dropdown menu under "Search in the address bar with", click Add new
- Select the new search engine, and click Add as default.
![]()
Personalizing your Privacy with Windows 10
![]()
Windows 10 is an operating system that collects certain information about who uses the operating system to deliver a more personalized user experience. While this may be a privacy and security concern for many users, Microsoft is very clear on what it collects, and Windows 10 makes it very easy to control what information the company is allowed to collect.
The downside is that the more you restrict Windows on what information it can collect, the less personalized the experience will be. Nevertheless, if you need to better understand the new privacy policies and how you can adjust your setting in Windows 10 and Microsoft Edge, you must read this guide, written by Daniel, which goes through in-depth on everything you need to know.
Wrapping things up
There are hundreds, and even thousands, different ways you can customize you user experience, and that's one of the beauties of the operating system, you can virtually customize it any way you like. Today, we looked at a few of them that hopefully will get you started getting the most of Windows 10.
For more resources, don't forget to check our Windows 10 help, tips, and tricks page. Or if you have any questions, you can always count post on our Windows 10 Forums at Windows Central for more help.
Is there any specific customization you like to add in Windows 10? Don't forget to tell us in the comments below.