Quantcast
Channel: Help & How To
Viewing all 5861 articles
Browse latest View live

How to set Slideshow to every 10 seconds and enable shuffle in Windows 10

$
0
0

Yesterday, I shared with you how to enable the wallpaper Slideshow feature in Windows 10 and how to get it to work when on your laptop battery.

The Slideshow option is not a new feature as it has been in previous versions of Windows. In fact, some users noticed you cannot set your Slideshow faster than once a minute. For most users, this is probably okay. However, Microsoft did not block this they merely buried it in the old Control Panel

Even better? This trick lets you get access to the shuffle feature as well!

How to enable Shuffle and short intervals for Slideshow

1. Open Run

Use the keyboard command Win + R to launch the Run window

2. Shortcut to Control Panel

You could navigate and dig deep to get to this old Control Panel setting, or just copy paste this into the Run window: control /name Microsoft.Personalization /page pageWallpaper and then hit OK. This is a direct route to this setting.

3. More settings!

You should notice new timing options near the bottom, including 10 and 30-second intervals along with more options for various hours. Just pick the one you want and hit Save changes.

4. Set Shuffle

Near the bottom, you should also notice the Shuffle option is now listed here as well. Simply check the box and hit Save changes when finished.

5. Enable on battery?

Yesterday, I demonstrated how you can dig deep into your power settings to make Slideshow run on a battery. Microsoft disables this by default as it could potentially be a small battery drain depending if you set it for every 10 seconds, for example. Turns out, you can enable or disable it here too. Choose what you want and click Save changes to keep them.

Wrapping up

I am not sure why some of these settings are missing from the new Settings in Windows 10. My guess is Microsoft (a) ran out of time to finish porting them or (b) did not want to present too many options to users, especially since it may not be used very often.

Whatever the reason, now you know how to get around them and make you wallpaper new every 10 seconds!

Big thanks toMark Turner6for the tip in comments!

Related Reading

How to customize your Windows 10 experience

For more resources, don't forget to check our Windows 10 help, tips, and tricks page. Or if you have any questions, you can always count post on our Windows 10 Forums at Windows Central for more help.


Everything you need to know about managing your Store account on Windows 10

$
0
0

Windows 10 Store

While you sign in to the Windows 10 Store with your Microsoft Account, there are things you need to manage connected to it that you wouldn't find in the main settings of the operating system. Your Store account settings help you manage transactions, payment methods and more.

Here's what you can do and how you can do it.

Before we begin, all of the actual management happens on the web, not in the Store app, and all require you to sign in first with your Microsoft Account password for security. But, all of the options are available via simple shortcuts in the Store app so you don't have to go digging through Microsoft's web pages.

1. How to sign-out of any Microsoft Account attached to the Store

Widnows 10 Store

This one's a simple one, but nevertheless not immediately obvious. Along the top of the Store app you'll see a small circle with your Avatar in. Click on it and the drop-down menu above appears. Click on your name and you'll be taken to a box with an option to sign-out of the account.

2. View a complete overview of your account

If you want to see a general overview of your account information, follow the steps in point one to open up the options list. From here you want to click on "View account." After you've signed in with your Microsoft Account username and password you'll see the screens shown below.

Windows 10 Store

Windows 10 Store

  1. Your most recent purchases show up here. It's important to note that you'll see all purchases made with your Microsoft Account here, not just ones made in the Windows 10 Store. That includes the Windows Phone Store and anything you've bought on the Xbox such as Live Gold subscriptions, EA Access subscriptions and game purchases. But as Microsoft is moving to a unified storefront it makes perfect sense. Clicking on "View all" takes you to a complete statement.

  2. Money & gift cards shows the current status of credit on your account. Microsoft accepts many different payment methods, but if you load up gift cards you'll see your remaining balance here. There's also a link to redeem and to send a gift card to someone else.

  3. Basics - Change your name or your account password.

Some of the above items are also available directly from the Store app.

3. Manage your payment options

Windows 10 Store

This option allows you to control your default payment options when buying apps in the store. If you've got money in your Microsoft Account, for example, you might want this to be used in preference of your credit card until it runs out.

To add a new payment option simply hit "Add payment option" which will be displayed above all your existing ones. Follow the instructions and you're good to go.

4. View your full payment history

Windows 10 Store

This is the same page as accessed in the first point above. But, instead of going through the general account overview you can access a full transaction statement directly from the Store. Just click on your avatar to open the main menu, then hit "purchased" for direct link to a full statement of your purchases.

As already described, this will show purchases from the Windows Store and the Xbox Store, alongside the method you used to pay. Free apps are also shown here, but paid apps will have a little icon next to them. Clicking on this will display the invoice for that purchase.

5. Redeem a code

Windows 10 Store

If you're lucky enough to get gifted a code to redeem either an app or some hard currency, you could follow the steps mentioned in point one. Or, you could click on your avatar, then the "Redeem a code" option to go directly to that page. Again, you'll have to authenticate your Microsoft account first if if you haven't already.

Then just enter the code (no need to worry about the hypens, it'll do those for you), hit "Redeem" and your credit will be applied.

6. My Library

Windows 10 Store

Again, accessed by clicking on your avatar, the My Library section of the Store will show you a complete compendium of your purchased apps and games. It'll also give you shortcuts to open the Groove Music and Film & TV apps to see your respective music and video purchases.

If you hit the "See all" option on either section your list will be expanded to show you the full list. The expanded view will be split into two sections. There's one for things that work on your device, and one for things that don't. Anything that can be installed and that you don't currently have will have a little downwards facing arrow next to it. Click on that to begin installing it on your current device.

Window 10 Store

All the stuff that can't be installed, be that general compatibility issues or that they're Windows Phone apps, will be towards the bottom out of the way.

7. Downloads

The final option you see when clicking on your avatar is the "Downloads" section. As the name implies this is where you can monitor currently downloading apps.

Windows 10 Store

This little arrow will always show up if you have app updates available to install. It'll be visible from any tab in the Store app. Clicking on it will always take you to the Downloads page.

The "Check for updates" button is there for you to use to manually search for any newer versions of your apps and games.

The "X" and "II" buttons next to each installing app represent cancel install and pause install respectively.

Hopefully this guide can help you on your way with keeping things in order while you're using the Windows 10 Store.

For more Windows 10 tips be sure to drop by our dedicated page here

How to use the Magnifier in Windows 10

$
0
0

Magnifier Windows 10

If you want to temporarily enlarge a portion of the screen in Windows 10, you can use the handy built-in Magnifier. It's one of the options you can use to make text, apps, and other items bigger in Windows 10. We'll show you how to use the Magnifier and share some tips to take advantage of it.

You can quickly open the Magnifier by using the keyboard shortcut Windows keywiththe plus sign (+) to zoom in and Windowskey withminus sign (-) to zoom out. Use Windows key and Esc to exit the magnifier. You can use the Magnifier knowing just these three shortcuts, but there are actually a few more options.

Magnifier Windows 10

View options

While you're zoomed in, click the magnifying glass icon to see more options. Tap or click Views to change the way you zoom in or out. Here are the three different modes:

Magnifier Views

Full screen– This is the default mode. A portion of your screen gets enlarged, and the zoomed view follows your mouse pointer. If you're using the touch screen, you can tap the plus or minus sign at the corners to zoom in or out. Tap the edges to move the view up, down, left, or right.

Lens– Instead of the whole screen zooming in, just a portion of your display gets bigger.

Magnifier Windows 10

Docked– The magnified area stays in one location, no matter where your mouse pointer is. The dock appears on top by default, but you can snap to the other edges of your display or drag anywhere else in your screen.

Magnifier Windows 10

More settings

Tap or click the gear icon within the Magnifier app to see more options. There are additional settings like turning on color inversion, as well as tracking. If you're in Lens mode, you can change the lens size from this section. Use the sliders to increase or decrease the height and width of the lens.

Magnifier settings

Keyboard shortcuts

Sometimes keyboard shortcuts can get things done faster. Here are all the shortcuts related to the Magnifier:

Keyboard shortcutAction
Windows logo key + plus (+) or minus (-)Zoom in or out
Ctrl + Alt + SpacebarPreview the desktop in full-screen mode
Ctrl + Alt + DSwitch to docked mode
Ctrl + Alt + FSwitch to full-screen mode
Ctrl + Alt + IInvert colors
Ctrl + Alt + LSwitch to lens mode
Ctrl + Alt + RResize the lens
Ctrl+Alt+arrow keysPan in the direction of the arrow keys
Windows logo key + EscExit Magnifier

Do you use the Magnifier on your PC? Did you know about these additional settings? If you think this guide is helpful, we have many more posts like this in our Windows 10 help, tips,and tricks page.

How to auto-hide the taskbar in Windows 10

$
0
0

Surface 3 no taskbar

We recently showed you how to optimize your screen's real estate by using Task View and other multitasking tips for Windows 10. We have another tip that's especially handy if you have a smaller screen. We'll show you how to automatically hide the taskbar.

1. Right-click on the taskbar, and tap or click Properties

Taskbar properties

2. Check the box, Auto-hide the taskbar

Auto-hide taskbar

3. Tap or click Apply

That's it! The taskbar hides and automatically pops back up when the mouse pointer is near the bottom of the screen. It also shows up when you swipe up from the bottom of the screen.

One downside to enabling auto-hide for the taskbar is that it requires an additional action to view Start, access Cortana, or other items in the taskbar. However, it is still a nice option to have. Will you use auto-hide on Windows 10? Let us know in the comments!

If you think this guide is helpful, we have many more posts like this in our Windows 10 help, tips, and tricks page.

Google working to fix 64-bit Chrome crash in Windows 10 (10525), temp fix found

$
0
0

Chrome on Windows

Microsoft's release of Windows 10 build 10525 to members of the Windows Insiders Fast ring earlier this week ring caused some problems for users of the 64-bit version of Google's Chrome browser. The browser cannot load web pages and all tabs, extensions and plug-ins crash.

Google is aware of the issue, according to a post on the company's Chromium message board:

"We have the problem confirmed and someone is working on it, so additional "me to" comments are a distraction at this point. Please just star the issue if you want to convey that you are affected, and if we have any questions or need additional feedback we'll post a comment.

Also, please remember that this kind of temporary breakage is expected for users on the Windows 10 fast ring. So, we definitely appreciate your assistance in tracking down these problems, but if you're not comfortable dealing with disruptions and workarounds, then the fast ring might not be for you."

In the meantime, Windows 10 build 10525 users can download and install the 32-bit version of Chrome if they want to keep using it. They can also use a workaround that has been discovered to be successful for some users when running the 64-bit version of Chrome.

Temporary fix for Google Chrome 64-bit

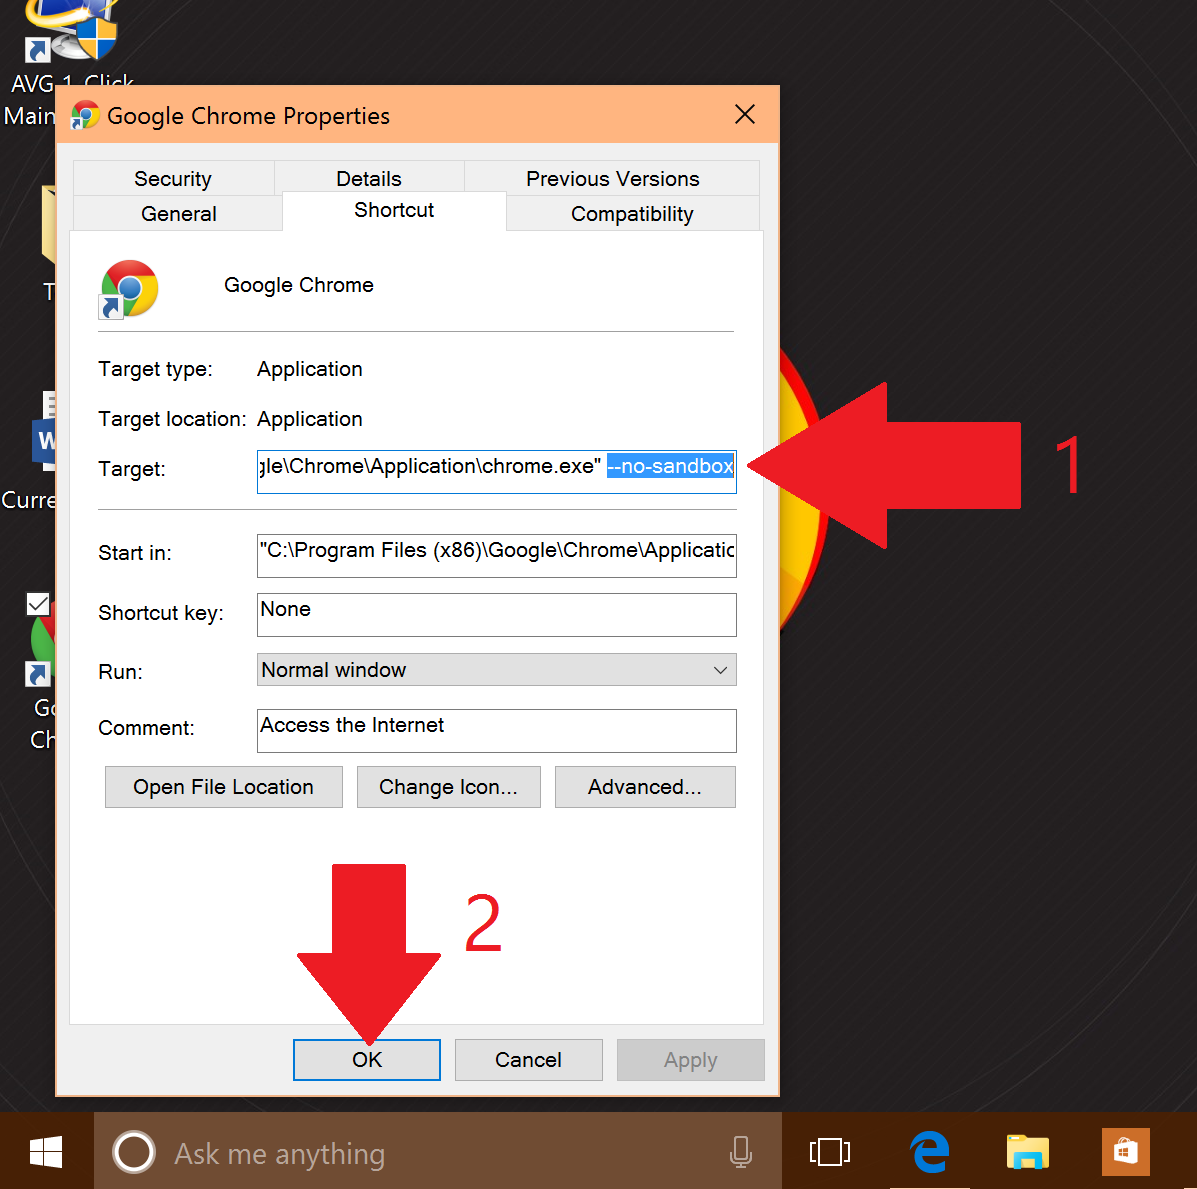
1. Right-click on Google Chrome's desktop shortcut and choose Properties

2. In the Target input box add --no-sandbox at the end of the box, then click OK. It should look like text in the screen shot below. You may have to give administrator priviledges before the change takes.

Open Chrome and, it should work again on Windows 10 build 10525. You should notice a security warning near the top, which can be dismissed. The fix only works for Chrome 64-bit and not for Chrome Canary 64-bit.

Source: Google; Thanks, Tero A., for the tip!

How to connect to a new Wi-Fi network in Windows 10

$
0
0

Windows 10 Wifi

Connecting to a new Wi-fi network with Windows 10 is very easy. This guide is meant for new users, so you can stop reading now if you think you're already a Windows 10 expert. This may be helpful when setting up a new device or if you're bringing your tablet/PC to a new place. Are you ready? Follow these steps:

1. Tap or click the Wi-fi icon in the taskbar. If you don't see it, you might have to tap the up arrow to make it visible.

2. Tap or click the Wi-fi network and tap or click the Connect button. You can also check the box that says Connect automatically if you don't want to manually reconnect next time.

Windows 10 Wifi

3. Enter the Wi-fi password and tap or click Next.

Windows 10 Wifi

That's it! You're connected. We told you it was easy. If you want to know more details, you can also check our more in-depth guide on how to manage wireless network connections in Windows 10.

If you think this guide is helpful, we have many more posts like this in ourWindows 10 help, tips, and trickspage.

How to sync your Dropbox folders to Windows 10

$
0
0

Dropbox sync on Windows 10

While OneDrive is built into Windows 10 one of the other most widely used cloud storage solutions is Dropbox. We have a pretty good app for Windows 10 allowing you to access your files, but it doesn't allow you to sync them to your PC.

For Dropbox syncing you'll need to install the desktop sync app first. Once you have that and you're set up you'll have something that resembles OneDrive. Here's what you need to do.

1. Go to Dropbox.com and click on "Download the app" on the homepage.

The installer will then download to your PC. Run the Dropbox Installer and follow all necessary instructions.

2. File Explorer.

Dropbox sync on Windows 10

Once you've installed the Dropbox sync app you'll be able to access your folders from the sidebar in File Explorer, just like any other folders on your PC, and OneDrive. To check everything went well it's worth checking that it's there.

3. Access Dropbox preferences

To select which folders to sync click the Dropbox icon on the taskbar located on the lower right corner. If you don't see it, you'll need to tap or click the up arrow to show more icons.

Dropbox sync on Windows 10

Then click the settings cog in the top right hand corner and select "Preferences."

Dropbox sync on Windows 10

4. Choose which folders to sync

Under the "Account" tab you'll see an option for "Selective Sync." Click it. The complete list of your Dropbox folders will now be in front of you. Check the box next to the ones you want and they will sync to your computer.

Dropbox sync on Windows 10

To access your Dropbox folders now simply open up File Explorer and you'll see it in the side bar on the left. You'll only see folders and files you've chosen to sync, so don't be alarmed if it looks a little empty. But, you'll also have offline access to these files.

For PC users this is probably the better way to access Dropbox on your computer. Since tablets and smartphones don't have the storage capacity that a Windows PC will have, the Store app is a much better way to go on those devices for accessing files. Once you've got Dropbox all set up following these easy steps, you don't have to worry about it. Just move things around across your devices and let the background sync take care of the rest.

For more Windows 10 tips be sure to visit our dedicated page here

How to move your photos from Android to Windows 10

$
0
0

Windows is the most popular desktop operating system in the world, which means that there are no doubts lots and lots of people who use both Windows 10 on a PC and an Android smartphone. Today's Microsoft is accommodating to most platforms, so regardless of your preference, they've got solutions for you.

In this guide we're specifically looking at how to get your photos from your Android phone over to your Windows 10 computer. Sounds simple, but there are a few different ways you can do things.

1. Import all photos using the Phone Companion app

The Phone Companion app is new from Microsoft for Windows 10. Much of it is geared at helping Windows users on iPhone or Android find their way with Microsoft services on each respective platform. What the Phone Companion app can also do is help you to quickly import your entire photo library from your phone to your computer.

Phone Companion

Plug your Android phone in to your Windows 10 machine using the regular microUSB cable. If the Phone Companion app doesn't launch, go into the Start Menu and select it. You may also need to make sure your Android phone is in MTP transfer mode. You should see a notification on the phone that will tell you if it's connected as a media device or not. Tapping on it will take you to the necessary settings, just ensure MTP not PTP is selected.

When it opens you'll see the screen above, with some Microsoft apps and services above some information about your phone. For what we want here you'll need to seek out the "Import photos and videos into the Photos app" option highlighted above.

Phone Companion

After you've clicked on that the stock Photos app for Windows 10 will open and you'll see the message shown here. By default it'll import all your photos and videos to the Pictures file on your computer. So this is a perfect method if you just want to dump everything at once.

2. Using File Explorer

File Explorer in Windows 10

If you don't want to do a blanket import (or, even if you do) there's File Explorer at your disposal. Once you're plugged in and in MTP mode as detailed in point one, File Explorer will see the contents of your phone. To get to your photos you'll need to navigate to the correct folder on your phone, and this will vary across different models.

On the phone we're using here (a Xiaomi Mi 4) our photos are found by going to Internal Storage > DCIM > Camera. From here you can simply drag and drop the photos you want to move from your phone to your computer.

3. Using the cloud

The great thing about Windows 10 is that there will be a solution for most people even if Microsoft isn't the direct supplier of it. The cloud is one of these situations. OneDrive is baked into Windows 10 but you can just as easily use other alternatives, like Dropbox, for example. Both of these can be used to sync your photos to your computer without the need for cables. We'll focus on these two for the purposes of this guide, but many of the same steps may apply to your chosen cloud service.

What's also great about both OneDrive and Dropbox is that their respective Android applications have camera auto-backup built in. This means you can turn it on and just not worry about syncing anything. Your photos will upload to the cloud in the background and then, providing you're syncing those folders to your PC, they'll just appear. Like magic.

For either option, first go into the Settings in the Android apps and ensure you have camera backup turned on to take advantage of this. If you don't want to do it this way you can manually upload your photos to your cloud accounts and still get them on your computer with these easy steps.

OneDrive

OneDrive for Windows 10

To get your photos from OneDrive onto your Windows 10 device you'll first need to tell it to sync the right folder. How to sync OneDrive folders in Windows 10 isn't immediately obvious, but fortunately we've got a full guide on how to do just that. Check it out at the link below.

Dropbox

Dropbox sync in Windows 10

Unlike OneDrive, Dropbox needs to be installed onto your Windows 10 device. We're not talking about the Store app, either, but the desktop sync app that you can download directly from Dropbox.

For a full guide on how to get set up and syncing your Dropbox folders check out the link below.

Both of these methods will keep your phone and Windows 10 PC in sync (data connection pending) so you don't ever have to worry about manually transferring your snaps again.

Those are a few of the more common methods to get your treasured snaps from your Android phone to your Windows 10 PC. If you've got any tips or tricks we didn't mention be sure to jump into the comments below and share them with everyone!

For more Windows 10 tips be sure to drop by our dedicated page here


How to set a custom accent color for Windows 10

$
0
0

Windows 10 is bringing a few options to customize the way things look. In fact, we wrote up a massive tome of all the various options you have at your disposal:

How to customize your Windows 10 experience

One of the more hidden abilities is to set a custom accent color. Microsoft lets you choose from a palette of 49 hues, which is probably fine for most users. In fact, you can let Windows auto-match the color according to your wallpaper.

However, you can go further and pick an exact color, including saturation, hue, intensity, and brightness. This feature is actually hidden, but with a simple run command you can have access to it. Let's see how.

Custom accent color picker

1. Run

Use Win + R to bring up the run command window, or type Run into Cortana/search box on the taskbar

2. Command

Type in (or copy and paste) Control Color and hit OK

3. Enable

Reveal the extended menu by clicking on Show color mixer

4. Pick

Using the various sliders, you can pick the color, hue, brightness , and intensity to your liking. Hit Save Changes once you are done.

If you are using the release version of Windows 10 build 10240, the color changes the Start menu, Action Center, and Taskbar. If you are on the Insider build of 10525 or later, the color you also choose changes the Title bar on apps.

How to check what Windows 10 build you are on in two easy steps

How to get rid of app shortcut arrows on the Windows 10 desktop

How to enable the Dark Theme for Windows 10

Of course, nothing is permanent. If you would like to undo the change, just go into All Settings > Personalization > Colors. From this area, you can let Windows auto-select an accent color based on your background again or use one of the 49 presets.

Most people should be okay with the default options in Windows 10, but for those who have a real peculiar hue that they want, this trick should help you out!

For more resources, don't forget to check our Windows 10 help, tips, and tricks page. Or if you have any questions, you can always count on our Windows 10 Forums at Windows Central for more help.

How to downgrade from Windows 10 to Windows 8.1

$
0
0

Microsoft released Windows 10 on July 29th, and since launch there have been over 50 million installs of the operating system. And there are good reasons. The software giant is betting on Windows 10 to be one of the best operating systems you want to use. After all, it brings familiar features from Windows 7, it improves the shortcomings from Windows 8.x, and it's a free upgrade.

Repeatedly, Microsoft CEO, Satya Nadella said: "We want to go from users needing Windows to choosing Windows to loving Windows." However, while Microsoft wants you to upgrade to Windows 10 and move forward, we're still in the early days of the new operating system. Since launch, many users has been reporting some issues, which range from upgrade problems, apps not opening, compatibility and network issues, and a lot more. So, as you can see Windows 10 seems not to be ready for a lot of people. So, today we're going to look the options you have and instructions to downgrade successfully from Windows 10 to Windows 8.1 if you decide the operating system isn't working for you at this time.

If you want to roll back, there are a number ways you can do this process. Today, we're going to look a three different ways.

Method one: Recovery by using a previous backup

If you have been following our Windows 10 coverage, you probably came across the post: "How to prepare your PC for the Windows 10 upgrade". If you followed the guide, you have created a full backup of your computer before upgrading to Windows 10.

If you did, fantastic! You can simply make a new backup of your new files since the last full backup or just make a copy of all your files to an external hard drive. Also, note any new software installation since the last full backup, as you'll need to reinstall them after rolling back.

You can do this by:

  1. Searching for Control Panel with Cortana.
  2. Navigating to Programs and Features.
  3. Arranging the list of apps in your system by Installed On

Once you have the backup of your files, and you know the apps you need to install, reboot your computer using the "repair disc", which you're prompted to create after creating the initial full backup.

Quick Tip: If you don't have repair disc, you can also boot with the Windows 8.1 installation media to perform the recovery.

After rebooting, follow these steps:

  1. While in the Setup wizard, click Next, and then Repair your computer.
  2. Click Troubleshoot, and then click Advanced options, and select System Image Recovery.
  3. Select the operating system you to recover from, click Next, and then Finish to begin with the recovery process.

Once the process completes, you'll be back to the previous version of your operating system, in this case, Windows 8.1.

Now, if you have made a lot files changes, it'll be recommended you delete all of your files and restore the updated versions using the new backup you created before downgrading back to Windows 8.1. Also, don't forget reinstall any software since the last backup.

Method two: Recovery by clean installation

If you want to downgrade from Windows 10 to Windows 8.1 in a clean way, you'll be better off starting from scratch again. This process involves having the installation media of Windows 8.1 and performing a clean install of the operating system.

This method requires you to backup your files and to re-install all the programs on your computer. This method takes more time, but it's also the cleanest way to downgrade.

If you don't the Windows 8.1 installation media, don't worry, Microsoft now allows you to download the files from the company's servers. Follow this link and instructions.

And then follow these instructions:

  1. Reboot your computer with Windows 8.1 installation files (make sure your PC is set to boot from the drive with installation files).
  2. During the Windows Setup, click Next, accept the licensing, and click Next.
  3. Click the option Custom: Install Windows only (Advanced) option to do a clean installation.
  4. Delete any partition created by you current operating system.
  5. Select the empty drive and click Next to begin the installation process.

Important: If you have a dedicated partition to store files or a secondary hard drive, you don't have to delete these partitions.

After the installation process completes, you'll be back to your previous version of Windows. Now the only thing left to do is to restore your documents and other files from the backup, and you'll need to re-install any software you have previously installed.

Method three: Recovery by uninstalling Windows 10

Then there is the third option. Unlike Windows 8.x, Microsoft has conveniently included a roll back option in the new Settings app that allows users to go seamlessly back to their previous version of the operating system with a single button.

If you happened not to like Windows 10, or you're having issues, Microsoft is adding the "Go back to Windows 8.1" feature to make the process a lot easier. However, the downside is that you only have a month after you upgrade to Windows 10 to go back. If you're still within a month after the upgrade you can follow these steps to go back:

1- Use the Windows + I shortcut to open the Settings app.

2- Navigate to Update & security and go to Recovery.

3- If everything is set correctly in your system, you'll see the option Go back to Windows 8.1. Here simply click the Get started button.

4- At this point, you can tell Microsoft why you're going back, click Next.

5- You'll get a warning that you'll need to reinstall some apps and programs, and you'll lose any changes made after upgrading to Windows 10. A file backup is not necessary but recommended. And then click Next.

6- Make sure you know your Windows 8.1 password as you'll be locked out of the system without it, and then click Next.

7- Finally, click the Go back to Windows 8.1 and let the process complete.

The process will take some time depending on your system configuration. Once you're back on Windows 8.1, don't forget to check all your apps are installed correctly and check for new updates, as, after a few weeks, it's likely to be out-of-date.

That's all!

Wrapping this up

Remember in school when you're taught the hard way, the difficult path, to resolve an equation? Well, of the three methods, this last option should be the easiest and the one recommended by Microsoft. However, keep in mind that the Settings app option to go back to your previous operating system is only good for a month. As a result, make sure you try Windows 10 as much as possible before the month expires, that way you don't have to resort to more complex methods.

Also, no matter what you do, always remember to make a full backup first, you'll be surprised when it will come in handy!

Are you on Windows 10? How do you like the new operating system or are you planning to downgrade? Let us know your experience in the comments below.

More Resources

We already have extensive coverage of Windows 10, in case you need more information or how-to articles, make sure you check these resources:

Our definitive review of Windows 10

Windows 10 on Windows Central – All you need to know

Windows 10 help, tips, and tricks

Windows 10: Help and discussion forum at Windows Central

How to send an email with Cortana on Windows 10

$
0
0

Cortana send email

Cortana, your personal assistant on Windows 10, can help you send an email without opening the Email app or even touching the keyboard. Want to see it in action? Check out our how-to video with the Surface Pro 3.

1. Tap the microphone button inside the search form located in the taskbar or use the keyboard shortcut, Windows key + C. This can also be enabled by saying Hey Cortana if you turned on that option in the settings.

Cortana microphone

2. Say, "Send an email to [Person's name]," followed by the message for the email. Cortana will prompt you to select a contact if she doesn't find an email address associated with the person or if the name matches multiple people.

Cortana Email

3. Cortana automatically inputs your contact's email and the message with the subject, "Quick note." She then asks if you want to send it, add a subject, or make any changes. You can make changes using your voice, touchscreen, or mouse pointer.

Cortana Email

4. If you're happy with the message, go ahead and say "Send."

Cortana Email

That's it! Cortana uses the People app to find the email addresses, so you can add your contacts there. Sending short emails with Cortana is very handy, but I wouldn't use it to send longer emails. Have you been using Cortana to send some emails? How was your experience? Let us know in the comments!

For more resources, don't forget to check our Windows 10 help, tips, and tricks page. Or if you have any questions, you can always count on our Windows 10 Forums at Windows Central for more help.

How to pin apps to the taskbar in Windows 10

$
0
0

Windows 10 taskbar

The Start menu in Windows 10 is a great place to pin your favorite apps and games, especially since you can take advantage of live tiles. However, if you have a few apps that you frequently use and want to open right away from the desktop, we recommend pinning them to the taskbar. It's very easy. We'll show you how to do it.

Here are two ways to pin an app to the Windows 10 taskbar:

1. From the app list or the Start menu, right-click an app and select Pin to taskbar.

Pin to taskbar

2. When you open an application, its icon appears in the taskbar. Right-click that icon and select Pin this program to taskbar

Pin to taskbar

That's it! We told you it was easy. On my Surface Pro 3, I've pinned Microsoft Edge, File Explorer, Store, and the Snipping tool to the taskbar. Which apps have you pinned to your taskbar? Sound off in the comments!

For more resources, don't forget to check our Windows 10 help, tips, and tricks page. Or if you have any questions, you can always count on our Windows 10 Forums at Windows Central for more help.

How to select which system icons appear in the Windows 10 taskbar

$
0
0

System icons Windows 10

We showed how easy it was to pin apps to the taskbar, but now let's talk about those icons towards the right within the taskbar. Those are system icons, and you can choose which icons can stay or go. We'll show you how to select which system icons appear in the Windows 10 taskbar.

1. Go to Settings (keyboard shortcut: Windows key + I) > System> Notifications & actions

System Settings

2. Tap or click Turn system icons on or off

System icons settings

3. Select which icons you want on your taskbar. You can select to enable them all, just turn on the ones you want to see. You can choose from Clock, Volume, Network, Power, Input Indicator, Location, and Action Center.

System icons on or off

I've turned on the Clock, Network, and Power on the Surface 3 and turned off the rest. I don't need the Action Center icon since I can access that by swiping in from the right side of the screen. I don't need the volume icon since the Surface 3 has physical volume buttons.

I like having the power icon in the taskbar because tapping or clicking it lets me know my battery percentage and how much time is remaining. I can also manually enable the Battery Saver if I need to squeeze out more battery life before plugging in.

System icons

Which system icons have you turned on or off for Windows 10? Let us know in the comments!

For more resources, don't forget to check our Windows 10 help, tips, and tricks page. Or if you have any questions, you can always count on our Windows 10 Forums at Windows Central for more help.

How to defer Windows 10 updates

$
0
0

Windows Updates

While many enthusiasts go celebrate every time an update comes out for Windows 10, there's a group of people and businesses who rather wait. Certain editions of Windows 10 allow you to defer upgrades, which ensures important software don't break. New features won't be installed for several months to allow for more testing, but you'll still get security updates. We'll show you how you can defer upgrades in Windows 10.

1. Go to Settings (keyboard shortcut: Windows key + I) > Update & security

Settings Windows 10

2. Tap or click Advanced options

Updates Advanced Settings

3. Check the box, Defer upgrades

Defer upgrades

Here's the official word from Microsoft about deferring upgrades:

Some Windows 10 editions let you defer upgrades to your PC. When you defer upgrades, new Windows features won't be downloaded or installed for several months. Deferring upgrades doesn't affect security updates. Note that deferring upgrades will prevent you from getting the latest Windows features as soon as they're available.

If you do not see the Defer upgrades option, it means your edition of Windows 10 isn't supported. You'll need to upgrade to Windows 10 Pro, Enterprise, or Education. You can read our guide on how to easily upgrade from Windows 10 Home to Windows 10 Pro for more details.

If you or your organization have a mission-critical software, deferring Windows 10 upgrades is a safe option to have. The downside, of course, is that you won't get new features until after several months.

Have you enabled this option in your Windows 10 PC? Let us know why in the comments!

We hope these tips help you become more productive in Windows 10. For more tips, we have many more posts like this one in our Windows 10 help, tips, and tricks page.

How to downgrade from Windows 10 to Windows 7

$
0
0

Windows 10 is having a great jump start, in only three weeks, after the operating system released to the public millions of users have already upgraded. Perhaps some of the reasons why people are quickly upgrading is because Microsoft is offering Windows 10 as a free upgrade for computers running Windows 7 and Windows 8. Additionally, there a lot of new features, such as Cortana, the Unified Settings app which runs across devices, the return of the Start menu, which combines the Windows 7 Start menu with the Start screen in Windows 8.1, and many more features that you can read in my previous write up here.

Seeing that Windows 10 introduces many new features, that it's headed in the right direction, and that you're getting it for free, there is no doubt that Microsoft wants you to upgrade and quickly. In fact, you only have one year from the day it was launch to take on the free offer after that you'll have to pay to upgrade.

However, since Windows 10 became available to the public, not everyone has had a good experience. Some people have issues upgrading, others have been reporting compatibility issues, the Windows Store not updating apps (which has already been fixed), and a number of other problems. As you can imagine, once people begin having issues almost by reflect the first thing that comes to mind is how can go back from Windows 10 to my previous version, in this case, Windows 7.

Today, we are going to go through three options, and steps to downgrade from Windows 10 to Windows 7, in case things aren't working out for you.

It's worth to point out that the options are pretty much the same as downgrading from Windows 10 to Windows 8.1, which I have previously added here.

Method one: Recovery by uninstalling Windows 10

Microsoft did something new in Windows 10 that wasn't available in Windows 8, which is adding a feature to the Settings app to allow you seamlessly go back to your previous version of the operating system.

As such, if you are having issues with Windows 10 or you simply don't like it you have options. For example, the software giant is including the "Go back to Windows 7" feature to make the process a lot simpler. However, there is a caveat; you only have a month after you have upgraded to Windows 10 to go back.

Now, if you're still on the one-month "trial", you can follow the instructions below to roll back:

1- Use the Windows + I shortcut to open the Settings app.

2- Navigate to Update & security and go to Recovery.

3- If everything is set correctly on your PC, you'll see the option Go back to Windows 7. Here simply click the Get started button.

4- At this point, you will need to pick the reason you're going back, click Next.

5- You will get a warning that you'll need to reinstall some apps and programs, and you'll lose any changes made after upgrading to Windows 10. Keep in mind that while a file backup is not necessary, but it's highly recommended, and then click Next.

6- Make sure you know your Windows 7 password as you'll be locked out of the system without it, and then click Next.

7- Finally, click the Go back to Windows 7 and to begin the downgrade process.

The time to complete the process should only be several minutes, but the time will vary from computer-to-computer. After you're back in Windows 7, don't forget to check that all your programs work correctly. As always make sure Windows is up to date, as it has probably been several weeks since and Microsoft may have already released some patches.

Method two: Downgrade by using you previous backup

You should always keep a backup of your computer before modifying any operating system. If you haven't upgraded to Windows 10, check out my previous post on how to prepare your computer for Windows 10. That will guide you through what you need to do before upgrading, including creating a full backup of your computer.

If you have the backup, you are haft way done. You only need to make a backup of your new files since the last full backup or simply copy all your files to an external drive. Besides, you may want to note any new software you have installed on your computer since the last backup, as you will need to reinstall them later on.

You can do this by:

  1. Searching for Control Panel with Cortana.
  2. Navigating to Programs and Features.
  3. Arranging the list of apps in your system by Installed On.

After you have the backup of your files, and you know the apps you need to reinstall, reboot your computer using the "repair disc", which you're prompted to create after creating the initial full backup.

Quick Tip: If you don't have repair disc, you can also boot with the Windows 7 installation media to perform the recovery.

Connect the external hard drive with the backup, reboot your PC, follow these steps:

  1. While in the Setup wizard, click Next, and then Repair your computer.
  2. Select "Restore your computer using a system image that you create earlier", and click Next.
  3. Select the backup to restore and click Next.
  4. Select the image you want to use and click Next.
  5. Click Next one more time and then Finish to begin with the recovery process.

Once the process completes, you'll be back to the previous version of your operating system, in this case, Windows 7.

Method three: Downgrade by clean installation

Alternatively, in the same way like you could do in going back to Windows 8.1, you can downgrade from Windows 10 to Windows 7 by doing a clean installation of the operating system. This method is more suited for people that have the time and don't trust the concept of rolling back.

This process involves having to reinstall the operating system using the Windows 7 installation media, and formatting, which will erase everything on the hard drive. You'll also need to reinstall all your applications once again, and use a backup to restore all of your files. This process takes more time than other methods, but it will ensure that everything works correctly.

Follow this steps:

  1. Reboot your computer with Windows 7 installation files (make sure your PC is set to boot from the drive with installation files).
  2. During the Windows Setup, click Next, accept the licensing, and click Next.
  3. Click the option Custom: Install Windows only (Advanced) option to do a clean installation.
  4. Delete any partition created by you current installation of Windows.
  5. Select the empty drive and click Next to start the installation process.

Important: If you have a partition where you store files or a secondary hard drive, you don't have to delete these partitions.

Once the Windows Setup process completes, you will once again back to Windows 7. However, remember that you need to restore your files and reinstall and configure all the programs you have previously installed on your system.

Wrapping this up

As you can see, downgrading from Windows 10 to either Windows 7 or Windows 8.1 are virtually identical. Just remember that in both versions of the operating system you only have a month to use the Settings app to go back to you previous version. If past the 30 days, then you likely have to go through one of the other two methods.

Always remember to make a full backup first, you'll never know when you are going to need it to recover!

Are you giving up on Windows 10 and going back to Windows 7? Let us know your experience in the comments below.

More Resources

Remember that we have many other articles on Windows 10, if you need help you always check these other resources:

Our definitive review of Windows 10

Windows 10 on Windows Central – All you need to know

Windows 10 help, tips, and tricks

Windows 10: Help and discussion forum at Windows Central


How to generate a Battery Report in Windows 10

$
0
0

If you are running Windows 10 on a laptop or tablet battery life is one of the most important things you are constantly observing. There is never enough battery for a portable device, so how we manage them is important.

Checking the estimated battery life on your laptop or tablet is super simple. Just click the battery icon in the notification area and you can see the percentage battery left and the estimated time you have to work. That estimate, however, is just that, and it is solely dependent on what you are doing at that moment. Just because it shows 8 hours does not mean you can get that much time if you start gaming, for instance.

This issue brings up the question: What is your actual battery life on your laptop? In other words, from your real-life usage combined with charge and discharge rates is there an actual battery time? The answer is yes, although to find it is a bit tricky.

By no means is this method new, in fact, every recent version of Windows can do it not just Windows 10. However, for many people just starting out you will want to know this command. Let's go!

How to generate a Battery Report in Windows 10

1. Right-click on the Start menu to bring up the menu

2. Command Prompt

Choose Command Prompt (Admin) from the menu. Note that this must be the Admin version and not a regular command prompt.

3. Yes to UAC prompt

A prompt will appear to which you need to give permission

4. Command

Copy and paste powercfg /batteryreport /output "C:\battery_report.html" into the command prompt window. Note that for the pros you can designate the output to any directory. For simplicity, we are placing it in the C:\ root folder.

5. Open file

Using Explorer navigate to C:\ aka the root directory. You should see a file labeled battery_report.html. Double-click on it to open the file in your default browser e.g. Microsoft Edge, Chome, Opera.

That's it!

Making Sense of the Report

The report itself is made up of a few somewhat obvious subsections. The first area defines the parameters of the hardware, OS version, and other file details. Here you can see samples from my MacBook Pro running Windows 10, although it works on any portable device. Note that this report does not generate for desktop PCs for somewhat obvious reasons.

The next section is called Installed batteries and gives a general breakdown of the battery installed on your computer. This information includes name, manufacturer, chemistry, design capacity and full charge capacity.

Recent Usage is a very useful section as it details the time, state (active, suspended), power source and remaining capacity of the battery. In short, this is the record of when the laptop went to sleep, became active, and or charged with AC power along with the mWh capacity. If your computer is waking when it should not, you should see it here. There is also a nifty Battery Usage graph below this area.

Other areas like Usage history and Battery capacity history are good to check for battery health. It is well known that Li-On batteries deteriorate over time, and this is where you can see that happen.

Battery life estimates is probably the most interesting section for most users. Here you can see what the OS is predicting for your computer's battery life with regular usage. This feedback tends to be more stable and accurate than the live estimate found by clicking the battery icon.

Like all data sources, the more information this tool has, the more accurate the report. If you just installed a new OS (including some Insider builds), you need a few power cycles and a few days for the Battery Report to have enough data for it to be valuable. The longer you use the OS and the more you keep the laptop off of AC power the better the estimates are for the long run.

Regardless, you now know a cool trick to get a lot more details about your laptop's battery! Make use of it and occasionally check it to make sure nothing is going wrong.

More Resources

Remember that we have many other articles on Windows 10, if you need help you always check these other resources:

Our definitive review of Windows 10

Windows 10 on Windows Central – All you need to know

Windows 10 help, tips, and tricks

Windows 10: Help and discussion forum at Windows Central

How to temporarily prevent a Windows or driver update in Windows 10

$
0
0

Show or hide updates Windows 10

We showed you how easy it was to defer Windows 10 updates, however, it was limited to some editions of Windows 10. There is another method that even users with Windows 10 Home edition can utilize. It's not as straightforward as the first method, but you won't need to spend money to upgrade to Windows 10 Pro.

In Windows 10, your device is always kept up to date with the latest features and fixes. Updates and drivers are installed automatically, with no need to select which updates are needed or not needed. However, some people prefer to choose which updates and drivers to install. Here's how to do it.

1. Download and open the "Show or hide updates" troubleshooter package. This package from Microsoft lets you select the updates that Windows will install automatically.

Windows Update troubleshooter

2. Tap or click Next to start checking for updates. Tap or click Hide updates.

Windows Update troubleshooter

3. If there are updates available, check the box next to the update that you do not want to install and tap or click Next.

Windows Update troubleshooter

4. Close the troubleshooter and open Settings> Update & Security. When you check for updates, Windows 10 will not be able to see or install the updates you've hidden with the troubleshooter package above.

Windows Update troubleshooter

That's it! You can unhide items by re-opening the troubleshooter package and selecting Show hidden updates. Check the box next to the item that you want to install next time Windows checks for an update.

I do not have any reasons to use the troubleshooter package on my Surface 3, but some people might have a specific driver or update that temporarily causes issues with their device. In that case, people may uninstall those drivers, and this method prevents the problematic driver or update from reinstalling automatically the next time Windows Updates are installed.

Do you need to use this tool? What device and which drivers or updates are you having trouble with? Sound off in the comments!

We hope these tips help you become more productive in Windows 10. For more tips, we have many more posts like this one in our Windows 10 help, tips, and tricks page.

How to set metered connections and disable Windows 10 Update Delivery Optimization

$
0
0

Windows 10 brings with it many new features and some old ones just moved around. When it comes to internet data many users, especially in the US, enjoy unlimited data at home. However, there are still parts of the world where there are monthly data caps for various internet connections, and this could cause problems with Windows 10.

One new feature in Windows 10 is Windows Update Delivery Optimization. The feature "lets you get Windows updates and Windows Store apps from sources in addition to Microsoft". Microsoft explains the reasons for this feature in their detailed FAQ on the technology:

"This can help you get updates and apps more quickly if you have a limited or unreliable Internet connection. And if you own more than one PC, it can reduce the amount of Internet bandwidth needed to keep all of your PCs up-to-date. Delivery Optimization also sends updates and apps from your PC to other PCs on your local network or PCs on the Internet."

The idea here is for distributed Store and Windows Updates, which helps you with faster, more reliable downloads. It also helps Microsoft by offloading some of their bandwidth and reaching more customers quickly. The idea is a very good one, but there are two concerns:

  1. Windows Update Delivery Optimization is on by default– If you did Express Settings during the Windows 10 setup, you agreed to have this feature enabled

  2. PCs on the Internet– Although it is one thing to share with computers on your network, you are also possibly sharing bits of updates (not the whole thing) to other PCs on the internet. There is no security concern here, to our knowledge. The data is siloed, and there are only shared bits, not whole services or updates.

Microsoft is pretty forward with this information detailing it in their FAQ on the subject, which is also linked in Settings. For most users with a home connection, this feature does not matter. Microsoft is not commandeering your network akin to a Torrent, swallowing up massive amounts of bandwidth in an all-they-can-get manner. Or perhaps more safely, this has not been demonstrated to our knowledge.

If you are uncomfortable with the setting, Microsoft makes it rather easy to control. I choose to leave WUDO on as I think is the right way for most users. However, you are in charge so here is how to turn it off.

Disable or Modify Windows Update Delivery Optimization

1. All Settings

2. Update & Security

3. Windows Update

4. Click Advanced options

5. Choose how updates are delivered

6. Modify

Here you can disable or enable Windows Update Delivery Optimization. You can also choose between share with PCs on my network or PCs on my network and PCs on the internet.

Click Learn more to jump to Microsoft's FAQ for more information.

Like all new tools, Windows Update Delivery Optimization is controversial for some users. Personally, I think a lot of it is over-reaction, which is why I leave this setting enabled. However, everyone has their reasons, their security concerns, so it is good Microsoft gives you a choice.

Metered Networks

The problem with Windows Update Delivery Optimization (or WUDO) also arises for those on a metered (or capped) data connection. Microsoft is very clear though about what happens:

"As with Windows 8.1, Windows 10 won't automatically download updates or apps if it detects that your PC is using a metered connection. Similarly, Delivery Optimization won't automatically download or send parts of updates or apps to other PCs on the Internet if it detects that you're using a metered connection."

By default, Microsoft does not use WUDO for detected metered connections. Of course, that is the rub. The OS must be aware that it is using a metered connection e.g. the LTE radio in the Surface 3 or X1 Carbon is identified as being metered by default. In that case, WUDO does not work on my Lenovo X1 Carbon, although I can over-ride it.

If, however, your connection is metered, and Windows does not detect it you need to set that feature manually. By doing this, you can keep on WUDO and not have to worry about it being used on capped internet connections. Here is how.

Set Wi-Fi to Metered

1. Connected

Make sure you are connected to the Wi-Fi network that you wish to set as metered

2. All Settings

3. Network & Internet

4. Advanced options

You may have to scroll down if you have a lot of networks. Assuming you are connected to the network you want to set as metered, hit Advanced options for the next step.

5. Turn on

Under Metered connection, you can toggle Set as metered connection to On.

That's it. Now that Wi-Fi connection is set to metered, and the OS will throttle data usage for just the barebones like user initiated web browsing or email checking. These limitations include:

  • Windows Update will only download priority updates.
  • Apps downloading from the Windows Store might be paused
  • Start screen tiles might stop updating
  • Offline files might not sync automatically

Setting to metered also prevents WUDO from being utilized.

No Ethernet for metered?

Of course, you may have noticed that this setting works only for Wi-Fi connections and Mobile Broadband e.g. Surface 3 LTE. It does not, however, work for ethernet. This inability means if you plug your PC in via a Cat-5 cable for internet the OS assumes you have unlimited data available.

If you use have a metered internet account, and you use ethernet, then you should disable Windows Update Delivery Optimization as described above. You can also use the 'defer Windows Updates' methods, referred to in our previous articles:

How to defer Windows 10 updates

How to temporarily prevent a Windows or driver update in Windows 10

Another option is to try and switch to a strict Wi-Fi-only connection (unplug ethernet) or use a USB Wi-Fi dongle and set those to metered. This last resort should only be necessary for a small minority of users, but it is good to know.

Microsoft's Windows 10 is a very cloud-based OS. This reliance on a dedicated internet connection should not be too surprising as the world moves to cloud computing more and more. From roaming profiles to syncing wallpapers, OneDrive, Windows Updates and Windows as a Service (WaaS), this is a very internet-dependent OS.

At least you know now how to reign all of that in if you have limited data per month.

Are you keeping WUDO on or off? Let us know why in comments!

More Resources

Remember that we have many other articles on Windows 10, if you need help you always check these other resources:

Our definitive review of Windows 10

Windows 10 on Windows Central – All you need to know

Windows 10 help, tips, and tricks

Windows 10: Help and discussion forum at Windows Central

Oh snap! 3 other ways to arrange multiple windows in Windows 10

$
0
0

Cascade Windows

When you have multiple apps open in Windows 10, a great way to re-arrange them on your desktop is by using Snap. Just drag the top of the app window top edge of the screen to maximize a window or use any of the edges to snap them to a side or corner. However, did you know there are three other ways to arrange them in your desktop? We'll show you.

First, let's talk about Snap. What's new in for Windows 10 is that you can now Snap open Windows to four corners. If you have any other open windows after snapping one window, you will see Snap Assist. This new feature on Windows 10 displays the other apps as thumbnails in the available space. Tap or click one of the thumbnails to snap it in that space. You can see it in action in this video below:

So now that you're familiar with Snap, let's talk about the three other ways to arrange windows in your desktop. These options are available when you right-click the taskbar.

Right-click Taskbar

1.Cascade windows - puts windows in a single stack that has been fanned out so that the window titles appear.

Cascade Windows

2.Show windows stacked- puts windows in one or more vertical stacks depending on how many windows you have open.

Stacked Windows

3.Show windows side by side- place each window side by side on the desktop so you can see all the windows at once.

Side by Side

It's not hard to be productive on Windows 10 when you combine Snap, Task View, Virtual Desktops, and other multitasking tips. What do you think of these three other views? Will you be using them? Let us know in the comments!

For more tips, we have many more posts like this one in our Windows 10 help, tips, and tricks page.

Use Cortana to define words for you in Windows 10

$
0
0

Microsoft's Cortana has many uses including sending emails or checking the weather. One of the best uses though is a simple look-up feature for words and their definitions. Combined with the Hey Cortana voice recognition using Cortana to tell you quickly what a word means is a great hands-free tip.

There are multiple ways to get Cortana to define a word. If you have Hey Cortana enabled you can simply blurt out your request:

"Hey Cortana what is the meaning/definition of inchoate?"

"Hey Cortana define ubiquitously"

You can, of course, also just type in your request e.g "define beatitude" although this admittedly takes some of the speed (and fun) out of using the personal digital assistant.

For many words, Cortana displays the definition within a card, and OxfordDictionaries or EncartaDictionaries powers it. Sometimes, if Cortana misunderstands you or does not have the definition, the assistant opens up a web page after performing a web search for it.

There is not much else to say about the feature outside of it being helpful, especially if you are writing something.

Ask Cortana

If you are using the Microsoft Edge browser and are reading an article with a word you do not know, Cortana has you covered here too. Simply highlight the word using your mouse (or tap if on a touch screen) and right-click to bring up a menu. Choose Ask Cortana and the assistant should grab the definition for you in a slide-out window from the right side.

Ask Cortana Microsoft Edge

  1. Highlight word
  2. Right-click
  3. Choose Ask Cortana

The beauty of this method is you do not have to open yet another browser tab disrupting your reading. Instead, Cortana pops in, gives you the definition and then disappears when completed. It's fast, clean and to the point. Even more neat is if you see the little Play button you can press it to hear how the word is pronounced:

Hopefully next time you find a word you are not familiar with Cortana will lend you a hand. All you have to do is ask!

More Cortana Resources

Need more information on Cortana and Windows 10? Maybe these will help you out!

Hey Cortana main topic page

How to enable 'Hey Cortana' in Windows 10

How to send an email with Cortana on Windows 10

How to check the weather anywhere with Cortana on Windows 10

How to set a reminder with Cortana in Windows 10

Viewing all 5861 articles
Browse latest View live


Latest Images