Quantcast
Channel: Help & How To
Viewing all 5861 articles
Browse latest View live

Windows 10 build 15014 for PC: Everything you need to know

$
0
0

A new test preview of the Windows 10 Creators Update rolls out, and here we take a closer look at the new features and improvements for PC.

Microsoft releases a new test preview as part of the Creators Update. This time around, the company is rolling out Windows 10 build 15014 for PC and Mobile devices through the Fast ring, and this new flight delivers a new wave of features and improvements.

Windows 10 build 15014 is a minor update, but it provides many new changes, including a new updated version of Microsoft Edge, which allows you to read ebooks that you can now purchase from the Windows Store. You can now pick your very own accent color when personalizing your Windows 10 experience. On the Creators Update, the operating system can automatically free up space when needed, there is a new slider on the power flyout to improve battery file or performance on demand, and a lot more.

We're expecting to see these new features and changes as part of the final release of the Windows 10 Creators Update, which should be available sometime in April.

While this release is available for both PC and Mobile, here we're going to be focusing on the PC version of Windows 10.

Here's everything you need to know about the most recent preview of Windows 10 for PC.

Windows build 15014

Start & Cortana

On Windows 10 build 15014, the Start menu remains virtually the same, but Microsoft is adding a few improvements, including a new animation when creating folders to make the experience a bit smoother.

Cortana isn't getting significant changes either, but the search box has been updated with a slightly new look featuring lighter color shade. Also, Cortana's voice notifications and Action Center look more consistent with larger text size and accent color.

Desktop

This flight also introduces a new power management feature to improve the battery life on Windows 10 devices.

Starting with build 15014, some of you will notice an updated power flyout on the Taskbar, which includes a new slider to change the power scheme. With this new feature, you'll be able to switch power modes from "Best battery life" to make your battery last longer. Or you can move the slider up to "Best performance" to makes sure your device gets optimal performance on demanding tasks -- but keep in mind that you'll be sacrificing battery life using this mode.

Image source: Microsoft

The new power management slider is currently for showing and it doesn't work, but the company says that the feature will be operational in future test previews of the operating system. While users will be able to change the power settings manually, Microsoft also notes that is "working with OEMs to determine the best settings for their customers, so that they can ship those on new Windows 10 PCs."

Additionally, the power flyout no longer includes the "Battery Saver" button, as a new power slider will be incorporated.

On Windows 10 build 15014, the Mail app is pinned by default on the Taskbar, but you can always unpin it, and in future updates, it will no longer appear by default on the Taskbar.

Another small change is happening in the power user menu (Windows key + X). Previously, we noticed Microsoft removing Control Panel from the menu for Settings. Now in build 15014, the company is also replacing "Programs and Features" for "Apps & features," which opens the Settings app instead of Control Panel.

Settings

On Windows 10 build 15014, the Settings app continues to improve, as the company introduces new features and tweaks.

Display

On Settings > System, the Display page updates the Blue Light settings. Now when you click the Blue light settings link, you'll notice an updated slider to change the color temperature, and when lowering blue light, there is a new animation that should be a little smoother than before.

Microsoft also says that new tweaks will be added in future builds.

Storage

On Settings > System, the Storage page now includes a new Storage sense section that introduces a new feature, which allows the operating system to free up space by deleting files, such as temporary files and those items that have been in the recycle bin for more than 30 days.

This feature is optional, and you can enable it by turning on the Storage sense toggle switch.

You can also click the Change how we free up space link to access a new page, which includes two options letting you decide the files you want Windows 10 to delete automatically.

Also, there is a Clean now button to free up space on your hard drive on demand.

Wi-Fi

On Settings > Network & Internet, the Wi-Fi page has been updated and now it combines the "Wi-Fi Sense" and "Paid Wi-Fi Services" into a new section called "Wi-Fi services".

Keep in mind that while you'll no longer see the mention for "Wi-Fi Sense," the feature continues to be there. It's the "Connect to suggested open hotspots" under Wi-Fi services.

Colors

On Settings > Personalization, the Colors page has been improved to allow you to pick a custom color accent.

On Windows 10 build 15014, you'll now see a Custom color button under "Windows colors" that allows you to create your very own color accent.

In the color picker, you can pick from virtually any accent color, but choose carefully as some colors will be hard to read and some colors aren't supported.

You can also click the More button to enter specific colors using RGB, HSV, or HEX color codes.

Also, the Automatic pick an accent color from my background option has been relocated to the top of the Colors page.

It's important to note that the color picker is also available in Background when you select "Solid Color" or "Picture" from the drop-down menu.

Themes

On Settings > Personalization, the Themes page includes a new Get more themes online, but this time the button will open the new "Windows Themes" section in the Windows Store.

Currently, all the themes available in the Store are the same you can already download online (over 100 as of now), but additional free and paid themes will start popping up anytime soon.

Windows Update

On Settings > Update & security, the Windows Update page remains virtually the same as previous builds, but in the Advanced options page there is a section that you select when feature update are installed on your system.

The new feature let you pick between "Current Branch" and "Current Branch for Business." In addition, there is an option to defer "feature updates" up to one year of its release, and another option to defer "quality updates" for up to 30 days.

Removable drives

On Settings > Update & security there is a new Removable drives page, which allows you to control whether or not users can save files to a removable drive that is not using BitLocker encryption.

Windows Store

On Windows 10 build 15014, Microsoft introduces a new ebook section in the Windows Store. Starting on this flight, Windows 10 users in the United States can purchase ebooks directly from the Store and read them in Microsoft Edge.

Microsoft Edge

This release also includes a new updated version of Microsoft Edge that includes a few new features and tweaks.

As mentioned above, you can now get ebooks from the Windows Store, but instead of building an ebook reader app for Windows 10, the software giant is making changes in Microsoft Edge to add support for ebooks.

On Windows 10 build 15014, Microsoft Edge bumps its version number to 39.15014 and adds a new Books section that you can access inside of the Hub, where you'll find all the books you've purchased from the Windows Store.

While the web browser already includes support for PDF files, on build 15014, Microsoft is also adding support for unprotected epub files.

The reading experience for books has also been updated on Microsoft Edge. When you open ebooks with the Windows 10 Creators Update, you'll be able to use the table of contents or seek bar at the bottom of the browser to navigate.

You can bookmark pages to make it easier to come back to an interesting section of your book. And like in most ebook readers, you can search words or phrases, and you can play embedded video and audio content.

Of course, the browser always remembers the last page you were reading, so you can quickly pick up where you left off at any time, even when you don't have an internet connection.

Other customization options include the ability to change text and add text spacing, and you can modify the font style and the page background.

Alongside these new improvements, Microsoft Edge also includes a new icon to open Web Notes to annotate web pages using Windows Ink features.

And the advanced settings page feature a new option to enable or disable sites that open in apps instead of loading the web page.

Snipping Tool

On Windows 10 build 15014, Microsoft is also updating its Snipping Tool with a new icon and new "Move" menu to access the snipping modes, including Free-form Snip, Rectangular Snip, Windows Snip, and Full-screen snip.

Wrapping things up

While this isn't a big update -- compared to Windows 10 build 15002 --, it's a good test preview with many welcome additions, and the overall performance is a lot better than previous releases. Though, it's not recommended to install this pre-release version on your main computer, because there are still a lot of things not working or not working correctly.

It's important to note that not everything is good news with Windows 10 build 15014, as Microsoft has also announced that won't be delivering the MyPeople feature, which is perhaps the biggest feature we're expecting with the Creators Update.

If you recall, MyPeople is a feature that brings your closest contacts front and center in the Taskbar, and it allows you to share messages and files with other people quickly. Unfortunately, there has been a change in the original plans, and Microsoft will not be delivering this feature with the Creators Update. Instead, it will become a feature that will be introduced with the Windows 10 Redstone 3, which is the next major update of the operating system expected to roll out sometime in Fall 2017.

This flight also includes some fixes and a bunch of new known issues, which Microsoft is listing in its official website.

What do you think about the new changes found in Windows 10 build 15014? Are you disappointed that Microsoft won't be including MyPeople with the Creators Update? Tell us in the comments below.

More Windows 10 resources

For more help articles, coverage, and answers on Windows 10, you can visit the following resources:


How to fix black screen problem on Windows 10

$
0
0

When your PC is experiencing a black screen, use this guide to troubleshoot and fix this issue on Windows 10.

Windows 10 has already proven to be a reliable operating system, but like with any piece of software unexpected things always will happen. Perhaps one of the worse issues you can come across is a black screen on your Windows 10 computer, because you don't get an error code or message giving you an idea where to start troubleshooting.

An unexpected black screen can occur in a number of scenarios on Windows 10, stemming from issues with the graphics driver, a connection problem between with your display, during the installation of the operating system, updates… or it just can happen randomly at any time.

In this Windows 10 guide, we'll walk you through a series of steps to help you troubleshoot and fix the black screen problem on your device.

How to fix black screen on your PC

Installation in progress

If you see a black screen during the installation process, depending on your hardware and data on your device the operating system may still working in the background. Sometimes it could take several hours to complete the process.

The best thing you can do in this situation is to wait, but if it's been anywhere between 3 to 6 hours, then chances are that the installation process is stuck.

If the installation is stuck, you should try shutting down your device completely. You can force your computer to shutdown by holding down the power button for about 10 seconds or until it shuts down, and then unplug the power cord.

In the case that you're using a laptop, it's also a good idea to remove the battery if possible (though increasingly that is not possible).

Then make sure to disconnect all the non-essential peripherals, including external storage, phone, printer, game controller, network cable, and secondary monitor. If possible, also turn off your Wi-Fi and Bluetooth adapters. Only leave connected to your computer the essentials: keyboard, mouse, and display.

Wait 60 seconds, reconnect the battery and power cable, but do not reconnect any of the peripherals, and power on your computer.

If this was a mere hiccup, the installation process should resume and complete successfully. Once you're on the Windows 10 desktop, remember to reconnect your peripherals and other devices.

If the installation process fails and rolls back, then keep your peripherals disconnected, and try to manually install Windows 10 updates one more time. In the case that you were trying to upgrade to Windows 10, you can try to upgrade one more time, but this time you can try using a bootable USB flash drive to install the operating system.

Double-check your video connections

If your computer gets a black screen before you sign into Windows 10, it could be a connection problem between your PC and the display.

In the case that you're using a desktop computer, double-check your display is connected properly to a power outlet and your computer.

When possible it's also a good idea trying to switch to a different video output. A lot of times a video driver can change and without a particular reason it can send the video signal to a different output port (e.g. DVI, HDMI, DisplayPort, Thunderbolt, VGA) or adapter.

If you installed a discrete graphics card, but your computer also includes an integrated video processor, you can also try switching the video connection to the integrated graphics as it could be a problem with the discrete card.

You can also try to connect a different monitor to your desktop PC or laptop to confirm that it's not a problem with your primary display.

If the computer isn't detecting the display, then you can try using the Windows key + P keyboard shortcut, press P again and then Enter. You'll need to repeat this steps a number of times to cycle through all screen options.

If you're connecting your PC to your TV, double-check the TV is turned on, and make sure to set the correct input to connect to your device.

Try to wake up the display

Many times it could happen that Windows 10 is just not detecting the display. Using your keyboard, you can use the Windows key + Ctrl + Shift + B keyboard shortcut to wake up your display.

In the case that you're using a tablet, the process to wake up the display is a bit different, press the volume up and volume down buttons simultaneously three times.

Disconnect non-essential devices

An external device connected to your computer could be the problem of a black screen. Try disconnecting all your peripherals.

If everything returns to normal and you no longer see a black screen, then try reconnecting one peripheral at a time. If your computer monitor goes black again, then you may have identified the device that is causing the problem. Disconnect the device in question, restart your computer, and if the device continues to produce a black screen, contact your device manufacturer for assistance.

Boot in Safe Mode to troubleshoot and fix a black screen problem

In the case that there isn't a problem with your external devices, there could be a number of other reasons, and you can boot your computer in Safe Mode to try to fix the problem.

You can get your computer to boot in Safe Mode in a number of ways, but in this case, you can do the following:

  1. Start your PC.
  2. At the sign-in screen, hold the Shift key down, click the Power button on the bottom-right, and select Restart.

    If you cannot see anything on the screen because of a black screen, then start your PC, as the blue Windows logo appears, press the power button and reboot again. Repeat these steps three times until you trigger Windows 10 automatic repair. Follow the on-screen directions and launch the advanced options menu.

  3. Once you're the advanced startup menu, click Troubleshoot.

  4. Click Advanced options.

  5. Click Startup Settings.

  6. Click the Restart button.

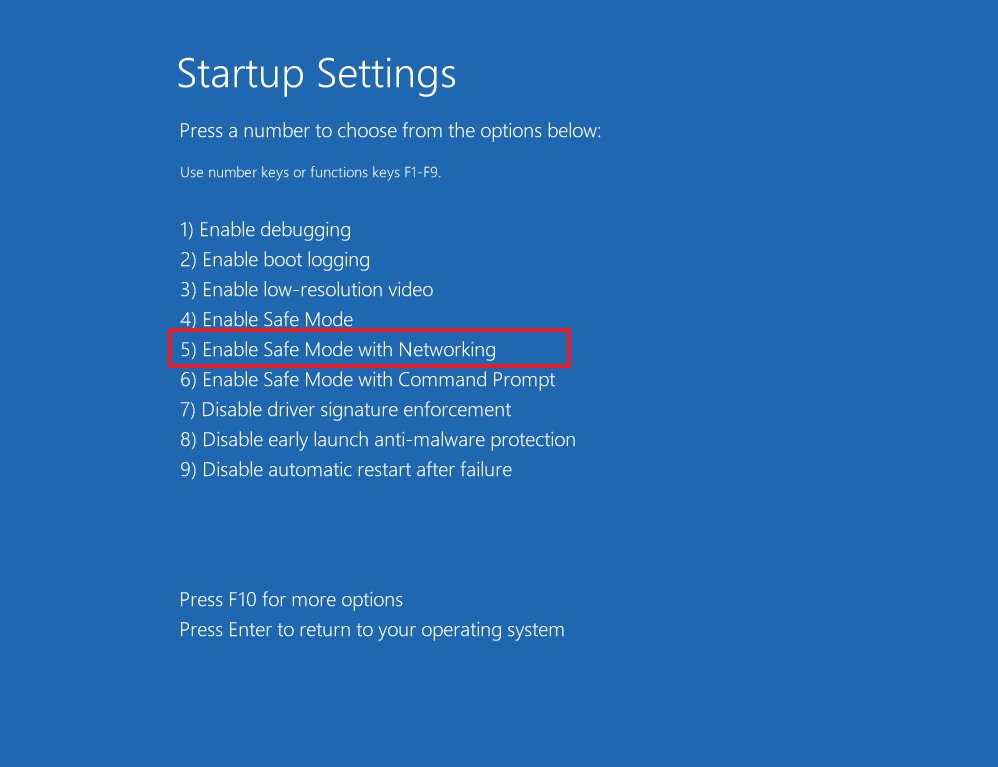
  7. On the Startup settings, press 5 or F5 to enter in Safe Mode with Networking.

Once your computer is in Safe Mode, you can try the following troubleshooting steps:

How to reinstall your video driver

Another issue that can cause your computer to experience a black screen is a buggy graphics driver update, which you might have received through the Windows 10 update. Other times there isn't a problem with the update, but the video driver may have got corrupted causing to malfunction and display a black screen.

If the video driver isn't working correctly, you can uninstall it in Safe Mode, and then let the operating system reinstall the driver automatically upon restart.

  1. Use the Windows key + X to open the power user menu and select Device Manager.
  2. Expand Display Adapters.
  3. Right-click the adapter and select Uninstall.

    Quick Tip: You can also select Delete the driver software for this device option to remove the driver from your computer. Sometimes, this is recommended, but if the operating system can't find the driver online, you'll need to download the correct driver for your video adapter from your PC manufacturer's website.

  4. Click OK to confirm.

  5. Restart your computer to complete the task.

Once your computer restarts, Windows 10 should automatically reinstall the video adapter driver and hopefully, the black screen will disappear.

If you're getting a black screen on a device that you upgraded from a previous version of Windows, you may need to download updated video driver from your PC manufacturer's support website to fix the problem.

How to disable fast startup

Sometimes the black screen problem keeps happening because fast startup is enabled on your computer.

While in Safe Mode, you can use the following steps to disable fast startup:

  1. Open Control Panel.
  2. Click on System and Security.
  3. Click on Power options.
  4. Select the Choose what the power button does link on the left pane.

  5. Click the Change settings that are currently unavailable link.

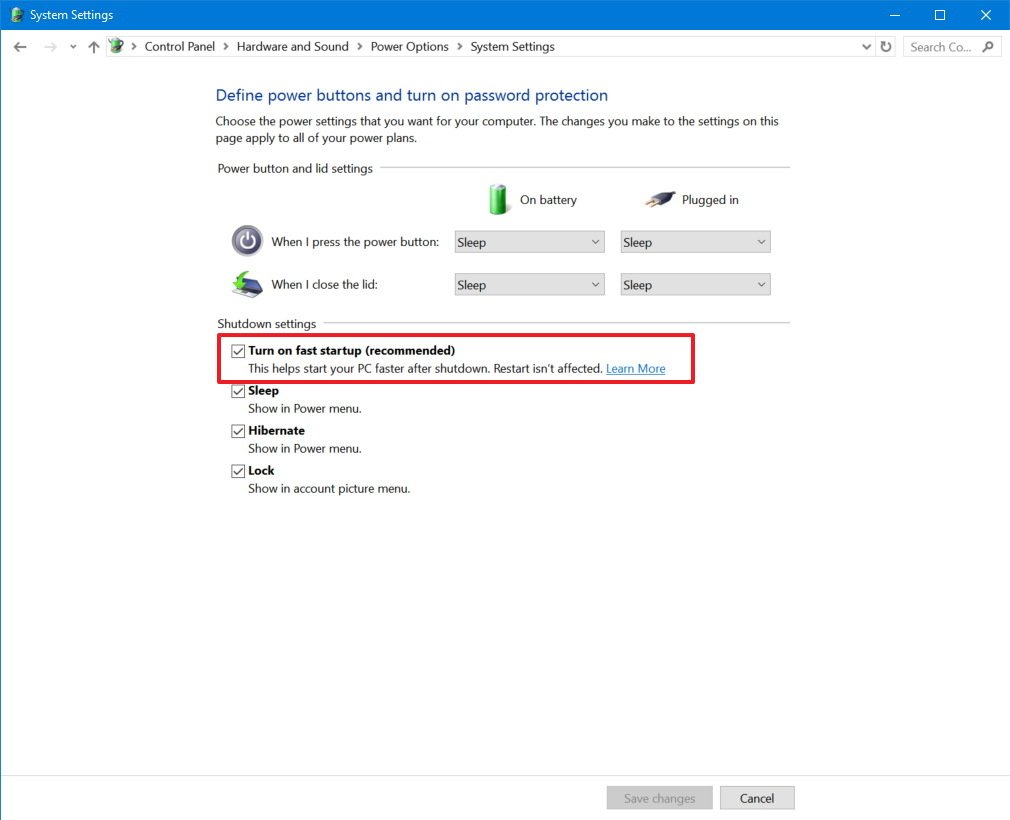
  6. Clear the Turn on fast startup (recommended) option.

  7. Click Save changes.
  8. Restart your computer to complete the task.

It's important to note that depending on your hardware configuration, your computer may not include support for fast startup.

How to disable high contrast

If you have high contrast enabled on your computer, it could also be the reason why you're getting a black screen.

While in Safe Mode, you can turn off high contrast using the following steps:

  1. Open Settings.
  2. Click on Ease of Access.
  3. Click High contrast.
  4. Select None from the drop-down menu to turn it off.

  5. Restart your computer to complete the task.

Terminate Run Once processes

Run Once process can also the be the reason of black screen after signing into Windows 10.

To terminate Run Once processes on Windows 10, do the following:

  1. Use the Ctrl + Shift + Esc keyboard shortcut to open Task Manager.
  2. Check the Processes tab and Services tab and look for any instances of RunOnce.exe and RunOnce32.exe.
  3. If you find an instance in the Processes tab, select the item, and click on End task. If you find an instance in the Services tab, right-click the item, and click Stop.
  4. Click on File.
  5. Select Run new task.
  6. Type the following command to restart your computer:

    shutdown -t00 -r

  7. Click OK to execute the restart command.

  8. Restart your computer to complete the task.

Create a new user account

A problem with your user account can also be the reason your computer is experiencing a black screen.

You can see if your user account is causing the black screen by creating a new account while you're in Safe Mode.

To create a new user account in Safe Mode, do the following:

  1. Open Start.
  2. Search for Command Prompt.
  3. Right-click the result and select Run as an Administrator.
  4. Type the following command to create a new account and press Enter:

    net user tempuser /add

    Remember to change "tempuser" in the command for the name of the account you want.

  5. Type the following command to change the account type to Administrator and press Enter:

    net localgroup administrators admin /add

    Don't forget to change "admin" in the command for the name of your account.

  6. Restart your computer to complete the task.

Note that you're using Command Prompt instead of the Settings app to create an account. This is because, for some reason, Windows 10 won't let you create a new user account using Settings while in Safe Mode.

Once you restart your computer, sign in with the newly created account. If your computer is no longer experiencing a black screen, then the problem was something on your old user account.

If this is the case, you may want to switch to the newly created account -- for more help, you can use our guide to move your files, link your user profile with a Microsoft account, and to delete the old account.

Did these troubleshooting steps help you to fix the black screen problem? Tell us in the comments below.

More Windows 10 resources

For more help articles, coverage, and answers on Windows 10, you can visit the following resources:

How to stream on Beam with FTL

$
0
0

Beam

Beam's latest streaming technology is promising sub-second latency and you can try it out right now.

FTL stands for faster than light and it's the term applied to the crazy fast, low latency technology Beam has been working on for its streams. It ultimately results in an almost invisible stream delay, making for a better all-around experience for the viewers, since they're able to interact with the streamer in real time.

It's still a work in progress but anyone who wants to stream on Beam can try it out for themselves right now. Here's what you need to know.

What you need

Beam

Right now there are two pieces of software you can use to stream to Beam using FTL: XSplit and Tachyon.

For XSplit, you need to be using the latest beta version of XSplit Broadcaster to enable FTL. Tachyon, on the other hand, is a customized version of OBS Studio with Beam's extra goodies under the hood.

Download XSplit Broadcaster beta

Download Tachyon

If you need any assistance getting set up to stream on Beam, we recommend checking out our comprehensive start-up guide linked below. That'll get you logged in, set up and ready to roll. As Tachyon is essentially OBS Studio, setting up is the same.

How to stream on Beam

How to use FTL in XSplit

FTL in XSplit

Once you've updated to the latest beta version of XSplit, at first boot all your necessary plugins will also update. Once you're loaded up enabling FTL is a simple process.

  1. Select outputs from the menu bar.
  2. Click on the settings cog next to your Beam account output.
  3. Under the channel settings box tick the box next to Use FTL (beta).
  4. Click OK.

Now you're all set. But do remember that the integration in XSplit is in beta so there is a chance of bugs. XSplit has already pushed out an update to improve things, and will no doubt continue until it's ready to be pushed out in public builds. Current issues include potentially not getting the closest server when this is set to automatic, so you might want to set that manually for the time being.

To ensure you're on the latest build for the best support, keep one eye on the XSplit blog.

How to use FTL in Tachyon

Tachyon

To set up in Tachyon, you won't need to enable any special settings to use FTL. OBS is an open source software project and Beam has built the necessary bits into the Tachyon version.

What you will need to do is make sure you've set everything up correctly, as detailed in our how to stream on Beam guide. You will need your stream key first, from Beam, as unlike XSplit you can't just log in and authenticate. Get that by following these steps:

  1. Click on your avatar on the Beam homepage
  2. Next, go to manage channel.
  3. Then click on setup stream.

Apply the stream key into Tachyon and make any adjustments to your stream setup in the settings and you'll be ready to go. Now, when you stream to Beam you'll always be using FTL.

For now, this is how you'll have to go about things if you want to try the FTL protocol for your Beam streams. XSplit does require a subscription to get the most from, but Tachyon is at least free and will suit you if you're familiar with OBS Studio.

And if you're using FTL for your own Beam streams, drop us a line (and your channel name!) in the comments below and share your experiences with us!

How to stream your Xbox One on Beam

$
0
0

Beam

How to stream your Xbox games on Microsoft's Beam live streaming service.

What on earth is Beam you might be asking? I thought everyone streamed on Twitch or YouTube? A relative upstart in the streaming game was scooped up by Microsoft and suddenly found itself in the limelight.

So you might find yourself wondering how to get started with it and share your Xbox One games (other consoles are available!) with the world. Twitch is built into the Xbox One for simple streaming but with Beam, at least for now, you'll need some additional hardware and software. This will soon be changing, but the best, most customized streams will always come using external resources.

That hardware will be a capture card, such as the Elgato HD60S and your PC, as well as some broadcasting software. Two of the most popular options are Open Broadcaster Software (OBS) which is free, and XSplit which requires a subscription for the full feature set.

Before any of this, you'll need to sign up for a free account over on the Beam website. You can either sign up using email or login with Twitter, Discord or your Microsoft Account.

Update 23 January 2017: We've refreshed the OBS portion of this guide to reflect changes to Beam's website as well as adding information about using the new, super-fast FTL technology for your streams.

How to stream on Beam using OBS

  1. On your Beam dashboard select manage channel from the sidebar menu on the right-hand side of the screen.

    Beam

  2. Select Setup stream from the screen that now displays.

    Beam

  3. When asked what you're using to stream, select OBS.

    Beam

  4. The best server should be selected automatically based on location and latency, but you can change this here. Next, copy your stream key from the highlighted box.

    Beam

That's all you need to do for now on the Beam website, next fire up your broadcasting software, in this case, OBS Studio.

  1. Select Settings in OBS Studio.

    Beam

  2. Select the Stream tab on the left sidebar.

    Beam

  3. Select beam.pro from the dropdown box for desired streaming service. In the box below paste the stream key you copied from your Beam dashboard.

How to stream on Beam using XSplit

If you're using XSplit Broadcaster to get your stream on, the latest versions of the app support Beam natively. Here's how you add support for Beam.

Beam

  1. In XSplit Broadcaster select Extensions.
  2. Scroll down and select Get more extensions.
  3. In the Plugin Store you now see, click on the Show Outputs button.
  4. Select Beam.
  5. To add Beam chat, now select Show Sources in the Plugin Store.
  6. Select Beam Chat Viewer.

You now have native support for streaming to Beam added to XSplit. From here it's very easy to set up your stream:

Beam

  1. In XSplit Broadcaster go to the Outputs menu.
  2. Scroll down to Set up a new output, and then select Beam.
  3. In the window that presents, click on Authorize.
  4. You'll now be taken to Beam to log in with your account information.
  5. Once you're all logged in, go to the Outputs menu again.
  6. Click on the settings cog next to your Beam account.
  7. The settings menu will now open allowing you to customize your output, including audio and video bitrate, as well as name your stream.

That's about all there is to it. These basic steps will help you set up your Beam account for streaming, but there are other things to consider, such as bitrate. Beam recommends what you should use in your dashboard, in our case it's showing as 720p, 30fps, and a maximum 2500kbps bitrate. You'll need to take these into account in your broadcast software as you set up your stream. A lot of this depends on your broadband upload speed and consistency.

How to stream using FTL

Beam

FTL stands for Faster Than Light and it's Beam's latest technology promising sub-second latency on your streams. That means an almost non-existent delay between you and your audience, and Beam is all about interactivity.

FTL is still a work in progress but you can try it out for yourselves using XSplit or a custom version of OBS Studio known as Tachyon. If you're interested, we've got a guide on getting set up to add some super speed to your streams!

How to stream on Beam using FTL

If you're ever lurking on Beam, be sure to give Windows Central a follow!

How to clean your mouse mat

$
0
0

Razer Firefly

Using a mouse mat on a daily basis can lead to the surface becoming clogged with all sorts of particles, be it dust or food, which can interfere with mouse operation and reduce performance.

Like everything in the house or office, the trusty mouse mat needs to be cleaned on a regular basis. Going through long periods of use without adequate care can result in performance hits when it comes to the mouse. This is due to the build up of dust, crumbs from food, or other particles that may fall and settle on the surface. Luckily, it doesn't take much time nor effort to clean the mat itself.

Here's what we'll need:

  • Large bowl (sink, basin or even the bath will also do)
  • Washing up liquid
  • Hot water

Depending on the size of the mouse mat, you may want to select an appropriately-sized bowl or basin, which should aid in effectively washing through both sides of the mat without having too much of an overhang.

  1. Brush any particles off the surface.
  2. Fill the bowl or basin with fresh, hot water.
  3. Pour in some washing up liquid.

    Mouse Mat

  4. Insert the dirty mouse mat.
  5. Rub the surface gently.
  6. Turn the mat over and do the same to the underlay.

After you've cleaned the mat and can no longer see or feel any particles along the surface of the mat, be sure to give it a good rinse and remove all the foamed soap. There are plenty of options to dry your mousepad, from patting it with a towel to letting it air dry to hitting it with a blast from a hair dryer. Regardless of which option you select, your mousepad will still retain some water, so you'll need to let it thoroughly dry before putting your mouse on it (remember: electronics and water don't mix). I recommend you leave it a solid 12 hours, or at least until it's dry to the touch.

Corsair MM600

Also, should your mat have advanced features like USB ports and LED lighting, be sure to check the manual and online documentation as to whether or not this method is suitable for that particular product. Alternatively, cleaning wipes can work wonders for removing stains and accumulated crud from the surface of the mat for maximum performance. Again, just be sure to let the surface dry thoroughly before use.

How to reset the Start menu layout on Windows 10

$
0
0

When the Start menu is not working correctly, you can use this guide to reset the layout and fix the problem.

On Windows 10, Microsoft introduced an updated version of the Start menu that combines the familiarity of the classic menu from Windows 7 with parts of the Start screen included with Windows 8.

In this new version, you get a left rail with buttons to access different settings and locations. Then there is your list of apps installed on your device, and on the right, you get your Live Tiles, which are always lighting up keeping you up to date without you even needing to open the app.

All the information about the Start menu layout is stored in a database inside the TileDataLayer folder. The only issue is that sometimes the database can get corrupted causing the menu not to work properly. Fortunately, there is a workaround you can use to reset the Start menu layout on your Windows 10 computer.

In this Windows 10 guide, we'll walk you through the steps to reset the Start menu layout to its default settings if for any reason it's not displaying or working correctly.

How to reset the Start menu layout on your PC

In order to reset the Start menu layout on Windows 10, you'll need to have three user accounts on your computer.

  • Your account: The account with the Start menu that isn't working correctly.
  • Local account: This is a temporary account that you'll need to create to copy the Start menu files to reset the menu on your account.
  • Administrator account: You'll need an administrator account to copy the Start menu files between accounts, because you can't overwrite files while they're in memory.

How to create a new local account

  1. Open Settings.
  2. Click on Accounts.
  3. Click on Family & other people.
  4. Click on Add someone else to this PC.

  5. Click the I don't have this person's sign-in information link.

  6. Click the Add a user without a Microsoft account link.

  7. Enter the information required to create an account.
  8. Click Next to complete the task.

How to enable the built-in Administrator account

You'll need another account to copy the database files between accounts. You can either create another account with administrator permissions, or you can quickly enable the Windows 10 built-in Administrator account to complete this task.

To enable the built-in Administrator account, do the following:

  1. Use the Windows key + X keyboard shortcut to open the power user menu and select Computer Management.
  2. Expand Local Users and Groups.
  3. Select Users.
  4. Double-click the Administrator account.
  5. Clear the Account is disabled option to enable the account.

  6. Click Apply.
  7. Click OK to complete the task.

How to reset the Start menu layout

  1. Sign-out of your account with the Start menu that isn't working correctly.
  2. Sign-in to the newly created local account to populate and set the environment.
  3. Sign-out of the newly created local account.
  4. Sign-in to the Administrator account.
  5. Open File Explorer.
  6. On the View tab, check the Hidden items option to show hidden files.

  7. Navigate the following path:

    C:\Users\BROKEN-START-USERNAME\AppData\Local\TileDataLayer

    Remember to replace BROKEN-START-USERNAME in the path with the name of the user account with the Start menu that isn't working properly.

  8. Right-click the Database folder that contains all the Start menu layout settings and select Rename.
  9. Rename the folder Database.bak and press Enter.

  10. Navigate to the TileDataLayer folder of the newly created local account:

    C:\Users\WORKING-START-USERNAME\AppData\Local\TileDataLayer

    Remember to replace WORKING-START-USERNAME in the path with the name of the local user account you created earlier.

  11. Inside the TileDataLayer folder, you'll find a Database folder that contains a working layout of the Start menu, right-click the folder and select Copy.

  12. Navigate the following path:

    C:\Users\BROKEN-START-USERNAME\AppData\Local\TileDataLayer

    Remember to replace BROKEN-START-USERNAME in the path with the name of the user account with the Start menu that isn't working properly.

  13. Right-click inside the folder and select Paste to copy the new Database folder to your account.

  14. Sign-out of the Administrator account.
  15. Sign-in to your original user account to complete the task.

Once you completed the steps, the Start menu should be reset and working properly.

If everything is working as expected, you can now delete the Database.bak folder containing the corrupted Start menu data.

  1. Use the Windows key + R keyboard shortcut to open the Run command.
  2. Type the following command to open the TileDataLayer folder and press Enter:

    %HOMEPATH%\AppData\Local\TileDataLayer

  3. Right-click the Database.bak folder and select Delete to complete the task.

In addition, you shouldn't forget to disable the built-in Administrator account.

  1. Use the Windows key + X to open the power user menu and select Computer Management.
  2. Expand Local Users and Groups.
  3. Select Users.
  4. Double-click the Administrator account.
  5. Check the Account is disabled option to disable the built-in account.

  6. Click Apply.
  7. Click OK to complete the task.

And you should also delete the temporary local user account you created.

  1. Open Settings.
  2. Click on Accounts.
  3. Click on Family & other people.
  4. Click on the temporary account you've created previously.

  5. Click the Remove button.
  6. Click the Delete account and data button to complete the task.

If the problem persist, you can use this guide to move to a new account, which may fix this and other issues with your current Windows 10 account. In case you have any questions, you can also head over the forums on Windows Central to find help.

Were you able to reset the Start menu layout on Windows 10? Tell us in the comments below.

More Windows 10 resources

For more help articles, coverage, and answers on Windows 10, you can visit the following resources:

How to find out if you can upgrade your laptop

$
0
0

Dell Inspiron 15 7559

It may be possible to upgrade your laptop. This may involve several components, including the CPU, RAM, storage options and possibly even a Wi-Fi or Bluetooth card. Here's how you can tell if yours can be upgraded.

We've all had it happen. You've had your laptop for a few years and it's starting to feel sluggish when you're running modern, demanding tasks. Maybe your RAM's just not up to snuff, or your old spinning-disk hard drive is starting to falter. It's time to upgrade! But instead of pitching the entire laptop, you might be able to swap out some bits inside to breath in some new life.

Unfortunately, unlike desktop PCs that are generally completely upgradable, laptops are increasingly sealed units that may have certain limitations when it comes to accessing the insides and tinkering with what's contained within the chassis. Actually gazing at specific components is one thing, being able to remove said chips and boards and replace with enhanced replacements is a completely different ball game.

ASUS GL552

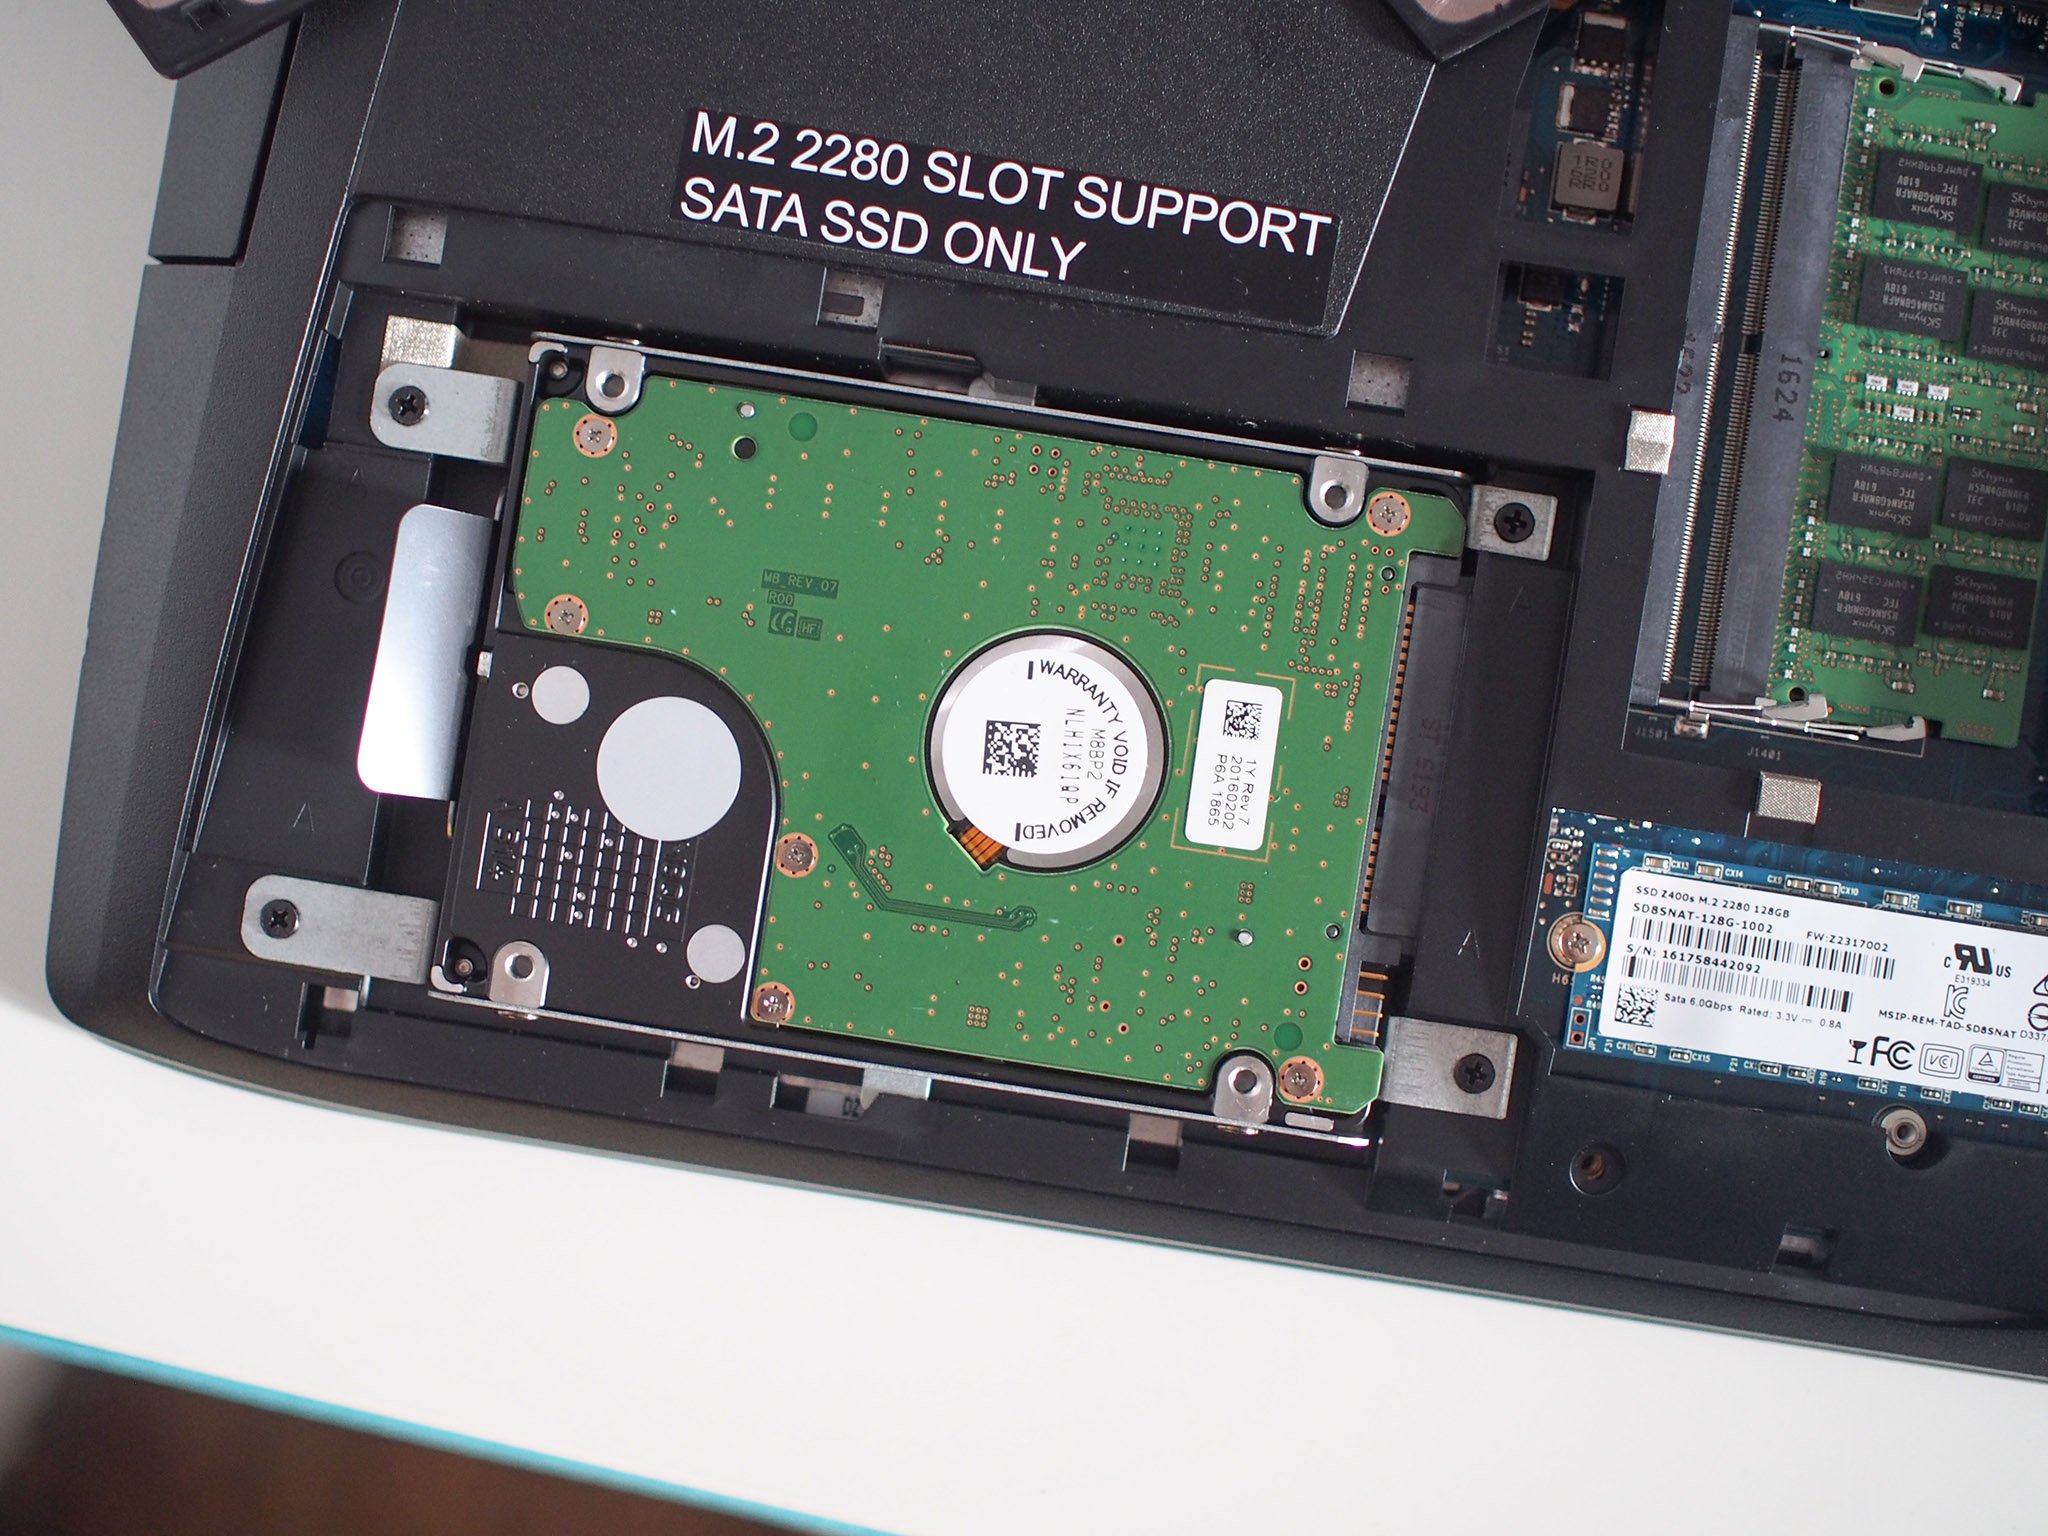
The most common upgrades these days in laptops are RAM and storage drives. The latter is a recommended task on machines that sport a mechanical drive, which can be upgraded to a vastly superior SSD solution. The same goes for RAM when the total amount available to Windows and applications is below 4GB. Moving up to 8GB or even 16GB can really boost productivity and multitasking.

We'd avoid touching anything else inside most laptops, such as the Wi-Fi card or CPU, unless you absolutely know what you're doing and are sure everything is compatible. The easiest way to see just what you'll be able to do with the laptop is to look on the manufacturer's website or open up the PC and take a look inside. The latter usually involves removing a number of screws on the underside, but be sure to check with the manual (or online guides) for further details.

Crucial RAM/SSD Checker

Crucial sells branded RAM and SSDs and the company has a handy tool available that can quickly check if you're able to upgrade the memory or storage in thousands of laptops.

  1. Head to Crucial's website.
  2. Select the manufacturer of your laptop.

    Crucial Checker

  3. Choose the product family.
  4. Select the model of your particular laptop.
  5. Hit "Find upgrade".

The tool should return results as to what type of RAM your laptop supports and whether an SSD upgrade is in on the cards. Crucial will, of course, recommend its own products for you to use (we highly recommend the brand), but you can use alternatives from other companies, so long as you match up specifications. Be wary when it comes to SSDs as there are multiple types available. The same goes for RAM with regards to DDR2, DDR3 and DDR4.

It's also worth noting that you'll need to clone the old drive in order to continue using your Windows installation on the new storage solution. That or you can re-install Windows on the new storage drive to start fresh.

How to stop Windows 10 auto updates

$
0
0

Windows 10 software updates install on your device automatically (whether you like it or not), but this guide can help you retake control and decide when to install them.

On Windows 10, you no longer have absolute control over software updates. They're mandatory, and they download and install automatically to ensure your device stays up to date with the latest security patches and improvements. This approach is convenient for many users, but it's not one that everyone wants.

If you're running Windows 10 Pro or higher, it's possible to retake control and prevent the OS from downloading and installing updates automatically using the Local Group Policy Editor or the Registry.

In this Windows 10 guide, we'll walk you through the steps to prevent updates from automatically installing on your computer.

How to prevent automatic updates using the Local Group Policy Editor

If you run Windows 10 (Professional, Enterprise, or Education ), you can use the Local Group Policy Editor to quickly change the settings to prevent Windows 10 from automatically downloading and installing updates.

Here's how to change the Local Group Policy Editor settings:

  1. Use the Windows key + R keyboard shortcut to open the Run command.
  2. Type gpedit.msc and click OK to open the Local Group Policy Editor.
  3. Browse the following path:

    Computer Configuration\Administrative Templates\Windows Components\Windows Update

  4. On the right side, double-click the Configure Automatic Updates policy.

  5. On the left side, check the Enabled option to enable the policy.
  6. Under Options, you'll find a number of ways to configure automatic updates, including:

    • 2 - "Notify for download and notify for install."
    • 3 - "Auto download and notify for install."
    • 4 - "Auto download and schedule the install."
    • 5 - "Allow local admin to choose setting."


    You should select the update option you want to configure. If you select option 4, you can specify exactly when to install new updates. You can also choose to install updates during automatic maintenance, on a particular day and time, and you can even check the option to include other Microsoft product updates when updating the OS.

  7. Click Apply.
  8. Click OK to complete the task.

While you can pick from any of the available options, your best choice is probably 2 - Notify for download and notify for install. This option will not only prevent the OS from downloading updates automatically, which can save you data when using a metered internet connection, but you'll get a notification when new updates are available.

When new updates are released, you'll receive a notification in Action Center, but updates won't download and install until you're ready and do the following:

  1. Open Settings.
  2. Click on Update & security.
  3. Click on Windows Update.
  4. Click the Download button.

  5. Click the Restart button to complete the task.

How to prevent automatic updates using the Registry

Instead of using the Local Group Policy Editor, you can also change the Windows 10 updates using the Registry.

Important warning: Editing the registry is risky, and it can cause irreversible damage to your installation if you don't do it correctly. It's recommended that you make a full backup of your computer before proceeding.

  1. Use the Windows key + R keyboard shortcut to open the Run command.
  2. Type regedit, and click OK to open the Registry.
  3. Browse the following path:

    HKEY_LOCAL_MACHINE\SOFTWARE\Policies\Microsoft\Windows

  4. Right-click the Windows (folder) key, select New, and then click Key.

  5. Name the new key WindowsUpdate and press Enter.
  6. Right-click the newly created key, select new, and click Key.

  7. Name the new key AU and press Enter.
  8. Inside the newly created key, right-click on the right side, select New, and click on DWORD (32-bit) Value.

  9. Name the new key AUOptions and press Enter.
  10. Double-click the newly created key and change its value using one of the following options:

    • 2 - "Notify for download and notify for install."
    • 3 - "Auto download and notify for install."
    • 4 - "Auto download and schedule the install."
    • 5 - "Allow local admin to choose settings."

  11. Click OK.
  12. Close the Registry to complete the task.

Although you can use any of these available values, your best choice is to change the value to 2 to configure the "Notify for download and notify for install" option. Using this value prevents Windows 10 from downloading updates automatically, and you'll get a notification when new updates are available.

After tweaking the Registry, when new updates become available, you'll receive a notification in Action Center, but updates won't download and install until you're ready and do the following:

  1. Open Settings.
  2. Click on Update & security.
  3. Click on Windows Update.
  4. Click the Download button.

  5. Click the Restart button to complete the task.

Wrapping things up

The steps mentioned in this guide are meant to prevent regular updates that patch security vulnerabilities and improve the overall performance of Windows 10. If you're looking to prevent the OS from installing feature updates, such as the Windows 10 Creators Update, you need to use this guide to defer major updates.

We do not recommend using a computer without the latest updates, because they're often key to keeping your Windows 10 PC running properly. However, there will be times when you may want to manually apply new updates, when you want to install them during a particular time, or because you want to wait until you're sure the update will not cause issues.

If you only want to prevent your computer from restarting when you're actively using it you can configure Active Hours in the Settings app.

More Windows 10 resources

For more help articles, coverage and common questions about Windows 10, check out the following resources:


How to use Kodi on Xbox One

$
0
0

Kodi

You may not be able to install Kodi directly onto the Xbox One, but that doesn't mean you can't cheat a little.

If Xbox One is the center of your home entertainment setup, you can integrate the media-playing software, Kodi, using a workaround. For some reason you can't just install Kodi on the Xbox One. That's a little disappointing considering it grew from Xbox Media Center (XBMC), from the original Xbox console days.

The Xbox One has an HDMI passthrough, so you can bend the rules a little and plug in a Kodi box, which you can then operate through the TV feature on the Xbox One console. That's one less thing plugged into the back of your TV. It's not as good as running it on the Xbox One, but it's still a good option.

What you need

Raspberry Pi

Ultimately you need a small Kodi device to connect up to the HDMI input on the back of the Xbox One. You could just hit the pages of Amazon and get a generic box preloaded with it, but the downside there is that they usually run a horrible build of Android.

There's also the Amazon Fire TV Stick, which is nice and compact, or if you have one or like to tinker, the Raspberry Pi is an option, as well. If you go for either of these options you'll have to set things up yourself, but that's really easy in both cases.

Our buddies over at Android Central have guides on how to get going with both:

How to install Kodi on a Raspberry Pi

How to install Kodi on an Amazon Fire TV Stick

Remote control

Kodi

Once you have your Kodi box plugged into your Xbox you just need to open the TV application and interact with it. However, you need a remote control, because you're actually controlling another device, not just a TV channel. If you're using a dedicated box or a Fire TV Stick, you'll have a hardware remote already.

If you use a Raspberry Pi you can go down the hardware route or the software route, even with a Windows phone. The great thing about Kodi is that it's open source, and folks are free to build all kinds of things for it. Other mobile platforms have official remote apps from the XBMC Foundation, but on Windows 10 you'll need to go third-party.

OSMC Remote

You've got a few options to choose from. OSMC remote is a basic yet well-made app to use Raspberry Pi. If you're looking for a more in-depth remote experience, try something like mrRemote for Kodi. Both are free.

Download OSMC Remote from the Windows Store

Download mrRemote for Kodi from the Windows Store

For hardware solutions, check out the official OSMC remote provided by the folks who build the Raspberry Pi fork of Kodi by the same name. Or you can snag a cheap wireless handheld keyboard, such as the Rii i8 that we previously reviewed. A keyboard will give you a quicker experience if you need to search within Kodi, but the OSMC remote is nice for kicking back and browsing.

You may even be able to use one of your Xbox Media Remotes, in some cases. OSMC, for example, definitely has support built in, but you'll need to check out the remotes area in the settings on your particular build to be sure.

Add-ons

Kodi

When you first setup Kodi it will be completely empty. You have to add sources of media, and there are a bunch of legal add-ons available right out of the box in the official Kodi repository.

These include YouTube, Twitch and OneDrive, as well as some services provided by cable TV networks, news channels and the Smithsonian Museum. It's not limited to video, either, so you can also pull in music and photos to your Kodi setup.

Bottom line

Sure, this option is a cheat, and it's not as good as being able to natively install Kodi. It now has its latest version inside the Windows 10 Store to download, however, so who knows what the future may hold? For now, you can still get in on the action and take up one less slot on your TV if you're not using a cable box with your console.

The Xbox One can handle Netflix and Amazon Prime; Kodi can handle just about everything else.

How to use Windows 10 Task Manager to kill processes that drain resources

$
0
0

If your PC is slowing down or apps stop responding, this guide can help find and terminate the processes that are causing the problem, using Task Manager on Windows 10.

The Task Manager is an advanced tool that comes with Windows 10, and it provides a number of tabs that allow you to monitor the applications, processes and services running on your computer. However, you'll likely find yourself using the Processes tab more than anything else, because it lets you quickly see how system resources are utilized, which can be very helpful when trying to troubleshoot applications or find out why your computer is suddenly slow.

In this Windows 10 guide, we'll walk you through the steps to use Task Manager to identify and stop processes that use excessive system resources, to keep your computer at top speeds.

How to use Task Manager to manage high-resource processes

Opening Task Manager

If you want to use Task Manager to view and stop processes with high-resource usage, you first need to know how to open the tool. Here are a few ways to open Task Manager:

  • Right-click the Taskbar and click on Task Manager.
  • Open Start, do a search for Task Manager and click the result.
  • Use the Ctrl + Shift + Esc keyboard shortcut.
  • Use the Windows key + Ctrl + Del keyboard shortcut and click on Task Manager.
  • Use the Windows key + X keyboard shortcut to open the power-user menu and click on Task Manager.

If this is your first time opening Task Manager, the tool will probably open in compact mode, which only lists running applications. Click the More details button to access Task Manager in advanced mode.

Task Manager compact mode (left), Task Manager advanced mode (right)

Understanding the Processes tab

When you're in advanced mode, you'll see a number of tabs, including "Performance", "App history", "Startup", "Users", "Details", "Services", and the one we're interested in, the "Processes" tab. Typically, the Processes tab is the first place you want to go to detemine which process is draining your computer's resources. This tab lists all the running processes in a single view grouped by "Apps", "Background processes" and "Windows Processes". On Windows 10, you can also find multiple instances or other processes under the same process, which helps you to better understand how they're organized and how they use system resources.

You can always expand a group to see all the processes by clicking the chevron-right icon or by right-clicking the item and selecting Expand. Usually, you'll see groups for Windows processes when opening multiple tabs on your web browser or multiple File Explorer windows, for example.

Identifying processes with high-resource usage

If an application is not responding, a website is taking a long time to load, or your system fan starts getting loud, you can quickly use Task Manager to troubleshoot the problem. In the Processes tab, the first thing you want to look at is the percentage of the total resource use for the processor, memory, hard drive and network. You can click the column names to sort the list and bring to the top the ones using the most resources. If you see any of these resources running high (90 percent or higher), you might have found the problem.

Task Manager also uses colors to highlight processes that use the most resources. You'll notice that as a process starts to consume more resources, the color begins to change from a light- to a dark-shade of orange, making it easier to tell which one is causing the problem.

Typically, when you're not actively using applications and your computer isn't working on anything specific, such as maintenance, your total CPU usage should be less than 30 percent. Applications that are running, even if you're not using them, and processes use part of your computer's memory, and that usage will increase as you use or launch more applications. Memory usually won't be an issue unless you run out of it, in which case your computer will start using virtual memory, and that can cause your PC to slow down. Generally speaking, depending on your system configuration, your total memory usage should be below 60 percent. If you're not copying files or rendering videos, disk usage should be below 5 percent.

Network connectivity is almost never the reason your system is slow, but there could be a problem in the network causing web content to take a long time to load. If you're having problems downloading files, and you see "Network" stuck at 0 percent, you may have an idea of what's going on.

Stopping processes with high-resource usage

After you identify the problem, right-click the process, and select End task to terminate it. Alternatively, you can simply select the item and click the End task button in the bottom-right corner.

While stopping a process using the Task Manager will most likely stabilize your computer, ending a process can completely close an application or crash your computer, and you could lose any unsaved data. It's always recommended to save your data before killing a process, if possible.

If you're not sure about how the process you're trying to terminate affects your PC, you can right-click it, and select the Search online option. This action opens your web browser and displays a search result with more information about the process. Windows 10 is also smart enough to let you know if you're about to end an essential system process that can crash your computer.

Wrapping things up

Although there are many other ways to troubleshoot system performance, Task Manager gives you an easy way to find out at a glance why your computer is slow or if an app is not responding, and then quickly act on it. You can end an application that isn't responding using Task Manager in compact mode, but the advanced view gives you more information about processes that are acting up in Windows 10.

More Windows 10 resources

For more help articles, coverage, and answers to common Windows 10 questions, visit the following resources:

How to customize the HTC Vive's Chaperone with SteamVR

$
0
0

For a safer room-scale experience, the HTC Vive's Chaperone is your friend!

No matter how expansive virtual worlds become, real-world space is always something we have to consider with VR. The HTC Vive's room-scale feature is a great example of this, offering full-body VR experiences – provided your play space meets the minimum spatial requirements. To reduce the chance embedding a controller in your wall, the HTC Vive comes with a play-space tracking system. Known as the Chaperone, this outlines the edges of your place space in VR, giving a rough idea of your real-world position.

Using SteamVR, this Chaperone can be customized to your liking. Although changing its appearance isn't recommended for those new to VR, it's a great way for advanced players to witness a more immersive experience.

Read more at VRHeads!

How to hide files and folders on Windows 10

$
0
0

When you have any file or folder you want to keep away from prying eyes, use this guide to hide them using File Explorer or Command Prompt.

No matter what kind of content you keep on your computer, you'll always find reasons to hide certain files and folders. Perhaps you have important documents and videos that you want to keep under wraps, or you simply want to prevent users from accidentally deleting certain files if you're sharing your PC with other people.

For whatever the reason it might be, on Windows 10, you can quickly hide a file or folder in two different ways, including using File Explorer or using the attrib command using Command Prompt.

In this Windows 10 guide, we'll walk you through the easy steps to hide a file and folder on your computer. In addition, you'll learn the steps to access those hidden items as needed.

How to hide files and folders using File Explorer

The easiest way to keep content hidden is using File Explorer.

  1. Open File Explorer.
  2. Navigate to the file or folder you want to hide.
  3. Right-click the item and click on Properties.

  4. On the General tab, under Attributes, check the Hidden option.
  5. Click Apply.

  6. If you're hiding a folder with files and subfolders, make sure to select the Apply changes to this folder, subfolders, and files option.
  7. Click OK.

  8. Click OK again to complete the task.

Once you've completed the steps, the hidden items will not be visible anymore, because by default Windows 10 doesn't show hidden files.

If you want to access your hidden items you'll have to type the complete path to the hidden folder or file you want to open and press Enter. For example: C:\Users\admin\Desktop\Files\Secret Files\Great Secret.txt.

Or you can open File Explorer, click on the View tab and make sure to check the Hidden items option. Then you can browse your hidden items as you would normally do with other content.

At any time, you can make the files and folders visible again by using the same steps mentioned above, but this time on step 4 make sure to clear the Hidden option.

How to hide files and folders using Command Prompt

Alternatively, you can also use Command Prompt to hide files and folders on your computer.

  1. Open Start.
  2. Do a search for Command Prompt and click the result.
  3. Type the following command to navigate to the items you want to hide and press Enter:

    cd C:\Users\admin\Desktop\Files

    In the command replace the path after cd with the path to your file or folder.

  4. Type the following command to hide a folder or file and press Enter:

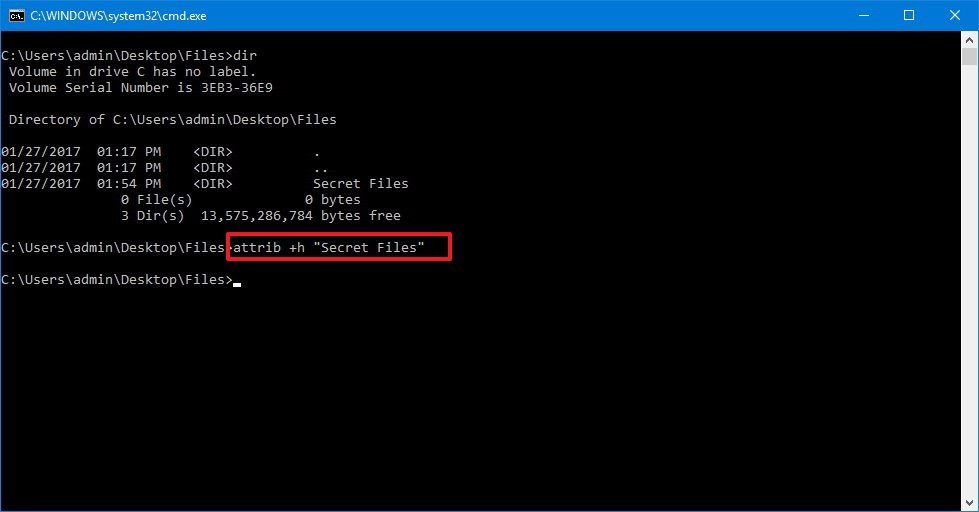
    attrib +h "Secret Files"

    In the command replace "Secret Files" with the name of your folder or file. Quotation marks are only necessary when there are spaces in the name.

If you're trying to hide a folder with files and subfolders, which you also want to keep hidden, then you'll need to use these steps as well.

  1. While in Command Prompt type the following command to navigate inside the hidden folder and press Enter:

    cd "Secret Files"

    In the command replace "Secret Files" with the name of your hidden folder.

  2. Type the following command to hide all files and folders inside the hidden folder and press Enter:

    attrib +h /s /d

After completing the steps, the items with the hidden attribute will no longer be visible.

Making hidden files and folders visible again

If you change your mind, you can use the following steps to remove the hidden attribute for files and folders.

  1. Open Start.
  2. Do a search for Command Prompt and click the result.
  3. Type the following command to navigate to the hidden items location and press Enter:

    cd C:\Users\admin\Desktop\Files

    In the command replace the path after cd with the path to your file or folder.

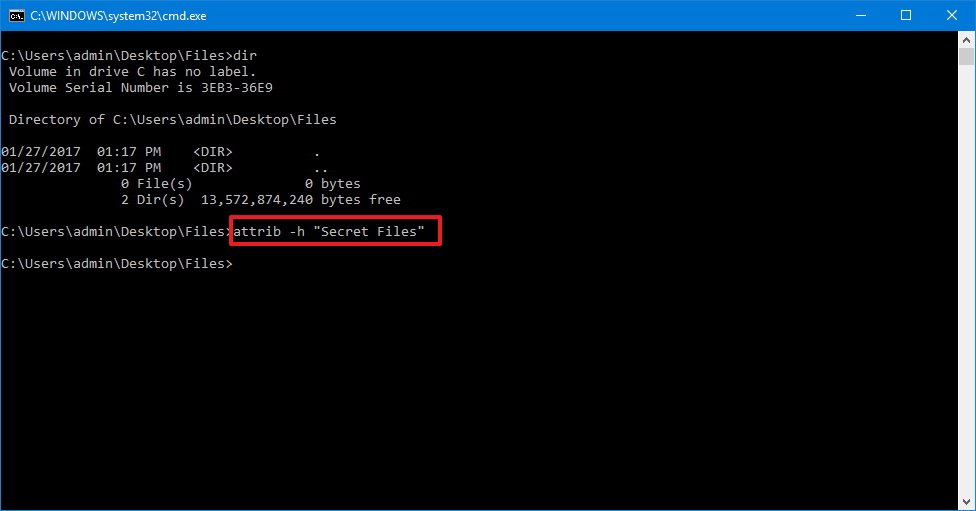
  4. Type the following command to make the items visible again and press Enter:

    attrib -h "Secret Files"

    In the command replace "Secret Files" with the name of your folder or file. Quotation marks are only necessary when there are spaces in the name.

In the case you also set the hidden attribute for files and subfolders inside of a folder, then do the following to remove the attribute.

  1. While in Command Prompt type the following command to navigate inside the hidden folder and press Enter:

    cd "Secret Files"

    In the command replace "Secret Files" with the name of your hidden folder.

  2. Type the following command to remove the hidden attribute from all files and folders inside the folder and press Enter:

    attrib -h /s /d

Which method do you prefer to hide files and folders on Windows 10? Tell us in the comments below.

More Windows 10 resources

For more help articles, coverage, and answers on Windows 10, you can visit the following resources:

Five tips to get the most out of your HTC Vive!

$
0
0

Get the most out of your HTC Vive with these five quick tips!

While you might be using your HTC Vive on a daily basis, the headset comes packed with dozens of hidden features you might not be aware of. Between a growing community and support from software giant, Valve, the platform now has more potential than ever before.

We've brought together our top tips for the best VR experience, ranging from hidden features to sanitary advice. If you've got your hands on the HTC Vive, these are the five things you should try today!

How to manage your saved passwords in Edge for Windows 10

$
0
0

How to manage your saved passwords in Edge for Windows 10

How do I save passwords in Edge for Windows 10?

Microsoft Edge lets you save passwords for any website; this helps save time on sites you visit often, as the field will be automatically filled in for you. It is also a good way to not forget your credentials. Here's how to manage your saved passwords in Edge for Windows 10.

How to set Edge to offer to save passwords

If you want Edge to save your passwords, you must first let it prompt you to save each time you type one into a form.

  1. Launch Edge from your Start menu, desktop, or taskbar.
  2. Click the More button in the top-right corner of the window. It looks like •••
  3. Click Settings.

    Click the More button. Click Settings.

  4. Click View advanced settings. You might have to scroll down a bit to find it.
  5. Click the switch beneath Offer to save passwords so that it turns On. This switch should be set to On by default.

    Click View advanced settings. Click the switch.

How to save a password in Edge

Passwords you type into Edge aren't automatically saved. Here's how to save a password in Edge.

  1. Launch Edge from your Start menu, desktop, or taskbar.
  2. Navigate to a website that requires a password.

    Launch Edge. Navigate to a website.

  3. Type your password and click Log in or hit Enter on your keyboard.
  4. Click Yes in the frame that pops up at the bottom of the Edge window.

    Type your password and log in. Click Yes in the frame at the bottom of the window.

The password is now saved in Edge.

How to edit saved passwords in Edge

If you change a password you use to log into a website, you can go into Edge's settings and also change the password it has saved.

  1. Launch Edge from your Start menu, desktop, or taskbar.
  2. Click the More button in the top-right corner of the window. It looks like •••
  3. Click Settings.

    Click the More button. Click Settings.

  4. Click View advanced settings. You might have to scroll down a bit to find it.
  5. Click Manage my saved passwords. You might have to scroll down a bit to find it.

    Click View advanced settings. Click Manage my saved passwords.

  6. Click a password you want to change.
  7. Double-click the Password field.

    Click a password. Double-click the password field.

  8. Type a new password.
  9. Click Save.

    Type a new password. Click Save.

How to remove saved passwords from Edge

When you stop using a website or stop trusting anything other than your noggin to safekeep your passwords, you can go into Edge and delete your saved passwords.

  1. Launch Edge from your Start menu, desktop, or taskbar.
  2. Click the More button in the top-right corner of the window. It looks like •••
  3. Click Settings.

    Click the More button. Click Settings.

  4. Click View advanced settings. You might have to scroll down a bit to find it.
  5. Click Manage my saved passwords. You might have to scroll down a bit to find it.

    Click View advanced settings. Click Manage my saved passwords.

  6. Hover your cursor over a password you want to delete.
  7. Click the X to remove the password.

    Hover your cursor over the password. Click the X.

Your saved passwords

Do you save passwords in Edge? Do you use a separate password manager? Let us know in the comments section!

How to put Windows 10 on a MacBook Pro (late-2016)

$
0
0

There's no denying that Apple makes great hardware, and the MacBook Pro is no exception. Especially when it's running Windows 10.

Apple finally refreshed their MacBook Pro lineup in late 2016 with refreshed designs, a new Touch Bar and many controversial decisions when it comes to ports. Despite most reviews being ho-hum about the new hardware many users are still tied to the Apple ecosystem and feel obliged to continue with their hardware.

Nonetheless, if you do have a new MacBook Pro, you can still try the zesty new world of Windows 10 for free and little effort. Today, I'll show you how to do that and give you some tips on what to expect!

Update 29 January 2017: With new MacBooks comes a new guide. With Touch Bars and giant trackpads, there's now more to configure for an optimal Windows 10 experience.

Why Windows?

Apple knows the allure of Windows and PCs, which is why they build Boot Camp right into the OS. Boot Camp lets macOS users create a partition and install Windows directly on a dual-boot system. Seeing as that Apple hardware is just a refined (and pricey) PC, any modern Intel-powered MacBook from the past decade can run Windows.

One of the main reasons Mac users want to use Windows is for the superior gaming experience. Additionally, there are still many Windows-only desktop apps that some users may want or need to run. Finally, there is just the allure. Windows 10 is making many headlines these days and what better way to nab some Apple fans than with a (virtually) free new operating system?

Apple makes the process of installing Windows 10 very comfortable. In this video, I'll show you how in about 45 minutes, you can load Microsoft's latest OS on any new MacBook Pro.

In this case, we are using a 13-inch late-2016 MacBook Pro with 512 GB of storage, Touch Bar, and Intel Iris Graphics 550 for the article. In the video posted below, we're using a mid-2015 MacBook Pro 15-inch with Intel HD graphics. Nonetheless, the same principles apply.

Installing Windows 10 on a new MacBook Pro is very easy. You need two things to get started: a USB drive with at least 4 GB of space and the Windows 10 ISO.

Of course, you should also back up macOS just in case.

Get the Windows 10 ISO

  1. Plug your USB drive into your MacBook.
  2. In macOS, open Safari or your preferred web browser.
  3. Go to Microsoft's website to download the Windows 10 ISO

  4. Select your desired version of Windows 10.

    Most users should choose Windows 10 or Windows 10 Single Language ISOs.

    Note: The KN and N versions just have reduced (non-baked in) media capabilities due to legal challenges in South Korea and the European Commission from a ruling in 2004. They are best to skip.)

  5. Click Confirm.
  6. Select your desired language.
  7. Click Confirm.
  8. Click on 64-bit download.
  9. Save the ISO onto your USB drive. It is a large file (around 4GB), so the download may take a while depending on the speed of your internet connection.

Set up Boot Camp and install Windows 10

Before continuing with the next steps, save anything you're working on, complete a backup of your Mac, and quit all running apps. Leave your ISO-carrying USB drive plugged in.

  1. Open the Boot Camp Assistant app. You'll find it in the Utilities folder in Applications.
  2. Click Continue. Boot Camp Assistant will automatically locate the ISO file on your USB drive.
  3. Click and drag on the partition slider to adjust how much space will be allocated to the Windows partition.

    By default, 49GB will be set aside. You can leave the majority to macOS if that is your primary OS, or give most of it to Windows 10 — it's up to you, but you cannot resize the Windows 10 partition at a later point without deleting the entire Windows 10 install and starting over.

  4. Click Install to start the process of partitioning the drive and installing Windows 10.

    You computer will restart automatically and without warning. You may see a black screen for several seconds as the partitioning process takes place. After the partitions are set, the Windows 10 installation will begin. The display drivers will not yet be scaling Widows 10, so everything will be tiny (we'll fix this later in this guide).

  5. Select your language, number formats, and keyboard if prompted.
  6. Click Next.
  7. Click Install Now.
  8. Enter your product key to activate Windows 10. If you do not have a product key, select "Skip" instead.
  9. Select the Windows 10 version you want to install. Most users will be fine with Home instead of Pro.
  10. Click Next.
  11. Accept the license terms
  12. Click Next.
  13. Select the partition labeled Drive 0 Partition X: BOOTCAMP and that its size matches the size you set earlier with the Boot Camp Assistant. Do not select any other partition, as you could overwrite your macOS installation.
  14. Double check that you've selected the right partition.
  15. Seriously. Drive 0 Partition X: BOOTCAMP. Nothing else.
  16. Click Format. The Windows 10 Installer will reformat the partition.
  17. Click Next to begin installing Windows 10.
  18. Follow the on-screen prompts to install Windows 10. It will take several minutes to copy the Windows 10 files off the USB drive and install the OS.
  19. The computer will reboot after finishing installation and prompt you to again enter your activation key.

    If you do not have an activation key, you can instead click "Do this later". You do not need to Activate Windows 10 to install it, but you can activate later.

Setting up Windows 10

  1. Set up your Windows 10 Account. You will have to enter a username, password, and password hint.

    Windows 10 will then set up the account and install some additional files, which will take several more minutes.

  2. On first boot, the Boot Camp Installer will open in Windows 10. Click Next.
  3. Accept the license terms.
  4. Click Install. This will install various drivers and bits of software to ensure compatibility with the MacBook Pro's hardware, including the display, trackpad, and Wi-Fi.
  5. After the installation is finished, click Finish.

    The new Boot Camp app will be in the Windows 10 taskbar. With this app you can reboot back into macOS and change some settings for the keyboard and trackpad.

Update Windows 10

Although you are downloading the latest version of Windows 10, you want to do an immediate update. Doing so will get you the most recent security updates and the necessary Intel Iris Pro graphics drivers for the computer. This update fixes any graphics stuttering you may have noticed.

  1. Click on the Start menu.
  2. Click on Settings. It is the gear icon in the left column.
  3. Click on Update & Security.
  4. Click on Windows Update.
  5. Click on Check for updates. Windows will automatically search for, download, and install any available updates. You will likely have to restart your computer when prompted to complete the installation.

Update Windows Apps

In Windows 10 many of the core apps like Groove Music, MSN News, Weather, and more are Windows Store apps. These are updated through the Windows Store.

  1. Click on the Start menu.
  2. Click on the Store button.
  3. Click on the user icon in the top right corner.
  4. Click on Downloads and updates
  5. Click on Check for updates. The Store app will automatically download and install any available updates.

    Note: The Store app itself may receive an update, and it will automatically close itself to install the update. If this happens, simply reopen the Store app and it will continue to install the remaining updates.

Reverse trackpad and mouse scrolling

If you use macOS, you are likely accustomed to the way the trackpad scrolls. Apple calls it "natural" scrolling, where dragging two fingers up on the trackpad scrolls the content up on the display. This is the opposite from most PCs (and mouse scroll wheels), which typically use "inverted" scrolling (drag down, scroll up). You can fix that on the MacBook by using a registry modification (directions originally found on waded.org)

  1. Click on the Search bar on the left side of the task bar.
  2. Type Regedit.
  3. Press Enter.
  4. Answer Yes to the security prompt.
  5. In Regedit expand the folders on the left through HKEY_LOCAL_MACHINE \ SYSTEM \ CurrentControlSet \ Enum \HID.
  6. Under HID, you'll see some folders that start with VID. Expand each VID folder to Device Parameters. (Note: only one VID folder has it, so you have to try them all.)
  7. Click each Device Parameters until you find the one that contains FlipFlopWheel in the right pane.
  8. Double-click FlipFlopWheel.
  9. Change the value from 0 to 1.
  10. Click OK.
  11. Repeat steps 5-8 for FlipFlopHScroll.
  12. Close Regedit.
  13. Restart Windows. Logging off and back on does not enable this entry.

Alternatively, you can download the free app flipflop-windows-wheel from GitHub that automates this task. Just download the file, run it and hit 'Flip.' Once again you need to reboot (not log off) to make the settings work.

Use Trackpad++ for a real Windows trackpad

Although you can reverse the scrolling by using the methods above, you won't get Microsoft's trackpad gestures like 3- and 4-finger taps. That's unfortunate, as those gestures by default are used to call up Cortana and the Action Center respectively.

Luckily, there is a free third-party app called Trackpad++ that lets you add those gestures and more through a very easy user interface. Trackpad++ has been updated to support the late-2016 MacBook Pro, giving users the following abilities:

  • 2, 3 and 4-finger gestures, such as pinch-to-zoom, back / forward, middle mouse button, new Windows 10 gestures, and more
  • 3-finger drag with unique option to increase the pointer speed when dragging (classic '2-fingers with click' drag also available)
  • User-customizable option to ignore accidental input when typing, and many more useful tweaks/enhancements
  • Improved 2-finger scrolling experience: accelerated / natural scrolling model is implemented, and 3 optimal presets provided
  • Improved pointer ballistics (i.e. how the pointer speed depends on the finger speed, comes with 6 built-in optimal presets)
  • Trackpad++ Control Module for adjusting the trackpad settings. All possible settings put together conveniently, see screenshot
  • Full, native support of the Microsoft Windows 7 (32-bit / 64-bit), Windows 8 / 8.1 (32-bit / 64-bit), and Windows 10 (64-bit)

As a hardcore Windows 10 user, I think Trackpad++ does a solid job of approximating native Precision Touch gestures and the feel of a native Windows 10 machine. It's not perfect, and sometimes there are quirks, but overall it's a fine experience.

You can read more and download Trackpad++ from their website. If you're already a Windows user, I highly recommend using it (and donating to the project if you rely on it).

So How Is It?

Overall, Windows 10 runs fantastic on the MacBook Pro (late-2016). Battery life is great, performance is outstanding, and there is nothing that doesn't work. Even the trackpad experience is quite solid. Heck, even Cortana and the voice-activated Hey Cortana work as well.

How to enable 'Hey Cortana' in Windows 10

From my experience, if you wanted, you could make this a primary Windows 10 machine, albeit a very expensive one.

However, if you are already a Mac user and are curious about Windows 10, I see no reason to not download the Windows 10 ISO and give this a shot. As a warning, older Apple hardware may have more complications, but newer devices should be A-Okay.

Stay tuned for my full experience write-up of using Windows 10 on the MacBook Pro including some more tricks.

More Info!

If you are an Apple and Mac user make sure you check out our sister site iMore for all of their Windows 10 info. It is the best spot to ease your way into the Microsoft world if you mainly use macOS.

For more basic info on Windows 10, including some tips and our vast array of how-to articles, make sure you head to our main Windows 10 help page or jump into our forums!


How to sync Edge data between Windows 10 devices

$
0
0

How to sync Edge settings between Windows 10 devices

How do you get your favorites and reading list onto all of your Windows 10 devices?

Microsoft Edge has a feature that lets you sync that data between devices as long as you're signed in with a Microsoft account. This keeps you from wasting time searching for the same websites, and it gives you a more familiar experience no matter what device you're using. Let's take a look at how to set Edge to sync.

How to sign into Edge with a Microsoft account

Before you can start syncing Edge data between devices, you must be signed into your PC using a Microsoft account. When you set up your PC for the first time, if you signed in with your Microsoft account, you can move on to the next section. If not, follow these steps:

  1. Click the Start button.
  2. Click the Settings button. (It looks like a gear.)
  3. Click Accounts.

    Click the Settings button. Click Accounts.

  4. Click Sign in with a Microsoft account instead.
  5. Type the email address associated with your Microsoft account and hit Tab on your keyboard.

    Click Sign in with a Microsoft account. Type your email address.

  6. Type your password.
  7. Click Sign in.

    Type your password. Click Sign in.

How to sign into Edge with a Microsoft account on Windows 10 Mobile

If you skipped signing in to your Microsoft account when you first set up your phone, you can still sign in later. Here's how:

  1. Swipe down from the top of the screen.
  2. Tap All settings.
  3. Tap Accounts.

    Swipe down. Tap All settings. Tap Accounts.

  4. Tap Your info.
  5. Tap Sign in with a Microsoft account instead.
  6. Type the email address associated with your Microsoft account.

    Type your info. Tap Sign in with a Microsoft account instead. Type your email address.

  7. Tap the Password field.
  8. Type your password.
  9. Tap Enter.

    Tap the password field. Type your password. Tap Enter.

How to make Edge sync between Windows 10 devices

Now that you're signed in with your Microsoft account, you must go into Edge's settings and enable syncing between devices. When enabled, any websites you add to your favorites list or reading list on this PC will also show up in the same lists on other devices you signed into with your Microsoft account and then enabled syncing.

  1. Launch Edge from your Start menu, desktop or taskbar.
  2. Click the More button in the top-right corner of the window. (It looks like three dots.)

    Launch Edge. Click the More button.

  3. Click Settings.
  4. Click the switch below Sync your favorites and reading list so that it turns On. You might have to scroll down a bit to find it.

    Click Settings. Click the switch.

How to set Edge to sync on Windows 10 Mobile

If you want Edge on your phone to sync with your other devices, you must go into Edge's settings and set it to sync.

  1. Launch Edge.
  2. Tap the More button in the bottom-right corner. (It looks like three dots.)
  3. Tap Settings.
  4. Tap the switch below Sync your favorites and reading list so that it turns On.

    Tap the More button. Tap Settings. Tap the switch.

How to change other sync options

Now that you're syncing Edge between devices, you might want to know where to find additional sync options in Windows 10.

  1. Click the Start button.
  2. Click the Settings button. (It looks like a gear.)

    Click the Start button. Click the Settings button.

  3. Click Accounts.
  4. Click Sync your settings.

    Click Accounts. Click Sync your settings.

  5. Click the switch below Sync settings.
  6. Click the switch below any items you want to sync so that it turns On. Options include:
    • Theme.
    • Internet Explorer settings.
    • Passwords.
    • Language preferences.
    • Ease of Access.
    • Other Windows settings.

      Click the switch. Click any Switches.

Do you keep Edge consistent across your devices? Let us know in the comments.

3 easy-to-build mini PCs that can save you money

$
0
0

Skull Canyon

With just a screwdriver and some determination, you can build a small PC and even save some cash.

Specifically, what we're referring to is Barebones PC, a kit that you can buy that comes with all of the bare essentials required to make a PC. You'll get a case, a processor and a motherboard, and that's about it. Occasionally you might find a kit or bundle from a retailer that also offers storage or RAM, but generally you have to provide those yourself. You'll also need the OS, so you'll have to pick up a copy of Windows 10.

Beyond saving space and money, Barebones PC is also an easy way to break into the world of building your own PC.

Some of the main benefits of Barebones PC:

  • Lower cost.
  • Space-saving small form factor.
  • Customization and only paying for what you need.
  • Good performance despite the small size.

Better still, there is a whole range of options out there now, from the high-end to the entry-level and most places in between. Let's look at a few of the options and what you need to pick up to build your own.

High end — Intel Skull Canyon NUC

Skull Canyon

What you get with this option is essentially a powerful PC stuffed into a really compact box. It doesn't come cheap, but if you're looking for the least compromises, this is it. The only thing the Skull Canyon doesn't have is dedicated NVIDIA or AMD graphics, but everywhere else you'll get a powerful PC that's smaller than the keyboard you'll connect to it. And with Iris Pro 580 graphics from Intel, you're still going to get good mileage.

Intel includes the motherboard and a Core i7-6770HQ quad-core processor, along with the case and power cable. Also built in is USB-C Thunderbolt 3 and Gigabit Ethernet, which means you need only RAM, storage and an OS.

The Skull Canyon supports up to 32GB of DDR4 SO-DIMM RAM in dual-channel, as well as up to a pair of m.2 SSDs for storage. Get going with something like this Samsung EVO SSD and an 8GB Crucial RAM kit for another $150, and then add more to it as and when you need to.

See at Amazon

Mid range — MSI Cubi

MSI Cubi

Looking for a bit of power without going as crazy as the Skull Canyon? Something like the MSI Cubi might be right for you. In something the same size as many livingroom streaming boxes you'll still find an Intel Core i5 processor, albeit a 5th-generation. MSI has an updated model with seventh-generation Kaby Lake chips, but that'll cost a decent chunk more.

With Mini DisplayPort, you can output to a 4K display from this little box, which, thanks to its VESA mounting, can actually be fixed to the back of said monitor and kept out of sight. The Cubi also boasts HDMI, Ethernet and USB 3.1.

Throw in an mSATA SSD and up to 16GB of SODIMM DDR3 RAM along with the OS, and you're good to go. While supporting older spec parts, the Cubi can save you added cash, because things like DDR3 RAM are quite affordable now.

See at Amazon

Entry Level — Intel NUC

Intel NUC

For a good, really cheap entry-level product for some light computing, Intel's standard NUC is a great start. At this point, you're stepping down to a Celeron processor, but for right around $100, you're still getting a decent little computer that's better than a stick PC. The NUC is not exactly a giant itself.

With something that can easily fit in your palm, you'll be able to squeeze in 8GB of RAM and a 2.5-inch SSD for storage, both of which are substantially more than you'd find in a stick PC or even a similarly priced laptop. Throw in HDMI, full-sized USB and even an SDXC slot, and you've got a capable little box for not much money.

Add an affordable RAM stick from Crucial and a similarly affordable SSD, and you've got a great little mini PC for yourself or for the kids.

See at Amazon

Windows 10 license

You need to provide an OS for most of these barebones mini PCs. Since you're here on WindowsCentral.com we'll assume you want Windows 10. So you'll be looking at around $100 for that software.

See at Microsoft

With a barebones mini PC, you take away a lot of the hassle of choosing and buying parts, and a whole lot of the space requirement. In most cases, you'll save yourself a few bucks, too. With a lot of the choices out there, you'll be able to add more memory and storage as you need it, just as you would with a larger PC.

If you have any suggestions, tips or tricks for folks interested in building their own mini PCs, drop us a line in the comments below.

Lead image courtesy of Newegg

How to use StreamJar to add some serious style to your Beam streams

$
0
0

Streamjar

If you're looking to get a bit more professional with your Beam streams, StreamJar is the tool for you.

The easiest way to stream on Beam is going to be directly from Windows 10 or the Xbox One once those features roll out to everyone. But you won't be able to add much in the way of customizations.

We've got a base guide already on how to stream on Beam using your console, a capture card, and your PC, but this tutorial is designed to help you step up your game a little.

You've probably seen a number of streamers with fancy-looking overlays and might be wondering how they did it. Not everyone is a whizz with graphic design, and thanks to StreamJar, you don't have to be. There's a web client and a Windows app, but both do the same thing.

Here's a quick intro to StreamJar and some details on how you can make your Beam streams extra fancy.

What is StreamJar?

In a similar fashion to how most chatbots work, StreamJar is an online tool that allows you to easily design custom options for your Beam stream. It can handle a number of things, such as overlays with follower notifications and donation notifications. All you have to do is link StreamJar to your Beam account at login. The rest is easy. For this guide, we're focusing on how to get started with overlays.

StreamJar and overlays

Streamjar

If you want to create a professional-looking overlay for Beam, StreamJar will have you up running in no time. Clicking on the overlay tab will bring you to what you see above, and this is where you'll arrange all the different visual elements of your stream. It's a simple drag-and-drop affair to perfect your layout once you've selected it. Here's what you can add:

  • Notifications - A box will pop up on your stream celebrating new followers, tips, donations, subscribers and when someone else hosts you. All you need to do is decide what you want to show in the settings.
  • Text - Add a permanent text string to your overlay.
  • Banners - Add a banner anywhere you want on the screen to show new followers, tips or donations.
  • Song - If you use both Spotify and the Streamjar desktop app you can display your currently playing song on screen throughout your streams. Support for other services is supposed to be coming soon.
  • Goal - show an onscreen meter charting your progress towards a designated goal for followers, subscribers or a tip amount.
  • Image - Add a permanent image to your stream.
  • Trigger - Viewers can use a command to spend their in-chat points, which will make an image appear or make a sound play. Point costs require BlipBot in the channel linked in your chat settings. This feature is still in beta.
  • Chat - Adds your Beam chat to the window.
  • Events - A different way to showoff recent followers, subscribers, tips and more.

Streamjar

Configuring each element to look and behave how you want is no more than a right-click away. You'll get a menu that can help you remove it altogether, move in front or behind another element or access the settings. The settings are fairly straightforward, with dropdowns and checkboxes taking care of most things. To change colors, though, you will need to know a little code, or at least how to search the web for the code for the color you want. The default is purple, and you don't want to look the same as everyone else using StreamJar.

How to add your overlay to your stream

Streamjar

The beauty of StreamJar is that everything is hosted online, meaning all you have to do is literally add a web address to your streaming software and you'll see it magically appear in front of you.

On the right-hand side of the screen in StreamJar, once you're happy with the overlay scene you've created, hit copy url. StreamJar will generate a unique web address for you and will keep your overlay updated with any changes you make in the app or on the site.

In XSplit you simply go to add, then other and select webpage URL. Paste the URL you copied, and your overlay will appear in your XSplit window.

In OBS Studio/Tachyon simply click the + button under sources, then select BrowserSource. Paste the URL and set the dimensions and click OK.

StreamJar is a really easy, Beam-friendly tool that can help you start to take your streams to the next level. Head on over to StreamJar.tv to get started. And be sure to drop us a follow the next time you're on Beam.

How to skip the Start screen in Microsoft Word 2016 for Windows

$
0
0

How do I disable the Start screen in Word 2016?

Microsoft Word 2016 for Windows automatically shows an annoying Start screen every time you open it, to provide quick access to a variety of document types. However, the majority of Word users use the same type of document 99 percent of the time, most likely the trusty "blank document." If you fit this bill and want to disable Word's default Start screen, a simple fix exists.

How to skip the Start screen in Microsoft Word 2016

  1. Open any Word document, then click the File tab at the top of your screen, all the way to the left.
  2. Click Options in the vertical menu on the left of your screen.

  3. In the General section, scroll down to Start up options and remove the checkmark from the box next to Show the Start screen when this application starts.

  4. Click OK to save your changes.

That's it. If ever you want to re-enable the Word Start screen, just follow this process again and recheck the Start screen box.

Office 365 vs. Office 2016: Which should you buy?

See all Office 365 subscription options on Microsoft.com

How to manage Windows 10's many 'optional features'

$
0
0

When you have to add or remove functionality to your computer, this guide can help you manage Windows 10's "optional features."

Windows 10 is a sophisticated OS that includes an extensive array of features, some of which you have to turn on or off as needed. These are known as "optional features," and they're available through the "Windows Features" page in Control Panel. While most of them are meant to add server functionality to your computer, there are some features that are useful for all users.

These optional features can't be entirely removed from your device, and they'll continue to use space on your hard drive, but depending on the functionalities required, you can enable or disable them as needed. Many of these Windows 10 features are advanced, and turning them on could potentially make your computer vulnerable or slow if you don't know how to configure them correctly.

In this Windows 10 guide, we'll walk you through the steps to optional features turn on and off, and we'll provide details on what they are.

How to manage optional features using Control Panel

Although Windows 10 includes the Settings app, you still need to use Control Panel to manage optional features on your computer, if you want to create virtual machines using Hyper-V, use Internet Information Services (IIS) to set up an FTP server, or add the Linux Bash command-line tool.

Here's how to turn on or off optional features on Windows 10 using Control Panel:

  1. Open Control Panel.
  2. Click on Programs.
  3. Click the Turn Windows features on or off link.

  4. On Windows Features, check or clear the feature you want.

  5. Click OK to enable and disable the feature.
  6. Restart your computer as indicated by the wizard to complete the task.

While you're in Windows Features, you'll see a long list with all the optional features you can manage. If they have a check mark, then it means that the feature is currently enabled on your computer.

You'll also notice that some features have multiple features under them. If you see a feature with a black square, instead of a check mark, then it means that only part of the feature is enabled. You can always enable sub-features by expanding and checking the ones you want to enable. Of course, those that don't have any check marks indicate that they're not currently enabled on your computer.

Optional features available in Windows 10

The optional features available will depend on the edition of Windows 10 installed on your computer. For example, even though, you can manage features on Windows 10 Home and Pro, some advanced features won't be available in the Home version of the OS.

Here's a list with a description of the features you can enable or disable in Windows 10 Pro:

  • .NET Framework 3.5 (includes .NET 2.0 and 3.0): This feature is essential to run applications built using Microsoft .NET software framework version 3.5 or older. You can safely enable earlier support, but usually it'll turn on automatically when needed.
  • .NET Framework 4.6 Advanced Services: You'll need to enable this feature for apps built with version 4.6 of the framework.
  • Active Directory Lightweight Directory Services: Adds Lightweight Directory Access Protocol (LDAP) support for directory-enabled applications. This is an alternative to Windows Active Directory, which is a more complex directory solution. Usually, you'll need this feature in certain corporate network scenarios.
  • Containers: Provides services and tools to create and manage Windows Server Containers and Hyper-V containers on your desktop.
  • Data Center Bridging: This feature is an IEEE standard that enables converged fabrics in a data center, where network, storage, clustering and traffic managements share the same Ethernet network infrastructure. Data center bridging is only useful in corporate networks.
  • Device Lockdown: You can enable this feature to add services and tools to provide a more controlled experience. Typically, you'll enable this feature when setting up a kiosk or a temporary device.
  • Hyper-V: Microsoft offers its own virtualization technology that allows you to create and manage virtual machines on your computer.
  • Internet Explorer 11: Although Windows 10 includes Edge, Microsoft continues to ship Internet Explorer 11 for compatibility purposes, but it's possible to disable it if you don't need it.
  • Internet Information Services: Commonly known as IIS, it allows you to set up an FTP server or a server to host websites with management services.
  • Internet Information Services Hostable Web Core: Allows you to set an environment to host applications on the web. Typically, developers will find this feature beneficial to test applications on Windows 10 Pro.
  • Legacy Components: Allows you to add support for old components on Windows. This includes DirectPlay, a feature that was used to be part of DirectX.
  • Media Features: Provides a way to remove Windows Media Player from Windows 10.
  • Microsoft Message Queue (MSMO) Server: Enables applications to run correctly on unreliable networks by queuing messages instead of sending them as they're generated. Usually, you'll only find this feature useful on particular corporate network environments.
  • Microsoft Print to PDF: Instead of printing a document directly to paper, you can print to PDF and save the content as a file. However, it's possible to disable the feature if you don't use it.
  • MultiPoint Connector: If you enable this feature, you can monitor and manage your computer using a MultiPoint Manager and MultiPoint Manager Dashboard applications.
  • Print and Document Services: This feature deals with printing services on Windows 10. Here's where you can enable or disable services for scan, fax and network printing.
  • RAS Connection Manager Administration Kit (CMAK): You can use CHMAK to create custom profiles to connect to remote access servers. This is a feature that you'll only use if you're an IT administrator.
  • Remote Differential Compression API Support: Provides synchronization algorithm that intelligently compares two files that are about to be synchronized and only updating the differences between them. Only certain applications can use this feature.
  • RIP Listener: If you're in a network using the old RIP protocol version 1, you can use RIP Listener to listen to RIP updates in the network. If you're on a home network, chances are you'll never use this.
  • Services for NFS: Allows you to access files using the Network File System (NFS) protocol. Typically, you'll use this feature to access files on Network Attached Storage (NAS).
  • Simple Network Management Protocol (SNMP): Enables SNMP agents on your computer that monitors switches, routers, and other devices in the network, and reports to the network console. This feature isn't useful unless you're connected to a network using the protocol.
  • Simple TCPIP Services (echo, daytime etc): Provides support for additional TCP/IP protocol services, including "Echo", "Character Generator (CHARGEN)", "Daytime", "Discard", and "Quote of the Day (QUOTE)".
  • SMB 1.0/CIFS File Sharing Support: Adds support to configure file and printer sharing for previous versions of the OS, including Windows XP and Windows Server 2003 R2.
  • SMB Direct: Allows the use of network adapters with Remote Direct Memory Access (RDMA) capability to improve file sharing support using SMB 3.x.
  • Telnet Client: This is a command-line utility that allows you to connect to other computers or devices, such as routers and switches, running a telnet server. This network protocol isn't secure, and you shouldn't use it outside of your network.
  • TFTP Client: This is a command-line utility that you can use to upload and download files using Trivial File Transfer Protocol. This protocol isn't secure, and you shouldn't use it unless is a requirement.
  • Windows Identity Foundation 3.5: Newer applications use .NET 4 that adds a new identity framework, but applications created with older .NET technologies may still require this feature.
  • Windows PowerShell 2.0: This is an advanced command-line scripting tool, similar to Command Prompt. PowerShell comes enabled by default, but it's possible to disable the feature on Windows 10.
  • Windows Process Activation Service: Installs services that may be required if you're using IIS web services.
  • Windows Subsystem for Linux (Beta): Installs the Ubuntu Bash shell command-line utility on Windows 10. However, there are additional steps that you must follow to complete the installation.
  • Windows TIFF iFilter: When this feature is enabled, Windows 10 can index and search Tagged Image File Format (TIFF) using optical character recognition (OCR), but it typically uses more system resources than traditional file indexing and searching. However, if you work with these type of documents, it can help you to find those scanned documents quicker.
  • Work Folders Client: Allows file synchronization with network file servers.
  • XPS Services: This is an old Microsoft feature similar to PDF. You can still print documents to XPS, but PDF is a format that's more widely supported. If you don't use it, you can clear the check mark to remove it.
  • XPS Viewer: This is an application that Microsoft includes with the OS to open XPS files. If you don't work with any XPS files, you can safely disable this feature.

As you can see, there are a lot of optional features that you can turn on or off in Windows 10, but many of them won't be useful unless you're in a corporate environment.

Windows 10 Home optional features (left), Windows 10 Pro optional features (right)

How to manage optional features using Settings

The Settings app also includes a section to manage optional features, but it's not the same as the one in Control Panel. It's only a place to manage particular modern Windows 10 features, such as Windows Developer Mode, Contact Support, and Microsoft Quick Assist.

To manage optional features using the Settings app on Windows 10, do the following:

  1. Open Settings.
  2. Click on System.
  3. Click on Apps & features.

  4. Click the Manage optional features link.
  5. Select the feature you want, and you'll notice a button to Uninstall or Manage, which will redirect you to the settings page where the feature is located.

You can also click the Add a feature button to add a number of fonts for different languages.

Wrapping things up

While it can be good to have a basic understanding of these optional features and how to manage them, for the most part, regular users don't have to worry about them. Windows 10 and applications are typically smart enough to detect and automatically turn on features as needed.

However, sometimes there are particular scenarios where you may need to turn on or off an optional feature manually. For example, when you want to test upcoming features of Windows 10 using a virtual machine using Microsoft's Hyper-V virtualization tool. Of if you're a developer working on Windows and Linux, and you need a command-line tool like the Bash shell on Ubuntu. Or when you want to set up an FTP server to create your private cloud and share files without restrictions.

The list of features we mentioned in this guide covers all the ones included with the Windows 10 Anniversary Update, but remember that they can change in future releases.

What optional features do you have enabled on Windows 10? Let us know in the comments.

More Windows 10 resources

For more help articles, coverage, and answers to common questions about Windows 10, visit the following resources:

Viewing all 5861 articles
Browse latest View live


Latest Images