Quantcast
Channel: Help & How To
Viewing all 5861 articles
Browse latest View live

Round-up: The New Xbox One Experience, tips, tricks, useful links and more

$
0
0

In this article, we're rounding up all of the tips, tricks, guides and helpful links relevant to the New Xbox One Experience (NXOE), all in one place.

The NXOE bought sweeping alterations to the way we use our Xbox One consoles. As a result, some functions have been moved, tweaked or even removed entirely. As such, we've also gathered ten quick tips and tricks that'll help you get to grips with the new dashboard.

As always, if there's any functionality in the new OS you're unsure of, hit the comments, and we'll try to help out!

Invite friends to parties in three steps

One of the best things about the NXOE update is the new guide menu, which offers quick access to all of the Xbox One's core functions. The new guide allows you to invite friends to parties far more quickly than the previous dashboard, and you can achieve this in three easy steps:

  • Double tap the home button on your controller to open the new guide.
  • Navigate to your friends list.
  • Hover over the friend you want to invite, and hit X!

In the coming months, Cortana and Kinect will allow you to invite party members by name using voice commands, but until then, this is the fastest method.

Control your party audio using the new guide

Being able to create parties faster is great, but where have the microphone settings been moved?

  • Navigate to the party in the new guide by double tapping the home button.
  • Highlight one of the party members.
  • Press X to mute the party, or Y to mute your microphone.

Quick access to your games and pins

In the previous dashboard, you accessed your pins by moving the cursor to the left side of the home screen. Microsoft has opted for a vertically scrolling dashboard for the NXOE, placing the pins and games access beneath the recent apps list.

  • You can easily flip between the top and bottom of the dashboard by pulling the right and left triggers respectively.

For a more in depth look at how to manage and create pins, take a look at this help article.

Use the new Avatars app to create the perfect profile picture

The Avatars app for the NXOE is, in fact, one of the first Universal Windows Apps available for both Xbox One and Windows 10 - it even has a hamburger menu.

The new Avatars app for Xbox One allows you to create unique profile pictures using Avatar props you might've purchased or unlocked on Xbox 360.

  • Go to the new Xbox Avatars app either by accessing Games and Apps at the bottom of the dashboard, or saying "Xbox, go to Xbox Avatars" using Kinect.
  • Press the menu button on your controller to bring up the hamburger menu, then select "Take a photo".
  • Select a pose, or choose the first option to take a picture with your currently equipped avatar prop.
  • Use the timeline and positioning controls shown on-screen to take the perfect pic.
  • Press the "View" button to save your gamer pic!
  • Alternatively, you can create a gamer pic using the Windows 10 version of this app, which you can download over here.

Access the magnifying glass and other accessibility features

The New Xbox One Experience comes with some new features to make life easier for those who may need accessibility options. You can access those features using the following steps:

  • Press and hold the Xbox home button to turn on the power options, from here, you can hit the view button to turn on a magnifier, which can be handy for reading lettering in text-heavy apps.
  • If you're in a region that supports it, you can enable the audio narrator from this menu by pressing the menu button.
  • Other accessibility features can be accessed by opening the new guide, either by pressing left on the home screen, double tapping the home button or by saying "Xbox, go to settings" to Kinect.
  • From here, you can go down to the "Ease of access" setting, which offers the magnifier, closed captioning, high contrast settings, the narrator (if you're in a supported region) and button re-mapping.

Re-map controller buttons using the new accessories app

Speaking of button remapping, you can use the new Xbox accessories app to take charge of the Xbox One controller, and indeed the new Xbox One Elite controller.

  • Navigate to Xbox Accessories in your apps list by going down to the Games and Apps section at the bottom of the home screen. You can also access it via the Ease of Access setting menu, or by saying "Xbox, go to Xbox Accessories" to Kinect.
  • Using the app, you can alter the button bindings, invert joysticks, and much more!

Redeem codes in the new store app

Redeeming codes hasn't changed a great deal in the New Xbox One Experience, but the setting has moved into a new app along with other store features.

  • On the home screen, navigate to the right until you get to the new game store. If you have Kinect, you can simply say "Xbox, use a code" as usual.
  • Select "browse all games" to access the full game store for the Xbox One.
  • You can then select "use a code" from the menu at the top.
  • Either hold up the QR code to the Kinect sensor, or enter the 25 character code.
  • Alternatively, you can redeem codes on Xbox.com by signing in, and using this link.

Manage your notifications

The New Xbox One Experience gives you greater control over notification management, allowing you to clear individual notifications, or long lists of notifications in an instant.

  • Navigate to the new guide by double tapping the home button on your controller, or saying "Xbox, show guide" to Kinect.
  • Select the notifications menu option, depicted as a single chat bubble.
  • Highlight the notification and press X to remove them manually.
  • Select "clear all" at the top to wipe everything.
  • You can view notification options by pressing the A button once they're highlighted.

Take screenshots and video clips using Kinect, or your controller

One of the greatest things about the Xbox One is its Game DVR functionality, allowing you to create clips and screenshots for sharing with your friends. Thankfully, the systems governing these features hasn't changed a great deal, but here's how it works in the New Xbox One Experience.

  • You can access your clips by going to the Game DVR app in your apps list, or by saying "Xbox, go to Game DVR" to Kinect.
  • If you have Kinect, simply say "Xbox, take a screenshot" or "Xbox, record that" to create captures.
  • If you want to use the controller, double tap the home button while you're running a game to bring up the new guide. Sadly, this seems to pause some games, making screenshotting difficult.
  • Press Y to save a screenshot, press X to record the last 30 seconds of gameplay.
  • Note: This even works while playing an Xbox 360 game via backwards compatibility.

If you want to capture more of the Xbox One's 5 minute video recording buffer, you'll need to take slightly different steps.

  • Open the new guide again by double tapping the home button, then navigate down to the "Snap" menu at the bottom.
  • Select to snap the Game DVR app. You can do this with Kinect by saying "Xbox, snap Game DVR".
  • From the Game DVR, you can set it to begin recording a new clip (which you can end manually again by snapping the app), capture the last 5 minutes of DVR recording, or use it as a shortcut for accessing all your captures.

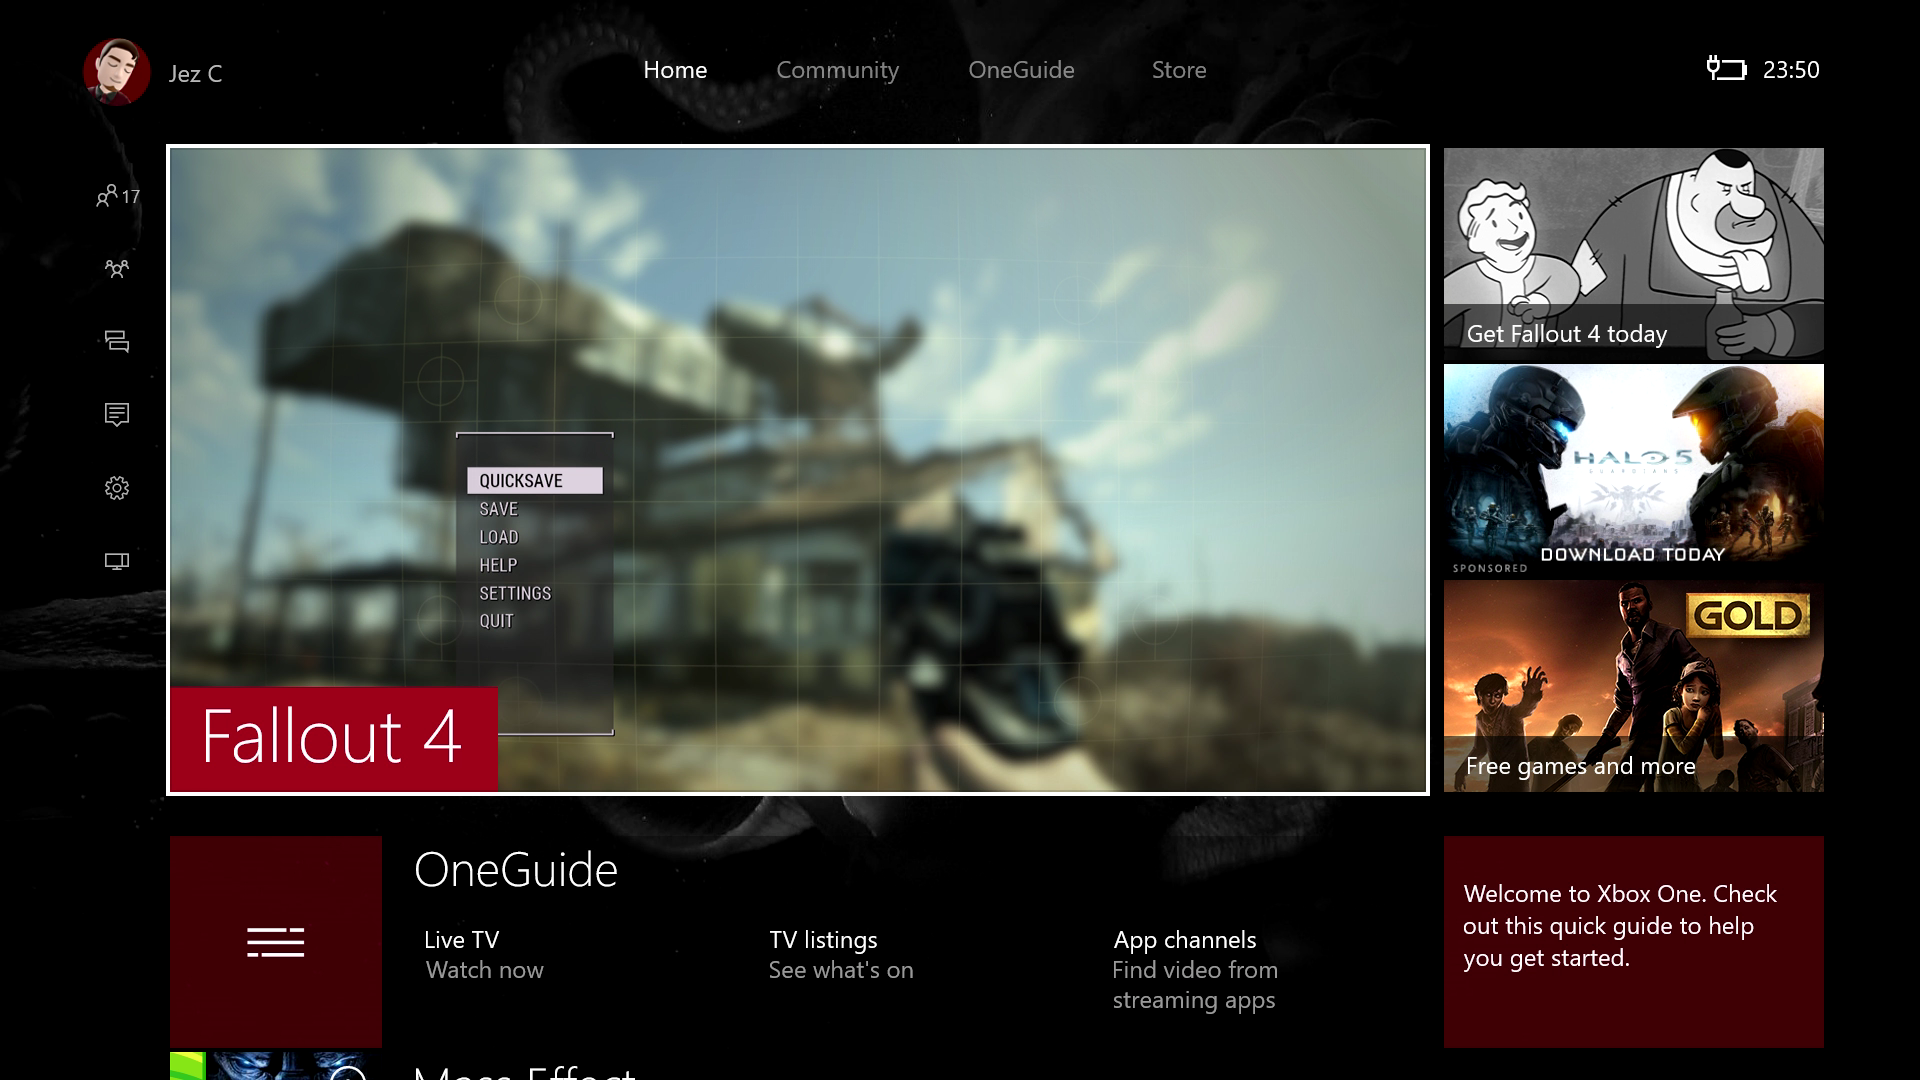
Watching live TV through your Xbox One

The way TV works in the New Xbox One Experience has changed slightly, but we're on hand to show you how. In the NXOE, the TV functions have been merged into a new dedicated OneGuide app.

  • Make sure your cable box is plugged in to your HDMI pass-through in the back of your Xbox One.
  • Access OneGuide either by going to your Games and Apps, or navigating to the OneGuide section of the dashboard, two segments to the right of the home screen.
  • From the OneGuide section, you can press "Live TV, watch now" to enable OneGuide. You can also say "Xbox, watch TV" or, "Xbox, go to OneGuide" to access the same functionality using the app.
  • Set up your cable box by accessing the set-up wizard, hitting the "view" button on your controller, selecting "settings", then select "device control".
  • If you're set up and ready to go, press X to toggle between your TV listings or live TV.
  • If you have Kinect, you can simply say "Xbox, OneGuide" to access your TV listings while utilizing any other part of the Xbox One. I haven't discovered a way to access this without Kinect as of writing - if you know of a way, do let us know!
  • You can navigate OneGuide using the joystick and tapping "A" to change channel and view TV listings.

Other tips, tricks, guides and troubleshooting

The New Xbox One Experience is still a work in progress, intended to lay the ground work for Windows 10 apps and future features like background music. Over the coming months, Microsoft will be improving the new OS, fixing bugs and adding features voted for by the community.

Some of our other Xbox Help guides can be found here:

Known issues, troubleshooting and feedback

Microsoft has provided a help article for the most recent known issues and problems with the New Xbox One Experience. If you're having trouble, consult the links below, and use the UserVoice link to add your own feedback.

Other NXOE content:

The future

In our interview with the Xbox engineering team lead, Mike Ybarra, he stated that the company is already developing "two to three" backwards compatibility-tier major features for Xbox One owners for 2016. We know that the company is working on mouse support, background music support, and working out how best to deploy the full Windows 10 app store to the Xbox One.

The Universal Windows Platform, with its capabilities to deploy to any Windows-based device is likely to blur the lines between PC and console even more for the Xbox One. Will we eventually be running Office UWA from our Xbox Ones with mouse and keyboard? Will we be streaming Xbox One to Windows 10 Mobile, then casting it to another screen with continuum? Could Xbox One with Windows 10 apps replace the casual family living room PC? Who knows.

Regardless of what Microsoft chooses to do with the Windows 10 store where Xbox One is concerned, 2016 is looking incredibly hot for gamers already, with Quantum Break, Crackdown, Scalebound, Sea of Thieves and more on the horizon. The Xbox One has incredible momentum, and it's going to be interesting to see if Microsoft can beat the high standards they've already set for themselves throughout 2015.


How to keep your Windows 10 colored title bars even when using the default dark theme

$
0
0

Through its new servicing model, Microsoft recently began to roll out the first major update to the desktop version of Windows 10. Version 1511 includes a lot of features and improvements to make the overall experience a little better.

In the November update, the software giant has fixed a lot of issues, added performance enhancements everywhere, included new apps (e.g., Messaging apps powered by Skype) and some new features in the Settings app that should help users further customize the operating system.

If you want to see pretty much everything that is new in Windows 10, don't forget to check out our previous roundup of features, improvements, and changes for Windows 10 November update.

In addition, version 1511 brings a bunch of tweaks to the user interface, such as updated context menus (which by the way they're still inconsistent, but they are headed in the right direction), and new icons.

The company also incorporated the ability to display colored title bars for desktop applications by updating the Show color on Start, taskbar, action center, and title bar option in the Colors personalization settings.

However, this new feature can only be enabled as long as you have your settings configured to show colors in the user interface. If you are using the default dark theme, you will continue to see the boring white colored title bars on File Explorer and desktop applications.

As such, in this new Windows 10 guide, we will show you how easy it's to tweak a registry setting to enable you to see colored title bars on desktop apps and File Explorer even when you're using the default dark theme.

How to get colored title bars using the dark theme

Important: Before you modify anything on your system, it's important to note that modifying the Windows registry can be a dangerous game that can cause irreversible damages to your installation if you don't know what you are doing. As such, it's recommended for you to make a full backup of your system or at least System Restore Point before proceeding with this guide. You have been warned!

1- If you're already showing colors on desktop apps, use the Windows + I keyboard shortcut to open the Settings app.

2- Next, navigate to Personalization and go to Colors.

3- On Colors make sure to turn off the **Show color on Start, taskbar, action center, and title bar **.

4- Go to the Start menu, do a search for regedit, hit Enter, and click OK to open the Registry with admin rights.

5- Navigate the following path in the Registry:

HKEY_CURRENT_USER\SOFTWARE\Microsoft\Windows\DWM

6- Inside the DWM key, double-click the ColorPrevalence DWORD and change the value from 0 to 1.

You don't need to restart your computer or do anything else, as the change should apply immediately. Simple close and open the File Explorer or a desktop app to see the colored title bars.

After applying the change, you can still go back to Settings > Personalization > Backgrounds to pick a new desktop wallpaper, and see the title bars changing colors.

The settings will be preserved even after rebooting your computer, the only caveat with this trick is that you'll lose the configuration whenever you turn on the Show color on Start, taskbar, action center, and title bar option. However, you can always repeat the steps shown in this guide to get the colored title bars again when you want to use the Windows 10 dark theme.

How would you like Microsoft officially bringing the feature to Windows 10? If you like it, remember to let the company know through the Windows Feedback app.

More Resources

If you want to see more how-to for Windows 10, make sure you check the following resources too:

What's your preferred method to avoid running into issues when modifying your Windows installation? Let us know in the comments below.

Source WinAero

The Lumia 950 and USB OTG: Thumb drives, microphones and keyboards

$
0
0

Lumia 950 and USB OTG

In our review of the Microsoft Lumia 950 I noted that there is support for USB OTG and Type-C peripherals. Now, we'll go more in-depth and show you some of the more practical things you can do with it using a cheap USB Type-C adapter.

The gist of the technology means that you can use external storage like a USB thumb drive or any USB card reader and connect it up to your Lumia 950 or Lumia 950 XL. Using the build in File Explorer in Windows 10 Mobile you can then browse the drive, view and edit files like .docx, .pdf, image files and music, create folders, move things around and more.

Obviously the big benefit here would be for students or those in enterprise who need to transfer documents or access files on their phone from an external storage source.

You can also use USB microphones like the BLUE Yeti microphone for higher-quality audio recording.

You can connect up a wireless or even wired mouse too, which results in a mouse cursor on your phone. However, we did have stability issues on occasion. Likewise, keyboards work as well for typing.

Unfortunately, connecting up an Xbox controller had no benefit and no, it did not work with Halo Spartan Strike. Seeing as these are mostly driver issues, and this is technically Windows 10, we suppose Microsoft could roll out wider support for various USB peripherals.

Regardless, it is clear now that our phones are running Windows 10 OS, so none of this should be too surprising. Still, if you can now know that this does work in case you were on the fence. Certainly this also opens the door for more USB peripherals for Windows Phone in the future, and that is very exciting.

For more information on Microsoft's Type-C support you can read their documentation:

Microsoft: Windows support for USB Type-C connectors

Watch our hands-on video and let us know what you think!

USB Type-C Adapters Tested

Buy VicTsing USB 3.1 Type C to USB 3.0 Adapter Converter w/ OTG

Buy Kirin 10cm Type-c USB 3.1 Usb-c OTG Cable

Buy ELUCTO USB 3.1 Type C male to USB 3.0 A Female OTG Host Cable

Where to buy

Buy the Microsoft Lumia 950 from AT&T

Buy the Microsoft Lumia 950 Unlocked for $550

Want to know which Type-C cable to get? How about a micro SD card? Read these guides for the best tips.

News

Want all the latest news on these phones? Hit these topic pages for all that we got.

Support and help forums

Want to chat about the Lumia 950 and Lumia 950 XL? Jump into our forums and ask others what they think or get help and advice on your new phone!

Help & How-to

$
0
0

New Windows Phone, Surface Pro 3, or Xbox? We're here to help you get the most out of your Microsoft device. Here's where you'll find helpful guides and how-tos for your stuff. We'll show you simple things like how to take a screenshot on Windows Phone and offer more advanced guides for things like moving your contacts from Gmail to Outlook.com

Don't see a help guide or how-to on our site? Just ask us, and we'll make it for you! Otherwise, you can always ask our resource community forums yourself!

Image: 

How to enable native call recording on the Lumia 950 and Lumia 950 XL

$
0
0

One feature that many users have been asking for on Windows Phone is the ability to record phone calls. While there are legal issues varying from state to state the real reason has always been a technical one. Both the OS and hardware need to be able to support recording a two-way conversation as there need to be API accessible microphones and the ability to intercept the audio coming out the ear piece.

Windows 10 Mobile brings this feature natively to the OS although not all phones can do it. Whether that is because of firmware or hardware, it is not yet known. What is known is that the new Microsoft Lumia 950 and Lumia 950 XL can both have this feature enabled. However, it is important to note that it is not configured by default, so you need to do that before anything else.

Here is how to get it working. Just follow our written tutorial or watch our video hands-on.

Enable call recording – Lumia 950 & Lumia 950 XL

1. Settings

Go to Settings > System > Phone

2. Manage recorders

Scroll down to the bottom of the Phone settings and from the menu selector 'Choose the app you want to use to manage recorded phone calls.'

3. Voice Recorder

As of now, there are no third party apps that handle this feature. However, you can choose the native Voice Recorder app from the menu

That's it!

How to use

Using the call recording feature is very simple. Whenever you are on a call, your on-screen menu now has an extra option to Record found in the upper left area. Simply tap this button to initiate two-way call recording.

It does not matter if you call someone or someone calls you. From our testing, there is no audible beeping noise either notifying the other party that call recording has been initiated.

Listening to recorded calls

To go back and listen to call you recorded is very simple. Once the feature was enabled as outlined above you get a new menu option under the Phone app called Recorded Calls. Tapping this menu item brings up the native Voice Recorder app with the recorded call history. Simply tapping one of the logs will play the recorded call.

The audio call is recorded in MP4 format at a 174 bitrate , which should keep them at an adequate size. You can listen to a short sample above via our SoundCloud embed.

Other options include:

  • Ability to flag (demarcate) important points in the call timeline
  • Share – Using the universal Share picker you can send the audio clip to Messaging, Outlook Mail, Bluetooth, OneDrive, WhatsApp and more
  • Trim- Using the editing tools you can trim the file to just the pertinent part you want
  • Delete
  • Contact information
  • Open file location: Choosing this option opens the file in File Explorer. The directory structure for recorded calls is always This Device > Recorded Calls, although you could have these stored on the micro SD card under Storage.

Wrapping things up

All in all native call recording on the Lumia 950 and Lumia 950 XL is pretty straightforward once you get past the initial step of having to enable the feature. Once turned on, it is just another option on the call menu. You cannot, of course, have it set to auto-record every call, which could theoretically take up a lot of space if you forgot.

The quality of the recorded conversation is decent with the other party being slightly more quiet than our voice. Still, the recording is audible and depending on the connection and quality of their microphone is more than usable for record keeping.

It is finally nice to see native call recording come to Windows 10 Mobile. It should be obvious how such a feature leverages all the native apps to handle fluidly the feature. From Phone to Voice Recorder to File Explorer all of these apps are involved. It will be interesting to see if other third-party apps take advantage of the option as clearly Microsoft leaves it as a user choice.

Where to buy

Buy the Microsoft Lumia 950 from AT&T

Buy the Microsoft Lumia 950 Unlocked for $550

Want to know which Type-C cable to get? How about a micro SD card? Read these guides for the best tips.

News

Want all the latest news on these phones? Hit these topic pages for all that we got.

Support and help forums

Need to chat about the Lumia 950 and Lumia 950 XL? Jump into our forums and ask others what they think or get help and advice on your new phone!

How to enable four columns for the Start screen on the Lumia 950

$
0
0

Windows 10 Mobile, like its predecessor, sits somewhere between iOS and Android regarding customization. You cannot just hack and move around everything, but you do have a lot more choice than an iPhone.

One feature that arrived with Windows 10 Mobile is the ability to have more columns on the Start screen. On phones with smaller displays, users can have one wide tile and one medium tile adjacent (or just three medium tiles). On a phone like the Lumia 1520, however, you can have two wide tiles side by side (or four medium tiles).

By default, the Lumia 950 opts for the three-column layout. Personally, I think it is a good choice as it keeps the Live Tiles at just the right size for most users. In Windows 10 Mobile users can also toggle a switch to 'Show more tiles' that adds in a fourth row. Interestingly, this does nothing on the Lumia 950 by default. The reason has to do with text size and is easy to work around.

Without further ado, here is how to enable four column support on the Lumia 950.

Enable more Live Tiles for the Lumia 950

1. Settings

Go to Settings > System > Display

2. Adjust size

Navigate down until you see Size of text, apps, and items on this display. By default, the Lumia 950 is set at 400%. This setting is due to the extremely high-resolution format (1440x2560) that is crammed into a small 5.2-inch screen. You will want to move the slider to the left until it says 350% instead. Once set, you need to tap Apply and restart the phone.

3. Show more

Now that the phone has rebooted, we are still not where we want to be so there is one more setting. Navigate to Settings > Personalization > Start and enable Show more tiles.

That's it!

Heading back to the Start screen and you should now have a fourth column. It is clear that at 400% there is just not enough room for the extra column, but by reducing text size and other UI elements we can make space. You will need to move your Tiles around to make use of the extra area, and unfortunately, toggling Show more tiles on and off does not preserve your setup.

So, is it better? The choice is up to you. Certainly with the fourth column there is much more information crammed on the Start screen, and you can have many more Tiles readily available. Some users, however, will likely find the text too small or the overall look just "too busy". Luckily, you can play with these settings and find what works for you.

For now, I have opted to keep the extra column as I like the sharpness, and you may want to consider it as well. If not, at least you now know how to change it!

Where to buy

Buy the Microsoft Lumia 950 from AT&T

Buy the Microsoft Lumia 950 Unlocked for $550

Want to know which Type-C cable to get? How about a micro SD card? Read these guides for the best tips.

News

Want all the latest news on these phones? Hit these topic pages for all that we got.

Support and help forums

Want to chat about the Lumia 950 and Lumia 950 XL? Jump into our forums and ask others what they think or get help and advice on your new phone!

How to enable Hey Cortana for the Lumia 950 and Lumia 950 XL

$
0
0

Cortana listening

If you are thinking about getting a new Lumia 950 or Lumia 950 XL (or you already have one), you may want to remember to enable Hey Cortana. For those who are not familiar Hey Cortana is Microsoft's hands-free solution to activating the Cortana personal digital assistant. Simply calling out 'Hey, Cortana' while your phone is in standby (the display is off) summons the helper to do your bidding. Once activated, you can then dictate a text message, check the weather, or activate an programs that utilizes commands like the Windows 10 Weather Channel app.

For those already used to Hey Cortana you may be think that enabling the feature is obvious. However, Microsoft did change it on the Lumia 950 and Lumia 950 XL when compared to the Lumia 1520 and Lumia 930. This change is actually welcomed as it now matches Windows 10 desktop.

Under Nokia Hey Cortana was located under Settings > Extras > Hey Cortana. Those 'Extra' settings were Nokia customizations that fell outside the default settings of the OS. However, with Windows 10 Mobile Microsoft has the chance to start to build those features into the OS itself. As a result, there simply is no Hey Cortana configuration under Settings anymore as it has moved directly to Cortana.

Here is how to turn it on!

Enable Hey Cortana (Lumia 950, Lumia 950 XL)

1. Launch

Hit the search button to launch Cortana (or choose the Tile or Cortana from the app menu)

2. Menu

From the upper left split-view menu (aka Hamburger button) choose Notebook

3. Settings

In the top area of the Notebook select Settings

4. Enable

From the menu items listed enable Hey Cortana. You also have the secondary option to train Cortana to recognize just your voice or anyone. To train for your voice select To me and the program will walk you through the steps to learn your manner of speaking.

That's it! Once completed, you can now just say Hey Cortana anytime you are near your Lumia. Cortana will pop up on the display, and you and you will hear a beep letting you know that you can speak your command. This behavior differs from the desktop version where you can just say "HeyCortanaRemindMeToGetSomeBreadTonight" with no pauses.

[Edit: Turns out, another change with the Lumia 950 and Lumia 950 XL is you do not need to pause after saying 'Hey Cortana'. Cool!]

It should be noted that using Hey Cortana requires some extra battery as the microphone needs to stay on when the display is off. Although the battery usage is exceedingly minimal if you find yourself struggling to get by through the day without recharging you may want to consider disabling it.

Do you plan to use Hey Cortana on your Lumia 950 or Lumia 950 XL? Let us know in comments!

Where to buy

Buy the Microsoft Lumia 950 from AT&T

Buy the Microsoft Lumia 950 Unlocked for $550

Want to know which Type-C cable to get? How about a micro SD card? Read these guides for the best tips.

News

Want all the latest news on these phones? Hit these topic pages for all that we got.

Support and help forums

Want to chat about the Lumia 950 and Lumia 950 XL? Jump into our forums and ask others what they think or get help and advice on your new phone!

Dull display? Make the Lumia 950 and Lumia 950 XL's extra vivid

$
0
0

Lumia 950 Color Profile

For those using or planning to get the new Microsoft Lumia 950 or Lumia 950 XL, the display is surely something to get excited about. The 5.2 and 5.7 inch displays pack a 1440x2560 resolution with ClearBlack and OLED technology for super deep blacks and rich, vibrant colors.

One complaint from some users, however, is that the displays on these new Lumias are not vibrant enough. Truth be told, AMOLED displays can be contentious as some call the color saturation too vivid and not life like. Others, on the other hand, simply love how the color pops.

Luckily, there is an easy way to customize the saturation, hue and coolness of these displays to your satisfaction. Here is how!

Control display vibrancy

1. Settings

Open up Settings and scroll down to the bottom until you find the Extras category. Tap to open.

2. Profile

Select the option that reads Color profile and open it

3. Choose

From the drop down menu you will have four choices: Standard, Cool, Vivid and Advanced. Choose the color profile that suits your tastes. You can scroll through the sample images to see how images will look with the changes. By default, both new Lumias ships on Standard, but many will prefer Vivid to have a high-contrast appearance.

4. Customize (optional)

Don't like any of the presets? Select Advanced from the menu and three sliders become visible. Those sliders control Color temperature, Tint and Color saturation. You can move the sliders to where you like to find your sweet spot.

Once completed just back out to the Settings menu. The effect is instant, and there is no need to reboot the phone. This also means you can change these profiles on-the-fly, which may be good for those shutterbugs who want a Standard profile for photo editing.

So next time someone complains that the Lumia 950 and Lumia 950 XL displays look dull, set them straight with this guide!

Bonus!

We should also note that older Lumias like the Lumia 1520, Lumia 930, etc. also have these settings found under Settings > Extras > Display. There you can set the Brightness and Color profiles just like above.

Although the new Lumia 950 and Lumia 950 XL do not have a brightness profile per se, it does look like the brightness buttons now directly set those natively, or you can use the slider under Settings > System > Display to set the base for brightness.

Which profile do you prefer? We're set on Vivid here at Windows Central.

Where to buy

Buy the Microsoft Lumia 950 from AT&T

Buy the Microsoft Lumia 950 Unlocked for $550

Want to know which Type-C cable to get? How about a micro SD card? Read these guides for the best tips.

News

Want all the latest news on these phones? Hit these topic pages for all that we got.

Support and help forums

Want to chat about the Lumia 950 and Lumia 950 XL? Jump into our forums and ask others what they think or get help and advice on your new phone!


How to change the keyboard size on the Lumia 950 and 950 XL

$
0
0

Lumia 950 Keyboard

If you feel like the keyboard on the Lumia 950 or 950 XL is too big on the screen, there's a way to make it smaller. The main benefit of making the keyboard smaller is seeing more content on the screen. However, you pay with having smaller keys that might result in more spelling errors. Nevertheless, we'll show you how to change the keyboard size so you can see for yourself which option works best.

  1. Swipe down from the top of the screen and select All settings
  2. Go to Time & language> Keyboard and tap More keyboard settings
  3. Under Keyboard size, you can select Small, Medium, or Large. The default option is Large.

That's it! Here's a comparison of the three sizes on the Lumia 950 running Microsoft Edge:

Keyboard size

Are you changing the keyboard size on the Lumia 950 and 950 XL or are you leaving the default option? Sound off in the comments!

Buy the Microsoft Lumia 950 from AT&T

Buy the Microsoft Lumia 950 Unlocked for $550

News

Want all the latest news on these phones? Hit these topic pages for all that we got.

Support and help forums

Need to chat about the Lumia 950 and Lumia 950 XL? Jump into our forums and ask others what they think or get help and advice on your new phone!

How to migrate from your old Windows Phone to your new Lumia 950 or Lumia 950 XL

$
0
0

Windows Phone Backup

One of the few downsides of getting a new Windows Phone is having to migrate all the apps, games and settings of your old phone to your new. Many will be picking up the new Lumia 950 or Lumia 950 XL and the process has gotten a lot easier than it used to be.

The process is no longer as cumbersome as it used to be with everything having to be manually reinstalled and set-up. With the Windows Phone Back-up feature, you can create a backup file for all your games, apps, email accounts, settings and text messages that can easily be restored or migrated to your new Windows Phone.

Windows Phone Backup

The steps are straightforward.

  • From your old Windows Phone (in my case the Lumia 830), go to your settings and scroll down to the Update+Backup section of the settings.
  • Here is where you can choose what gets backed up. So you have the most recent file available, go ahead and tap the Apps+Settings and Text Messages to back them up.
  • Images have the option of being backed up to your OneDrive and accessible from your new Windows Phone. Personally, I store my images on my microSD Card and simply move my card from Phone to Phone.

Once you've created a recent backup file for your Apps+Settings and/or Text Messages, go ahead and start the initial set-up for your new Windows Phone. At some point, you will be asked if you would like to restore a previous Windows Phone backup file. All that is needed is to pick your file, tap okay and sit back and relax.

Windows Phone Restoration

The restoration will adjust your new Windows Phone settings to match your old Windows Phone as best as possible. Just keep in mind that some of the settings on your old phone may not transfer over to your Windows 10 phone. The same is possible with your old apps and games.

The reinstallation will take a little time, but it is a lot easier than finding the app in the Windows Phone Store and manually re-install things one app at a time.

Additional Reading

Support and help forums

Want to chat about the Lumia 950 and Lumia 950 XL? Jump into our forums and ask others what they think or get help and advice on your new phone!

How to fix Hey Cortana on the Lumia 1520 and Lumia 930 with Windows 10 Mobile

$
0
0

Hey Cortana fail

Over the last few Insider builds of Windows 10 Mobile, many users with higher spec'd phones saw the return of Hey Cortana– the hands-free, voice-activated personal assistant. However, for many users, including on our Lumia 1520 we had the feature but could not get it to recognize our voice during training.

We now have a fix in place the returns the full Hey Cortana feature to build 10586 of Windows 10 Mobile. Remember, only phones with a Snapdragon 800 and higher processor can use the feature as it is hardware dependent.

Here is how to fix Hey Cortana if the training does not recognize your voice. The solution takes no more than a few minutes.

Fix Hey Cortana on Lumia 1520 and Lumia 930

1. Settings

Go into Settings > Time & language > Language

2. Add

Use the + Add Languages function to add English (United Kingdom). Hit the checkmark at the bottom and yes to the download prompt.

3. Remove

On the main Languages page long press on English (United States) and choose Remove. Now, select the Restart phone button and let the phone reboot

4. Add Part II

For these steps, we are reversing what we did above. Use the + Add Languages function to add English (United States). Hit the checkmark at the bottom and yes to the download prompt.

5. Remove Part II

On the main Languages page long press on English (United Kingdom) and choose Remove. Now, select the Restart phone button and let the phone reboot

6. Train Cortana

Once the phone has restarted with the correct English (United States) language you can go back to Settings > Extras > Hey Cortana and begin to train Cortana again to use your voice when the display is off.

*Obviously, if you are a UK users and cannot use Hey Cortana even though you have the feature, you will need to reverse Steps 2 and 3.

Long story short, it appears the language pack with Windows 10 Mobile build 10586 is not recognized as the correct one when using Hey Cortana. All this trick does is reset the language pack and lets the OS recognize it has the right one installed. Hey Cortana and Cortana are dependent on a having the correct region, keyboard and language packs installed. If just one of those are off, it will disrupt Cortana functionality.

We did confirm this worked on our Lumia 1520, so it should work on your phone as well.

Special thanks to NOLATechy, for bringing the solution to our attention

How to enable Battery Saver automatically on the Lumia 950 and 950 XL

$
0
0

Lumia 950 battery

Battery Saver extends the battery life of the Lumia 950 and 950 XL by limiting background activity and push notifications. It is off by default, but you can set it up so that your phone automatically turns on battery saver when the battery falls below a certain percentage. We'll show you how to do it.

  1. Swipe down from the top of the display and tap All settings
  2. Go to System> Battery saver and tap Battery saver settings
  3. Enable Turn battery saver on automatically if my battery falls below
  4. The default setting is 20%, but you can adjust the slider

Battery Saver

Once your Lumia 950 and 950 XL is in Battery saver mode, apps stop running in the background and stop sending and receiving push notifications. However, you can add exceptions. In the battery saver settings, tap Add an app. This lets the app operate normally.

I set it up on my Lumia 950 XL so that battery saver automatically turns on below 20%, but I made an exception for Mail and Calendar. Are you going to turn on Battery Saver? What apps are you still allowing to run in the background? Sound off in the comments!

Buy the Microsoft Lumia 950 from AT&T

Buy the Microsoft Lumia 950 Unlocked for $550

Buy the Microsoft Lumia 950 XL

News

Want all the latest news on these phones? Hit these topic pages for all that we got.

Support and help forums

Need to chat about the Lumia 950 and Lumia 950 XL? Jump into our forums and ask others what they think or get help and advice on your new phone!

Here is why you are not getting full LTE on AT&T when using the Lumia 950 XL

$
0
0

Over the last few days, people have been picking up the new Lumia 950 XL unlocked from Microsoft. The phone supports many LTE bands, which is why it is surprising to see a few people complaining about not getting LTE when they insert their AT&T SIM.

To be certain, the Lumia 950 XL dual-SIM does support AT&T's LTE bands. You can see it in action in our unboxing video. So why are some users having an issue? As it turns out, it can be a complicated mess that falls mostly in AT&T's lap.

Issue #1 – Setting up the phone without a SIM installed

Many times when you get a new phone you just want to turn it on and start using it. Additionally, you may want to set up the phone and use it for a few hours without a SIM to get a feel for it before committing your SIM to the phone.

However, skipping the SIM during the initial out-of-box setup may be a bad idea. We have set up our Lumia 950 XL twice with different AT&T SIMs and never had an issue getting LTE data speeds. It seems one common denominator with those getting non-LTE data is that they added the SIM after the setup. There may be a crucial step where the phone configures the APN settings during the initial setup, so it is best to start with the SIM when you take the Lumia 950 XL out of the box.

Hey, you can always pop out the SIM after and put it on your older phone until the Lumia 950 XL meets your criteria for usage.

Issue #2 – No IMEI for AT&T

The International Mobile Station Equipment Identity or IMEI is used to ID phones on a network. Did you never notice how your AT&T account settings "knows" what phone you are using? That falls on the IMEI.

AT&T keeps a list of IMEIs for the phones they official sell and support. The Lumia 950 XL is not amongst those they sell. If you call AT&T and tell them you are having issues with your unlocked Lumia 950 XL and you give that phone's IMEI, they will tell you they can't help and your phone won't work. This, however, is not true.

Many people in our forums have simply given IMEIs from other AT&T phones. One trick is just walk into an AT&T store and copy the IMEI from the AT&T Lumia 950 floor model. Others have used their older AT&T phones.

Once AT&T has an IMEI they can work with they can add it to your account and SIM. Once their system recognizes the IMEI, the LTE data should kick in. So much for open GSM standards, right? Remember, the IMEI does not matter on your end it is just a device ID and is independent of your SIM account number.

IMEI, where?

How to get an IMEI? On Windows Phone, it is always found under Settings > System > About > More Info and it should be listed near the MND and IMS numbers.

Now call AT&T support and tell them you have a new phone but your data isn't working. Provide them with the dummy IMEI from another AT&T phone and your SIM number. They'll add it to their system, and you should be good to go.

As user coolbreeze78remarks in a forum thread on this topic "AT&T's system seems to require a branded AT&T LTE IMEI to be listed on your account for LTE provisioning to work". Once AT&T has this IMEI in their system you should be all set.

Interestingly, this LTE IMEI requirement seems to be only an AT&T issue, which is why those on T-Mobile do not seem to have the same problems.

Wrap up

To clarify again: The Microsoft Lumia 950 XL unlocked with dual-SIM 100% works on AT&T's network with LTE (although visual voicemail seems to be missing).

If you are only getting "4G" showing in the notification area on your Lumia 950 XL instead of "LTE", there is nothing wrong with the phone. Our Lumia 950 XL and many others are rolling just fine on AT&T. However, you do need to follow one or both steps above to make it work.

Most of the time the problems seem to come from picking up a new AT&T SIM and giving AT&T the IMEI from the Lumia 950 XL. Those who are migrating from an AT&T Lumia 1520, Lumia 920 or any other AT&T phone with LTE do not have these problems.

If you need more help on this or want to read other's experiences just jump into our help and support forums!

Order page for the Lumia 950 XL from Microsoft

Did you get your Lumia 950 XL in today? Let us know in comments your experience so far!

More resources

News

Want all the latest news on these phones? Hit these topic pages for all that we got.

11 keyboard tips that will help you type faster on Windows 10 Mobile

$
0
0

Lumia 950 keyboard

The keyboard could be the most frequently used tool on our phones. We use it to write emails, notes, send messages, tweet, search the web, and more. Whether you're already a pro at typing or just getting familiar with your new Windows 10 Mobile device like the Lumia 950 and 950 XL, there are definitely some tips and tricks that will make you type faster. We'll show you 11 ways that might help.

1. Tap space bar twice for period

This is the oldest trick in the book. Simply tap the space bar twice to end a sentence. Of course you can always tap the period button, but the space bar covers more space, making it easier to reach.

2. Swipe to numbers or symbols

Instead of tapping the symbol key and then the number or symbol, try swiping! For example, if you need to type the number 3, swipe from the &123 key on the lower left corner, drag it to the number 3, then release. The letters automatically change when you start the swiping motion.

3. Swipe to common punctuations

If you tap and hold the period button, you can then drag your finger to other common punctuations like the exclamation point, question mark, comma and dash. Swiping is optional. You can also tap and hold the period button, then tap the punctuation.

Lumia 950 keyboard

4. Swipe to .org, .edu, or .net

When you're typing a URL in Microsoft Edge, a dedicated .com button shows up in the keyboard. Tap and hold the .com button and then swipe to another extension you need. This is definitely faster than manually typing the rest of the URL.

5. Tap and hold Shift button for CAPS LOCK

Tap and hold the Shift button for caps lock. You can also double tap it to type everything in capital letters. Tap the button again to return to normal.

6. Use the precision pointing stick

The Windows 10 Mobile keyboard has a precision pointing stick within the keyboard. Use it to move the cursor to correct a typo or quickly insert a missing letter or apostrophe.

7. Add words to the suggestions list

The Windows 10 mobile keyboard gives you text suggestions above the keyboard as you type. If there's a word that you use a lot that isn't in the dictionary, you should add it to the suggestions list. To add a new word, type it in an app like Mail or OneNote, then click to select it. Tap the plus sign to add it to the suggestion list.

Lumia 950 keybaord

8. Shift the keyboard to the left or right

If you find yourself often typing with one hand, we recommend shifting the keyboard to one side. When the keyboard is open, tap and hold the $123 button, and then tap the keyboard icon. Select which side you want to shift it to. This seems to be only be available for devices with displays greater than 5 inches.

Lumia 950 keyboard

9. Move the keyboard up or down the screen

You're not required to have the keyboard always show up at the bottom of the screen. Tap and hold the spacebar, and then drag it up or down the screen. This seems to be only be available for devices with displays greater than 5 inches.

10. Swipe to switch between keyboards

If you have multiple keyboards in different languages, you can quickly switch between them by swiping on the space bar. To add a new keyboard, tap and hold the $123 key and then tap the gear icon. Select Add keyboard and choose what you want to add.

Lumia 950 keyboard

11. Say it instead

As long as it's not annoying anyone else around you, try using the keyboard's voice input. It may be faster at typing long messages. Tap the mic icon above the keyboard to start.

Which of these tips do you already use regularly? Did you learn something new? Sound off in the comments!

How to disable background apps for the Lumia 950 and Windows 10 Mobile

$
0
0

When it comes to mobile phones, there is rarely a device that always has perfect battery life. Whether it is the iPhone, Android, or even Windows Phones, they can all vary depending on how often you check your email, how often you turn on the display and how many apps are fetching data in the background.

Windows Phone is mostly pretty good at not hammering the battery but once you start installing third-party apps and services, anything can happen. One easy way to get some control over these runaway apps is to turn off some apps running in the background.

Like Windows Phone 8.1 in Windows 10 Mobile users have access to the Battery Saver feature. The core feature of Battery Saver – turning off non-essential apps when your battery hits a threshold – is off by default and we already covered how to enable it.

Today, we will show you how to manage individual apps on the Lumia 950 and Lumia 950 XL. Of course, this feature is a universal one for Windows 10 Mobile, so for those upgrading you can also benefit from this how-to.

How to disable background apps

1. Settings

Head to Settings > System > Battery saver

2. Usage

In what I think is a poor UI design Microsoft lets you dive deeper into your battery usage. To do so you need to tap the text that matches your system accent color and read Battery use. What bothers me about this is it is not a clear "button" to push so I think many users do not know about it.

Note: It will take a few seconds for the OS to collect data and respond with the results, this is normal.

3. Data

Scrolling down the list you can see some interesting information including which apps are using the most amount of power. You can also see it separated by In use versus Background, which is important.

Tapping an individual app will surface a Details option where you can go even deeper into that app's usage. Here you can also enable or disable background usage through the Allow this app to run in the background option.

4. Background app settings

Going back to the main Battery Use page you can see a Change battery saver settings listing under the graph. Tap this to go into a master list of apps and their toggles to let them run in the background (or not).

Go through and if you see any apps that you do not need running the background feel free to disable them. Some things like Facebook, Messenger, and system files like Gestures & Touch you probably want to leave enabled.

Small warning

Although disabling apps from running in the background will not have any catastrophic effects on your phone, you may notice some odd changes within the apps you have disabled. Just make a mental note of the changes you made so the next time you use an app something is not working as expected it may be because you disabled it. For instance, if you disabled MSN Weather do not be shocked when the Live Tile stops updating. Most of this is obvious, but some of it may not be.

Microsoft Edge?

In an odd finding, we noticed that the Microsoft Edge browser does not always appear under Background app settings. It seems that an app needs to trigger the background process before it gets listed in this section, which makes sense. So as demonstrated in our video and screenshots we can disable Microsoft Edge, you may not see it.

Presumably, you need to visit a site that auto-refreshes or does something in the background so your experience may vary. Disabling it should not have any consequence. However, your expectations for browser behavior may differ so just be aware if you do turn it off.

Pin to Start (Bonus)

Another somewhat hidden feature is you can long-press and hold on many menu items under Settings e.g. Battery Saver that lets you pin the item to your Start screen as a Tile.

Unfortunately, Battery Saver does not reveal the battery percentage like it did on Windows Phone 8.1. Hopefully, that will be added in the future.

Battery app

A well-reviewed third-party battery app is one called simply Battery and is the one we used in this how-to video. It is a free app with a $1.29 optional donation. You can read our review or download the app below.

Download Battery for Windows Phone 8.1 and 10

QR: battery

Wrap up

Overall, Windows Phone is one of the better mobile operating systems for maintaining battery life. Still, there is never such thing as too much standby time. Therefore, being able to fine tune things may let you eek out some extra battery life here and there, although we would be surprised if you witness something dramatic.

Everyone's phone is configured differently, however, so let us know what you find!


How to remove pre-installed and suggested apps in Windows 10

$
0
0

Among all the new features and improvements, one of the biggest changes with Windows 10 is Microsoft alternating its way on how it makes money with its operating system. For the first time, the software giant is offering its operating system free of charge, which is also helping to boost the adoption rate to all new highs.

However, the term "free" comes with various restrictions, which makes Windows 10 not entirely free. Microsoft will let you install its new operating system at no extra cost as long you're upgrading a computer already running a genuine copy of Windows 7 or Windows 8.x. In addition, the software giant is also letting PC manufacturers install Windows 10 for free on qualifying devices, which also helps to reduce prices and stay competitive.

There is another reason the operating system is free. It's because Microsoft plans to make up some of the difference by luring customers to use its cloud services, such as OneDrive, Office, and Skype, and selling Store apps.

One strategy currently in place is bundling Windows 10 with some promotional apps and offering app suggestions based on your operating system usage. In this article, we'll be listing a few things that can be considered advertising that you can remove to make your Windows 10 experience a little better.

Uninstalling promotional apps from Windows 10

When you install or boot Windows 10 for the first time, you will notice a few apps pre-installed by default on the Start menu. These apps include the Get Office, Get Skype, Phone Companion, and Candy Crush. They not only waste space, but they can be a distraction, especially the Get Office app that keeps prompting you to jump into Office 365. It will stay installed even after setting up the latest version of Office suite.

Fortunately, if you know where to look, you can easily get rid of most of the default promotional apps bundled in Windows 10. Just follow the steps below:

1- Use the Windows + I keyboard shortcut to open the Settings app.

2- Navigate through System and go to Apps & features.

3- On Apps & features you'll see a list of all your desktop and Store apps currently installed on your system. Look for the Get Office app, click on the app, and then click the Uninstall button to finish the removal.

4- Repeat the previous step for the remaining promotional apps, such as Get Skype, Phone Companion, and Candy Crush.

While on Apps & features, you can also uninstall other apps that you might not need, including 3D Builder, Microsoft Wi-Fi, Microsoft Solitaire Collection, Get Started, and others.

Disabling app suggestions from the Start menu

The new operating system also includes a new feature that shows app suggestions in Start. Many could consider this tactic just straight advertising more than Microsoft trying to help you discover new apps. (However, it does help the ecosystem and developers get their apps downloaded and used. Remember, the whole model of Windows 10 and UWP depends on the assumption that you will discover and use Windows apps. App discovery is a major problem that this feature tries to solve).

You can disable Windows Store app suggestions by doing the following:

1- Use the Windows + I keyboard shortcut to open the Settings app.

2- Navigate through Personalization and go to Start.

3- While in Start, make sure the Occasionally show suggestions in Start is turned Off.

How much do you mind Microsoft including these kind promotional apps? Do you find them useful and prefer them or find them annoying and want to disable them? How would you solve the app discovery problem that plagues all app stores?

Let us know in the comments below!

More resources

If you want to read more about Windows 10, make sure you check these resources:

Windows 10 on Windows Central – All you need to know

Windows 10 help, tips, and tricks

11 things you should do first with the Lumia 950 or 950 XL

$
0
0

Lumia 950 and 950 XL

Picking up a new smartphone can be an overwhelming experience. Indeed, first impressions matter so from the moment you power the phone on for the first time to when you confidently put it in your pocket to face the world how it all goes can impact your view.

What do you need to do when you first pick up a new Lumia 950 or Lumia 950 XL? Sure, drop in a SIM and maybe a microSD card are obvious, but what about app updates, system updates and more? Here are a few things that we do every time we fire up a new Windows Phone. Maybe you'll learn a thing or two as well.

Without further ado, this is our list of 11 things you should do when setting up your new phone, so you can have the best experience right away.

1. Uninstall apps

Uninstall Lumia 950

One of the cool things about Windows Phone versus the iPhone and Android is you can actually remove preinstalled apps from carriers or Microsoft. We are not talking about hiding apps but completely removing them from the phone to save storage.

For example, the Lumia 950 from AT&T includes AT&T Address Book, FamilyMap, Locker, Navigator, Ready2Go, Mobile TV, and more. If you don't think you'll be using any of these apps, you can uninstall them. To uninstall an app, tap and hold the app's name and select Uninstall. The app is gone from your system. If you ever want it back, you can just grab them from the Windows Store again.

2. Store updates

Lumia 950 Store updates

Many apps might have been updated since the phone has left the store and reached your hands. We recommend checking if updates are available before you start using them. Open the Store, tap the hamburger menu, tap Downloads and updates, and then Check for updates.

It is not uncommon to see app updates for 38 apps (or more) on these new Lumias. These updates are super important to your experience as many of them are fixes and enhancements. If you start using an older version of an app, you may think something is wrong when an updated version is just waiting to be downloaded.

3. Phone update

Lumia 950 Check update

While your phone is still mostly untouched, check if there are any phone updates for the operating system. Swipe down from the top of the screen and select All settings. Go to Update & security> Phone update and tap Check for updates.

Microsoft has changed the model for Windows 10 Mobile and OS updates should be much more frequent. Don't worry either, your phone does check once a day for OS updates so you won't ever miss 'em for long.

4. Email accounts

Lumia 950 email setup

Adding your email accounts to Outlook should be one of the first things you should do with the Lumia 950 and 950 XL. In addition to sending and receiving emails right away, it'll also be included as an option when sharing items such as photos, screenshots, links, or more.

5. Color profile

Others have mentioned that the Lumia 950 display appears washed out. Fortunately, you can change the screen profile. We recommend changing it to the vivid option. Go to Settings> Extras and choose Color profile. Select Standard, Vivid, Cool, or even Advanced for more control over what the screen shows.

6. Lock screen

Lumia 950 Bing

Get a new lock screen image automatically every day from Bing instead of using the default one. You can also choose to use your own photos or from other apps, but Bing is a great option to start with.

7. Start screen

Lumia 950 Start

Personalize your phone even more by changing the way the Start screen looks. Go to Settings> Personalization> Start. You can change the background image, use it as a full screen or tile picture, and even change the transparency of the tiles. When you're done, hit the back button and then tap Colors. Select your accent color and choose whether you want the dark or light theme. We like wallpapers from interfacelift.com and Theme+.

We'll be doing more in-depth articles on customization in the coming weeks, stay tuned!

8. Keyboard size

Lumia 950 keyboard

There is a way to change the keyboard size on the Lumia 950 and 950 XL. It is large by default, so check if you're comfortable with the small and medium sizes too. A smaller keyboard gives you more space to see content on the screen.

  1. Swipe down from the top of the screen and select All settings
  2. Go to Time & language> Keyboard and tap More keyboard settings
  3. Under Keyboard size, you can select Small, Medium, or Large.

9. Windows Hello

Lumia 950 Windows Hello

The Lumia 950 and 950 XL both feature Windows Hello (Beta), which is a biometric form of authentication. You can securely unlock your device or make purchases at the Store by just looking directly at the screen. The front-facing infra-red camera technology is used to authenticate you.

  1. Go to Settings > Accounts > Sign-in options.
  2. Tap the Set up button under Iris
  3. Tap Get started, hold your phone in front of your eyes, and tap Next.
  4. The Lumia 950 and 950 XL scans your eyes and you can do this several times to improve the recognition.

10. Battery saver

Battery Saver

Battery Saver extends the battery life of the Lumia 950 and 950 XL by limiting background activity and push notifications. It is off by default, but you can set it up so that your phone automatically turns on battery saver when the battery falls below a certain percentage (usually 20 percent is a good idea). Follow the steps here.

11. Install apps

Lumia 950 Windows Store

It isn't truly your phone until you start installing apps. If this is your first time using Windows 10 Mobile, check out Daniel's list of 23 must-have apps for the Lumia 950, Lumia 950 XL. Some of the first apps I install are 6tag (Instagram app), Pandora, Facebook, Yelp, and myTube (Youtube app).

More tips

Lumia 950 and 950 XL Mozo case

Have more tips for new users? Let them know in the comments what else you think they should do with their Lumia 950 and 950 XL!

Buy the Microsoft Lumia 950 from AT&T

Buy the Microsoft Lumia 950 Unlocked for $550

Buy the Microsoft Lumia 950 XL

News

Want all the latest news on these phones? Hit these topic pages for all that we got.

Support and help forums

Need to chat about the Lumia 950 and Lumia 950 XL? Jump into our forums and ask others what they think or get help and advice on your new phone!

How to use the Gadgets app on the Lumia 950, 950 XL, & Windows 10 Mobile

$
0
0

Lumia 950 Gadgets

The built-in Gadgets app on the Lumia 950 and 950 XL isn't the most exciting app available on Windows 10 Mobile, but it definitely deserves some attention. Our favorite Gadgets feature is the ability to automatically open apps when connecting a phone to accessories like headphones, or Bluetooth speakers. We'll show you how you can do that along with other tips for the Gadgets app.

The Gadgets app opens automatically whenever you connect your phone with a new accessory for the first time. However, you can also access it via the app list.

How to automatically open an app when connecting an accessory

Let's use the JBL Powerup as an example. It's a Bluetooth speaker with NFC and wireless charger on top. In order to pair it with the Lumia 950, you hold and place the back of the Lumia 950 near the NFC logo of the JBL Powerup. Once paired, the Gadgets app opens up and lets you know that it's connected and ready for use. From the Gadgets app, you can decide what will happen next time you pair the phone with the Powerup.

  1. Swipe towards Customize
  2. Under When I connect this accessory, you have the option to Do nothing, open any app you want, open the Gadgets app, or show Notification.
  3. Select Open app and choose the application you want. For example, I've selected Pandora. Note: We noticed Groove does not open automatically even when selected. We hope this bug gets fixed soon.

JBL Powerup Gadgets

How to create app shortcuts in Gadgets

If you select to automatically open the Gadgets app when connecting to an accessory, we recommend adding app shortcuts specific to that accessory. For example, when connecting your phone to your car's Bluetooth, you either open the Maps app or a music app. You don't want one specific app to open automatically. Here's how to add the shortcuts:

  1. Tap your accessory tile in the Gadgets app
  2. Tap the plus (+) sign next to Apps
  3. Choose as many apps you want to add by tapping checkboxes

Gadgets shortcut

How to pin your favorite accessory to the Start screen

We have a Bluetooth speaker in a corner of the office. Instead of physically tapping it with the Lumia 950, we can turn it on right from the Start Screen. Here's how you can set it up:

  1. Tap your accessory in the Gadgets app
  2. Tap the Pin to Start icon
  3. Next time you want to use it, just tap the accessory's icon in the Start screen, and then tap Connect

Lumia 950 gadgets

Will you use it?

Now that you know a little more about the Gadgets app, will you be using it with your Lumia 950, Lumia 950 XL, or other Windows 10 Mobile devices? Let us know what you think in the comments!

Buy the JBL PowerUp Wireless Charging Speaker

Buy the Microsoft Lumia 950 from AT&T

Buy the Microsoft Lumia 950 Unlocked for $550

Buy the Microsoft Lumia 950 XL

News

Want all the latest news on these phones? Hit these topic pages for all that we got.

Support and help forums

Need to chat about the Lumia 950 and Lumia 950 XL? Jump into our forums and ask others what they think or get help and advice on your new phone!

How to add recurring tasks in Todoist for Windows 10

$
0
0

Todoist

Recently we featured a first look at the Todoist Preview for Windows 10, a new universal app set to launch in the not too distant future from the popular cross-platform service. The app itself was born from the company's acquisition of Taskcrunch for Windows Phone, and it's developer, and we're now beginning to reap the benefits.

There's a whole ton of things that Todoist can do for you in managing your day. Here's one quick tip on how to add a recurring task.

  1. In any project or your inbox hit the big "+" button in the top right hand corner or the "add task" button to open the new task window.
  2. Give it a name before going any further.
  3. In the box that will either say "today" or "no due date" depending on where about's you are adding the task is where you work the magic.
  4. Simply write "every xxx at yyy" to set the recurring time.

For example to set a recurring task for a Friday at noon simply write "every Friday at 12:00" in the due date box. This will then create the recurring task. It's pretty broad, too, with every day, every second Thursday and such all adding the necessary dates. The beauty is that you just need to type out the instruction instead of going into a calendar, or any menus and having to set anything else up. One command and it'll be there until you remove it.

Of course, this technique will work inside any of Todoists apps, we're just using the new Windows 10 app as an example to show off a feature.

If you've yet to take a look, grab Todoist Preview from the Store at the link below.

Download Todoist Premium for Windows 10

How to safely remove the microSD card on the Lumia 950 & 950 XL

$
0
0

MicroSD Card removal

The Lumia 950 and 950 XL both have microSD slots so you can have more room for storage. In fact, you can get a 200GB microSDXC card for the phones right now. These high-speed, high-capacity cards can get expensive depending on what you get, so making sure to take care of them can save you money later on. For example, simply pulling the microSD card out of your Lumia 950 or 950 XL isn't recommended. We'll show you the safer way.

  1. Swipe down from the top of the screen and tap All settings
  2. Go to System> Storage and tap the SD Card
  3. Scroll down and tap Remove
  4. You'll get a warning that the files stored on this card won't be available until you put it back in. Tap Yes, I'm sure.

Remove MicroSD Lumia 950

That's it! Now, you can remove the back cover and remove the microSD card. Most people won't be removing their microSD cards often, but it's one way of transferring files between the Lumia 950/XL and the Surface Pro 4, which has a microSD slot, too.

Did you know about this safety measurement? Have you pulled out your card before removing it in the settings? Let us know in the comments.

Buy the SanDisk Ultra 200GB microSDXC card

Buy SanDisk Extreme PRO 64GB microSDXC card

Buy the Microsoft Lumia 950 Unlocked for $550

Buy the Microsoft Lumia 950 XL

News

Want all the latest news on these phones? Hit these topic pages for all that we got.

Support and help forums

Need to chat about the Lumia 950 and Lumia 950 XL? Jump into our forums and ask others what they think or get help and advice on your new phone!

Viewing all 5861 articles
Browse latest View live


Latest Images