Quantcast
Channel: Help & How To
Viewing all 5861 articles
Browse latest View live

Cheap Continuum with an HDMI adapter for the Lumia 950 and Lumia 950 XL

$
0
0

If you are considering picking up a new Lumia 950 or Lumia 950 XL (or already have one) you may have a few questions regarding that USB Type-C and OTG connector on the bottom of your phone.

If you caught our earlier video, we showed you how you can connect USB thumb drives and other peripherals like a mouse to your phone. Today, we'll show you a $25 HDMI adapter works and answer if you can use a Type-C Ethernet cable!

Ethernet is a no-go

If you ever wanted to plug your new Lumia directly up to a network through a Cat-5 cable, it looks like you cannot yet do that on Windows 10 Mobile.

We picked up two USB 3.1 Type C to Ethernet Adapters, and neither would let us get blazing fast Verizon FiOS internet directly to our phones. Sad trombone.

HDMI does work

It is likely not a surprise that a Type C to HDMI connector, however, does work. After all, the $99 Display Dock is the same device but with added USB ports.

For this test, we used a Cable Matters USB 3.1 Type C to HDMI Adapter Supporting 4K Resolution, which retails for $25. That is not cheap, but it is cheaper than the $99 display dock and significantly lighter.

Using the HDMI adapter to a monitor enables Continuum for phone turning your Lumia into a semi-PC. You can then use the phone as a trackpad, which is still super clever. You can also still connect a mouse and keyboard up through Bluetooth and have yourself a full Continuum experience at about a ¼ the cost of the Display Dock.

You can buy the one we used in the video below, however other options are likely to work as well.

Buy Cable Matters USB 3.1 Type C to HDMI Adapter at Amazon.com for $24.99

Using the HDMI-only option is ideal for presentations or just showing off photos and videos. Remember, even though our adapter and monitor were both 4K ready devices Continuum can only max out at 1080P at 60FPS.

Wrap up

Overall, Continuum and USB Type C OTG continues to surprise us with what these new Lumias can do. Easily the USB thumb drive and HDMI adapters are our favorite as those are some real-world problem solvers.

Finally, although we do not have a portable digital-to-analog converter (DAC) a few users in our forums, have had success in using those too. The one caveat is if it has to install a driver then it will not work, but if it is plug and play it should be just fine to output amplified and HQ audio to headphone or speakers.

We're still investing the USB Printer situation, so stay tuned.

Buy the Microsoft Lumia 950 Unlocked for $550

Buy the Microsoft Lumia 950 XL for $650

News

Want all the latest news on these phones? Hit these topic pages for all that we got.

Support and help forums

Want to chat about the Lumia 950 and Lumia 950 XL? Jump into our forums and ask others what they think or get help and advice on your new phone!


How to turn off the camera shutter sound on the Lumia 950 & 950 XL

$
0
0

Lumia 950 Camera

When taking photos with the Lumia 950 and 950 XL, a fake shutter sound goes on. Sometimes, it can be loud and annoying, especially when you're trying to snap a picture discretely. We'll show you two ways to disable the sound.

Put the Lumia 950 or 950 XL in silent mode

If you mute the Ringer & notifications volume on your phone, the camera shutter sound will also be muted. Click one of the volume buttons on your phone and tap the bell icon at the top left corner of the screen. The icon changes to the vibrate or mute icon. This method is great if you just want to temporarily turn off the camera shutter sound.

Completely disable the camera shutter sound

If you want to completely disable the camera shutter sound go to Settings> Personalization> Sounds. Uncheck the box for Camera shutter. That's it. You no longer need to worry about it from now on. This also turns off the sound when taking screenshots!

Camera shutter off

Will you be turning off the camera shutter sound on your Lumia 950 or 950 XL? Let us know in the comments!

Buy the Microsoft Lumia 950 Unlocked for $550

Buy the Microsoft Lumia 950 XL

News

Want all the latest news on these phones? Hit these topic pages for all that we got.

Support and help forums

Need to chat about the Lumia 950 and Lumia 950 XL? Jump into our forums and ask others what they think or get help and advice on your new phone!

How to link Messaging and Phone tiles on the dual-SIM Lumia 950 XL

$
0
0

Lumia 950 XL dual SIM

If you picked up a Microsoft Lumia 950 XL recently, you might have had the interesting surprise to learn it is dual SIM. This feature means you can add two separate SIM cards from different carriers in one phone with both active for SMS and phone calls (however, only one can be used for data).

Nonetheless, for many in the U.S. dual-SIM phones are still the exception. And although you do not have to use both SIMs the OS by default creates two Messaging inboxes and two Phone tiles to manage those SIMs. Alternatively, maybe you just want a unified inbox for calls and messaging for both of your phone numbers.

If you are only using one SIM, we'll show you how to link those Tiles, remove the numbering and clean things up.

How to link dual Messaging tiles

1. Open Messaging

Pick one of the Messaging tiles from the Start screen or menu. Tap the ellipsis […] at the bottom right corner. From the menu, you should see Link tiles as the third option.

2. Link

Follow the menu prompt and hit the Link button. The second, non-used Tile should now disappear from the Start screen and menu. Likewise, the icon will lose the superscript '1' and '2' from the Tile icon.

If you ever add a second SIM and would prefer separate inboxes for SMS messages, you can just follow the same steps but choose Unlink instead. This action will reverse the merging.

How to link dual Phone tiles

1. Open Phone

From the Start screen select the Phone icon or Phone from the Start menu. From the menu, you should see Link tiles as the third option.

2. Link

Follow the menu prompt and hit the Link button.

The second, non-used Tile should now disappear from the Start screen and menu. Likewise, the icon will lose the superscript '1' and '2' from the Tile icon.

If you ever add a second SIM and would prefer separate inboxes for SMS messages, you can just follow the same steps but choose Unlink instead. This action will reverse the merging.

About that 2nd SIM notification icon

While these actions clean up your device with the creation of single, unified inboxes for phone calls and SMS message it does not get rid of the icon for the non-used SIM in the notification area.

In fact, there is no known way to do this yet on Windows 10 Mobile. Although it is just superficial, it is rather annoying too. It would behoove Microsoft to add a mode where the system can act completely like a single SIM system instead of leaving odd remnants laying around as reminders that you don't have a second SIM installed.

Under System > Network & wireless > Cellular & SIM you can turn off the second SIM, but as noted above this has no visual change within the OS. Instead, it is a control for those who wish to temporarily suspend one of their SIMs from being active. You would think turning off a SIM would disable its icon in the notification area but alas, it does not.

Stay tuned for more tips and tricks with the new Lumia 950, Lumia 950 XL and devices upgraded to Windows 10 Mobile!

News

Want all the latest news on these phones? Hit these topic pages for all that we got.

Support and help forums

Need to chat about the Lumia 950 and Lumia 950 XL? Jump into our forums and ask others what they think or get help and advice on your new phone!

Gems of War: Achievement Guide for Xbox One, Steam, and more

$
0
0

Gems of War: Achievement Guide for Xbox One, Steam, and more

The creators of Puzzle Quest recently teamed up with 505 Games to bring a new puzzle-RPG to Xbox One and PlayStation 4. Gems of War is a deep and addictive puzzle game featuring endless hours of single-player content as well as online guilds and asynchronous player-versus-player battles. Some of the game's Achievements can be very time-consuming, but our in-depth Achievement Guide will help you get them all – and become a better player!

Roadmap and platform notes

Gems of War Achievement Guide gameplay

The total completion time for Gems of War's Achievements should be about 150 hours, but that's a very rough estimate.

The order the Achievements can be earned in is fairly linear, but it breaks down like this:

  • Quick and Easy Achievements
  • Troop Achievements
  • Kingdoms Achievements
  • Level Achievements

This guide applies to Xbox One, PlayStation 4, and Steam. However, the Steam version has five Achievements not currently found in the console games. We won't cover those in this guide unless they get added to the console versions down the line.

Quick and easy Achievements

Student (5): Finish the Tutorial.

Gems of War Achievement Guide Student

This one is a gimme. Just complete the first two battles and you'll get it.

Fashionista (10): Change your hero's costume.

Gems of War Achievement Guide Fashionista

To change your hero's costume:

  • On the map screen, press the Y button to bring up the menu
  • Select Hero
  • Choose Costume
  • Switch to another costume.

You start with two costumes so that you can get this one at any time. Neither of the starting costumes provides any bonuses, but premium costumes do. See 'In-App Purchases' section below for more details.

Team Player (30): Join or create a guild.

Gems of War Achievement Guide Windows Central Guild

Guilds are the big social component of Gems of War. Members of a guild are expected to donate Gold to research tasks. Completing these tasks will get everyone items like keys to unlock Troops, Treasure Maps, Souls, and free premium currency. It also helps unlock elemental mastery bonuses for everyone in the guild.

Joining a guild filled with active members and then actively donating Gold yourself is a huge part of long-term success in Gems. If you'd like to join the Windows Central Guild and you're willing to donate daily, send a message with your character name and level to EastX on Xbox Live. We'll get you in!

Alternately, you could just form a new Guild for this Achievement. But starting a new guild offers far fewer benefits than joining an established one.

Brawler (30): Successfully invade an enemy.

Gems of War Achievement Guide Invade

Invasions are asynchronous player-versus-player (PvP) battles and the most reliable and important source of Gold in Gems of War. Do lots of them every day!

To invade an enemy kingdom:

  • On the map screen, press the Y button to bring up the menu
  • Select Invade
  • The game will match you against another player. This costs ten Gold.

Consider the opponent's level and multiplayer rank before going through with the fight. If you lose the fight, you will lose a Trophy and will not receive the Gold that you'd get for winning. I recommend against invading enemies who are more than 3-4 levels above you until you have a strong and well-leveled deck.

If you'd rather look for another opponent, press right and select Try Another. This costs ten Gold as well.

When you find an opponent that you like, select Fight! and begin the battle. The reward for winning the battle will be 200 percent of the Gold the enemy cost to fight.

Challenger (10): Defeat a Challenge and gain a star.

Gems of War Achievement Guide Windows Central Guild

See 'Champion' below.

Champion (40): Master any Challenge by gaining 5 stars

Gems of War Achievement Guide  Challenges

Challenges are the most reliable and important source of Souls in the game. You need Souls to level up your troops, so be sure to complete as many of these as you can.

Each Kingdom starts with one Challenge unlocked, which is technically enough for you to get both Challenge Achievements. But you can unlock a total of 7 Challenges per Kingdom simply by completing Quests (story content) in that Kingdom.

Every individual Challenge has five stars for you to unlock. To do so, you must complete that Challenge five times. Each star is harder to earn than the last, as the enemies become more powerful.

A skilled Gems of War player will be able to 5-star the first Challenge fairly early on. You just need an effective deck with sufficiently leveled troops. If you're not sure of your abilities, wait until the first Kingdom's Quests start to become too tough for you and then start working on Challenge in order to beef up your troops.

Troop Achievements

Rabble Rouser (25): Unlock 10 different Troops.

Gems of War Achievement Guide  Rabble Rouser

See 'General' below.

Raid Leader (60): Unlock 25 different Troops.

Gems of War Achievement Guide Raid Leader

See 'General' below.

General (100): Unlock 50 different Troops.

Gems of War Achievement Guide Troops

Troops are the cards/units that you take into battle. There are four ways to earn troops. Two involve opening chests with keys. You can find Chests on the main menu.

Iron Keys: These cost 1,000 Gold each and can easily be acquired without spending real money. Early on, you might want to buy a Iron Key or two, just to get your troop lineup started.

Long-term, you shouldn't spend Gold on keys. Instead, join a guild and you'll get free keys as the guild completes tasks. You'll also win these from Arena victories and Treasure Maps. You get three troops per Iron Key, one of which will be at least a Rare.

Magic Keys: These cost 15 gems (premium currency), so you generally have to spend real money on them. You can also win these (occasionally) from Treasure Maps.

You get three troops per Magic Key, all Rare or above, and one of which will be at least an Ultra Rare. Rather than buying gems for Magic Keys, you might consider the premium Bundles available in the Shop. The Bundles that contain armor are great values and will speed your progression through the game.

In addition to chests, you can pick up a few troops through other means:

Quests: Each Kingdom has a series of Quests that tell a story. The reward for completing the final Quest in any kingdom is a unique Epic Troop. You'll want to knock out the starting area, Broken Spire's Quests as soon as possible. The Troop you get there, Luther, is one of the best in the game.

Glory: The primary source of Glory is winning Invasions, though you can also receive it from Defense battles and as tributes from your Kingdoms. This PvP currency can be spent in the Rewards section of the Shop. The Rewards Shop offers a single Troop to purchase, with different Troops available over time.

Mentor (70): Train any Troop to level 10.

Just as important as assembling a good deck of Troops is building up those Troops. To increase the level of your Troops, you'll need Souls. You earn Souls from completing Challenges, as well Arena victories and defeating enemies in general. And Disenchanting unwanted Troops will convert those Troops into Souls.

To level up a Troop, visit Troops from the main menu. Select the Troop and pick Train. Each new level costs more Souls than the one before it. Troop rarity also affects leveling cost. See this page at the Gems of War site for a full leveling price list.

It costs a total of 875 Souls to train a Common Troop to Level 10 for the Achievement. The actual maximum Troop level is 15.

Capture Kingdom Achievements

Robber Baron (50): Capture 2 Kingdoms.

See 'King of Kings' below.

Arch Duke (100): Capture 5 Kingdoms.

See 'King of Kings' below.

Prince Regent (100): Capture 10 Kingdoms.

See 'King of Kings' below.

King of Kings (100): Capture 15 Kingdoms.

Gems of War Achievement Guide Kingdoms Map

Each location on the game map is a Kingdom. Players start with access to Broken Spire and will need to purchase additional Kingdoms with Gold. Only Kingdoms adjacent to Kingdoms you already own can be purchased. Although Gems of War has more than 15 Kingdoms, you only need 15 to get this Achievement.

Each new Kingdom costs more Gold than the previous one. Their Gold costs are:

  1. 250
  2. 500
  3. 750
  4. 1,000
  5. 1,250
  6. 1,500
  7. 1,750
  8. 2,000
  9. 2,250
  10. 2,500
  11. 2,750
  12. 3,000
  13. 3,500
  14. 4,000
  15. 4,000

Total cost of 15 Kingdoms: 30,750 Gold

You really need to balance your purchasing of new Kingdoms with donating to your Guild. This particular Achievement would be faster if you skipped joining a Guild, but your long-term progress would be hampered. If you have any serious aspirations of earning 'Centurion,' don't try to go it solo.

Level-based Achievements

Double Digits (20): Reach level 10.

See 'Centurion' below.

Silver Platter (50): Reach level 25.

Gems of War Achievement Guide Silver Platter

See 'Centurion' below.

Golden Jubilee (100): Reach level 50.

See 'Centurion' below.

Centurion (100): Reach level 100.

Gems of War Achievement Guide level up

Your main character gains experience for every single-player and PvP battle you win, eventually leveling up. This leveling up is separate from Troop leveling.

Every time your hero levels up, you get to select between two elemental mastery bonuses. Some elemental mastery bonus thresholds will reward you with a new weapon. Your character gains stat bonuses from reaching certain milestone levels, but not every level.

The max hero level is 1,000, but you only need to reach 100 for this Achievement.

There is no one superior grinding strategy – your best bet is to complete as many Quests and Challenges as you can between Invasions, spicing things up with visits to the Arena now and then. With so many Kingdoms to conquer, you won't run out of campaign content before hitting level 100. (I also recommend listening to podcasts, TV, or movies while playing to reduce the drudgery of longer playing sessions.)

That said, you can speed up the leveling process considerably by purchasing a premium armor that boosts XP gain. See 'In-App Purchases' section below for more details.

More tips

Gold and Treasure maps

Gems of War Achievement Guide Victory gold

Most of your progress in Gems of War depends on Gold, the game's soft currency. You need Gold to participate in battles, unlock new Kingdoms, and contribute to your Guild. And if you play right, you'll never run out of it – Gold is always there for the taking.

As mentioned earlier, Invading other players is the most reliable way to earn Gold. Compared to single-player content, Invasions have much higher payouts. Provided you have a good deck and play well enough, you should win at least 70% of your PvP battles.

You should also work towards completing daily Tasks (displayed at the top-left corner of the map) as often as possible. These often pay out several thousand Gold each. They also tend to sweeten the pot for single-player content, which otherwise doesn't award a lot of Gold.

Two specific Troops also help increase Gold gain from individual matches: Alchemist (Rare) and Tyri (Epic). Each of these Troops' spells will add to the Gold pot you win at the end of fights, up to a certain limit. Neither is a great offensive unit, but a sufficiently strong deck can compensate for that. You'll win Tyri by completing the Zhul'Kari Kingdom's Quest line.

Gems of War Achievement Guide  Zhul'qari Kingdom

Buying the Zhul'Kari Kingdom as soon as possible is a good idea because it also unlocks the Treasure Map minigame. You'll acquire Treasure Maps from cascading gem combos and completing certain Guild tasks. Treasure Maps offer a fun diversion from standard battles, and they offer great potential rewards like Gold, Souls, and keys.

Finally, premium armor can boost your Gold gains as well. See 'In-App Purchases' section below for more details.

In-App Purchases

Gems of War Achievement Guide Bestial Armor Bundle

Gems of War is a free to play game with optional In-App Purchases (IAPs). While you never need to make an IAP to succeed, doing so can greatly speed up your progress through the game. It's also a fine way to show thanks to the developers for making a game that you enjoy.

Each premium armor boosts one or more of the following: Gold, Souls, and XP. The most important bonuses for Achievement hunters are Gold and especially XP. Individual armors start at approximately $5 worth of Gems. But rather than buying an armor by itself, you might want to choose a Bundle.

The Xbox One and PlayStation 4 versions of Gems of War each offer three Bundles with platform-specific armors. These bundles not only come with armor, but also Gold, Souls, and Magic Keys to help players get a leg up in the game.

The $5 Wild Bundle on Xbox One includes the Wild Armor, which boosts Soul gain by 25% and XP by 50%. That one purchase will shave hours off of the time to unlock the 'Centurion' Achievement. If you like the game anyway, definitely give this bundle some thought.

Let's match some gems!

Gems of War Achievement Guide Treasure Map

If you've found this guide useful, please leave a comment to let us know. And be sure to read our comprehensive Gems of War review for more game insights!

  • Gems of War – Xbox One – 1.8 GB – Free – Xbox Link
  • Gems of War – Windows PC – Free – Steam Link

6 ways to improve your experience with the People app on Windows 10 Mobile

$
0
0

Windows 10 Mobile People

Remember when we told you that Gadgets app on Windows 10 Mobile deserved more attention? We feel the same about the built-in People app. It can be really useful if you spend some time playing with the app and its settings. We'll show you six ways that can improve your experience.

1. Add accounts

Populate the contacts list by adding your existing accounts. You can manually add your contacts or add your existing phone book.

Add accounts

  1. Open the People app on your phone
  2. Tap the three dots on the lower right corner, then tap Settings
  3. Tap add an account
  4. You can add your existing contacts from your phone book in Google, Outlook, iCloud, and more.

2. Filter contacts

The contacts list can get overwhelming if you've added several accounts to your phone. What if you've added your work and personal email accounts, but don't want to see your co-workers from in the contacts list? The good news is that you can filter who appears on the list.

Filter accounts

From the contacts list, tap the link that says Showing some contacts. You can hide contacts without phone numbers, so the list only shows people you can call or text. Everyone is still searchable, even those who are filtered out. You can also filter out contacts from some of your accounts. They'll still be searchable when you send emails, but you can hide them from the People app's contact list.

3. Install social apps

When you swipe left from the Contacts section, you'll see the What's new section. This gets populated from social apps. We've installed Facebook (Beta) and Twitter, and see content here from friends. Tap the link on top of the screen to filter what you see here. We think more social apps will be supported since Microsoft has a "Get social apps" button in the settings within the People app. It currently goes to a blank page in the Windows Store.

What's new

To make sure the link between the People hub and these apps exist, double check the settings on those social apps. For example, you can find it in the Twitter app by going to the app's settings> General> People hub. On the Facebook Beta app, you can find it in settings> Connect Facebook with Windows.

4. Merge contacts

Now that you've added your phone, email, and social accounts, we recommend merging accounts that belong to the same people. This makes sure you get all their contact information in one page. Swiping left on the contact page will display What's New, showing updates from their social networks like Facebook or Twitter. To link contacts, tap the Link button under their details. Tap Choose a contact to link then select from the list.

Lumia 950 Contacts

5. Create groups

If you frequently need to contact a group of people at the same time via email, text, or chat, then you should create a group. Currently, you can create a GroupMe or Windows group. The easiest one to set up is the Windows Group. You simply name the group then add people from your contacts list. For example, I've added my brother and sister to a group, so I can easily send them a text message at the same time.

Groups

The GroupMe integration in the People app is a little more advanced. It requires you to install the GroupMe app. Your group can have an avatar, you can send images, existing members can add other members to the group, and the app is also available on Android and iOS. It uses data, so people without unlimited SMS messaging might like to use GroupMe instead. Your GroupMe groups will appear in the People hub, but tapping them forwards you to the app. For example, I use GroupMe with my basketball buddies to plan pickup games.

Download GroupMe from the Windows Store (free)

6. Find people faster

Use the search form on top to find your contact faster. You can also tap the letters to jump through the list faster. Another option is to pin Contacts to the Start screen. Just tap and hold the contact from the list and then select Pin to Start. The live tile has an interesting animation, too. The contact's avatar rotates as their name slides up the tile.

Letters

More tips

Will you be using the People app more often after learning these tips? Do you have other tips or requests that can improve our experience with the People hub on Windows 10 Mobile? Let us know in the comments below!

Buy the Microsoft Lumia 950 Unlocked for $550

Buy the Microsoft Lumia 950 XL

News

Want all the latest news on these phones? Hit these topic pages for all that we got.

Support and help forums

Need to chat about the Lumia 950 and Lumia 950 XL? Jump into our forums and ask others what they think or get help and advice on your new phone!

Here's a quick fix for a creaky Lumia 950 XL back cover

$
0
0

There is a lot to like about the Lumia 950 and Lumia 950 XL, but the super thin polycarbonate back covers could be better. Sure, we know have some of the lightest and thinnest Lumias to date, but the trade-off is somewhat flimsy.

One issue some folks have noticed, and we have too is rather unfortunate: some creaking in the corners.

The issue is undoubtedly due to the thin shell and some mild warping when removed to put in SIMs and microSD cards (or changing into a Mozo shell). The result is near the corners of the device there is an audible creaking when pressed. It's not the end of the world, but it does take both phones down a notch. It also seems to be more prevalent with the Lumia 950 XL due to the larger cover.

Luckily, there is a stupidly simple fix for it. Granted, this is something that Microsoft could – and should – fix in production, but for now you can just take the 45 seconds to fix it yourself.

The easiest way is to grab some sticky posts and add four pieces to the lower sides and corners of the cover as seen above. You could, of course, Scotch tape them too if you don't have sticky notes. The bigger point is to get some padding in there, so, in theory, you can jam any material in there to help.

We applied this to our Lumia 950 XL, and it's been a much better experience. Creaking cases are one of those nuisances that once you notice, you cannot un-feel and it could spoil the experience. If you are wondering if this applies to the more expensive Mozo cases, the answer is a tentative yes, but it is a lot less pronounced and probably more rare.

Our Lumia 950, on the other hand, is just fine both for the default and Mozo cases. Then again, if you do experience some creaking you can do the same trick above to alleviate it.

Thanks, Brandon R., for the tip and photo!

More tips

Will you be using the People app more often after learning these tips? Do you have other tips or requests that can improve our experience with the People hub on Windows 10 Mobile? Let us know in the comments below!

Buy the Microsoft Lumia 950 Unlocked for $550

Buy the Microsoft Lumia 950 XL unlocked for $650

News

Want all the latest news on these phones? Hit these topic pages for all that we got.

Support and help forums

Need to chat about the Lumia 950 and Lumia 950 XL? Jump into our forums and ask others what they think or get help and advice on your new phone!

How to display full message & images in Outlook Mail for the Lumia 950, 950 XL, & Windows 10 Mobile

$
0
0

Outlook Mail

One thing that really annoyed me about Outlook for Windows 10 Mobile is that the emails did not fully show the messages and images. I'd have to click Download message and pictures at the bottom of the emails. I can understand how this can be great for many people trying to save bandwidth, but I want to see the whole message when I open an email. If you feel the same, I'll show you how to change that default behavior.

  1. Open Outlook Mail
  2. Tap the three dots on the lower right corner and select Accounts
  3. Tap your email account and select Change mailbox sync settings
  4. Check the box that says Always download full message and Internet Images
  5. Tap Done and repeat the steps on your other email accounts
  6. Exit and re-open Outlook mail (Press and hold the back button, then swipe down the app to exit)

Full Message

That's it! You no longer have to click the link at the bottom of every email to read the full message and view images.

Why the setting exists in the first place

You may be wondering why even have this setting at all? Well, there are two reasons, one that reader JTDraper reminds us of in comments:

"When links to pictures are resolved, a request is made to the sender's server, which indirectly acts as a 'receipt.' SPAMmers use these receipts as confirmation that their unsolicited mail is reaching its intended target. The default setting prevents the sender from knowing you've received their email. Ideally, you would delete the email based on the sender name, subject and text and the sender would eventually prune your address from their SPAM list."

So if you have an account that gets spam email it is actually good to have this feature enabled. The second reason is a little more obvious: data. Not everyone has unlimited data and you'd be surprised at the amount you can pull in from email all day. Leaving this setting to limit downloads could make a big difference for those on fixed or pro-rated plans.

What kind of email reader are you? Do you prefer your emails to download the whole message, or do prefer to manually download them? Let us know in the comments!

You can now use Kinect and Windows Hello to sign in to Windows 10

$
0
0

Ever since Microsoft announced their Windows Hello biometric authentication program for Windows 10 people immediately asked about using the Kinect sensor. After all, Kinect already uses your face to sign you into the Xbox One making it patient zero of the Windows Hello paradigm. Unfortunately, for those using Kinect and Kinect for Windows there was no way to use the hardware for Windows Hello.

All of that is changing as Microsoft has finally created a beta driver that lets Windows 10 use Kinect for Windows v2 and Kinect for Xbox One use Windows Hello. The news came through an email to developers of Kinect who are part of the SDK and testing program where they announced the "public preview of Kinect support for Windows 10".

For now, you need to do some registry digging and hacking to let the OS download the new beta drivers for the feature. Microsoft has posted the instructions here and they are relatively short and sweet.

Once your PC has grabbed the driver you can read our tutorial on setting up Windows Hello for Windows 10:

How to set up Windows Hello facial recognition in Windows 10

It should be noted that if you are using your Kinect for Xbox One with your PC you do need to pick up a $50 cable and have it plugged into a USB 3.0 port (due to the power and bandwidth requirements). Alternatively, you can go all in for $199 and pick up the Kinect for Windows v2. That's about $100 more than the hard to acquire and always out of stock Intel F200, which is the only alternative third-party Windows Hello option at this time. (Note: Kinect for the Xbox 360 does not appear to be supported, sorry)

Buy Kinect adapter for Windows from Amazon.com for $50

But Kinect for Windows kit for $199 from Microsoft

Needless to say this is a rather cool development and you have a spare Kinect laying around or want to rig your PC battle station to use this feature, now is your chance. Being the drivers are in development, there could be some hiccups, but Hello has come along quite a bit since the summertime.

Still need more? Stay tuned as we have a Kinect adapter headed our way and will to a how-to video and share with you how well it works.

Via: SuperSite for Windows, Mike Taulty's Blog, and @mikehole


How to do a clean setup of your brand new Windows 10 computer

$
0
0

If you live in the United States or in another country that have Black Friday and Cyber Monday, you probably took advantage of great deals to get a brand new computer.

In the US and Canada, Microsoft even has its 12 Days of Deals, which unlike Black Friday or Cyber Monday, the company offers a new deal every day on the first 12 days of December.

Whether you bought your brand new Windows 10 PC in your local store or online in this guide, we're going to help you to set up your new device.

In this setup guide, we'll go through doing a clean installation of Windows 10, get the operating system and drivers up to date, set some common configurations to make your computer more personal and productive. We'll also show how to protect your data from a system failure by making a full backup.

Starting clean

Seeing Lenovo, Samsung, and recently Dell as some of the manufacturers putting customers at risk by adding potentially harmful code to their devices, it's becoming harder to know which company to trust, as such it's a good idea to do a clean installation of the operating system on your new computer whenever possible.

Note: If you have purchased a "Signature Edition" computer from the Microsoft Store, you can probably skip this step, as the purpose of a service is to have a fast and clean computer from the beginning.

If you choose to go through a clean installation route to start from scratch knowing exactly what will be included in your brand new computer, there are a few things you want to do before proceeding:

  • Make sure your new computer is working correctly
  • Make sure your copy of Windows 10 is activated
  • Identify which edition of the operating system came with your device
  • Download all the latest drivers
  • Get your machine product key

Step 1

Instead of erasing your new computer's hard drive from the beginning, you want to make sure that the device is working properly. You can do this by going through the initial out-of-box experience (OOBE) as you would with any other device. Then simply make sure your display, keyboard, mouse, network adapter, other hardware, and peripherals are working correctly.

Step 2

The next step is to make sure your copy of Windows 10 is activated. Simply use the Windows + I keyboard shortcut to open the Settings app, go to Update & security, and under Activation take a look at the activation status.

Step 3

Once, you know Windows is activated, go back to the main Settings page, get into System, and under About make note of your edition (e.g., Windows 10 Home or Windows 10 Pro) and system type (e.g., 64-bit or 32-bit).

Step 4

Now, it's the time to download the drivers onto an external USB drive that you can use to reinstall drivers after the clean installation of Windows 10 as necessary.

There are various ways to obtain your computer drivers, sometimes manufacturers create a "Drivers" folder on the main hard drive, which you can copy to an external drive. However, your best bet is to download the latest drivers available from your computer's manufacturer support page.

Here are a few links from popular brands:

Additionally, if you have a gaming rig running on specific graphic card, you may also want download and install the latest drivers from graphics manufacturer:

Step 5

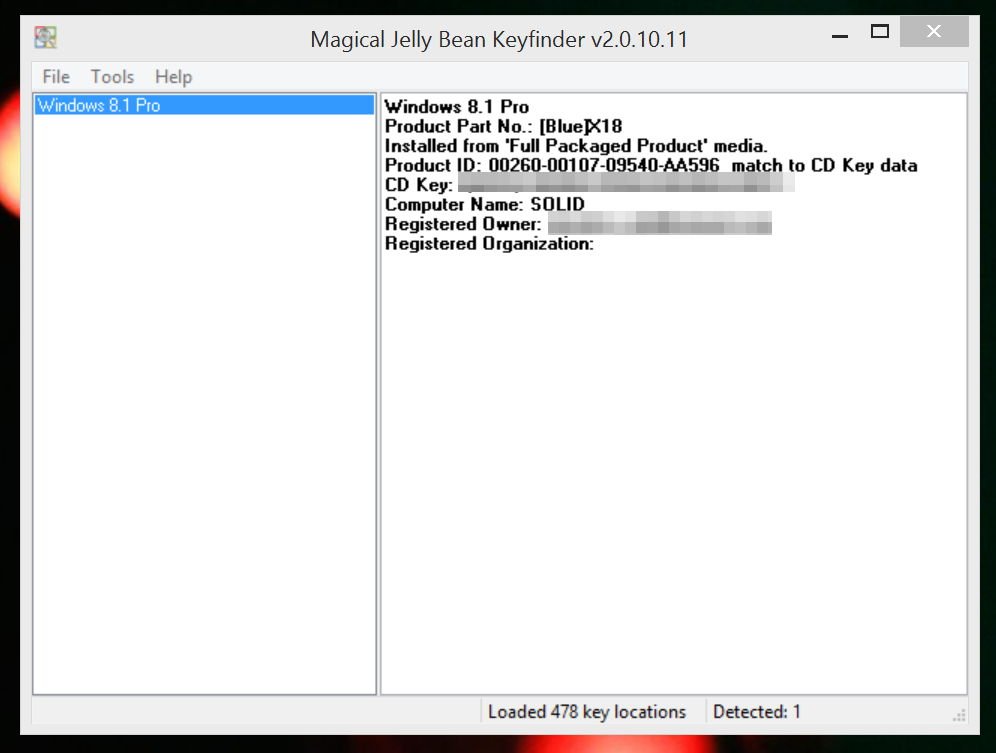
It's important that before you reformat your computer, know your Windows 10 product key just in case something goes wrong and you need to reactivate.

If the product key didn't come with the packaging and there isn't a sticker attached to your device, even though the key can be recorded in the BIOS, you can use a number of software to retrieve your product key. For example, you can try using Enchanted Keyfinder tool, which is a free tool designed to recover your product key.

Step 6

Now, it's the time to reinstall Windows 10 in your new computer. Yes, you could use the reset feature within Windows to do a clean install, but on an OEM computer, it will restore the factory defaults that includes all the configurations we're trying to avoid.

The next step is to download the Media Creation Tool to create a bootable installation media:

1- Go to the Microsoft Software Download page and click the Download tool now.

2- Run the Media Creation Tool and select Create installation media for another PC.

3- Select the language, architecture, and edition, but to make easier you can check the option "Use the recommended settings for this PC," which should select the correct settings for your computer.

4- Connect a USB flash drive with at least 3GB of free space, choose the option USB flash drive, and click Next.

5- Select the correct removal drive and click Next to complete the process.

Step 7

When you're ready to do a clean install, connect the USB flash drive into the computer, restart your computer and press any key to boot from the installation drive.

If your computer reboots into your current version of Windows, you may need to change the boot order on the BIOS or UEFI settings. Typically, you can access these settings by pressing ESC, Delete, F2, or F12 during boot, but you may want to refer to your computer manufacturer support website for more specific help.

Important: It's worth pointing out that during the following steps you will completely wipe out the hard drive, and you won't be able to restore the computer to the factory default configurations that originally came with the device. It's assumed that you know what you're doing and you have previously created a full backup in case things don't go as planned and you need to roll back.

Once in the Windows 10 Setup do the following:

1- Click Install Windows and then Next.

2- Select Install Windows, and enter your product key if prompted, but you can click the Skip button to this later.

3- Accept the license terms and click Next.

4- At this point, you will get to the Which type of installation do you want? page, select Custom to do a clean installation.

5- On the Where do you want to install Windows? page, select and delete all available partitions until you end up with only one "Unallocated Space".

6- Click Next and follow the on-screen instructions to complete the Windows 10 installation.

Getting things ready

Step 1

As soon as you complete the installation, you want to get the operating system updated:

1- Use the Windows + I keyboard shortcut to open the Settings app.

2- Navigate to Update & security > Windows Update, click the Check for updates, and let the operating system download and install all the necessary updates and drivers.

Step 2

You also want to make sure all the drivers are installed correctly in Device Manager. Simply open Start, do a search and open Device Manager. If you don't see any exclamation or red mark, then it's a good sign.

If one of the devices isn't installed properly or it doesn't have any driver installed. You can either go online to your manufacturer's website support or use the drivers you downloaded before the clean installation.

It's good to know that some companies, such as Dell provide software to automatically detect, download, and install drivers.

In case you're setting up a gaming computer, you may also want to replace the graphics driver currently installed with the latest driver provided by the graphic adapter manufacturer.

You can use the links below to download graphics drivers from NVIDIA, AMD, and Intel:

Step 4

Once you have a clean and fast installation of Windows 10, it's time to add some personal customization.

There are endless ways to personalize your computer, but below we'll be listing a few features that you may want to consider configuring in your new Windows 10 PC.

Uninstall pre-configured and suggested apps

Windows 10 by default installs a number of default apps and might set app suggestions in the Start menu that many customers may consider as advertisement. If you don't like these apps and or suggestions, you can easily remove them using this previous guide.

Configure your computer name

In order to speed up the installation process, Windows 10 will name your computer randomly, but you can change the name at any time by going to Settings > System > About, click the Rename PC, type name you like, click Next, then Restart now to complete the process.

Installing apps on external storage

If you bought a device with limited space, you can now install new apps into an external drive. Simply, go to Settings > System > Storage, connect a microSD card or USB drive to your computer, and under Save locations, change the New apps will save to to the drive you just connected.

Set your personalization

By default, the operating system configures accounts with a dark theme and the Windows 10 default wallpapers. As such, you can go to Settings > Personalization to set your own Background.

In Colors, you can turn on the "Show color on Start, taskbar, action center, and title bar" to disable the dark theme and more.

In Lock screen, you can enable Windows Spotlight from the "Background" drop-down menu, choose which apps can show quick status on the screen, and if you don't like the default background in the sign-in screen, you can do it here too by turning off Show Windows background picture on the sign-in screen.

In Start, you can add a fourth row of tiles to the menu by turning on Show more tiles, and a number of other configurations.

Extra: Remember that you can download great Windows themes from the Microsoft website.

Configure PIN password

If you don't want to deal with complicated passwords, you can set a 4-digit pin to sign into your account. Simply, go to Settings > Accounts > Sign-in options, under PIN, click Add, and follow the easy on-screen instructions.

Also, if you don't like your user profile picture you can easily change it while you're in Accounts, and you go to Your email and accounts.

Configure your privacy settings

Windows 10 is an operating system that relies on the cloud, which means that it connects with various online services rising privacy concerns for many users. If this is your case, you can refer to our previous guide to properly configure your privacy settings in Windows 10.

Configure Find My Device

If you constantly forget where you leave your computer or if it ever gets stolen, Windows 10 has a new feature for you. It's called, "Find My Device," and similar to the feature in Windows Phone, it allows Microsoft to save periodically your device location in your online account.

Once you enable the feature by going to Settings > Update & security > Find My Device, clicking Change, and turning the feature On, you will be able to login to accounts.microsoft.com/devices and see where your Windows 10 device was last seen, which can really help you recover your device if it ever gets lost or stolen.

Configure Cortana to only respond to your voice

During the out-of-box experience you already enable Cortana, Microsoft digital assistant, but by default the feature will answer to anyone. If you want to personalize the assistant to only answer to your voice, don't forget to launch Cortana, go to the Settings page, turn on Hey Cortana, and pick the option To me, and then click the Learn my voice button to train the assistant to only answer to you.

If you want to receive missed calls from your phone, also make sure to have enabled the Missed call notifications option on your computer and on your phone.

Get started with OneDrive

One last thing you want to make sure to configure is OneDrive. Although, Microsoft will soon be limiting the amount of storage you can use as a free and paid customer, the service still a pretty good option to keep documents, pictures, and other files backed up in the cloud and synchronized between computer.

OneDrive will be enabled by default, but Microsoft now uses selective sync instead of placeholders. You need to remember to open the OneDrive app from Start or from the notification area, and specify which folders you want to sync to your device. This is a process you do once per computer, but you can always go back by right-clicking the white cloud icon in the notification area and opening the Settings page.

Here are some additional tips on OneDrive:

Backing up

Last but not least, we recommend protecting all your data and time you have invested setting up your new computer. The best way to protect your installation, configuration, and data is by making a system image backup.

Fortunately, Windows 10 continues to offer the System Image Backup tool, which can help you create an exact replica of everything stored in your computer.

If you need help creating a System Image Backup, we got you covered! Simply refer to our previous guide.

Wrapping thing up

You've done it! It took a little bit of time, but your brand new Windows 10 PC is now set up and ready to use. Best of all, you know exactly what is included in the installation.

The last thing to do now is to decide, which web browser you want to use: Microsoft Edge, Chrome, or Firefox. It's also a good time to install your favorite applications and security software, if you don't feel that Windows Defender and Windows Firewall will do the job.

Did you get a new computer during Black Friday, Cyber Monday, or during the Microsoft 12 Days of Deals? Do you have a specific way to configure your new devices? Let us know your experience setting it up in comments below.

How to force the Surface Pro 4 and Surface Book to hibernate to save your battery

$
0
0

The Surface Pro 4 and Surface Book from Microsoft have a lot going for them, but new hardware does not come without new bugs. One of the biggest is the occasional inability of both devices to go into deep sleep states and stay there. Some device events can wake the Surface when in standby causing the processor to ramp up, create heat and drain the battery.

Microsoft is working on a solution reportedly aimed for early next year, and you can read the details here. Until then, here is what you can do to as a temporary workaround and what Microsoft recommends. (It should be mentioned that this tip works for the Surface Pro 3 too for users also experiencing battery drainage).

How to force Hibernate instead of Sleep

1. Power Options

In the Cortana search box type in Power Options and select the second choice listed for Control Panel

2. Function

There are two options that can be changed: 'Choose what the power buttons do' and 'Choose what closing the lid does' (they both go to the same section)

3. Change to Hibernate

Under When I close the lid instead of Sleep choose Hibernate for both Battery and Plugged In; for Surface Pro 4 owners, you can also make this change for 'When I press the power button' if you are operating the Surface without a keyboard. Make sure to hit Save Changes before exiting.

TIP: It is also recommended to change all the settings to Hibernate including When I press the power button. This will maximize battery in all scenerios.

Effect: What happens now is when you close the lid the PC will go to pure Hibernate, which is the lowest power level. You should have near 0% battery depletion, and the Surface will no longer get warm.

Also check Times

You should also make sure that your settings for 'Put the computer to sleep' are not set for Never and instead for a more reasonable time e.g. 10 minutes on battery and 20 minutes when plugged in. If set to Never when plugged in your Surface will never go into the necessary Hibernate mode by itself. Here is how to change those settings;

1. Power Options

Right-click on the battery icon and choose Power Options

2. Change

Choose Change plan settings to the right of the current Balanced power plan

3. Set time

Now choose the times you want the Surface to go into the hibernate power state. At the very least, make sure Plugged in is not set to Never.

The downside is it takes a few seconds longer when you power on the PC as it is waking from a deeper sleep state. However, with the new Skylake processors and SSD drives this is still relatively fast and is not much of a nuisance. The Surface naturally goes to Hibernate after two hours by default, so this change just makes it quicker.

Hibernate is very effective and should drain no more than 1% an hour in the most extreme case, but in theory, the device is just off and no battery drain will occur.

More resources

Not sold on either device yet? Check out our Surface Pro 4 review and our Surface Book impressions or jump into our forums.

How to max out the Intel HD graphics on Surface Book and Surface Pro 4

Microsoft Surface Tips and Tricks

Windows Central Surface Book forums

Windows Central Surface Pro 4 forums

Turn your Xbox One into a PC with Continuum on the Lumia 950 or 950 XL!

$
0
0

Lumia 950 Xbox One continuum

For the best Continuum experience, we recommend the Microsoft Display Dock. While some people may be able to get it for free as part of a promotion with a purchase of the Lumia 950 or 950 XL, it'll cost $99 for many others. Before you go out and decide to buy one, you can see how Continuum works with something you might already have in your living room: the Xbox One!

Let's get one thing out of the way already. It's not as snappy as using the Microsoft Display Dock. There is a noticeable lag. However, this is a great way to see how Continuum works on your new Lumia 950 or 950 XL without spending more money.

Here's how it works. You need the Wireless Display app. Unfortunately, it's currently in Preview, and you'll need to be in the Xbox One Preview Program. The program is by invitation only. If your friends are already in the program, they can invite you by using the Invite friends page in the Xbox Preview Dashboard app. The Windows Central community can help you out too. Just ask nicely in the comments.

  1. Once you have the Wireless Display app installed, open it on your Xbox One.
  2. On your Lumia 950 or 950 XL, open the Continuum app.
  3. Select Wireless adapter and then tap Connect.
  4. Tap the Xbox One on the list.

Continuum Xbox

That's it! You can also connect a Bluetooth keyboard or wireless mouse, but those are optional. You can use your phone's display as a touchpad and the phone's on-screen keyboard show up whenever you tap any text boxes on the screen.

The Continuum experience between the Xbox One and the Lumia 950/XL is not snappy, but it's tolerable. The output on Continuum via the Xbox One is 30 frames per second (fps) compared to 60 fps when wired via the Display Dock. If you like what you see, perhaps it'll make you purchase the Microsoft Display Dock for a better experience.

Have you given Continuum a try? What do you think? Sound off in the comments!

Buy the Microsoft Display Dock

Buy the Microsoft Lumia 950 Unlocked for $550

Buy the Microsoft Lumia 950 XL

News

Want all the latest news on these phones? Hit these topic pages for all that we got.

Support and help forums

Need to chat about the Lumia 950 and Lumia 950 XL? Jump into our forums and ask others what they think or get help and advice on your new phone!

How to change the notification sounds in Lumia 950 & 950 XL

$
0
0

Lumia 950 Notifications

With more than one person in the office having multiple Windows 10 Mobile devices on their desk, it can get confusing which phone is sounding off a notification. Enough is enough, so I decided to finally change the default notification sounds. This is also helpful If you're tired of hearing the same notification sounds on your Lumia 950 or 950 XL. You can customize the sound per app. It's not very obvious in the Settings, so I'll show you how to do it.

  1. Go to Settings (Swipe down from top of the screen and tap All Settings)
  2. Tap System> Notifications & actions
  3. Tap an app from the list to change its default notification sound
  4. Select a sound under the Notification sound list. You can tap the play button next to the sound for a preview.

Notification Sounds

That's it! You'll need to do this for each app that you want to change the notification sound for. These instructions also work for other devices with Windows 10 Mobile.

You don't need to pick the same sound for each one. For example, I've changed the notification sounds for the apps I frequently use: Messaging app, Facebook Messenger, Outlook Mail, 6tag, and Slack Beta.

Are you changing up your default notification apps on your Lumia 950 or 950 XL? Let us know in the comments!

Buy the Microsoft Lumia 950 Unlocked for $550

Buy the Microsoft Lumia 950 XL

News

Want all the latest news on these phones? Hit these topic pages for all that we got.

Support and help forums

Need to chat about the Lumia 950 and Lumia 950 XL? Jump into our forums and ask others what they think or get help and advice on your new phone!

How to opt back into Windows 10 Mobile Insider Preview builds

$
0
0

Now that Windows 10 Mobile is out the door, you probably stopped getting the Insider Preview builds just to get a taste of an official "stable" release and all its new features, changes, and improvements. However, the development of the operating system isn't complete -- in fact, starting Windows 10 and forward, Windows will never be considered done --, as such when Microsoft is ready new Insider Previews will roll out, and you might want to jump back into getting new builds.

Indeed, build 10586.29 is now available to most Lumias including the newer Lumia 550, Lumia 950 and Lumia 950 XL. That release brings some bug fixing and optimizations making it a worthy contender for your phone.

Thankfully, similar to the Insider Program for Windows 10 desktop, you can leave and come back the Windows 10 Mobile preview program at any time without having to worry resetting or wiping out your phone. As such, today we're going to walk you through the necessary steps to opt back into the Windows 10 Mobile Insider program.

Note: If you're interested in stop getting the Insider builds, you can get more specific instructions on our previous guide.

How to get Windows 10 Mobile builds again

1. Get the app

On your phone, open the Windows Insider app. If you have uninstalled the app, you can use this link to get the app again from the Store.

QR: insider

2. Log in

Once inside the app, click Get preview builds. If you're prompted, signed in with your Microsoft Account. (If you have previously used the Windows Insider, you probably won't be asked to sign-in again.)

3. Enroll - Fast or Slow Ring

Now, it's the time to enroll your mobile phone into one of the rings. You can choose between the Insider Slow and Insider Fast. While you can make the choice between the two rings, Microsoft doesn't usually deliver many builds through the Slow ring, as such you may want to be set your phone to the Insider Fast options. However, you want to make sure, you understand that builds available through the Fast ring of updates contain more bugs and things don't always work as expected.

4. Confirm

Confirm the risks of installing a pre-release version of Windows by clicking the accept button.

Finally, your phone will reboot to complete applying the new settings and then you will be once again part of the Windows Insider program for phones.

After your Windows phone reboots member to go to Settings, navigate to Update & security, and then Phone update to check for new builds.

Once you updated your phone to the latest Windows 10 Mobile Insider Preview, you can check if everything has been installed correctly by going to Settings > System About, and look into the "Device information" section, you will be able to find information, such as version, build number, and other phone specific details.

That's all folks.

More Resources

If you need more help on the Windows Insider Program for mobile phone, you can check the resources below, and of course, you can stop by our Windows Phone forums:

Windows Insider for Phone – All you need to know

How to install Windows 10 Preview to your Lumia Windows Phone

Windows 10 preview builds for phone are 'roughly' every month

How to roll back from Windows 10 Mobile preview to Windows Phone 8.1

How to save your car's location on Maps for Windows 10 Mobile

$
0
0

Maps Find Car

One of my worst time-wasters is trying to find where I parked my car. When I was living in New York City, I didn't need to drive every day. So after a few days of not driving, I would forget where I parked near the house. I'd have to walk around few blocks until I find the car. A workaround that helped was to take a photo of the location. If you are forgetful like me, the Maps app for Windows 10 Mobile has a built-in feature that helps mark the location and find your car later on. I'll show you how it works.

If you're using navigation, tap the Car icon at the bottom of the screen when you're near your destination. It'll stamp the time and address of the location on the map. There are options to add a photo, note, and even adjust the location in case it is incorrect. When you're done, tap the save button.

Maps Windows 10

When you're not using the navigation, follow these steps:

  1. Tap the hamburger menu
  2. Tap Favorites and then Add location under Car

How to get back to your car

Windows 10 directions

  1. Tap the hamburger menu, then Favorites
  2. Tap Car to open its location in the map or tap Directions under Car to immediately start navigating there.

That's it! Have you ever forgotten where you parked? Will you be using this built-in feature on Windows 10 Mobile? Let us know in the comments!

Here is Xbox Kinect on Windows 10 with Windows Hello

$
0
0

Late last week Microsoft released some early drivers for the Xbox One's Kinect to work on Windows 10. Kinect within Windows, for now, is mostly for developers to code and write things for the multi-usage sensor, but for consumers there is one thing you can do right now: Windows Hello for facial recognition with system logins.

We picked up the $50 conversion kit that Microsoft sells through their store and gave it a spin. Here are our quick thoughts and a hands-on video.

Here is what you need to know:

  • Windows Hello works very well
  • You cannot yet use Kinect as a web camera for Skype or any other Windows app
  • You will need a tripod or shelf to mount the Kinect if using it for your PC
  • You need a USB 3.0 port and some extra power in your PC
  • The Kinect still needs to plug into an AC outlet too
  • The wires are all very cumbersome

The bottom line is if you are not a developer Kinect for Windows 10 is still very much a novelty. Sure, you can use it for Windows Hello, and it works great, but you will have to spend some time hiding wires and finding someplace to stick the rather bulky accessory.

Seeing as Kinect on Windows 10 is still very new and only in an early release we hope to see it become more useful on Windows 10 going forward. However, it'll probably be some time before we see this being utilized in any standard sense. For developers, however, this is all very good news and should be exciting.

How to setup

You will need the following to make this work if you are still interested:

  • Kinect sensor from Xbox One or Kinect for Windows Developer Bundle ($199)
  • Kinect Adapter for Windows ($50) (Not need if buying the Developer Bundle)
  • Simple registry edits to enable the Kinect drivers to be downloaded

Buy Kinect adapter for Windows from Amazon.com for $50

But Kinect for Windows kit for $199 from Microsoft

To modify the system registry, you need to add just a few subkeys as directed by Microsoft. No restart is needed. As always, heed caution when making changes in your system registry:

  1. Open the Windows Registry Editor (regedit.exe).
  2. Go to HKLM\Software\Microsoft\
  3. Create subkeys \DriverFlighting\Partner\
  4. Under \Partner subkey, create a string named "TargetRing" and key-in "Drivers" as the value.
  5. Exit from the Windows Registry Editor. You do not need to restart the computer after this change.
  6. Run the Windows Update application and check for updates, or in the Device Manager, right-click the target device and select Update Device Software.
  7. Verify your test driver is offered as expected.

Once complete, you can then head to Settings to being using Windows Hello. Just read our simple guide on how to use Windows Hello.

How to set up Windows Hello facial recognition in Windows 10

The overall setup process is very easy, but as mentioned above usage scenarios for non-developers is limited at this time.

Any developers here using Kinect for Windows? Let us know what you are working on in comments!


How to view emails from multiple accounts using Linked Inbox on Outlook Mail for Windows 10 Mobile

$
0
0

Lumia 950 Linked Inbox

A linked inbox lets you view messages from multiple email accounts in one inbox. This feature was added a few weeks ago to Outlook Mail on Windows 10 Mobile, and then removed, and then added back for users enrolled in the Windows Insiders program. We imagine this feature will be available again to everyone soon. We'll show you how to set it up.

Some people like linked inboxes, and some people don't. Fans of linked inboxes like it because it's fewer taps on the screen. They don't have to tap the hamburger menu and then tap an account to switch views. Those who receive a lot of emails might be overwhelmed having emails from multiple accounts in one page. The good news is that you're not forced to use Linked Inboxes. The feature is off by default. Those who want linked inboxes can enable it. Here's how:

  1. Open Outlook Mail and tap the three dots on the lower right corner
  2. Tap Manage accounts
  3. Tap Link inboxes
  4. Choose the accounts to link and you can optionally give the new linked inbox a name

Linked Inbox

That's it! All emails from those accounts show up in one inbox. When replying to messages, the sender will be the same account the original email was sent to.

We're very happy to see Linked Inbox now as an option on Outlook Mail for Windows 10 Mobile. How long do you think we have to wait until Microsoft adds Focused Inbox? It's a very handy and interesting feature that's already available on Outlook for iOS and Android. It automatically detects important emails and show them in your Focused Inbox, while the rest remain easily accessible in another tab — but out of the way. If you move email in or out of your Focused Inbox, Outlook learns this about you and gets even more tailored to your priorities. 

How do you feel about Linked Inbox on Outlook Mail? Will you be using this feature? Let us know in the comments!

How to use Storage Spaces in Windows 10

$
0
0

Windows 10 is an operating system that delivers a lot of new features and improvements, including a new breed of apps that run across devices, a new web browser built for the modern web, a unified Store, improvements on security, and an updated, but yet familiar user interface.

The operating system also includes many familiar features found in Windows 7 and Windows 8.1. One of these features is Storage Spaces. This feature was originally introduced in Windows 8.x and let you group different types of drives, such as traditional rotating platters hard drives and Solid State Drives into a single storage pool, which then you can use to create "storage spaces".

What are Storage Spaces?

Storage Spaces are technically virtual drives that appear in File Explorer as normal local storage, and each storage space you create can be less, equal, or greater to the amount of the physical capacity available in the storage pool.

Storage Spaces support some drive technologies, including ATA, SATA, SAS and USB drives. Getting started with the feature only requires one or more drives, in addition to the drive where you have Windows installed.

You don't even have to use all the available drives to create storage spaces. For example, if you have three drives of 100GB each, you could only use two to create a "storage pool". Once you have a new pool, you can create a 200GB virtual drive that represents the total amount of space available, or you can provision and create a 1000GB virtual drive (storage space).

Of course, if you have a storage space of 1000GB that was created in a pool with 200GB of available physical storage, you can only store 200GB worth of data. However, as the drives begin to fill up, you will be notified to add more drives to accommodate more available space.

Also, you're not limited to one storage space per storage pool; you can create as many spaces as allowed by the available space. Let me explain. While you can create storage spaces of virtually any size, each time you create a new virtual drive, you will be using a small portion of the physically available storage, and eventually, you will run out of space as you keep creating more storage spaces.

Why Storage Spaces?

Although, there are not many scenarios where everyday users will be using this feature, "Storage Spaces" has numerous benefits. For example, you can use storage spaces to create a large network drive instead of sharing multiple drives in your network, which is cleaner and more efficient.

If you have different USB drives that you can connect to your computer to save your data, you can combine the drives into a single logical drive, which enables you to organize all your data in a single place -- and no more asking yourself: "In which drive did I save those photos?"

Perhaps the most important aspect of Storage Spaces isn't the ability to group different drive technologies with different sizes, but the ability to configure different types of data protection.

Resiliency

Storage Spaces supports four types of resiliency:

  • Simple: A simple storage space writes one copy of your data and does not protect you from driver failures. This option requires, at least, one drive, and each new additional drive adds another point of failure.
  • Two-way mirror: This option writes two copies of your data on the drives, which can protect your data from a single driver failure. Two-way mirror requires a least two drives.
  • Three-way mirror: This option works similar to the two-way mirror, but it writes three copies of your data on the drives, which will help you to protect your data from two simultaneous drive failures. Three-way mirror requires, at least, three drives.
  • Parity: Similar to the standard RAID 5 technology, Parity for a storage space writes your data with parity information on the available driver to help you protect your data from a single driver failure. This option requires a least three drivers.

The resiliency type you need will mainly depend on what you're trying to accomplish. If you're only interested in available space and drive speed, you could use the "Simple (no resiliency)" option. If you want to protect your data from drive failure, you can go with one of the two mirror types, but remember that the more copies of your data get written to disk, it will consume more storage. If you like a balance of available space and speed, then you should use the "Parity" option.

Here's something else to keep in mind. You can always make a storage space larger, but you cannot make the available space smaller. Every time you make a change it will cost you a quarter of a gigabyte of the available physical space, as such, you should plan in advance how large you want to make the storage space. Currently, the operating system allows a maximum of 63TB per storage space.

How to setup Storage Spaces

Now that you have a little background on Storage Spaces for Windows, below we'll go through how to use and manage the feature.

How to create a storage pool and storage space

1- Connect all the drives you want to participate on Storage Spaces.

2- Open Start, do a search and open Storage Spaces.

3- Click the link Create a new pool and storage space.

4- Select the drives you want to be part of the pool and click Create Pool. It's important to note that all the data currently on the drives will be erased during the process.

5- Now, it's the time to create the storage space (virtual drive), choose a descriptive name, as it will get confusing if you don't. Then choose the drive letter and file system -- for most people NTFS will be fine, but you always REFS (Resilient File System), which is a new "local file system. It maximizes data availability, despite errors that would historically cause data loss or downtime. Data integrity ensures that business-critical data is protected from errors and available when needed."

6- Pick the resiliency type you want to use for this particular storage space.

7- Select the size you want to allocate. Remember that you can pick any size you want. It doesn't matter if you don't have the available physical space as you will get an alert when it's time to add more storage.

8- Click the Create storage space button to complete the process.

Now that you have created the storage space, in "Manage Storage Spaces" you can now view some useful information, such as physical storage usage, information about the storage space and from the participating physical drives.

How to create multiple storage spaces

1- If you want to create a second storage space, open Start, do a search and open Storage Spaces.

2- Click the Create a storage space link under the storage pool.

3- Choose your preferences (remember to pick a descriptive name).

4- Click the Create storage space button to complete the process (refer to the previous image).

How to add new drives to a storage pool

At any time, you can always add more drives to the pool to expand a storage space -- just follow the steps below:

1- While in "Manage Storage Spaces" click the Add drives from the storage pool.

2- The available drives you can add will appear, select the one you want, and click the Add drives button. You will also notice the Optimize drive usage to spread existing data across all drives, make sure this option is enabled as well.

How to change the size of a storage space

1- Open Start, do a search and open Storage Spaces.

2- Under the storage space you want to modify, click the Change option.

3- From this page, you can change the name of the "space", drive letter, and size. Make your changes, and click the Change storage space button to complete the process.

How to optimize drive usage

While "Storage Spaces" remains pretty much unchanged since Windows 8.1, Microsoft is adding a new feature to optimize drive usage in Windows 10. This feature is useful when you add new drives to an existing pool, as it will move some data to the newly added drive to better utilize the drives in the pool and capacity.

The optimization happens by default when you add a new drive to an existing pool, when you select the Optimize drive usage to spread existing data across all drives option. However, if you didn't check the option or drives were added before upgrading the pool, you need to perform an optimization manually.

1- While in Storage Spaces click the Optimize drive usage from the storage pool.

2- Click the Optimize drive usage button. Keep in mind that this process in intensive, as such you may notice your PC being slow for a while.

How to properly remove a drive in use

When you have a Storage Space configured, you cannot just disconnect a drive out of the blue, as it may cause data loss and other problems.

Fortunately, Windows 10 includes a mechanism to remove a drive properly from a pool, by moving the data on that drive other drives in the pool, and then you can disconnect the drive from your computer, or you can use to store something else.

Follow the step below to remove a drive from a pool:

1- Open Start, do a search and open Storage Spaces.

2- On the storage pool expand Physical drives.

3- Click the Prepare for removal option.

4- Make you're removing the correct drive and then click the Prepare for removal button.

5- Once again locate the drive you want to remove and click the Remove button (refer to the image in step number three).

6- Finally, click the Remove drive button to complete the process.

It's important to note that after you remove the drive, it won't be accessible through File Explorer. You'll need to open Disk Management and reformat the drive in question.

1- Simply, right-click the Start button, and click Disk Management, locate the drive with the "Unallocated" label.

2- Right-click the drive, select New Simple Volume and follow the on-screen instructions to format the drive using NTFS file system and performing a quick format.

Now the removed drive should be usable again.

How to delete a Storage Space

If you no longer need a storage space, you can easily delete it. Simply follow the steps below:

1- Open Start, do a search and open Storage Spaces.

2- Under "Storage Spaces" click the Delete option next to the "space" you no longer need. It's important to note that that deleting a storage space permanently deletes the data it contains. The only way to recover is by using a previously made backup.

3- Once you're ready, click the Delete storage space.

How to delete a Storage Pool

You cannot delete a storage pool that contains a storage space. You first need to remove all the storage spaces created in a pool properly. Only then the option to delete the pool will be available.

1- Open Start, do a search and open Storage Spaces.

2- Click the Delete pool on the storage pool you want to remove.

3- Then click the Delete pool to complete the process.

Once you delete the pool, the participating drive will be reinstated to your system, but again, as I have mentioned in the steps, the drives won't be visible in File Explorer until you manually reformat each drive through Disk Management.

Additional information

  • Once set, you cannot change the storage space resiliency or file system.
  • Yes, you can add more drives and upgrade a storage space on-demand without disrupting access and affecting data already in the "space".
  • At any time, you can rename a pool or space.
  • Storage Spaces is available in Windows 10 Pro and Windows 10 Home.
  • The drive has to be around 5GB of size to be available in Storage Spaces.

Wrapping things up

By now, you should be able to use and manage Storage Spaces in Windows 10. If it was a bit confusing, just remember that with Storage Spaces for Windows, you can create one or more pools with the available drives on your system. In each pool, you can create one or more storage spaces (a virtual drive) of any size as available storage. You can always add more drives and upgrade the space as necessary.

Note: If all the options appear grayed out after creating a Storage Space, this is because you need Administrator Rights. To enable this feature simply click the Change settings button in the top-right corner of the settings page.

More resources

If you want to read more about Windows 10, make sure you check these resources:

Windows 10 on Windows Central – All you need to know

Windows 10 help, tips, and tricks

Do you use Storage Spaces in Windows 10? What's the primary reason you use the feature? Tell us your story in the comments below.

Microsoft rolls out first update for the Display Dock for Continuum

$
0
0

Tonight in Redmond Microsoft is pushing out the very first update to the Display Dock used for Continuum on phones. The update takes the firmware of the Display Dock from version 3.0 to version 4.0, and there is no changelog posted yet (but there is a link to a 'What's new' that is not yet refreshed).

Updating the Display Dock is relatively easy and only takes a few minutes.

How to update the Display Dock

1. Get Connected

Users should be connected to the Display Dock through the USB Type-C connector. On the phone, navigate to the Gadgets app and choose the HD-500 listed on the menu.

2. Open HD-500

Once the app is open choose the ellipsis ('…') at the bottom of the display and pick Check for updates

The phone will then take over and download the new firmware and install it to the HD-500 Display Dock. Users are instructed to unplug then the power cord to the Display Dock to refresh the software.

Nothing stuck out as immediately new regarding features although performance seemed slightly better. The update is likely tied to today's Gadget app update and build 10586.29 of Windows 10 that went out earlier this week. We also wouldn't be shocked to hear about some improvements with Miracast support, which like Bluetooth, can be very finicky.

We'll update this article if we learn more. Sounds off in comments if you notice anything new!

Thanks, Show, for the tip!

Turn off your phone's display during Continuum with this simple app

$
0
0

Microsoft's Continuum for phone is certainly one of the more interesting aspects of the new Lumia 950 and Lumia 950 XL. While some people are dismissive of it, many change their mind once they see using your phone as a PC can be quite useful.

However, all is not perfect. One complaint I have seen a lot of is in regards to the phone's display staying on 100% of the time. If you turn the display power off using the side button, it also kills the Continuum function. This inability to power off the display could be a problem for some who would prefer to leave their phone connected to the Display Dock for hours on end with a wired mouse. While the phone does use the USB-Quick Charge feature diagnostics tells us that the number one power drain is an active display on the Lumia 950 and Lumia 950 XL.

Luckily, there is now a freeware app called simply Disable Screen and that is all it does – it blanks and disables the display while connected to Continuum. This function should allow more rapid charging of the battery and keep the heat down maybe as well.

To use Disable Screen just connect to the Display Dock and once setup navigate on your phone to the app and enable it (you could do it through Continuum on your external display, but this will cause the two to shift focus and is a tad confusing).

Of course, the next question you may have his How to power it back on? Turns out, the app is cleverer than you would think.

While the display is off and it does not respond to touch, you can still swipe up from the bottom to bring back the action keys (Back, Start, Search). Once those are visible, you can hit the Windows key or Back key to go to a live display. This function means at no point you need to break the Continuum connection to the Display Dock.

Overall, Disable Screen is a win-win app in our book. I've been using it for the last 20 minutes without any immediate issues, and I feel confident to recommend it. I hope to see Microsoft build such a feature into Windows Phone at some point, but I can see how discoverability and control could be an issue.

Regardless, for now, you can download it for free and start being even more productive...like a boss.

Thanks, Zsolt M., for the tip!

Download Disable Screen for Windows 10 Mobile

qr: disable

How to set up a kid-friendly Windows 10 device with a child account

$
0
0

Microsoft Child

You can share your Windows 10 PC with kids in your family and use the built-in Family features to ensure they have a safer experience. You can view reports of your kids' online activity, limit how long and when they use their devices, and help make sure they don't see inappropriate websites, apps, or games. Their settings will apply to any Windows 10 device that they sign in to. We'll show you how to set it up.

How to add a child account in Windows 10

  1. On your Windows 10 PC, go to Settings > Accounts > Family & other users.
  2. Click Add a family member.
  3. Select Add a child 
  4. Enter the email address of child to send them an invitation to join.
  5. If they don't have an email address, click The person I want to invite doesn't have an email address.
  6. After they've accepted the email invitation, have them sign in to Windows 10 using the same email address you sent the invitation to.

How to manage family settings

  1. Go to account.microsoft.com/family
  2. Select the child's account
  3. Select settings to turn on or modify:

Family Safety

Recent activity

You can turn on activity reporting for your child. You can see what websites they've been visiting, what apps and games they've been downloading and playing, and how much time they've been spending on their devices. You can also get activity reports emailed to adults in the family weekly. This is also where you can block apps and games.

Recent activity

Web Browsing

You can turn on website restrictions for your child. You can choose to block or allow specific sites and to restrict websites rated beyond a certain age. If you have very young children, you can also choose to only allow them to visit websites you've decided are safe.

Family Web Browsing

Keep in mind that websites can only be blocked on Microsoft Edge. To protect your child, block any other browsers appearing in Recent activity under Apps & games.

Apps, games & media

You can turn on restrictions for apps, games and media. You can choose to only allow your child to download items that are appropriate below a certain age rating. If your child downloaded something before you set these limits, you could block it where it appears on the Recent activity page. Your child won't be able to use it until you allow it again.

Apps and Games

Screen time

You can set limits as to when during the day your child can be on their Windows devices and the maximum amount of time they can spend on each device per day. For example, you might let them spend three hours a day on each device during the week, but give them more time on weekends. You can also set it up so that they can't use their device later than 10 PM.

Family screen time

Purchase and spending

You can add money to your child's account so they can buy the apps, games, and items from the Windows store. Scroll down to Purchase history to see a list of their purchases from the last 90 days.

Family Purchase

Works everywhere

We've shown you how to add a child account and place limits on their usage for a safer experience. We like that the Windows 10 family feature is connected to your child's account so that the same settings apply to all the Windows 10 devices they log in to. Adults also don't need to be physically using the child's device since the family settings can be configured from the web browser.

Do you use the family feature in Windows 10? Share your setup in the comments!

Image: Microsoft.com

Viewing all 5861 articles
Browse latest View live


Latest Images