Quantcast
Channel: Help & How To
Viewing all 5861 articles
Browse latest View live

Make sense of your Outlook email madness using Focused Inbox

$
0
0

A lot of emails overflowing your mailbox? Use Focused Inbox to reduce the noise and focus only on those important messages.

In Outlook, Focused Inbox is a feature that uses machine learning to control the overflow of emails by analyzing incoming messages and placing the most important emails in the "Focused" tab, while the rest go to the "Other" tab.

The feature is available for all Outlook.com, Live.com, Hotmail.com, and Exchange users through the web portal, using the desktop version of Outlook included with Office, or using the default Mail app available with Windows 10.

In this Windows 10 guide, we walk you through the steps to get started and manage the Focused Inbox feature included in the Outlook app or on the web.

How to enable or disable Focused Inbox in Outlook desktop app

If you're using Outlook 2019, Outlook 2016, or Outlook from Office 365, you can manage Focused Inbox using the instructions below.

Enabling Focused Inbox

To enable automatic sorting of messages, use these steps:

  1. Open Outlook.
  2. Click on the View tab.
  3. Click the Show Focused Inbox button.

Once you complete these steps, the "Focused" and "Other" tabs will appear in the Inbox column.

Disabling Focused Inbox

To disable Focused Inbox in the desktop version of Outlook, use these steps:

  1. Open Outlook.
  2. Click on the View tab.
  3. Click the Show Focused Inbox button.

After completing the steps, the changes will revert to the original settings, and you'll once again be able to switch between the "All" and "Unread" tabs from the Inbox section.

How to enable or disable Focused Inbox in Mail app

If you don't have an Office 365 subscription, and you use the default Mail app included with Windows 10, you can enable or disable Focused Inbox using the instructions below.

Enabling Focused Inbox

To enable Focused Inbox in the Windows 10 Mail app, use these steps:

  1. Open Mail.
  2. Click on the Settings (gear) button in the bottom-right corner.
  3. Click on Focused inbox in the right pane.

  4. Use the drop-down menu and select the account you want to configure.
  5. Turn on the Sort messages into Focused and Other toggle switch.

After you complete these steps, the Inbox section will sort the most important messages in the "Focused" tab, while the emails that seem to be irrelevant will appear in the "Other" tab.

Disabling Focused Inbox

In the case that you don't find Focused Inbox useful in the default Mail app, you can disable it using these steps:

  1. Open Mail.
  2. Click on the Settings (gear) button in the bottom-right corner.
  3. Click on Focused inbox in the right pane.

  4. Use the drop-down menu and select the account you want to configure.
  5. Turn off the Sort messages into Focused and Other toggle switch.

Once you've completed the steps, the Inbox will show all the messages as they arrive.

How to enable or disable Focused Inbox in Outlook web

If you use the web version of Outlook, it's also possible to enable or disable Focused Inbox in your account.

Enabling Focused Inbox

To enable Focused Inbox in your Outlook account, use these steps:

  1. Open Outlook web.
  2. Sign-in with your Microsoft account.
  3. Click the Settings (gear) button in the top-right corner.
  4. Turn on the Focused Inbox toggle switch.

After completing the steps, the Inbox will sort incoming messages in the "Focused" or "Other" tab depending on their importance.

Disabling Focused Inbox

To disable automatic email sorting in Outlook.com, use this steps:

  1. Open Outlook web.
  2. Sign-in with your Microsoft account.
  3. Click the Settings (gear) button in the top-right corner.
  4. Turn off the Focused Inbox toggle switch.

Once you complete these steps, Focused Inbox will no longer be available in your account, and all your messages will appear without any smart sorting.

How to use Focused Inbox in Outlook

Although the instructions to set up Focused Inbox are slightly different depending on your experience of Outlook, the feature works virtually the same on every environment.

Once the feature is enabled, you'll notice two new tabs in the Inbox section, including the "Focused" and "Other".

The Focused tab includes the emails that Outlook understands are the most important to you using machine learning. The emails that you'll find in this tab will consist of those emails from work, contacts, people you interact frequently, and other emails that the feature detects as important.

On the other hand, the Other tab includes the less important emails, such as newsletters, advertisements, automatically generated messages, and bulk emails.

While this feature to sort messages is convenient, it's not a perfect system, and you have to train it to improve its accuracy. For example, if new emails arrive and they're sorted incorrectly, in the Focused tab you can right-click the message and select one of the two options:

  • Move to Other — Relocates the email to the Other tab, but future emails from the same sender may continue to arrive in the Focused tab.
  • Always Move to Other — Moves the messages to the Other tab, and future messages will appear in the Other tab.

In the same way, while in the Other tab, you can select the Moved to Focused option when you only want to move one email. Or you can select the Always Move to Focused option if you want future emails from the same address to be available through the Focused tab.

If you're using the web version of Outlook, you need to right-click the email and select the Move submenu to find the options.

Also, because it can be easy to forget to check the Other tab, the Focused tab will show you a message at the top of the column informing you of the emails that have been sorted as less important.

We're focusing this guide on users who access their emails with a Windows 10 device, but Focused Inbox is also available for the mobile version of Outlook for Android and iOS, and it's available for the macOS version of Outlook, as well.

More Windows 10 resources

For more helpful articles, coverage, and answers to common questions about Windows 10, visit the following resources:


This third-party skill makes Microsoft To-Do and Amazon Echo work together

$
0
0

Amazon Echo Spot

Outside the U.S., there is no Cortana smart speaker, but in many places there is Amazon's Alexa, instead. And thanks to its developer community, you can use your Amazon Echo to add tasks and shopping lists to your Microsoft To-Do account.

Products used in this guide

(For the purposes of this guide we're referencing the standard Amazon Echo, but the process is identical for all Echo products, and it also works just fine with the devices with screens, such as the Echo Show and the Echo Spot.)

How to sync your Amazon Echo to Microsoft To-Do

Amazon Echo

The process is very simple, requiring you to only add the third-party Alexa skill that makes it all happen and link your Microsoft account. At this time it only works with a personal Microsoft Account, and school or business Office 365 accounts cannot be used. Just follow these steps:

  1. Open the Amazon Alexa app on your smartphone or in your browser.
  2. Open the skills and games section.
  3. Search for the Wonder Do It skill in the search box.

  4. Tap enable to add the skill to your Amazon Echo.
  5. Log in to your Microsoft account from the web browser window that pops up to link your account to the skill.

No Microsoft Account login information is added to the skill directly, and it uses a standard OAuth process for authenticating your account.

How to add tasks and shopping lists to Microsoft To-Do

Amazon Echo

The skill will automatically just add things you tell Alexa to your Microsoft To-Do lists without you needing to set anything up. Every time you add a task it will go into the "Tasks" list. Any items you tell Alexa to add to your shopping list will go into a new list in Microsoft To-Do called "Alexa Shopping List."

To add items from your Amazon Echo, simply speak to Alexa as follows:

  • "Alexa add (insert task here) to my to-do list."
  • "Alexa, add (insert item here) to my shopping list."

Both are standard Alexa voice commands and will add to your respective Alexa lists. The Wonder Do It skill will then sync both to your Microsoft To-Do account so you can access them on all your devices, wherever you are.

What you can't do is use Alexa to see what's on your Microsoft To-Do lists, and you're only able to add things using your Echo. It's also important to note that items added will be removed from the Alexa Shopping and To-do lists once synced to Microsoft To-Do.

Our top equipment picks

All you need is one of Amazon's Echo products to enjoy voice command bliss. We think the second-generation Amazon Echo is the one to go for.

Tell Alexa

Amazon Echo

$100 at Amazon

A great smart speaker to have in your life

An excellent companion for any room, and now with added integration with your Microsoft To-Do lists.

The regular second-generation Echo is the best all-around choice in Amazon's range, mixing a great balance of stylish design, good sound quality and an affordable price.

Additional equipment

The Echo isn't the only product that's great to put around your home; there are some fantastic alternatives that cost less or even have a display.

Amazon Echo Dot

$50 at Amazon

The third-generation Echo Dot is a huge improvement on its predecessor in both sound and looks, while remaining compact and extremely affordable.

Amazon Echo Spot

$130 at Amazon

Alexa takes on a new dimension when you add a screen, and the Echo Spot is a perfect companion for the office or any room in the home.

Spend less time retyping commands using the Command Prompt history feature

$
0
0

You can be more efficient while in Command Prompt using the command history feature, and in this guide, we'll show you how to use it.

If you're a frequent user of the Windows 10 Command Prompt, the "command history" feature allows you to view and quickly reuse recent command instead of having to retype them, making your daily tasks more efficient.

In this Windows 10 guide, we'll walk you through the steps to access your command history and export your recently typed command to a file while in Command Prompt.

How to view Command Prompt history with F7

To use the F7 key to view your Command Prompt history, use these steps:

  1. Open Start.
  2. Search for Command Prompt, and click the top result to open the console.
  3. Press the F7 key.

Using the F7 key will open the graphical interface with a list of commands you typed in the current session, even if you mistyped them.

While in the command history, you can use the up or down arrow keys to select the command that you want to reuse. If you want to exit without running any command, press the Esc key.

How to view Command Prompt history with doskey

On Command Prompt, the doskey is a command line tool that recalls previously typed commands, edits command lines, and you can even use it to create macros.

In this case, you can use the command to view a list of the command history from the current session. Here's how:

  1. Open Start.
  2. Search for Command Prompt, and click the top result to open the console.
  3. Type the following command to view the command history and press Enter:

    doskey /history

The only caveat with this tool is that you can view your current history, but you can't select the command like using the F7 key. However, you can use the arrows and pages keys on the keyboard to cycle and run previously typed commands.

  • Down arrow — Re-enters the next command that you typed. If you hit the arrow key repeatedly, it'll scroll down through the command history currently in memory.
  • Up arrow — Re-enters up the previous command that you typed. If you hit the arrow key repeatedly, it'll scroll up through the command history currently in memory.
  • Page Down — Re-enters the last command from the current session history.
  • Page Up — Re-enters up the first command from the current session history.
  • Esc — Deletes the current content of the console line.

How to export Command Prompt history to file

Unlike the Linux console, command history is only available for the current session. If you close Command Prompt, it will also clear the history, but you can the doskey command to save the history of the commands you typed to a file.

To export your command history, use these steps:

  1. Open Start.
  2. Search for Command Prompt, right-click the top result, and click the Run as administrator option.
  3. Type the following command to save the command history and press Enter:

    doskey /h > c:\cmd_history.txt

    In the command, change the c:\cmd_history.txt for the path and name of the file you want to use to export the current history.

Once you've completed the steps, the Command Prompt history will be saved on the location you specified.

We're focusing this guide on Windows 10, but command history for Command Prompt has been around for years, which means that you can also use this feature on Windows 8.1, Windows 7, and previous versions.

More Windows 10 resources

For more helpful articles, coverage, and answers to common questions about Windows 10, visit the following resources:

Do you need to disable Windows 10 automatic repair? Here's how to do it.

$
0
0

You can prevent Windows 10's self-repair mechanism from running automatically. In this guide, we show you how.

On Windows 10, automatic repair is a handy feature that troubleshoots and fixes common problems that may be preventing your device from loading correctly.

If your computer fails to start two consecutive times, in the third boot the self-repair mechanism will trigger, and during this process, the system will run a number of diagnostic tests to detect and repair common startup problems.

However, if you would rather troubleshoot and fix startup problems manually, or the automatic repair is causing unexpected loops, it's possible to disable the feature on Windows 10.

In this Windows 10 guide, we walk you through the steps to disable automatic diagnose and repair on your device. In addition, if automatic repair was previously disabled, or you want to revert the changes, we also outline the steps to re-enable the feature.

How to disable automatic repair on Windows 10

To disable automatic repair during the third unsuccessful boot of Windows 10, use these steps:

  1. Open Start.
  2. Search for Command Prompt, right-click the top result, and select Run as administrator.
  3. Type the following command and press Enter:

    bcdedit

  4. Make note of the reoveryenabled and identifier values under the "Windows Boot Loader" section. The values should be similar to these:

    • identifier: {current}
    • recoveryenabled: yes

  5. Type the following command to disable automatic repair and press Enter:

    bcdedit /set {current} recoveryenabled no

    • In the command, we're using {current} to specify the target OS option in the boot loader and the no value to disable the automatic repair.

Once you complete these steps, the diagnostic and repair feature will no longer run automatically after the third unsuccessful boot of your device.

How to enable automatic repair on Windows 10

If the automatic repair feature is disabled, you can use these steps to re-enable it:

  1. Open Start.
  2. Search for Command Prompt, right-click the top result, and select Run as administrator.
  3. Type the following command and press Enter:

    bcdedit

  4. Make note of the reoveryenabled and identifier values under the "Windows Boot Loader" section. The values should be similar to these:

    • identifier: {current}
    • recoveryenabled: no

  5. Type the following command to enable automatic repair and press Enter:

    bcdedit /set {current} recoveryenabled yes

  • In the command, we're using {current} to specify the target OS option in the boot loader and the yes value to enable automatic repair again.

After completing these steps, if you're having issues starting Windows 10, as you try to boot your device a third time, the system will proceed to diagnose your device, and it'll try to repair common issues that may prevent the OS from loading correctly.

More Windows 10 resources

For more helpful articles, coverage, and answers to common questions about Windows 10, visit the following resources:

Everything you need to get started with 3D printing on Windows

$
0
0

You think it is simple to start 3D printing? Think again.

So you have decided that you want to try your hand at 3D Printing, you've seen all the cool YouTube videos, and you are ready to pick up your first printer. But getting started requires a little more than you might think.

Here's an overview of the things you will need to ensure you can start printing straight away — and have a good chance of those prints actually working.

A computer

Not only do you need a computer for finding 3D models and for preparing those models for printing, but a lot of the back end of printing can be done here. From firmware upgrades to running the printer in real time, almost anything can be done from a laptop or PC.

I would recommend making sure you have at least 4GB of RAM and a fairly powerful processor. My Dell XPS 13 runs all of my slicing software and even some of my 3D design software well, but my 2011 MacBook struggles to prepare some of the more complex models for the printer.

If at all possible avoid using a direct connection to your PC. Using an SD card to copy your models over to the printer and letting it do the work is far better than using your laptop. If anything happens to your PC while you print, an update for example or a blue screen of death (BSOD), you could potentially lose hours of printing.

More: Best Laptops of 2018

A 3D printer

If you have never owned a 3D printer, have no idea what you want to do and have no plans to make something specific, then start with the Monoprice Maker Select Mini v2. For just $200, you can start printing with very little fuss.

While the print bed is relatively small, only 4.75 inches squared, the Select Mini is a sturdy, reliable little printer that can sit on your desk next to your PC and print some excellent starter pieces, while having enough parts to tweak and upgrade.

And $200 for a printer this good really is an amazing price and is the perfect infection vector for the hobby.

More: Best 3D Printers for Windows on a budget

Filament

Filament is the material you use to make everything in your 3D printer. The most popular and arguably the easiest to use is PLA, a corn-based plastic that requires fairly low temperatures to print and is easy to sand, prime, and paint. There are many other choices of filament, such as ABS, a stronger higher temp plastic, and Ninja Flex, a flexible filament you can use for phone cases.

Rolls of filament come in many different sizes and I like to use the 1kg or 2.2lb rolls that you can get for as little as $16.99 on Amazon. Plenty of people will tell you the cheap stuff is no good, and they may be right if you are planning on selling your prints or you don't want to paint them. For your first few rolls, though, while you are learning the ropes, go as cheap as you can. You will reach a point in your printing career when it will be time to buy some of the more expensive materials.

A note of caution, some of the filaments are noxious when printed. ABS shouldn't be printed without adequate ventilation in the house and needs to have an air-controlled room to really work well. Most printers don't come with an enclosure so you will need to build one to properly print ABS. That said ABS is a really nice material to get very smooth prints from, so it's worth learning more about. Make sure, as well, that you get the right size filament; 1.75mm is the norm but 3mm is available for some printers.

More: Best filaments for around $25

Assorted tools

There are several small tools that are key to making sure your 3D printing goes off without a hitch. While any 3D printer you purchase normally comes with a few tools to start you off, they normally aren't very high quality. Here are links to the stuff I personally use.

Supermarket stuff

There are some really helpful things for your printer that you can get from your local supermarket or D.I.Y. store. Aquanet hairspray or any water-based hairspray is extremely helpful for sticking your prints firmly to your print bed, especially if it is glass. You'll also want some 90 percent isopropyl alcohol to clean the hairspray off after each print. The alcohol is used often to clean your print bed as your fingers leave oils on the surface which can stop the plastic from sticking.

Check your local D.I.Y. store for a nice set of fine wire snippers, preferably with a flat bottom, to help cut the filament. They are also helpful for simply cleaning up some prints and when you start to get into modifications you can use them for actually cutting wire.

I've recently found an amazing build plate adhesive for glass beds called Magigoo. At just $20 on Amazon for around 100 prints, Magigoo is a cheap way of ensuring you get fantastic adhesion every time.

Larger purchases

There are several slightly larger tools that you will need. A set of metric Hex wrenches, a digital caliper, and a rounded pallet knife. This Pallet Knife set is my go-to for print removal as it comes with two different tools — 3D Prints are sometimes extremely difficult to remove so having a variety of tools is a good idea. One of the tools has a sharp edge for the very difficult prints, and one is a flexible rounded tool for the normal removals. Most 3D printers come with a paint scraper, but they tend to damage the print bed more than remove the print.

Most 3D printers you will buy will have metric screws and nuts holding it together, and while they often come with one hex wrench having a full set will save you time and effort. The one I use can be found here. I actually have a set of these attached to each printer so I always have them handy.

Lastly, a digital caliper is worth investing in to help fine-tune your prints. There are a lot of ways to make your prints better, but they normally require you to make very small measurements in millimeters. You can spend a lot of money on a set of digital calipers, and the more money the more accurate normally, but I've been using this set for a while now and they haven't steered me wrong.

3D models

Most printers come with an SD card and a few basic models to try out, but you may have an idea of what you want to print for your first go. You can always design your own models, but for now, let's find one on the interwebs.

The two most popular places to find 3D models specifically for printing are Thingiverse and My Mini Factory, and both offer a broad range of models that other people have made and that you can use. Tipping is available if you want to help the designer out.

Thingiverse is the largest repository of free-to-use 3D models on the web, with hundreds of thousands of models to choose from. If you have had an idea, the chances are someone already made one. I even uploaded a quick design of the Windows Central Logo that you could use as your first print.

My Mini Factory is smaller than Thingiverse but each model on there is guaranteed to be print ready. This means someone has actually printed all the models to make sure they will print. There are a lot more paid artists on My Mini Factory, but honestly, it's worth a few dollars to get some of these amazing models.

Slicers

Slicers are the final piece of the 3D Printing puzzle. Slicing software turns the 3D model file, normally an .STL or .OBJ, into a usable set of instructions for your printer to plot in 3D space. Normally a slicer will create a file called GCode, which can be edited by you to tweak certain aspects of the print. The GCode tells the printer when to start and stop, when to home the print head, and when to extrude filament between two points. There are quite a lot of different slicers, but the two I use most are the free-to-use Cura by Ultimaker and the costly Simplify 3D.

Simplify 3D (S3D) is an extremely powerful slicer that can be used on just about any printer. One of my printers uses a different flavor of code to print called .x3g, and as such, it needs specific software to run, which S3D includes. S3D has an excellent UI and powerful features to help you generate the best prints. Due to the price tag of $149, I wouldn't necessarily recommend it for a person new to 3D printing, but if you can afford it then you may as well start with what I feel is the best slicer around.

See Simplify 3D here

Cura by Ultimaker, on the other hand, is completely free and almost as powerful as Simplify 3D. Due to the open-source nature of Cura, you will see many different versions floating around in the world, your printer may even come with a version on the SD card. Don't use any other version than the current stable version unless you are secure in your 3D printing skills, as even one wrong setting can make all your prints look like garbage. I like Cura, and its UI is a little easier to understand than S3D, though there are some utilities missing in Cura that I find helpful in S3D. The biggest draw to Cura and what makes it the most popular slicer around is the price: it's free. And with an almost monthly upgrade cycle, it is hard to beat in the Slicing game.

See Cura by Ultimaker here

What have we missed?

For those of you already 3D printing, what have I missed? Is there anything you can't do without that you think we should know about? Let us know in the comments.

Updated November 30, 2018: We added more information on Magigoo and updated some other details on the printers mentioned throughout.

Three ways to delete the Windows.old folder on Windows 10

$
0
0

If you recently upgraded to a new version of Windows 10, you can use this guide to flush the Windows.old folder that's just wasting space on your device.

When you upgrade your computer to a new version of Windows 10, or you install a preview build, the installation process saves a copy of the previous version in the "Windows.old" folder.

This is part of the safety mechanism in case the upgrade process goes wrong. If the installation fails for any reason, the system can use the Windows.old folder to undo the changes. Also, if the upgrade completes successfully, the backup copy of the previous version will be kept to provide the option to rollback in the case the new installation is causing issues.

Although this is a handy feature, if your computer is working correctly after the upgrade, you can safely delete the Windows.old folder to reclaim gigabytes of space.

In this Windows 10 guide, we'll walk you through the different ways that you can get rid of the Windows.old folder to free up several gigabytes of space to store more important files.

Update November 29, 2018: We've updated this article with the latest information for the Windows 10 October 2018 Update.

How to delete the Windows.old folder using Storage sense settings

The easiest method to delete the Windows.old folder from your device is to use the Storage sense with these steps:

  1. Open Settings.
  2. Click on System.
  3. Click on Storage.
  4. Under the "Storage sense" section, click the Change how we free up space automatically option.

  5. Under the "Free up space now" section, check the Delete previous version of Windows option.

  6. Click the Clean now button.

Once you've completed the steps, the folder with the previous installation of Windows 10 will no longer be available on your device.

How to delete the Windows.old folder using Temporary files settings

Alternatively, using the Settings app, you can delete the Windows.old folder using the Temporary files settings with these steps:

  1. Open Settings.
  2. Click on System.
  3. Click on Storage.
  4. Under the "Storage sense" section, click the Free up space now option.

  5. Check the Previous Windows installation(s) option.

  6. (Optional) Clear the default selected options if you only want to remove the Windows.old folder to free up space.
  7. Click the Remove files button.

After completing the steps, the folder with the previous installation of Windows 10 will be removed freeing up 14GB to 20GB of storage space on your primary hard drive.

How to delete the Windows.old folder using Disk Cleanup

You can also delete the Windows.old folder using the legacy Disk Cleanup tool with these steps:

  1. Open File Explorer.
  2. Click on This PC from the left pane.
  3. Under the "Devices and drives" section, right-click the drive with the Windows 10 installation (usually the C drive) and select the Properties option.

  4. In the "General" tab, click the Disk Cleanup button.

  5. Click the Cleanup system files button.

  6. Check the Previous Windows installation(s) option.

  7. (Optional) Clear the default selected options if you only want to remove the Windows.old folder to free up space.

    Important: Starting with the October 2018 Update, Windows 10 is deprecating Disk Cleanup in favor of Storage sense, but it adds an option to delete all the contents from the Downloads folder. If you're using this option, and you have important files in the Downloads folder, make sure to clear this option.

  8. Click the OK button.
  9. Click the Delete Files button to confirm the deletion.
  10. Click the Yes button to confirm the warning.

Once you've completed the steps, the Windows.old folder will be removed from your device.

Wrapping things up

While it's safe to delete the Windows.old folder, if you remove its contents, you will no longer be able to use the recovery options to rollback to the previous version of Windows 10. If you delete the folder, and then you want to rollback, you'll need to perform a clean installation with the desire version.

More Windows 10 resources

For more helpful articles, coverage, and answers to common questions about Windows 10, visit the following resources:

Does Samsung's Galaxy Book2 have a 4K display?

$
0
0

Best answer: The Galaxy Book2 doesn't come with a 4K display but its sAMOLED display is still excellent and impressive.

Not 4K, but that's OK

The Samsung Galaxy Book2 features a 12-inch 2160x1440 (FHD+) Super AMOLED (sAMOLED) display. While it isn't a 4K screen, it lives up to the high reputation of Samsung screens.

Because it is sAMOLED, the device turns off pixels to show pure blacks. This brings out deep blacks that enhance the viewing experience. The color, contrast, and brightness of the display result in an excellent picture.

The display's unique pixel count is due to its 3:2 aspect ratio. This is becoming more common in devices and is especially popular among 2-in-1s like the Microsoft Surface Pro. The screen ratio provides a more natural-feeling display in both portrait and landscape modes, being neither too tall nor too narrow. Whether you're using the Galaxy Book2 in portrait or ladscape mode, you'll have enough screen real estate to get your work done.

Samsung has earned a high reputation with its displays that are used on a number of flagship phones and devices and the Galaxy Book2 is along those same lines. In our full review of the device , the screen was described as "dazzling." While it isn't a 4K display, it's likely that you'll be happy with the display quality.

More than looks

The display of the Galaxy Book2 has benefits beyond being really, really, ridiculously good looking. First, it supports the S Pen. This stylus earned its fame through the Galaxy Note line of phones and that same technology and experience is available on the Galaxy Book2. The display makes writing with the S Pen easier by supporting palm rejection.

Second, the display consumes less power than its LCD competitors. sAMOLED displays don't use power to show pure blacks, so when you use an app in dark mode, use Windows 10's dark theme, or view anything that has any amount of pure black, your device will use less power than a device with an LCD screen performing the same task. The Galaxy Book2 is already a battery life champion thanks to it running Windows 10 on ARM, but the sAMOLED display helps it last even longer.

Our pick

Samsung Galaxy Book2

$1,000 at Samsung

A gorgeous 2-in-1

The Galaxy Book2 has superb battery life, in part due to its power-friendly super AMOLED display. The screen has rich black, crisp colors, and is almost as dazzling as a 4K screen.

Here are five ways to remove a printer from Windows 10

$
0
0

If you're no longer using a particular printer, you can use this guide to remove it from your device in five different ways.

Although on Windows 10, the process to install printers has improved over the years, we're quickly moving into a digital world that has significantly reduced the need to print content on paper.

If you're also taking the paperless route, you simply no longer use a particular printer, or you're troubleshooting problems, you can use the Settings app, Control Panel, Print Management, Command Prompt, or even PowerShell to remove the printing device from your computer.

In this Windows 10 guide, we'll walk you through five different ways to properly remove a printer from your device.

How to uninstall a printer using Settings

If you're no longer using a particular printer, you can uninstall the device using these steps:

  1. Open Settings.
  2. Click on Devices.
  3. Click on Printers & scanners.
  4. Select the printer and click the Remove device button.

  5. Click the Yes button to confirm.

Once you've completed the steps, the printer will be removed from your device.

Uninstalling printer software

If you're only using the printer with the basic driver, there's nothing else to remove. However, if you're using a third-party utility, or if the Settings app also installed additional tools to manage the printer automatically, you'll need to remove the remaining software manually.

To remove left behind printer-related applications, use these steps:

  1. Open Settings.
  2. Click on Apps.
  3. Click on Apps & features.
  4. Select the software you want to remove.
  5. Click the Uninstall button.

  6. Continue with the on-screen directions to complete the removal.

How to uninstall a printer using Control Panel

Alternatively, you can still uninstall a printing device using Control Panel with these steps:

  1. Open Control Panel.
  2. Click on Hardware and Sound.

  3. Click on Devices and Printers.

  4. Under the "Printers" section, right-click the device you want, and select the Remove device option.

  5. Click the Yes button to confirm.

Once you've completed the steps, the printer in question will no longer be available on your device.

Uninstalling printer software

To remove left behind printer-related applications, use these steps:

  1. Open Settings.
  2. Click on Apps.
  3. Click on Apps & features.
  4. Select the software you want to remove.
  5. Click the Uninstall button.

  6. Continue with the on-screen directions to complete the removal.

How to uninstall a printer using Print Management

On Windows 10, you can also use the Print Management console to remove a printer you no longer use with these steps:

  1. Open Control Panel.
  2. Click on System and Security.

  3. Click on Administrative Tools.

  4. Double-click the Print Management shortcut.

  5. Under "Custom Filters," click on All Printers.
  6. Right-click the printer that you want to remove, and select the Delete option.

  7. Click the Yes button.

After completing the steps, the printer that you removed will no longer be available to any user.

Uninstalling printer software

To remove left behind printer-related applications, use these steps:

  1. Open Settings.
  2. Click on Apps.
  3. Click on Apps & features.
  4. Select the software you want to remove.
  5. Click the Uninstall button.

  6. Continue with the on-screen directions to complete the removal.

How to uninstall a printer using Command Prompt

If you prefer using command lines, you can use Command Prompt to delete a printer from Windows 10 using these steps:

  1. Open Start.
  2. Search for Command Prompt, right-click the top result, and select the Run as administrator option.
  3. Type the following command to queue a list of printers on your device and press Enter:

    wmic printer get name

  4. Type the following command to uninstall the printer and press Enter:

    printui.exe /dl /n "YOUR-PRINTER-NAME"

    In the command, replace the YOUR-PRINTER-NAME with the full name of your printer see step No. 3.

Once you've completed the steps, the printer that you specified in the command will be uninstalled.

Uninstalling printer software

To remove left behind printer-related applications, use these steps:

  1. Open Settings.
  2. Click on Apps.
  3. Click on Apps & features.
  4. Select the software you want to remove.
  5. Click the Uninstall button.

  6. Continue with the on-screen directions to complete the removal.

How to uninstall a printer using PowerShell

If you prefer to use PowerShell, you can use these steps to remove a printer from Windows 10:

  1. Open Start.
  2. Search for Windows PowerShell, right-click the top result, and select the Run as administrator option.
  3. Type the following command to queue a list of printers on your device and press Enter:

    Get-Printer | Format-List Name

  4. Type the following command to uninstall the printer and press Enter:

    Remove-Printer -Name "YOUR-PRINTER-NAME"

    In the command, replace the YOUR-PRINTER-NAME with the full name of your printer see step No. 3.

After completing the steps, the printer that you selected will be removed from your computer.

Uninstalling printer software

To remove left behind printer-related applications, use these steps:

  1. Open Settings.
  2. Click on Apps.
  3. Click on Apps & features.
  4. Select the software that you want to remove.
  5. Click the Uninstall button.

  6. Continue with the on-screen directions to complete the removal.

More Windows 10 resources

For more helpful articles, coverage, and answers to common questions about Windows 10, visit the following resources:


Here's how to unlock and use the AV1 media codec in Windows 10

$
0
0

Are you trying to watch a video using the AV1 codec, but it won't play on Windows 10? That's because you don't have the required codec. Here's how to get it for free.

Developed by the Alliance for Open Media, the AOMedia Video 1 (AV1) is an emerging free and open source video codec designed specifically to become the next standard for video streaming over the internet.

A lot of companies, such as Microsoft, Apple, Google, and Mozilla, are already behind this project, and it's expected to replace Google's VP9 codec and take over the costly HEVC/H.265 codec.

Although there isn't a lot of content encoded with AV1, if you want to stay ahead of the curve, or you came across a video using the new codec, and you can't watch it, Microsoft is already making available an extension for Windows 10 to play AV1 videos on your device.

In this Windows 10 guide, we'll walk you through the steps to add AV1 codec support to your device running the latest October 2018 Update (version 1809) or later.

How to add AV1 codec support to Windows 10

To play videos encoded with the AV1 codec on Windows 10, use these steps:

  1. Open Microsoft Store.
  2. Search for AV1 Video Extension, and click the result.
  3. Click the Install button.

Once you've completed the steps, there are no additional steps that you need to take. The next time you come across a video using the AV1 codec, as a file or on the web, Windows 10 will be able to play the video using the Movies & TV app or in Microsoft Edge.

This is an early preview of the codec for Windows 10, which means that hiccups and performance issues are expected. If you install the package now, and your device is configured to receive updates for apps automatically, future releases of the codec will install automatically.

In the case that you no longer need the playback codec, you can remove the extension on Settings> Apps> Apps & features, select AV1 Video Extension, and then click the Uninstall button.

More Windows 10 resources

For more helpful articles, coverage, and answers to common questions about Windows 10, visit the following resources:

How to choose between Office 2019 and Office 365

$
0
0

Getting a version of Office shouldn't be complicated. In this guide, we'll help you to pick the best option for your needs.

If you're planning to upgrade, or you're new to Microsoft Office, you probably noticed that now you have two options: Office 2019 and Office 365. If you're a little confused on which one to get, you're not alone.

Although both versions offer the same apps, including Word, Excel, PowerPoint, and Outlook with the latest core features, there are some significant differences that come down to the cost of ownership and list of features. (And to be clear, Office 2019 isn't a replacement for Office 365.)

In this Windows 10 guide, we'll walk you through the information you need to know to decide between getting Office 2019 or Office 365.

Office 2019 features

Office 2019 is the name that Microsoft is using for the standalone version of the popular suite of office apps, which doesn't require a monthly subscription, meaning that once you go through the one-time purchase, you own the copy forever.

Using this option (also known as "perpetual" or "on-premises" version of Office), you can only install the apps on a single computer, you'll get security updates, but you won't be able to upgrade to a follow-up version. This means that you can keep using the version that you purchased for its lifecycle and beyond (without updates), but if you want to access the new features and tools, you'll need to pay full price again.

Also, even though Office 2019 comes with apps like Word, Excel, PowerPoint, and Outlook with more improvements than its predecessor, it only ships with a subset of features and without many of the perks available with an Office 365 subscription.

For example, with the 2019 version, you won't find cloud and AI features, and benefits, such as 1TB of OneDrive cloud storage, and free monthly credit to make calls to landlines using Skype.

Who should buy Office 2019

Although anyone can purchase Office 2019, this version has been designed for commercial customers with volume licenses, which also happen to have specific requirements to use the suite of apps on-premises, and they're not ready to transition to a cloud-based version of Office.

If you're a regular consumer, this is still (somewhat) a good option, but only if you plan to install the suite on a single device, you don't depend on new features, or you're not ready to start using cloud-based applications, and you prefer a more traditional experience.

Additionally, while you're getting a license for one PC or Mac going down the one-time purchase route, you can install the Office apps on all your mobile devices, but you'll only get some basic features.

Office 2019 comes in two flavors, including Office Home & Student 2019 and Office Home & Business 2019, and they're typically priced at $149.99 and $249.99 per device respectively.

Office Home & Student 2019 comes with Word, Excel, and PowerPoint, while Office Home & Business 2019 includes Word, Excel, PowerPoint, Outlook, and OneNote.

Also, consider that unlike previous perpetual versions, Office 2019 is only supported on devices running Windows 10 or the three most recent versions of macOS. If you must use the most up-to-date version of Office, and you're still on Windows 8.1 or Windows 7, you have to purchase an Office 365 subscription.

See at Microsoft

Office 365 features

Office 365 is the name that Microsoft uses for its subscription plan service that offers the same apps available with Office 2019, but with even more apps, more features, tools, and other benefits.

Using this option, you'll be paying a monthly or yearly subscription feed giving you access to apps like Word, Excel, PowerPoint, Outlook, Publisher, Access, and others on all your devices as long as only five devices are accessing the account at a time. Also, depending on your subscription plan, you can share the account with up to five additional people, for a total of six people with one subscription.

Perhaps one of the best features getting a subscription plan is that you never have to worry about new versions. When you're using Office 365, you'll always be running the most up-to-date version of the apps that Microsoft can offer. This unlocks regular security updates, improvements, and more importantly, access to the latest features and tools as soon as they become available.

Quick Tip: Although Office 365 applications should update automatically, you can always check for updates on File> Account, clicking Update Options, and selecting the Update Now button.

You also get cloud features, such as real-time collaboration, and AI features to help boost your productivity at home, school, work, and across devices. In addition, as part of the bundle, you get 1TB of OneDrive storage, Skype minutes to make calls to landlines, and you can contact the support line with any questions you may have.

Similar to Office 2019, you can install Office 365 on your mobile devices, but unlike the perpetual version, you'll get access to the complete array of features.

Who should buy Office 365

If you need access to the suite of apps, Office 365 is perhaps your best choice, as it's the only option that ensures continuity of updates and upgrades at a low cost. Also, you get access to all the apps, which you can install on all your devices, including on devices running Windows 10, Windows 8.1, Windows 7, and macOS. (Office 2019 only allows you to use apps on a single computer running Windows 10.)

The subscription service comes with different plans. If you are the only person using the apps and services, you can purchase the "Office 365 Personal" plan for $69.99/year, which gives you access to the software suite, in addition to 1TB of OneDrive storage, and Skype minutes.

However, if you're planning to share the plan with family members or roommates, you should select the "Office 365 Home" plan for $99.99/year, which allows you to share the apps and the benefits with up to five additional people, and everyone gets their Skype minutes and 1TB of OneDrive storage. Amazon even has a deal on it right now offering one year of Office 365 Home for $54.99.

If you choose to buy into a subscription plan, you should purchase the yearly subscription as you'll be spending more money paying the monthly feed.

Microsoft even has a free subscription plan for students and teachers using a valid school email address. Using this service, you'll get access to Word, Excel, OneNote, PowerPoint, Microsoft Teams, and other school tools for free.

Alongside the consumer options, Microsoft also provides Office 365 small businesses and enterprises.

See at Microsoft

Office Online

If making the move to Office 2019 is too expensive, or you're not willing to commit to a monthly subscription, you also have Office Online. This option is free, and it allows you to access the web version of Word, Excel, and PowerPoint with all the essential features most regular users will need to get the work done. The apps are available through any web browser and from virtually anywhere, plus you get 5GB of OneDrive to store your documents and photos.

You can sign up for Office Online in this website, but if you already have an Outlook.com account, then you're already signed up with Office Online.

More Windows 10 resources

For more helpful articles, coverage, and answers to common questions about Windows 10, visit the following resources:

Is the Surface Pro 6 good for gaming?

$
0
0

Best answer: Yes. While you won't be running anything high-end on ultra settings, the huge back catalogue of Windows PC games makes the Pro 6 a totally viable, portable gaming PC if you're willing to compromise on the resolution in some instances.

Microsoft: Surface Pro 6 ($900+)

A vast Windows-powered PC gaming library

The Surface Pro 6 might not be the most powerful gaming PC out there, particularly since it lacks dedicated graphics, but thanks to the vast catalogue of games available on Steam and other digital game retailers, you can rest assured that there will always be hundreds of titles in all shapes and sizes on offer.

You won't be playing photorealistic contemporary titles on this thing, at least not without severely compromising on resolution and frame rates. The Intel UHD 620 graphics that powers the Pro 6 simply isn't up to the task. However, it will run less-intensive modern titles like Minecraft, Fortnite, and Overwatch at a reasonable level.

Where you'll get the most performance and quality is from titles designed for less intensive platforms. Games like Civilization, Pillars of Eternity, Hearthstone, and Football Manager fare very well on the tablet-optimized hardware in the Pro 6, and older games like XCOM: Enemy Within, World of Warcraft, Skyrim, and Fallout 3 will run practically flawlessly.

But which configuration?

Naturally, like most Surface devices, the Book 6 comes in multiple configurations. There are core i5 and core i7 versions, with 8 GB RAM and 16 GB RAM options. Obviously, running games on the 16 GB model will improve performance, but you shouldn't notice a massive bump moving from a core i5 to a core i7 unless you're playing on a particularly CPU-intensive game.

All configurations use the Intel UHD 620 graphics, and sadly there are no options for a Thunderbolt 3-powered external GPU dock, which would partially improve the Pro 6's graphics processing problems.

Go for the 16 GB model if you can, but, you can still find hundreds of classic games that will run well even on the 8 GB model. Just ensure that you lower the display resolution to maximize overall performance.

An additional downside is that the Pro 6 doesn't come with a keyboard or mouse, so you'll have to grab those separately. The type cover is $100, and the keys are quite compact for standard WASD-style gaming, but you can always attach a larger, better keyboard if you plan to stick the Pro 6 on a desk.

Surface Pro 6

$900+ at Microsoft

A huge portable Windows gaming legacy awaits

While the Pro 6 is certainly no gaming powerhouse, the decades of available classic Windows games makes this pint-sized PC a great portable gaming tablet.

Microsoft plans to revamp Edge using Chromium. But what exactly is it?

$
0
0

Chromium isn't just another Google product — it can be anything you want it to be thanks to its open-source license.

Microsoft's announcement that it will rebuild its Edge browser using Chromium was a bit of a shocker. It almost sounds like Microsoft has decided to let Google build the web browser of choice for Windows computers, and that's a change that would affect a couple billion people, most of which wouldn't even know, as long as they see the familiar icon in the Start menu. It would also be a change that gives Google a billion more users by default and heads down a path where there is only one company and one choice if you want to use the web. Nobody wants that. Thankfully, that's not the case. And Chromium is very different than Chrome.

While Chromium is a project started by Google, it's really not what you might think it is. And that's because of its open-source nature, which allows it to be anything.

Related: Everything you need to know about Microsoft Edge, Chromium, and Blink

What's in a name?

Google has a frustrating way of using the same name for things that really aren't the same. Android is a good example. Everyone knows what Android is: it's the OS used in a couple billion smartphones made by 100 or so different companies. But it's also an open-source application framework used by companies like the now-defunct Research In Motion (RIM), the company that used to make BlackBerrys, and an open-source base for a standalone OS that companies like Amazon, Delta Airlines, and Exxon use to power tablets, in-flight infotainment systems, and unmanned payment kiosks that are built using the Android Open Source Project.

Microsoft is smart to use what has already been built instead of spending billions to rebuild.

Chromium is very similar. You can install a standalone application for Windows, macOS and any flavor of Linux named Chromium that's a complete web browser complete with synchronization through Google's could services. But Chromium is also the name of the open-source code project used to make Chromium, as well as the Chrome web browser, Chrome OS, Amazon Silk, and the Android Chrome web-view component companies like Twitter can use to build a browser into an application.

The latter is the part that has Microsoft interested. Google started the Chromium project and has done a lot of work to make it easy for anyone to download the source code, modify it as they see fit, and create their own product. Chromium can be used to build any type of browser, like a file manager, photo gallery or a web browser. The company building the final product can change anything it likes in the code and use any parts of it. Having this ready-made and working base code means that Microsoft doesn't have to spend several years and several billion dollars to build itself.

It doesn't mean that Google is in your web browser once Microsoft uses the Chromium source code to make the new and improved Edge.

Chrome vs. Chromium vs. Edge

The Chromium code can be used as-is and built into a familiar looking web browser, but it's very different than the Chrome web browser. The basics are present in both: the design of the interface, the Blink rendering engine, and the option to synchronize all your user data in Google's cloud. But that's where the similarities end.

Google adds plenty of its own closed source and proprietary pieces into the Chrome browser that Chromium lacks. These options aren't available in Chromium and need to be added by an end user like you or me or by any company using the Chromium source to build its own standalone product. What follows is a list of them.

Media codecs

Chrome includes licensed codecs for AAC, H.264, and MP3 file support. Support for a set of "free" codecs is included, and those are Opus, Theora, Vorbis VP8, VP9, and WAV. Without the proprietary codecs, Chromium can't play a lot of content on the web, including HTML5 videos streamed in the H.264 codec and web media mostly sucks.

Adobe Flash Player

Flash content isn't dead, and the Chrome web browser includes a sandboxed API (the Pepper API also known as PPAPI) that gets constant security updates to play it in the browser window. A Flash player is not free. Anything not free isn't included in the Chromium source.

Background updates

Chrome has a mechanic to automatically update with patches for web exploits and new features the same as Microsoft does for Windows. Chromium lacks this.

Automatic security sandboxing

Chromium includes a sandbox that prevents any type of code from making any changes to any files outside of its own. That means malware ads can't change your settings or get into your address book. But in Chromium, it can be disabled. Google's Chrome web browser enforces the sandbox and won't run without nagging you that it's not fully functional.

Extension install policies

Chrome only allows extensions hosted at the Chrome Web Store to be installed unless you enter developer mode. Chromium has no such mechanic and can install a properly built extension from anywhere.

Error logging and reporting

Chrome has an option to automatically send crash reports to Google and Chromium doesn't.

Microsoft won't be trying to build Google Chrome. It's going to use the Chromium source to make Edge into a better browser, especially for ARM tablets and laptops. That means it will have to supply any of the above tools and options itself. Microsoft certainly will, too. And it will not use some of the tools Chromium includes, like synchronization of user data through the Google cloud. Edge is Microsoft's product and will sync through your Microsoft account, and Chromium can be built with that option included because it's open source. All of Edge's current features could be built into Chromium as well as any new features for always-connected tablets and laptops that Microsoft develops.

Amazon's Silk browser is a perfect example of this. Amazon uses Chromium as a base for its browser for Fire OS devices like Kindle tablets or the Echo Show, but it includes plenty of Amazon-centric options like sync and casting to Fire TV devices. Chromium did a lot of the hard work for things like page rendering and tabbed browsing but Amazon ditched much of the rest and built it into a product of its own. That's what Microsoft will do.

Chromium is more than just Google

Chromium was started by Google in 2008 and is maintained by Google, but it isn't the only company that helps make it. Anyone can contribute, and plenty of other companies you'll recognize have helped turn it into a stable and lightweight (yes, this isn't Chrome and is a lot less resource-intensive) tabbed browsing shell for the web and more. Code for Chromium comes from these companies as well as Google:

  • Samsung.
  • Intel.
  • NVIDIA.
  • Adobe.
  • Opera.
  • Motorola.
  • Microsoft.

Microsoft is a new addition, but it will have a big impact in the very near future, especially when it comes to ARM64 versions. Microsoft and Qualcomm have staked their future on ARM64, and that means plenty of attention will go towards Windows applications for the architecture. Like Edge, and that means Chromium.

Microsoft doesn't have to contribute its changes to Chromium. Amazon doesn't. But I'm almost certain that Microsoft will because it makes sense. One good idea gets better when other really smart people can keep working on it. Why not have the amazing developers at companies like Intel or Samsung improve the things you have implemented, right? That can only happen if Microsoft sends its code changes back upstream to the Chromium source.

It's not all roses in Chromium land

On the surface, it looks like Microsoft leveraging Chromium to improve Edge (for the technophiles out there, Microsoft probably just wants to swap EdgeHTML and Chakra for Blink and V8) is great. But it's not going to fix everything.

One not-so-positive bit of fallout is that Firefox and Safari are now the only browsers with measurable numbers that aren't built with the Blink rendering engine. When you look at market share, especially if you're a web developer, that means almost everyone on the planet that can use the web is using Chromium's Blink rendering engine to do it. If you had to develop a web application that didn't render the same using Mozilla's Gecko engine as it does with Blink, you would be crazy to not make the changes for it to run better on the version with 2 billion more users.

In a posting on GitHub, Microsoft said it will try to prevent Blink (and by default Chromium and Google) from taking over the web by essentially having veto powers on web standards. From Microsoft:

We believe the evolution of the open web is best served through the standards communities, and the open web benefits from open debate from a wide variety of perspectives. We will remain deeply and vigorously engaged in the standards discussions in the context of the W3C, ECMA and the WHATWG where the perspectives of vendors developing competing browsers and the larger web community can be heard and considered.

Microsoft has come a long way since its "embrace, extend, and extinguish" days of the early 2000s. If it follows through with its promise to remember that Google shouldn't hold the keys to the web and web standards, that means everyone benefits.

I'm hopeful that will be the case ... even if Mozilla CEO Chris Beard isn't.

How to do a clean installation of Windows 10

$
0
0

If you need to reinstall, upgrade, or set up a new device with Windows 10, a clean installation is your best choice – Here's why and how to do it.

On Windows 10, a clean installation is the best option to remove everything from the hard drive and start from scratch when your device is having performance and other issues. Using this process, you can quickly resolve startup and shut down problems as well as memory usage and apps issues. In addition, you can quickly get rid of viruses and other types of malware, fix system corruption and improve battery life.

If you're upgrading from a previous version, a clean installation is also a good method to install the new version. Although there are several ways to upgrade, they usually don't work correctly, and they may bring unwanted settings, files, and apps to the new installation.

It's also a useful choice to start fresh with a copy of Windows 10 on a new hard drive that you just replaced, or to set up a new device that came pre-installed with a lot of bloatware.

In this Windows 10 guide, we'll walk you through the steps to properly prepare and perform a clean installation, whether you're upgrading to the latest version of Windows 10 (October 2018 Update), or you're moving from a previous version, including from Windows 8.1 or Windows 7.

Update December 6, 2018: We've updated this article with the latest information for the Windows 10 October 2018 Update.

How to prepare a device before installation

Although the installation isn't a complicated process, there are a number of steps you want to follow for a smooth and successful installation, including backing up your files, downloading essential drivers, making sure that your device can boot from USB, and more.

Backing up your device and data

The installation process will delete everything on the primary hard drive of your computer, as such it's a good idea to create a backup of your files before proceeding.

You can do this by making sure to upload your files to OneDrive or to the cloud storage service that you prefer. Or you can simply copy the files that you want to restore in the new installation to an external storage.

To make a backup of your files, connect an external removable drive, and use these steps:

  1. Open Internet Explorer.
  2. Click on This PC from the left pane.
  3. Browse to the following path:

    C:\Users

  4. Right-click the user folder you want to backup and select the Copy option.

  5. Browse to the location of the removable storage.
  6. Right-click the select the Paste option.

Once you've completed the steps, if you're sharing your device with multiple people, repeat step No. 4, 5, and 6 to copy the remaining folders to the external storage.

Also, make a note of the apps you have installed, and make sure to have the product keys to reinstall them again (if applicable).

If you're not already saving your passwords and bookmarks in the cloud, it's a good idea to export your web browser links and online services credentials as well.

Downloading device drivers

While the setup process does a pretty good job detecting and installing the necessary drivers, you also want to download the latest drivers for devices, such as for your graphics card, wireless, and Ethernet adapter in case they may not get detected.

You can use this guide to install device drivers on Windows 10.

Also, here's a list with some of the most common computer manufacturer's support websites to download the latest drivers:

Knowing Windows 10 system requirements

If you're trying to upgrade an older version of Windows 10, it's likely that the new release will be compatible with your hardware. However, if you're trying to install Windows 10 on a computer running Windows 8.1, Windows 7, Vista, or XP, you need to make sure that your device meets the minimum hardware requirements.

Windows 10 minimum hardware requirements are as follows:

  • Processor: 1GHz or SoC (System on a Chip).
  • Memory: 1GB for 32-bit or 2GB for 64-bit.
  • Storage: 16GB for 32-bit or 20GB for 64-bit.
  • Graphics card: DirectX 9 or later with WDDM 1.0 driver.
  • Display: 800x600.

An internet connection is also recommended, but not a requirement to download and install updates. However, if you're using Windows 10 on S mode, you'll need an internet connection to complete the out-of-box experience (OOBE).

Checking Windows 10 activation

If you're trying to install a feature update or start fresh with a clean installation on a device that's already running Windows 10, you don't need to re-enter a product key during the setup. Windows 10 will re-activate automatically using an internet connection after the installation.

However, your device will re-activate only if it was previously properly activated. You can use these steps to confirm that your copy of Windows 10 is activated:

  1. Open Settings.
  2. Click on Update & Security.
  3. Click on Activation.
  4. Under the "Windows" section, confirm that your license is activated.

Getting a product key

In the case that you're planning to install the OS on a new device or trying to upgrade an old version, such as Windows 8.1 or Windows 7, you'll need a genuine product key, which you can purchase from the Microsoft Store using the links below:

In the past, you're able to upgrade to Windows 10 using an existing Windows 8.1 and Windows 7 license, but the promotion officially ended in 2016. However, some users are still able to activate their installation using old product keys.

While it's not guaranteed that it'll work, if you want to give this a try, you'll need to find your product key. Usually, you can find it on the sticker attached at the bottom of your laptop or the back of the desktop tower. Alternatively, you can use tools like Enchanted Keyfinder Tool to retrieve the activation key from your current setup. (This is a free third-party tool that you can use at your own risk.)

Configuring correct boot order

To use a USB installation media to do a clean install of Windows 10, you'll have to make sure that your device can start from a USB device. This means that you'll need to access the Basic Input/Output System (BIOS) or Unified Extensible Firmware Interface (UEFI) firmware on your motherboard to change the boot order.

This process typically requires hitting one of the function keys (F1, F2, F3, F10, or F12), the ESC, or Delete key as soon as you start your device. However, these settings will vary by manufacturer, and even by computer model. So make sure to check your PC manufacturer's support website for more specific instructions.

Inside the BIOS interface, look for the Boot menu, and configure the boot order to start from the USB drive that includes the installation files, and save the new changes (usually using the F10 key).

In the case that your device has a UEFI firmware, then the steps to change the boot order will be different as well.

On Windows 10, you need to use these steps to access the UEFI firmware:

  1. Open Settings.
  2. Click on Update & Security.
  3. Click on Recovery.
  4. Under "Advanced Startup," click the Restart now button.

  5. Click the Troubleshoot option.

  6. Click on Advanced options.

  7. Click the UEFI Firmware Settings option.

  8. Click the Restart button.

On Windows 8.1, you have to use these steps:

  1. Open PC Settings.
  2. Click on Update and recovery.
  3. Click on Recovery.
  4. Under "Advanced Startup," click the Restart now button.

  5. Click the Troubleshoot option.

  6. Click on Advanced options.

  7. Click the UEFI Firmware Settings option.

  8. Click the Restart button.

Once you're in the UEFI firmware interface, look for the Boot menu, and make sure to change the boot order to start with the USB drive that includes the installation files, and save the settings.

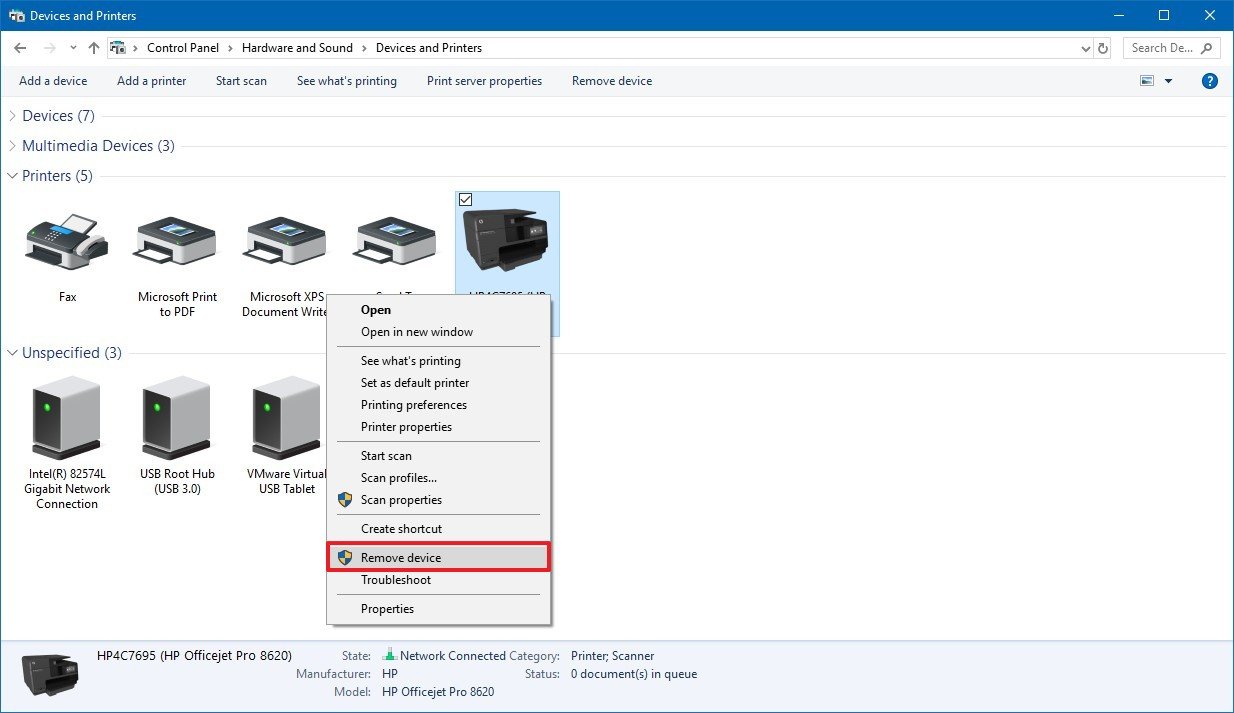
Disconnecting non-essential peripherals

Peripherals connected to your computer are often the reason for problems during installation. Before proceeding with the clean installation of Windows 10, make sure to disconnect non-essential peripherals, including removable drives, Bluetooth and USB devices, SD cards, printers, scanners, and others. You only need a monitor, keyboard and mouse, and an internet connection. After the process, you can reconnect your peripherals.

How to create a USB bootable media of Windows 10

To perform a clean installation of Windows 10, you'll need a USB bootable media, which you can create using the Media Creation Tool or third-party tools like Rufus.

Creating a USB bootable media using Media Creation Tool

To create a bootable installation media using the Microsoft Media Creation Tool, connect a USB flash drive of at least 8GB, and use these steps:

  1. Open the Windows 10 download page on your web browser.
  2. Click the Download tool now button.

  3. Save the file on your computer.
  4. Double-click the file to launch the Media Creation Tool.
  5. Click the Accept button to agree to the licensing agreement.
  6. Select the Create installation media (USB flash drive, DVD, or ISO file) for another PC option.

  7. Click the Next button.
  8. If you're downloading the files on the device that you're about to perform a clean install, the tool will detect the required configuration automatically. If you're not, clear the Use the recommended options for this PC option, and select the correct settings to override the default selections.

    • Quick Tip: If you're planning to use the USB bootable media on multiple devices, on "Architecture," select the Both option to download the 32-bit and 64-bit versions. (This may require a USB flash drive with a larger capacity.)
  9. Click the Next button.
  10. Select the USB flash drive option.

  11. Select the USB drive that you want to make bootable.

  12. Click the Next button.
  13. Click the Finish button.

Once you've completed the steps, you can use the USB flash drive to perform a clean install of Windows 10 on any device that meets the minimum hardware requirements.

Using ISO to create a bootable media using Rufus

If the Media Creation Tool option isn't working, you can also download the Windows 10 ISO file from a different source and use the Rufus tool to create an installation media with UEFI support.

To create a USB bootable media connect a USB flash drive to your computer, and use these steps:

  1. Open the official Rufus web page.
  2. Under "Download," click the latest release link of the tool.

  3. Double-click the Rufus-x.x.exe file to launch the tool.
  4. Under "Device," select the USB drive with at least 4GB of space.
  5. Under "Boot selection," click the Select button on the right.

  6. Browse to the folder with the Windows 10 ISO file.
  7. Select the image.
  8. Click the Open button.
  9. Under "Image option," select the Standard Windows installation option.
  10. Under "Partition scheme and target system type," select the GPT option.
  11. Under "Target system," select the UEFI (non CSM) option.
  12. Under "Volume label," enter a descriptive name for the drive. For Example, "win10_install_drive."
  13. Under "File system" and "Cluster size," leave the default settings.
  14. Click the Show advanced format options button, and make sure that "Quick format" and "Create extended label and icon files" options are selected.
  15. Click the Start button.
  16. Click the OK button to confirm that the USB flash drive will be wiped out.

After completing the steps, Rufus will create a Windows 10 installation media with support for systems using UEFI.

How to perform a clean installation of Windows 10

Once you've created the bootable media, connect the USB drive to your computer, and follow these steps to perform a clean installation of Windows 10.

Warning: This is a friendly reminder that this process will erase everything on your device. It's recommended to make a full backup of your PC before proceeding.

Installing Windows 10

To start fresh with a clean copy of Windows 10, use these steps:

  1. Start your device with the USB bootable media.
  2. On "Windows Setup," click Next to begin the process.

  3. Click the Install Now button.

  4. If you're installing Windows 10 for the first time or upgrading an old version, you must enter a genuine product key. However, if you're reinstalling Windows 10, you can click the I don't have a product key option to continue (assuming that your computer was already activated).

  5. (If applicable) Select the edition of Windows 10. This selection must match the edition your product key activates.
  6. Click the Next button.
  7. Select the I accept the license terms to agree option to continue.

  8. Click the Next button.
  9. Click on the Custom: Install Windows only (Advanced) option.

  10. Select the partition with the current installation of Windows (usually "Drive 0"), and click the Delete button to remove it from the hard drive.

    Quick Tip: If you have multiple partitions, on the primary hard drive (Drive 0), you can select and delete each of the partitions to allow the setup to use the entire drive for the installation. Windows 10 will create the required partitions automatically during the installation. If you have multiple hard drives, you don't need to delete those partitions.

  11. Click the Yes button to confirm the deletion.
  12. Select the empty drive (Drive 0 Unallocated Space).

  13. Click the Next button.

Once you've completed the steps, the setup will proceed to install Windows 10 on your device.

Completing out-of-box experience (OOBE)

After the installation, you need to complete the out-of-box experience to finish creating a new account and setting up your environment.

In this guide, we're using the OOBE available with the October 2018 Update (version 1809), but depending on the version that you're installing this setup may be a little different.

  1. Select your Region.
  2. Click the Yes button.

  3. Select your keyboard layout.
  4. Click the Yes button.

  5. Click the Skip button, unless you need to add a second keyboard layout.

  6. Click the Set up for personal use option.

  7. Type your Microsoft account information.

    Quick Tip: If you don't want to use a Microsoft account, click the Offline account option at the bottom left corner to create a traditional local account.

  8. Click the Next button.
  9. Type your Microsoft account password.

  10. Click the Next button.
  11. Click the Create PIN button to set up a PIN to unlock your device.

    Quick Tip: If you prefer to use a traditional password, click the Create PIN button, and then click the Cancel button to skip the process.

  12. Create your new four-digit PIN. (If you want to create a complex PIN, you can check the Include letters and symbols option.)
  13. Click the OK button.

  14. (Optional) You can enter your phone number and then click the Send button to link your phone with your device, but this is a feature that you can set up some other time. If you want to skip this option (recommended), click the Do it later button in the bottom left corner of the screen.

  15. Click the Next button to set up OneDrive. If you're not interested in using this cloud storage service, click the Only save files to this PC option in the bottom left corner of the screen.

  16. (Optional) Select the Let Cortana respond to "Hey Cortana" option.
  17. Click the Accept option to allow Cortana personalized your experience. (If you click the Decline button, Cortana will still be available on the taskbar, but it won't collect information about you.)

  18. (Optional) If you want to enable Timeline to access your activity history across devices, click the Yes button. Otherwise, click the No button. Using this option, you'll still be able to access your timeline, but it'll only show four days of activities, and your activities will not sync across devices.

  19. Choose the privacy settings that you like to use with Windows 10. (And don't forget to scroll down the page to review all settings.)

  20. Click the Accept button.

Once you've completed the steps, your settings will apply to the installation, and then you'll be directed to the desktop.

After installation tasks

After the installation, there are a few tasks left to do.

First, you want to confirm that you're running an activated copy of Windows 10:

  1. Open Settings.
  2. Click on Update & Security.
  3. Click on Activation.
  4. Confirm that Windows 10 is activated.

If you're having activation problems, you can use the Activation Troubleshooter to re-activate.

Install the latest cumulative updates:

  1. Open Settings.
  2. Click on Update & Security.
  3. Click on Windows Update.
  4. Click the Check for updates button.

Confirm that all the device drivers have been recognized and installed correctly.

  1. Open Start.
  2. Search for Device Manager, click the top result to open the experience.

While in Device Manager, if none of the branches are expanded revealing a device with a yellow or red mark, then you're in the clear. In the case that there's a problem, make sure to download and install the latest driver available through your device manufacturer.

You can refer to this guide to properly install device drivers on Windows 10.

Also, don't forget to install the apps you need to get the work done on your device, including Google Chrome or Mozilla Firefox, Office apps, Spotify or iTunes, and others.

If you created a backup of your files, now it's a good time to re-connect the drive and restore the files to your account folders. (You can quickly open your account folders using the Windows key + R keyboard shortcut, using this path %HOMEPATH% and clicking the OK button.)

Wrapping things up

Although on supported systems, you can use the Media Creation Tool to start fresh with a clean copy of Windows 10, there are some differences, limitations, and more chances to come across problems. If you want to perform a truly clean installation, using the bootable media route is perhaps your best option.

On devices already running Windows 10, you may be able to save some steps when installing a new release using Windows Update or the Update Assistant, or even using the reset option when you're troubleshooting problems. However, sometimes, using these options, you're more likely to see compatibility and other issues that may even block the installation. When you use a bootable media, you'll significantly reduce the number of problems.

More Windows 10 resources

For more helpful articles, coverage, and answers to common questions about Windows 10, visit the following resources:

Missing Office features? Your apps may need an update. Here's how to do it.

$
0
0

Not sure if you're running the latest version of Office? Here's how to check, install, and verify whether you're using the latest version of Office 365 or Office 2019.

Although if you ask around, anyone will say that if you're using the Office 365 apps, then you're running the most up-to-date version of Office that Microsoft has to offer, you may still be missing out on new features and improvements if your device hasn't received the latest update.

Microsoft updates its Office apps on a regular basis, and even though updates should download and install automatically, it doesn't necessarily mean that you'll receive updates as soon as they become available. Also, if it happens that the automatic update service has been disabled, there's no way for your device to grab those new fixes and improvements.

Fortunately, whether you're using an Office 365 subscription or the one-time purchase version of the apps, such as Office 2019, you can make sure that your device is running the most up-to-date version with just a few clicks.

In this Windows 10 guide, we'll walk you through the steps to manually install updates for Office apps. In addition, we'll outline the steps to enable the update service is currently disabled, and the steps to make sure that you're running the latest version whether you're using Office 365 or Office 2019.

How to update Office apps on Windows 10

To update the suite of Office apps to the latest version, use these steps:

Note: The interface may look a slightly different depending on the version of Office that you're running, but the steps are the same.

  1. Open an Office app. For example, Word.
  2. Create a new blank document.
  3. Click on File.
  4. Click on Account.
  5. On the right side, click the Update Options menu.
  6. Click the Update Now option.

  7. Continue with the on-screen directions to apply new updates (if applicable).

Once you've completed the steps, Office will download and install any available update for your apps.

Enabling updates for Office

If you don't see the option to update Office, use these steps to enable the service:

  1. Open an Office app. For example, Word.
  2. Create a new blank document.
  3. Click on File.
  4. Click on Account.
  5. On the right side, click the Update Options menu.
  6. Click the Enable updates option.

After completing the steps, use the above steps to check, download, and install updates.

Checking the latest version of Office

To make sure that you're running the latest version of Office, use these steps:

  1. Open an Office app, such as Word.
  2. Create a new blank document.
  3. Click on File.
  4. Click on Account.
  5. On the right side, check the version information under About Word.

If you have an Office 365 Personal or Home subscription, the version number of your installation should match the number in this Office support website to confirm that you're using the latest release.

In the case that you're using Office 365 ProPlus (commercial), the version number of your installation should match the number in this Office support website. However, the number will be different depending on the release channel that you're using, which can include "Monthly,""Semi-Annual (Targeted)," or "Semi-Annual." (The channel information is also specified in the "About Word" section of the app.)

If you're using Office 2019 (the one-time purchase option), the version number of your installation should match the number in this Office support website. (The information, should be under "Retail versions of Office 2019.")

You can use these steps to update apps available through Office 365, Office 2019, 2016, and older versions. The only difference is that updating Office 365 apps will sometimes include new features and significant improvements along with security patches, while updates for the standalone version of Office (2019, 2016, 2013) will only include security and maintenance fixes.

See at Microsoft

More Windows 10 resources

For more helpful articles, coverage, and answers to common questions about Windows 10, visit the following resources:

This is what you should do first on your Synology NAS

$
0
0

Synology DS119j

Here's what to do when setting up your new Synology NAS.

When buying prebuilt Synology Network Attached Storage, you're also acquiring a license to the manufacturer's OS, DiskStation Manager. Much like a new installation of Windows 10, there are a number of steps you should take after setting everything up to ensure you're going to have a great NAS experience. Here are some handy tips to get you started in DiskStation Manager.

Synology QuickConnect

Synology DSM

Synology has a feature called QuickConnect, which allows you to connect to the NAS at home without using any IP addresses. The servers at Synology will communicate with your NAS through a Synology account, allowing you to maintain a connection even if your ISP refreshes your external IP. It's also super-easy to locate it on the local network if you need to connect a new device to the NAS.

Setting up QuickConnect is simple too. It's part of the initial Synology NAS installation process but is an optional step. If you failed to set it up during the installation of your NAS, simply open up the Control Panel and choose "QuickConnect." You'll then need to enable the service, create a Synology account and give the NAS a name. The handy wizard will walk you through the few steps.

Ultimate power

Synology DSM

Like most electronic devices, a Synology NAS allows you to manage power settings, configuring when the NAS will wake up from hibernation, how bright LEDs are, and how aggressive the fan(s) spin to keep the internals cool. Everything can be manipulated on a single screen, which makes doing so an absolute breeze.

Fire up the Control Panel and select "Hardware & Power." Next, you'll be greeted by four tabs worth of settings.

General

General contains the following:

  • Power Recovery— Set whether the NAS should auto-start on power failure or LAN activity.
  • Beep Control— Decide when the NAS will perform a system audio sound.
  • Fan Speed— Configure how quiet you wish the fan(s) to operate.
  • LED Brightness— Set just how bright (or dim) the LEDs are for status indicators.

Power Schedule

Power schedules allow you to set just when the NAS will startup or shutdown. This is handy if you use the NAS in an office or at home and only require access at certain parts of the day. For example, you could set power schedules so the NAS would boot up at 7 a.m. and then shut down at 6 p.m. This not only saves on wear and tear but also power.

HDD Hibernation

Hibernating your drives is a great decision if you don't require drive access all the time, but don't fancy having the entire system shut down to save power. Not only can you configure internal drives to go to sleep after a certain time of inactivity, but also external HDDs too.

Note that some apps and services you run on the NAS will override these settings and not allow your HDDs to hibernate. Plex is one such service.

UPS

Should you have an uninterruptable power supply (UPS), Synology allows you to hook up the NAS to a UPS via USB to have it continue operation or perform a safe shut down should a power loss occur.

Glorious mobile apps

Synology DSM

Synology has a collection of mobile apps available for Android and iOS. Depending on what you wish to do, you can access files, photos, stream music, check surveillance cameras, and more. One great ability with the NAS and a smartphone is the automatic upload of all your photos — just like you can on OneDrive and Google Drive.

How to backup your mobile photos

Backup Windows 10

Synology DS218+

Backing up your Windows 10 installation regularly is a good practice. In fact, it's such a great idea that we highly recommend everyone does it. Even we have those odd times when Windows corrupts itself and requires a fresh install. You'll run the risk of losing everything if you don't have a backup at hand.

Synology NAS allows you to configure Windows 10 PCs to send backups to the central device. If you have multiple computers at home or in the office, you have safely store all backups on the single NAS. Sure, you can use discs or external HDDs, but having the process automated with a NAS is much more convenient.

How to backup Windows 10 to Synology NAS

More on Synology


How to turn off Xbox One video autoplay in Microsoft Store

$
0
0

Disabling video autoplay in the Microsoft Store can mean faster, distraction-free browsing.

The Xbox One's integrated Microsoft Store has undergone substantial changes since launch, recently bringing a full facelift to the console's digital marketplace. Updates have brought automatic video playback across store listings, which while a dynamic touch to browsing, can be equally frustrating. From loud trailer music, navigation woes, and slower load times, disabling these might be best for you.

Here's how to disable video autoplay on the Xbox One's digital Microsoft Store.

How to disable Xbox Store video autoplay

Battlefield V Xbox One store listing with video autoplay (left) | Xbox One store listing without video autoplay (right)

If autoplay videos aren't for you, disabling them on Xbox One is a simple switch away. Once disabled, the often-low-quality compressed videos will be replaced with high-resolution banners, meaning smoother and sharper store navigation. Follow the steps below to disable autoplay on the Microsoft Store:

  1. Visit the Xbox One Home menu.
  2. Press RB four times.
  3. Select Deals or open any other store category.

  4. Select the icon in the top right-hand of the screen.
  5. Select Settings.
  6. Toggle the Play videos automatically switch.

Once autoplay videos are disabled, trailers and other media can still be accessed while browsing, further down each listing. To revert this change, follow the above steps, toggling the switch to its "On" state.

Let us know in the comments if you experience smoother browsing after disabling autoplay.

How to enable Rainbow Six Siege two-step verification (2SV)

$
0
0

Why Ubisoft has forced two-step verification in Rainbow Six Siege – and how to enable it today.

Tom Clancy's Rainbow Six Siege is among today's top first-person shooters and it's important you keep your account locked down. For those on PC, Ubisoft provides the ability to further secure accounts beyond a password with the help of two-step verification (2SV). This keeps unwanted visitors out with an additional layer of security.

More importantly for many, Ubisoft has forced 2SV on all Rainbow Six Siege players within the "Ranked" playlist on the platform. Amid growing concerns around cheating, it hopes that enforcing 2SV will improve the state of competitive multiplayer. Here we break down the mentality behind Ubisoft's decision – plus how to enable 2SV for a sweet Thermite skin.

Why Ubisoft is forcing 2SV in Rainbow Six Siege

Thermite's exclusive in-game skin bundle, available exclusively after enabling 2FA.

With cheating becoming a big problem in Rainbow Six Siege, Ubisoft recently outlined its plans to improve its anti-cheat measures. While the existing BattlEye third-party anti-cheat system deters many, PC users have drawn attention to an increasingly growing population of hackers. Documented hacks included the ability to teleport freely and even plant the bomb defuser at spawn. That's not ideal for a game with a growing competitive scene.

Hacking has become more feasible through breached accounts stolen from other players, which can be sold behind the scenes for cheap. Not only does a shady market exist around the practice – it allows hackers to utilize cheats without repurchasing the game each time they're banned. Among several actions being taken, Ubisoft has forced Uplay 2SV on all players using the Ranked PC playlist. By making this mandatory, Ubisoft is targeting the lifeblood of many hackers.

To incentivize two-step verification adoption in Rainbow Six Siege, Ubisoft is also distributing exclusive cosmetic rewards to those enabling the feature. Doing so will bag the "Compatriot" uniform, "Ride or Die" headgear, and "Cyberfriend" weapon skin for Thermite. This skin is currently limited to PC players, even if 2SV is enabled as a console player.

How to enable Rainbow Six Siege two-step verification (2SV)

Enabling 2SV is limited to Ubisoft's account management page. Despite many services allowing phone numbers as authentication methods, Ubisoft limits users to a dedicated app or email address.

Activate 2SV using a phone

Here's how to enable 2SV for Rainbow Six Siege using a mobile device.

  1. Visit Ubisoft's account management page.
  2. Sign-in with your Ubisoft account.
  3. Select the 2-step verification tile.
  4. Scroll down to the 2-step verification subsection.

  5. Select Activate 2-step verification.
  6. Select Google Authenticator.
  7. Select Choose. Ubisoft will send an email to the email address associated with your account.
  8. Open the email from Ubisoft.
  9. Open the provided link to start the two-step verification process.
  10. Sign-in with your Ubisoft account again.
  11. Click Continue when prompted to download Google Authenticator.
  12. Download Google Authenticator via the App Store for iOS or Google Play for Android. Other authentication apps can also be used.
  13. Open Google Authenticator.

  14. Select Begin setup.
  15. Scan the QR code displayed on the Ubisoft website. Alternatively, the manual code can be entered.
  16. Click Continue.
  17. Enter the numerical code displayed on Google Authenticator when prompted.
  18. Click Continue. Six recovery codes should now be displayed on-screen.
  19. Securely store the recovery codes for future reference. If you have issues accessing the app, these six codes can be used to access your account.

Activate 2SV using an email address

Here's how to enable 2SV for Rainbow Six Siege using an email address.

  1. Visit Ubisoft's account management page.
  2. Sign-in with your Ubisoft account.
  3. Select the 2-step verification tile.
  4. Scroll down to the 2-step verification subsection.

  5. Select Activate 2-step verification.
  6. Select Email.
  7. Select Choose. Ubisoft will send an email to the email address associated with your account.
  8. Open the email from Ubisoft.
  9. Enter the provided code.
  10. Select Submit to complete the two-step verification process.

After completing these steps, the exclusive Thermite skin should appear in-game shortly.

See at AmazonSee at Green Man Gaming

Check out Windows Central's Rainbow Six Siege hub for in-depth coverage of upcoming content, latest updates, and tips to improve your gameplay.

Updated December 11, 2018: Updated following the implementation of forced 2SV for ranked play.

External drive won't show up on Windows 10? Here's the fix.

$
0
0

If your PC isn't detecting an external hard drive, use this guide to resolve the issue.

On Windows 10, you usually only need to connect an external drive to your computer and wait until it appears automatically in File Explorer to start using it. But it's not always a straightforward process.

Sometimes, for unknown reasons that could be related to your connection, driver, settings, or hardware issues, Windows 10 will just refuse to detect the external drive, or it'll detect the device, but it won't appear in File Explorer.

If you're trying to set up a new external hard drive, or you want to use a storage device previously connected to another computer, but it won't show up, there are a number of troubleshooting steps you can follow to resolve most common problems.

In this Windows 10 guide, we walk you through the steps to fix most issues when your computer won't detect an external hard drive.

How to fix problems with an external drive on Windows 10

The instructions outlined below should help to overcome most problems, whether you're trying to connect a traditional rotating platter hard drive, solid-state drive (SSD), or flash drive using a USB interface.

Fixing drive connection

A bad physical connection is among the most common problems that could block Windows 10 from detecting the external drive.

Although most small drives and pretty much every flash drive don't require a dedicated power connection, if you're connecting a large external hard drive, you need to make sure that it's plugged into a working power outlet.

On small and large drives, sometimes the problem can be the USB cable. The cable could be damaged, or you're probably trying to use the wrong cable. If your computer isn't recognizing the storage, make sure to use a good data cable.

If the USB and power cables are working, you'll hear the hard drive spinning, and you'll notice a light indicator.

Sometimes the problem can be the USB hub as these devices can introduce compatibility and power management issues. If you're connecting multiple peripherals using a hub, connect the drive directly into one of the other ports available on your computer. In the case that you're out of ports, disconnect the USB hub and plug the removable drive in directly to see if Windows 10 detects it.

It can also be the case that the problem is a dead USB port on your computer. You can quickly find out if there's a port problem by unplugging the drive and using a different port on the same or another computer.

If you've already tried the above recommendations, and you're still unable to use the drive. You can try resetting the connection by shutting down your computer and unplugging the external drive, then after one minute, turn on your computer and reconnect the drive.

Alternatively, you can try connecting the drive to a different computer, but if this isn't working, there's a good chance the drive or controller is dead.

Fixing drive letter

If you know that the drive is working correctly, but it won't show up in File Explorer, the drive could be trying to use a letter already in use by another device or the drive letter may be missing.

Resolving letter conflict

A drive letter conflict is a common problem with removable devices, and you can fix this issue with these steps:

  1. Open Start.
  2. Search for Create and format hard disk partitions.
  3. Click on the top result to open Disk Management.
  4. If the drive is trying to use an existing drive letter, right-click the volume and select the Change Drive Letter and Paths option.

  5. Click the Change button.

  6. Select the Assign the following drive letter option.
  7. Use the drop-down menu from the right and select any of the available letters.

    Quick Tip: When assigning a drive letter manually, it's good practice to use the last letter available to avoid future conflicts with automatic assignments.

  8. Click the OK button.
  9. If you receive a warning message, click the Yes button.

Immediately after assigning the new letter the external drive should appear in File Explorer.

Resolving letter missing

Unless you're mounting the drive as a folder, it'll require a letter to be accessible from File Explorer.

If the letter is missing from the drive, you can assign a new one using these steps:

  1. Open Start.
  2. Search for Create and format hard disk partitions.
  3. Click on the top result to open Disk Management.
  4. If the drive doesn't have a drive letter next to the name, right-click the volume and select the Change Drive Letter and Paths option.

  5. Click the Add button.
  6. Select the Assign the following drive letter option.
  7. Use the drop-down menu from the right and select any of the available letters.

  8. Click the OK button.

After completing these steps, the storage should be accessible in File Explorer.

Fixing drive without a partition

If you're connecting a new drive, it'll probably look as if it wasn't detected, because it doesn't have a partition properly configured.

To create a volume with a new partition and file system, use these steps:

  1. Open Start.
  2. Search for Create and format hard disk partitions.
  3. Click on the top result to open Disk Management.
  4. If the external drive doesn't have a partition, right-click the "Unallocated" space, and select the New Simple Volume option.

  5. Click the Next button.
  6. Click the Next button again.

  7. Select the Assign the following drive letter option.
  8. Use the drop-down menu from the right and select any of the available letters.

  9. Click the Next button.
  10. Select the Format this volume with the following settings option.
  11. Use the default settings, including:

    • File system — NTFS.
    • Allocation unit size — Default.
  12. Under "Volume label," enter a descriptive name for the drive.
  13. Check the Perform a quick format option.

  14. Click the Next button.
  15. Click the Finish button.

Once you complete the steps, the system will proceed to create a new volume with a partition and a drive letter.

Fixing drive with an unsupported file system

Windows 10 only recognizes drives using a supported file system (NTFS, FAT32, exFAT, or ReFS). If you're connecting a drive formatted using a different OS (macOS or Linux) with an unsupported file system, it won't appear on your computer. In this case, the solution is to format the drive using a supported file system.

Warning: Using this process will erase everything on the drive. If you have any data that you want to keep, make sure to connect it to a supported device, extract the data, and only then continue with the steps below.

To format a drive with a supported file system, use these steps:

  1. Open Start.
  2. Search for Create and format hard disk partitions.
  3. Click on the top result to open Disk Management.
  4. Right-click the drive with the unsupported file system, and select the Format option.

  5. Under "Volume label," select a name for the drive.
  6. Use the default settings, including:

    • File system — NTFS.
    • Allocation unit size — Default.
  7. Check the Perform a quick format option.

  8. Click the OK button.

After completing these steps, the drive will be formatted with a supported file system, and it should be available through File Explorer.

Fixing drive not initialized

Sometimes, when connecting an external drive that has never been initialized and formatted, or you're using it on another computer, Windows 10 may not detect the drive correctly. Also, it'll show up in Disk Management as "Unknown" and "Not Initialized." Typically, this problem will happen more often when installing an internal hard drive originally from another computer, but it can happen to portable hard drives.

If this is the case, you can quickly initialize the drive using these steps:

  1. Open Start.
  2. Search for Create and format hard disk partitions.
  3. Click on the top result to open Disk Management.
  4. If the drive appears "Unknown" and "Not Initialized," right-click it, and select the Initialize Disk option.

  5. Select the drive (if it's not already selected).
  6. Select the MBR (Master Boot Record) option.

  7. Click the OK button.

If the disk is initialized but it appears with "Unallocated" space, use these steps to create a volume, format, and assign a drive letter:

  1. Right-click the "Unallocated" space, and select the New Simple Volume option.

  2. Click the Next button.
  3. Click the Next button again.

  4. Select the Assign the following drive letter option.
  5. Use the drop-down menu from the right and select any of the available letters.

  6. Click the Next button.
  7. Select the Format this volume with the following settings option.
  8. Use the default settings, including:

    • File system — NTFS.
    • Allocation unit size — Default.
  9. Under "Volume label," enter a descriptive name for the drive.
  10. Check the Perform a quick format option.

  11. Click the Next button.
  12. Click the Finish button.

Once you complete these steps, the drive should be accessible from File Explorer.

Fixing drive offline

If your drive won't show up in File Explorer, and it appears as "Offline" in Disk Management, you can use the following steps to fix the issue:

  1. Open Start.
  2. Search for Create and format hard disk partitions.
  3. Click on the top result to open Disk Management.
  4. If the drive appears "Offline," right-click it, and select the Online option.

After completing the steps, you should be able to start using the storage as usual. If you can't get the storage online, and it was recently available, that could mean the drive is corrupted, disconnected, or it's not getting power.

Fixing drive status unreadable

If Windows 10 doesn't detect the drive correctly, and it appears in Disk Management with the Unreadable status, you're experiencing read and write errors, corruption, or hardware failure.

In the case that you already tried the recommendations to address connection, initialization, and formatting issues, it could mean hardware failure, in which case you should consider getting a new drive.

Fixing driver issues

When the drive isn't available on your computer, it could also be a driver issue. You can troubleshoot and fix this problem in at least two ways. You can install the most up-to-date driver available, or you can reinstall the same driver to see if it helps the computer detect the drive.

Updating device drivers

If Device Manager shows a yellow or red mark on the external drive, it's likely that this is a driver problem.

To install the latest driver, use these steps:

  1. Open Start.
  2. Search for Device Manager and click the top result to open the experience.
  3. Expand the Disk drives branch.
  4. Right-click the external drive with the problem and click the Update driver option.

  5. Click the Search automatically for updated driver software option.

After completing these steps, if Windows Update detects that your device is using an older version of the driver, it'll download and install the most up-to-date driver available.

In the case that no newer updates are available, you can also check your storage manufacturer support website to find out if they have a newer driver available for download. Also, make sure to follow their instructions to install the driver correctly.

Reinstalling device driver

If you're still having issues, sometimes removing and reinstalling the driver could help to detect the external drive on your computer.

  1. Open Start.
  2. Search for Device Manager.
  3. Click the top result to open the experience.
  4. Expand the Disk drives branch.
  5. Right-click the external drive with the problem, click the Uninstall device option.

  6. Click the Uninstall button.

  7. Disconnect the removable drive from your device.
  8. Restart your computer.
  9. Reconnect the drive.

Once you've completed these steps, Windows 10 should detect and configure the drive automatically.

Wrapping things up

Although there are a lot of factors that could prevent an external drive from being detected, these solutions should help fix the most common problems. If the drive works after trying these instructions, that's good but remember that drives fail quite often. As such, you should consider this as a reminder to keep an updated backup of your files. (You can always use OneDrive or File History to back up your data.)

If the external drive still doesn't show up on your computer, you're probably dealing with a broken drive, and you should consider getting a new one. If that's the case, check out our picks for the best portable drives available in the market.

More Windows 10 resources

For more helpful articles, coverage, and answers to common questions about Windows 10, visit the following resources:

All the changes included with Windows 10 build 18298

$
0
0

Here's a closer look at the new features and improvements available with Windows 10 build 18298 and build 18290.

Windows 10 build 18298 is now available for download on PCs enrolled in the Fast ring of the Windows Insider program. This is the fifteenth preview that Microsoft releases for the 19H1 development, and even though it's a relatively small update, we're getting a number of features and improvements expected to arrive in the first half of 2019.

This flight brings a couple of tweaks for File Explorer. Using the Settings app, you can now configure a security key. Notepad receives a bunch of welcome improvements. If you use Command Prompt or another console, you can now configure more settings using the new Terminal tab. Build 18298 also unveils a new interface when installing Windows 10 using an ISO, Narrator gets a slew of changes, and a lot more.

Alongside build 18298, Windows 10 build 18290 recently released to testers as well, without significant changes, but with some interesting improvements.

In this Windows 10 guide, we'll take a closer look at the latest changes and improvements coming sometime next year.

Windows 10 build 18298

Here's everything that the Windows team has been working in the last two Insider preview builds for the next version of Windows 10.

Start menu and search

Starting with build 18290, when you click the Power button, you'll notice a new set of icons for Sleep, Shut down, and Restart.

The new iconography also expands to the profile menu, including for Change account settings, Lock, and Sign out options.

When using the Search interface in the taskbar, now there's a new landing page to display your recent activities. In addition, the experience now includes light theme support with the acrylic effect at the top of the page where the filters are located.

Finally, the power button will now show an orange indicator to let you know that a restart is required to apply an update.

Taskbar

The taskbar isn't getting a lot of changes, but the orange indicator will also appear in the notification for the Windows Update icon letting you know that a reboot is pending to apply a cumulative update.

Also, starting with the preview build 18290, when hovering over the microphone icon that appears in the notification area, it now shows the name of the app accessing your microphone. If there is more than one app accessing the mic, you'll see the number of apps accessing the device. Also, if you double-click the icon, you can access the Microphone page in the Settings app.

File Explorer

Windows 10 build 18298, File Explorer is getting a new default icon with a design that aligns with the iconography design that Microsoft has been showing off for its Office apps.

In addition, the "Downloads" folder now has been configured to sort the content to show the most recent downloaded files at the top. While it's a minor adjustment, it's a welcome change that will help users to find content faster as most users don't change the default name of internet files, and then it becomes almost impossible to find them.

Also, using the folders options, it's now possible to select an option to show dates in a conversational format. For example, "12 minutes ago," instead of "12/12/2018 10:58 AM," which makes it harder to understand.

Game bar

If you play games on Windows 10, beginning with build 18298, you're getting an updated version of the Game bar, which introduces a new gallery experience, which allows you to view screenshots and videos without having to step out of the game. And there's even an option to share images directly to your Twitter followers.

Image source: Microsoft

Settings

Windows 10 build 18298 and build 18290 are also bringing several changes to the Settings app.

Colors

On Settings> Personalization, the Colors isn't getting new settings, but with build 18298, the "Transparency effects" option has been updated so that when you turn off the toggle switch, it will also disable the transparency with blur effect in the Sign-in screen.

Accounts

On Settings> Accounts, the Sign-in options page is getting another update with Windows 10 build 18298 to include an option to configure a security key (physical key) that you can use to securely sign in to your account.

To set up a new key, select the "Security Key" option, click the Manage button, and follow the on-screen directions.

Also, you'll notice that the sign-in options now appear at the top of the page, instead of below the "Require sign-in" settings.

Date & Time

On Settings> Time & Language, the Date & time settings page introduces a new option to synchronize your clock with the time server. According to the company, this option will come in handy if the clock goes out of sync, or when the time service has been disabled.

Once you click the Sync now button, you'll notice that the exact time when the clock was successfully updated and the time server that your device is using. (The option was originally introduced with Windows 10 build 18290.)

Cursor & pointer

On Settings> Ease of Access, the Cursor & pointer page now includes a slider to specified the pointer size, and under the "Change pointer color" section, you can now pick the color wheel option to change the color of the pointer. You'll see a list of suggested colors that you can choose, but you can always click the plus (+) button to create a custom color.

Narrator

On Settings> Ease of Access, the Narrator page now includes an option to remove the "Narrator Home" from the "Alt + Tab" list, instead of minimizing the experience in the notification area.

Under the "Change what you hear when reading and interacting" section, there are five new verbosity levels to control the amount of information you hear, and you can now cycle through all them using the Narrator + V shortcut.

By default, the cursor always stays in the place you left it, but now, under the "Use Narrator Cursor" section, you have a new option to have it follow the Narrator cursor with the Move my cursor with the Narrator cursor as Narrator reads text option.

Microphone and Camera

On Settings> Privacy, the Microphone and Camera pages will now show which apps are using your camera or microphone with a "Currently in use" label. (This improvement is available starting with build 18298.)

Delivery Optimization

On Settings> Update & Security, the Deliver Optimization page isn't getting new settings with build 18290, but the feature now supports LEDBAT to prevent congestions and allow peer-to-peer upload traffic to slow down instantly when the network is utilized for higher priority traffic.

Input

In the latest 19H1 preview for Windows 10, the touch keyboard experience is getting an update to help you type faster with more accuracy.

Basically, the on-screen keyboard now can analyze your typing and dynamically adjust the hit target for the keys to accurately predict the key you intend to press.

Image source: Microsoft

Also, there are some new improvements that should help prevent the touch keyboard from getting in the way of a text field.

If you use dictation, the timeout period when dictating has been modified from 5 to 10 seconds.

Accessibility

In a continued effort to make Windows 10 more inclusive, build 18298 introduces additional improvements for Narrator, including a new "Narrator Home" that will appear every time that you start the experience, and it features everything you need to know to use Narrator.

If you want to read aloud the entire link, you can now use the Narrator + 0 shortcut.

Narrator no longer announces "non-selected" in a table when the aria-selected isn't set, when you exit and re-enter a table if reading a single table continuously, or when navigating to a nested table.

You can now use capitalization reading in all reading modes, and you can turn this feature on or off using the Narrator + 4 shortcut.

When viewing web content, the reading and navigation commands will now stay in the page for most browsers. This feature is also available when reading emails with the Mail or Outlook apps.

Starting with Windows 10 build 18298, the Narrator text-reading commands now work to read a full window, and you can have Narrator read groups of keyboard keys when pressed.

Narrator now includes support for combo edit controls, and it'll refer them as "combo edit." In addition, Narrator is available through the entire PIN or password reset process.

Console

Whether you use Command Prompt, PowerShell, Linux Bash, or any other console, Windows 10 build 18298 is introducing a new "Terminal" tab in the properties, which you can use to configure the terminal and cursor colors as well as an option to set the cursor shape and terminal scrolling.

These changes are a work in progress, and you can learn more in this Microsoft support website.

Notepad

Windows 10 build 18298 includes an updated version of Notepad. In this new version, the note-taking app adds support to save files using UTF-8 without a Byte Order Mark, which is simply a character marker at the start of the text stream that can signal pieces of information to the app reading the text. In addition, Notepad is making the new support the new default behavior, and the encoding of the document will now appear in the status bar.

If the text file has unsaved text, you'll now see an asterisk (*) next to the file name in the title bar.

This flight also introduces a few new keyboard shortcuts that you can use with the note-taking app, including:

  • Ctrl + Shift + N — opens a new Notepad window.
  • Ctrl + Shift + S — opens the Save as dialog.
  • Ctrl + W — closes the current Notepad window.

Additionally, the app can now open and save text files with a path longer than 260 characters (MAX_PATH).

Finally, even though, you can just fire up the Feedback Hub, you can now click the Help menu, and select the Send Feedback option to open the Hub to send feedback to Microsoft about Notepad.

Windows 10 Setup

As part of the 19H1 development, Microsoft is also updating the design of the Windows 10 Setup experience with a light background, instead of the purple color. But other than the color and font touches, it seems that everything else will be kept the same.

Wrapping things up

Although we're still many builds away from the final release, we're quickly starting to see how the Windows 10 19H1 update is taking shape with many small incremental improvements rather than significant new features.

If you're planning to install this or other previews, remember that these are not complete versions of Windows 10. As a result, errors, bugs, and things not working are expected occurrences.

As usual, it's recommended to install pre-releases of Windows 10 on a spare machine or virtual machine. In the case that you're thinking of upgrading your main computer, you should create a full backup before the installation if something happens and you need to rollback.

What are your thoughts in the improvements and features included with this flight? Let us know in the comments.

For more helpful articles, coverage, and answers to common questions about Windows 10, visit the following resources:

Is AMD Ryzen 5 2600 a good CPU for Fortnite?

$
0
0

AMD Ryzen 5 2600

Best answer: AMD's Ryzen 5 2600 is an excellent mid-range CPU, perfect for gaming and Fortnite.

Six cores / 12 threads

The number of cores and threads may not mean much, but think of them as a highway. A vehicle is a task assigned to the processor to handle. A core has two threads, which you can consider as highway lanes. Twelve lanes allow you to cram down more vehicles before bottlenecks occur.

Having 12 threads allows the processor to handle multiple tasks at once, ideal for games that support multi-core setups. Fortnite isn't the most multi-core supported game out there, but it doesn't hurt to have the available performance at hand, especially if you play other games and do some work on the side too.

An added bonus with this CPU is the inclusion of a stock cooler that's actually decent enough for keeping the processor within safe operating temperatures without sounding like a jet engine.

Dropping from the bus

Throw in a GTX 1060 or higher GPU with the Ryzen 5 2600 and you'll have an extremely capable gaming rig, all without overclocking. You'll surpass the recommended PC requirements for Fortnite, which include:

  • CPU: Intel Core i5 2.8GHz or AMD equivalent.
  • RAM: 8GB.
  • GPU: NVIDIA GTX 660 or AMD Radeon HD 7870 (DX11 GPU).

Using the AMD Ryzen 5 2600 with a GTX 1060 will allow you to play Fortnite in 1080p at 60 FPS easily. Step it up to a GTX 1070 and you can move to a 1440p monitor with a refresh rate of 144Hz.

AMD Ryzen 5 2600

$160 at Amazon

AMD's impressive mid-range processor

When you have a fair amount to spend on a new desktop processor, look no further than the AMD Ryzen 5 2600. It's a great mid-range processor with six cores, 12 threads, and it works with most AM4-supported motherboards.

GPU pick

ASUS GTX 1060

$250 at Amazon

Best GPU for PC gaming at 1080p

Need a GPU that will perform well connected to a 1080p monitor? The NVIDIA GTX 1060 is about as good as you can get without going overboard. It's also well-matched for an AMD Ryzen 5 2600 in a budget build.

Viewing all 5861 articles
Browse latest View live


Latest Images