Quantcast
Channel: Help & How To
Viewing all 5861 articles
Browse latest View live

Far Cry 5 for Xbox One: Everything you need to know

$
0
0

Get your guns and prepare for freedom – Far Cry 5 is heading to Montana.

The next entry in Ubisoft's twisted open-world action-adventure series, Far Cry, is set to make an arrival early next year. As the fifth major entry in the franchise, Far Cry 5 takes the conflict to Montana, alongside a set of features designed with the new locale in mind. We rounded up everything you need to know about Far Cry 5, ahead of its expected release on February 28, 2018.

See at Microsoft StoreSee at Amazon

Story: The end is nigh

Far Cry 5 shifts from the exotic roots of its predecessors, establishing the first game rooted solely in the U.S. Set in the fictional "Hope County," an isolated region in Montana, the game delivers a somewhat satirical take on isolated societies and cultures built on stereotypical American values. This rural backdrop makes for the largest game world in Far Cry history, spanning rolling farmland, mountainous spaces, and small settlements.

While Hope County may paint the picture of a traditional rural community, its also houses "The Project at Eden's Gate"– a doomsday cult hellbent on oppressing those who reject its values. Led by Joseph Seed and his siblings, the faction aims to spread the word about an upcoming cataclysmic event, using excessive force to punish non-believers.

You'll be stepping into the role of an ex-junior deputy who falls into conflict with the Eden's Gate. Leading to the formation of a resistance, you'll join a group of followers in pushing back Seed's beliefs and saving the people of Hope County. To do so, players can fight through cult forces, with the eventual goal of taking down the crazed leader.

Leading the resistance against Eden's Gate, you'll be backed by a range of allies each with its own motivators, backstories, and personalities to be developed over the course of the game. Ubisoft has previously teased a non-linear narrative building on this system, allowing players to form bonds with certain characters, potentially affecting both story and gameplay.

Certain characters will also serve as companions in battle, with a revived "Guns for Hire" system from previous Far Cry games. Influenced by their backgrounds, certain characters (and animals) can be convinced to join the resistance, delivering their own skill sets to the team. These are some of the characters discussed in pre-release marketing so far, and what they're expected to bring to the game:

  • As a bartender in Hope Country, "Mary May Fairgrave" aims to get revenge on the Seed family for causing the fall of her family. She'll act as a major quest giver for a majority of the game.
  • "Jerome Jeffries" is a Catholic priest who looks to take down Eden's Gate, after stealing the church's following in pursuit of cult values. He'll also task you with missions to complete, that lead to the fall of Eden's Gate.
  • "Nick Rye" is an established pilot and crop-duster, who jumps to help the resistance after his family is threatened. Using a plane retrofitted with guns and bombs, he'll be able to deliver formidable firepower from the skies above.
  • Known for her firearms capabilities abilities on the field,"Grace Armstrong" is a proven marksman. Using her sniper rifle from up high, she'll deliver welcome backup against Eden's Gate forces.
  • "Boomer" provides support in battle as a "Fangs for Hire," protecting his owner by any means necessary. In Far Cry 5, you'll have the chance to command Boomer to help fight the cult.

Character relationships and your actions as a player are expected to affect the world in some significant ways, though the details on these systems are yet to be unveiled. Ultimately, Ubisoft is hoping these make for a more realistic take on rural Montana, with consequences for the decisions you make.

Gameplay: All guns blazing

Following up on previous titles, Far Cry 5 doesn't hugely change its gameplay from predecessors. While it is an evolution with new additions, the core gameplay loop of story missions, an expansive open world and various side activities remain similar.

One of the biggest changes to the flow of gameplay is being touted as the "resistance meter"– a new example of your actions affecting the world's events. The more chaos caused throughout the world, the heavier Eden's Gate will push back, with a "dynamic AI" that scales around the player. It remains to be seen how much of this is marketing, though some type of system is expected to respond to your threat toward the cult.

Far Cry 5 also introduces a greater push for cooperative gameplay, giving more opportunities for friends to hop into your world. Unlike previous games that limit multiplayer to certain quests, the entirety of Far Cry 5's story missions will support online co-op. While there are still some aspects of the sandbox limited to one player, these are less frequent than in the past.

As always, with the change in theme, Far Cry 5 also brings a wide arsenal of new gadgets, weapons, and vehicles to explore. Among the highlights are iconic American weaponry, classic trucks of the region, and crop-planes kitted out with their own defenses.

Finally, Far Cry 5 will also be "Enhanced" for Microsoft's latest flagship console, the Xbox One X. While details are yet to be provided, expect a bump in resolution and textures.

Far Cry 5 editions

Far Cry 5 should be released on February 27, 2018, across Xbox One, PlayStation 4 and PC. The game is available in multiple tiers, starting with the base version and reaching as high as a $200, for the collector's package. Between tiers, players can gain access to new in-game content, as well as limited-run physical goods. Here are all the editions currently expected at launch.

Far Cry 5 Standard Edition

This version of Far Cry 5 provides access to the core game and no additional content. This is the most common unit, stocked by most video game retailers. This is available digitally on the Microsoft Store, and on disc through retailers such as Microsoft, Amazon, and GameStop. This version of the game will be priced at $59.99 in the U.S.

Far Cry 5 Deluxe Edition

For those looking to receive a little more from their purchase, the Deluxe Edition packs exclusive in-game content, comprised of cosmetically-skinned weapons and vehicles. This can be purchased digitally through the Microsoft Store and in physical form through Microsoft, Amazon, and GameStop. This version costs $10 more than standard editions, at $69.99.

Far Cry 5 Gold Edition

If you're looking for the complete Far Cry 5 experience, the "Gold" edition includes all aforementioned bonuses and the season pass for future content. This is available digitally via Microsoft, or physically through Microsoft, Amazon, and GameStop. For this experience, you'll pay $89.99.

Other Far Cry 5 Editions

An extensive range of higher-tier editions are also available for preorder, providing access to the full game, alongside collectible goodies. These include the "Hope County, MT Collector's Case,""The Father Edition" (UK only) and "Resistance Edition." These all contain their own various bonuses, with identical in-game content.

As always, new Far Cry 5 content and information is expected leading up to launch. We'll be sure to update this post going forward with new details as they arise, with a full review for the game's launch.

Prepare for doomsday

Will you be picking up Far Cry 5 when it's released next year? What makes you most excited about the game? Make sure to drop into the comments section below and share your thoughts.

See at Microsoft StoreSee at Amazon


How to use System Restore on Windows 10

$
0
0

System Restore on Windows 10 allows you to send your PC back in time to undo changes that may be causing problems, and here's how to use it.

Sometimes something just goes wrong. An install screwed up everything, or you were tinkering and stuff isn't working right anymore. Of course, you performed a full backup first, but Windows 10 also includes System Restore so you can easily revert system changes without losing your files.

System Restore works by detecting system changes, such as in system files and settings, Registry, applications, and drivers, and saving a working state as a "restore point." If as a result of a misconfiguration your device experiences any issues, you can then use a restore point to undo the changes to fix problems that may be causing your PC to stop responding or affecting performance.

By default, System Restore is disabled on Windows 10, but when enabled and configured correctly, it can automatically create checkpoints, but you can create restore points manually before making any system changes.

In this Windows 10 guide, we'll walk you through the steps to configure and use System Restore to undo changes that may be harming your device.

How to enable System Restore

On Windows 10, System Restore is turned off by default, but you can use the following steps to enable it:

  1. Open Start.
  2. Search for Create a restore point, and click the result System Properties.
  3. Under "Protection Settings," select the main system drive, and click the Configure button.

  4. Select the Turn on system protection option.

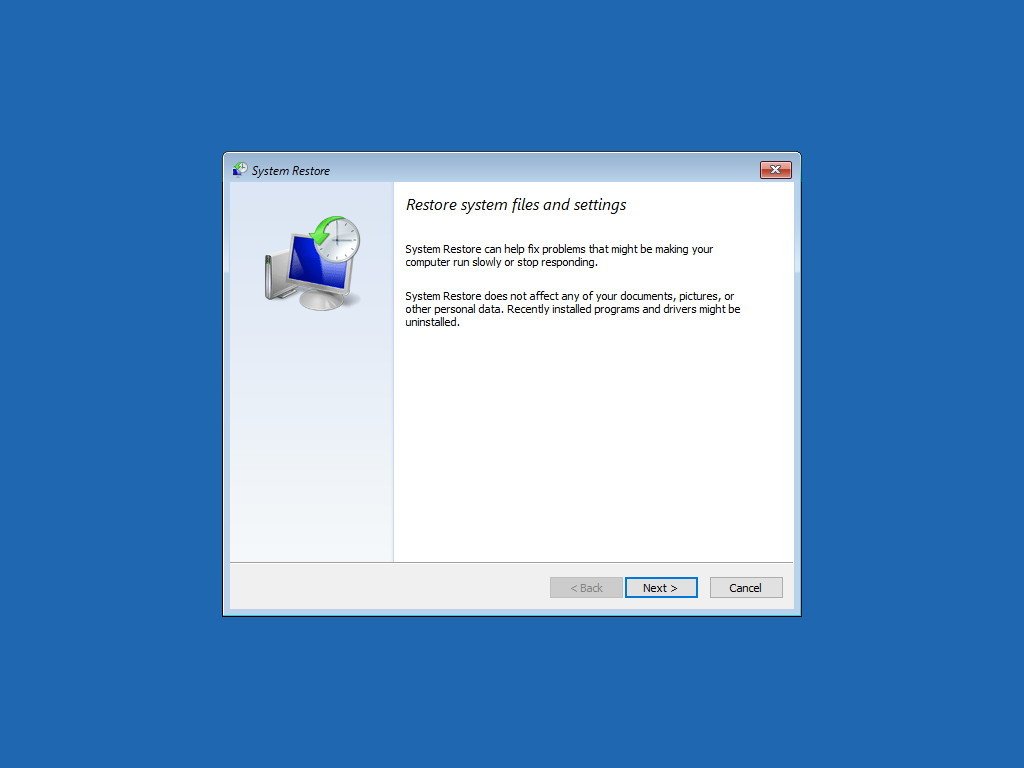
    Quick Tip: You can also use the slider to set the amount of storage you want System Restore to use, which by default is only one percent.

  5. Click Apply.
  6. Click OK.

Once you've completed the steps, a new restore point will be created automatically when an important system change occur, such as before an installation of a Windows 10 update.

If you need to delete checkpoints, within the same page, you can click the Delete button to remove them all, which is a handy option, when creating a new restore point manually, and there isn't any more available space.

It's worth noting that you can enable System Restore only on supported drives. It's not a feature that you can turn on per device. In the case that you have multiple drives, it may not be possible to configure them.

How to create a System Restore point

Although a new restore point will be created automatically during a significant change happens, there will be times where you may want to manually create a restore point before modifying anything that might cause problems if you don't do it correctly.

  1. Open Start.
  2. Search for Create a restore point, and click the result System Properties.
  3. Under "Protection Settings," select the main system drive, and click the Create button.

  4. Enter a description to identify the restore point.

  5. Click Create.

After completing the steps, if something wrong happens while modifying the Registry, installing a new app or a driver, you can use the steps outlined below to use the restore point to undo the changes.

How to undo changes with System Restore

In the case you come across any issues, before reinstalling Windows 10, you roll back changes using a restore point to get up and running again.

  1. Open Start.
  2. Search for Create a restore point, and click the result System Properties.
  3. Click the System Restore button.

  4. Click Next.

  5. Select the most recent known working restore point that will help you to fix the current problem.
  6. Click the Scan for affected programs button to see the applications that will be removed if they're installed after the restore point was created.
  7. Click Close.
  8. Click Next.

  9. Click Finish.

Once you've completed the steps, your device will go back in time to a previous state where everything was working correctly.

Using a restore point when your device won't boot

The previous steps went over how to use a restore point when you still have access to the desktop. However, there will be times when you may need to use System Restore because a system change is preventing your device from starting.

If you unable to start your computer, it's possible to use the system advanced options to access System Restore, which you can do with these steps:

  1. Try to start your PC three times to trigger automatic repair on Windows 10.
  2. Click on Advanced Startup.
  3. Click on Troubleshoot.
  4. Click on Advanced options.
  5. Click on System Restore.

  6. Click Next.

  7. Select the most recent known working restore point that will help you to fix the current problem.
  8. Click the Scan for affected programs button to see the applications that will be removed if they're installed after the restore point was created.
  9. Click Close.
  10. Click Next.

  11. Click Finish.

If you can't get to the automatic repair environment, you can boot your device using a bootable media, click Next, click the Repair your computer button, and then follow the above instructions.

Wrapping things up

While we're focusing this guide on Windows 10, System Restore has been around for years, and you can use the same instructions on Windows 8.1 and Windows 7.

Also, remember that this feature isn't replacement for a full backup or to reset your device to factory defaults. If your computer encounters a hardware problem, you won't be able to use this feature to recover, and it's likely that you may lose your files.

More Windows 10 resources

For more helpful articles, coverage, and answers to common questions about Windows 10, visit the following resources:

How to transfer your data from an old PC to a new PC

$
0
0

How to transfer your data from an old PC to a new PC

Take advantage of one of these five ways to move your data from an old PC.

Moving to a new Windows 10 PC is an exciting time — shiny new hardware and a snappy system are sitting there waiting to be used. The problem is that your familiar files are sitting on the old PC, and you don't want to start over entirely anew. To ease your transition between PCs, here are five ways you can transfer your data.

Use OneDrive to transfer your data

Use OneDrive

One of the easiest ways to back up and transfer your data is to use the cloud storage service OneDrive. If you have a Microsoft account, you automatically get 5GB of storage for free.

This isn't a lot of space for a backup, especially if your old PC has been around for a long time, but there are affordable options with much more storage. 50GB of space will cost you about $2 per month, while 1TB of space will cost you about $7 per month and will also get you a Personal subscription to Office 365.

Transferring your files and folders between PCs is easy as long as you have an internet connection, and you can enjoy knowing that your data is protected from hard drive failure. The only downside here is that your applications and settings won't make the trip over to your new PC.

See at Microsoft Store

Use an external hard drive to transfer your data

Use an external hard drive

Using an external hard drive to transfer your data from an old PC to a new PC also gives you a backup of your data in case things go wrong. This mostly manual process might take a bit longer, but if you already have an external drive laying around, you can transfer your files without spending more money.

All you have to do is plug your hard drive into your old PC, move your files and folders from your old PC onto the drive, then plug it into your new PC and reverse the transfer process. Note that using an external hard drive does not let you transfer your Windows settings or applications — this is a method for moving your files and folders only.

If you're interested in using an external drive to back up and transfer your data, check out our roundup of the best external hard drives available now.

Use a transfer cable to transfer your data

Use a transfer cable

If you don't want to subscribe to cloud storage services or spend the money on an external hard drive, there is a relatively cheap option that lets you transfer your data between Windows XP all the way up to Windows 10.

This Windows transfer cable from Plugable is about $30 and uses two USB 3.0 male connectors to plug into each PC. Once the PCs are connected, the included software will move you through the process of transferring your files, settings, user accounts, and folders. If both PCs don't have USB 3.0 ports, there is also a USB 2.0 option available from UGREEN.

If you're looking to move entire applications, however, you'll have to go with something like PCmover Professional. Also, note that using a transfer cable does not create a backup of your files when they are transferred.

See at Amazon

Use PCmover to transfer your data

Use PCmover

Back in the days of Windows 7 and Windows 8, Microsoft had a service called Easy Transfer that allowed users to move their files and settings between PCs using either a physical USB transfer cable, a set of DVDs, an external hard drive, or a network.

Unfortunately, Easy Transfer was scrapped in Windows 10, but you've not been abandoned completely — Microsoft's partnered up with Laplink PCmover to duplicate that functionality, except now it's no longer free.

PCmover Express

Microsoft offers Windows 10 users a half-price deal on PCmover Express — it will cost you about $15 for a single-move license. The Express version lets you select folders, user profiles, files, and settings you want transferred over to your new PC. All you have to do then is connect the two PCs to the internet and let everything transfer. PCmover will do its best to make your new PC seem like your old PC, but, depending on how old of an OS you're moving from, you will likely see some changes. In the case of anything going wrong, there is 24/7 assistance to get you through the problem.

This version of PCmover does not allow for full application transfer between PCs. It is compatible with Windows operating systems between and including Windows XP and Windows 10. Keep in mind that PCmover does not create a backup of your files when they are transferred.

See at Microsoft

PCmover Professional

PCmover Professional will cost you more — about $50 for a single-move license — but if you want to also transfer your applications, you'll want to go with this option. It works essentially the same as PCmover Express, except you can choose which applications to transfer as well as your folders, user profiles, files, and settings. It also has 24/7 assistance in case anything goes wrong.

This works on Windows operating systems between and including Windows XP and Windows 10. Keep in mind that PCmover does not create a backup of your files when they are transferred.

See at Amazon

Use Macrium Reflect to clone your hard drive

Use Macrium Reflect to clone your hard drive

Cloning a hard drive allows you to create an exact replica of your old drive on a new drive, whether external or internal. As soon as a clone is created, it's ready to boot just as if nothing had happened.

There are several cloning tools you can choose from, but we found success with Macrium Reflect. There is a free version that works well for casual users, and there's also a business version with varying prices.

If you're interested in creating a direct clone of your old drive to use in a new PC, check out these guides that will walk you through the entire process.

Updated December 5, 2017: We've refreshed this guide to ensure you're still getting an accurate look at what it takes to transfer your data.

Here's what time PlayerUnknown's Battlegrounds for Xbox One releases in your region

$
0
0

PlayerUnknown's Battlegrounds is just around the corner on Xbox One. Here's when the game launches in your region, on December 12.

One of this year's biggest success stories in video games, PlayerUnknown's Battlegrounds, is set to soon make its Xbox One debut, with an exclusive console release via Xbox Game Preview. Promising to deliver a near identical experience to the game's PC version, the multiplayer shooter is expanding to a new audience, reworked for the Microsoft's console family.

With the game's arrival scheduled for December 12, Microsoft has announced its release times across Xbox Live regions. As a game delivered digitally over the Microsoft Store, the game's rollout will be staggered between regions, allowing those located further east to get hands-on ahead of the west. Here's a breakdown of the game's worldwide release schedule, as first outlined by Xbox Live's director of programming, Larry Hryb. We've translated all times to local time zones on the morning of December 12, for easier consumption.

  • New Zealand: 12 a.m. NZDT
  • Australia: 12 a.m. AEDT
  • Japan, South Korea: 12 a.m. ‎KST / JST
  • Hong Kong, Taiwan, Singapore: 12 a.m. HKT / CST / SGT
  • India: 12 a.m. IST
  • United Arab Emirates: 12 a.m. GST
  • Russia, Saudi Arabia: 12 a.m. MSK / AST
  • Finland, Greece, Israel, Turkey, South Africa: 12 a.m. EET / IST / TRT / SAST
  • Austria, Belgium, Czech Republic, Denmark, France, Germany, Hungary, Italy, Netherlands, Norway, Poland, Slovakia, Spain, Sweden, Switzerland: 12 a.m. CET
  • United Kingdom, Ireland, Portugal: 12 a.m. GMT
  • Brazil: 12 a.m. BRST
  • Argentina, Chile: 12 a.m. ART / CLST
  • United States, Canada, Colombia: 12 a.m. EST / COT
  • Mexico: 12 a.m. CST

Once PUBG is available in your region, a store listing for the digital version of the game will appear on the Microsoft Store. Through the listing, the title will be available for purchase, alongside a one-hour free trial. Those who purchased the game's physical boxed copy will gain access via a 25-digit redeemable code. Despite the physical nature of the game, as an in-progress project, a playable disc won't be included.

Are you looking forward to PUBG on Xbox One? Make sure to drop into the comments to share your thoughts.

What to expect from PlayerUnknown's Battlegrounds (PUBG) for Xbox One

See at MicrosoftSee at Amazon

How to choose and use an Xbox One external hard drive

$
0
0

Get more storage for your games with a USB hard drive.

Games are getting bigger, but the internal hard drive in your Xbox One is not. Games like Halo 5 and Gears of War 4 are reaching over 100GB, post-launch DLC continues to grow in size, and that's not even factoring in the 4K assets for "Xbox One X Enhanced" titles. And with the base storage on Xbox One ranging from 500GB to 1TB, your console will soon be full after a few installs.

Sooner or later, you'll need to invest in an external hard drive for your Xbox One. Doing so will increase your storage capacity and even make games install and load slightly quicker. Installing an external hard drive is a snap, but you probably have some questions if you haven't made the jump. We're here to help with this guide to selecting and using an external hard drive with your Xbox.

Choosing an external drive for Xbox One

All Xbox One games must be fully installed on the console's hard drive before use — even those you bought the disc for. The Xbox One's built-in hard drive cannot be replaced or upgraded without voiding your warranty, so unless you're into the hardware-mod scene, you're stuck with the stock drive.

Luckily, the console supports the use of external drives, making it easy to expand your storage space for games and other content. The external drive must be at least 256GB and support USB 3.0. Slower USB 2.0 drives are not supported because Microsoft wants to ensure that data will transfer very quickly between the Xbox One and an external drive.

When choosing a drive, your first consideration should be how much space you want. The console has a 16TB limit on external storage size, so for many, the sky is the limit. For context, 1TB externals run in the $60 range, though we recommend thinking longer term and going with at least 2TB. Drives with 4TB and 8TB offer a little more room to freely install games, especially for those on Xbox One X that take advantage of 4K assets.

More: Best External Hard Drive for Xbox One S and Xbox One X

Your next decision will be whether to seek a drive that requires a separate power source. Some drives can draw all the power they need from the console's USB 3.0 port. Other drives include a power cord or AC adapter and tend to be faster than smaller, USB-powered ones.

Hard drive speed can be roughly estimated by the drive's revolutions per minute (RPM). And 7,200 RPM drives are faster than 5,400 RPM drives. So 10K RPM drives are even faster, hybrid drives (a combination of a large traditional hard drive and a smaller solid state drive) are faster still, and pure solid-state drives (SSDs) are the fastest. Theoretically, the faster the drive, the faster games will install, load, and save.

All Xbox One models, including the Xbox One X, pack a 5,400 RPM internal hard drive. However, limitations of the console's "SATA II" interface means its full potential is rarely used, making a 5,400 RPM USB 3.0 drive a preferred solution in many situations. As for the Xbox One X, which uses high-bandwidth "SATA III," internal load times are significantly increased, as demonstrated by our own extensive testing.

Alternatively, you can opt to pick up an external hard drive enclosure and stick the hard drive of your choice inside of it. This is a good option for people who already have a decent sized spare hard drive that's collecting dust — you'll just need to buy the enclosure. You can also recycle any old PC or laptop hard drives you have laying around, essentially making for a free drive.

How to expand Xbox One storage with an old hard drive

Installing your hard drive

External drive formatting

With your drive in-hand, it's time to connect it to the Xbox One. The console doesn't have to be turned off when you connect the drive, although connecting and disconnecting peripherals while powered down never hurts.

Here's how to get the drive up and running:

1.Connect the drive to a vacant USB port on your Xbox One. 2. Select Yes when asked how to configure the drive. 3. Enter a drive name. 4. If you want to install games on it by default, select Yes when prompted.

Managing your new drive

With your external drive installed and formatted, you're ready to install and copy games onto it. We recommend moving all but the lowest-priority games onto the new drive so that they can benefit from the performance increase it brings. Follow the steps below to transfer games between your internal and external drive in bulk:

  1. Open the Settings app on Xbox One.
  2. Scroll down to the System tab.
  3. Choose Storage.
  4. Select your internal drive.
  5. Select Transfer.
  6. Select the games you wish to move from your Xbox One console.
    • Ensure the storage required for the selected games is less or equal to the available storage on your external drive. Alternatively, you can choose Select all to automatically select the entire contents of your old console.
  7. Choose Move selected.
  8. Select which drive you wish to move games onto.
  9. Hit Move to begin the transfer.

After you're done moving your games, the "My Games & Apps" menu will now display the total combined free storage and percentage of used storage on the left side of the screen.

Updated December 7, 2017: We added details for the revised Xbox One OS of fall 2017, as well as mentions of Xbox One X, where appropriate.

52511
311631

How to add cloud storage services as save locations in Office 2016

$
0
0

Here are the steps to show Google Drive, Dropbox, Box, and multiple OneDrive accounts as save locations in Office 2016.

Office 2016 is very peculiar when it comes to saving documents. It remembers your recently used locations (which can be pinned within the list) and shows OneDrive automatically as an option if you've previously configured the service, but it doesn't let you add new save locations manually.

If you use the same OneDrive account associated with your Windows 10 profile, it's not an issue, but not everyone uses this service. A lot of people because of work or personal choice prefer other services, such as Google Drive, Dropbox, Box, or even OneDrive for Business. However, it's not entirely impossible to add new save locations to Word, Excel, PowerPoint, and other Office apps, you just need to know the process.

In this Windows 10 guide, we'll walk you through the steps to connect Google Drive, Dropbox, Box, and even multiple OneDrive accounts to save files more quickly in Office 2016.

How to add Google Drive as a save location in Office

If you want to add Google Drive as a location to save your documents, you must download and set up the dedicated plug-in for Microsoft Office by Google.

  1. Close any Office app running on Windows 10 (if applicable).
  2. Download the Google Drive plug-in for Microsoft Office.
  3. Double-click the driveforoffice.exe file to install the plug-in.
  4. Open Word (or any Office app you like).
  5. The plug-in wizard will open, click the Get Started button.

  6. Sign-in with your Google Drive account.
  7. Click the Allow button to give the plug-in permission to connect your account.

  8. In the wizard, click the Done button.

Once you've completed the steps, whether you're opening or saving a Word, Excel, or PowerPoint document, you'll be able to use your Google Drive account, and the best part is that you don't even need to install the full sync client on your device.

How to add Dropbox as a save location in Office

Dropbox doesn't have a plug-in to integrate with Office, but you can turn on an option within the sync client to show this cloud service as a save location.

  1. Close any Office app running on Windows 10 (if applicable).
  2. Download the Dropbox sync client (if you don't have it already installed).
  3. Double-click the DropboxInstaller.exe file to install the client.
  4. Sign in with your Dropbox account to complete the setup.

  5. Click the Dropbox icon in the notification area.
  6. Click the settings (gear) button on the top-right corner.
  7. Select Preferences.

  8. Under "Microsoft Office add-in," check the Show Dropbox as a save location in Microsoft Office option.

  9. Click Apply.
  10. Click OK.
  11. Restart your computer to apply the settings.

After completing the steps, whenever you try to save as or open an Office document you'll be offered the option to use Dropbox.

How to add Box as a save location in Office

In the case you're a Box user, similar to Google Drive, you need to install a plug-in to integrate Box as a save location in Office 2016.

  1. Close any Office app running on Windows 10 (if applicable).
  2. Download the Box for Office plug-in.
  3. Double-click the BoxForOffice.exe file.
  4. Click Install.

  5. Click Finish.
  6. Open Word (or any Office app you like).
  7. Click on File.
  8. Click on Save as.
  9. Select Box.
  10. Click the Sign in button.

  11. Enter your email and password associated with your Box account.
  12. Click the Authorize button to start using Box for Office.

Once you've completed the steps, open Word, Excel, or PowerPoint, and you'll be able to access Box through Open, Save, Save as, and Share options. Additionally, the Box plug-in adds two new options to the Home ribbon for quicker access to share and upload files.

How to add another OneDrive account as a save location in Office

Although after setting up OneDrive on Windows 10, the cloud service automatically integrates with Office, it's also possible to add multiple accounts in those cases when you want to save Office documents to your OneDrive for Business or a secondary OneDrive account.

  1. Open Word (or any Office app you like).
  2. Click on File.
  3. Select Account.
  4. Click the Add a service drop-down menu.
  5. Select OneDrive.

  6. Enter your email address associated with the OneDrive account you want to use.
  7. Click the Next button.

  8. Enter your email password.
  9. Click the Sign in button to add the new location.

After completing the steps, open Word, Excel, or PowerPoint, and you'll be able to use your OneDrive account within the Open, Save, and Save as options.

More Windows 10 resources

For more helpful articles, coverage, and answers to common questions about Windows 10, visit the following resources:

Understanding the differences between CPU, GPU, and APU

$
0
0

/how-build-pc-ultimate-step-step-guide

Is there a difference between a CPU, GPU, and APU?

Most of the hardware in your PC is associated with an acronym, and as technology advances and the number of parts increases, keeping all those names straight can be confusing. For the sake of keeping it all straight and to potentially help you get the hardware you need, let's take a look at the differences between the terms CPU, GPU, and APU.

What is a Central Processing Unit (CPU)?

Intel Pentium CPU

The CPU can be considered the brain of your PC. It has a hand in pretty much all tasks and calculations carried out from all hardware, making it essential to your device's health and performance. Most modern PC CPUs employ multiple cores to handle multiple tasks at once, and overall performance is measured in gigahertz (GHz). For example, if a CPU has a base clock speed of 2.4GHz, it should be able to process up to 2.4 billion instructions in a second.

When it comes to CPU manufacturers, you'll likely hear about Intel and Advanced Micro Devices (AMD). Both create products that can run Windows, and, especially now that AMD has Ryzen, there's a shrinking gap between the two companies when it comes to price and performance.

Performance does vary quite widely across all CPUs from both manufacturers, offering up plenty of options when it comes to price and power consumption. You can find a low-performance CPU that's great for word processing, web browsing, and battery life, while you can also find a high-performance CPU that will absolutely shred anything you throw at it but will also suck up power like a vacuum in comparison.

We've written extensively about CPU technology and choosing the right CPU for your PC, so be sure to check out these links for more information.

What is a Graphics Processing Unit (GPU)?

NVIDIA GTX 1080 Ti

The GPU in your PC is essentially responsible for what you see displayed on the monitor(s) connected to your PC. There are typically two types of GPU: integrated and dedicated (also called discrete). Integrated GPUs share space with the CPU's chipset, while dedicated GPU's are a separate piece of hardware connected to a separate bus.

A GPU is designed to focus on big jobs that require a lot of power. Intensive gaming, VR, and video editing are all tasks associated with GPUs, thanks to the high number of cores available. While the CPU is the captain of your PC's team, the GPU can be considered the grunt, ready to accept the most strenuous jobs.

Like the CPU, we've written a lot about graphics cards, so be sure to check out these links for further information.

What is an Accelerated Processing Unit (APU)?

AMD FX APU

APU is a term that AMD came up with to denote a GPU integrated into a CPU's architecture. Both the graphics processing cores and the standard processing cores share the same cache and die, and data is transferred through the same bus.

Why create an APU? Having both the CPU and GPU in the same spot allows them to work more efficiently for increased processing power. Likewise, having the GPU and CPU integrated is usually more energy efficient than having a CPU and a separate, dedicated GPU. Many modern APUs are powerful enough for non-intensive gaming; however, an APU will almost always be trumped by a modern dedicated GPU.

The first APU, using codename Llano, was announced by AMD back in 2011, but the project had been in the works since about 2006. If you're wondering where Intel stands in all this, most of their CPUs also employ integrated graphics. For example, the Intel Core-i7-8700K, commonly paired with a powerful dedicated GPU, does have Intel UHD Graphics 630 built right in. The term APU, however, isn't used by Intel, likely due to the heavy connection with AMD.

How to create a Linux virtual machine on Windows 10 using Hyper-V

$
0
0

If you work with Linux, or you just want to test drive the OS, you can use Hyper-V to create a virtual machine with the distro you like alongside Windows 10.

Although it's now possible to run a number of Linux distros natively on Windows 10, these environments can be somewhat limited in features and tools you can use. Also, you can only pick from three distros, including Ubuntu, SUSE Linux Enterprise, and OpenSUSE Leap, and you're stuck with the command-line interface, which means that you can't run any of the graphical experiences (e.g., GNOME, KDE, XFCE) or Linux-based graphical applications.

Of course, you can always install your favorite Linux distro on a second machine, but if you don't have one, it's still possible to run a full-blown version of Linux using a virtual machine (VM).

If you're running Windows 10, you can enable Hyper-V on your device to create a VM to install your preferred distro whether you're a developer or an enthusiast who just wants to know what's the Linux fuzz all about.

In this Windows 10 guide, we'll walk you through the steps to install most Linux distributions on virtual machines using Microsoft's Hyper-V virtualization feature.

Guide requirements

To run a Linux virtual machine on Windows 10, you'll need the following:

  • A computer with support for Hyper-V.
  • An ISO file to install your preferred Linux distribution.

In this guide, we'll be using Ubuntu version 17.10, which you can download from the official Ubuntu website. However, it's possible to install version 16.04, which might be a more stable version of the open source project, and you can also install other distros, including:

  • CentOS and Red Hat Enterprise Linux.
  • Debian.
  • SUSE.
  • Oracle Linux.
  • FreeBSD.

How to enable Hyper-V on Windows 10

Hyper-V is a virtualization technology from Microsoft available on Windows 10 Pro, Enterprise, and Education, and it allows you to create one or multiple virtual machines to install and run different OSes on the same physical hardware.

Verifying Hyper-V support

Although Hyper-V is part of Windows 10, there is a minimum hardware requirement a computer must meet to enable the feature.

  • 64-bit CPU with Second Level Address Translation (SLAT).
  • Processor must support VM Monitor Mode Extension (VT-c on Intel chips).
  • 4GB of memory at a minimum.

In addition, you have to make sure the Virtualization Technology and Hardware Enforced Data Execution Prevention options are enabled on your system BIOS.

You can quickly verify your computer has the required support for Hyper-V using Systeminfo:

  1. Open Start.
  2. Search for Command Prompt and click the top result.
  3. Type the following command and press Enter:

    systeminfo.exe

  4. Under Hyper-V Requirements, if the result reads Yes, then you can run Hyper-V.

If the command displays No under Hyper-V Requirements, then your hardware doesn't support this feature, or you need to make sure to enable it manually.

Enabling Hyper-V

Use the following steps to enable Hyper-V on Windows 10:

  1. Open Control Panel.
  2. Click on Programs.
  3. Click on Turn Windows features on or off.

  4. Check the Hyper-V option making sure: Hyper-V Management Tools and Hyper-V Platform are also selected.
  5. Click OK to begin the process.

  6. After the installation completes, click Restart now to apply the changes.

How to create a virtual machine using Hyper-V

Once you've completed adding the virtualization layer to Windows 10, you'll need to create a virtual machine for the Linux distribution you want to use.

However, before you do that, you must create a virtual switch to allow the VM to connect to the internet.

Creating a virtual switch

Use the following steps to configure a virtual switch on Hyper-V:

  1. Open Start.
  2. Search for Hyper-V Manager and click the top result.
  3. Click on the Action menu.
  4. Select New and click on Virtual Switch Manager.

  5. On the left pane, select New virtual network switch.
  6. On the right, select External.
  7. Click the Create Virtual Switch button.

  8. Enter a new descriptive name for the switch (e.g., MyVirtualSwitch).
  9. Under connection type, make sure your network adapter is select on External network.
  10. Click Apply.
  11. Click OK.

Creating a virtual machine

After creating the virtual switch, you can proceed to create a new virtual machine:

  1. Open Start.
  2. Search for Hyper-V Manager and click the top result.
  3. Click on the Action menu.
  4. Select New and click on Virtual Machine.

  5. Click the Next button.
  6. Enter a descriptive name for your virtual machine (e.g., vm-ubuntu).

  7. Use the default location to store your virtual machine, or check the Store the virtual machine in a different location option to select a different path.
  8. Click Next to continue.
  9. You can leave the default Generation 1 option selected. Or you can select Generation 2 if you want a UEFI-based firmware.
  10. Click Next.

  11. Select the amount of RAM to allocate for your virtual machine. In the case of Ubuntu, you need a minimum of 2GB of memory.

    You can allocate as much memory as you want, but this setting will always depend on the physical memory available on your computer.

  12. Click Next.

  13. Use the drop-down menu to select the virtual switch you created earlier.
  14. Click Next.

  15. You can leave all the default settings to create a virtual hard drive, but under Size make sure to allocated at least 25GB of storage, which is the minimum required to run Ubuntu.
  16. Click Next to continue.

  17. On Installation options, select the Install an operating system from a bootable CD/DVD-ROM option.
  18. Select the Image file (.iso) option.
  19. Select the path for the ISO file with the Ubuntu installation files.
  20. Click Next.

  21. Click Finish.

How to install Ubuntu Linux using Hyper-V on Windows 10

The last step is to start the virtual machine and install the Linux distribution you want to use.

  1. On Hyper-V Manager, under Virtual Machine, right-click the newly created device, and select Connect.

  2. Click the Start (power) button.

  3. Select your language.
  4. Click the Install Ubuntu button.

  5. Check the Install third-party software for graphics and Wi-Fi hardware, Flash, MP3 and other media option.
  6. Click Continue.

  7. Select the Something else option.
  8. Click Continue.

  9. Double-click the /dev/sda drive.

  10. Click Continue.
  11. Double-click free space.

  12. Under "Use as," use the drop-down menu and select Swap area to create a swap partition.
  13. Under "Size," select the amount of space for the swap partition, which should be about 2x of the amount of RAM allocated for the virtual machine.
  14. Click OK.

  15. Double-click free space again.

  16. Select the amount of space to allocate for the installation.
  17. Under "Mount point," use the drop-down menu and select root /.
  18. Click OK.

  19. Select the ext4 partition from the list.
  20. Click the Install Now button.

  21. Click Continue to install Ubuntu.
  22. Select your time zone.
  23. Click Continue.

  24. Select the keyboard layout.
  25. Click Continue.

  26. Create a user account with your information.
  27. Click Continue.

  28. Restart the virtual machine to finish the setup.

    Quick Tip: If during the final restart process, you get a message to remove the installation and press Enter, but hitting the key won't restart the VM, just click the Turn off button and then turn it back on again.

After completing the steps, you can just turn on the VM and start using Ubuntu Linux alongside Windows 10.

While we're focusing this guide setting up Ubuntu, you can also refer to these instructions to run other distributions of Linux.

More Windows 10 resources

For more helpful articles, coverage, and answers to common questions about Windows 10, visit the following resources:


PlayerUnknown's Battlegrounds (PUBG) Xbox One ultimate beginner's guide

$
0
0

New to the harsh world of PlayerUnknown's Battlegrounds? Here's what you need to know to get started and claim that "chicken dinner."

PlayerUnknown's Battlegrounds (PUBG) is undoubtedly the biggest hit of 2017, drawing in tens of millions of players through its PC release. Following this success, Microsoft has jumped onboard locking down a deal with its developer, publishing a version of the game built for Xbox One. And with an exclusivity period to market the game as an Xbox exclusive, Microsoft is pushing the game as a core part of its fall lineup.

While PUBG has seen over half a year on PC, its console debut will be the first step into its harsh, unforgiving warzones for many. With mechanics that punish those lacking skill and strategy, PUBG can be a brutal game to get started with – and even harder to master. Without any form of a tutorial, we've rounded up everything you should know before diving into the title as an Xbox One game.

See at MicrosoftSee at Amazon

Laying down the basics

PUBG is a "last-man-standing" multiplayer shooter game, pitting 100 players against one another in an expansive open world. Taking strong influence from "Battle Royale" and arena survival games, players must gather supplies, converge upon a single location and with the goal of finding off hostile players to be the last man remaining.

After being dropped in from a cargo plane via parachute, players land in Battlegrounds' world with no equipment. From there, it's key to quickly search for weapons, ammunition, attachments and more, while watching out for enemies in the vicinity. By collecting stronger equipment you'll be given an advantage, which can be used for a better chance at surviving in more situations.

Throughout the round, the map size will continually shrink, pushing players closer over time. If playing solo, the last man remaining is crowned the winner. Team-based variants are also available, which throw teams of two or four into the arena.

1. Prepare for the drop

At the start of every round of PUBG, you'll be soaring through the sky inside a C-130 cargo plane packed with 99 other players. The plane will follow a straight, linear trajectory, traveling from one side of the map to the other. To get a better idea of the plane's flight path, open your map and take note of which direction it's heading.

Before jumping from the plane, you'll want to find an ideal landing zone. Depending on where the plane flies, accessible landing zones may vary but you'll always have a range of locations to choose from. Higher-level gear can be more frequently found in large cities and landmarks but isolated areas see fewer enemies.

After deciding on a location, jump from the plane and aim yourself toward your chosen landing zone. For the quickest descent, don't pull your parachute and wait until the parachute automatically deploys close to the ground. However, you may wish to pull your parachute earlier for improved positioning and to ensure an ideal landing. If several enemies are dropping into a similar location to you, don't be hesitant to change course and find a new landing zone.

2. Grab your loot

When you're not aimlessly running throughout the map, a fair amount of your time in PlayerUnknown's Battlegrounds will be spent in search of loot. All players start on even footing, meaning looting can often have a significant bearing on your success. While strategy and skills factor in, it's still rare a crowbar emerges victorious when facing a light machine gun.

Loot is scattered throughout the world of PUBG and should be the first priority after hitting the ground. While mostly randomized, loot rarity often increases in larger, riskier settlements. Searching through smaller settlements, melee weapons, pistols, and shotguns will be the most common, while rifles are often a harder to find. The same goes for equipable items, with high-level helmets, armor, and backpacks mostly located around landmarks.

Over time you'll come to find more powerful weapons and armor that suit your playstyle, climbing through the loot chain. Despite being some of the weakest weapons in the game, picking up common weapons in early minutes provides some type of defense from the outset. The ultimate goal is to equip a helmet, armor vest and backpack ranked at "Level 3," though this often requires some thorough scavenging to be achieved.

Choosing weapons comes down to personal weapon class preferences, though some of the most coveted weapons lie within occasional supply drops. For those willing to take a risk, items like the M249 light machine gun, AUG A3 assault rifle, and AWM sniper are all exclusive to these crates but you'll need to put up a fight to secure them.

3. Follow the circle

As a match progresses, the playable area will begin to shrink, forcing contestants to gather upon an increasingly shrinking area. This mechanic is what makes PUBG so intense, forcing players to focalize on and fight over a single location.

Five minutes after dropping in, the play space will start to shrink with a circular blue barrier. Throughout the match, this surrounding blue barrier will continue to shrink over randomized center point, until one player remains. Those who step outside the playable zone suffer health drain, meaning that playing near to the circle's edge can be a risky move.

Throughout the game, keep an eye on the map to see how the blue circle is closing in. Skilled players will find themselves planning to avoid the edge of the map, staying far from the edges. Playing near the edge is a valid strategy though, reducing the angle that enemies can approach from.

4. Getting into combat

After searching dirty houses and rolling around in bushes, you'll eventually need to enter combat to come out on top. While for a fair majority of the round it's possible to avoid combat entirely, you'll likely find players as the playable space gets smaller.

Apart from inside major towns, a majority of battles take place over longer ranges. Picking players off from hundreds of meters away isn't rare and is often the safest way to carry out attacks. If you're able to scout players from a distance, with steady aim, this has a high chance of delivering a kill. For this reason, it's best to keep scoped rifles on you at all times.

Unlike a traditional mainstream shooter, combat in PUBG should also be taken at a slower pace. Rarely will you charge into battle gun's blazing – utilizing cover and tight angles are all key to securing kills.

With less combat than an average shooter, it may take time to develop skills with weapons. Finding the same weapons regularly is challenging, meaning the time you'll spend with them is only a fraction of the experience. Keeping this in mind, don't be so aggressive with attacks initially.

5. The final stretch

The circle is now beginning to enclose upon the final few people – congratulations, you're a lot better than you thought. In the final minutes of a game, the circle will be at its smallest, with less room to maneuver without finding enemies.

With few players, you'll be fighting only high-skilled opponents, mostly decked out with heavy armor and weaponry. From here, keeping your cool and maintaining good positioning is crucial. If possible, keep your back against the circle, to prevent unexpected attacks from behind.

Wrapping up

If things go according to plan, you might just be the last man standing. If so, you're the 1 in 100 who overcame the odds. For those less fortunate, you'll need to start from scratch, working your way back from cargo plane drop. How has your experience been with PUBG so far? Let us know your thoughts in the comments.

See at MicrosoftSee at Amazon

How to manage Power Throttling on Windows 10

$
0
0

Power Throttling is a feature to improve battery life on Windows 10, but if it's not working as expected, you can use this guide to manage its settings.

On Windows 10, you typically work with multiple applications, and even though you may not be actively using them at the same time the background processes can still consume a significant amount of power.

In order to optimize power usage, the Windows 10 Fall Creators Update introduced "Power Throttling," a feature that leverages the power-saving capabilities on modern processors to limit resources for background processes, while still allowing them to run, but only using a very minimal amount of power.

Using this technology, Windows can automatically detect which applications you're actively using and throttle any other processes that are identified as not important, which can result in up to 11 percent of battery life saving to help you get more work done on a single charge.

The only caveat is that the detection process may not always work as expected, and in these cases, you can always monitor which apps are being throttled and configure Windows 10 to prevent putting certain apps into a low power state.

In this Windows 10 guide, we'll walk you through the steps to check, control, and completely disable Power Throttling on your mobile PC.

How to see which processes are being throttled

You can use Task Manager to see which processes Windows 10 is throttling to conserve battery life on your device.

  1. Right-click the taskbar and select Task Manager.
  2. Click the More details button if you're using the Task Manager in compact mode.
  3. Click the Details tab.
  4. Right-click one of the column header and click Select columns.

  5. Scroll down and check Power Throttling.
  6. Click OK.

Once you've completed the steps, a new Power Throttling column will show you which processes are in a power throttling state.

On a laptop, tablet, or other form factor running on battery, you'll expect to find some processes with Power Throttling set to "Enabled" and some others will show as "Disabled."

You can always see this feature in action when opening and minimizing an application. When you're actively using an app, or it's on focus, you'll notice that its processes in the Task Manager will appear as "Disabled," but as soon as you minimize the app the state will change to "Enabled."

If you see every process with the "Disabled" state, then your device is probably connected to a power source, or it's using the "Best performance" power mode.

How to disable Power Throttling using power settings

Power Throttling activates automatically when your mobile device isn't charging, which means that quickest way to disable the feature is to plug it into a power source.

You can also control Power Throttling across your system by clicking the power icon in the notification area and using the "Power Slider" to change the power mode.

  • Battery saver — Enables Power Throttling.
  • Better battery — Enables Power Throttling.
  • Better performance — Enables Power Throttling, but it's a more relaxed option.
  • Best performance — Disables Power Throttling.

How to disable Power Throttling using Group Policy

If you're running Windows 10 Pro, it's possible to disable Power Throttling using the Group Policy Editor.

  1. Use the Windows key + R keyboard shortcut to open the Run command.
  2. Type gpedit.msc and click OK to open the Local Group Policy Editor.
  3. Browse the following path:

    Computer Configuration > Administrative Templates > System > Power Throttling Settings

  4. Double-click the Turn off Power Throttling policy.

  5. Select the Enabled option.

  6. Click Apply.
  7. Click OK.

Once you've completed the steps, Windows 10 will no longer limit power usage on any application, regardless to which power mode you're using on your device.

At any time, you can revert the changes using the same instructions, but on step No.5, make sure to select the Not Configured option.

How to disable Power Throttling using Registry

You won't have access to the Local Group Policy Editor on Windows 10 Home, but if you must disable Power Throttling in the entire system, you can modify the Registry to accomplish the same result.

Warning: This is a friendly reminder that editing the Registry is risky, and it can cause irreversible damage to your installation if you don't do it correctly. It's recommended to make a full backup of your PC before proceeding.

  1. Use the Windows key + R keyboard shortcut to open the Run command.
  2. Type regedit, and click OK to open the Registry.
  3. Browse the following path:

    HKEY_LOCAL_MACHINE\SYSTEM\CurrentControlSet\Control\Power

  4. Right-click the Power (folder) key, select New, and click on Key.

  5. Name the key PowerThrottling and press Enter.
  6. Right-click the newly created key, select New, and click on DWORD (32-bit) Value.

  7. Name the key PowerThrottlingOff and press Enter.
  8. Double-click the newly created DWORD and set the value from 0 to 1.

  9. Click OK.

After completing the steps, Power Throttling will be completely disabled on Windows 10.

In the future, you can revert the changes using the same instructions, but on step No. 4, right-click the PowerThrottling key and select Delete to remove it.

How to disable Power Throttling for processes individually

Windows 10 works intelligently to determine which processes need to be throttled to conserve battery life. However, there will be special cases when an app may get throttled by mistake which can result in unwanted performance issues.

In these situations, it's possible to disable Power Throttling per application without having to disable the feature entirely.

  1. Open Settings.
  2. Click on System.
  3. Under "Overview," click the Battery by app link.

  4. Select the app you want to change its settings.

    Quick Tip: The apps labeled "Decided by Windows" indicate that the OS is controlling the power consumption, and those labeled "Decided by me" are the apps you've configured manually.

  5. Clear the "Let Windows decide when this app can run in the background" option.
  6. Clear the "Reduce the work app can do when it's in the background" option.

Once you've completed the steps, Power Throttling for that particular application will be disabled.

Wrapping things up

Power Throttling is a feature designed to optimize battery life on mobile devices with virtually no drawbacks, as such it's not recommended to change its settings unless you're having issues with applications as a result of this feature being active.

More Windows 10 resources

For more helpful articles, coverage, and answers to common questions about Windows 10, visit the following resources:

How to use Mixer Create to stream iOS games to your audience

$
0
0

Mixer Create

Microsoft's Mixer Create is out of beta but predictably on Apple's iOS devices, there are hoops to jump through.

Mixer Create on Android is a breeze to use. Because you're able to just record the entire contents of the screen whenever you like, broadcasting games to Mixer require nothing more than a couple of taps. And you can broadcast any of the games on your phone or tablet.

Enter Apple's iPhone and iPad. The platform is teeming with quality games, but you probably can't stream most of your favorites games to Mixer. At least not just yet.

Here's the lowdown on the what, the why, and the how.

Download Mixer Create from the App Store

Mixer Create and ReplayKit

To broadcast using Mixer Create on iOS before iOS 11 you need to be playing a game that first supports Apple's ReplayKit. Apple has ReplayKit available to developers to allow you, the app user, to capture content from within your apps or games. The trouble is, if the developer doesn't support it, then you can't.

And that also means you can't stream it using Mixer Create. Inside the app on iOS you have only one gameplay related control, and that's a slider to alter the balance of game audio vs microphone audio. One thing the iOS version has over the Android one, at least, is that it's able to pull audio directly from the app rather than relying on capturing the speaker audio with the phone's microphone.

However, as you'll see further down, thanks to iOS 11 all this is about to change.

So which games can I stream?

Mixer Create

There aren't, it seems, that many titles out there that seem to support ReplayKit. A couple of big names do, though, like Star Trek Timelines and Modern Combat 5: Breakout.

Our buddies over at iMore have a roundup of the best games you should be playing that support ReplayKit.

Best ReplayKit games for iPhone and iPad

How to stream using Mixer Create right now

Mixer Create

For the purposes of this guide, we'll be using Gameloft's Modern Combat 5: Breakout as the example. The steps may vary slightly from game to game, but the overall process should be about the same.

  1. Launch the game on your iPhone or iPad.
  2. Tap the broadcast button on the home screen.
  3. From the popup window select Mixer Create.

    Mixer Create

  4. Add a title for your stream.

    Mixer Create

  5. Tap on start broadcast.

The nice thing about the integration on iOS is that you don't have to go back to the Mixer Create app to do anything. You can handle the broadcast from within the game environment.

Mixer Create

When streaming either a game or yourself, you have the same options to control the resolution of your stream, or have the app handle it automatically, adjusting it to compensate for weak connections on the fly.

There might not be a huge range of titles right now, and that's disappointing considering how long ReplayKit has been around. But, assuming your favorite mobile game does, you can now share it with the world with minimal effort on your part.

Coming soon: Stream any games

Currently available to anyone in the Mixer Create beta program is the ability to stream any games, at least if you're running iOS 11.

Microsoft's boffins have reworked the app to be able to use the built-in iOS 11 screen recording feature. This means it'll work just like any console or PC game you stream to Mixer, and you'll be able to just capture what's happening on the display.

It's a neat workaround to add full functionality to the app that was sorely missing. Sadly, if you're on a device that does not run iOS 11, you won't be able to do this. There's no word yet on when it'll push out to the public, but we'll update this guide when it does. It makes everything much easier!

Download Mixer Create from the App Store

Updated December 12, 2017: We added details about changes coming to Mixer Create for iOS that are currently in beta.

HDMI 2.1: Everything you need to know

$
0
0

HDMI 2.1 promises to deliver 10K video, 120 Hz refresh rates and much more. Here's everything you should know about HDMI's next revision.

Earlier this year "HDMI 2.1" was unveiled – the latest revision of the now commonplace audio and video cable standard across consumer electronics. And while still in its early stages, the final specification provides a new spectrum of high-end features, designed to deliver premium home entertainment experiences. With improvements focusing on both video consumption and gaming, HDMI 2.1 lays the foundation for clearer and smoother future. But what does this mean to you?

What is HDMI 2.1?

HDMI 2.1 is the latest revised specification of the HDMI interface, which is used for transmitting both audio and video across modern devices. Having become the go-to solution across consumer electronics, you'll have undoubtedly encountered previous versions of the cable or port over the last decade. And while using a visually identical connector, HDMI 2.1 delivers hardware refinements that push improved video and audio quality.

After its first unveiling at the Consumer Electronics Show in January 2017, "HDMI Forum," the body managing the interface's development, has created a specification for HDMI 2.1 going forward. As of November 2017, the specification was finalized, allowing manufacturers to begin adopting the technology itself.

HDMI 2.1's new features

Improved bandwidth

One of the principal developments with HDMI 2.1 is a boost in available bandwidth, allowing for transfer rates up to 48 Gigabits per second (Gbps) – a significant step up from the 18 Gbps available with HDMI 2.0. In contrast to the leap from the 10.2 Gbps offered by its predecessor, HDMI 1.4, HDMI 2.1 represents a significant advancement in the potential throughput. Not only does this allow for improved visual clarity, but other video and audio upgrades have been detailed that take advantage of this overhead.

Higher resolutions and framerates

For general consumers, one of the alluring promises is a leap in both supported resolution and framerates when using an HDMI 2.1 connection. Topping out at 10K resolution and 120 Hz at lower pixel counts, the new revision should provide more than enough flexibility for any consumer display hitting the market for the years ahead.

While 10K video won't be among the mainstream anytime soon, HDMI 2.1 also leverages its improved bandwidth to target lower resolutions. On supported displays, 8K (7,680 pixels x 4,320 pixels) at 60 Hz will be possible, as well as 4K (3,840 × 2,160) at 120 Hz. These resolutions also see the full benefit of High Dynamic Range (HDR) across supported content, with a wider gamut of colors and improved contrast ratio. Stepping up from the limit of 4K at 60Hz imposed with HDMI 2.0, resolutions can now be pushed even further without comprising fluidity.

Dynamic HDR

HDMI 2.1 also ushers in "Dynamic HDR," which extends the potential of existing HDR technology with improved color tuning. When the feature is in use, dynamic metadata is processed on a frame-by-frame basis, allowing color settings and brightness to adapt on the fly. The result is an improvement to how colors are displayed, depending on the current scene. While dynamic metadata is already available over HDMI 2.0 with "Dolby Vision," HDMI 2.1 aims to deliver this to the open "HDR10" standard.

Difference between HDR10 and Dolby Vision

eARC

In a move to continue simplifying household entertainment centers, HDMI 2.1 adopts support for enhanced audio return channel (eARC), which is used to deliver audio over an HDMI connection to soundbars and receivers. Building on the existing ARC implementation implemented in earlier HDMI specifications, this allows a single HDMI to send and receive audio, reducing the cabling between external devices.

eARC is an extension of this technology, making your TV the central hub for entertainment, rather than a traditional receiver. With support for integrated TV tuners, streaming apps and other devices connected to the TV via other HDMI ports, the TV can handoff essentially all audio to an external sound system. With support for Dolby Atmos and DTS:X, too, this delivers high-quality sound to audio-only receivers, soundbars, and amplifiers.

Other features of HDMI 2.1

While the most impressive features of HDMI 2.1 deliver improvements to visual clarity and color, several other additions are making an arrival with the specification. Tailored for video playback and gaming, these provide enhancements for more specific scenarios.

For gamers, one of the most promising features of HDMI 2.1 is support for "Variable Refresh Rate" (VRR) outputs. In essence, VRR adapts the refresh rate of your display to that out outputted content, reducing screen tearing and stuttering, without the input lag suffered when using a similar solution known as V-Sync. This makes for a much smoother overall experience for gamers on supported displays, although has few applications for other content types.

HDMI 2.1 also delivers support for a minor feature known as "Quick Media Switching" (QMS), which streamlines the process of changing media types on the fly. On traditional displays, changing framerate, resolution and other settings can result in a short blackout. If using a QMS-supported display, HDMI 2.1 will smoothen the process of changing source material, without dropping the signal.

Another welcome feature for gamers is support for "Quick Frame Transport" (QFS) – a relatively simple concept, which makes for a snappier experience. When using QFS, frame output latency is reduced, which delivers a much more responsive experience to displays and VR headsets.

To further enhance refresh rates comes "Auto Low Latency Mode" (ALLM), which automatically adjusts latency on the fly, to make for the smoothest, lag-free viewing experience.

Pushing more advanced visuals, "Display Stream Compression" (DSC) is also a part of the new specification, meaning devices can theoretically surpass the 48 Gbps limit on HDMI 2.1 displays. With this feature enhanced, video streams can be compressed on the fly, delivering improved visual quality to supported displays.

Getting started with HDMI 2.1

Xbox One X is among the few devices ready for HDMI 2.1, set to receive a firmware update at a later date.

With the HDMI 2.1 specification only recently having been finalized, development of hardware utilizing the technology is still in the early stages. Despite using the same connector, the revised interface requires dedicated ports and cables designed for the latest specification, meaning there are no consumer setups available that offer its feature set.

To take advantage of all the new features offered by HDMI 2.1, a new "Ultra High-Speed HDMI Cable" will be required. Cables certified for use with the new standard will be built for 48 Gbps transfer rates and all the other features details with the revised specification. As of publication, manufacturers are yet to release cables that have passed the HDMI 2.1 Compliance Test Specification (CTS), however, they are expected to first hit the market sometime in 2018. But be warned – at first, these cables won't be cheap.

Some HDMI 2.1 features are accessible with other HDMI cables, but to get the complete range of features, you'll have to invest in an Ultra High-Speed variant. For example, eARC can be accessed using HDMI High-Speed Cables with Ethernet, while less intensive resolution and frame rate combinations can be output alongside Dynamic HDR using older HDMI cables. Ultra High-Speed cables are backward compatible with older ports, only with older features offered by the port.

The same concept applies to devices themselves, meaning both outputting and receiving devices must support HDMI 2.1 to take full advantage of the interface. Using the same connector means that implementing HDMI 2.1 shouldn't be too challenging for major manufacturers, but due to the infancy of the specification, it will once again be some time before these devices are in the home.

So, should you care about HDMI 2.1?

Not really, not yet. While HDMI 2.1 delivers some anticipated premium features, with the specification only recently having been finalized, the technology is still in early stages. It will still be some time before supported devices are available to consumers – and that's not even touching the fact that price will be a major barrier to entry.

4K displays are only just finding a place among the mainstream, meaning the technology showcasing the greatest benefits of HDMI 2.1 will come at a cost. Simply put, HDMI 2.1 is so future-proofed, displays simply haven't caught up to its capabilities. Once HDMI 2.1 is more accessible, there will be welcome improvements for both video and gaming experiences, but you'll have to wait for now.

A laptop makes a great gift, but you need to keep these things mind

$
0
0

A laptop makes a great gift, but you need to keep these things mind

Should you give a laptop as a gift? What is there to know first?

Here's the bottom line: laptops can make great gifts, no matter the occasion or time of year. However, there are some things you must keep in mind to ensure that the laptop is actually well received, and that the person isn't let down by the specs, build, or display. You might have the word "ungrateful" in your head, but purchasing a new laptop is really a personal thing, akin to buying a new phone. Let's take a look at whether or not you really want to gift a laptop, and if you do, we'll also examine some key questions to ask before buying.

Do you really want to gift a laptop?

Do you really want to gift a laptop?

Before we get into the things to look out for when buying a laptop, it's good to first answer whether or not you really want to gift a laptop. Sure, they make great gifts, but they can also become quite expensive depending on the configuration. You can go the budget or used route, but it might be harder to get what's required. There are some ways to save money on a brand new laptop, but they generally involve knowing exactly what the giftee needs.

Likewise, shopping for a laptop can take up quite a lot of time, and if you're planning to gift one during the holiday season, you're likely already on a time crunch. Give yourself plenty of time to shop around, as the first laptop you see won't likely be the right one to give. As a plus, however, laptops usually dip in price at the end of November and start of December, so giving one during the holiday season is doable.

How to buy a laptop at the right time (and be much happier with your purchase)

There's also the element of surprise. If you love the shocked look when a gift is opened, giving a laptop likely won't do. There are plenty of questions that must be asked (unless the giftee has been dropping some heavy hints) in order to give a suitable device, and the element of surprise will likely be ruined. If you do buy blindly, ensure it's from a manufacturer with a generous return policy. That way the giftee can enjoy the surprise of opening a laptop, yet can eventually get exactly what they want.

5 common mistakes to avoid when buying a laptop

What you need to know before buying a laptop as a gift

What you need to know before buying a laptop as a gift

So, you've decided that you'd absolutely like to gift a laptop. As always when buying a new PC, there are some questions that must be answered when it comes to things like chassis size, display, hardware, and general usage.

Is a notebook, convertible, or 2-in-1 preferred?

HP Spectre x2 and Surface Pro are both excellent 2-in-1 devices.

Laptops are generally built in a standard notebook form with the lid only opening so far, a convertible form with a lid that rotates around 360 degrees, or a 2-in-1 form with a removable keyboard and touchpad.

Make sure you figure out what type of chassis is preferred. Buying a convertible for someone who only needs a notebook will likely be a waste of money. Likewise, buying a standard notebook for someone who wants to use their device as a tablet half the time just won't do.

What size display should you buy?

Laptops often come in variations somewhere between 12 and 17 inches. Smaller laptops are usually best suited for those who are often on the go. Toting around 15- and 17-inch laptops is not nearly as easy, and the weight can make a big difference, especially in the backpack of, say, a college student.

Larger laptops are, however, usually suitable for gamers and anyone looking to edit multimedia. The same can be said for those who need to multitask. Being able to open up two or more windows next to each other is more efficient than switching back and forth.

What is a suitable resolution?

4K is gorgeous, but is it necessary?

These days, a PC should usually come with at least a 1080p display, no matter the size. A lesser display just doesn't quite hold up as well as it once did, especially when even many thin-and-light Ultrabooks have 4K screens available.

On that note, buying the highest resolution possible isn't always recommended. Sure, a 4K display is gorgeous, but battery life almost always takes a hit. If the laptop is going to be used primarily as a gaming device, 1440p and 1080p are usually still preferred because of performance gains. Hitting 1080p or 1440p (or somewhere around there, as in the case of Surface devices) are recommended for most tasks unless specified otherwise by the person receiving the laptop.

What processor has enough power?

The processor (CPU) is an incredibly important part of the laptop, as it is the anchor point for other hardware. Buying an underpowered CPU for the task at hand is going to affect the rest of the laptop by causing a bottleneck. Always try to find a relatively new CPU. Technology is constantly improving to reduce power usage and up performance, resulting in a faster device with a longer battery life.

What CPU works for what task? In the case of Intel, a Core i3 is usually enough for web browsing and word processing, a Core i5 is generally enough for multitasking and even gaming, and a Core i7 is best if the best performance is needed, as in the case of multimedia editing.

How much RAM is needed to keep up?

How much RAM do you need?

Like the CPU, how much RAM a PC needs depends heavily on what the laptop will be used for. There isn't quite as much variation when it comes to RAM; DDR3 or DDR4 will do, and it's more about the amount included.

For web browsing and word processing, 4GB should be enough. For gaming or VR, at least 8GB of RAM is recommended, and for intensive tasks, like multimedia editing, at least 16GB is recommended.

How much and what type of storage is needed to hold all data?

The SSD in a Razer Blade

There are basically two different types of storage commonly found in a PC: solid-state drives (SSD) and hard-disk drives (HDD). HDDs have been around much longer, and can usually be found in larger configurations for a cheaper price. The downside here is that data transfer is slow because of moving parts.

An SSD, on the other hand, has no moving parts, and data transfer is usually much faster. The downside is that they'll usually raise the price of a laptop significantly.

The main difference between the two types is performance. A 1TB HDD and a 1TB SSD are going to hold the same amount of data, but they will deliver it at a different pace. What's likely more important here is how much storage is actually required, and if the person you're buying for is a regular user of cloud storage.

If the laptop is going to be used for video games or multimedia editing, a larger SSD is recommended. Just going to be using it for productivity and web browsing? You can probably get away with a smaller HDD, possibly coupled with some cloud storage or an external drive.

Is a dedicated graphics card required?

This is one of the easier questions to answer. Will the laptop be used for high-end gaming? If so, it should absolutely have a dedicated graphics card (GPU). Will it be used for multimedia editing? It should likewise have a dedicated GPU.

If, however, the laptop will be used for everyday regular tasks with a bit of light gaming on the side, integrated GPUs have come a long way and will likely get the job done.

Getting more help buying a laptop

Now that you know what answers to ask, you might be wondering exactly where to look for a wide selection of laptops. We've painstakingly compiled a laptop buyer's guide with categories that include price, design, size, manufacturer, usage, and feature. From here you should be able to find the perfect laptop to give as a gift.

See our Laptop Buyer's Guide for a wide selection of the best laptops available

How to enable Windows Mixed Reality joysticks for more SteamVR games

$
0
0

So, Windows Mixed Reality is pretty awesome, but the amount of titles that support the platform natively is pretty slim right now. Thankfully, SteamVR is here to do some of the heavy lifting.

Most of the games on Windows Mixed Reality via SteamVR function via some form of emulation, mimicking the peripherals of other platforms. For example, in DOOM VFR, recently released (and totally awesome), you can see HTC Vive motion controllers in the in-game menus, rather than Microsoft's own WMR controllers.

Sadly, this also means many games don't support WMR's joysticks natively either, meaning that in games like DOOM VFR, you have to physically turn, to well, turn. Physical movement in VR is not only disorienting for some, but for others, there simply isn't room to move around, unless you want to end up tangled in a HDMI and USB cable from your headset.

Thankfully, Microsoft's joystick solution enables VR experiences in a more accessible seated format, allowing you to turn using your joysticks rather than spinning around like a crazy person. While few games support this functionality by default, Microsoft recently updated the WMR engine on Steam to enable joystick support in more games, according to the company, supporting both smooth motion and staggered turning. Here's how to turn it on early before Microsoft pushes it out via an update. Obviously, you need SteamVR to try this.

  1. First, navigate to this file on your computer:

    C:\Program Files (x86)\Steam\steamapps\common\MixedRealityVRDriver\resources\settings\default.vrsettings

    Note: The file path may vary depending on where you have installed Steam. Before proceeding, be sure to make a copy of the default.vrsettings file incase you experience any issues. This method is direct from Microsoft, and we have tested that it works, but it's always a good idea to keep a backup before tampering with code.

  2. Once you have found default.vrsettings, right click and select Open With.
  3. Open the file using Notepad.
  4. Next, check to see if the code inside the file has the text beginning with "driver_Holographic_Experimental" inside, if not, replace the text with the code below. If you restart Steam, it might show up automatically.
{"driver_Holographic" : {"renderTargetScale" : 1.0
    },"driver_Holographic_Experimental" : {"thumbstickTurnLeftEnabled" : false,"thumbstickTurnRightEnabled" : true,

        // Some people may experience increased discomfort such as nausea, motion sickness, dizziness,
        // disorientation, headache, fatigue, or eye strain when using "smooth turns" in Windows Mixed Reality."thumbstickTurnSmooth" : false
    }
}
  1. You can customize your experience by altering the true and false statements above. For example, if you want joystick turning on your left WMR controller, flip "thumbstickTurnLeftEnabled" : false, to "thumbstickTurnLeftEnabled" : true,.
  2. You can also change between staggered turning (less disorienting for some) or smooth turning (can be motion sickness inducing) by switching "thumbstickTurnSmooth" : false to "thumbstickTurnSmooth" : true.
  3. When you're done, hit File > Save, then go and kill some demons in DOOM VFR!

    Note: Be sure to observe the syntax in the code above for it to execute properly. Removing or adding any commas or braces will break the code.

Now, you should be able to use joystick turning even in games that don't support WMR natively, like DOOM VFR and Fallout VR. We tested this code with DOOM VFR, GORN, Surgeon Simulator and Job Simulator, and found that it worked a treat. Microsoft is rolling out the code via an update soon regardless, but this is how you can get in early. Pretty cool, no?

How to manage custom power plans on Windows 10

$
0
0

You can use a custom plan to optimize the power usage on your device, and in this guide, we show you how.

On Windows 10, a power plan is nothing more than a set of system and hardware settings to manage how your device consumes and conserves power. By default, you can pick from three predefined plans (or schemes), including Balanced, Power saver, and High performance.

Although you can modify each plan with your preferences, you can also create custom power plans with specific settings that are optimized for your particular computer configuration.

In this Windows 10 guide, we'll walk you through the steps to create, customize, and delete a custom power plan on your computer.

How to create a power plan

In order to create a new custom power plan, you can use the following steps on Windows 10:

  1. Open Settings.
  2. Click on System.
  3. Click on Power & sleep.
  4. Click the Additional power settings link.

  5. On the left pane, click the Create a power plan button.

  6. Select a power plan with the settings you want to start.
  7. Under "Plan name," type a descriptive name for the new power scheme.
  8. Click the Next button.

  9. Using the drop-down menus, select when your computer should turn off the display and when it should go to sleep.
  10. Click the Create button.

Once you've completed the steps, your new custom plan will be applied to your device.

How to customize a power plan

Although during the creation process you'll be able to select a set of predefined settings and change when the display should turn off and when your device should go to sleep, there are a number of additional settings you can customize in your newly created plan.

  1. Open Settings.
  2. Click on System.
  3. Click on Power & sleep.
  4. Click the Additional power settings link.
  5. Click the Change plan settings link next to your custom power plan.

  6. Click the Change advanced power settings link.

In the "Advanced settings" tab, you'll find a list of settings you can configure in your scheme.

If you're looking to create a power plan to optimize battery life, you should consider changing the settings that can impact battery, including the brightness, dimming, and timeout under the Display settings.

In the case your laptop is using a traditional hard drive. You may want to specify when to turn off the drive to conserve battery using the Hard disk settings.

Usually, when you're not actively using your device, it'll automatically go into a low-power sleep or hibernation state. Depending on how you use your computer, to reduce power usage, you can set exactly when your computer should go to sleep or hibernate using the Sleep settings.

Wi-Fi adapters can use a significant amount of battery, as such it's also a good idea to check the Wireless Adapter Settings to make sure "Power Saving Mode" is set at least to Medium Power Saving.

It's worth noting that not every computer has the same available settings, it'll depend on your hardware configuration and device category. For example, on laptops, you can change the advanced settings when your device is running on battery or plugged in, but on desktop PCs, you can only configure settings when your device is connected to AC power (for obvious reasons).

Quick Tip: If you want to start over, you can always reset the settings by clicking the Restore plan defaults button in the "Advanced settings" tab for Power Options.

How to delete a power plan

In the case you no longer need a custom power plan, you can quickly delete it using the following steps:

  1. Open Settings.
  2. Click on System.
  3. Click on Power & sleep.
  4. Click the Additional power settings link.
  5. Click the Change plan settings link for the power plan you want to delete.

    Quick Tip: If you're trying to delete a power plan you're currently using, make sure to switch to another scheme before trying to remove it. Otherwise, the delete option won't be available.

  6. Click the Delete this plan link.

  7. Click OK to confirm.

After completing the steps, the custom power plan will no longer be available on your device.

Wrapping things up

Alongside "power plan," you'll also hear about "power mode," but even though both features are related, you shouldn't confuse them. Power mode is a feature on Windows 10 to optimize battery life on laptops and tablets, while power plan is available on desktops, laptops, and tablets, and it's a feature that you can customize any way you want to let Windows know exactly how it should manage power on your PC.

More Windows 10 resources

For more helpful articles, coverage, and answers to common questions about Windows 10, visit the following resources:


How to disable Windows 10 fast startup (and why you'd want to)

$
0
0

How to disable Windows 10 fast startup (and why you might want to)

What is fast startup and why is it an option in Windows 10?

Fast startup is a feature first implemented in Windows 8 and carried over to Windows 10 that provides a faster boot time when starting up your PC. It's a handy feature and one that most people use without even knowing, but there are others who disable it immediately when they get their hands on a new PC.

Let's take a look at exactly how fast startup works, why you might want to enable or disable it, and how to do so.

What is fast startup?

What is fast startup?

Windows PCs typically operate in a number of Advanced Configuration and Power Interface (ACPI) power states. An S0 power state, for example, is when your PC is running and ready to respond to your input. There are a number of sleep states, including S1, S2, and S3, and there's also a hybrid sleep state where hibernation is used in tandem with a sleep state.

Hibernate, sleep, or shut down: What's best for your PC?

Hibernation is considered an S4 power state. While hibernating, your PC will seem like it's completely off, but there will be a saved hibernation file ready to be used to boot back to where you were during your last user session. Some power is usually still routed to peripherals so that you can, say, tap your keyboard and have the PC boot.

An S5 power state (soft off) is when your PC is shut down and rebooted completely. There's no hibernation file and no saved user session. There is also a G3 power state, which is when your PC consumes absolutely no power and is by all means off.

With fast startup enabled, choosing to shut down your PC might look like you're completely shutting things down, but in reality, your PC is entering a mix between a shutdown and hibernation. A hibernation file is indeed used, although it is smaller than usual. Why? You're logged off before the file is created, meaning your session is not recorded. The speed boost comes from the Windows kernel being saved on your hard drive and loaded when booting.

Is your PC truly shutting down?

While fast startup is a pretty harmless tool that can deliver a considerable startup speed boost, especially to PCs using hard-disk drives (HDD), some people prefer to have their PC truly shut down when they click the "Shut down" button on their PC.

Power options in the Windows 10 Start button

In a post on the PC Master Race subreddit, a user pointed out that fast startup was re-enabled in a Windows 10 update following the release of the Fall Creators Update.

If you're among the group of people who disable fast startup on their Windows 10 PC, you might want to recheck the settings to see if it's still off.

Why disable fast startup?

Leaving fast startup enabled shouldn't harm anything on your PC — it's a feature built into Windows — but there are a few reasons why you might want to nevertheless disable it.

One of the major reasons is if you're using Wake-on-LAN, which does not work when your PC is shut down with fast startup enabled. Others would like to save the hard drive space that is usually taken up with the hibernation file, and Linux users will likely see complications with dual boot and virtualization. Furthermore, some users have even reported that power buttons on their keyboard will not work and fans in their PCs will continue spinning. These problems are by no means across the board, but they can prove to be frustrating.

Left: after shutting down with fast startup enabled. Right: after shutting down with fast startup disabled.

Your reason for disabling fast startup might simply have to do with wanting to see your PC truly shut down when you choose to shut down, especially when working with a speedy solid-state drive (SSD), or to have the processor (CPU) uptime reset after booting.

How to enable and disable fast startup on Windows 10

If you'd like to see how your PC performs without fast startup enabled, you can disable it in just a few steps:

  1. Right-click the Start button.
  2. Click Search.

    Right-click the Start button. Click Search.

  3. Type Control Panel and hit Enter on your keyboard.
  4. Click Power Options.

    Type Control Panel. Click Power Options.

  5. Click Choose what the power buttons do.
  6. Click Change settings that are currently unavailable.

    Click Choose what the power buttons do. Click Change settings that are currently unavailable.

  7. Click Turn on fast startup (recommended) so that the checkmark disappears.
  8. Click Save changes.

    Click Turn on fast startup. Click Save changes.

If you want to re-enable fast startup at any point, simply repeat the steps so a checkmark appears next to Turn on fast startup.

More resources

Be sure to check out our other Windows 10 Help articles!

See more Windows 10 help, tips, and tricks

How to check if someone logged into your Windows 10 PC

$
0
0

Did you ever wonder who had access to your PC and when it happened? In this guide, we'll show you the steps to use Windows 10's auditing feature to track login attempts.

On Windows 10, you can enable the "Auditing logon events" policy to track login attempts, which can come in handy in many scenarios, including to find out who has been using your device without permission, troubleshoot certain problems, and more.

When the policy is enabled, Windows 10 can track local, and network logins whether they're successful or not, and every event will include the account name and the time of when it happened among other information. Typically, this feature is reserved for organizations, but anyone can use it as long as you know the process.

In this Windows 10 guide, we'll walk you through the steps to see when and who has signed into your device using Group Policy and the Event Viewer.

How to enable logon auditing policy on Windows 10

If you're running Windows 10 Pro, you can use the Local Group Policy Editor to enable the "Audit logon events" policy to track success and feature sign-in attempts on your device.

Important: Group Policy isn't available on Windows 10 Home, but interesting enough, at least login auditing for successful attempts comes enabled by default in this edition. If you're running Windows 10 Home, you can skip these steps, and jump right into the Event Viewer instructions.

  1. Use the Windows key + R keyboard shortcut to open the Run command.
  2. Type gpedit.msc and click OK to open the Local Group Policy Editor.
  3. Browse the following path:

    Computer Configuration > Windows Settings > Security Settings > Local Policies > Audit Policy

  4. On the right side, double-click the Audit logon events policy.

  5. Check the Success and Failure options.

  6. Click Apply.
  7. Click OK.

After completing the steps, Windows 10 will track every login attempt to your device whether it's successful or not.

If you're no longer interested in tracking logins on your computer, you can use the same instructions, but on step No. 5, make sure to clear the Success and Failure options.

How to see who logged into Windows 10

Once you've configured Windows 10 to audit logon events, you can use the Event Viewer to see who signed into your computer and when it happened.

  1. Open Start.
  2. Search for Event Viewer, click the top result to launch the experience.
  3. Browse the following path:

    Event Viewer > Windows Logs > Security

  4. Double-click the event with the 4624 ID number, which indicates a successful sign-in event.

    Quick Tip: On Windows 10 Pro, you can also double-click the event with the 4625 ID number to see unsuccessful attempts, or event ID 4634 to see when the user logged off.

In the event log, you'll find a lot of useful information, but you can simply look at the Logged section to figure out when the event took place, and within the "General" tab, look under New Logon to find out the account that was granted permission to your computer.

Using filters

The "Security" page logs many login attempts, including from background services, as such you may need to browse a few events until you find the information you're seeking. However, you can speed up the process using the Event Viewer filter feature to create a custom view to see only the login attempts.

  1. Right-click Custom Views.
  2. Select the Create Custom View option.

  3. Use the Logged drop-down menu, select a time range you want.
  4. Check the By log option.
  5. Use the "Event logs" drop-down menu, and select Security under "Windows Logs."
  6. In the "All Event IDs" field, type 4624.

  7. Click OK.

Once you've completed the steps, you'll be able to find out who and when someone successfully signed into your device more quickly.

Although we're focusing this guide on Windows 10, you can also refer to these instructions to track logins to your device on previous versions, including Windows 8.1 and Windows 7.

More Windows 10 resources

For more helpful articles, coverage, and answers to common questions about Windows 10, visit the following resources:

How to link keyboard shortcuts to touchpad gestures on Windows 10

$
0
0

If you use a precision touchpad, you can quickly run a keyboard shortcut or launch any application using a simple gesture — Here's how .

Gestures using a touchpad is nothing new on laptops, Windows 10 has supported this feature since the beginning, but it's not until the release of the Creators Update that Microsoft brings support for precision touchpads making easier to reconfigure gestures to control their actions.

If you have a laptop with a precision touchpad, you can make use of these new advanced settings to customize gestures in many ways, including the ability to assign a keyboard shortcut to perform a specific action with a simple swipe.

In this Windows 10 guide, we'll walk you through the steps to execute a keyboard shortcut using a touchpad gesture. Also, we go a step further and outline the steps to use a gesture to launch any app you want.

How to associate a shortcut using custom gesture

To link a keyboard shortcut to a touchpad gesture on Windows 10, do the following:

Quick Tip: If you don't know whether your device includes this feature, check the "Touchpad" settings page, and under the Touchpad section, you should see a line that reads Your PC has a precision touchpad.

  1. Open Settings.
  2. Click on Devices.
  3. Click on Touchpad.
  4. Under "Related settings," click the Advanced gesture configuration link.

  5. Choose the gestures type you want to use (three or four fingers) depending on your device gesture support.
  6. Choose a gesture:

    • Taps.
    • Up.
    • Down.
    • Left.
    • Right.
  7. Using the drop-down menu, select the Custom shortcut option.
  8. Click the Start recording button.
  9. Run the keyboard shortcut you want to use to save it in the gesture.

  10. Click the Stop recording button.

Once you've completed the steps, simply use the gesture you just configured to run the keyboard shortcut on your device.

Launching an app with a custom gesture

In addition, to modify a gesture to run one of the many keyboard shortcuts on Windows 10, it's also possible to configure a gesture to launch an app instead of performing an action (e.g., cut, paste, print screen).

  1. Right-click an app icon.
  2. Click on Properties.

  3. In the "Shortcut" tab, configure a key combo in the Shortcut key field.

  4. Click Apply.
  5. Click OK.

After completing the steps, use the instructions to associate the keyboard shortcut with a gesture to link the app shortcut with a gesture, and then, you'll be able to launch the app with a simple touchpad tap or swipe.

More Windows 10 resources

For more helpful articles, coverage, and answers to common questions about Windows 10, visit the following resources:

Complete list of PlayerUnknown's Battlegrounds Xbox One crates and cosmetics

$
0
0

Looking to get stylish on the harsh battlefields of PlayerUnknown's Battlegrounds? These are all the crates available at launch and their cosmetic contents.

PlayerUnknown's Battlegrounds (PUBG), one of the biggest games of 2017, has made its Xbox One debut following a wave of a success on PC. With tense 1 vs 100 "Battle Royale" gameplay, players will fight to the death in a shrinking area, until a single player emerges victorious. Delivering a majority of content seen on its flagship platform, Xbox One owners gain access to everything needed for the true PUBG experience.

PUBG might not offer an overwhelming among of content, but to make for this, its gameplay is remarkably replayable. Building on its core gameplay loop, the game also features an accompanying progression system. After spending time in-game you'll get the chance to unlock cosmetic items, helping your character stand out on the battlefield.

More: PUBG for Xbox One is unique and intense, but rough around the edges

See at Microsoft (Digital)See at Microsoft (Physical)See at Amazon

How PUBG's cosmetics system works

When playing PUBG across any of its modes, after completing a match, players are rewarded with an in-game currency, Battle Points (BP). Various factors affect how much BP is earned per match, including your end-of-match ranking, total kills, and player hits.

In the game's menu, players can redeem BP in exchange for randomized crates. By purchasing a randomized crate, you'll be provided with one random crate type, providing access to an item from the crate's set collection. Multiple crate types are currently offered in-game, with more expected to debut going forward.

The price of crates starts at 700 BP, however, after purchasing each crate, the price raises. Players are also limited to only six crate purchases a week. This price resets on a weekly basis but throttles the number of crates that can be earned over a short period of time. Microsoft has also released a set of limited-time crates to promote the game's Xbox One debut, purchased with real-world money.

List of crates in PUBG for Xbox One

As of launch, two crate types are available with in-game credits in PUBG for Xbox One. Early adopters also had the chance to purchase three limited-time crates, using real-world money.

  • Wanderer Crate
  • Survivor Crate
  • Warrior Crate (Paid)
  • Accessory Crate (Paid)
  • Tracksuit Crate (Paid)

List of all cosmetic items in PUBG for Xbox One

Wanderer Crate contents

As first seen in PC version of PUBG, the Wanderer Crate is a standard crate purchased using BP. With the purchase of this crate, you'll be getting one randomized item, from the crate's set potential contents. This crate contains items found on the floor around the game's map and one of the game's rarest items, the blue pleated mini-skirt.

  • Ballistic Mask
  • Bloody Combat Pants
  • Blue Hi-top Trainers
  • Boots (Punk)
  • Cargo Pants (Beige)
  • Cargo Pants (Blue)
  • Cargo Pants (Khaki)
  • Dirty Tank-top (White)
  • Floral Shirt
  • Gas Mask (Full)
  • Glasses (Punk)
  • Hotpants (Blue)
  • Long Sleeved T-shirt (Striped)
  • Long-sleeved T-shirt (Black)
  • Long-sleeved T-shirt (Light Blue)
  • Mandarin Jacket (Blue)
  • Padded Jacket (Urban)
  • Pleated Mini-skirt (Blue)
  • Protective Sunglasses
  • School Shirt (Open)
  • School Shoes
  • Slacks (Blue)
  • T-shirt (Red)
  • T-shirt (Striped)
  • Tank-top (Charcoal)
  • Working Boots

Survivor Crate contents

The Survivor Crate is another standard crate, obtained using BP. This crate contains one randomized item upon purchase, including combat pants, trench coats, and other cosmetic items. Players also have to chance to obtain the purple pleated mini-skirt, which is the rarest item in this crate.

  • Baseball Cap
  • Beanie
  • Brown Hi-top Trainers
  • Checkered Shirt (Red)
  • Checkered Shirt (White)
  • Combat Pants (Black)
  • Combat Pants (Blue)
  • Combat Pants (Camo)
  • Combat Pants (White)
  • Fingerless Gloves (Camo)
  • Fingerless Gloves (Tan)
  • Grey Boots
  • Matched Grey Shirt
  • Mini-skirt (Purple)
  • Padded Jacket (Beige)
  • Padded Jacket (Camo)
  • Padded Jacket (Khaki)
  • Shirt (White)
  • Slacks (Purple)
  • Trench Coat (Black)
  • Trench Coat (Camel)
  • Trench Coat (Grey)
  • Trench Coat (Red)
  • Vintage Baseball Hat (Black)
  • Vintage Baseball Hat (White)
  • Women's Tuxedo Jacket (Purple)

Warrior Crate contents

To mark the launch of PUBG on Xbox One, the "Warrior Crate" was the first of three limited-time crates, containing exclusive items. Priced at $9.99 from December 7 to December 10, buyers would get four pieces of aptly-themed green clothing, for use in the Xbox One version.

  • Green Pattern Balaclava
  • Green Pattern T-shirt
  • Green Pattern Pants
  • Green Pattern Hi-top Trainers

Accessory Crate contents

Following the release of PUBG on Xbox One, Microsoft introduced the "Accessory Crate," from December 14 to December 17. Priced at $4.99, this pack contained two exclusive cosmetic accessories, once again themed around the iconic Xbox green.

  • Green Pattern Cap
  • Green Pattern Fingerless Gloves

Tracksuit Crate contents

From December 21 to December 22, Microsoft will sell the third and final exclusive crate for PUBG on Xbox One. Priced at $4.99, buyers will receive two items, making a full tracksuit piece. These come in a stylish clean white, although might not be best for camouflage.

  • Xbox Tracksuit Top
  • Xbox Tracksuit Pants

See at Microsoft (Digital)See at Microsoft (Physical)See at Amazon

How to create an Outlook 'Out of Office' calendar entry

$
0
0

Are you planning to take a few days off during the holidays? Then don't forget to create a calendar event to let colleagues know you won't be around for a while.

The holiday season is upon us once again, which means that for many people, it's also the time to take a break from work to relax or spend some quality time with family.

If you're planning to take a few days off, in addition to configuring automatic email replies, it's a good idea to update your Outlook calendar to make sure no one tries to drag you into meetings or projects during your time away.

In this Windows 10 guide, we'll walk you through the steps to create an out-of-office calendar event to remind people that you'll be taking a few days of vacation using the Outlook 2016 app, Outlook.com, and even with the default Mail & Calendar app on Windows 10.

How to create an 'Out of Office' calendar event using Outlook app

If you're using Outlook 2016 on Windows 10, you can quickly create an event to let people in your circle know that you'll not be around for a number of days by creating an out-of-office calendar event.

  1. Open the Outlook app.
  2. Click the Calendar button in the bottom-left corner.

  3. Select the calendar you want to add the new event form the left pane. For example, your shared work calendar.
  4. Select a day in the calendar.
  5. In the "Home" tab, click the New Appointment button.

  6. In the "Subject" field, add a descriptive title for the event.
  7. Use the "Start time" picker to select the day you're planning to leave work.
  8. Use the "End time" picker to select the day you're planning to return to work.
  9. Check the All day event option.
  10. In the "Event" tab, use the "Show As" drop-down menu, and select the Out of Office option.

  11. Create a custom message for anyone who will see your event (optional).
  12. Click the Save & Close button.

Once you've completed the steps, people who also have access to the shared calendar will be able to see that you won't be available for a number of days.

How to create an 'Out of Office' calendar event using Outlook web

It's also possible to create an out-of-office calendar event when you're planning to take a vacation using Outlook on the web.

  1. Open Outlook.com on your web browser.
  2. Click the app launcher button in the top-left corner.
  3. Click on Calendar.

  4. Click the New button from the toolbar to create a new event.

  5. Under "Details," enter a descriptive title for the event.
  6. Use the Start date picker to select the day you're planning to leave work.
  7. Use the End date picker to select the day you're planning to return to work.
  8. Check the All day event option.
  9. Use the "Save to calendar" drop-down menu and select the calendar you want to add the new event. For example, your shared work calendar.
  10. Use the "Show as" drop-down menu and select Away, but anyone using an app will see the "Out of Office" label.

  11. Create a custom message for anyone who will see your event (optional).
  12. Click the Save button from the top-left corner.

After completing the steps, those who have access to the calendar, whether they use Outlook.com or a supported email client will see that you're taking a few days of vacation.

How to create an 'Out of Office' calendar event using Mail & Calendar app

In the case that you're using the default Mail & Calendar app on Windows 10. You can also create an out-of-office event to let family, friends, or colleagues that you'll be taking some days off during the holidays.

  1. Open the Mail app.
  2. Click the Calendar button in the bottom-left corner.

  3. Click the New event button in the top-left corner.

  4. Click the "Calendar" drop-down menu and select calendar that you want to add the new event. For example, your shared work calendar.
  5. Enter a descriptive name for the event.
  6. Use the "Start time" picker to select the day you're planning to leave work.
  7. Use the "End time" picker to select the day you're planning to return to work.

  8. Check the All day event option.
  9. In the "Home" tab, use the "Show As" drop-down menu, and select the Out of Office option.

  10. Create a custom message for anyone who will see your event (optional).
  11. Click the Save and Close button.

Once you've completed the steps, your time away schedule will appear to everyone who has access to the shared calendar.

More Windows 10 resources

For more helpful articles, coverage, and answers to common questions about Windows 10, visit the following resources:

Viewing all 5861 articles
Browse latest View live


Latest Images