Quantcast
Channel: Help & How To
Viewing all 5861 articles
Browse latest View live

How to switch between fast and slow rings on the Windows 10 Insider Preview

$
0
0

Windows 10 updates

You might not even know that you can change how quickly you get updates to the Windows 10 Insider Preview, nor which speed you're currently getting them at.

Fortunately, changing between the "fast" and "slow" rings is extremely simple to do. And since build 10122 has some pretty showstopping bugs for some folks using AMD GPUs, you might need to get onto the slow ring in a hurry.

Here's what to do.

  1. Open up the "Settings" app
  2. On the main screen you'll want to click on "Update & security"
  3. From there you'll find yourself in the Windows Update menu.
  4. Click on "Advanced options"
  5. Scroll right to the bottom where you;ll see a drop-down box
  6. Click on it and select "fast" or "slow" depending on your preference.

And that's all there is to it. You can switch between the two at any time by following the same steps.


Mirror your Windows Phone to the big screen with the low-cost Amazon Fire TV Stick

$
0
0

Screen mirroring with Amazon Fire TV Stick

The Android powered Amazon Fire TV Stick might not be the first device on your radar, but it can be very useful to Windows Phone owners at a pretty low price.

If you enjoy mirroring your Windows Phone to your TV, the Fire TV Stick is a great option for doing so. And it has so many benefits over a Miracast adapter, especially if you don't use any other set-top boxes or something like an Xbox One.

I'll admit I didn't look into any details on the Fire TV Stick before picking one up. Aside from knowing it runs Android, has a bunch of UK specific on-demand content apps, Netflix and all the Amazon digital ecosystem, it's just a low-cost way of having said services in my bedroom. So imagine the surprise when I discovered it's also a pretty nifty way to mirror my Windows Phone to the TV. If this sounds tempting, here's how you do it. Do note that not all Windows Phones support screen mirroring.

  1. On the Fire TV Stick, hold down the Home button on the remote.
  2. Select the "Mirroring" option to prepare the device.
  3. Open up "Settings" on your Windows Phone.
  4. Scroll down until you find the "project my screen" option.
  5. You should now see your Fire TV Stick as an option to pair with.
  6. Tap to pair and you should see your Windows Phone display appear on your TV!

Miracast dongle's aren't the most common thing around and when you consider Microsoft's own will set you back £60 in the UK, the current promo price of £25 (regular RRP is £35) makes this all the more tempting. And you have the added bonus of being able to do a whole bunch of stuff (even play Crossy Road) on the Fire TV Stick without your phone attached.

  • Buy an Amazon Fire TV Stick from Amazon (U.S.), (UK) ($39/£25)

How to enable full-screen Start menu in Windows 10 Insider Preview desktop mode

$
0
0

Windows 10 Start Screen

When Windows 10 Insider Preview build 10122 was released, one noticeable change was the removal of the toggle to expand the Start menu. According to Microsoft, people usually pick the appropriate size (or just go with the default) for Start and stick with that, which makes having this button being present all the time unnecessary. If you want the full-screen Start experience on Windows 10 desktop mode, you have to enable it in the settings. We'll show you how. It's really simple. Watch the steps in our video.

  1. Swipe-in from the right edge of the screen and tap or click All settings
  2. Tap or click Personalization
  3. At the bottom, there's the toggle to use full-screen Start when in the desktop

Windows 10 Start screen

That's it! Another reason Microsoft removed the toggle in the Start was that it created confusion for users where many thought that is how they got to Tablet mode when all it did was just resize Start. Microsoft says moving the toggle to Start settings helps them remove the confusion. It also makes Start menu look sleeker.

Windows 10 Start screen

If you haven't seen them yet, check out everything you need to know about Windows 10 Insider Preview build 10122 and our hands-on video of what's new. Do you like this change in the recent build? Sound off in the comments!

How to manage wireless network connections in Windows 10

$
0
0

In this how-to guide, we will go through the new "Network & Internet" Settings to learn how to manage wireless connections in your Windows 10 PC. In Windows 10, Microsoft is adding a huge number of improvements and features. One of these changes is the addition of the Settings app, which replaces "PC settings" from Windows 8 and it will eventually also replace the Control Panel.

Inside Settings, users will find the new "Network & Internet" section. Unlike Windows 8, the new settings in Windows 10 are much improved. For example, in Windows 10, Microsoft is dividing wireless and wired connections in different sections (Wi-Fi and Ethernet). You can share and connect to a wireless network with friends using Wi-Fi Sense, and you can pretty much perform all the wireless networking tasks right from Settings.

Of course, if you only use Ethernet, then connecting to a network is very straightforward. Just plug the Ethernet cable into the network adapter in your computer and you're good to go. On the other hand, connecting to a wireless network has a few more steps and there are a variety of features.

Connecting to a wireless network

Once you have installed and configured the wireless adapter in your computer, you'll notice the new wireless network icon in the system tray. To connect to your network, click the network icon in the system tray and select from one of the available networks. Then, make sure you select the Connect automatically option if this is a network you'll be frequently connecting to on a regular basis. Finally, click Connect and enter the SSID to complete the configuration.

Managing your wireless connections

In Windows 10 Microsoft is slowly removing the fly-in menu to access different settings and features. Because of this all the network functionalities have been moved to "Network & Internet". To access the network settings, click the "Network settings" link (refer to the previous image). Or launch the Settings app and navigate to "Network & Internet".

In the Wi-Fi section, you'll find all the wireless networks available to you (this is new to Windows 10), which is the same list you see in the system tray.

Like in Windows 8, if you need to see the IP address, security type, and SSID, or if you need to set your connection as a metered connection, you can click the Advanced Options link the bottom of the list of connections.

How to forget wireless networks in Windows 10

If you need to remove or forget wireless networks that you don't use anymore this is how you can do that. From Wi-Fi, click the "Manage Wi-Fi settings". Then, from the list of "Mange known networks", click on the relevant network, and then click the "Forget" button.

Wi-Fi Sense

You will also notice that on the page labeled "Manage Wi-Fi settings" there is a new "Wi-Fi Sense" feature. The idea of Wi-Fi Sense comes from the same feature on Windows Phone 8 and it's simple. To save mobile data you can connect to suggested secure open hotspots around your neighborhood. If you have Skype, Outlook.com, or a Facebook contacts, you can share, and access password-protected networks without ever having to type or show a password.

To connect to free, open hotspots, make sure that you slide the pill switch to the "On" position under "Remember, not all Wi-Fi networks are secure".

To share a network connection with your contacts, slide the pill switch to the "On" position under "Connect to networks shared by my contacts".

Finally, click one of the three types of contacts you want to share a network. Under "Manage known networks", select a wireless network, click Share, enter the SSID password, and click the Share button again.

In the same way, if you want to stop sharing a particular wireless network, simply click Stop sharing.

As you may have noticed, available W-Fi Sense connections will appear under the "Wi-Fi" list with the "Wi-Fi Sense" label (refer to the previous image).

And that is it!

Do you like the updated Microsoft approach for managing networks? Let us know your thoughts in the comments below.

How to install Windows 10 apps to an external drive

$
0
0

While we are used to installing apps inside the Windows installation drive, the fact is that lately we see more devices with limited local storage. However, things started to change when in Windows Phone 8 when Microsoft introduced a feature to allow users to install Windows Store apps directly onto an external SD Card.

Now the same feature will continue to be part of Windows 10 Mobile, and it will also be part of Windows 10 (desktop).

Follow the steps below to save apps to a new location

In Windows 10, Microsoft is adding the "New apps will save to" option in the Storage "Save locations" area, inside System, in the Settings app.

In "New apps will save to", you'll notice a drop down menu with the available locations you can save newly installed apps, select one storage drive, and you're good to go.

It's worth pointing out that for this guide, I'm using a virtual machine in which I have created and mounted a secondary hard drive. I have also tested the feature with a regular USB thumb drive, and it both cases the feature worked perfectly. This option means that you're not limited to SD Cards only, as you can also use an external USB or secondary hard drive, or a USB thumb drive. However, you cannot not use mapped network drives to install and store Windows apps, and you can always use one drive at a time.

Furthermore, the feature does not require you to format the drive, so you can safely use a personal external drive with data already on it, knowing that nothing will happen to it. Nonetheless, it's always a good idea to make a backup of your files.

Now, what happens if you disconnect the drive? Short answer: Nothing. You'll click an app, and it won't start, but simply reconnecting the drive or SD Card will bring things back to normal.

Also, when you change the settings to install new apps into a secondary location, Windows 10 will create three folders: the first folder has your profile name, then there is the "WindowsApps", which is where the apps will be installed, and finally there is the "WpSystem" folder, which is where all related application data will be saved. Also, the app files stored on the new drive are encrypted, so if you lose the drive no one will be able to access the data. However, keep in mind that personal files stored in your profile folder will not be encrypted by this feature.

Here are a few other things you need to know

This feature only installs new apps to the secondary location. It doesn't move existing apps to a new location. Though, Microsoft is also building a feature to move already installed apps to an external drive, but it's not working at the time of this writing in Windows 10 build 10122.

The best way to get around this limitation is by uninstalling the apps you want, then change the setting to install apps to a new location, and now reinstall the apps again. (Be warned! Depending on how the app was designed, you may lose some app data in the process.)

If you want to stop using a secondary location to install apps, simply go back to the Storage Settings, and choose "This PC". However, the data stored on the external drive will not migrate to your PC. In this case, you want to uninstall all the apps from the secondary storage before changing the settings, and then you can reinstall the apps in your system. Again, this is how things are working in Windows 10 build 10122. Future updates might change the process. Finally, delete the remaining files and folder from the external drive and everything will go back to normal.

Will you be using this feature in Windows 10? Let us know your thoughts in the comments below.

How to download offline maps in Windows 10 Mobile

$
0
0

Windows 10 offline Maps

When visiting a new country, you might not always have internet connection right away. Fortunately, Windows 10 Mobile (and Windows Phone 8.1) lets you pre-download maps if you need directions even when you're offline. It's really simple. Watch our how-to video on a Lumia 830 running Windows 10 Mobile Insider Preview.

  1. Go to Settings and select System
  2. Tap Offline maps at the bottom
  3. Tap Download a map
  4. Select the map(s) you want to download

That's it! You don't need an internet connection to use Maps in the region(s) you've selected above. This can be very handy if you're traveling to a new place without a local SIM card or if you want to save money on data.

Offline Maps Windows 10

Offline maps can also get updates. You can check for map updates under the same section in the settings. Tap the check now button to manually update or toggle on the option to automatically update maps. The phone will automatically update maps only when your device is plugged in and you're not on a metered connection.

While Google is bringing full offline access to Google Maps later this year, you can already do it now on the Maps application for Windows 10 mobile and Windows Phone 8.1. Is this an important feature for you? Let us know in the comments!

How to manage file storage more efficiently in Windows 10

$
0
0

We recently got a look at how Microsoft is making it easier for Windows 10 devices with limited storage to deal with app installations by changing a simple option in Storage settings to install new apps on an external drive. Today, we are looking at how you can save local storage space by saving your files to a secondary drive automatically.

In Windows 10, Microsoft is adding some new features, many of which come from Windows Phone 8. One example is Storage Sense, which let users easily change the default save locations of documents, music, photos, and more.

The new operating system, which apparently is on track to launch later in the summer, brings a similar feature to configure specific locations to save your documents, music, pictures, and videos to an alternate location.

Follow these steps to save files to a different drive

To change the settings, simply go to the Settings app, navigate to Storage and under Save locations, change the location for each specific type of file.

The only drawback to this feature is that it will only save files to these locations after changing the settings. If you have files already stored in the "Documents" or any of the other folders, those files will not get moved to the new location.

Quickly move old file to the new location

Although, this is a good option to help you save space in your local storage, it can get a little confusing for some users. Using this new feature will not change the location for the folders listed under "This PC" in the File Explorer. Many users can end up saving and moving files in two different locations without knowing.

To avoid this issue, you can change the settings in Storage, but you also want to change the location of your account folders to the new destination.

To do this:

1- Go to File Explorer and navigate to This PC, in "Folders", right-click the "Documents" folder and click Properties.

2- Navigate to the Location tab, click the Find Target button and browse to the new location for the document's folder.

3- Copy the path from the address bar, go back to the Location tab, and paste the path in the field, and click Apply.

4- In the "Move Folder" dialog box, click Yes to allow to move the content from the old location to the new one. (Repeat the same process for each folder you change settings in Storage.)

This process will accomplish two things. First, no matter where you're in the operating system, you can be sure you'll always be saving the files to the new location. Second, this process moves all the old files in your system to the new location.

Here are a few more things you need to know

  • Make sure you're using an external drive that you won't be disconnecting very often
  • When you change the save location settings, files will be stored inside of a folder that has your account name
  • Be consistent on how you save files moving forward
  • If you disconnect the drive, the save locations settings will revert to "This PC" until you reconnect the drive
  • Saving files to a secondary location doesn't replace a backup of your files, but it's an option that help in case the Windows installation gets corrupted or it just simply dies. (Though, this could also happen to the secondary location.)

How do you manage files on your PC? Let us know your experience in the comments below.

How to remove the 'Get Windows 10' app from your PC and cancel your upgrade reservation

$
0
0

Starting on June 1st, 2015, millions of PCs and tablets around the world will begin to see the Windows 10 upgrade notification icon in the system tray, on all qualifying devices. That's because Microsoft has announced that the next version of its operating system will be arriving on July 29.

Now there is a slight chance that some Windows users won't want to move quickly to the new version of the operating system. Some users might feel they want to stay a little longer with Windows 7 or Windows 8.1, or they feel that Windows 10 isn't quite ready. For those people, I will show you how you can remove the icon from the system tray and how to cancel your reservation.

The Windows logo icon in the system tray didn't magically appear on your PC. It was the update KB3035583 that handled the notification preparing your computer for Windows 10.

KB3035583 was originally an update released back in April, Microsoft offered it as an optional update for Windows 7 and Windows 8.1 machines. Today, the software maker is changing the priority of the update to "Recommended", which will force the update to download and install automatically via Windows Update.

Cancel reservation

If you reserved your copy of Windows 10, but you just realized that you don't want to upgrade, you can easily:

1- Right-click the system tray icon and select Check your upgrade status.

2- Click the Cancel reservation link. If you don't see the link, click the hamburger button in the top-left, click View information, and then click the Cancel reservation.

That's it.

Removing the "Get Windows 10" app

If you're prompted to reserve your free copy of Windows 10, it means that your device is ready to receive the new version of the operating system. You'll be asked to enter your email address to confirm your reservation, but if you don't want to upgrade or get reminded, you can easily:

1- Go to Control Panel > Programs and Features > Installed Updates.

2- Do a search for KB3035583, double-click it, and then click Yes, to uninstall the update.

3- Reboot your computer, and you'll be good to go.

If you can't remember whether you reserved your copy, you can check your upgrade status. To do so go to the Control Panel > Windows Update, and you'll notice the "Windows 10 Upgrade reserved" message.

It's worth noting that Windows 10 is a major update to the operating system, and this is the first time in history that Microsoft will be offering users a chance to upgrade free of charge. However, Windows 10 will not be free forever, there is a limited time to get the update. While the company is opening the doors to reserve a copy of the operating system on June 1st (some users even received the notification on May 31st), the company will only offer the free upgrade until July 29, 2016 (one year to be exact).

After this time, those who didn't take advantage of the upgrade will have to pay full price.

Reserving your upgrade again

Now, if you change your mind, you can always download and install the update KB3035583, and reserve your copy of Windows 10.

In conclusion

I encourage you to reserve your upgrade of Windows 10. This next version is looking to be an awesome operating system, just like Windows XP and Windows 7. But we also have to understand that there will be a lot of users that might feel annoyed by being prompted to upgrade, and there will be users feeling that Windows 10 isn't for them.

Will you be reserving your Windows 10 upgrade? Let us know in the comments below!


5 Settings tips to make your Windows 10 experience more enjoyable

$
0
0

In Windows 10, Microsoft is changing a lot of things. While the focus on this new release is to bring some of the operating system familiarity back to users, the company is also adding new features that will work across different devices. One of these new features is the new Settings app.

The Settings app is the new one-stop-shop to change pretty much all your PC settings, and unlike the Control Panel, the same app will work on PCs, tablets, and phones. Eventually, we also know that Microsoft will be replacing the good old Control Panel in favor of "Settings".

In Windows 8.x, Microsoft introduced the "PC settings", but it doesn't compare with the new Settings app. This new app brings a complete place to customize settings and it's something more like the Control Panel.

While there are many new options you can customize in Settings, today I want focus on five settings you can customize in Windows 10. These include how to control notifications banners and system tray icons, save energy and manually prioritize system resources, and to bring a little more customization to the Start menu.

Control feedback notifications

Feedback is one of the main pieces of information Microsoft is using to build Windows 10. Since the first public preview of the operating system, the software maker has included the "Windows Feedback" app for this purpose. But to get users to engage with Windows 10 and submit their reactions, the company has configured the operating system to show frequently pop-up banners notifications asking users to share their experience after a particular task.

During the development process, it's recommended that users send feedback to Microsoft as much as possible to get a great version of Windows 10. However, constant reminders to submit feedback can be a little bit annoying. Thankfully, the company added an option to control the frequency in which users get prompted for their feedback.

To change this behavior, open the Settings app > Privacy > Feedback (note that "Feedback" has been renamed to "Feedback & diagnostics" starting on Windows 10 build 10134). Then, under Feedback frequency, you can change the frequency to "Automatically, Always, Once a day, Once a week, or Never". Select your preference and now you'll be able to enjoy Windows 10 with less annoying notifications.

Also, you can on the System Settings, under Notifications & actions, users can also control notifications for the Windows Feedback app. Users can turn on or off, or click the Advanced link to choose to show only notifications or also show notification banners.

If you don't want to see any notifications, you can simply slide the pill switch to the Off position in "Notifications" (refer to the previous image).

Remove system icons from the system tray

Another change coming to Windows 10 is the location from where users can enable or disable system tray items. In previous versions of Windows, users needed to go to "Notifications Area Icons > System Icons" to choose which items, such as Clock, Volume, Network, Power, Action Center, and more. Users can simply go to the Settings app, and navigate to System > Notifications & actions, and under Turn system icons on or off, you can easily decide which items should appear in the system tray for less clutter taskbar.

Remove program icons from the system tray

In the same way, users can control which program icons can appear in the bottom-right corner of the screen. In Windows 10, Microsoft is also relocating the setting to select which icons from apps will appear on the taskbar to the Notifications & actions area. Simply, click the Select which icons appear on the taskbar, and you'll see a listing with all the apps and services you can turn on and off, make your choice and you're good to go.

Here is a screenshot of a clean system tray:

Control which apps run the background

In Windows 10 build 10134, Microsoft is adding a new feature in the Privacy settings to give users more control over which apps can run in the background.

A similar feature was included in Windows 8.x, but after allowing a Windows app to run in the background, it was very confusing to disable the functionality. This involved going into each app, opening its settings, and changing the Lock screen option to stop the app from running the background.

In the new operating system, the settings now appear unified in a single place. To change this behavior, simply go to the Settings app, navigate to Privacy > Background apps. Then under "Let apps run in the background", you will see a list of Windows apps currently installed on your system. You can then slide the pill switch on or off to restrict apps from receiving info, send notifications, and stay up-to-date, even if you're not using them.

It's worth pointing out that that turning off background apps can also help save battery on mobile devices. However, I think it would be nice if this feature also offered a setting so that background apps can automatically turn off when the Windows 10 device isn't charging.

Remove frequently used apps from the Start menu

Microsoft is also bringing back the Start menu in Windows 10, which is a mix of the Start menu in Windows 7 and the Start screen from Windows 8.1. In the left pane, the part of the menu that looks like Windows 7 has three listings: "Most used", "Recently added", and a list of places such as File Explorer, Settings, and others.

Because you have a listing of the most used apps, it doesn't necessary mean that you like to see listed all the apps Windows 10 thinks you'll keep on using. It can even be the case where you don't want to see even a list of the most used apps in the Start menu at all. For these cases, Microsoft is making it easier for users to manually items from the listing or to disable the entire list.

Furthermore, users will also notice the "Recently added" list that notifies users of newly installed apps. Again the software maker also is including an option for the user to disable this type of notification from the Start menu.

To change these two behaviors, launch the Settings app and navigate to Personalization > Start, and from the "Customize list" slide the pill switch to the Off position for the "Store and display recently opened programs in Start" and "Show the recently added apps group".

If you like the listing of the "Most used" apps, but there is that one single app, you don't want to see here is how to fix that. Simply open the Start menu, right-click the app, and from the context menu click "Don't show in this list". Then the slot will be filled with the next app in line as the most used.

And there you have it, five useful tips you can use in Settings to get less distracted using Windows 10!

If you haven't seen all the new features coming to Windows 10, don't forget to check out our Windows 10 section with all the latest information, news, and videos.

Do you like how the Settings app is shaping up? Don't forget to let us know what you think in the comments below.

Farming Simulator 15 Guide: How to make unlimited easy money

$
0
0

Farming Simulator 15 Easy Money and Achievement guide

Farming Simulator 15, a realistic simulation game, recently arrived on Xbox One after launching on Windows and Xbox 360. Players manage a farm, performing numerous real-life tasks like planting and sowing crops and cutting and selling trees – all while trying to make a profit. I've been playing Farming Simulator 15 for a while now. Somehow, even though it doesn't involve killing or shooting anything at all, it's quite fun!

Money plays an important role in the game, as players need to earn lots of it to finance new machines and supplies that allow them to perform additional tasks. Several Achievements involve reaching financial milestones as well. Wouldn't it be nice if you could jump ahead a little, get all the money you need, and then just focus on whichever tasks you like without the bill collectors looming over?

Recent Farming Simulator games have a great money-making exploit that will bring the money in super quickly. Our strategy guide including a video explains just how to do it!

Before we begin

Note that this strategy involves leaving your Xbox One or other console of choice on for several hours at a time while you build up your fortune. You'll want to use a wired controller (such as the Xbox One Mini Series controller) or plug a wireless one into the console in order to prevent the controller from powering off and interrupting the game. Don't worry, the effort (and electricity) will pay off!

Farming Simulator 15 guide

Getting started on the road to riches

The strategy works on either of the game's maps and any difficulty setting. You don't have to start a new game to do it; all you need is $125,000 (earned or borrowed) to get started. Still, for the sake of this guide we'll start from the beginning.

Start a new game. Select the map and difficulty of your choice. In our video, we go with Bjornholm on Easy. Once the game begins, press left or right on the d-pad to hop between tractors until you land in the one located closest to the shop. Drive it right up to the entrance for maximum convenience.

Farming Simulator 15 guide

At the shop, head to the ATM. You'll find it to the left of the shop entrance on either map. Now withdraw money until you have at least $125,000. You could also get this money quickly by selling tractors, but that takes longer. Plus you'll want to keep one tractor at the shop so that you can warp to it whenever you resume your save file.

With $125,000 in hand, return to the shop front (a basket icon) and find the Placeables section in the top-right corner of the menu. Buy a Solar Collector and place it somewhere nearby that won't interfere with future farming activities. Solar Collectors generate $380 every in-game hour and require no supervision or maintenance.

Farming Simulator 15 guide

Time travel

Now we game the system a bit by pausing and accessing the Settings menu. Turn the Timescale up to 120x to make time accelerate faster in-game. Also switch Plant growth and plant withering off so that everything doesn't run amok during your journey into the deep future. Save your game and exit the menu.

At 120x, every 30 seconds of real-time equate to one in-game hour. Thus, your new Solar Collector brings in $760 per minute without you having to do anything. That's helpful, but it's not enough. We want to buy five or so Solar Collectors to get the money train rolling.

Farming Simulator 15 guide

Factoring in your farm's expenses, it should take about three hours to reach $125,000 again so you can buy your second solar panel. Just leave the game running with the screen off while you wait. Or you could set out and collect all of the hidden gold coins. The advanced timescale won't interfere with your searches, and you can get three Achievements if you find them all.

Return and buy a second solar panel, placing it next to the first. Now you're making $1,520 every minute! It should only take 90 minutes to afford a third Solar Collector. Keep checking back and buying panels until you have five or so panels.

Save intermittently! Whenever you need to turn the system off and come back to it, you can jump right back to the tractor you placed in front of the shop.

Farming Simulator 15 guide

Investing in wind power

With an arsenal of Solar Collectors in your pocket, it's time to start thinking about wind power. One Wind Energy Converter costs $1,200,000 and produces $4,000 every 30 seconds.

With five solar panels producing $1,900 per half minute, it will take about six hours to afford a windmill. During this time, you should get the 'Noveau Rich' Achievement (have one million dollars) and 'Longplayer' (play for over 10 hours).

Farming Simulator 15 guide

Come back and buy your first Wind Energy converter from the Placeables section of the shop. Combined with your five solar panels, you should now be making $11,800 per minute. It should take about two hours to earn another $1,200,000 and buy your next windmill. Repeat the process until you have five Wind Energy Converters.

Once you have five windmills, it's time to let the game idle until you earn ten million dollars. With five solar panels and windmills, you should be making $43,800 per minute. It will only take 2.5 hours to hit ten million! This gets you the $5 million Achievement and 'Pots of Gold' (ten million dollars).

Farming Simulator 15 guide

Living the good life

Now that you're filthy stinking rich feel free to buy all of the best vehicles and equipment in the store. Better tractors drive faster, nicer trailers carry more cargo, etc. The sky is practically the limit. Turn the timescale and plant growth back to normal when you're ready to resume normal farming. Whenever you want to farm money instead of crops, just set time to fast-forward again.

But wait, why stop at ten million? You could always keep buying more Wind Energy Converters and multiplying the amount of money your energy business brings in.

Farming Simulator 15 guide

To farm or not to farm

When you're not gaming the system, Farming Simulator 15 provides a fairly engrossing simulation experience. Pick any activity for which you own the equipment, and then get to work! Players can harvest wheat, mow grass, chop down trees, raise animals, and much more. Optional missions even give the game a structure beyond just building up an awesome farm.

Of course, the real fun comes from multiplayer. Teaming up with friends, dividing up tasks, and working together in a stress-free environment provides a relaxing and Minecraft-like experience. Up to six players can team up on Xbox One and PlayStation 4, with 16 on PC.

The one downside to multiplayer is nobody earns Achievements. That encourages people to stick to single-player instead of teaming up, which is silly. Giants Software needs to enable multiplayer Achievements via update or in next year's version.

If driving a variety of tractors, trucks, and other big vehicles and customizing your farm sounds like fun, Farming Simulator 15 is your game. You can always kill stuff in some other game!

Thus wraps up our first Xbox One strategy guide. Please watch both videos, leave a comment, and let us know if you find this guide useful!

How to turn off Cortana and stop personal data gathering in Windows 10

$
0
0

Perhaps one of the biggest features in Windows 10 is the arrival of Cortana, Microsoft's answer to Apple's Siri and Google Now. Cortana is the "world's first" digital assistant capable of helping users on many tasks. The more she learns about you, the more it understands you more and be able to assist you more efficiently.

On Windows 10, you can simply say "Hey, Cortana" to have the service immediately answer questions about weather forecasts, set reminders, search the web, find virtually anything on your PC, keep track of flights, calendar, packages, and a lot more – Heck! Cortana can even tell you joke if you need a distraction.

As good as Cortana is there is the issue of privacy as Cortana inevitably has to collect various pieces of information and personal data to learn to assist you accordingly.

Some information collected by the digital assistant includes information about your contacts, calendar, location, internet history and favorites, speech, inking and typing, and more.

Although, I personally believe that Cortana is a great tool that will only get better with time, we have to understand that many users will find Microsoft collecting certain pieces information as an invasion of privacy. As such in this how-to guide, you'll learn the options Microsoft is offering to turn off Cortana and stop personal data gathering.

Follow these steps to turn off Cortana in Windows 10

It's pretty straightforward to disable Cortana, in fact, there are two ways to do this task. The first option is by launching Cortana from the search bar on the taskbar. Then, from the left pane click the settings button, and under "Cortana" (the first option) and slide the pill switch to the Off position.

The second option is by launching the Settings app and on Privacy, go to Speech, inking, & typing, and click Stop getting to know me.

Either action will turn off Cortana deleting everything the assistant knows about you on this devices. Previously collected data from Cortana's Notebook will not be deleted.

Deleting personalization data from the Microsoft servers

To delete any remaining type of Cortana data and personal information, such as Notebook, Reminders, Places, from your account, go to the Bing Settings' page. Using the account you're using on your computer, click the Clear button for both "Clear personal info" and "Other Cortana Data and Personalized Speech, Inking, and Typing". In both cases, confirm the deletion and you'll be good to go.

Turning off additional data gathering options in Windows 10

If you want to stop Microsoft from collecting personal information, you can go to the Privacy settings page and disable "Send Microsoft info about how I write to help improving typing and writing in the future".

In the same way, you can turn off data collection for location by going to the Privacy settings page and disabling Location globally. Please note that you can also disable location per app. You can even turn off location for Cortana, but a the time of this writing, this option cannot be configured just yet. Disabling location globally will also disable the feature for Cortana.

Things you need to know

While Microsoft is providing different ways to turn off Cortana in Windows 10, there are a few things you may want to know about this feature and data collection:

  • You can only disable Cortana per device. You cannot simply disable the assistant in one device and expect to be turned off on every Windows device you own.
  • The name you set Cortana to call you is also set per device, not globally
  • You can clear data and personal information that Microsoft collects using Cortana, but there isn't a button to stop collecting information globally in your Microsoft account
  • If you do not want Microsoft to store personal information in the cloud, turn off Cortana on all your devices, then clear all your personal information from your Microsoft account
  • If you disable Cortana in one device, then you clear your information stored online, but if you have another device using Cortana, then that information will once again be uploaded and stored in your account
  • Turning off Cortana will make Windows 10 less efficient in trying to make better suggestions for you
  • Yes, the search bar on the taskbar will continue to work. It won't disappear because you disable Cortana. However, you will be limited to simple searches
  • You can always turn on Cortana by opening search on the taskbar, going to the Settings section of the left panel, and sliding the pill switch to the On position. You can also do it via the Settings app > Privacy > Speech, inking, & typing and clicking the Get to know me button

Wrapping things up

As you can see, Cortana's settings and how Microsoft collects information is very fragmented. Currently, you have to go to different locations to turn off Cortana and other features that will trigger data collection. Users have to access a web page to clear stored information in their Microsoft accounts, and the Bing Personalization page only offers options to clear the users personal information. It does not provide an option to stop personal data gathering completely. In part, this is because, disabling data collection will also affect Bing search results -- after all the digital assistant is powered by the Microsoft's search engine.

Furthermore, the only way you can access Cortana's Notebook, Reminders, and Places is from the device itself, Microsoft does not provide access to such information on the web. So, if you have multiple Windows 10 devices and you did disable the assistant and other data gathering after clearing the data chances are some of your personal information will upload back up to your account.

Of course, this is just the beginning, and the work is far from done. Like Google, Microsoft also offers a dashboard, which is the home for users to control their accounts, devices, services, and subscriptions. I think it would be better if everything the software maker offers were located in a single location to simplify the user experience.

Microsoft is working to include Cortana on most Windows 10 devices for the July 29th release, including PCs, tablets, laptops, and phones. However, at launch the digital assistant will be limited to certain regions, including United States, United Kingdom, China, France, Italy, Germany, and Spain.

And there are other big plans as well. Microsoft has already announced that the digital assistant won't be exclusive to Windows 10, and it will be releasing a standalone app for Android phones, iPhones, and iPads in the near future. However, the app will have limited functionality, because of the nature of the app unable to access part of the different operating systems.

Will you be turning off Cortana in Windows 10? How do you feel about Microsoft collecting this kind of information? Let us know your thought in comments below!

How to watch the Xbox Briefing at E3 2015 on your Xbox, Windows or Windows Phone

$
0
0

Xbox Briefing at E3 2015 Windows Phone

Starting Monday at 9:30 am PDT (12:30 pm EDT, 16:30 GMT), Microsoft is set to kick off E3 with their massive Xbox Briefing. So how do you watch the darn thing? Glad you asked.

What Time?

Don't have time to do a Bing search for time zone conversion? No worries, just follow THIS LINK and you can see when the Xbox Briefing at E3 2015 kicks off in your part of the world.

Watch Right Here! (Windows Central)

Windows Central will be at the live event blogging it. In fact, we'll also have the video embedded right above so you can watch the stream, read our live blog with live photos, and chat with each other! What if you are on a Windows 8.1 PC or tablet or are sporting a Windows Phone? We have you covered.

Windows 8.1 PCs and Tablets

Go to the Windows Store and download the official Xbox Briefing at E3 2015 for your device. Now, to be clear, this app merely pushes you to a dedicated web player. This year, Microsoft is doing something new with an HD, a full-screen player that works on virtually any device. This app merely makes it easier as you just launch the app and go!

Download Xbox Briefing at E3 2015 for Windows

Windows Phone

Windows Phone users do not get a web wrapper app, but you can still watch it on your phone. To do so, just bookmark this site: http://download.xboxlive.com/content/mgs/liveplayer/production/amp/e32015_media_briefing.html

In fact, if you launch it now you can see the sample test stream. Sweet!

Xbox 360, Xbox One

To watch it on your TV and console you can just boot those up and under the News section, you should be able to see Microsoft boasting about their #XboxE3 coverage. Follow that badge and you can download the coveted 'Xbox Live Events interactive' app aka XLEi. This app, available on the both consoles lets you stream the whole event right to your living room.

XLEi for Xbox One

What to Expect?

Our gaming guru Paul Acevedo has written everything you need to know about E3, so make sure you read his all-in-one guide: Windows Central's E3 2015 plans and predictions

Now pardon us, we are packing for LA! Expect some on-the-ground coverage starting tomorrow evening.

How to stream Xbox One games to Windows 10 PCs

$
0
0

Back in January, Microsoft first revealed that it was working on a new streaming feature that will allow Xbox One owners to streaming games directly to Windows 10.

After months of work and a few weeks after adding support for "test streaming" on the Xbox app for Windows 10, the company announced that Xbox One game streaming is now available for testing.

I had the chance to test the new functionality and I have to admit that it's quite amazing what Microsoft is doing by allowing you to play Xbox One remotely.

Before we go any further, there are a few things you need to know when trying to stream any of your Xbox One games.

The obvious is that the new feature only works between an Xbox One running the Preview build of the operating system (version 6.2.13171.0 or later) and a PC running the latest preview of Windows 10 (build 10130 or later recommended). You also need to be running the latest version of the Xbox app for Windows 10, grab it from Store (beta) on your device if you need to. The streaming feature is included in version 5.6.11034.

Once you have all the latest updates, make sure that both your Windows 10 device and Xbox One are on the same network (IP address range).

The next step is to use a USB cable to connect your Xbox One controller to your PC. Microsoft is including the necessary drivers in Windows 10 to make it all plug-and-play. After connecting the controller, you'll know it's connected after you feel a vibration.

If it doesn't vibrate, it could be that you are using a USB charging and not a USB data cable. If the controller is still not working, go to Device Manager, locate the Xbox One controller, right-click it and select Update driver software.

Then click Browse my computer for driver software, click Let me pick from a list of device drivers on my computer, and try to install a different driver. Click Next to install.

Important While the latest Xbox One Preview build offers the streaming feature, you still need to go to your Xbox One settings, Preferences, and check the option "Allow game streaming to other devices (Beta)".

Note that if you're just wanting to try out the new streaming feature and you're about a room apart from the console, you can always use the controller without connecting it to your PC, as it will still be connected to your Xbox One.

Then launch the Xbox app and from the left pane, click Connect (if you have previously, try to connect to the console, the option will probably read Connected), and you should be able to see your Xbox One listed. Click your console from the list, and if everything is working accordingly, you'll be connected to your Xbox One.

If you cannot connect to your console you always try restarting the Xbox app.

While you cannot use your mouse and keyboard to control the console or play games, you'll notice that when moving the mouse during the stream, a tool bar will appear on the top with a few options. The options are quite useful, you can click the Xbox logo to go home, turn on or off the microphone, and stop the stream.

Clicking the hamburger button will bring an overlay with network bandwidth statics that can be very useful to troubleshoot your stream. Perhaps the most interesting setting is found in the last button, which allows you to change the bandwidth speed of the stream. The default is set to "medium", but you can also choose "high" or "low" depending on your network.

Have you tried the new streaming feature? What do you think about it? Tell us what you think in the comments below.

How to remove Quick access from File Explorer in Windows 10

$
0
0

In Windows 10, Microsoft is adding a number of changes to File Explorer. Besides the new icons, a few new user interface tweaks, and listing new drives outside of "This PC", the company is replacing the "Favorites listing" in favor of the new "Quick access".

Quick access is the new default location when opening File Explorer and it helps users by listing links of the most frequently accessed files and folders. This content is grouped by "Frequent folders" and "Recent files", and by default, settings can display up to ten folders and twenty files.

Although quick access is a good little feature in Windows 10, it may not be for everyone, so in this new how-to guide, we will go through the steps to remove it from the navigation pane in File Explorer.

Step 1

Warning! Before removing quick access, make sure to set File Explorer to access "This PC" by default. If you don't do this, after changing the settings you'll get an error like in the image below.

To do this, open File Explorer, navigate to View, click Options to access "Folder Options", and on the "General" tab, change Open File Explorer to"This PC".

Keep in mind that removing quick access doesn't clear the File Explorer history, as such this is a good time to disable Show recently used files in Quick access and Show frequently used folders in Quick access, and click the Clear button to erase the File Explorer history.

Then click Apply and OK.

Step 2

In this step we will give the local administrator accounts full control over ShellFolder, which will allow us to modify the registry keys located in this particular shell folder.

  1. Open the Windows Registry as an administrator by launching the Run command using the Windows + R keyboard shortcut, typing "regedit", and hitting Enter.
  2. Navigate to the following registry path: HKEY_CLASSES_ROOT\CLSID{679f85cb-0220-4080-b29b-5540cc05aab6}
  3. Now you need to change the permissions of ShellFolder, right-click ShellFolder, select Permissions, then click the Advanced button.
  4. At the top of Advanced Security Settings for ShellFolder, change the ownership of the folder to "Administrators". To do this, click Change, click Advanced, click the Find Now button, and from "search results" select "Administrators", then click OK, OK again, then Apply, hit OK, and hit OK one last time to close the ShellFolder Permissions box.

Step 3

With step 2 completed, we can now change the settings to remove quick access from File Explorer.

Inside "ShellFolder", double-click Attributes, and change data value from a0100000 to a0600000, and click OK.

Warning! Making changes to the Windows Registry can cause errors and other serious problems. Make sure to make a full backup of your PC before proceeding.

Step 4

You can now either restart Windows 10 or open the Task Manager, find and select Windows Explorer, and click Restart from bottom-right corner.

Now try to open the File Explorer and if everything worked as planned, you shouldn't see quick access on the navigation pane anymore.

If you want to see quick access again, simply follow step 3 again and change the data on Attributes from a0600000 to a0100000, and click OK.

Do you like the new Quick access feature in Windows 10? Leave your option in the comments below.

Got a blue screen of death installing Windows 10 Mobile? Here's the fix!

$
0
0

During the install process of Windows 10 Mobile build 10149 something bizarre happened to my Lumia 830. Something I've never seen before on any Windows Phone that's come across my desk.

The BSOD (blue screen of death.) Normally a running joke on PCs, the image up top shows what presented itself when the phone tried to reboot and finish the install. Nothing seemed to work. Not the 'recommended' button press, the reset using the physical buttons on the phone, nothing.

But fortunately there's an easy way out, thanks to the Windows Phone Recovery Tool.

Normally you'd be using this to roll back from Windows 10 Mobile to the safety of Windows Phone 8.1. Fortunately, the same steps can be used here to rescue you from blue screen hell. If your phone is in this state it will keep trying to reboot every minute or so, but that doesn't affect the recovery. Follow these steps to the letter and you'll be OK.

  1. Download and install the latest version of the Windows Phone Recovery Tool to your PC.
  2. Launch the recovery tool and connect your phone using a USB cable. It probably won't detect the phone so click My phone was not detected.
  3. In the next screen, click your phone, wait a few seconds, and you'll see your phone information and the software available for download to roll back to a previous operating system. It'll say something about the phone being in UEFI mode. To continue, click Reinstall software.
  4. Next, the recovery tool will warn you to backup all your data, settings, and apps before continuing, as the rolling back process will delete all the previous data in your phone. Click Continue to proceed.
  5. Now, the recovery tool will download the image from Microsoft's servers and restore your phone to Windows Phone 8.1. It'll take a while, but just leave it alone and let it work its magic.

Once it's done your phone will reboot and you'll be back at the very first step in the Windows Phone 8.1 set up process. Complete all this and you'll be back up and running.

Hopefully this isn't too widespread an issue, but if I've seen it there's going to be someone else who has or is going to. Luckily, Microsoft has all the tools to make it go away with minimal effort.


How to create desktop shortcuts to specific settings in Windows 10

$
0
0

Microsoft is packing many new features into Windows 10, and it's bringing back a familiar user interface that moves away from being a touch-first operating system to something that adapts to different screens. This means that on a desktop computer, Windows 10 will work great with keyboard and mouse. On a tablet you'll get an operating system that it's optimized for touch.

Other changes are happening to how users will configure settings in Windows 10. Microsoft is slowly, but surely, moving away from the Control Panel in favor of the new Settings app that brings a more unified and consistent place to configure classic and advanced settings. Also, because Windows 10 is designed with a single core across devices, the Settings app will work identically on phones, tablets, laptops, and desktops.

Now, what you probably did not know is that each setting page in the new Settings app has a unique link called "URI" (short for uniform resource identifier). Microsoft gives each page a unique value, or command, which anyone can use in the Run command or even inside of the Command Prompt to access to a specific page of settings.

While you can pin settings to the Start menu, you cannot have direct access to specific settings from the desktop. But, knowing the URI for each page of Settings, you can easily create shortcuts on the desktop to access your favorite settings.

Below you'll find a list compiled by WinAero with most of the Settings' URIs:

  • Battery Saver: ms-settings:batterysaver
  • Battery Saver: ms-settings:batterysaver-settings
  • Battery Saver Settings: ms-settings:batterysaver-usagedetails
  • Bluetooth: ms-settings:bluetooth
  • Data Usage: ms-settings:datausage
  • Date and Time: ms-settings:dateandtime
  • Closed Captioning: ms-settings:easeofaccess-closedcaptioning
  • High Contrast: ms-settings:easeofaccess-highcontrast
  • Magnifier: ms-settings:easeofaccess-magnifier
  • Narrator: ms-settings:easeofaccess-narrator
  • Keyboard: ms-settings:easeofaccess-keyboard
  • Mouse: ms-settings:easeofaccess-mouse
  • Other options (Ease of Access): ms-settings:easeofaccess-otheroptions
  • Lockscreen: ms-settings:lockscreen
  • Offline maps: ms-settings:maps
  • Airplane mode :ms-settings:network-airplanemode
  • Proxy: ms-settings:network-proxy
  • VPN: ms-settings:network-vpn
  • Notifications & actions: ms-settings:notifications
  • Account info: ms-settings:privacy-accountinfo
  • Calendar: ms-settings:privacy-calendar
  • Contacts: ms-settings:privacy-contacts
  • Other Devices: ms-settings:privacy-customdevices
  • Feedback: ms-settings:privacy-feedback
  • Location: ms-settings:privacy-location
  • Messaging: ms-settings:privacy-messaging
  • Motion : ms-settings:privacy-motion
  • Radios: ms-settings:privacy-radios
  • Speech, inking, & typing: ms-settings:privacy-speechtyping
  • Camera: ms-settings:privacy-webcam
  • Region & language: ms-settings:regionlanguage
  • Speech: ms-settings:speech
  • Windows Update: ms-settings:windowsupdate
  • Work access: ms-settings:workplace
  • Connected devices: ms-settings:connecteddevices
  • For developers: ms-settings:developers
  • Display: ms-settings:display
  • Mouse & touchpad: ms-settings:mousetouchpad
  • Cellular: ms-settings:network-cellular
  • Dial-up: ms-settings:network-dialup
  • DirectAccess: ms-settings:network-directaccess
  • Ethernet: ms-settings:network-ethernet
  • Mobile hotspot: ms-settings:network-mobilehotspot
  • Wi-Fi: ms-settings:network-wifi
  • Manage Wi-Fi Settings: ms-settings:network-wifisettings
  • Optional features: ms-settings:optionalfeatures
  • Family & other users: ms-settings:otherusers
  • Personalization: ms-settings:personalization
  • Backgrounds: ms-settings:personalization-background
  • Colors: ms-settings:personalization-colors
  • Start: ms-settings:personalization-start
  • Power & Sleep: ms-settings:powersleep
  • Proximity: ms-settings:proximity
  • Display: ms-settings:screenrotation
  • Sign-in options: ms-settings:signinoptions
  • Storage Sense: ms-settings:storagesense
  • Themes: ms-settings:themes
  • Typing: ms-settings:typing
  • Tablet move: ms-settings://tabletmode/
  • Privacy: ms-settings:privacy
  • Microphone: ms-settings:privacy-microphone

Follow the steps below to create desktop shortcuts to specific setting page in Windows 10

1- Choose what settings you want to access and copy one of the settings paths. For example, "ms-settings:colors" to access the Colors settings in Personalization

2- Right-click on an empty space on the desktop, select New, and click on Shortcut

3- Paste the URI for page with settings you like quick access to and click Next

4- Choose a name for the shortcut, in this case, "Colors", and click Finish

Now double-click the shortcut and the Settings should open to the page you have specified. You can also right-click the shortcut and access the properties to change the icon to something that identifies the settings you want to access, or to assign a keyboard shortcut to access your favorite settings even faster.

Quick Tip: On recent builds, Microsoft has removed the pin icon from Settings apps. However, users can continue to pin their favorite settings to Start, by right-clicking the title of a specific page of Settings, and click "Pin to Start".

And there you have it. Now you can access a specific page of settings right from the desktop.

Which settings page would you create a shortcut for? Tell us in the comments below.

How to prepare your PC for the Windows 10 upgrade

$
0
0

On July 29, Microsoft's goal of having Windows 10 running on a billion devices in the next three years begins.

It's been a long ride, but at the end of July, millions of users around the world will finally get their hands on Windows 10. In this new release, Microsoft is going back to the drawing board to make Windows better. The company is doing this by bringing back many of the familiarities of Windows 7 with a mix of Windows 8.1 functionality, brand new features, such as Cortana, Settings, and universal Windows apps, and changing the way people upgrade to the next operating system. So far things are looking very good.

Below you will find everything you need to know to prepare your computer to upgrade to Windows 10. From making sure all your system's components are compatible with the new operating system, to preparing a recovery plan, to making the necessary changes to prevent possible hiccups during the process.

Making sure Windows 10 is compatible with your PC

One of the efforts to put Windows 10 on a billion devices is by making the operating system free for the first year after the release, for everyone running a genuine version of Windows 7 Service Pack 1 and Windows 8.1 Update. Recently an important update (KB3035583) has rolled out adding the "Get Windows 10" app on qualifying PCs to allow users to reserve their free copy of Windows 10.

However, the app offers more than just a way to reserve a copy of the operating system; it also includes a tool to check your PC to see if it's compatible with Windows 10. While almost every computer running Windows 7 or Windows 8 will be compatible, the app is very handy to detect if certain applications or hardware currently installed on your computer will work after the upgrade.

If you already see the Start button icon in the notification area (bottom-right corner), click it to launch the "Get Windows 10" app. From the top-left, click the hamburger button, and then from the menu, click Check your PC. If everything is good, you'll see a green message saying "This PC meets the system requirements", and you can now safely click the Reserve button to complete the reservation.

If there is an issue, you will see it listed under Devices and Apps. For more information about the what the report covers, check this support page from Microsoft.

While most hardware and software should work without a problem, typical compatibility issues could include wireless and Bluetooth adapters, outdated drivers, and very old applications.

If you find something that isn't compatible, it doesn't necessarily mean that you cannot install Windows 10. But, you should halt the reservation, go to your PC manufacturer's support website and see if there are any updates or drivers available for that particular product.

Even though Windows can detect and install most device drivers, it's a good idea to always update to the latest and just to have them handy in case you need to reinstall any of them after the upgrade. (Trust me, you don't want a network adapter problem after the upgrade and without a network connection to find a solution.)

Here is a list of the most common PC manufacturer websites support to download drivers and software:

In the case you're dealing with an old application, see if there is an update available or decide if it's time to upgrade. If the app ends up being not compatible, but you want to use Windows 10, you can also opt to create a virtual machine running Windows 7 (keep in mind that a license may be required) to run the app. To do this, you can use free tools such as VirtualBox or Microsoft's Hyper-V (available on Windows 10 Pro).

You can always find more detailed information about Windows 10 compatibility for a particular application or hardware at the Windows Compatibility Center, but remember that the database is currently small, so results are limited.

There could be the case where you'll see the notification that you won't be able to restore factory settings. If you get this message, it means that the manufacturer has set up your PC to run from a compressed Windows image and included an option to restore factory settings. After the upgrade, you will not be able to restore to the original factory settings, but there will be other recovery options.

If you don't see the "Get Windows 10" app, chances are that one of following cases is true:

  • Your PC doesn't have installed update KB3035583
  • Your PC is having an issue with update KB3035583. Try uninstalling and reinstalling the update again.
  • Your PC is not running Windows 7 Service Pack 1 or Windows 8.1 Update
  • Your PC is not compatible with Windows 10
  • Your PC is not running a genuine version of Windows

Note: Microsoft will offer Windows 10 as a free upgrade, which means that you'll have to install the new version on top of Windows 7 or Windows 8.1 in order to have a fully activated installation, but the company will also allow users to upgrade doing a clean install of the operating system. However, users will be forced to do the upgrade via Windows Update first, then being allowed to perform a clean install of Windows 10.

Now that you know your PC is ready, it's time to make sure you don't lose any settings, files, and you have a bulletproof recovery option.

The next step is to make a full backup of your system

I cannot stress this enough, but before even considering pressing the upgrade button, you have to understand that software could always fail and if something bad happens, you could lose many important files. To prevent such a nightmare, you need a recovery plan, but luckily, both Windows 7 and Windows 8.1 come with a System image backup tool.

The System image backup can be found in the Control Panel and it's a tool that will help you to create a bit-by-bit copy of your entire system's hard drive, including operating system, settings, programs, and files.

You can check out our previous guide on how to create a full backup. The instructions applies for Windows 7, Windows 8.x, and Windows 10.

Once you have the backup created, you can move to the next step.

Knowing your Windows product key

Another step I personally like to do before modifying an installation of Windows is to make sure I have the product key of my current install. The product key could come in handy if for some reason the installation gets corrupted and I have to start from scratch by installing the previous version of Windows again. Or sometimes it could even happen that the setup process could ask you for the product key during the upgrade, even though it shouldn't. Also, you'll need the product key if you are planning to perform a clean installation of Windows 10.

Now, chances are that you probably have the product key on the original box that came with a copy of the operating system, or it's printed out on a label attached to your computer, or you have this information sent to you via email after you purchased Windows. However, if you don't have this information, you'll have to resort to specific tools that can allow you to pull the product key from the current installation.

One of the tools that can help you with this task is KeyFinder. This is a tool that you can download for free to recover Windows and Office product keys. This product also offers a paid version to recover keys from thousands of other software products, but the free version is all you need.

Once you open the app, you can easily save all the information on a text file for later use. If you're using OneDrive, you can save it there and this file will then be accessible from your phone or a secondary computer.

Keep in mind the minimum requirements to install Windows 10

While most machines running Windows 7 and Windows 8.1 are likely to run Windows 10 flawlessly, Microsoft has a minimum spec requirement to install the new operating system:

  • Processor: 1 gigahertz (GHz) or faster processor or SoC
  • RAM: 1 gigabyte (GB) for 32-bit or 2 GB for 64-bit
  • Hard disk space: 16 GB for 32-bit OS 20 GB for 64-bit OS
  • Graphics Card: DirectX 9 or later with WDDM 1.0 driver
  • Display: 1024x600

Disabling unnecessary security software during the upgrade

While your computer should never be without security protection, sometimes antivirus, spyware, and other security software may be the common causes for an unsuccessful installation of an operating system. During the installation process try to disable any antivirus, firewall, and other security software you may have installed in your computer. Even better, many times it is recommended to uninstall this type of software and then reinstall again after the upgrade.

For example, to disable Microsoft's free antivirus, open Control Panel, click Windows Defender, then navigate to the Settings tab, uncheck the Turn on real-time protection (recommended), and click Save changes.

And to disable Windows Firewall, open Control Panel, click Windows Firewall, from the left pane click Turn Windows Firewall on or off, and turn off the firewall on "Private network settings" and "Public network settings".

In other cases, some programs that start in the background also be the cause of an unsuccessful installation. To prevent this, disable and/or uninstall any application that starts at boot during the upgrade process. In addition, before beginning with the installation process, close all running applications as this could also issues during the installation.

Making space for the upgrade

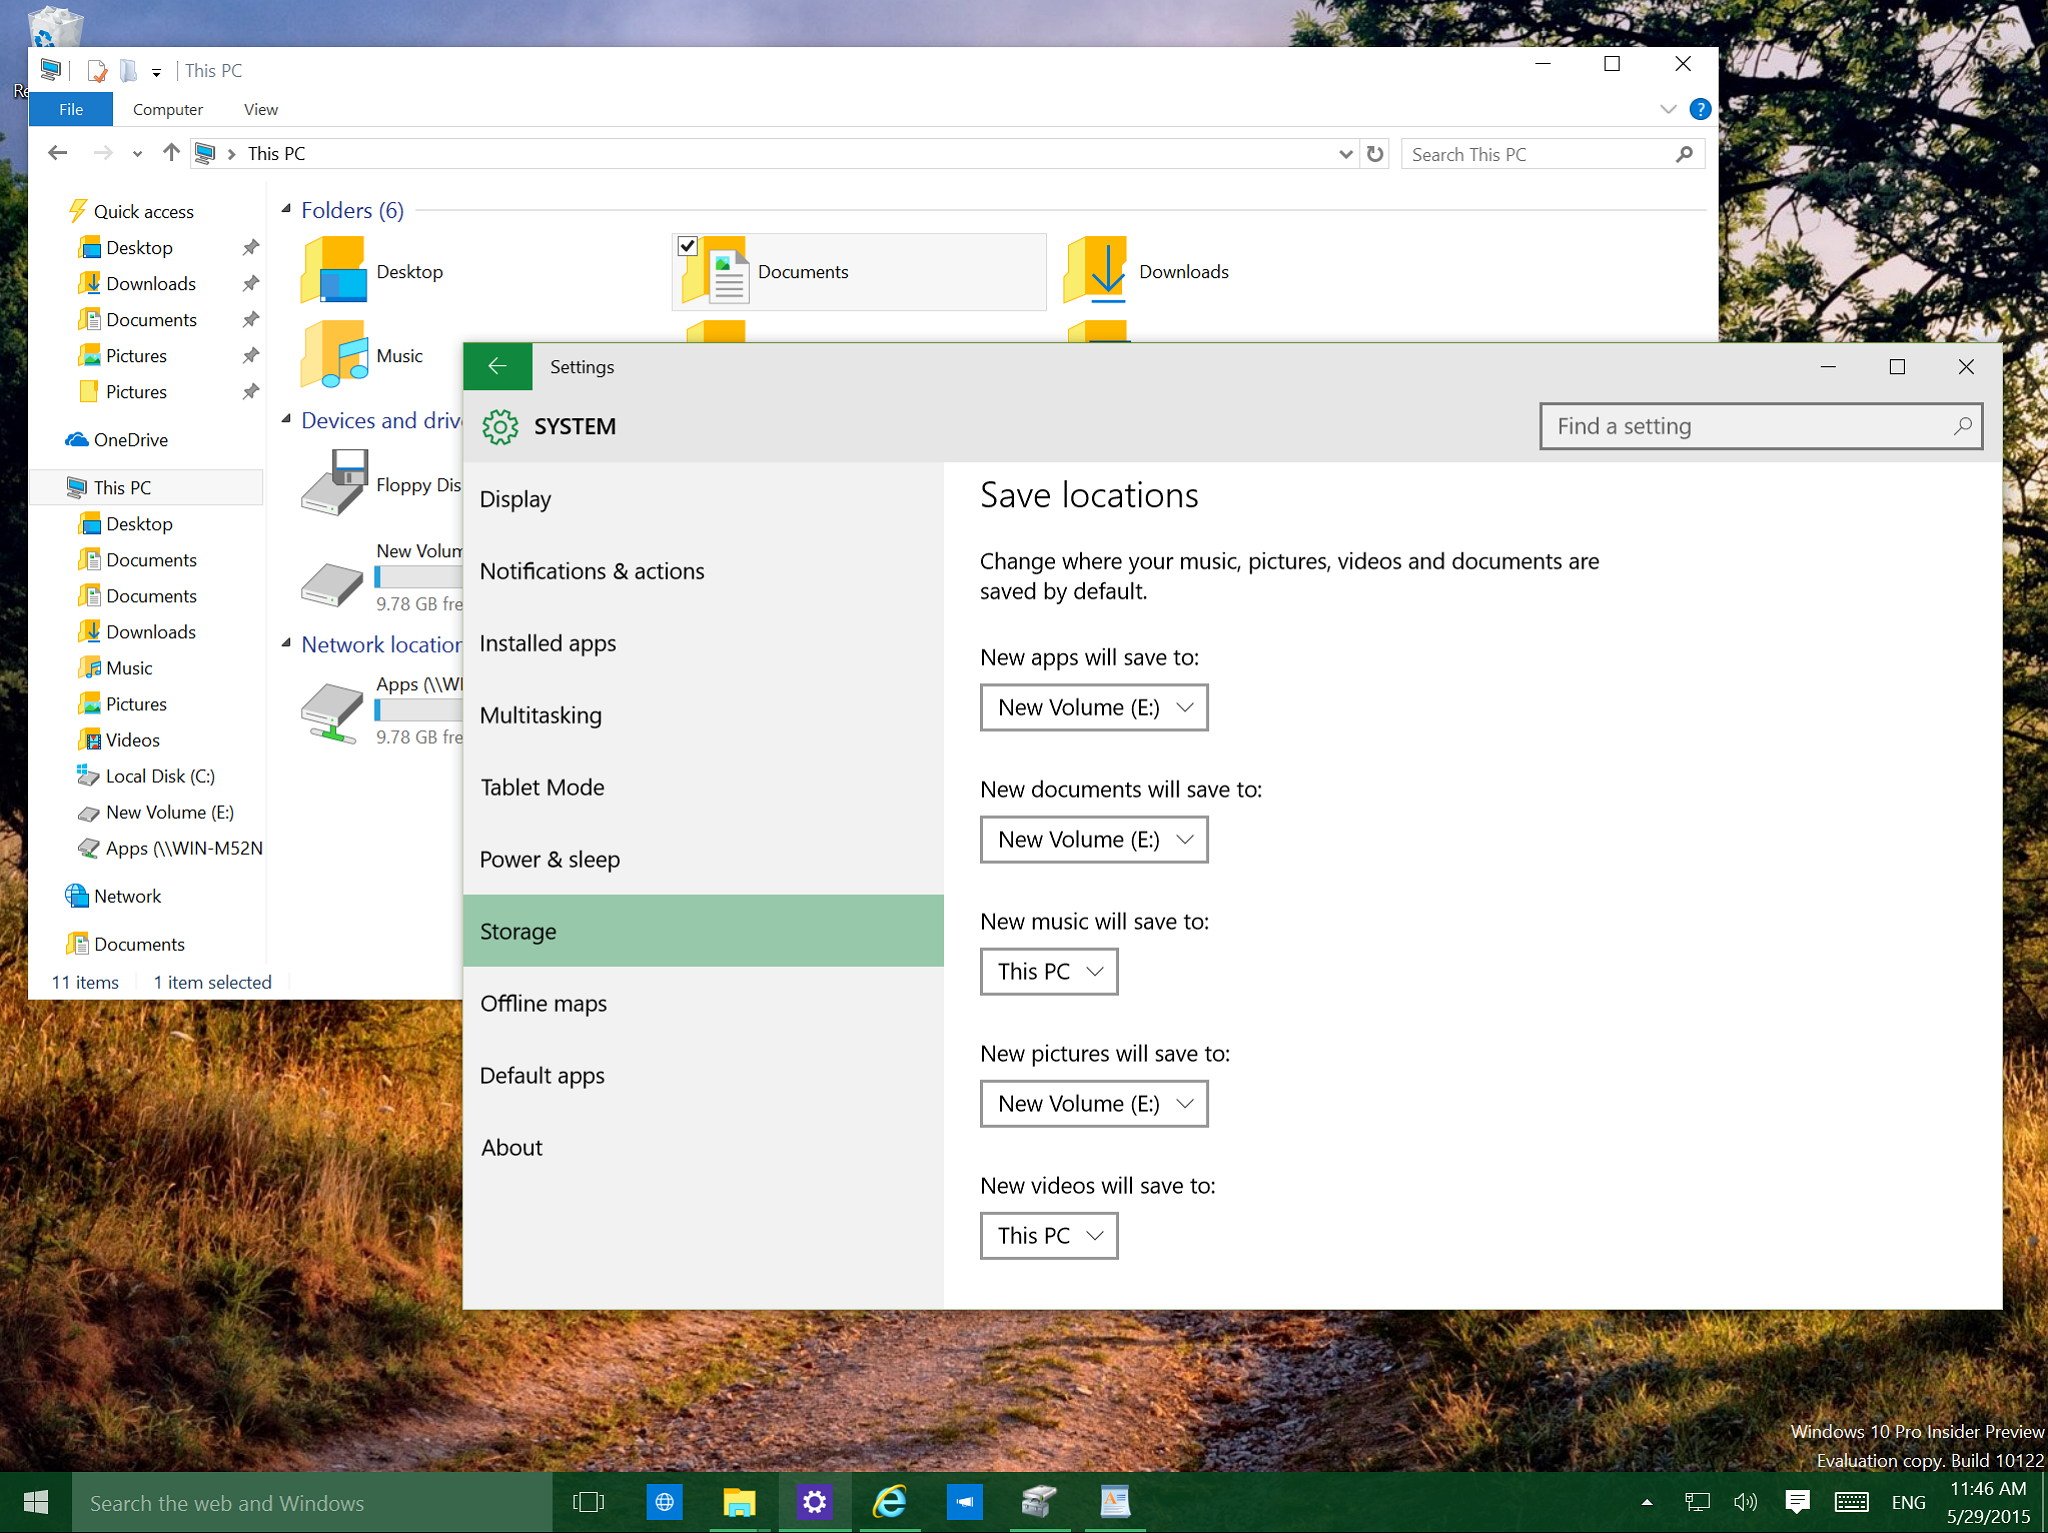
Although your computer is likely to have enough space to perform the upgrade, you're required to have at least 5GB free. If you don't have enough disk space available, you can make more space by moving files, such as Documents, Videos, Pictures, and Music, to an alternate location.

You can also uninstall programs that you don't need or rarely use. In addition, you can run the Windows Disk Cleanup tool to delete unnecessary files like Temporary Internet Files, Debug Dump Files, Recycle Bin, Temporary Files, System error memory dump files, old updates, and pretty much any else in the list.

The cleanup task is straightforward:

1- Open File Explorer and navigate to This PC

2- Right-click the Windows drive (typically the C:/ drive), and click on Properties

3- Then click the Disk Cleanup button and after you're shown the results, click the Clean up system files button

4- From the list check all files you want to delete, click OK, and Delete Files

If that isn't enough to free up disk space, the Windows 10 installation process allows you to connect an external drive that the setup can use for temporary storage, but again it has to have at least 5GB of free space. Then, after the upgrade process completes, you can disconnect the drive.

Disconnect unnecessary peripherals

Another factor that can prevent a successful installation are peripherals connected to the computer. These devices could interrupt the installation because Windows 10 is trying to install them, but they are either not compatible or the latest drivers are not available at the time of installation.

Before beginning with the upgrade process, disconnect all the peripherals that are not necessary, you'll probably be OK by having connected only a mouse, keyboard, and monitor.

Windows 10, Windows Insiders, and Windows 10 Preview

There has been some miscommunication between Microsoft and Windows Insiders, but now the information is clear how the upgrade process will work with insiders, so you can be prepare.

If you installed any of the Windows 10 Previews on a computer running Windows 7 or Windows 8.1 as an upgrade, you'll be able to upgrade to the final release of Windows 10 and the operating system will stay fully activated.

If you've performed a clean installation of Windows 10 Preview, you'll have to roll back to your previous version, before upgrading to the final version of Windows 10 and have the operating system fully activated.

If you have performed a clean installation using Windows 10 Preview and you don't have an eligible version of Windows to upgrade for free, you can upgrade to Windows 10 RTM, but it will be just another pre-release build. It will be activated with a pre-release product key and it will expire after a certain amount of time, so as long you signed in with your Microsoft Account, you can continue to get new builds. Basically, while you can use Windows 10 for free, the Windows Insider program is not a path to obtain a product key of the operating system.

For those still wondering, you can find out which version of Windows 10 you will get when you upgrade for free here.

Wrapping things up

While the upgrade process should be as easy as pressing a single upgrade button, you can see that there are a number of steps you have to make sure you follow to prepare your PC for a new operating system and minimize any issues.

Windows 10 is set to launch on July 29, 2015, and those who reserve a free copy will begin receiving the bits via Windows Update, so make sure to also check that Windows Update is enabled in Control Panel.

Finally, remember that you'll also need a Microsoft Account if you want to take full advantage of the new operating system and be able to install apps from the Windows Store.

How are you preparing for Windows 10? If you have extra tips, let us know in the comments below.

Happy Windows 10 upgrade!

How to add quick access to Settings pages to the right-click desktop menu in Windows 10

$
0
0

In Windows 10, for some reason, I find that the quickest way to access the Settings app is by right-clicking on the desktop and selecting "Display settings" or "Personalize", even though once I access one of the page settings, I have to click to go back to the main section. So, I ask myself: Why is Microsoft not adding an option to access the Settings app from the desktop right-click context menu? I think it'll be very useful for many users.

In our previous guide, we talked about how Microsoft is slowly moving away from the Control Panel in Windows 10 in favor of the new Settings app. This app is a more unified experience that brings all the Windows settings in one place and a user interface that works across devices e.g. phones, tablets, laptops, and desktops.

We also learned that each setting page in the Settings app has a unique identifier called "URI" (short for uniform resource identifier) that allows to link directly to specific settings. Knowing these URIs, we can use the Command Prompt or create desktop shortcuts to access settings quickly. However, as it turns out using the same logic, it's also possible to modify the Windows 10 desktop right-click context menu to add links to direct access to a specific page of settings.

If you want to learn how you can do this in your PC, keep reading below, where you'll find all the steps.

To add specific access to Settings, you can refer to my previous how-to guide to grab the URIs).

Warning: This is very important. The steps below involve modifying the Windows Registry, which it can be dangerous, and it could cause system instability. This guide is aimed for savvy users, who understand the risks. It's assumed that you will have done a full back of your computer or a recovery plan before continuing in case of something goes wrong and you need to roll back to a working version of Windows.

Adding Settings items to the Windows 10 desktop right-click menu

1- Open the Windows Registry editor: To do this, use the Windows + R keyboard shortcut to open the Run, type Regedit, and hit Enter.

2- While in the Registry, navigate the following path: HKEY_CLASSES_ROOT\Directory\Background\shell

3- Next, right-click Shell, select New*, and click on **Key, and name the new key with the name of the specific setting page you want to access. (For this guide, I'll be showing you how to add access to the Settings app, as such I'll be naming the key Settings.)

4- Right-click the newly created Settings key, select New, and click on Key, and this time, create a new key called command

5- Inside of the command key, double-click the Default to edit the String

Here is where the magic happens. Choose from the list of URIs, a page you would like to add to the desktop right-click menu, and create a command like in the example shown below:

  • Example #1: "C:\Windows\explorer.exe" ms-settings:
  • Example #2: "C:\Windows\explorer.exe" ms-settings:powersleep

Now, copy and paste the command to access Settings on the Value date field, and click OK

Next, right-click like you always do on an empty space on the desktop, and the menu should include the new entry to access Settings.

There you have it, folks! It's worth pointing out that this works for pretty much all the settings accessible via a URI.

What setting pages will you be adding to the right-click menu? Tell us in the comments below.

How to optimize battery life in Windows 10 devices using built-in settings

$
0
0

Nowadays, people are no longer attached to a desktop to do work. They use all kind of devices, and most of them are mobile, such as smartphones, tablet, and laptops. Now, one of the biggest problems that can affect productivity is battery life. While battery technologies have been improving over the years, they are still far from perfect.

The software is a big factor that can negatively impact battery life if not designed properly. If you have been running Windows 10, you probably already know that Microsoft has been doing a great effort to make its operating system more mobile friendly.

Windows 10 brings back many of the familiar features to help users on previous versions to get more productive quickly without a huge learning curve. It's also an operating system that packs a handful of features that makes this version stand out from anything we have seen before.

One of these changes is happening in mobility. As such today, we are going to look at some of the improvements Microsoft is bringing to Windows 10 and tips you can use to improve the battery life in your mobile devices.

Battery saver

One of the new features in Windows 10 is included in the new Settings app. It's called "Battery saver" and as the name implies, it's a feature to help Windows 10 devices to save battery life by limiting background activity and automatically adjusting different system settings. This is in addition to battery usage reports for you to understand what is draining your battery.

To access the new battery settings, open the Settings app, go to System, and navigate to Battery saver.

Note: Windows 10 features that your device can't handle won't be shown as an option. If you're running the operating system on a desktop computer without a battery, the Battery saver option won't be available. The same is true for other features.

When you arrive at the settings, you'll see two sections: Overview shows you the battery level and an indicator when your device is charging or draining.

There is a link to access Battery use. This section is very useful, as it can show you battery usage across all your apps. This information can be very valuable to understand better which apps you probably want to be careful or stay away from when you're not plugged in.

On the list of running apps, you'll notice Windows apps, desktop applications, and other components of Windows 10 that behave like apps, but you can't uninstall. It includes Microsoft Edge, Cortana, Settings, etc. While you cannot disable all of them, you can select an app like Microsoft Edge, click Details to get more information, and limit its background activity when plugged in or running on battery. (Very important to remember that the app has to be designed for Windows 10 in order to enable or disable background activity.)

You can also control which apps are allowed to run in the background to conserve battery life by going to Privacy and accessing Backgrounds apps.

When going back to the main page, you will find the Battery saver section. You'll also notice that if your Windows 10 device is currently plugged in, the main option is grayed out. It's okay because you can only turn the switch "On" or "Off" if your PC is running on battery (Refer to the previous image).

To adjust the settings, click the Battery saver settings link. In Battery saver settings, you can configure four different options:

Turn battery saver on automatically if my battery falls below, with this option users have the ability to set at which percentage Battery saver will kick on. The default setting is 20%.

Then you can also enable or disable: Allow push notifications from any app while in battery saver and Lower screen brightness while in battery saver.

Finally, you have the Always allowed section, where you can add apps that will run in the background and can send and receive push notifications, even when battery saver is enabled.

Also, remember that the Settings app is still a work in progress. Microsoft still hasn't migrated all the Control Panel settings over. If you need to adjust the brightness settings, you need to go to the Power Options in Control Panel, click the Change plan settings from the current power plan to adjust the brightness when running on battery.

On the system tray (or notification area), you can also click the on the battery icon to access quick power settings and charging information. You can click the brightness button to quickly change the screen brightness, and you can manually turn "On" or "Off" Battery saver.

Power & sleep

Like in Windows 8.1, the Settings app in Windows 10 also includes the Power & sleep settings.

On Screen, make sure to have a low number when the display should turn off when running on battery. For example, five minutes can be a good option.

On Sleep, set your computer to go to sleep around 10-15 minutes when running on battery.

Disabling unnecessary wireless communication

In addition to configuring specific battery settings and power options, you can also conserve battery power by quickly turning off all your wireless connections.

You can do this by enabling Airplane mode, which is a feature commonly found on mobile devices. It's useful for disabling all kinds of wireless communications (Wi-Fi, Bluetooth, GPS, NFC, and others) that can help to conserve battery life in your device.

While Airplane mode disables all wireless connections, you can also re-enable specific path communications as necessary.

Accessing Airplane mode in Windows 10 can be done in a number of ways, you can click the wireless network icon in the notification center, and clicking the Airplane mode button. You can also access the same button in Action Center from quick access or you can go to the Settings apps, Network & Internet > Airplane mode and turn on the switch to stop all wireless communication.

If you need to access the internet, you can simply click the airplane icon in the notification center and then the Wi-Fi button.

Showing the right colors on your display can improve battery life too

Another factor that can negatively affect battery life is the colors. Having a poor choice of colors showing up on the screen (e.g., red, white, yellow, etc.) can increase the power usage on the display, which will translate shorter battery life.

One thing you can do to optimize battery life in your device is to use a solid color (black recommended) instead of an image, in the Background settings.

And on the Colors settings, turn on "Automatically pick an accent color from my background" and turn off "Show color on Start, taskbar, and action center" and "Make Start, taskbar, and action center transparent".

Only run the necessary programs

Finally, make sure to close any program you don't need to get the work done. Limit the time you use to play games and watch videos. You can always do these things when you're plugged in.

Wrapping things up

As you can see, there are many things you can do to improve battery life and today you learned Windows 10 can help with many built-in features.

Do you have any other battery saver tip for Windows 10? Let us know in the comments below.

How to create a Windows 10 USB installation media with UEFI support

$
0
0

Windows 10 is just around the corner, and a lot of users are now ready to upgrade free to the latest and greatest. However, there will be users who are still skeptical about Windows 10 and those who need more time to upgrade.

Many of those users who won't be upgrading immediately may opt to create a dual-boot system to start using Windows 10 alongside Windows 8.1 or Windows 7. After all, this could be considered one of the safest method to test an operating system.

Typically before beginning with a dual-boot setup (instructions that you can check from my previous guide), users will first need to download the Windows 10 ISO file for either 32-bit or 64-bit architecture from the Microsoft servers. Then they will try to create a bootable media using the "Windows 7 USB/DVD Download tool", which for a good period worked pretty well.

However, most computers sold today, such as Surface Pro 3, Surface 3, Dell XPS systems, and others, use a new BIOS called UEFI (Unified Extensible Firmware Interface), which is a standard firmware designed to replace the old BIOS standard.

When you plug in the USB drive with the Windows 10 installation files and boot your computer, you'll probably notice that either (1) the bootable media won't be recognized or (2) you might even get some other errors, as many user have reported in the Microsoft community. If you try to do a clean installation using the "Custom" install you'll get a message that you cannot install Windows 10 because the partition you're trying to use is GPT (GUID Partition Table). .

This error could be the case if you use the "Windows USB/DVD tool", which creates a bootable USB drive using MBR (Master Boot Record) partition and not a GPT partition.

You can also try configuring the BIOS to use the "Legacy Support" to boot with the USB installation media if it wasn't detected before. However, you will probably get the error "no OS found" when rebooting your PC, so this isn't the solution.

Now, how you do solve the issue? While it will be a good idea for Microsoft to update its USB/DVD tool to let users customize the creation of installation media, the company wants you to update from Windows Update. But we know many there are many users who prefer to upgrade the old fashion way.

Using Rufus to solve the problem

Lucky there is an easier way, you only need the right tool. You need Rufus, a utility designed to create bootable USB drive for systems using MBR or GPT partitions.

Rufus is also a standalone utility, meaning that installation isn't required, just download, double-click the executable file, and you're ready to go:

  1. Once you have Rufus open, the first thing you have to do is to choose from Device the USB you want to use to copy the Windows 10 installation files.

  2. Then select GPT partition scheme for UEFI, leave the "File system" and "Cluster size" on the default settings, and remember to enter a label for the drive.

  3. Make sure that Create a bootable disk using is checked and ISO Image is selected from the drop-down menu.

  4. Next click the drive icon and open the Windows 10 ISO file you want to write to the USB drive, and click Start to finish.

Download Rufus

Download the Windows 10 ISO files

That's all.

Now, try to boot your computer with the new Windows 10 USB installation drive and you should be able to install the operating system normally alongside your previous version of the operating system.

Thanks for the tip @Swizzlerz!

Viewing all 5861 articles
Browse latest View live


Latest Images