Quantcast
Channel: Help & How To
Viewing all 5861 articles
Browse latest View live

Beginner's guide to PC water cooling fittings

$
0
0

Fittings

When putting together a water loop in a PC, you need the correct fittings.

In a PC, fittings are what hold all your tubes together and connect water blocks to pumps and radiators. It's not enough to simply attach a soft or hard tube to a block and call it a day. You need to add a fitting to create a water-tight seal. When working with electronics and liquids, you need to be double (and triple) certain no leaks will occur. There are a number of fitting types available, as well as sizing and materials.

Here's what you need to know.

Getting started with PC water cooling fittings

Much like other parts of a water-cooling loop inside a PC, choosing fittings for your system is a simple process. But you need to bear in mind the materials used to make said fittings. It's not recommended to mix material types. If you have a copper radiator and water block but nickel fittings, you'll be fine. Copper and nickel are usually OK to use together, but when you throw aluminum or silver into the mix, things can get messy with galvanic corrosion.

The second consideration is size, which needs to match your tubing. Both tubing and fittings can be purchased at the following sizes. ID and OD stand for inner diameter and outer diameter, respectively.

IDOD
3/8-inch
10 mm
1/2 inch
13 mm
3/8-inch
10 mm
5/8 inch
16 mm
7/16-inch
12 mm
5/8 inch
16 mm
1/2-inch
13 mm
3/4 inch
19 mm

Match the fitting size with the tubing and blocks, and you're good to go.

Soft tube fittings

Fittings

For soft tubing, you have two choices. The first is the barb, which simply allows the tubing to wrap around a point and create a seal. This is useful for inlets and outlets, or when you need to add or extract liquid from the loop. It's not great for a longterm installation due to the lack of compression on the seal. You will need to install a clamp of sorts to keep it on the fitting.

But if you don't want to mess around with clamps, this is where a compression barb fitting comes in, which is essentially a standard barb but with a locking ring. This keeps the tube secured around the barb. Barb fittings can be plugged in without much effort, while compression barbs need to have the collar placed over the tube prior to inserting the bar, which can then be screwed onto the fitting to secure it.

Barb fittings come in a single size, which represents the ID. A 3/8-inch (10 mm) ID barb fitting will work with 3/8-inch (10 mm) tubing. Compression barbs should match both the ID and OD of tubing.

Hard tube fittings

Fittings

For hard tubes like acrylic and glass, you can't use barb fittings and need to go with either push-in or HD compression fittings. Usually, you'll find them made of silver or nickel, but you should be fine with copper components, too. Push-in fittings are different than barbs because they use two o-rings to create an air-tight seal once the tube has been pushed into the fitting. Hard tube fittings are usually listed with only the OD, which needs to match the OD for hard tubing. The most common sizes are 1/2 inch (13 mm) and 5/8 inch (16 mm).

As for HD compression fittings, it's a similar setup to the barb compression counterparts, but these are designed for use with hard tubing. There are two o-rings: one in the base and another in the locking collar.

More on PC water cooling


Surface Go: How to switch out of Windows 10 in S mode

$
0
0

So your Surface Go came pre-loaded with Windows 10 in S mode and you want to install programs from outside the Store. Here's how to upgrade your Surface Go to Windows 10 Home.

The Microsoft Surface Go comes pre-installed with Windows 10 Home in S mode (formerly known as Windows 10 S). This mode locks installation of apps only from the Microsoft Store versus downloading potentially dangerous .exe apps via a web browser.

Long-term, Windows 10 in S mode is supposed to deliver a better experience as apps from the Microsoft Store won't damage or slow down your Surface Go over time. Nonetheless, sometimes you just need that one app and it's not in the Store or you hit some other known limitations of the special mode.

Luckily, switching out of Windows 10 in S mode is super easy. The whole process won't take you more than a minute and you don't even need to restart your Surface Go. Here's how to do it.

How to switch Windows 10 Home in S mode to Windows 10 Home

A word of caution: If you do unlock Windows 10 in S mode to just Windows 10 Home the process is one way. There is no easy way to roll back or undo the change. You can reinstall a factory image of the OS from Microsoft, but that requires a USB drive, some patience, and a few more steps (plus you lose all your data).

Additionally, if you switch from Windows 10 Home in S mode to just Windows 10 Home you can buy a Windows 10 Pro license through the Microsoft Store and upgrade to Pro after for $99.

Switching from Windows 10 S mode though is free to just Windows 10 Home.

To initiate the switching process:

  1. Press the Start button located at the bottom left of your screen.

  2. Select the Settings icon, located just above the power icon on the Start menu.

  3. Select Update & Security in the Settings app.

  4. Select Activation, and then select Go to Store.

  5. Select the Get option.

  6. Then hit Install when ready to proceed.

  7. The process to switch out of S mode is seconds (maybe about five to be exact). You do not need to restart the PC for it to take effect. You can just continue on and start installing .exe apps now in addition to apps from the Microsoft Store.

And that's it. While Windows 10 in S mode is built for security and performance it's not for everyone. Microsoft at least gives you the choice as to which version you prefer.

Unfortunately, it's not easy to go back to S mode without wiping the entire Surface Go, so give it a good think over before you hit that button.

You can read more about Windows 10 in S mode at the Microsoft FAQ.

Related Reading and Tips

Surrface Go reviewHow to reinstall Windows 10 Home in S mode on your Surface GoMicrosoft Surface Go with 64GB eMMC storage – How much slower is the $399 model?

How to reinstall Windows 10 Home in S mode on your Surface Go

$
0
0

Having issues with your Surface Go or just want to go back to Windows 10 Home in S mode after upgrading to Pro? Here's how to recover it and restore the factory settings.

Microsoft provides Surface customers with recovery images that allow you to reset your Surface as if it was just new out of the box. This process requires a USB drive, some time, and an internet connection. If you're planning to sell your Surface Go, go back to Windows 10 Home in S mode, or are having technical difficulties, recovering the Surface Go is recommended. Here's how to do it.

How to reinstall Windows 10 Home in S mode on Surface Go

Download the recovery image

Before we get started, you must acquire the files necessary for recovery. To do that, you're going to need your Surface Go serial number and some time to allow the download to complete. (You can find the 12-digit serial number under the kickstand on the Surface Go.) The download is around 6.6GB so it may take a while depending on your internet connection.

  1. Open Microsoft's recovery image download page
  2. Select Surface Go from the drop-down menu.
  3. Enter your Surface Go serial number. It is located on the underside of the Go's kickstand (you can also find in the pre-installed Surface app on the Go).

  4. Select Download recovery image on the latest version available. The download will take some time depending on your internet connection.

Create a USB recovery drive

Now that you have the necessary files for recovery, you need to set up a USB drive for recovery. We'll be using this USB drive to recover the Surface Go. Make sure the USB drive is at least 16GB in size, and that you backed up any photos, documents, or files you want to save.

  1. Press Start
  2. Search for "Create a recovery drive".

  3. Deselect Backup system files to the recovery drive.
  4. Press Next.

  5. Select the USB drive you'll be using as the recovery drive.
  6. Press Next.

  7. Select Create drive.

Extract recovery files

Once your USB recovery drive is created, you need to transfer all the recovery files you downloaded earlier.

  1. Right click on the downloaded recovery file.
  2. Select Extract All.

  3. Select Extract. This will create a folder in the same directory as your downloaded recovery file, into which the contents will be extracted.

  4. Open the extracted contents folder. It will have a name along the lines of "SurfaceGo_BMR_11_1.011.2" (the specific name may vary depending on the latest version available).
  5. Copy all the files in the extracted folder into your newly created USB recovery drive.

    You can press CTRL + A to select all the files in the folder and drag-and-drop them into the drive labeled "RECOVERY" in the left sidebar.

    You may be prompted to replace already existing files in the destination. If so, select "Replace files in destination."

Recover Surface Go

Now that you've created the USB recovery drive and loaded all the necessary files onto it, you can finally get to recovering the Surface Go. Make sure you backed up all your data first, as this process will remove all your apps, documents and settings.

  1. Turn off the Surface Go.
  2. Insert the USB recovery drive we just created into the USB port on the Surface Go.
  3. Hold the volume-down button and power button at the same time.
  4. When the Surface logo appears, let go of the buttons. A blue screen with language selection options will appear.
  5. Select your language and keyboard settings.

  6. Select Troubleshoot.

  7. Select Recover from a drive.
  8. If prompted for a recovery key, select Skip this drive.

  9. Select Just remove my files.

    If you're parting with your Surface Go, I recommend selecting Fully clean the drive to erase your old files thoroughly.

  10. Select Recover. This will restart your Surface Go and take some time, but when it's done, Windows 10 Home in S mode will be back on your Surface Go.

That's it. Your Surface Go should now be recovered and running Windows 10 Home in S mode.

How to set up iCloud on Windows 10

$
0
0

iCloud for Windows

If you're using an iPhone or iPad alongside Windows 10, here's how to get up and running with iCloud.

It's perfectly reasonable to expect a large number of iPhone and iPad owners to also use a Windows computer. The same was true back in the early days of the iPod and led to the development of iTunes for Windows. It's never been the greatest piece of software ever, but Apple, albeit less so than Microsoft, does recognize the necessity to make services cross-platform.

It's also perfectly reasonable that you may have never been aware that you could use iCloud on your Windows PC. It's not exactly shouted about since Apple would prefer that you use its own PC hardware and software together. But, if you're using a mix of iOS and Windows, here's the basics on how to get set up with iCloud on Windows 10.

Where to download iCloud for Windows

iCloud for Windows

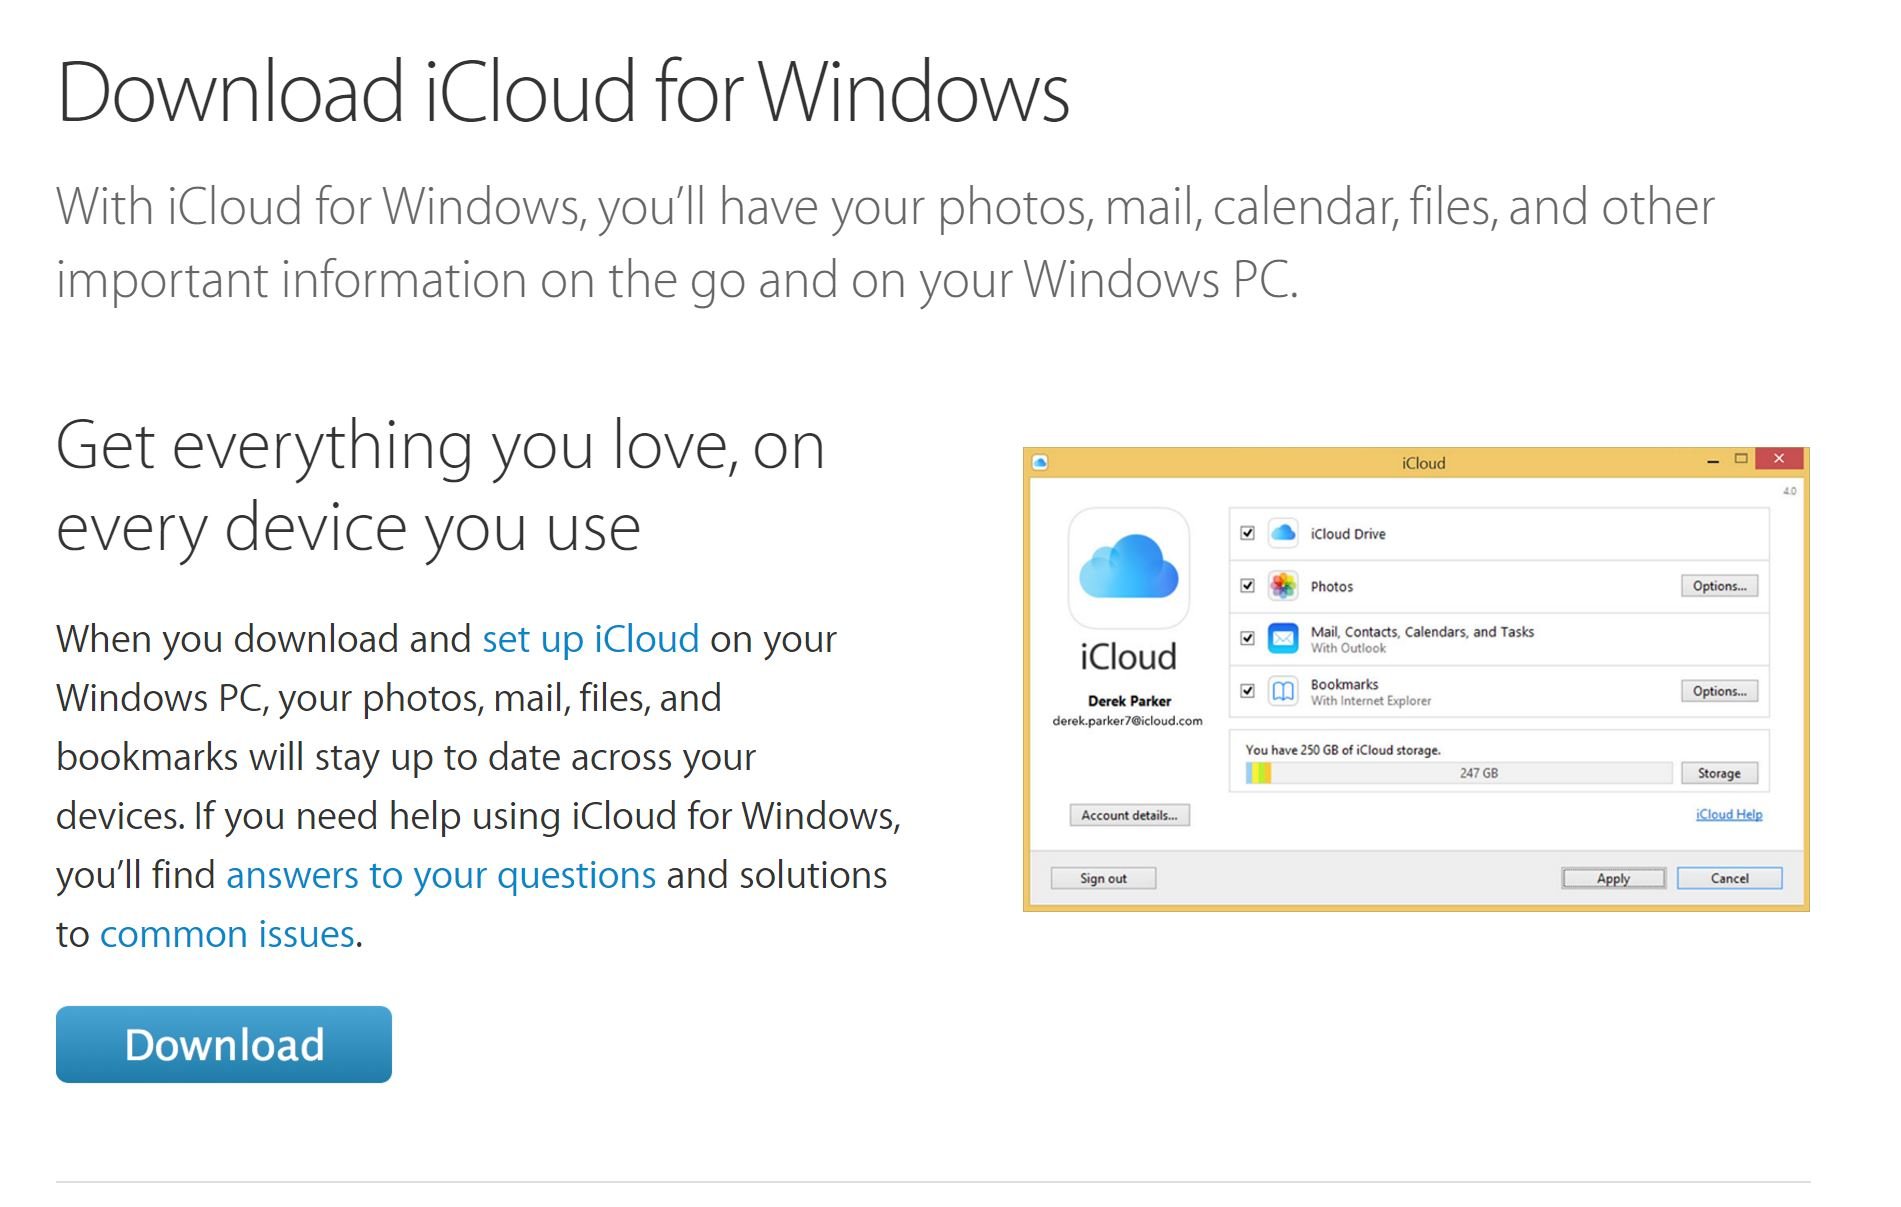
It sounds silly, but Apple doesn't exactly shout about iCloud for Windows on its homepage. If you didn't know it even existed, you may also not know where to find it.

All you need to do is visit the link below and download the iCloud for Windows installer.

Download iCloud for Windows

Signing in to iCloud for Windows

iCloud for Windows

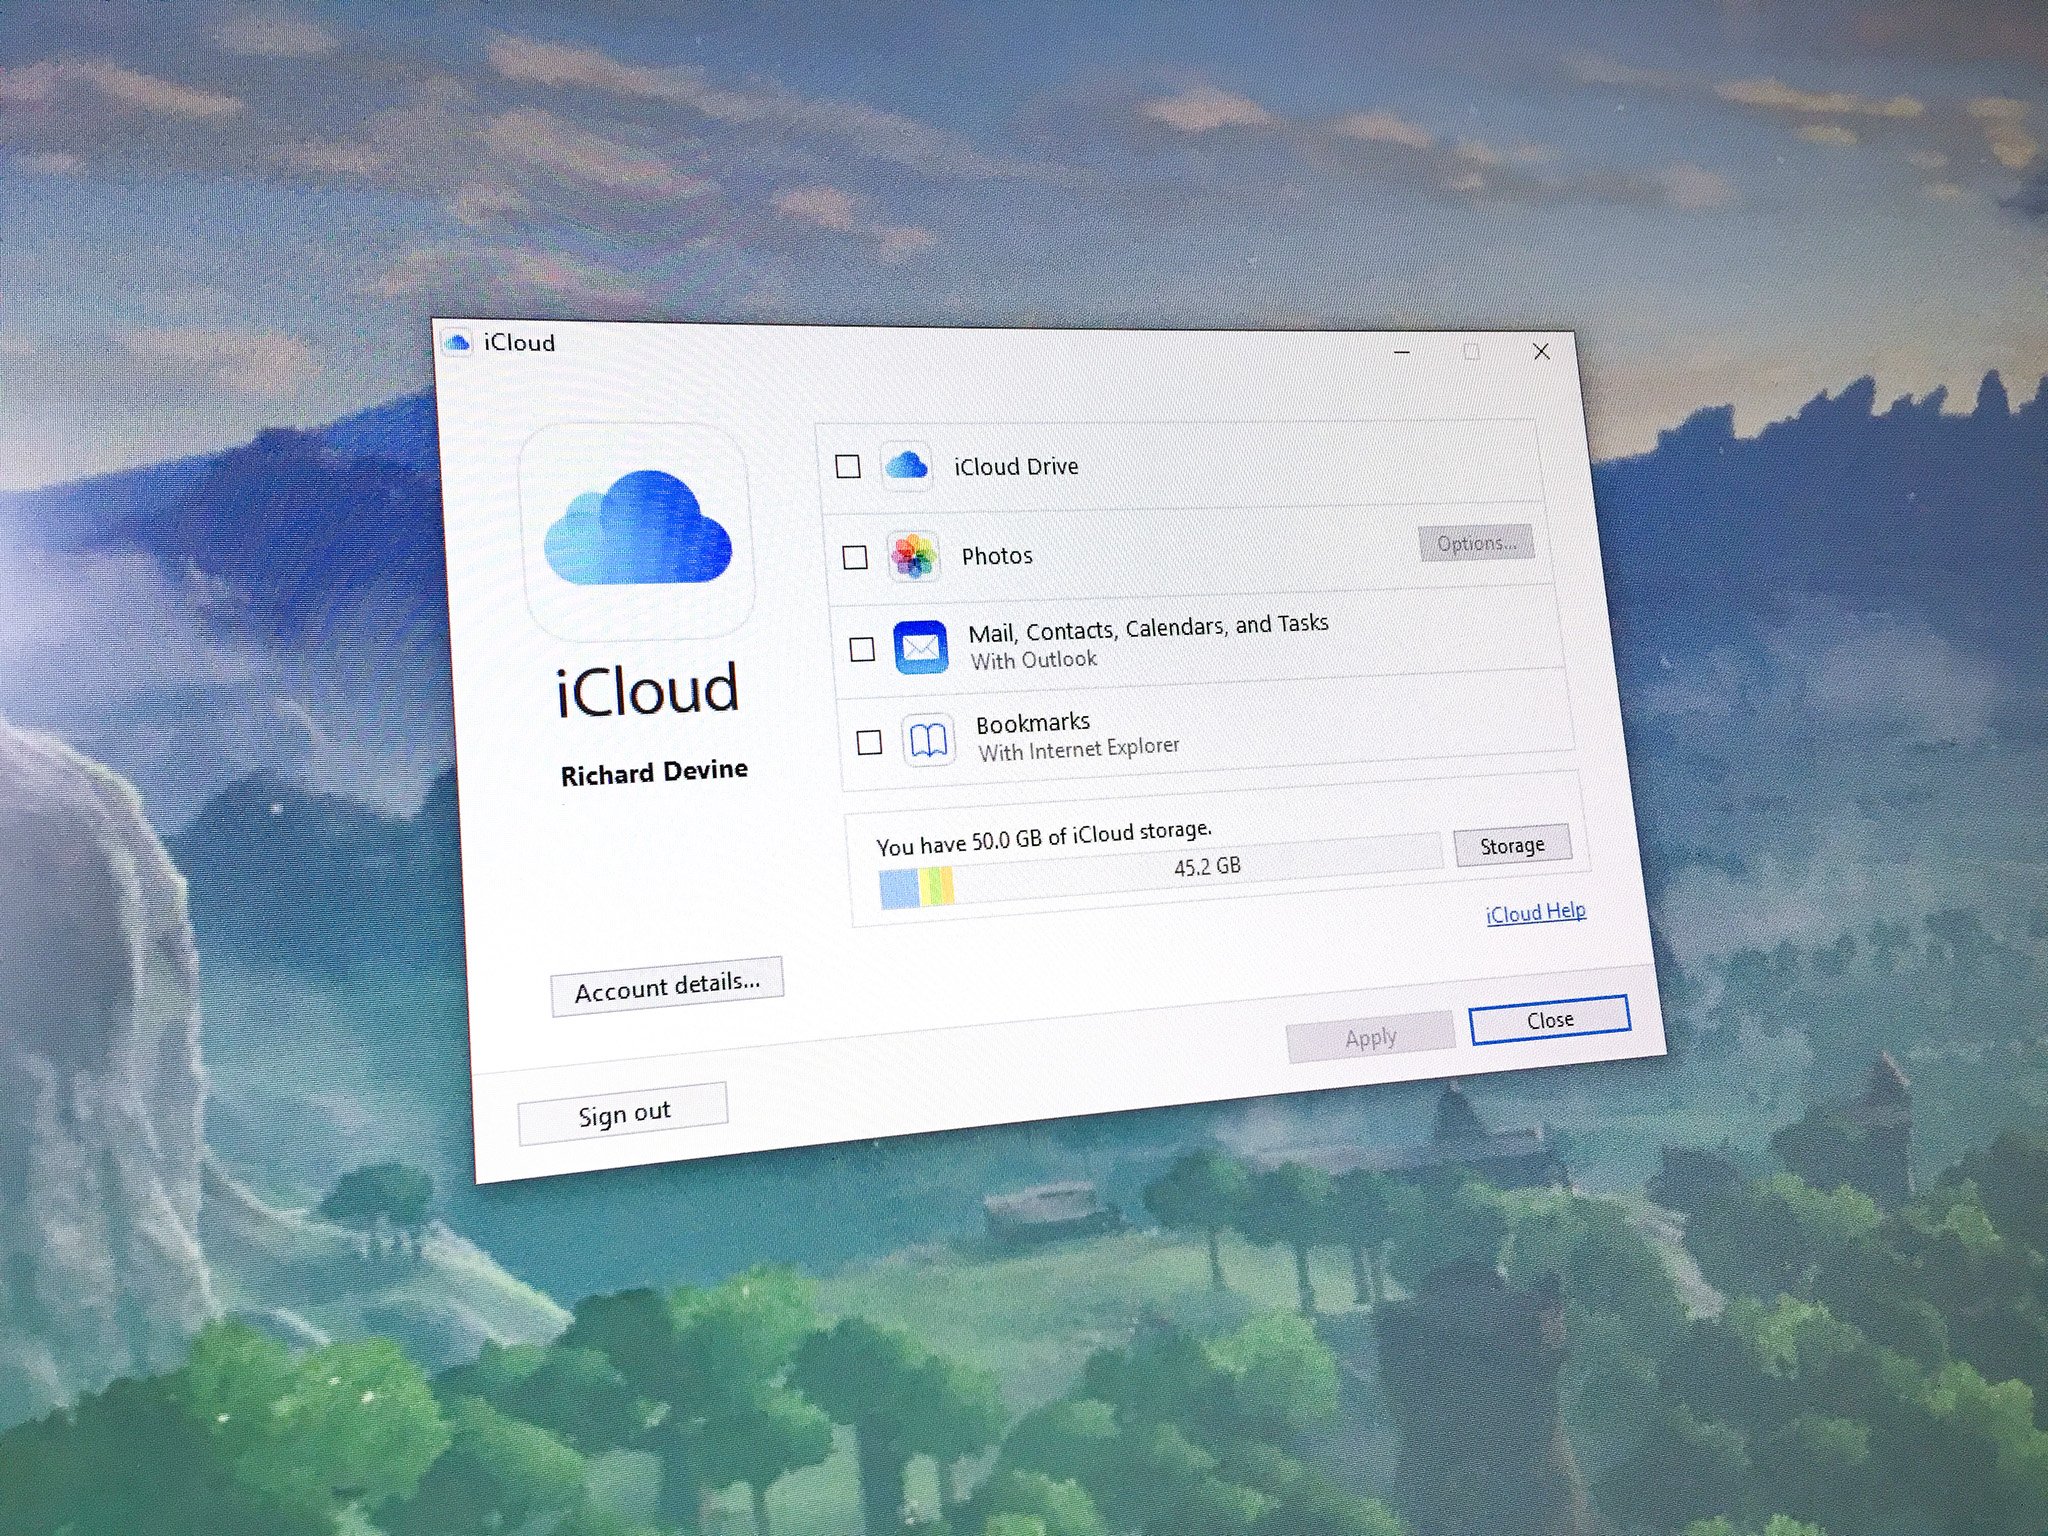
Once you've followed the instructions to install the package, the very first thing you have to do is sign-in. Use the same Apple ID username and password that you're signed into on your Apple devices.

Choosing what to sync

iCloud for Windows

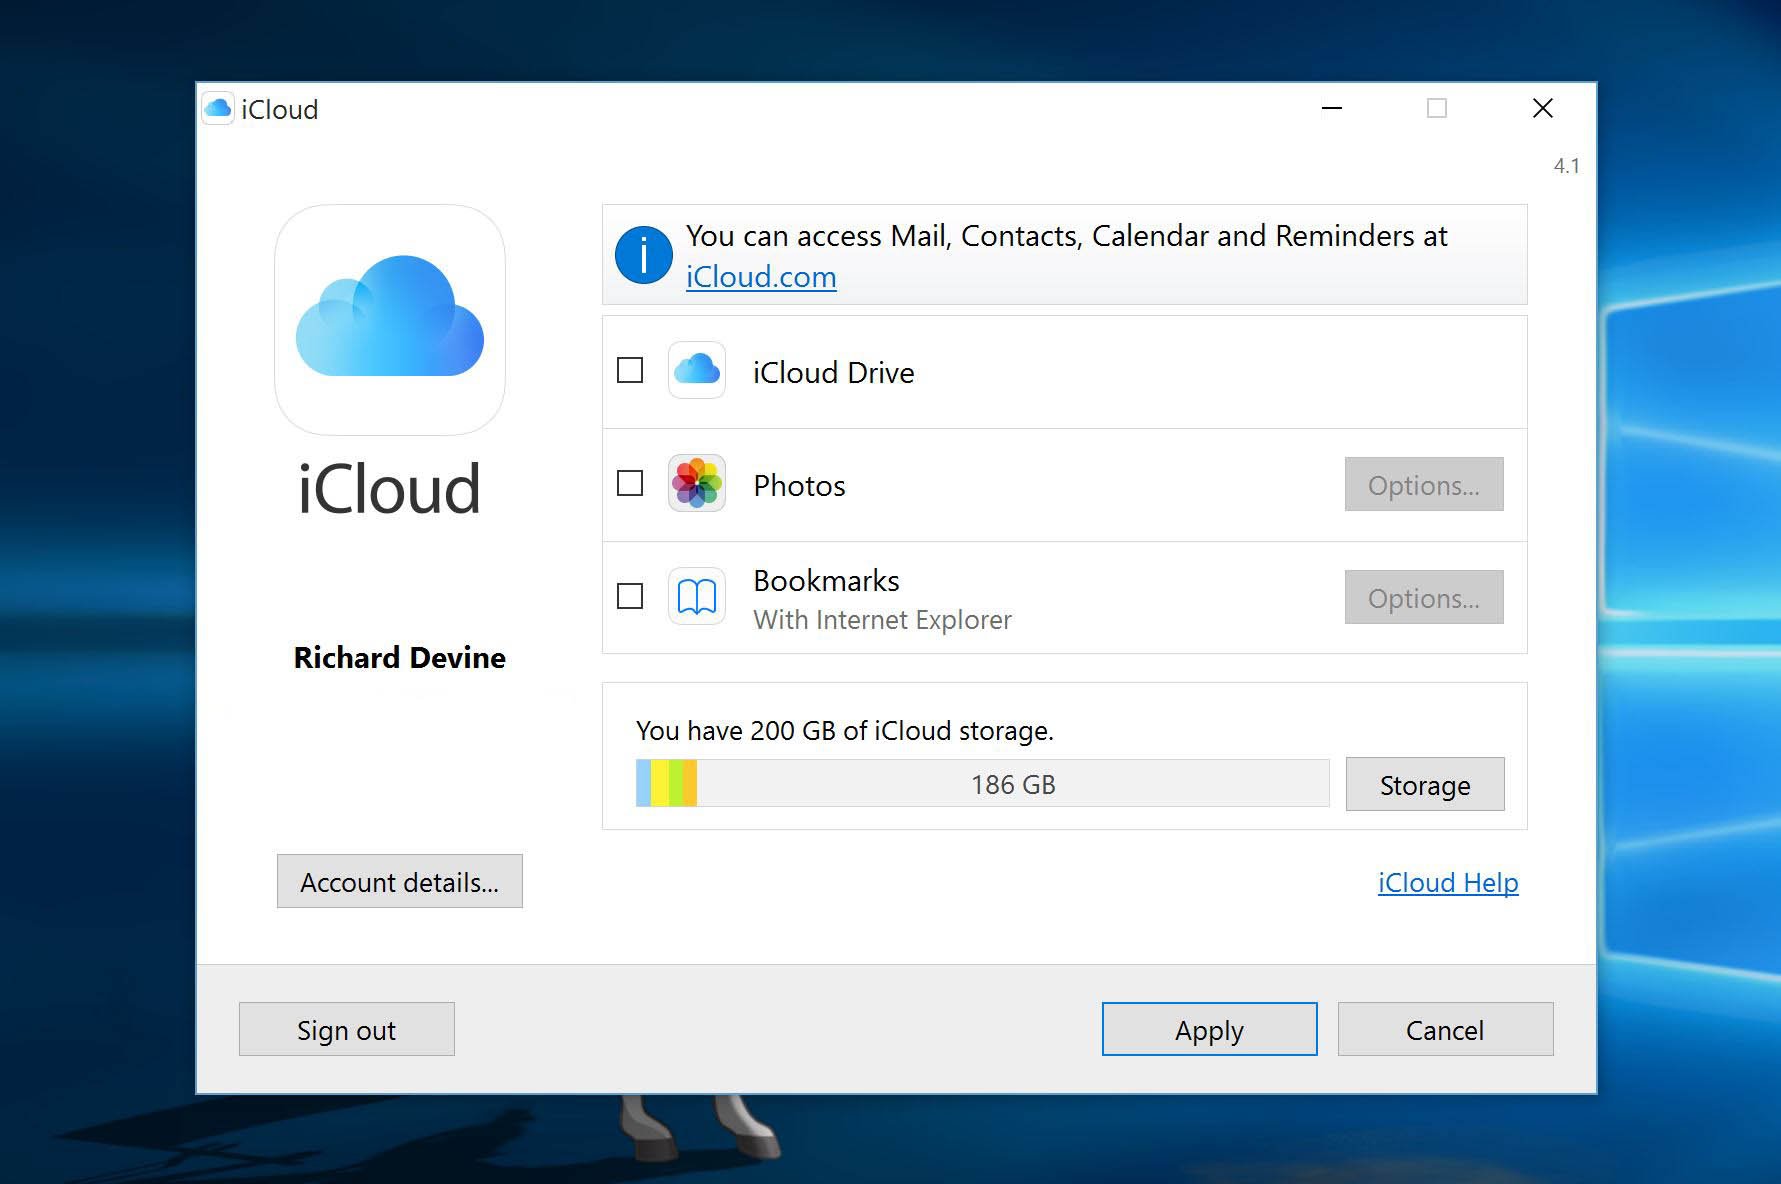
iCloud covers a few different bases, and you might not want to sync all of them to your PC. Select the ones you want by checking the relevant boxes and then click "Apply."

The program you've installed support iCloud Photos, iCloud Drive and bookmark syncing from Safari to Internet Explorer. It can also integrate your calendars, contacts and more with Outlook on Windows.

How to add to iCloud to File Explorer Quick Access panel

iCloud Drive in Windows 10

Unlike Dropbox, iCloud Drive will not automatically add to your Quick Access panel in File Explorer. But it's easy enough to do yourself. Here's how:

  1. By default, your iCloud Drive folder will be in your main User folder. For example, in C:/Users/Richard/iCloud Drive, as it is on my PC.
  2. Navigate to the director's location in File Explorer.
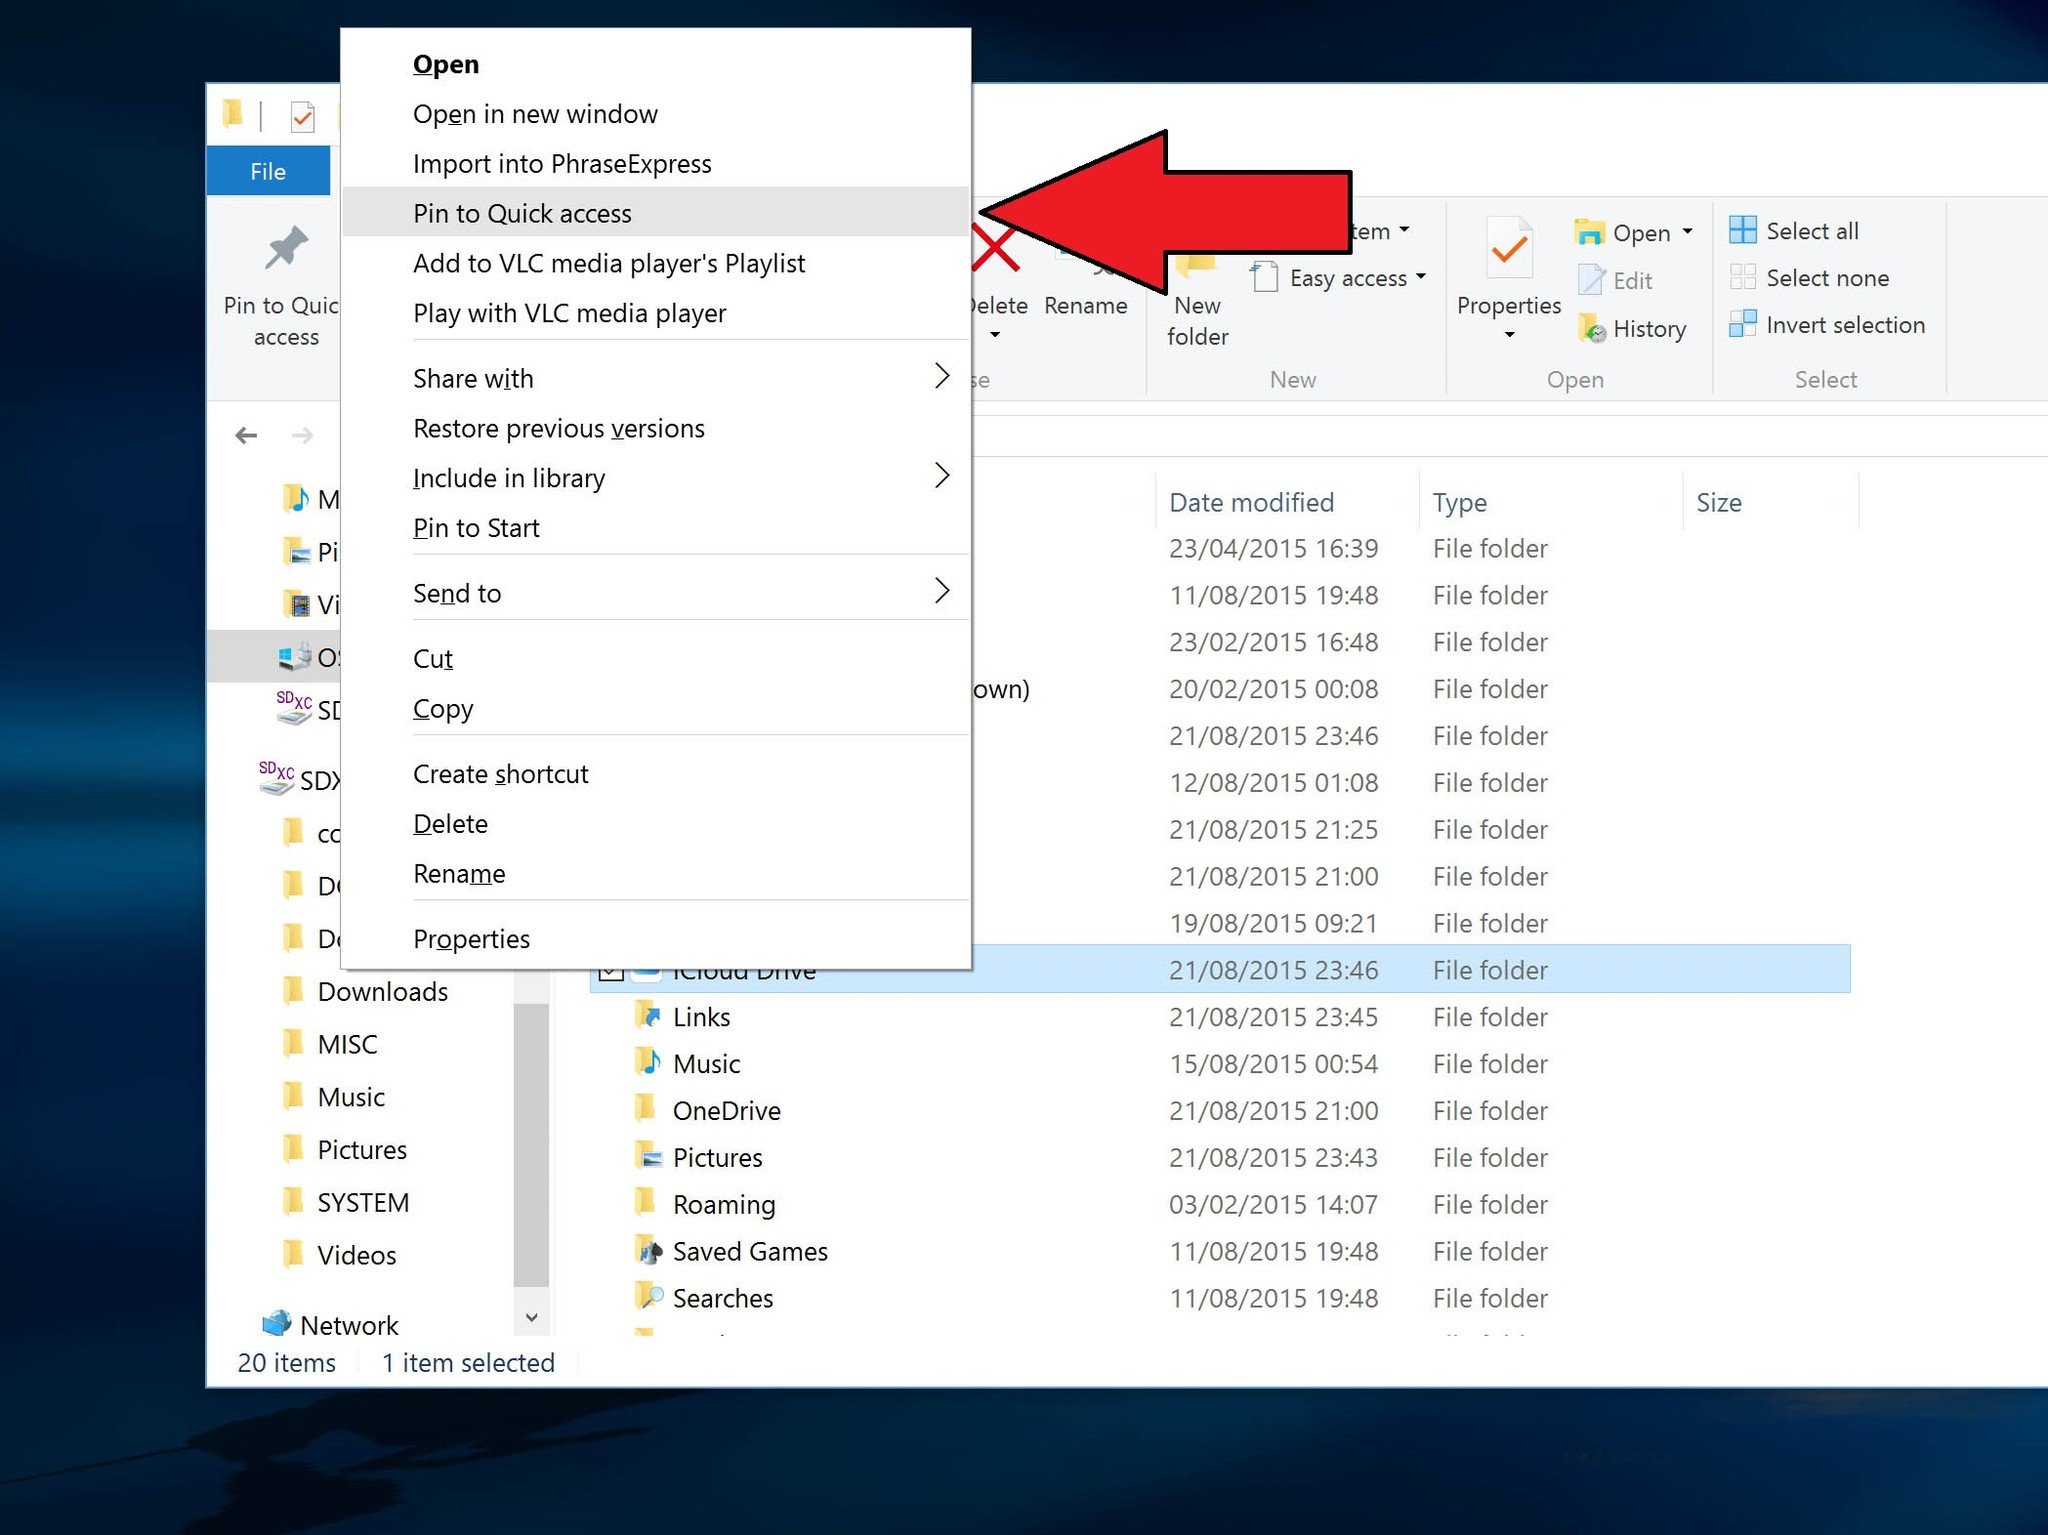
  3. Find the folder "iCloud Drive" and right click on it.
  4. Select Pin to Quick Access to have a shortcut permanently in the left-hand pane in File Explorer as seen in the image above.

iCloud Drive in Windows 10

That covers off the very basics. We'll be looking in more detail at each feature offered by iCloud for Windows in specific guides.

For more on iCloud be sure to stop by and see our buddies at iMore.

Updated August 2, 2018: Guide checked to make sure you still have all the best information on setting up iCloud on Windows 10 right now!

How to make money fast in No Man's Sky

$
0
0

Earning money in No Man's Sky can be a grind, but a few simple steps can make it faster and easier

When you're not out exploring the awe-inspiring worlds of No Man's Sky, you're likely looking for a way to make a quick buck. Nearly every upgrade in the game will cost you units unless you want to grind long hours and search for rare materials. If you just can't wait that long to earn millions and buy your favorite starship, here's how to earn a ton of money fast. We're talking millions.

See at AmazonSee at Microsoft Store

Exploit the trade market (Post-patch 1.53)

Every galaxy has a space station, and every space station has a Galactic Trade Market terminal. An easy way to exploit the market is to find a Superconductor blueprint (a Superconductor itself sells for about 2 million units) and then craft the required materials, which cost a fraction of the price. You're essentially spending a small amount of money to make millions once you sell back the finished product. Just rinse and repeat and you're good to go.

Note: Make sure you don't do this too often in a single galaxy or it will drive the price down. You'll need to hop around a lot to exploit the system.

The required materials to craft a Superconductor are as follows:

  • Nitrogen Salt– 50,000 units
  • Thermic Condensate– 50,000 units
  • Enriched Carbon– 50,000 units
  • Semiconductor– 400,000 units

Now here's where the process will get a bit different from what you may expect, or at least, it's the same process with a few extra steps added. After the game's latest patch, update 1.53, you can no longer purchase Enriched Carbon, Nitrogen Salt, and Thermic Condensate from other merchants aboard space stations. Meaning there isn't a super quick way to get these materials like there used to be other than by crafting them. Luckily, crafting them isn't too hard.

Here's what each requires:

  • Enriched Carbon: 250 Radon and 50 Condensed Carbon
  • Nitrogen Salt: 250 Nitrogen and 50 Condensed Carbon
  • Thermic Condensate: 250 Sulphurine and 50 Condensed Carbon

You may not be able to get the crafted materials from merchants anymore, but they still sell plenty of raw materials that you can use to craft whatever you need. Carbon is one of the most common elements you'll come across, and its condensed form is easily found on planets as well, or can be processed from Carbon through a Portable Refiner.

The Radon, Nitrogen, and Sulphurine can then be purchased from merchants for a small price. Nitrogen and Sulphurine are fairly cheap themselves at around 25 units a pop. Purchasing 250 will set you back a little over 6,000 units, which is nothing. Radon itself is around the same price, though a bit more rare to come across, but it can also be refined from Sulphurine if you're having trouble finding merchants who sell it.

Combing the Nitrogen Salt and Thermic Condensate will produce a Semiconductor, which needs to be combined with Enriched Carbon to form a Superconductor.

Since you'll be crafting more than usual, you'll need the required blueprints for each.

How to find blueprints

The steps required to find these blueprints out in the wild are relatively simple, but may need to be repeated a few times as it's up to chance.

  1. Build a Signal Booster.
  2. Use a Navigation Point to scan for Secure Frequencies.
  3. Once it locates a Manufacturing Facility, head to that waypoint.
  4. Stay in your ship and blast open the door, circling around to avoid Sentinel forces as necessary.
  5. Enter the building and interact with the center console.

At this point you'll be asked to solve a quick problem by choosing one of the options it gives you. For example, if the facility's machines are overheating, you'll need to choose the option to flush them out with coolant. You'll then receive an item after bringing the facility back online. If it's not any of the blueprints you need, you'll need to use your Signal Booster again to search for another Manufacturing Facility. Eventually you'll come across the correct blueprints.

I managed to luck out and find Semiconductor and Enriched Carbon blueprints at the first couple of Manufacturing Facilities I hit up, but it could take you the better part of a few hours to find all of the blueprints. Still, it beats spending a few weeks. This is the most tedious process, but once you find the blueprints you'll have them for good, so you won't need to keep searching for more. The hard part is over.

Can't find Navigation Points? Scan your surroundings and you'll eventually come across some. They look like small blocks/diamonds. They are also common on space stations and in buildings where they are labelled as Encrypted Navigation Data. There's a chance you could either get Nav Points or Nanite Clusters from interacting with them.

Harvest eggs

No Man's Sky NEXT introduced an alien enemy called Biological Horrors. They're high damage, high health monsters that pop up when you try to harvest their larval core, which can be acquired from Whispering Eggs found throughout various planets, especially nuclear and toxic ones riddled in radiation, near abandoned buildings. This method is a bit slower than the above, and it doesn't offer as good a return on investment, but it's another way to make some fast money.

To complete this method the easy way, you'll need to make sure you have enough materials to craft a Base Computer and enough Carbon to make four walls.

  1. Find Whispering Eggs. (Not to be confused with Humming Eggs)
  2. Set up your Base Computer.
  3. Build four walls around the batch of eggs.
  4. Shoot an egg outside of the walls and wait for the Biological Horrors to crawl out of the ground.
  5. Use your jetpack to fly inside of the walls.
  6. Harvest your larval cores in peace.

Biological Horrors cannot climb or jump into your secure area once the walls are up, so you're safe to gather the larval core. Each sells for roughly 90,000 units.

Of course you can always opt to do it the hard way and skip building the protective walls if you're a masochist. Just watch out for the swarm of Xenomor- I mean Biological Horrors.

Scan planets

The following methods are slower and not as rewarding as the previous two, but they're the quickest if you're looking to make a few thousand units because you're short on cash at the moment and don't need millions to purchase whatever item you're eyeing. These are less about hoarding millions and more about getting small lumps of cash as quick as possible.

Almost every planet will have its own species of flora and fauna that can be scanned for units. Finding a new animal or mineral can snag you a couple hundred to a couple thousand units at a time.

Even better, scan planets for Ancient Ruins. At these locations you'll find items known as Gravitino Balls, which sell for about 20,000 units a piece. Sentinels will attack once you gather one, so be prepared for a fight

Check out our No Man's Sky: Beginner's Guide!

See at AmazonSee at Microsoft Store

How to stop automatic updates in Windows 10

$
0
0

Windows 10 always install cumulative updates automatically, even if you're against them, but you can use these steps to stop this behavior and decide when to install them.

On Windows 10, cumulative updates are no longer optional, they're mandatory, which means that they download and install automatically as soon as they're ready. Although this new mechanism is a convenient approach to ensure that every device has the latest security patches, bug fixes, and improvements, it's not an option that everyone likes.

If you have a computer running Windows 10, depending on the edition, it's still possible to regain some of the control and stop automatic updates using the Local Group Policy Editor or Registry.

In this Windows 10 guide, we'll walk you through the steps to prevent automatic updates from installing on your device.

How to block automatic updates using Local Group Policy

If you're running Windows 10 Pro, you can use the Local Group Policy Editor to change the system settings to prevent your device from downloading and installing updates automatically. Here's how:

  1. Use the Windows key + R keyboard shortcut to open the Run command.
  2. Type gpedit.msc and click OK to open the Local Group Policy Editor.
  3. Browse the following path:

    Computer Configuration\Administrative Templates\Windows Components\Windows Update

  4. On the right side, double-click the Configure Automatic Updates policy.

  5. Check the Disabled option to turn off the policy.

  6. Click the Apply button.
  7. Click the OK button.

Once you've completed the steps, Windows 10 will no longer download updates automatically, which can also save data when using a metered internet connection, and any future updates must be downloaded and installed manually from Settings> Update & Security> Windows Update.

Configuring automatic update options

Alternatively, if disabling the policy isn't working, you can also use the Group Policy Editor to configure the Windows Update options to prevent updates from installing automatically on your computer.

  1. Use the Windows key + R keyboard shortcut to open the Run command.
  2. Type gpedit.msc and click OK to open the Local Group Policy Editor.
  3. Browse the following path:

    Computer Configuration\Administrative Templates\Windows Components\Windows Update

  4. On the right side, double-click the Configure Automatic Updates policy.

  5. Check the Enabled option to turn on the policy.
  6. Under the "Options" section, you'll find a number of options to configure automatic updates, including:

    • 2 - Notify for download and auto install.
    • 3 - Auto download and notify for install.
    • 4 - Auto download and schedule the install.
    • 5 - Allow local admin to choose setting.

    You should select the option that best fits your preference, but option 2 - Notify for download and auto install is the closest to permanently disable automatic updates.

  7. Click the Apply button.
  8. Click the OK button.

Once you've completed the steps, Windows 10 will no longer download updates automatically, and once new updates become available, you'll get a notification to install them manually from Settings> Update & Security> Windows Update.

At any time, you can revert the changes using the same steps, but on step No. 5, make sure to select the Not Configured option. Then reboot your device to apply the changes.

How to block automatic updates using Registry

On Windows 10 Pro, you can alternatively stop automatic updates using the Registry. Here's how:

Warning: This is a friendly reminder that editing the Registry is risky, and it can cause irreversible damage to your installation if you don't do it correctly. It's recommended to make a full backup of your PC before proceeding.

  1. Use the Windows key + R keyboard shortcut to open the Run command.
  2. Type regedit, and click OK to open the Registry.
  3. Browse the following path:

    HKEY_LOCAL_MACHINE\SOFTWARE\Policies\Microsoft\Windows

  4. Right-click the Windows (folder) key, select New, and then click on Key.

  5. Name the new key WindowsUpdate and press Enter.
  6. Right-click the newly created key, select New, and click on Key.

  7. Name the new key AU and press Enter.
  8. Right-click the newly created key, select New, and click on DWORD (32-bit) Value.

  9. Name the new key NoAutoUpdate and press Enter.
  10. Double-click the newly created key and change its value from 0 to 1.

  11. Click the OK button.

After completing the steps, your device will stop receiving updates automatically, but you can still go to Settings> Update & Security> Windows Update to force the download and installation of future updates.

Configuring automatic update options

If disabling the Windows 10 update service policy isn't working, you can also use the Registry to configure the Windows Update options to avoid updates from installing automatically on your device.

  1. Use the Windows key + R keyboard shortcut to open the Run command.
  2. Type regedit, and click OK to open the Registry.
  3. Browse the following path:

    HKEY_LOCAL_MACHINE\SOFTWARE\Policies\Microsoft\Windows

  4. Right-click the Windows (folder) key, select New, and then click on Key.

  5. Name the new key WindowsUpdate and press Enter.
  6. Right-click the newly created key, select New, and click on Key.

  7. Name the new key AU and press Enter.
  8. Right-click the newly created key, select New, and click on DWORD (32-bit) Value.

  9. Name the new key AUOptions and press Enter.
  10. Double-click the newly created key and change its value using one of the following options:

    • 2: Notify for download and auto install.
    • 3: Auto download and notify for install.
    • 4: Auto download and schedule the install.
    • 5: Allow local admin to choose settings.

    Similar to using Local Group Policy, you can select the option that best suits your preference, but setting the value to 2 is the closest option to disable Windows Update.

  11. Click the OK button.

After completing the steps, your device will stop receiving updates automatically. However, when new patches are available, you'll get a notification to download and install them manually from Settings> Update & Security> Windows Update.

If you no longer need to block automatic updates, you can revert the changes using the same steps, but on step No. 4, make sure to right-click the WindowsUpdate key (folder) and select the Delete option. Then restart your computer to apply the changes.

Wrapping things up

Although we're outlining the steps to prevent your computer from getting updates, it's important to make it clear that it's never recommended to skip them. The reason is that updates are crucial to keeping Windows 10 running correctly and your data safe.

However, there are scenarios when you may need to apply updates manually, schedule an install during a particular time, or just because you want to make sure that a particular cumulative update works correctly before installing it on your device.

This guide only blocks monthly cumulative updates, which usually patch security vulnerabilities and improves the overall performance of Windows 10. If you want to avoid automatic installs of feature updates, such as the Windows 10 April 2018 Update, you need to modify the settings to defer major releases.

More Windows 10 resources

For more helpful articles, coverage, and answers to common questions about Windows 10, visit the following resources:

List of every Xbox One controller so far: Special editions, limited, and more

$
0
0

Find the perfect Xbox One controller for you with our complete list of special and limited edition controllers up for grabs.

Since the Xbox One's 2013 debut, Microsoft has launched an array of unique and stylish Xbox One controllers, even providing the opportunity to design your own. While the standard issue Xbox One controller gets the job done, designs based on various franchises, patterns and aesthetics make it easy to find one that truly expresses you. We've rounded up every special edition and limited edition controller available for Xbox One so far and where to find them.

Third generation Xbox One controllers

This is the latest revision of the Xbox One controller, which offers several improvements over its predecessor. Among its highlights is Bluetooth connectivity for PCs and a textured grip on the rear. Third generation Xbox One controllers can be identified by their single face plate which surrounds the Xbox button. The design was first introduced with the launch of the Xbox One S in 2016.

Armed Forces II

Delivering a modern take on a classic design, the Armed Forces II Special Edition revives the same angular lozenge camouflage of its predecessors. This military-inspired aesthetic has been explored multiple times, though this latest revision brings the benefits of the third-generation feature set. The Armed Forces II Special Edition is now available for preorder ahead of its slated August 14 release, priced at $64.99.

See at Microsoft Store

Sport White

Bearing similarities to the "Tech" line, this Sport White special edition controller is one of Microsoft's sleekest yet. Its clean white military-inspired design is paired accompanying mint and silver accents, while the rubberized diamond finish helps you maintain grip. The Sport White design is currently available from various retailers, priced at $69.99.

See at Microsoft Store

Combat Tech

Combat Tech is the latest entry in the "Tech" line of Xbox One controllers, featuring a sleek look embracing a dark military green. Featuring the signature diamond grip, icons embossed down the center and matching accents, this controller fully embraces military design.

See at Microsoft Store

Sea of Thieves

The Xbox One's latest game-themed controller takes inspiration from Sea of Thieves– Microsoft's upcoming pirate-themed adventure title. With a sleek nautical design plucked from the depths, the controller stands out as one of the most distinct yet. Among its highlights is a translucent purple casing etched in barnacles, a gold trigger resembling a pirate's tooth and a glow in a dark skull symbol. The Sea of Thieves controller retailed for $74.99 and while stock has depleted, some units still surface online.

See at Microsoft StoreSee at Amazon

Project Scorpio

Microsoft first formally discussed the Xbox One X at E3 2016 under its "Project Scorpio" codename, prior to settling on a formal name for the device. While the codename has since been dropped, the "Project Scorpio Edition" console and controller pays homage with its unique branding. The Project Scorpio Edition controller can be picked up via the Xbox One X bundle and isn't sold separately.

See at Amazon

Minecraft Creeper

This Creeper design is a one of a pair of Minecraft controllers, designed around the game's iconic foe. On the front, you'll find the Creeper's face, reconstructed in a subtle, yet identifiable tile pattern. The A, B, X and Y buttons are represented in a blocky Minecraft front, while a secret explosive surprise lies under the battery pack. Although the controller is available for standalone purchase at $64.99, dedicated fans can also pick up the controller in the Minecraft Xbox One S bundle.

See at Microsoft StoreSee at Amazon

Minecraft Pig

Minecraft fans also have the choice of the limited edition Pig controller, based on everyone's favorite porky friend. Like the Creeper controller, the Minecraft Pig design features the pig face on the front of the controller in a tiled pattern. The A, B, X and Y buttons have also been skinned with a blocky Minecraft font, while the rear is rounded off with a curly tail. The Minecraft Pig controller can be purchased standalone for $64.99.

See at Microsoft StoreSee at Amazon

Volcano Shadow

The Volcano Shadow controller offers a fiery twist to "shadow" line of designs, with a black gradient descending into a metallic orange base. Characterized by its shifting colors, black buttons, and red accents, you won't find a controller hotter than this. The Volcano Shadow is currently available from various retailers, priced at $69.99.

See at Microsoft StoreSee at Amazon

Patrol Tech

Inspired by modern military forces, the Patrol Tech Xbox One controller offers a utilitarian design with a sleek finish. Complementing its dark blue faceplate, the Patrol Tech controller features a rubberized, etched diamond grip and three stacked icons down the center. The Patrol Tech controller is currently priced at $69.99.

See at Microsoft StoreSee at Amazon

Gray / Green

This controller offers a simple yet striking colorway, blending a two-tone gray design with subtle green highlights. While soft gray makes up a majority of the controller, bright green accents lay hidden underneath the two thumbsticks. The Green/Gray Xbox One controller is available for $64.99 in the U.S.

See at Microsoft StoreSee at Amazon

Recon Tech

As the first of the "Tech" line of controllers, Recon Tech established the sharp, modern design used across future entries. Defining aspects of the controller are its warm grey base color, diamond grip etched in gold and three minimalistic icons down the center. This model has been discontinued, however remaining stock is available from some retailers.

See at Microsoft StoreSee at Amazon

Ocean Shadow

The Ocean Shadow controller features a metallic blue merging into a rich black. Complemented by black buttons highlighted with blue accents, the controller offers a simple yet distinct look. This controller is currently priced at $59.99 at most retailers.

See at Amazon

Winter Forces

The Winter Forces Xbox One controller is draped in a lozenge camouflage, comprised of various polygonal shapes. Taking advantage of clean whites and lighter grays, this controller is perfect for any arctic operation. The Winter Forces controller is currently available for $59.99.

See at Microsoft StoreSee at Amazon

Green / Orange

This controller comes in a dark military green, with matching buttons, thumbsticks and triggers. Hidden underneath the thumbsticks are sharp neon orange highlights, contrasting with the main body. This controller retails for $59.99 in the U.S.

See at Microsoft StoreSee at Amazon

Red

For those that want something simple, yet striking, nothing beats the red Xbox One controller. With a vibrant red front and a darker tone on the rear, this controller is a fit alternative to the standard black or white colorways. This controller is available for $54.99.

See at Microsoft StoreSee at Amazon

Blue

Like its red alternative, this Xbox One controller comes in a bright blue. On the front, you'll be getting a vibrant flat blue, while the back and accents rock a darker tone. This controller is available for $54.99 across most retailers.

See at Microsoft StoreSee at Amazon

Dawn Shadow

The Dawn Shadow Xbox One controller embraces an eye-catching metallic magenta rising into to matte black finish. Having sold fast at launch and since being discontinued, the remaining stock can be hard to come by.

See at Amazon

Military Green

Coinciding with the launch of Battlefield 1, Electronic Arts' brutal First World War shooter, a special edition Xbox One S bundle hit the market. Packing a unique military green 1TB console, a matching controller and a copy of Battlefield 1, the bundle proved the best way to experience the game on Xbox One. While Microsoft has since discontinued the console, the remaining stock is still circulating among retailers.

See at Amazon

Deep Blue

Shortly after the launch of the Xbox One S, a 500 GB variant of the console was released in "Deep Blue" across select regions. Packaged alongside Battlefield 1, Gears of War or FIFA 17, this was the only way to obtain a "Deep Blue" Xbox One controller.

See at Amazon

Storm Grey

Like the Deep Blue console, a "Storm Grey" variant of the 500 GB console was available in select regions. Included in this bundle was a Storm Grey console, matching all-grey controller and a copy of Battlefield 1 or FIFA 17.

See at Amazon

Gears of War 4 Crimson Omen

The Crimson Omen controller was one part of controller duo, based on Microsoft's Gears of War shooter series. Celebrating the game's fourth main installment, this controller reflected its brutal universe, etched with lasers and painted with a gritty design. This controller is still available today, priced at $64.99.

See at Microsoft StoreSee at Amazon

Gears of War 4 JD Fenix

The second controller in the Gears of War 4 series opted for a grey and blue color scheme based on the game's protagonist, JD Fenix. With a rustic form similarly styled to Fenix's armor, this controller is a must-buy for any Gears fan. This controller is also still available, priced at $64.99.

See at Microsoft StoreSee at Amazon

Second generation Xbox One controllers

The second generation of Xbox One controller delivered a welcome revision of the original design, adding a dedicated 3.5 mm headphone jack next to the proprietary accessory port. This allowed standard 3.5 mm headsets to be used on the device without a Xbox One Stereo Headset Adapter. The second generation design was first introduced in June 2015 and retired one year later for the launch of the Xbox One S.

Gears of War 4 Elite

Microsoft raised the bar for special edition peripherals with this Gears of War Elite controller. Etched with lasers, brutal battle scars and several layers of detail, this Gears of War Elite truly captures the aesthetic of the universe itself. As an Elite controller, it features removable joysticks, fully configurable buttons, interchangeable d-pad options and four additional paddles for extra tactical control. However, due to the design of the Elite line, you'll be losing out on Bluetooth connectivity. Don't expect these to come cheap either, with remaining controllers scarce at high price point.

Dusk Shadow

Taking influence from the skies, the Dusk Shadow controller offers a deep metallic blue, slowly descending into a matte black finish. The controller also features black thumbsticks and buttons, with blue highlights on A, B, X and Y. This controller has since been discontinued, although stock remains through select retailers.

See at Amazon

Copper Shadow

In contrast to its Dusk Shadow partner, this controller features a metallic copper and black finish, bound to grab attention. Black thumbsticks and buttons are also included, with stylish copper highlights on A, B, X, and Y. This controller has also been discontinued but lucky buyers may find stock at some retailers.

See at Amazon

Halo 5: Guardians Master Chief

Marking the release of Halo 5: Guardians, Microsoft released two limited-run controllers, designed around the game's main characters. One of these captures the series' most iconic figure, the Master Chief, with a green and gold design mimicking his unique armor. This controller has been discontinued, however, several retailers still stock the item for a markup.

See at Amazon

Halo 5: Guardians Locke

The second controller within the Halo 5: Guardians line is inspired by Spartan Locke, the Master Chief's main foe throughout the game. Designed to replicate gunmetal plating with blue highlights, the controller fully captures the styling of the character's armor. This controller is also stocked at a variety of retailers, sold at a markup.

See at Amazon

Armed Forces

Covered by lozenge camouflage in an iconic military green, the Armed Forces controller perfectly captures military operations. With a design made of angular polygons, the controller offers a unique blend of sharp, modern geometry and the natural feel of the wilderness.

See at Amazon

Lunar White

The Lunar White Xbox One controller provides one of the best premium designs to date, embracing a space-age aesthetic of white, black and gold. While the matte white finish and black highlights make for a sleek design, the gold directional pad and triggers provide a look out of this world.

See at Amazon

Forza Motorsport 6

Marking the launch of Forza Motorsport 6, 2015's entry to Microsoft's racing franchise, a special edition controller was released. Its dark navy color scheme is layered with dual racing stripes, and two silver triggers on the rear. This controller has since been discontinued, meaning collectors will now pay an above-retail price.

See at Amazon

Covert Forces

Take part in only the most surreptitious operations with the Covert Forces controller, which features a dark camouflage design. This controller takes influence from the original Camouflage controller, however, with a dark gray color scheme. This controller was the first of the second-generation controllers, debuting the 3.5 mm headphone jack for stereo audio and voice chat.

See at Amazon

First generation Xbox One controllers

The first generation Xbox One controller design made its debut with the launch of the console in 2013. While the core functionality of the controller remains, several improvements were seen in future revisions.

Midnight Forces

The Midnight Forces controller offers a nocturnal take on the original camouflage design, embracing blues and blacks in a darker theme. This controller also features black analog sticks and a metallic directional pad.

See at Amazon

Call of Duty Advanced Warfare

Paired with the launch of Call of Duty Advanced Warfare, this special edition is the only official Xbox One console based on the world-famous shooter franchise.

See at Amazon

White (Sunset Overdrive)

Paired with the release of Sunset Overdrive, Microsoft released a special edition Xbox One console, offering the first widely-available design since the console's launch. Alongside a white console, a matching controller was also produced, available exclusively through this bundle. Although this console has since been discontinued, the complete package is still available from select resellers.

See at Amazon

Camouflage

Classic camouflage made its arrival on Xbox One with this controller, delivering the first patterned design in the range. With a clean lozenge design, the controller rocks an array of green polygons to keep you hidden from foes. This controller is based on the first revision of the Xbox One controller, however, a similar updated model is available through the "Armed Forces" design.

China Day One

Although the Xbox One first hit store shelves in late 2013, it took almost a year for the console to reach China. After a lengthy console ban, the Xbox One was the country's first official console in 14 years. Commemorating its arrival, a "China Day One" bundle was released, featuring a 500 GB console and a branded controller. This controller is especially hard to find, with most units understandably residing in China.

Titanfall controller

This controller was the first themed special edition Xbox One controller, tying into the release of Respawn's Xbox-exclusive shooter, Titanfall. Designed around the game's near-future technology, the controller embraces a clean white and orange color scheme of the Frontier. Today, the Titanfall controller is hard to find in a new condition.

See at Amazon

Launch Team

Celebrating the efforts of the Xbox One team, a limited-run console was distributed to select Microsoft employees. With "I Made This, Launch Team 2013" printed on the console and controller, few Xbox collectibles are as rare as this. Just don't expect to get one, unless you're willing to drop several hundred dollars.

Day One

Kicking off the launch of Xbox One, the special edition "Day One" edition of the controller was issued. While a similar design to the standard first-generation Xbox One controller, the Day One controller was defined by its "Day One 2013" branding in the center. This controller was only available as a part of the Day One console bundle available on launch day.

Over to you!

What controller are you using? Are there any franchises you would like to see Microsoft develop a special edition controller for? Let us know in the comments.

Updated August 3, 2018: Updated this article with the upcoming Armed Forces II design.

How to create Windows 10 system restore points automatically on startup

$
0
0

You can create system restore points every time Windows 10 starts, and in this guide, we'll show you how to do it.

On Windows 10, System Restore is a feature that works like a time machine that takes your computer to an earlier point in time to reverse system changes using a restore point. This feature is particularly useful to recover from a number of issues when your device isn't working correctly without affecting your files.

Usually, new restore points are created automatically before a significant event occurs, such as when installing a new app, driver, or software update, and you can even trigger them manually. The only caveat is that using a restore point that isn't recent may end up undoing many unnecessary changes. However, if you want to make sure there is always a fresh restore point available, you can configure System Restore to generate additional checkpoints every time you start Windows 10.

In this Windows 10 guide, we'll walk you through the steps to use Task Scheduler along with a PowerShell command to create restore points automatically during startup.

How to create system restore points at startup

To create automatic restore points during startup, you must enable System Restore, disable the restore point creation frequency option, and use Task Scheduler to create a task to automate the restore point process every time your computer starts.

Enabling system restore point service

On Windows 10, System Restore comes disabled by default, but you can use these steps to enable the feature:

  1. Open Start.
  2. Search for Create a restore point and click the top result to open the experience.
  3. Under "Protection Settings," if your device system drive has "Protection" set to "Off," click the Configure button.

  4. Select the Turn on system protection option.

  5. Click Apply.
  6. Click OK.

Once you've completed the steps, you can continue with the steps below to configure System Restore to create restore points during startup.

If you want to disable System Restore, you can use the same instructions, but on step No. 4, make sure to select the Disable system protection option.

Disabling system restore point frequency

When you enable System Restore, Windows 10 doesn't create additional automatic restore points if there's another restore point that has been created within the last 24 hours. Although this restriction won't apply when triggering a new restore point manually or automatically as a result of an app, driver, or update installation, it'll prevent Task Scheduler from creating restore points during startup. However, it's possible to avoid this problem by disabling the frequency option using these steps:

Warning: This is a friendly reminder that editing the Registry is risky, and it can cause irreversible damage to your installation if you don't do it correctly. It's recommended to make a full backup of your PC before proceeding.

  1. Use the Windows key + R keyboard shortcut to open the Run command.
  2. Type regedit, and click OK to open the Registry.
  3. Browse the following path:

    HKEY_LOCAL_MACHINE\SOFTWARE\Microsoft\Windows NT\CurrentVersion\SystemRestore

    Quick Tip: On Windows 10, you can now copy and paste the path in the Registry's address bar to quickly jump to the key destination.

  4. Right-click the SystemRestore (folder) key, select New, and click on DWORD (32-bit) Value.

  5. Name the key SystemRestorePointCreationFrequency and press Enter.
  6. Double-click the newly created key and make sure its value is set to 0.

  7. Click OK.

After completing the steps, Task Scheduler should be able to run the task with the corresponding command to create new restore points at every startup.

Windows 10 is very savvy at controlling the number of restore points that can be stored on your device, as such, you shouldn't be worrying about running out of space when disabling this feature.

If you no longer want to create new checkpoints at startup, you can always revert the Registry changes using the same instructions, but on step No. 4, make sure to right-click the SystemRestorePointCreationFrequency DWORD and select the Delete option, and then delete the task using the steps below.

Creating a system restore point during startup

The next step is to use the Task Scheduler to create a new task that will run at startup to trigger a new restore point using these steps:

  1. Open Start.
  2. Search for Task Scheduler, click the top result to open the experience.
  3. Right-click the Task Scheduler Library folder.
  4. Click the Create Task option.

  5. Click on the General tab.
  6. In the "Name" field, type a descriptive name for the task. For example, My Restore Point Startup.
  7. Under "Security options," select the Run whether the user is logged on or not option.
  8. Check the Run with highest privileges option.

  9. Click on the Triggers tab.
  10. Click the New button.

  11. Use the "Begin the task" drop-down menu and select the At startup option.

  12. Click the OK button.
  13. Click on the Actions tab.
  14. Click the New button.

  15. Use the "Actions" drop-down menu and select the Start a program option.
  16. In the "Program/script" field, type the following command:

    powershell.exe

  17. In the "Add arguments (optional)" field, type the following command:

    -ExecutionPolicy Bypass -Command "Checkpoint-Computer -Description \"My Restore Point Startup\" -RestorePointType \"MODIFY_SETTINGS\""

  18. Click the OK button.
  19. Click the Conditions tab.
  20. Under "Power," clear the following two options:

    • Stop if the computer switches to battery power.
    • Start the task only if the computer is on AC power.

  21. Click the OK button.
  22. Specify the password for your account.

  23. Click the OK button.

Once you've completed the steps, the new task will appear in the Task Scheduler Library folder, and it'll run to create a new system restore point every time you start your device.

You can always stop running the task by right-clicking the task inside the "Task Scheduler Library" folder and selecting the Delete option.

Checking system restore points

After following the above instructions, you can make sure that system restore points are being created by restarting your device, waiting around five minutes, and using these steps:

  1. Open Start.
  2. Search for Create a restore point and click the top result to open the experience.
  3. Click the System Restore button.
  4. Select the Choose a different restore point or click the Next button.

After completing the steps, if the task ran as expected, a new restore point with the "My Restore Point Startup" description should appear in the list.

If you're not seeing new restore points being created, review the steps as the problem is likely a typo or mistake in the command.

Moving forward, every time you turn on or reboot your device, Windows 10 will create a restore point that you can use to revert system changes if your computer isn't working correctly without affecting your files or removing many of the configurations you may have recently made.

More Windows 10 resources

For more helpful articles, coverage, and answers to common questions about Windows 10, visit the following resources:


Where to find study guides for passing a CompTIA test

$
0
0

If you currently work in information technology or are considering it, you've probably thought about taking a core CompTIA IT certification test — such as A+, Network+, or Security+. 

There are a wide variety of certifications available, each with their own uses in specialized fields — and choosing your path is the hardest part. Once you've identified the jobs you're interested, it will be easier to make that call and start looking for the material needed to pass a (yes, challenging) CompTIA test. There's no Kaplan class like with the LSAT or MCAT, so you'll likely need to get more creative with your search. Exhibit A: you might try something like this comprehensive CompTIA certification training bundle, which is available on our Digital Offers store for $59. This extensive study guide breaks down how to prepare for each core certification into mini study guides, so you'll be ready to sign up and pass a CompTIA test with no problem. Here are a few of the critical sections:

The Linux+ certification study guide for network and cloud technologies 

The path to becoming a Linux system administrator requires extensive knowledge of, well, Linux! With a Linux+ certification, you'll have mastered system configuration, how to use the command line, scripting basics, network settings & services, and system security.

To help you prepare for the Linux+ certification test, the CompTIA certification training bundle provides a course in Linux+. This course contains 14 hours of content across 422 lectures, and teach you fundamental principles such as Linux installation, shell scripting, and data manipulation in SQL.

The Cloud+ certification study guide for optimizing cloud infrastructure

With cloud services becoming increasingly popular, those who have already mastered Linux may want to earn their CompTIA Cloud+ certification. This will allow you to land a job as a cloud computing service manager or cloud engineer. The CompTIA test will require you to know cloud models, virtualization, infrastructure, security, resource management, and business continuity, all of which is covered in the complete bundle.

In the certification training bundle, you'll find a CompTIA Cloud+ test guide featuring 149 lectures that will teach you how to securely maintain and implement cloud technologies. You'll also be granted access to a cloud essentials course, which serves as a primer into cloud computing for those who already have an A+ certification

The CySA+ and CASP certification study guides for information security 

Two CompTIA certifications are recommended for advanced roles in information security: CSA+ (changing to CySA+ as of June 29, 2018) and Advanced Security Practitioner (CASP). To prepare for a CySA+ test, you need to be able to be able to prevent, detect, and combat cybersecurity threats, while a CASP certification takes it a step further by requiring you to propose and implement solutions that map to enterprise drivers.

The CompTIA training bundle contains two courses dedicated to CySA+ and CASP certifications. Together, these courses feature 37 hours of prep material across 144 lectures.

Additional IT certifications

Perhaps you're still considering a career in IT and need entry-level courses to get your feet wet. This bundle has a has a number of CompTIA certification training guides ranging from entry-level courses like IT Fundamentals and A+ up to the advanced courses we previously mentioned. 

All of the courses in this bundle cost at least $299 when purchased individually and can range upward of $672, but you can gain lifetime access to the Complete 2018 CompTIA Certification Training Bundle today for $59, or 98% off.

Disabling the Your Phone feature in Windows 10

$
0
0

You can prevent users from trying to use the Your Phone feature on Windows 10. In this guide, we show you how.

On Windows 10, "Your Phone" is a feature that allows you to connect your iPhone or Android phone to your PC, and then using the "Continue to PC" option, which is part of the Microsoft Edge mobile experience, you can send activities to your computer, allowing you to take advantage of the larger screen and additional processing power.

Although this cross-device experience is a handy feature, if you're an IT administrator where your organization disapproves of this kind of integration, or if you share your computer with other people and you just don't want them to link their phone, starting with the April 2018 Update, Windows 10 includes an option to disable the Phone-PC linking feature using Group Policy and Registry.

In this Windows 10 guide, we show you two ways to prevent users from linking their phones to your device.

How to disable Windows Phone-PC linking using Group Policy

If you're running Windows 10 Pro (or Enterprise), the easiest way to disable the ability to link a phone to a PC is using the Local Group Policy Editor.

  1. Use the Windows key + R keyboard shortcut to open the Run command.
  2. Type gpedit.msc and click OK to open the Local Group Policy Editor.
  3. Browse the following path:

    Computer Configuration > Administrative Templates > System > Group Policy

  4. On the right side, double-click the Phone-PC linking on this device policy.

  5. Select the Disabled option.

  6. Click Apply
  7. Click OK.

Once you complete these steps, Windows 10 will no longer allow you to link any phone to pick up tasks on your computer from the "Your Phone" page located in Settings> Phone.

You can always re-enable the feature using the same instructions, but on step No. 5, make sure to select the Not Configured option.

How to disable Windows Phone-PC linking using Registry

Alternatively, if you're running Windows 10 Home, you won't have access to the Local Group Policy Editor, but you can modify the Registry to disable the Your Phone settings.

Warning: This is a friendly reminder that editing the Registry is risky, and it can cause irreversible damage to your installation if you don't do it correctly. We recommend making a full backup of your PC before proceeding.

  1. Use the Windows key + R keyboard shortcut to open the Run command.
  2. Type regedit, and click OK to open the Registry.
  3. Browse the following path:

    HKEY_LOCAL_MACHINE\SOFTWARE\Policies\Microsoft\Windows

    Quick Tip: On Windows 10, you can now copy and paste the path in the Registry's address bar to quickly jump to the key destination.

  4. Right-click the Windows (folder) key, select New, and click on Key.

  5. Name the key System and press Enter.
  6. Right-click the newly created key, select New, and click on DWORD (32-bit) Value.

  7. Name the key EnableMmx and press Enter.
  8. Double-click the newly created DWORD key and make sure that its value is set to 0.

  9. Click OK.

After completing these steps, similar to using the Local Group Policy Editor, users will no longer be able to link their phones to your computer using the "Your Phone" settings page.

It's possible to revert the changes using the same instructions, but on step No. 4, make sure to right-click the System (folder) key, and select the Delete option.

More Windows 10 resources

For more helpful articles, coverage, and answers to common questions about Windows 10, visit the following resources:

Everything you need to get started with 3D printing on Windows

$
0
0

You think it is simple to start 3D printing? Think again.

So you have decided that you want to try your hand at 3D Printing, you've seen all the cool YouTube videos, and you are ready to pick up your first printer. But getting started requires a little more than you might think.

Here's an overview of the things you will need to ensure you can start printing straight away — and have a good chance of those prints actually working.

A computer

Not only do you need a computer for finding 3D models and for preparing those models for printing, but a lot of the back end of printing can be done here. From firmware upgrades to running the printer in real time, almost anything can be done from a laptop or PC.

I would recommend making sure you have at least 4GB of RAM and a fairly powerful processor. My Dell XPS 13 runs all of my slicing software and even some of my 3D design software well, but my 2011 MacBook struggles to prepare some of the more complex models for the printer.

If at all possible avoid using a direct connection to your PC. Using an SD card to copy your models over to the printer and letting it do the work is far better than using your laptop. If anything happens to your PC while you print, an update for example or a blue screen of death (BSoD), you could potentially lose hours of printing.

More: Best Laptops of 2018

A 3D printer

If you have never owned a 3D printer, have no idea what you want to do and have no plans to make something specific, then start with the Monoprice Maker Select Mini v2. For just $200, you can start printing with very little fuss.

While the print bed is relatively small, only 4.75 inches squared, the Select Mini is a sturdy, reliable little printer that can sit on your desk next to your PC and print some excellent starter pieces, while having enough parts to tweak and upgrade.

And $200 for a printer this good really is an amazing price and is the perfect infection vector for the hobby.

More: Best 3D Printers for Windows on a budget

Filament

Filament is the material you use to make everything in your 3D printer. The most popular and arguably the easiest to use is PLA, a corn-based plastic that requires fairly low temperatures to print and is easy to sand, prime, and paint. There are many other choices of filament, such as ABS, a stronger higher temp plastic, and Ninja Flex, a flexible filament you can use for phone cases.

Rolls of filament come in many different sizes and I like to use the 1kg or 2.2lb rolls that you can get for as little as $16.99 on Amazon). Plenty of people will tell you the cheap stuff is no good, and they may be right if you are planning on selling your prints or you don't want to paint them. For your first few rolls, though, while you are learning the ropes, go as cheap as you can. You will reach a point in your printing career when it will be time to buy some of the more expensive materials.

A note of caution, some of the filaments are noxious when printed. ABS shouldn't be printed without adequate ventilation in the house and needs to have an air-controlled room to really work well. Most printers don't come with an enclosure so you will need to build one to properly print ABS. That said ABS is a really nice material to get very smooth prints from, so it's worth learning more about. Make sure, as well, that you get the right size filament; 1.75mm is the norm but 3mm is available for some printers.

See filaments at Amazon

Assorted tools

There are several small tools that are key to making sure your 3D printing goes off without a hitch. While any 3D printer you purchase normally comes with a few tools to start you off, they normally aren't very high quality. Here are links to the stuff I personally use.

Supermarket stuff

There are some really helpful things for your printer that you can get from your local supermarket or D.I.Y. store. Aquanet hairspray or any water-based hairspray is extremely helpful for sticking your prints firmly to your print bed, especially if it is glass. You'll also want some 90 percent isopropyl alcohol to clean the hairspray off after each print. The alcohol is used often to clean your print bed as your fingers leave oils on the surface which can stop the plastic from sticking.

Check your local D.I.Y. store for a nice set of fine wire snippers, preferably with a flat bottom, to help cut the filament. They are also helpful for simply cleaning up some prints and when you start to get into modifications you can use them for actually cutting wire.

Larger purchases

The three slightly larger tools that you will need are a set of metric Hex wrenches, a digital caliper, and a rounded pallet knife. This Pallet Knife set is my go-to for print removal as it comes with two different tools — 3D Prints are sometimes extremely difficult to remove so having a variety of tools is a good idea. One of the tools has a sharp edge for the very difficult prints, and one is a flexible rounded tool for the normal removals. Most 3D printers come with a paint scraper, but they tend to damage the print bed more than remove the print.

Most 3D printers you will buy will have metric screws and nuts holding it together, and while they often come with one hex wrench having a full set will save you time and effort. The one I use can be found here. I actually have a set of these attached to each printer so I always have them handy.

Lastly, a digital caliper is worth investing in to help fine-tune your prints. There are a lot of ways to make your prints better, but they normally require you to make very small measurements in millimeters. You can spend a lot of money on a set of digital calipers, and the more money the more accurate normally, but I've been using this set for a while now and they haven't steered me wrong.

3D models

Most printers come with an SD card and a few basic models to try out, but you may have an idea of what you want to print for your first go. You can always design your own models, but for now, let's find one on the interwebs.

The two most popular places to find 3D models specifically for printing are Thingiverse and My Mini Factory, and both offer a broad range of models that other people have made and that you can use. Tipping is available if you want to help the designer out.

Thingiverse is the largest repository of free-to-use 3D models on the web, with hundreds of thousands of models to choose from. If you have had an idea, the chances are someone already made one. I even uploaded a quick design of the Windows Central Logo that you could use as your first print.

My Mini Factory is smaller than Thingiverse but each model on there is guaranteed to be print ready. This means someone has actually printed all the models to make sure they will print. There are a lot more paid artists on My Mini Factory, but honestly, it's worth a few dollars to get some of these amazing models.

Slicers

Slicers are the final piece of the 3D Printing puzzle. Slicing software turns the 3D model file, normally a .STL or .OBJ, into a usable set of instructions for your printer to plot in 3D space. Normally a slicer will create a file called GCode, which can be edited by you to tweak certain aspects of the print. The GCode tells the printer when to start and stop, when to home the print head, and when to extrude filament between two points. There are quite a lot of different slicers, but the two I use most are the free-to-use Cura by Ultimaker and the costly Simplify 3D.

Simplify 3D (S3D) is an extremely powerful slicer that can be used on just about any printer. One of my printers uses a different flavor of code to print called .x3g, and as such, it needs specific software to run, which S3D includes. S3D has an excellent UI and powerful features to help you generate the best prints. Due to the price tag of $149, I wouldn't necessarily recommend it for a person new to 3D printing, but if you can afford it then you may as well start with what I feel is the best slicer around.

See Simplify 3D here

Cura by Ultimaker on the other hand is completely free and almost as powerful as Simplify 3D. Due to the open-source nature of Cura, you will see many different versions floating around in the world, your printer may even come with a version on the SD card. Don't use any other version than the current stable version unless you are secure in your 3D printing skills, as even one wrong setting can make all your prints look like garbage. I like Cura, and its UI is a little easier to understand than S3D, though there are some utilities missing in Cura that I find helpful in S3D. The biggest draw to Cura and what makes it the most popular slicer around is the price: it's free. And with an almost monthly upgrade cycle, it is hard to beat in the Slicing game.

See Cura by Ultimaker here

What have I missed?

For those of you already 3D printing, what have I missed? Is there anything you can't do without that you think we should know about? Let us know in the comments.

How to create custom Start menu Tiles in Windows 10

$
0
0

The Windows 10 Start menu can be customized with different tiles to represent your favorite apps, games, and websites. But what if you want more control over how they look?

Microsoft allows app developers, game makers, and website owners to create custom tiles when you pin one of their products to the Start menu. Sadly, the way some of these tiles look is just plain ugly. But what if you could get more control over the appearance?

WinTileR is a cheap app for Windows 10 that allows you to customize the way your tiles look and function on the OS. It costs just $0.99 and comes with a free trial to help you decide whether or not to pick it up. Here's how it works.

See at Microsoft Store

WinTileR app and plugin

After grabbing WinTileR from the store, it will prompt you to download an .exe plugin that helps the tiles communicate with programs on your computer. You'll still be able to create tiles without this, but they won't be able to launch programs as expected. Once you have installed the plug-in, select "Done."

How to create a custom tile

To get started creating your own tiles, follow these steps:

  1. In WinTileR, select Programs to set up a new tile.

  2. Select Select File and browse for the app you want to create a tile for.

  3. Next, you'll need to create graphics for the tile. (I searched in Bing for a logo, then simply cropped it into a square shape to fit the tile boxes.)
  4. Click the tile boxes on the right to add the tile images you want.

    • You can customize additional options, such as setting a background color, the name of the tile, and conditions for displaying the name of the tile on the left.

  5. Once you are satisfied and have added images for each tile size, select Pin to Start menu.

You should see your shiny new tile appear on the Start menu, complete with executable functionality from installing the plugin. From WinTileR's main menu, you can also perform the same tile creation for websites, folders, and music. Sadly, WinTileR's Steam integration feature for creating tiles for your PC games seems to be broken as of writing. I've found it quite hard to find custom Windows 8.1 or Windows 10-style tiles on the internet, since many apps that previously worked for creating custom tiles have fell into disrepair with subsequent Windows updates.

See at Microsoft Store

Your thoughts?

Do you create custom Windows 10 Start menu tiles? What do you use? Share your thoughts in the comments.

Get your Touch controllers working again with our troubleshooting guide

$
0
0

Oculus Touch troubleshooting guide

Get your Touch controllers back on track.

The Oculus Rift and its amazing Touch controllers deliver together one of the best VR experiences, but there are still a few issues that might pop up during your time playing. To get you back to Rifting with your hands, here's how to fix common issues you might encounter when using Oculus Touch.

See at Amazon

Remember, if you've exhausted all fixes and are at the point of exasperation, you can always contact Oculus support.

Touch not detected during sensor reset

When resetting sensor tracking within the Oculus app, you might be presented with an error that says "We couldn't save your position"— this is especially common when setting up room-scale Rifting with three sensors. The cause of this problem might be that not all of your sensors can see your Touch controllers.

First, try moving your Touch controllers around and reposition your body so that all three sensors can see the controllers. If this doesn't work, you'll want to run a full setup again instead of just the "Sensor Setup" option.

  1. Launch the Oculus app from your Start menu, desktop, or taskbar.
  2. Click Devices.
  3. Click Configure Rift.

    Click Devices. Click Configure Rift.

  4. Click Full Setup.
  5. Click Next.

    Click Full Setup. Click Next.

  6. Click Next.
  7. Click Touch.

    Click Next. Click Touch.

  8. Click Next.
  9. Click Next again and follow the on-screen instructions to complete the setup.

    Click Next. Click Next and proceed.

Now that you've run through the full setup, your Touch controllers should have no problem being detected.

Touch controller tracking issues

A few Oculus Touch users have noticed that the controllers are sometimes plagued by a tracking issue above and beyond the sensors losing sight of it for a few seconds. If you think you're experiencing something like this, try holding the controller about three feet from a sensor and moving it around. If the tracking still isn't right, you'll need to go deeper.

The next step is to pull the battery out of your Touch controller for a few seconds before re-inserting it. For whatever reason, giving it a power reset can fix the tracking problem.

If, after pulling out and re-inserting the battery, your controller is still having a tracking problem, your best bet is to unplug your sensors and plug them back in. Unfortunately, there's no way to tell which sensor is potentially giving you the problem, so all might have to be unplugged before you get back to normal

How to replace Touch batteries

Securing your head-mounted display and grabbing your Touch controllers only to find that one of them (or both! Gasp!) is dead is a pain. Here's how to replace them when they've gone cold.

  1. Place your thumb firmly against the down arrow on the grip of the controller. If you've been using your controllers for a while, putting a cloth between your thumb and the controller can give you better traction on the now-slick surface.

    Place your thumb firmly against the down arrow.

  2. Pull or push down, away from the trigger. You'll notice there is a bit of spring to the clasp.

    Pull or push down.

  3. Pull the bottom (+) of the battery out first or it will get stuck — tight spaces!

    Pull on the bottom of the battery.

  4. Place a new battery in the compartment.
  5. Replace the cover by sliding it up toward the trigger.

Playing 360-degree room-scale games with two sensors

Now that your Touch controllers have arrived, you probably want to get to gaming in every corner of your room. If you've tried it with only the original sensor and the extra sensor included with the Touch controllers, you probably noticed some seriously buggy tracking.

With two sensors, you're only set up for 180-degree gaming. For true 360-degree room-scale gaming, Oculus recommends grabbing a third sensor (about $60), and you might even want to try out a four-sensor setup for best performance.

See at Amazon

However, you can set up two sensors in a way that will almost emulate having a third sensor. You will no doubt experience some buggy tracking, but it's better than nothing.

If you're able, attempt to mount your sensors somewhere higher than your desk. Not only will they not be bumped around as much, they can see more of the room. You also want to space the two sensors as far apart as possible — about fifteen feet is as far as you want to go. If they're more than six feet apart, you will be notified when you run the Touch setup, but you can choose to proceed anyway.

For more information about setting up room-scale Rifting with the recommended three sensors, check out our great guide with everything you need to know. You can also check out our guide to using Desk Scene if you'd like to see exactly what your sensors are seeing.

How to fix Rift USB issues

Some Rift users have had problems in the past with the USB ports on their PC being incompatible. You might have been OK with just the one sensor and headset USB, but now that you have one or two extra sensors, this problem might have crept up.

As a fix, you can grab a PCIe to USB 3.0 expansion card for about $28. This is likely the best scenario for anyone who already has a PC built or who doesn't want to pick up a new motherboard.

See at Amazon

How to fix a moving Guardian system

Have you ever removed your Rift after a play session, let it sit for a while, and noticed that the Guardian parameters were off when you returned at a later time? You're not alone.

While there isn't a concrete cause for this problem, there are a few measures you can take to get your Guardian system back where it should be.

First, if your PC went to sleep while you set your Rift aside, your sensors might not turn back on or sync properly when you pull your PC from its slumber. Try closing the Oculus app completely. Once you restart it, your sensors will sync back up and you might find your Guardian system to be back where it should be.

If restarting the Oculus app doesn't work, you can try going into the Settings menu to reconfigure the Guardian system.

  1. Launch the Oculus app from your Start menu, desktop, or taskbar.
  2. Click Devices.
  3. Click Configure Rift.

    Click Devices. Click Configure Rift.

  4. Click Guardian System.
  5. Click Next and follow the on-screen instructions to complete the Guardian setup.

    Click Guardian System. Click Next.

For more information on how to configure your virtual walls properly, check out our guide to getting the most from Guardian.

How to fix Oculus Touch thumb and index gestures not working

How to fix Oculus Touch thumb and index gestures not working

Using gestures — in other words, lifting fingers and pointing or making signs with them — with your Oculus Touch controllers is a big part of the VR fun. Unfortunately, for some people, gestures stop working. When lifting, say, a real thumb from the controller, your virtual thumb doesn't move in the Rift.

  1. Launch File Explorer from your Start menu, desktop, or taskbar.
  2. Navigate to your C: drive.

    Launch File Explorer. Navigate to your C: drive.

  3. Double-click Users.
  4. Double-click your username.

    Double-click Users. Double-click your username.

  5. Double-click AppData.
  6. Double-click Local.

    Double-click AppData. Double-click Local.

  7. Double-click Oculus.
  8. Double-click TouchCalibration.

    Double-click Oculus. Double-click TouchCalibration.

  9. Right-click the LTOUCH file. If your right controller is giving you problems, right-click the RTOUCH file.
  10. Click Open with.

    Right-click LTOUCH or RTOUCH. Click Open with.

  11. Click Notepad.
  12. Click OK. You'll see a Notepad file open with a bunch of numbers.

    Click Notepad. Click OK.

You now want to locate CapSenseMin. It will have a set of eight numbers in brackets next to it. At this point, you can adjust the second or third number in the sequence. The second number applies to the thumb, while the third number applies to the index. In this case, my settings are [36901, 31182, 44376, 29547, 0, 0, 0, 36172].

CapSenseMin and CapSenseTouch

If I'm having trouble with thumb gestures, I would tweak the second number in the sequence. You don't need to make a big change. Here, I'll go from 31182 to 31382.

Now, locate CapSenseTouch. It will also have a set of eight numbers next to it. Likewise, the second number applies to the thumb, while the third number applies to the index. In this case, my settings are [39798, 33651, 47667, 32101, 0, 0, 0, 39018].

Adjusting numbers

I'm having trouble with thumb gestures, so I'll tweak the second number in the sequence. In this case, I go from 33651 to 33951. Before closing the Notepad window, save the file.

  1. Click File.
  2. Click Save.

    Click File. Click Save.

All Touch controllers have different hardware settings, so you'll almost certainly see a different set of numbers. You can experiment with the numbers all you want in order to get gestures working again. Before testing in the Oculus Rift, however, you must restart the Oculus VR service.

Related resources

Updated August 7, 2018: We refreshed this guide to ensure you're still getting current information about fixing any problems you encounter with your Touch controllers.

How to watch Rainbow Six Siege's Operation Grim Sky reveal

$
0
0

With Rainbow Six Siege Operation Grim Sky on the horizon, here's how to watch the reveal yourself.

Earlier this week, Ubisoft revealed the next major update headed to its hit tactical shooter, Tom Clancy's Rainbow Six Siege. Titled Operation Grim Sky, the year's third season is set to deliver a variety of content, including two new Operators, a rework of Hereford Base, and other anticipated improvements. More details are expected in the coming weeks, leading to a full reveal at the "Six Major" in Paris.

Ubisoft has now outlined its schedule for the Six Major, breaking down plans for the three-day competitive event. This also confirms a time for the Grim Sky update reveal, currently on track for 9:30 ET (6:30 AM PT / 2:30 PM BST / 3:30 PM CEST) on August 19, 2018. This will follow the "Another Mindset" premiere, an upcoming Rainbow Six Siege documentary, while the 3-hour grand final commences shortly after.

To view the Operation Grim Sky reveal as it happens, Ubisoft will be hosting a live stream on the official Rainbow Six YouTube channel. Quarterfinals and semifinals are to be hosted on August 17 and 18, followed by the big showcase on the final day. For those who tune in, exclusive weapon charms will also be up grabs through Twitch drops.

Stay tuned in the coming days, where more news on the game's two upcoming Operators, map rework, and improvements are expected. In the meantime, be sure to check out our complete wrap up of all Operation Grim Sky details so far.

Rainbow Six Siege Operation Grim Sky: Everything We Know

See at AmazonSee at Microsoft

Check out Windows Central's Rainbow Six Siege hub for in-depth coverage of upcoming content, latest updates, and tips to improve your gameplay.

Play Minecraft with your friends by setting up and managing a Realm

$
0
0

How to set up and manage a Realm in Minecraft for Windows 10

Set up your own Realm and play with your friends in Minecraft!

Minecraft, the building-block phenomenon that lets you create just about anything you want, is a lot of fun solo, but you can take things to the next level by creating a Realm and inviting your friends to join. While you can enjoy multiplayer in a regular world, if you'd like to let others remain in the world while you aren't present, purchasing a Realm is required. Here's how to set up and manage your own Realm in Minecraft for Windows 10.

How to create a Realm in Minecraft for Windows 10

Before managing anything, you need to get a Realm off the ground. Here's how it's done.

  1. Launch Minecraft for Windows 10 from your Start menu or desktop.
  2. Click Play.
  3. Click Create New.

    Click Play. Click Create New.

  4. Click New Realm.
  5. Click Create New Realm.

    Click New Realm. Click Create New Realm.

  6. Type a name for your Realm.
  7. Click a duration of time for which you'd like to rent the realm.

    Type a name. Click a duration.

  8. Click a number of users for which you'd like to allow into the realm at once.
  9. Click the checkbox next to I agree.

    Click a number. Click the checkbox.

  10. Click Create for $X.XX button.
  11. Type your account password.

    Click Create. Type your password.

  12. Click Sign in.
  13. Click Buy.

    Click Sign in. Click Buy.

The transaction will finalize and you will now be able to invite friends to join your realm. Click Done, Let's Play! when you're finished inviting.

How to manage Minecraft Realm settings

There are some settings you can tweak to make your Realm feel more like home for you and your friends.

  1. Launch Minecraft for Windows 10 from your Start menu or desktop.
  2. Click Play.
  3. Click the Edit button next to your Realm.

    Click Play. Click the Edit button.

From here, you can change the Realm's name, add a description, change difficulty and game mode, and even enable cheats.

Realm settings

How to make a backup of your Realm

There's nothing worse than losing progress in Minecraft. For that reason, you can make backups of your online world.

  1. Launch Minecraft for Windows 10 from your Start menu or desktop.
  2. Click Play.

    Launch Minecraft. Click Play.

  3. Click the Edit button next to your Realm.
  4. Click Download World.

    Click the Edit button. Click Download World.

You'll now have a local backup of the Realm with a timestamp attached.

How to add an existing world to your Realm

If you have an existing world you'd like to share with friends, you can do so with Realms. This method will replace the existing world inside the Realm, so tread carefully.

  1. Launch Minecraft for Windows 10 from your Start menu or desktop.
  2. Click Play.
  3. Click the Edit button next to your Realm.

    Click Play. Click the Edit button.

  4. Click Replace World.
  5. Click Confirm.

    Click Replace World. Click Confirm.

  6. Click a World.
  7. Click Let's Go! when the upload is complete.

    Click a World. Click Let's Go!

How to reset your Realm

You can start with a completely new world inside your Realm at any time. Remember, this erases any progress you've made.

  1. Launch Minecraft for Windows 10 from your Start menu or desktop.
  2. Click Play.
  3. Click the Edit button next to your Realm.

    Click Play. Click the Edit button.

  4. Click Reset World.
  5. Click Reset.

    Click Reset World. Click Reset.

How to extend your Minecraft Realm subscription

You can only buy a Realm subscription in a set number of days, but that doesn't mean you can't extend by buying more time.

  1. Launch Minecraft for Windows 10 from your Start menu or desktop.
  2. Click Play.
  3. Click the Edit button next to your Realm.

    Click Play. Click the Edit button.

  4. Click Subscription.
  5. Click Extend Realm.

    Click Subscription. Click Extend Realm.

  6. Click a duration.
  7. Click Extend for $X.XX.

    Click a duration. Click Extend.

You'll now be able to submit your payment info and complete the transaction. If you extend while you still have days remaining in your current subscription, they will be tacked on to the total time. You won't lose any time by extending early.

How to invite people to your Minecraft Realm

A Realm is made for multiplayer! You can easily and quickly invite other people to your Realm.

  1. Launch Minecraft for Windows 10 from your Start menu or desktop.
  2. Click Play.
  3. Click the Edit button next to your Realm.

    Click Play. Click the Edit button.

  4. Click Members.
  5. Click Invite next to any people already in your Xbox friends list.

    Click Members. Click Invite.

How to share your Realm with everyone

Don't want to limit your Realm to people you know? Here's how to share a link with everyone.

  1. Launch Minecraft for Windows 10 from your Start menu or desktop.
  2. Click Play.
  3. Click the Edit button next to your Realm.

    Click Play. Click the Edit button.

  4. Click Members.
  5. Click Share.

    Click Members. Click Share.

Here you'll find a link that you can share. Anyone who has this link can join your realm, so it's a good idea to make a backup before opening it up to the public.

How to add posts to the Minecraft Realm news board

To keep track of the goings on in your Realm, there is a news board that members can add to.

  1. Launch Minecraft for Windows 10 from your Start menu or desktop.
  2. Click Play.

    Launch Minecraft. Click Play.

  3. Click the Newspaper button next to your Realm.
  4. Click New Post.

    Click the Newspaper button. Click New Post.

  5. Click the What are you up to? field.
  6. Type a message.

    Click the field. Type a message.

  7. Click Add Screenshot to add an image to your post. Only images taken in-game can be added.
  8. Click Share.

    Click Add Screenshot. Click Share.

How to close your Minecraft Realm

Don't want anyone joining your Realm? You can close it down. This will kick out anyone who's currently playing in the Realm.

  1. Launch Minecraft for Windows 10 from your Start menu or desktop.
  2. Click Play.

    Launch Minecraft. Click Play.

  3. Click the Edit button next to your Realm.
  4. Click Subscription.

    Click the Edit button. Click Subscription.

  5. Click Close Realm.
  6. Click Yes.

    Click Close Realm. Click Yes.

To re-open the Realm, just repeat these steps but click Open Realm in Step 5.

Related resources

Minecraft Realms review: Infinite procedural fun held back by weak admin tools

Updated August 7, 2018: I've overhauled this guide to reflect major changes made to the Realms system in Minecraft.


How to remove a Spigen Style Ring from your phone

$
0
0

The Style Ring is convenient, but if you want to get rid of it, here's how.

Having a Spigen Style Ring on your phone can really make a world of difference. I do a lot of event photography when I'm not binging true crime docs or writing up a storm, and it's the perfect tool for always ensuring my phone is in my hand without rendering the other useless as I carry it and my gear.

Style Rings make watching videos easier, car rides safer (with the little mount that comes with it), and your phone feel more secure in your hand: but what if you want to get rid of it? What if you're done twirling your phone around absentmindedly while you wait for the bus? What if you want to go back to dropping your phone on your face while you scroll through Instagram in bed?

Spigen Style Ring Review: The ultimate phone accessory

Regardless of your reasons for ridding yourself of your Style Ring, there are a few different ways you can do it. Here's how!

Gently rock it back and forth

It seems kind of matter-of-fact, but one of the easiest ways to get your Style Ring off your phone is to gently maneuver it back and forth.

Using the ring itself, bend the Style Ring from side to side. Eventually, a small portion of the ring will lift from the phone and you can use your fingers to unstick it easily.

Be careful not to roughly pull the ring. If you do, it could snap off the base. It's happened to me before and it totally sucked.

The best part? There won't be any icky residue left behind to scrape off!

Plastic knife or spoon

If you're having a really hard time with your Style Ring, using a plastic knife or spoon is a great way to take 'er off.

Gently slide the plastic cutlery under your style ring and pull upwards. With the spoon, you can actually almost "scoop" the style ring off the phone!

If you don't have plastic cutlery, don't go for a metal spoon or knife. You will definitely damage your phone. Take it from the gal who used her keys to get a LuMee case off her phone once ... it's not worth it.

Put your Spigen Style Ring on a case

If you really don't want to have to worry about the stress of removing your Style Ring, then don't put it on your phone directly, silly! Put it on a case!

Having a flexible case especially makes it easy to remove your Style Ring because you can bend, warp it, and easily peel it off. Beware of some textured cases, though: your Style Ring might not stick at all.

Maybe you're someone who's not a big big fan of having a case! Then you can easily outfit your phone with a super-duper-super-teeny-tiny-itty-bitty-barely-there case.

Accept your fate

Maybe no matter what you do you can't get your Style Ring off: and that's okay. Your Spigen Style Ring is now a part of you, and it loves you. (Kidding!)

How do you Style Ring?

Are you a big fan of using accessories like Style Rings and PopSockets? Maybe you prefer a type of case that helps you hang onto your iPhone and watch videos?

Let us know what you think in the comments down below!

How to split a 3D model in 3D Builder

$
0
0

Splitting models is one of the easiest ways to get good prints.

There is a big difference between a 3D model and a 3D model designed for 3D printing. 3D printing a model requires a lot of specific parameters on the model to be exact for the print to succeed. For example, too big an overhang on a print will cause the printer to try and print in midair making it look stringy or may just collapse the model unless you use supports. By using supports, however, you can scar the surface of the print which you will then need to sand away before the print looks good.

So whats the answer?

Ideally, you want to be able to minimize the overhangs and supports on the model before you actually print it, and that's where splitting comes in. Using the split function in 3D builder you can slice a model into a number of smaller parts along certain planes or axis to reduce the need for support or to eliminate overhangs. In this How-To we will be using this model of a Rocketship made by hayling99 on Thingiverse to show where and how to cut. As you can see if you tried to print this the way it is right now you will either need a lot of support around the bottom or watch the whole model fall to pieces as you print.

Step by Step

  1. Open 3D Builder and choose Open to select your model.
  2. Select the Edit tab on the top menu.
  3. Select the split action from the edit menu.
  4. Select the Keep Both option from the split menu.
  5. Position the cutting plane using the rotation gyroscope.
  6. Select Cut to select your choice.
  7. Select Done to finalize your selection.
  8. Select the Object tab in the top menu.
  9. Select the floating model then click Settle.
  10. Rotate the bottom model 180 degrees.
  11. Repeat step by step instructions 8 and 9 to Settle the bottom object.
  12. Select Save as and save as a .STL file.

The details

Slicing a 3D model with 3D Builder is incredibly simple, much simpler than most apps, even Tinkercad — in Tinkercad you have to create two square holes and then two copies of the model and group them to make the slices — a few simple clicks and 3D builder will have it done. The most difficult part is deciding where to cut and how many cuts you will need. Working with our rocket demo you can see that the cut is made just high enough that thrusters can be placed upside down on a flat print bed. This also makes lining the prints up to glue them back together much easier.

When you select Split from the Edit tab you will need to make sure you select the Keep Both option or 3D builder will assume you don't want to keep some of the models and delete it which can be a pain. now you have the cutting plane you can choose the position you want it to slice. I went for just above the thrusters and then decided to make a second cut above the fuselage so that all the printed parts are roughly the same height. By keeping the prints the same height you increase the layer cooling time, giving small layers like the nose point sufficient time to cool so it doesn't look ugly and melted.

More: Tinkercad Vs 3D Builder

Once you have completed the slices it is important to make sure all the models are orientated correctly so no overhangs are left or that any that are have a minimum need for support. As you can see in the model nowhere in this model will support be needed now that it is sliced. It would be amazing if we could do this with all models but unfortunately, you will have to use the occasional support, though, if your overhang is less than 35 degrees then your printer should be able to cope with it just fine.

Once you have rotated them all to the right way you can choose to settle the models. This will drop them down onto the print bed and allow them to be printed easily. If you forget this part and save your model as a .STL file without settling them your printer will try to print your model in midair which will make a lovely 3D model of spaghetti rather than the model you actually wanted. don't worry though if you followed the Step by Step guide that shouldn't happen to you and your prints should print with minimal fuss. Maybe. There are still a lot of variables but splitting really does help.

More: Getting started with 3D printing

Any questions?

Let me know down in the comments section if you need more information or if you guys have found an easier way to slice 3D models than using 3D Builder. With 3D builder coming free with Windows 10 now It feels like a no-brainer to use its best feature.

Anthem isn't due until February 2019, but there will be early demos

$
0
0

Anthem is Electronic Arts' highly-anticipated new role-playing franchise, currently on track for a February 22, 2019 debut. While extensive gameplay demos have outlined what's to come, we still have a lot to learn about the title.

If you can't wait for launch, the promise of early access lies ahead for select gamers. Details on these gameplay sessions are now beginning to surface, with steps to prepare for their arrival. We've broken down what to expect from Anthem "pre-launch demos," how to play, and their scheduled release.

See at Microsoft

Anthem: Everything we know

What to expect from Anthem demo

The word "beta" is frequently used in video games as a blanket term for pre-release game access. These versions are from the later stages of development, though can simply be an early slice of the final product. While often valuable for network stress testing and last-minute refinements, they're mostly seen as a method of last-minute marketing. EA is being somewhat transparent for its intentions for Anthem's tests, angling them as "pre-release demos." The phrasing indicates these sessions are a preview of the final experience, featuring the game's opening hours. As seen for similar games like Destiny 2, expect early missions and restrictions on player progression.

Mention of multiple "demos" has been made, indicating several tests are on the horizon. It's unclear how frequently these will occur but expect reccuring chances to play in the coming months.

How to sign-up for Anthem pre-launch demos

While Anthem's pre-launch demos are likely some time away, EA has discussed several ways players will gain access. Those who preorder the game can ensure participation, while select users may also gain access for free.

Anthem paid demo access (via preorder)

The only way to guarantee access to Anthem demos is via a preorder at a participating retailer. Preordering any edition of the game grants "VIP access," although specifics on what this entails are unclear. You'll have a chance to play the game early but it's unclear if any form of benefits over newsletter access is awarded.

The most common version of Anthem is the game's "Standard Edition," which provides access to the base game for $59.99. Alongside demo access, preorders will receive "The Ranger Legion of Dawn Armor Pack," a legendary weapon, a founders player banner. Physical disc-based copies for Xbox One, PlayStation 4, and PC are stocked at GameStop. Alternatively, digital licenses are stocked at the Microsoft Store, PlayStation Store, and Origin PC store.

A premium-tier Legion of Dawn edition is priced at $79.99, which locks down additional content aims at franchise fans. Buyers will receive the complete set of Legion of Dawn Armor Packs for all four classes, alongside a legendary weapon, Javelin gear attachment and a copy of the soundtrack. Preorders will once again be paired with the Founders player banner and access to the pre-launch demos. Phsyical disc-based copies for Xbox One and PlayStation 4 are stocked at GameStop. Alternatively, digital licenses are stocked at the Microsoft Store, PlayStation Store, and Origin PC store.

Anthem free demo access (via newsletter)

If you don't want to lay down a preorder, you're not excluded from the demos. EA is promising "a chance to play" to select users who sign-up for the official newsletter.

Details on your access as a free user are somewhat unclear. Footnotes specifically reference "a chance to be selected to play in a pre-launch Anthem demo," in the singular form. With multiple tests seemingly planned, your access could be limited to a specific session or timeframe. If you want to play as much as possible before launch, preordering is currently the way to go.

To register for the Anthem newsletter and enroll in demo opportunities, follow the steps ahead:

  1. Visit Electronic Arts' Anthem page.
  2. Scroll down to Sign up to Anthem news at the bottom of the page.
  3. Provide the required personal details.
  4. Fill the checkbox to consent to future marketing.
  5. Click Sign Up.

A confirmation email will now be sent to your inbox, with future updates expected in the forthcoming months. For the latest details on the demo, also be sure to return to this post.

Anthem demo release date

Once again, EA is yet to decide on dates for Anthem demos, aside from committing to deliver them prior to release. As demos rather than a full beta test, expect them relatively close to the final release date. Assuming Anthem hits its February 22 street date, we could see news later this year, before kicking off in January or early February.

Step into your Javelin

As Anthem's release nears, we'll be sure to update this article with the latest details on its demo. In the meantime, the game is available for preorder starting at $59.99, ahead of its planned February 22, 2019, release for Xbox One, PlayStation 4, and Windows PCs.

See at Microsoft

How to make a 3D post on Facebook using Paint 3D

$
0
0

Finally, a simple way to post 3D models.

In October 2017 Facebook debut the ability to share 3D objects in your Facebook posts. At the time it seemed like a fantastic new way of creating posts but ended up being painfully limited, the only devices that worked with it were Sony Android smartphones and the Oculus library of models, but with the Creators Update to Windows 10 we can finally share 3D models quickly and easily.

Using Microsoft Paint 3D you can convert any 3D Model into a .glb file, the format needed to post directly to Facebook. .glb is a pretty versatile file format, allowing you to create texture and paint your 3D models, albeit crudely in Paint 3D, and is used a lot in modeling for VR. Both Facebook's Oculus Rift and Microsoft's Mixed Reality can use .glb files to add 3D models into the 3D environment and when we can finally add our own models to the Cliff house I'm sure .glb will be the format they choose.

Step By Step

  1. Download a 3D Model from Thingiverse or design one yourself.
  2. Open Paint 3D and select the Menu button in the top left.
  3. Select Browse files from the open menu.
  4. Choose your 3D model and click Open to bring it into the canvas.
  5. Use the paint tools to color your 3D model ready for posting.
  6. Use the menu button to select Save As.
  7. Select 3D model as the option and be sure to use the .glb file format.
  8. Open Facebook and choose Compose Post.
  9. Drag and drop your .glb file into the compose box.
  10. Write your post as normal and select Send to finish.

Specific Instructions

Despite the ten point step-by-step guide, this process is relatively simple. You are only really using Paint 3D as a conversion tool rather than what it was designed to do, so you can safely skip over most of its features. Firstly, you will need to find yourself a 3D model you want to post about.

There are plenty on Thingiverse, but if you want to make your own I would suggest looking at Tinkercad by Autodesk. It is a powerful, yet simple to use 3D design tool available for free online. Once you have the model you can load it into Paint 3D to get it converted and ready to go.

Related: Tinkercad vs. 3D Builder

Now that the model is inside Paint 3D you can play around with the brushes and the textures as an .stl file will come into the app gray so it's nice to add a splash of color before you post it to Facebook, after all, you need it to grab attention don't you? Once you have made it look good you can save the file as the .glb you need to post it and that is pretty much it — just open up Facebook and add the file to your post.

You will need to drag and drop the file to your facebook post though, for some reason, there isn't an add 3D model button yet, as I said earlier Facebook doesn't make it easy to post in 3D but we can hope this is fixed as this post becomes more mainstream.

Tell us what you think

As someone who designs 3D models, I really like this ability in Facebooks news feed. It gives me a chance to show off my design skills to a whole different audience, not just the people who use Thingiverse all the time. Is this something you would use or have thought of using? Let us know in the comments if you like or dislike it.

Beginners guide to the Mail app on Windows 10

$
0
0

The Mail app for Windows 10 includes all the essential features to manage one or multiple email accounts, and in this guide, we'll show you how to get started.

Windows 10 comes with the Mail app, which is your new default client to connect and manage all your email accounts from a single experience without having to load different websites to check your emails.

Although the feature set isn't as large as the one found in the desktop version of Outlook, the Mail app for Windows 10 includes all the basic features that most users will need to manage the flow of emails in the day-to-day basis. And it supports all the popular services, such as Outlook, Exchange, Yahoo, Gmail, iCloud, and other services using custom POP and IMAP configuration.

In this Windows 10 guide, we'll walk you through the steps to get started with the built-in Mail experience.

How to start using the Mail app on Windows 10

The Mail app is one of the most complete and easy to use free client to manage one or multiple email accounts, and here are the steps to get started:

Adding new email account

To get started with the app, you must first connect at least one email service using these steps:

  1. Open Start.
  2. Search for Mail, and click the top result to open the experience.
  3. Click the Add account button.

  4. Select a service and continue with the on-screen directions. Or select your email account from the list if applicable.

  5. Click the Done button.
  6. Repeat steps No. 3, 4, and 5 to configure additional accounts during the initial setup. Otherwise, click the Go to inbox button.

Once you've completed the steps, you can start using the Mail app to manage your emails.

In the case that you need to set up an account from any of the supported services, usually, you only need to enter your address and password, as the app will figure out the required server settings automatically.

Adding multiple email accounts

If you want to add multiple email accounts after the initial setup, use these steps:

  1. Open the Mail app.
  2. Click the Settings (gear) button at the bottom of the left pane.
  3. Click the Manage accounts option in the right pane.

  4. Click the Add account button.

  5. Select the email service you want to add.

  6. Continue with the on-screen directions to add the account.

After completing the steps, you can repeat the instructions to configure additional accounts you want to manage with the application.

Changing email account settings

Depending on the email service that you're using, you can adjust some different account settings with these steps:

  1. Open the Mail app.
  2. Click the Settings (gear) button at the bottom of the left pane.
  3. Click the Manage accounts in the right pane.
  4. Select the account you want to change settings.

In the "Account settings" page, you can change the account name using a more descriptive name in the left pane of the app.

Clicking the Change mailbox sync settings option will open another page where you can control various settings.

Using the Download new content drop-down menu, you can specify when the app should retrieve new emails from your account.

If you're using a metered connection, you can even clear the Always download full message and Internet images to save data or to prevent downloading malicious content.

Using the Download email from drop-down menu, it's possible to specify the number of emails that you want to see in your desktop inbox.

In addition, under Sync options, you can decide if the app should only sync emails or calendar and contacts, which you can then access using the Calendar and People apps respectively.

Checking and replying emails

Checking and replying to emails is no different from the experience you get on the web or from other clients.

To view and respond to emails, use the following steps:

  1. Open the Mail app.
  2. Select the account to send a new email from the left pane.
  3. Under "Folders," select the list of emails.
  4. In the message list, select the email you want to read, which will open in the reading pane on the right.

    Quick Tip: If you need more space to view or compose emails, you can always collapse the left pane using the hamburger menu button in the top left corner.

If the folder that you need to access isn't in the list, click the More option, and either select the folder you want to see, or right-click the folder you want and select the Add to Favorites option, so it'll always appear under "Folders."

Once in the email, you can use the reading pane toolbar to reply, forward the message to another person, archive, delete, or set a flag.

When clicking the menu (three-dotted) button in the far left, you can access additional options to move the email to a different folder, mark as spam, print, and more.

If you don't see the email you want, above the message list pane, you can use the search box to find it. Also, it's possible to use the drop-down menu on the left to sort the list in a number of ways to find or manage your emails.

Composing your first email

Crafting and sending a message is a simple process, just follow these steps:

  1. Open the Mail app.
  2. Select the account you want to use to send a new email from the left pane.
  3. Click the New mail button from the left pane.
  4. In the "To" field enter the email address of the recipient.

    Quick Tip: You can send the same email to multiple people by separating each address using a semicolon (;).

  5. In the "Subject" field, enter a title for the email.

  6. Click the message body to start writing your email.

While writing your message, you'll notice that the Format tab is now available with tools to format text, lists, heading, and options to undo and redo content.

If you want to send a file, you can use the Insert tab, and click the Files button. Also, using this tab, you can also send pictures, links, and even create tables.

The Draw tab includes the tools to allow you to write emails using natural handwriting. To get started, click the Drawing Canvas button, select the Pen or Highlighter that you want to use and start writing away.

In the Options tab, you'll find the options to set a flag to indicate that message contains high or low priority content, check for spelling mistakes before sending the email, and options to zoom and find content within the body.

Once you've completed writing the message, you can click the Send button in the top-right corner or click the Discard button to delete the message.

Customizing the Mail app experience

Although the Mail app has been designed to provide a basic experience to manage email accounts, it's possible to control various aspects of the app, some of which include settings to customize the look and feel, notifications, signature, and much more.

Personalizing background image, color, and mode

To set the background image, color accent, and switch between the dark and light mode, use these steps:

  1. Open the Mail app.
  2. Click the Settings (gear) button at the bottom of the left pane.
  3. Select the Personalization option.

In this page, you can change the color accent for the experience, switch between light and dark mode, or you can allow the app to match the system mode currently in use.

Using the "Folder and message spacing" settings, you can adjust the display density to fit even more content in the screen.

Additionally, under Background, you can set the wallpaper that will appear in the background when no email is selected. Using these settings, you can set the image to fill the entire experience, disable the feature, or select your custom image.

Configuring automatic replies

"Automatic replies" is a useful feature that allows you to communicate a specific message automatically to make sure anyone who sends you an email will get a response.

In the Mail app, "automatic replies" is only available for Outlook.com accounts, and you can set it up using these steps:

  1. Open the Mail app.
  2. Click the Settings (gear) button at the bottom of the left pane.
  3. Click the Automatic replies option.
  4. Use the drop-down menu to select the Outlook email address you want to configure.
  5. Turn on the Send Automatic Replies toggle switch.

  6. Under "Inside my organization," create a custom message that senders will receive during your time away.
  7. Check the Send replies outside of my organization option, if you want to send an out-of-office reply to every email you receive that wasn't originated within your organization.
  8. If you must limit responses to a specific group of people, check the Send replies only to my contacts option.
  9. In the second box, create a custom message that your contacts will receive during your time away.

Once you've completed the steps, your account will send automatic replies based on your configuration.

Configuring focused inbox

Focused inbox is a feature specific to Outlook accounts, and if enabled, the message list will organize your emails automatically into two tabs, Focused and Other.

To enable or disable Focused inbox, follow these steps:

  1. Open the Mail app.
  2. Click the Settings (gear) button at the bottom of the left pane.
  3. Click the Focused inbox option.
  4. Use the drop-down menu to select the Outlook email address you want to configure.
  5. Turn on or off the Sort messages into Focused and Other toggle switch.

After completing the steps, depending on your settings, your most important emails will appear in the "Focused" tab, while the rest will be organized in the "Other" tab.

Personalizing the messaging list pane

To change the settings the for message list pane, use these steps:

  1. Open the Mail app.
  2. Click the Settings (gear) button at the bottom of the left pane.
  3. Select the Message list option.

Under the "Swipe actions" section, you can enable or disable swipe the gestures and decide the action when swiping a message to the right or left.

Also, at the bottom of the page, it's possible to personalize several other features, including:

  • Organization: Allows you to group emails by conversation, or you can organize each message in chronological order as they arrive.
  • Preview text: Shows a short preview of the content message.
  • Sender pictures: Displays a profile image of the sender. If the image isn't available, a standard icon will appear.
  • Image preview: Shows a small preview of the image included in the message.

Personalizing the reading pane

To change the settings for the reading pane, use these steps:

  1. Open the Mail app.
  2. Click the Settings (gear) button at the bottom of the left pane.
  3. Select the Reading pane option.

In this page, you can customize many features, including:

  • Auto-open: If enabled, when you delete a message, the next email in the message list will open automatically.
  • Mark item as read: Allows you to decide when a message will get marked as read after it's open.
  • Caret browsing: When enabled, you can navigate emails using the text cursor.
  • External content: If disabled, external elements, such as images and style will be blocked in the message. Typically, this option will affect email newsletters and promotional offers crafted using web technologies.

Personalizing email signature

If you end up every email with the same signature, instead of writing it over and over, the Mail app offers an option to create a custom signature that you can attach to every email automatically.

To create a custom signature, use these steps:

  1. Open the Mail app.
  2. Click the Settings (gear) button at the bottom of the left pane.
  3. Select the Signature option.
  4. Select the account to apply the signature or check the Apply to all accounts option.
  5. Turn on the Use an email signature toggle switch.
  6. Compose the signature that you want to use.

  7. Click the Save button.

Once you've completed the steps, your new custom signature will be included with every new message you send.

Personalizing email notifications

The Mail app integrates with the Action Center to show notifications, and you can use these steps to customize the experience:

  1. Open the Mail app.
  2. Click the Settings (gear) button at the bottom of the left pane.
  3. Select the Notifications option.
  4. Select the account to adjust notifications or check the Apply to all accounts option.
  5. Turn on the Show notifications in the action center toggle switch.

  6. Select the notifications settings that you want to use, including:

    • Show a notification banner.
    • Play a sound.
    • Show notification for folders pinned to Start.

Removing email accounts

If you no longer need to manage emails for a particular service, you can remove the account using these steps:

  1. Open the Mail app.
  2. Click the Settings (gear) button at the bottom of the left pane.
  3. Click the Manage accounts in the right pane.
  4. Select the account you want to remove.

  5. In the "Account settings," click the Delete account from this device option.

  6. Click the Delete button.

After completing the steps, you'll no longer be able to check the account your removed using the Mail app.

Reseting the Mail app

If you're having trouble getting the app to sync your emails or other problems, you can quickly fix most common issues by resetting the app.

  1. Open Settings.
  2. Click on Apps.
  3. Click on Apps & features.
  4. Under "Apps & features," select the Mail and Calendar app.
  5. Click the Advanced options link.

  6. Click the Reset button.

  7. Click the Reset button again to confirm.

Once you've completed the steps, the app will reset to its factory settings, which is a process that usually fixes most problems. After the app installs again, you'll need to set it up from scratch using the steps we outlined above.

Wrapping things up

While there are many email clients that you can use, the built-in Mail app on Windows 10 provides all the essential features that most regular users will need to manage one or multiple email accounts from virtually any service provider.

What email client do you use on Windows 10? Tell us in the comments.

More Windows 10 resources

For more helpful articles, coverage, and answers to common questions about Windows 10, visit the following resources:

Viewing all 5861 articles
Browse latest View live


Latest Images