
If you want to improve your computer's battery life, then you should be using the power-saving hibernation state in Windows 10.
Hibernation has been around for years on Windows machines. It's the process of saving the content currently in memory to the hard drive to allow your PC to shut down completely, saving battery without losing your current session. At any time, you can turn your PC on to resume from hibernation and continue working where you left off. This feature is one of the power-saving states in the operating system that conserves the most power and extends battery life significantly longer than the Sleep option.
While you can use hibernation at any time, you will see the benefit when using the feature for those times you won't be using your computer for an extended period. For example, when your laptop or tablet is running out of battery, or when using a Surface Book or Surface Pro 4, as both devices still having battery drain issues. Using hibernation can help to improve battery life.
While Windows PCs typically come with hibernation automatically enabled on new installations, the default settings may not be optimal to save the most power. In this Windows 10 guide, we'll show you the steps to verify the power-saving feature is enabled and supported on your system. We'll demonstrate how to add the "Hibernate" option to the Power menu on Start, and you'll also learn the process to customize when your computer should go into hibernation automatically.
Enabling hibernation in Windows 10
You can use the steps below to check and enable hibernation in your Windows 10 PC.
- Hold down the Windows key + X to open the Power User menu.
From the list select Command Prompt (Admin) to open the Command Prompt as an administrator.
![]()
Type the following command: powercfg /availablesleepstates, and hit Enter. If Hibernate appears under "The following sleep states are available on this system", then the feature is enabled.
![]()
If you don't see "Hibernate" on the list of power features enabled on your computer, then type the following command: powercfg /hibernate on and hit Enter.
![]()


Keep in mind that "hibernate" won't be available depending on your hardware configuration. Some reasons include:
- Current video card driver doesn't support the power state, in which case you'll need to update your video adapter driver.
- The power-saving options are supported by your computer, but they aren't enabled in the BIOS. (Note that instructions to access the BIOS will vary depending on your PC manufacturer. Always check your computer manufacturer's support website for details.)
- In some cases, hibernation won't be available if "hybrid sleep" is enabled on your computer.
- Your computer hardware is not compatible with the power-saving options.
Adding the "Hibernate" option in the Power menu
Similar to previous versions, Windows 10 doesn't include the "Hibernate" option in the Power menu, which allows you to put your computer into the power-saving mode on demand. You can add the option using the following steps:
- Hold down the Windows key + X to open the Power User menu.
Select the Power Options from the menu.
![]()
From the left pane, click the Require a password on wakeup option to access the System Settings of Power Options.
![]()
Click the Change settings that are currently unavailable link to modify the Shutdown settings.
![]()
Check the Hibernate option, and click the Save changes button to commit the changes.
![]()
Go to the Start menu, select the Power menu, and you should now see the "Hibernate" option. (The option will also appear throughout all the Power menus available in the operating system.)
![]()


Quick Tip: If you don't see the "Hibernate" option under the Shutdown settings, this is another way to tell that hibernation is disabled or isn't supported on your computer.
Additionally, in the System Settings page, you can also configure to hibernate your PC immediately when closing the lid or when pressing the power button to save the most battery — either when your device is running on battery or when it's plugged into an electrical outlet.
Under When I press the power button and When I close the lid settings, click the drop-down menu, and change the option from Sleep to Hibernate for "On battery" and "Plugged in".

Setting custom timers to hibernate your computer automatically
If you want to save power as much as possible to expand your laptop or tablet battery life, you can also manually configure when your device should hibernate automatically. You can do this by using the following steps:
- Hold down the Windows key + X to open the Power User menu.
Select the Power Options from the menu.
![]()
Click Change plan settings in your current power plan.
![]()
Click the Change advanced power settings option.
![]()
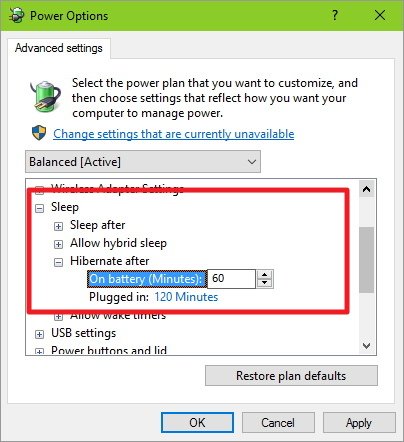
On the list of available options, expand Sleep, and then Hibernate after. Depending whether it's a mobile device or not, you will see two options: On battery and Plugged in, change the value (in minutes) to the time you want your device to go automatically to hibernate.
![]()
- Finally, click Apply and OK to finish saving the settings.


In Windows 10, similar to previous versions, the hibernation feature offers a reliable method to conserve power. It's also a method that takes more time to process a shutdown and resume than the sleep option. If you're looking to save battery life while being able to return quickly, perhaps the sleep option is what you need to use. However, keep in mind that if your computer loses all power during sleep mode (battery drains), you will lose all your unsaved work.
Which power state do you usually use on your computer? Tell us in the comments below.
More resources
For more tips and tricks on Windows 10, and get the latest news, you can visit the following resources: