Image may be NSFW.
Clik here to view.
If you want to protect a folder with a password, you won't find such a feature on Windows 10, but you can this alternative.
Although Windows 10 doesn't have an option to protect folders and files with a password, it doesn't mean that you're data isn't secure. One of the reasons why you can't set a password to a folder is because your account is already protected from unauthorized access with a password and even encryption if you use BitLocker to encrypt your entire device.
However, if you have precious family and friends photos, bank information, and other business documents that you feel would be more secure using a password, you can use a combination of a virtual hard disk and BitLocker to password protect folders and files on your computer. And all without the need for third-party tools or complicated scripts, which are probably not as secure as using the Windows 10 built-in encryption feature.
In this Windows 10 guide, we'll walk you through the steps to protect a folder with a password using a virtual hard disk and BitLocker available with the professional version of the OS.
How to protect a folder with password on Windows 10
Although Windows 10 doesn't include an option to add a password to a folder, you can set up a virtual disk with BitLocker, which gives you the ability to mimic the same password protection experience and extra security without complicated steps.
Creating a virtual hard disk
To create a virtual hard disk on Windows 10, use these steps:
- Open Start.
- Search for Disk Management and click the top result to open the app.
- Click the Action menu.
Click the Create VHD option.
Image may be NSFW.
Clik here to view.
- Click the Browse button to select a location to store the virtual disk.
Specify a name for the drive. For example, folder_vault.
Image may be NSFW.
Clik here to view.- Click the Save button.
- Under the "Virtual hard disk size" section, specify the amount of space that you want to reserve for storage. For example, 8GB, but you can use any amount based on the content that you want to protect.
- (Optional) Under the "Virtual hard disk format" section, select the VHDX option.
Select the Dynamically expanding option so the storage will only grow as you save files.
Image may be NSFW.
Clik here to view.- Click the OK button.
Right-click the "Disk x," and select the Initialize Disk option.
Image may be NSFW.
Clik here to view.- Check the new Disk x.
Select the MBR (Master Boot Record) option.
Image may be NSFW.
Clik here to view.- Click the OK button.
Right-click the "Unallocated space," and select the New Simple Volume option.
Image may be NSFW.
Clik here to view.- Click the Next button.
Use the default settings for the volume size.
Image may be NSFW.
Clik here to view.- Click the Next button.
Use the "Assign the following drive letter" drop-down menu to select a letter for the new drive.
Image may be NSFW.
Clik here to view.- Click the Next button.
- Use the "File system" drop-down menu, and select the NTFS option.
- Use the "Allocation unit size" drop-down menu, and select the Default option.
- In the "Value label" field, type a descriptive name for the drive. For example, folder_vault.
Check the Perform a quick format option.
Image may be NSFW.
Clik here to view.![]()
- Unless necessary, clear the Enable file and folder compression option.
- Click the Next button.
- Click the Finish button.


Once you complete the steps, you'll end up with a virtual hard disk that you can treat as a folder and password protect using BitLocker.
Enabling BitLocker on a virtual hard disk
To set up BitLocker on a virtual hard disk on Windows 10, use these steps:
- Open Control Panel.
- Click on System and Security.
- Click on BitLocker Drive Encryption.
- Under the "Fixed data drives" section, select the folder_vault drive.
Click the Turn on BitLocker option.
Image may be NSFW.
Clik here to view.![]()
Check the Use a password to unlock the drive option.
Image may be NSFW.
Clik here to view.![]()
- Create a password to protect your folders inside the drive.
- Click the Next button.
Click the Save to a file button.
Image may be NSFW.
Clik here to view.![]()
Select a location to store the recovery key.
Quick tip: If you forget the password or lose the recovery key, you won't be able to recover your files, so make sure to keep this file in a secure place.
- Click the Save button.
- Click the Next button.
Select the Encrypt used disk space only option.
Image may be NSFW.
Clik here to view.![]()
- Click the Next button.
Select the Compatibility mode option.
Image may be NSFW.
Clik here to view.![]()
- Click the Next button.
Click the Start encryption button.
Image may be NSFW.
Clik here to view.![]()
- Click the Close button once the encryption has finished.


After you complete the steps, you can begin using the virtual disk as a folder to protect your content with a password.
Locking and unlocking folder with password
Once you created a virtual drive and configured BitLocker, you'll need to know a few steps to lock and unlock your files and folders.
Unlock folders with password
To access folders and files protected with a password on Windows 10, use these steps:
- Open File Explorer.
Browse to the folder with the folder_vault.vhd file.
Image may be NSFW.
Clik here to view.![]()
Double-click the VHD (VHDX) file to mount it to File Explorer.
Quick note: If you receive a "is not accessible" and "Access is denied" message, this is normal behavior because you mounted the drive, but you haven't unlocked it with the password yet.
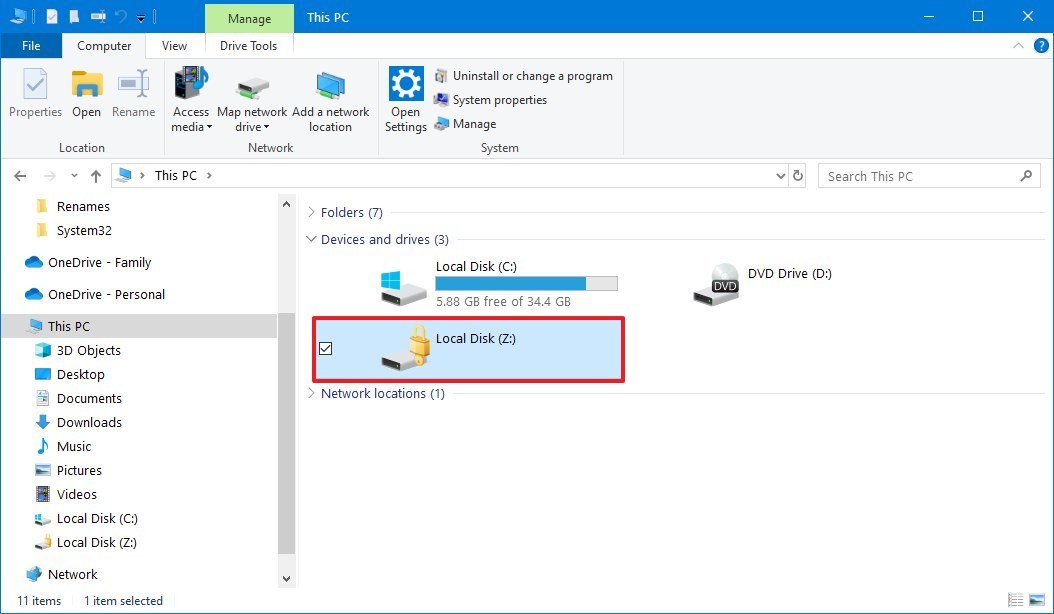
- Click on This PC from the left pane.
Under the "Devices and drives" section, double-click the drive to open the sign-in page.
Image may be NSFW.
Clik here to view.![]()
Type the password to unlock the drive with your important files and folders.
Image may be NSFW.
Clik here to view.![]()
Quick tip: If you can't remember the password, click the More options link, click the Enter recovery key option, and type the 48-digit recovery key available in the text file that you should have saved when setting up BitLocker on the virtual hard disk.
- Click the Unlock button.


Once you complete the steps, you will be able to access your important files and folders.
Lock folders with password
When you no longer need to access your files, use these steps to lock the drive:
- Open File Explorer.
- Click on This PC from the left pane.
Under the "Devices and drives" section, right-click the BitLocker drive, and select the Eject option.
Image may be NSFW.
Clik here to view.![]()

After you complete the steps, the folders will remain encrypted and protected using the BitLocker password. The next time that you need to access those important files and folders, you'll need to follow the unlock instructions, which include entering the password again.
The best part about using a virtual hard disk with BitLocker to add a password to a folder is that you can continue to unlock your files on the same or different computer using the above steps.
More Windows 10 resources
For more helpful articles, coverage, and answers to common questions about Windows 10, visit the following resources: