Quantcast
Channel: Help & How To
Viewing all 5861 articles
Browse latest View live

How to add a custom shell to your Xbox One controller

$
0
0

Xbox One controller

Bored of the same old black or white Xbox One controller that came with your console? Change it up a little.

A custom Xbox One controller certainly stands out and what you may not know is that it's really easy to build one yourself.

One of the most immediately obvious customizations is a new shell, and with some fairly cheap parts and tools and about 15 minutes of your time, you can transform the look of your controller.

Here's everything you need to know.

What you need

Xbox One controller

It's handy to keep the tools mentioned above around as for any work you'll undertake on a controller you'll need them. Better still, you can snag a decent tool kit with both in and more besides for around $10.

When it comes to getting a new shell, there are plenty out there to choose from. In some cases you'll perhaps just want a new faceplate, others may want a completely new housing which also includes the backplate, battery cover, and grips. Whichever specific bits you're replacing, taking apart your controller and installing them is the same.

How to add a custom shell to your Xbox One controller

Note that this guide refers specifically to the standard Bluetooth Xbox One controller that comes included with the Xbox One S and Xbox One X.

  1. Remove the battery door.
  2. Remove the batteries from the controller.

    Xbox One Controller

  3. Use the plastic pry tool to detach the rear grips from the controller body. (Once you've separated them, pull firmly to remove them from the body.)

    Xbox One Controller

  4. You now have five screws to remove as shown in the image with the T8 screwdriver. (The fifth is located beneath the battery label so you'll have to pierce it or remove it entirely.)

    Xbox One Controller

  5. Pull the backplate away from the controller body.

    Xbox One Controller

  6. Flip the controller around and pull the faceplate away from the controller body.

    Xbox One Controller

  7. Follow the steps above in reverse to reassemble, adding your new shell in place of the old parts.

    Xbox One controller

Now, you'll have a completely transformed controller that not only looks great, but didn't cost a lot, either.

You could also take the time to add some improved parts to the exterior of your controller, too, such as some quality grips or even some trigger stops if you're a fan of FPS games.


Windows 10 build 17643 (and earlier) for PC: Everything you need to know

$
0
0

Check out all the new features and changes Windows 10 is introducing with builds 17643, 17639, 17634, 17627, 17623, 17618, and 17604.

Windows 10 build 17643 is now available for devices enrolled in the Fast ring using the Skip Ahead option. This is the seventh preview that Microsoft is releasing as part of the Redstone 5 development, and while it's a minor update, it introduces a number of changes that users are expected to receive before the end of the year.

This flight focuses on improving Sets adding support to use tabs with Office 365 desktop applications. The Settings app gets some new tweaks, including for Data Usage and Magnifier, and a lot more.

Along with build 17643, Microsoft has also previouly released six other builds, including 17639, 17634, 17627, 17623, 17618, and 17604, which even though they aren't significant, these previews also introduce improvements for the next version of Windows 10.

In this Windows 10 guide, we'll walk you through the features and changes Microsoft has been working on for the Redstone 5 update.

Windows 10 Redstone 5 latest features and changes

Start menu and Action Center

Thus far the Start menu isn't getting a lot of improvements, but starting with build 17618, when using the Automatically hide scroll bars in Windows option in Ease of Access now will make the Start menu scroll bar to stay always visible.

The same flight also introduces a couple of changes to Action Center. For example, now opening the experience, you'll notice that notifications now appear using a fade-in animation, and the toast notification to fix blurry apps now will show in Action Center after it's dismissed or timed out.

Sets

Sets is a new feature coming to Windows 10 that allows to group apps, documents, and websites into tabs.

Microsoft initially introduced Sets during the Redstone 4 development, but it was then removed with the promised that the feature would return in the next development. And now, the feature is back starting build 17618, and since then, Microsoft has been adding a slew of improvements up to build 17643.

"Sets" works very similar to the way you use tabs in Microsoft Edge, Google Chrome, and Mozilla Firefox. When the feature is enabled on your computer, a tab experience will appear in the title bar part of the application.

You can click the plus (+) button to open a new tab that features a startup page with a search box, which you can use to open documents, apps, and web searches in the same page.

Right-clicking a tab will let you access a context menu with a number of options, including:

  • Close tab.
  • Close other tabs.
  • Close tabs to the right.
  • Move to new window.
  • Close menu.

Interesting enough, you'll need the "Close menu" option because, at this point, you can't click outside the menu to dismiss it.

In the far-left side of the tab experience is where the Previous tabs button is located, and as the name implies, it's the button that allows you to get back to the group of tabs you're working in the past. (You can choose to open one tab or an entire session.)

Perhaps one of the biggest changes with Sets is the support of tabs for File Explorer. This not only finally allows you to open folders in tabs alongside apps and websites, but the experience is getting a few new tweaks, including a Open in new tab option in the context menu when right-clicking a folder.

And there's an Open new tab option in the File menu.

Shortcuts

List of keyboard shortcuts to use Sets:

  • Ctrl + T — Opens a new File Explorer tab.
  • Ctrl + N — Opens a new File Explorer tab.
  • Ctrl + W — Closes a window or tab.
  • Ctrl + Windows key + Tab — moves to the next tab.
  • Ctrl + Windows key + Shift + Tab — moves to the previous tab.
  • Ctrl + Windows key + T — Opens a new tab.
  • Ctrl + Windows key + W — Closes current tab.
  • Alt + Tab — Circles between open tabs.

Other features and improvements

Here's the list of additional features and improvements for sets up to Windows 10 build 17643:

  • You can restore previous tabs from any activity.
  • You can drag apps and Microsoft Edge tabs between groups.
  • You can rearrange tabs within the set of tabs.
  • Restoring a project, you'll be asked to restore related web pages and apps.
  • Opening a document that previously had tabs, you'll be asked to restore those tabs.
  • Timeline now shows groups of tabs as activities, and each activity will reveal the number of tabs for the set.
  • Apps, documents, and Edge tabs open as a tab in the group replacing the new tab page.
  • Support for Microsoft Store apps has been added.
  • Support for Office 365 apps has been added.
  • Support for most classic (win32) desktop apps that do not use a custom title bar (such as File Explorer, Command Prompt, PowerShell, and Notepad) has been added.

Settings

Microsoft has also been working to improve the Settings app throughout the release of build 17643, 17639, 17623, 17618, and 17604.

Focus assist

On Settings> System, the Focus assist page, under "Automatic rules," you'll find an option to enable the feature while you're at home. However, if you don't have specified your home address in Cortana, this feature will be grayed out.

When enabled, you can click the option to access the "At home" page with options to allow Cortana to recognize your location and set the focus level.

Multitasking

On Settings> System, the Multitasking page is getting updated to include additional options to customize Sets.

Alongside the toggle switch to enable or disable Sets, you'll now see a drop-down menu that allows customize the Alt + Tab keyboard shortcut to show "Windows and tabs" or "Windows only."

If you don't want a particular set of apps to use tabs, you'll also find an option to exclude apps from the experience.

Bluetooth & other devices

On Settings> System, the Bluetooth & other devices page now shows the battery level for Bluetooth devices paired to your computer. However, to work, the Bluetooth device must support this functionality.

Image source: Microsoft

Data Usage

On Setting> Network & Internet, the Data Usage is changing to show how much data you're using while roaming using a mobile data plan.

Image source: Microsoft

If you want to enable or disable roaming stats, you can find the option in the "Cellular" settings page.

Display

On Settings> Ease of Access, the Display page is updating the Simplify and personalize Windows section so when you disable the Automatically hide scroll bars in Windows option the scroll bars in the Start menu will also stay visible.

Magnifier

On Settings> Ease of Access, the Magnifier page now gives you more control over the zoom increments by adding 5% and 10% to the "Change zoom increments" drop-down menu.

Also, it's now possible to keep the mouse centered while in full-screen mode using the new "Keep the mouse cursor" drop-down menu.

Cortana

The Cortana setting section isn't getting any new options, but since build 17623, the section has been renamed to Cortana & Search.

System

In addition, Windows 10 is adding support for the High Efficiency Image File Format (HEIF). The new support is available starting build 17623, and it's an image container that uses codecs like HEVC to improve compression, quality, and other advantages over older file formats, such as JPEG, PNG, and GIF.

This new format also supports encoding image sequences, auxiliary images like alpha or depth maps, image collections, live images and video, audio, and better contrast for HDR.

As part of the Redstone 5 development, Windows 10 is also introducing a safer way to disconnect external graphics processors connected to your computer using Thunderbolt 3.

This new mechanism lets you see which apps are using the external GPU allowing you to close those applications to prevent data loss as you disconnect the peripheral.

If you're using an external graphics processor, you can now open the "Safely Remove Hardware and Eject Media" menu from the notification area of the taskbar, and select the GPU you want to disconnect. If a prompt appears, close the application in the list, and then try to detach the graphics processor.

Microsoft Edge

This far Microsoft Edge isn't getting a lot of improvement, but the WebDriver is now included as Feature on Demand (FoD) to make it easier to get the right version for your device.

According to Microsoft, this new change should address the problem from customers around binary mismatches, as Feature on Demand's match the build, branch, and flavor automatically.

Input

Starting with Windows 10 build 17604, the emoji design has been updated to improve consistency, and the emoji panel is available in more than 150 locales, including English (Great Britain), French (France), German (Germany), Spanish (Spain), and more.

Image source: Microsoft

Other improvements

Alongside the new features and improvements, you'll also find a number of other changes, including performance improvements for Windows Defender Application Guard (WDAG) for Microsoft Edge making the experience load faster and lighter. Also, it's now possible to download files using WDAG if you're using Windows 10 Enterprise.

In a continuous effort to retire Control Panel, starting with build 17639, the settings to change the display brightness are now only available in the Settings app.

Windows 10 Pro for Workstation now includes an "Ultimate Performance" power plan with special settings designed to deliver the best performance that the machine's hardware allows.

The new scheme is based on the High-Performance policy with additional tweaks to eliminate micro-latencies associated with delicate power management techniques. Additionally, Microsoft will no longer bundle consumer apps and games with this edition of Windows 10. Instead, the company will only include productivity and enterprise apps.

Task Manager, in the Processes tab, just like in the Redstone 4 update, you'll see a new icon when a process is suspended in the Status column.

Also, as of build 17643, you can copy and paste text from and in any Windows Subsystem for Linux console using the Ctrl + Shift + C (copy) and Ctrl + Shift + V (paste) keyboard shortcuts. However, it's an option that you'll need to turn on manually enable in the "Options" tab of the console properties.

Finally, during the upgrade process, Windows 10 Redstone 5 also includes the ability to disable Inking & Typing and Find my device options to prevent Microsoft from collecting this type of information, just like the spring update.

Wrapping things up

Although we're still in the early days of the Redstone 5 development (and the spring update haven't even released yet), these first seven builds already show a small set of welcome additions, which if everything goes according to plan, we'll see before the end of 2018.

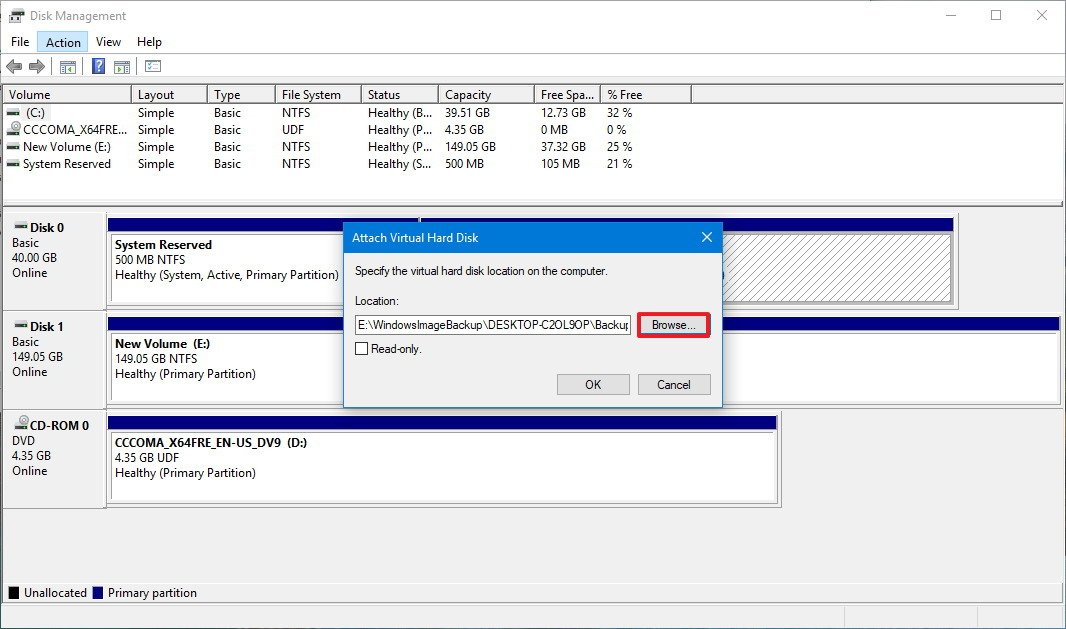
If you're thinking on testing the latest preview, you should consider only installing it on a spare computer or virtual machine. It's not recommended to use pre-releases on your primary machine as you may come across errors, problems, and it may cause data loss. You should at least make sure to create a full backup of your computer before installing that latest build, in case something wrong happens and you need to recover your computer.

What do you think about the Redstone 5 progress thus far? Tell us in the comments.

More Windows 10 resources

For more helpful articles, coverage, and answers to common questions about Windows 10, visit the following resources:

Here are 3 tips to help you beat Overwatch's new Retribution game mode

$
0
0

A brand new PvE mode has arrived in Overwatch: Retribution. Here are three tips to help you and your team beat it.

Ever since the massive success of last year's Uprising event, Overwatch fans have anxiously awaited Blizzard's next attempt at bringing the primarily objective-based multiplayer game to the cooperative Player-versus-Enemy (PvE) department. The wait has been long, but the patience has been rewarded; the newest PvE iteration, Retribution, is an improvement on the Uprising event in almost every way — including how effectively the player is challenged.

If you or your team aren't careful, it can be easy to get killed in the blink of an eye in Retribution, especially on higher difficulties. Whether you're a fan looking to return to the game and play the mode for the first time, or a regular Overwatch player struggling with the challenge, these three tips will give you a strong edge in the battle.

Play around cover

In Retribution, you don't have a tank hero on the roster to block damage for the team (you have McCree, Reaper, Genji, and Moira) so it's critical that you try and take as little damage as possible. There are plenty of pieces of geometry you can use to avoid incoming fire in the map the mode takes place in, so don't hesitate to crouch down when things are getting a little too dicey.

It's also important to remember not to stick in the same place for too long, though. Otherwise, you'll get flanked and surrounded. Utilize the mobility abilities each hero has (such as Moira's Fade and McCree's Combat Roll) to quickly change positions and keep the enemy from trapping you in one area.

Assign Genji to sniper duty

If you aren't careful, the Sniper unit that gets introduced early on in the mission can and will kill every player on the team very quickly. Her rifle takes a few seconds to charge, but she instant kills whoever she hits, meaning that it's foolish to fight in her sightlines. Since Retribution released, the Sniper units have been the biggest obstacle for many players due to not knowing how to deal with her.

The answer is actually quite simple: have your Genji player face her one-versus-one. His Reflect ability can redirect the Sniper's own shot against her, killing her instantly and removing the threat. If that isn't possible, Genji can alternatively use his Swift Strike dash to close the distance immediately and take her down from close range where she's ineffective. McCree is also effective at engaging her from range.

Never face the Heavy Assault directly

By far, the most fearsome foe in Retribution is the Heavy Assault enemy. Armed with miniguns on their arms and capable of charging players like a Reinhardt, they are extremely dangerous. Their minigun damage can chew through health like a hot knife through butter, regardless of healing, so don't attack him out in the open. Instead, peek in and out from cover so that you can land shots onto him without ever fully exposing yourself. If he goes for a charge, avoid it and rotate to a new position before he opens fire.

This won't do much damage, but your patience will be rewarded when the Heavy Assault has to reload his weapons for several seconds and can't attack you. This is your opportunity to do some real damage, but make sure that you return to your cover-peeking strategy when he finishes his reload. Repeat this several times, and you'll topple the juggernaut eventually.

Your thoughts

What do you think of Retribution? If you've beaten it, what strategy did you use? Let me know in the comments.

Overwatch is available on the Xbox One for $59.99.

How to set up the Astro Gaming Mixamp to mix PC and console audio

$
0
0

Astro Mixamp

The Astro Gaming Mixamp is a really great piece of kit if you're a streamer in particular. Here's how you get set up with your console and PC audio being mixed together.

There's one part of the Astro Gaming A40 TR headset that really stands out: the Mixamp. This little box that Astro includes with some of its headsets might be just the thing you've been looking for and don't even know it.

I'd long wanted a way to have all my console audio mixed with all my PC audio with no latency issues in either direction. That's where the Mixamp comes — it allows you to do things like use Discord or Skype for your party chat, while still hearing everything that's happening in your console games and get the benefit of virtual surround sound.

Astro has a couple of different versions, one geared towards the Xbox One and one for PS4. In both cases, the Mixamp basic setup is the same, and both console versions work with the PC.

What you need

Astro Mixamp

If you buy an Astro Gaming headset with the Mixamp included, you'll already have all the equipment you need. If you don't have everything, here's how it all breaks down:

Once you've assembled all the bits you need, the other thing to do is download the Astro Command Center application for your PC. It's not essential, but it's how you change audio settings on the Mixamp as well as update its firmware, so it's highly recommended.

How to set up the Astro Gaming Mixamp for PC and console audio

Astro Mixamp

The goal here is to have native console audio and all the PC audio coming through the same headset. This means you can use PC apps for party chat and hear other sounds like stream alert notifications without compromising on the quality of the audio you're hearing from your console game.

By using the Mixamp there are no latency issues and you're still able to take advantage of directional audio and virtual surround sound. Here's how to set it up.

  1. Connect one end of the optical audio cable to the port on the rear of the console.
  2. Connect the other end to the optical port on the Mixamp.
  3. Connect the micro USB cable to its port on the Mixamp.
  4. Connect the USB-A end of the same cable to a USB 2.0 or 3.0 port on your PC.
  5. Connect your gaming headset or headphones to the 3.5mm jack on the Mixamp.

It's important to remember to connect the headset before you do anything, as the Mixamp will detect it isn't there and you'll see a bunch of red lights.

Astro Mixamp

Now all you have to do is point your Windows default audio towards the Mixamp. In the bottom right-hand corner of the desktop, you need to select it as default by clicking on the speaker icon. This means that every sound that comes from your PC will be routed through the Mixamp and into your headset. If you use a program like Voicemeeter Banana to handle your PC audio, set the Mixamp as one of your hardware outputs.

The optical audio output from the console will deliver the same thing, mixing the two together in your ears in perfect harmony. From here you just need to use the hardware volume controls on the Mixamp to set the overall volume, the mix between game and voice and the presets you may have setup in the Astro Command Center application.

Astro Mixamp

What this method doesn't do is allow you to use party chat on the console, because the USB connection to the Xbox or PS4 is needed to deliver the microphone input. The 'regular' setup of the Mixamp Pro where the stream output is used to funnel console audio into a PC would be better here. Or you could try a splitter cable to connect the headset to both the Mixamp as above and to the controller.

But the setup as detailed above will give you your full, native console audio mixed in with your full PC audio which is perfect for streamers, for example, to get the best experience on both pieces of hardware. The Mixamp TR comes bundled with the A40 headset for around $250, or you can buy it on its own and use with your current headset for $130.

See at Amazon

State of Decay 2 weapons: Crafting, upgrades, mods explained

$
0
0

Breaking down everything we know so far about State of Decay 2's weapons, crafting and more.

Microsoft's upcoming zombie survival game State of Decay 2 is just around the corner, with new details on its gameplay emerging. Dropping players into a world ravished by infection, there's a lot to manage between combat, resource management, and base operations. Weapons are a major component of this, forming your line of defense against ravenous hordes.

While State of Decay 2 is yet to launch, pre-release videos from IGN First have outlined the basics of combat. With deep mechanics for obtaining, maintaining and upgrading your armaments, you'll need to stay on top of them to survive. Here's what we know about State of Decay 2's weapons and their associated systems so far.

Choosing weapons in State of Decay 2

Like its predecessor, weapons are a valuable commodity in State of Decay 2. It's not the case of picking up a machine gun and going zombie slaying – you'll need to work for weapons and maintain them with limited resources.

State of Decay 2's sandbox contains a variety of choices, including melee weapons, pistols, rifles, shotguns and more. These can be found on the game's maps or crafted with collected supplies. Alongside weapons themselves, the correct ammunition type must be scavenged or crafted.

Multiple variants of the weapons can also be found or crafted in State of Decay 2. Different alternatives of the same weapon can bear varying statistic rolls, altering how they behave.

Each of the game's firearms is rated by seven attributes – power, accuracy, control, max durability, fire rate, range, and quietness. These statistics determine a weapon's capabilities, as well as additional traits such as long-term durability and how loud they fire. Melee weapons are ranked similarly, by impact, dismember, lethality, speed, max durability, knockdown, quietness and ease of use.

Upgrading weapons in State of Decay 2

After obtaining weapons, modifications can be applied to upgrade performance beyond their original state. However, unlike many popular shooters with weapon customization, your options are limited.

Magazines, sights, and grips are all tied exclusively to weapon variants and can't be attached and detached on the fly. While the AK-47, "Raider's AK-47" and "Prepper's AK-47" are similar, their fixed modifications create different handling.

Many of State of Decay 2's weapons also support muzzle attachments, which are the only modification that can be freely switched. If a weapon supports these, attachments like suppressors, flash hiders, and compensators can be equipped. Weapons deteriorate over time though muzzle attachments don't break like the first game.

Weapon crafting, repairs and more in State of Decay 2

The weapons you own are key to success, but your base plays a major role in arming survivors too. As a part of the game's base building mechanics, several facilities aid in the creation and repair of equipment.

Workshops are an essential installation for any base, providing a location for weapons repair and salvage for parts. Explosives can also be crafted here, including throwable bombs, incendiaries, placed charges, and decoys.

Forges expand your base's capabilities with metalwork, helping in the creation of new melee weapons. These facilities can also be used to convert raw materials into parts or break down existing parts.

Armories allow for the creation of different ammunition types from raw parts. Military-grade explosives can also be created with these, unlocking access to some of the game's top-tier equipment.

Finally, shooting ranges have also been confirmed for State of Decay 2. Once constructed, the shooting skills of your survivors can be improved by training on the range.

Get armed for launch

Details on State of Decay 2 are currently limited, but more is expected in the weeks leading to launch. We'll be sure to update this article going forward, with in-depth breakdowns of the game's mechanics after getting hands-on. Are you looking forward to the game? Drop into the comments section below with your thoughts.

3 tips and tricks you can use to raid skeleton forts in Sea of Thieves

$
0
0

Skeleton forts in Sea of Thieves are full of riches beyond your wildest dreams, but getting to that booty is very difficult if you go in unprepared.

The vaults found in the hearts of Sea of Theives' skeleton forts contain a huge amount of treasure — over ten thousand gold coins worth of chests, skulls, and artifacts, to be specific. However, getting into the vault is not an easy task. You'll need to sail your way through heavy cannon fire to even get to the island, and once there, you'll need to fight your way through 15 grueling waves of skeleton enemies.

A pirate crew prepared with a plan, though, can complete this gauntlet much easier then a crew that isn't. Here's three tips that will help you conquer skeleton forts and take all the loot within.

Sail at full speed towards the fort

Since forts are protected by gun emplacement towers that will lace your vessel with cannonballs, it may seem like a good idea to pepper them with your own weaponry to destroy them before moving in. This won't help — the AI skeleton gunners are deadly accurate at any range, and it can be difficult to line up a good shot on the top of the towers with your cannons. Any errors in your crew's play and you'll be meeting a watery grave.

Instead, turn your ship to directly face the fort and go full speed, making sure to keep your sails in the wind if possible. You will get hit a few times, but getting right up to the island puts your ship in the cannons' blind spot, meaning your ship is no longer in danger. An added bonus of not fighting the tower gunners is that you'll hear them start shooting ships of other players if they approach, warning you of their presence.

Cutlasses are your best friend

Firearms are great, but unfortunately for you, ammunition for them is scarce during raids. There's only one ammo box at each fort, and they're usually in dangerous places near where enemy skeletons respawn. For this reason, you would be wise to bring along a cutlass in place of one of your two handheld guns.

Not only do cutlasses not require ammo, they're also a great weapon for taking on hordes of foes because of how fast you can swing them. A group of players with cutlasses can cut down over a dozen skeletons in seconds, so there's no better weapon to bring with you.

Lure skeletons into cannon sightlines

While it's true that cannons are primarily meant for ship-to-ship combat, their ability to decimate infantry on land should not be underestimated. A well-aimed cannonball can kill a large group of foes, so if your crew is starting to get overwhelmed, it may be wise to use them during the raid to do some heavy damage.

The skeleton enemies will mindlessly chase players everywhere except into deep water, so luring them all to the beach where you anchored your ship is a good idea. They can't follow you through the water, and they'll be left wide open to your vessel's cannonball barrage. If your ship isn't in a good position for this, then you can employ similar tactics in the forts by baiting them in front of the cannons in the fort's center area. Don't hit a powder keg with one while a teammate is near, though, or else they'll be instantly killed.

Your thoughts

Do you have any strategies for raiding skeleton forts? Let me know in the comments.

Read: Sea of Thieves buyer's guide

Sea of Thieves is available now for $59.99 on Xbox One, or you can play it as part of the $9.99/mo Xbox Game Pass.

How to upgrade your laptop's hard drive to a solid-state drive (SSD)

$
0
0

How to upgrade your laptop's hard drive to a solid-state drive (SSD)

Boost your laptop's performance with a speedy SSD.

Whether you wanted to save some money during the initial laptop purchase, the manufacturer you purchased your laptop from only offered hard-disk drive (HDD) options, or you're fixing up a laptop from a time before solid-state storage, upgrading to an SSD is a relatively common DIY practice. However, before ripping the back off your laptop and poking around inside, there are a few things to consider and keep in mind when going about this task.

Why upgrade your laptop's hard drive?

Why upgrade your laptop's hard drive?

HDDs were the standard form of big storage for PCs for a long time, but their spinning platters and actuator arms can only operate so fast. SSDs, which have no moving parts inside and usually rely on NAND flash memory, offer speeds that far surpass HDDs. They're also quite a bit more stable and should last longer due to the lack of moving mechanical parts.

SSDs are likewise a lot more compact since they don't need to accommodate the platters and arm, and they're usually found in lightweight, thin Ultrabooks. No matter what size you choose, the biggest positive impact you'll see from a replacement should be speed, especially when using a PCIe bus. Windows 10 boots in seconds, and you'll probably even notice a difference when working with large files and apps.

Before continuing any further with a DIY replacement project, you want to ensure that your laptop can indeed be opened up and can have its hard drive accessed. Some laptops will stop you from even getting past the outer chassis, while others will let you in before dashing your hopes with a buried drive.

Your best bet is to do some research on your specific model to see if it is indeed upgradeable, or check out our roundup of great laptops that are easily upgraded at home.

Back up your data

Back up your data

Now that you know your laptop can indeed have its drive replaced, it's time to back up your existing drive. If you'd like to start over completely fresh without any of your old files and programs, you can gloss over this section and go straight to choosing a replacement SSD.

Upgrading your hard drive? Don't bother with cloning, just do a clean Windows 10 install

If you want to pick up where you left there are a few popular options. You can clone your old drive to your new SSD for an exact replica, you can create an image and restore your familiar OS with all apps and settings, or you can back up files to a cloud service, like OneDrive. There are a few other options as well, detailed in our guide to easy and effective ways of backing up your PC.

If you're interested in cloning or imagining, these guides should help you get started (and finished!) with the process.

Choose a replacement solid-state drive

Choose a replacement solid-state drive

Whether or not you're bringing your old data over to your new drive, it's time to pick out a quality SSD that makes the entire upgrade worthwhile.

First, figure out what type of interface the drive in your laptop is compatible with (usually SATA or PCIe) and determine which form factor will fit (often 2.5-inch or the slim M.2). From there, it's up to you to balance price, performance, and size. If you need a hand, we've put together a list of the best SSDs on the market today.

Best solid-state drives for Windows PCs

Use the right tools

Use the right tools

Gathering up whatever assortment of tools you have lying around the home or office and sitting down to operate on your laptop's innards likely won't do. There are plenty of delicate parts inside, and we all know how everything starts looking like a nail when all you have is a hammer to work with.

Luckily, specialized toolkits are generally inexpensive and should contain everything you need for a successful upgrade, including specialized screwdrivers, suction cups, pry tools, tweezers, and spudges. For our Razer Blade SSD swap, we used the E.Durable kit (about $12) and haven't looked back.

See at Amazon

As an added bonus, you can invest in an anti-static mat or anti-static wrist strap to prevent any accidental damage while working.

See at Amazon

How to upgrade your laptop's hard drive

Video tutorial on replacing the SSD in a Razer Blade.

Because laptops differ so much when it comes to internal layout, it's hard giving a specific step-by-step explanation that covers everything. In general, though, you remove the back of the laptop's chassis, loosen the old drive, unclip the bus, and remove the old hardware.

In some cases ― like with the Acer Aspire 5― there will be an easy-access panel that lets you quickly and painlessly add extra storage without even taking apart your laptop.

There are plenty of tutorials online that will help with replacing the drive in a specific laptop, including a few of our own.

Wrapping up

As a reminder, always create a backup (unless you want to start completely new), always research what type of SSD your laptop is compatible with, always use the right tools, and upgrade to an SSD that will remain relevant (consider size and speed) for years to come.

Have any extra tips or tricks for anyone looking to go down this DIY road? Be sure to hit up the comments section!

State of Decay 2 buyer's guide: Editions, bonuses, and release dates

$
0
0

State of Decay 2 buyer's guide: Editions, bonuses, and release dates

Here's which version of State of Decay 2 is best for you – and where to preorder.

Microsoft is set to debut the second entry to its zombie-filled survival franchise with State of Decay 2, delivering a variety of improvements upon its predecessor. Packing deeper progression mechanics, a larger world and more undead to kill, there's a lot to look forward to this time around.

With its arrival around the corner, I rounded up everything you need to know about the game's launch, available editions, and preorder bonuses. Here's a breakdown of what you can expect on release day, to decide which version is best for you.

State of Decay 2 release date

State of Decay 2 is set to launch for Xbox One and Windows 10 on May 22, 2018. However, those who purchase the $49.99 "Ultimate Edition" will gain four-day early access over standard copies, on May 18, 2018. Those who play the game through Microsoft's Xbox Game Pass subscription will also gain access alongside the standard release on May 22.

State of Decay 2 preorder bonuses

State of Decay 2 *preorder bonuses*

Depending on where you purchase your copy of State of Decay 2, additional content may be on offer. Preorder bonuses differ by retailers, with different in-game gear up for grabs. Here's a breakdown of the bonuses across the U.S.

  • Microsoft Store: Prepper's Pack: Grasscutter (Blade), Rhames V Truck, Survival supplies
  • Amazon: Survivor's pack: Zed-Swatter (Blunt), Vagabond 4-wheeler, Survival supplies
  • GameStop: SHTF Pack: Zeddpiercer (Blunt), Brogan Rapscallion hatchback, Survival supplies
  • Best Buy: Survival Pack: Skullsplitter (Blade), Miragra seda, Survival supplies

(Note: If you redeem a digital code for State of Decay 2 from any retailer, your copy will be playable on both Xbox One and Windows 10 through Xbox Play Anywhere.)

State of Decay 2 editions

State of Decay 2 (Physical disc)

State of Decay 2 (Physical disc)

The main way to play State of Decay 2 is the standard edition, which provides access to the base game on Xbox One. By purchasing this version, you'll be getting nearly all content available at launch. The standard version of State of Decay 2 costs $29.99, with additional bonus content dependent on the retailer. All video game retailers should stock this version worldwide.

State of Decay 2 (Digital)

State of Decay 2 (Digital)

A digital version of State of Decay 2 is also available for $29.99, sold as a pre-paid code to be redeemed via Xbox Live. Most retailers that stock codes will distribute codes ahead of launch as Xbox Live currency, to give players the chance to preorder and pre-load the title.

Like digital copies purchased directly from the Microsoft Store, these copies of the game will unlock at 12:01 in your time zone. Codes are valid for both Xbox One and Windows 10, with cross-platform purchasing, saves and multiplayer between the two platforms under the "Play Anywhere" program.

State of Decay 2: Ultimate Edition (Physical disc)

State of Decay 2: Ultimate Edition (Physical disc)

State of Decay 2: Ultimate Edition is the complete package, bundling together all the content needed by a franchise fan. With this edition buyers receive the base game, alongside access to two upcoming content drops titled the Independence and Daybreak expansion packs. This version also unlocks four days prior to standard editions on May 18.

This definitive edition also includes a bonus copy of State of Decay: Year One Survival Edition– the original game reworked for Xbox One, with all post-launch content and visual upgrades. Copies of the game are included with the Ultimate Edition package, meaning you won't have the chance to play before State of Decay 2 launches.

State of Decay 2: Ultimate Edition is available for preorder at $49.99 across all major retailers.

State of Decay 2: Ultimate Edition (Digital)

State of Decay 2: Ultimate Edition (Digital)

Like the physical version of the State of Decay 2: Ultimate Edition, this digital release provides access to the same content in a different form factor. By going digital, you'll be receiving a downloadable copy of the game for use across Xbox One and Windows 10 with all additional content transferring between the two platforms. This version of the game also retails for $49.99.

Xbox Game Pass

Although for many State of Decay 2: Ultimate Edition will be purchased outright, Microsoft is also set to release the game on its Xbox Game Pass subscription service on May 22. As recently unveiled, future Microsoft Studios-published titles will hit the Netflix-style service and remain playable with an active subscription. Xbox Game Pass subscriptions also entitle players to an additional library of over 100 existing games on Xbox One. Xbox Game Pass subscriptions are priced at $9.99 digitally or $10.99 as gifts, making for a great way to start zombie-slaying on the cheap.

State of Decay 2 Collectibles Kit

State of Decay 2 Collectibles Kit

Alongside the release of State of Decay 2, Microsoft is also releasing a "Collectibles Kit," designed for the series' most devoted fans. Although this package doesn't contain the game, the handy box packs a variety of exclusive items tied into its zombie theme. Highlights of this package are a latex zombie mask, 4GB thumb drive and Steelbook case. You'll also receive an iron-on patch and brain-themed stand to display your case.

State of Decay 2's Collectibles Kit is available exclusively through Best Buy in the U.S, priced at $79.99. The Steelbook case is also available for standalone purchase for $19.99.

See at Best Buy


How to set up a kid-friendly Windows 10 PC with a child account

$
0
0

You can set up a much safer computing environment for your children, and in this guide, we'll show you how on Windows 10.

On Windows 10, you can add multiple accounts to share a device with other family members. If you have children in the family, they can also have a personal space, but in a more controlled environment to make sure they have the safest experience possible while using apps, playing games — on Windows 10 or Xbox One — and browsing the internet.

It's all possible using a child account, which once created, you can manage in a number of ways through the Family dashboard in your Microsoft account. Using these tools, you can review reports of your children's online activities. Limit the time they can spend in front of Windows 10 devices, or the time they spend playing Xbox One games. You can restrict apps and games, and you have the ability to make sure they don't end up visiting websites that aren't suitable for them.

In this Windows 10 guide, we'll walk you through the steps to properly set up a child account and manage its parental control settings.

How to create a child account on Windows 10

If you want to create an account designed specifically for a young member of the family, do the following:

  1. Open Settings.
  2. Click on Accounts.
  3. Click on Family & other people.
  4. Under "Your family," click the Add a family member button.

  5. Select the Add a child option.
  6. Type the email address of the young person you want to add.

    Quick Tip: If an email address is not available, click The person I want to add doesn't have an email address link. Then use the wizard to create a Microsoft account.

  7. Click the Confirm button.

  8. Click the Close button.

Once you've completed the steps, the new member will be able to sign-in immediately, but you won't be able to control the account until they accept the invitation sent during the account creation process.

How to manage a child account on Windows 10

After accepting the invitation, you or another adult family member can take control of the account and view activity reports, limit computing and gaming time, set up limited rated content, apps, and games, and add funds to allow the young person to make small purchases in the Microsoft Store.

To start controlling the family member account, use the following steps:

  1. Open Settings.
  2. Click on Accounts.
  3. Click on Family & other people.
  4. Under "Your family," click the Manage family settings online option.

Alternatively, you can sign-in to your Microsoft account in your web browser, and open the Family tab.

While in the family dashboard, you can view activity reports and manage various aspects of the account.

Viewing recent activities

In the Activity page, you can turn the Activity reporting toggle switch to start collecting activities on Windows 10 devices and Xbox One.

Once the option is enabled, you can see the websites the young family member is visiting, the apps and games they've been downloading and playing, and the time they've been spending on their devices.

If you can't stay on top of the activities, you can also turn on the Email weekly reports to me toggle switch to get a full report delivered to your email address.

After enabling activity reporting, you can always come back and use the "View activity from" drop-down menu to select the day of activities you want to review.

Setting screen time

In the Screen time page, you can easily limit the hours and days of the week a child can use their Windows 10 and Xbox One devices.

Using the parental controls, you can set two types of schedules. You can turn on the Use one screen time schedule toggle switch, which allows you set the schedule for computing and gaming. Or you can turn on the Xbox screen time and PC screen time toggle switches to set limits separately.

Setting screen limits is a straightforward process. Once you've enabled an option, you'll see the default schedule.

Under the "Hours allowed" column, you can use the drop-down menu to select the amount of screen time for a particular day, including the ability to block the day entirely.

Once you've selected the number of hours a child can use a device, click the schedule chart to the right to specify when they can use the allowed time.

When specifying when they can use their allowed time, you can add and remove multiple schedules. After configuring the screen time, click the Save button to apply the changes.

If you want to add the same time to more than one day, click the Add time to multiple days link to set up the desired schedule.

The scheduling process will be the same for setting screen time for Xbox and PC individually.

Setting content restrictions

In the Content restrictions page, you can configure the account to require adult approval for purchases in the Microsoft Store, set age limit for apps, games, and media, and you can even block those websites you want to restrict access.

Ask a parent

The Ask a parent feature allows you to require your approval for a child to proceed with a Microsoft Store purchase. However, this option excludes purchases made with the funds you added to the child account and gift cards.

To enable this feature, turn on the Needs adult approval to buy things toggle switch. If you also want to know when and what a child has purchased, then turn on the Email me when my child gets stuff toggle switch.

Apps, games & media

The Apps, games & media feature option enables you to block apps, games, and media that isn't appropriate for your children.

To restrict content, turn on the Block inappropriate apps, games & media toggle switch, and then use the drop-down menu to specify the rating you want to allow. (For more details, click the View allowed ratings link.)

Web browsing

The Web browsing feature works as a web filter, and it lets you block those websites that are not suitable for your children.

To enable this feature, turn on the Block inappropriate websites toggle switch.

Under "Always allowed," you can add the links for the websites that a child can visit. It's also possible to check the Only allow these websites option to explicitly set this list as the only websites a child can visit blocking everything else.

Under "Always blocked," you can add the links for the websites you want to block.

This option will also suppress inappropriate search results using Microsoft Edge or Internet Explorer and Bing as the default search engine.

If you want to prevent your child from using another search engine that may not have safe search configured, it's a good idea to add those sites to the blocked list, including Google.com, Yahoo.com, and others.

Because this feature only works with the Microsoft default web browser, turning on Web browsing will block other browsers, such as Chrome or Firefox, to help to keep your kid safer when surfing the internet. However, if you want to allow the use of another browser, you can unblock them from the Apps, games & media section, under "Always blocked."

Adding funds to a child account

Then in the Spending page allows you to add money to the kid's Microsoft account to buy anything they want without breaking the bank.

This feature works in combination with the Apps, games & media feature to restrict the products they can't buy, such as game rated for a much older audience.

To add funds to your kid's account, click the Add money button, specify the amount, and complete the transaction. (This process is not refundable. If you're not sure how it's going to work, start with a small amount.)

In addition to adding money, from this page, you can also view your child purchase history.

Fixing and preventing common problems

Usually, after setting up a child account and configuring parental controls, settings will apply immediately, but rarely, you may come across some problems getting screen time and family activities working correctly.

Here are a number a few things you can do to prevent or fix problems using these features:

As soon as the account is created you want to verify the account on Windows 10 on Settings> Accounts> Your info, click the Verify link and follow the on-screen instructions to complete the process.

If the settings aren't working, make sure the device is connected to the internet, and reboot the PC to update the system settings.

Problems can also occur as a result of missing updates, and even though, Windows 10 updates automatically, you may still need to check for new releases manually on Settings> Update & Security> Windows Update, and click the Check for updates button.

In the case family activity reporting isn't working, you can also go to Settings> Privacy> Feedback & diagnostic, and ensure the Enhanced or Full level is selected.

More Windows 10 resources

For more helpful articles, coverage, and answers to common questions about Windows 10, visit the following resources:

How to connect a PlayStation 4 controller to your PC

$
0
0

How to connect a PlayStation 4 controller to your PC

The brands might not match, but you can use your PS4 controller with your PC.

Windows 10 and Xbox are understandably great bedfellows, and it's easy to use your Xbox controller across the two platforms. However, many people have a PlayStation 4 (PS4) lying around, complete with a DualShock 4 (DS4) controller. Whereas connecting the DS4 to a PC was once a bit of a nightmare, it's now pretty easy thanks to better software integration. Here's how to get the two working together and how to use the DS4 in a couple of different scenarios.

See DualShock 4 at Amazon

How to pair your PlayStation 4 controller with a wired connection

DS4 wired connection

Connecting the DS4 to your PC with a USB-A to Micro-USB cable is by far the easiest way to start gaming with the PS4's pointer. Just plug it into your PC and let the drivers install themselves.

Hitting the PS button in the middle of the controller at this point won't do anything unless you have Steam installed and running. If so, you'll notice that Big Picture mode launches when you hit the button. At this point, you can make some tweaks inside Steam.

How to pair your PlayStation 4 controller with a wireless connection

DS4 wireless adapter

Sony has an official USB-A wireless adapter meant to bridge the gap between the DS4 controller and any PCs without Bluetooth capabilities. Unfortunately, it seems like the product has been discontinued, making it much harder to track down.

This Japanese version ― which by all means should work no matter where you are located ― costs about $60, making it the most expensive route. If your PC doesn't have Bluetooth capabilities and you don't want a long cable running between your PC and controller, though, it becomes quite attractive.

To use this adapter, just plug it into your PC and let the drivers install automatically. From there, the DS4 should operate just as though you have a wired or Bluetooth connection.

See at Amazon

How to pair your PlayStation 4 controller with Bluetooth

If you can't get your hands on one of the official DS4 wireless adapters, you can always give Bluetooth a shot. Fair warning, the connection might not always work depending on your PC's hardware, but it's at least worth a shot if you don't want to snake a long cable to the controller.

Make sure the controller isn't paired with a PS4 ― a good way to start is to pair the controller with your PC using the wired method ― before proceeding.

  1. Hold down the Share and PS buttons simultaneously to put the controller into Bluetooth pairing mode. The controller light will begin flashing.
  2. Click the Start button on your PC.
  3. Click Settings.

    Click the Start button. Click Settings.

  4. Click Devices.
  5. Click Bluetooth & other devices.

    Click Devices. Click Bluetooth & other devices.

  6. Click Add Bluetooth or other device.
  7. Click Bluetooth.

    Click Add Bluetooth or other device. Click Bluetooth.

  8. Click Wireless Controller.
  9. Click Done.

    Click Wireless Controller. Click Done.

Drivers should now be automatically installed. Like with the wired connection, hitting the PS button with Steam running will launch Big Picture mode.

Using your PlayStation 4 controller with your PC

PlayStation Now

One of the most common reasons you might want to use a DS4 controller with your PC is PlayStation Now, the streaming game service that delivers PS3 and PS4 games to your computer. Once the DS4 is connected, all you have to do is install the PlayStation Now app and follow the setup instructions.

Check out a free PlayStation Now trial

DS4Windows

If you'd rather use your DS4 in a number of other scenarios, including those usually reserved for an Xbox controller, I suggest trying out DS4Windows. Before downloading and installing DS4Windows, I paired my DS4 controller with my PC using Bluetooth, although any pairing method will work.

  1. Navigate to the DS4Windows GitHub page.
  2. Click the ZIP file of the latest release.
  3. Click Save.

    Click the ZIP file. Click Save.

  4. Click Open when download is complete.
  5. Double-click DS4Windows.

    Click Open. Double-click DS4Windows.

  6. Double-click DS4Windows.
  7. Click an install option.

    Double-click DS4Windows. Click an install option.

  8. Click Step 1: Install the DS4 Driver.
  9. Click Finish.

    Click Step 1: Install the DS4 Driver. Click Finish.

At this point I had to restart DS4Windows in order for my controller to appear in the list of connected devices. Once recognized, you'll likely see a notification pop up letting you know that an Xbox controller is being set up. This is good news, as it means that your PC has been successfully tricked. You can now use your DS4 in any place where you'd normally use an Xbox controller, though the on-screen buttons will remain relevant to the Xbox hardware.

Using your PlayStation 4 controller with Steam

Steam Big Picture

Steam added built-in support for the DS4 awhile ago, and some PC games even come with further support and settings that can be tweaked from the in-game menu.

In the case of Steam, you can select the DS4 as the default controller through the Settings menu.

  1. Launch Steam from your Start menu, desktop, or taskbar.
  2. Click Steam.

    Launch Steam. Click Steam.

  3. Click Settings.
  4. Click Controller.

    Click Settings. Click Controller.

  5. Click General Controller Settings.
  6. Click PS4 Configuration Support.

    Click General Controller Settings. Click PS4 Configuration Support.

Your PC will now be tricked into thinking that the DS4 is an official Steam Controller, and you should have no issues using it with any games and apps with Steam controller support.

See Steam Controller at Amazon

More resources

How to use an Xbox One controller as a mouse to control your Windows 10 PC

How to upgrade your PC's graphics card (GPU)

$
0
0

GTX 1070

Upgrading your graphics card (GPU) is mostly a simple process, but there's still a process to follow.

It's an exciting time getting a new graphics card for your PC. Whether you've been hanging on to the same one for years, or you're a fan of the bleeding edge, it's something that always brings new life to your gaming.

Getting a newer, more powerful graphics card means better performance in the latest games, and in some cases, it increases the resolution you can play at. Once you've got your new card, making the switch is fairly straightforward but there are some things you need to make sure you do.

How to save money on a new graphics card

1080 ti

Right now, graphics cards are really expensive. The trouble is that the recent cryptocurrency boom has severely increased demand because there are plenty of currencies you can successfully mine with GPUs.

Our advice is to avoid buying unless you really have to, because let's face it, spending potentially hundreds of dollars more than you need to isn't a good idea. But that's not to say there aren't deals out there worth taking advantage of, and we're doing our best to make sure we're bringing you those deals regularly.

Best deals on graphics cards (GPUs)

Remove the old drivers

Geforce drivers

Even if you're going from NVIDIA to NVIDIA, or AMD to AMD, you still need to sort out the drivers. If you don't, you'll most likely have a bad time. trust me, I speak from experience. (Yes, I forgot to do this during an upgrade.) This will remove the drivers for your current card, so you'll also want to make sure you hook up your monitor to the onboard display output for your PC. This way you'll be able to see what you're doing.

Here's how to do it:

  1. In the Cortana search bar type device manager to go there quickest.
  2. Select display adapters.
  3. Right click on your current graphics card.

  4. Select uninstall device.

Install the new card

1080 Ti

Installing a new graphics card inside your PC is easy, whether you're going inside a pre-built machine or a custom creation. If you built your own PC, you'll already be familiar enough.

What you will need to make sure of is that you have the necessary power connector for your new card. For the sake of this guide, we're going to assume you already have a big enough power supply. But you may still need a different connector.

For example, my old GTX 1070 used an eight-pin connector, whereas my new GTX 1080 Ti uses an eight-pin and a six-pin. Your power supply may already have the additional connector attached if it's non-modular. If it's a modular power supply you might need to go back into the box and find another cable.

It's then a simple matter of slotting the graphics card into the now vacant PCIe slot and connecting the power.

Getting new drivers

NVIDIA Drivers

To use your new graphics card, you need new drivers. The only thing that differs is where you go to get them. You'll also still need to make sure you're connected to your onboard display output for this, not one of those coming from the graphics card.

Installing the drivers is no more difficult than installing any other program on your PC. They'll be packaged up into an executable that you just open, follow the on-screen directions, and let it do its thing.

These driver packages will also install either the NVIDIA Geforce Experience or AMD Crimson applications on your PC. You can use them or not, but they're not necessary to use the graphics card. Both apps are, however, an easy way to make sure you always have the latest drivers for your card.

That's it. When you fire up your PC, your new graphics card should be off and running for all the gaming you can handle.

The Windows Central ultimate PC build guide

Updated April 24, 2018: We checked through our guide to make sure you still have the best information on upgrading your graphics card.

How to recover missing files after an upgrade on Windows 10

$
0
0

Are your files nowhere to be found after an upgrade? In this guide, you'll find a few ways to get back missing files after upgrading to the latest version of Windows 10.

The setup process to upgrade to Windows 10 from a previous release, or from a previous version (such as Windows 8.1 or Windows 7), usually does a pretty good job preserving your files. However, in some scenarios, unexpected behaviors may occur that will cause your documents, pictures, music, and videos to suddenly disappear after the installation.

If this happens, not everything is lost just yet, as there are a number of ways to find and restore missing files.

In this Windows 10 guide, we'll walk you through a few ways you can get back your documents, pictures, music, and videos after upgrading to the latest version of the OS.

How to recover files removing temporary account

Immediately after upgrading to the latest version of Windows 10, you may notice that your files are no longer available, but this is because you're signed in using a temporary account.

You can quickly check if you're using a temporary profile using these steps:

  1. Open Settings.
  2. Click on Accounts.
  3. Click on Sync your settings.

  4. If you see a message at the top that reads: "You are logged on with a temporary profile. Roaming options are currently unavailable," then reboot your computer.

    Note: It may take a few reboots until you see your account on the sign-in screen.

  5. Sign in with your account.

Once you've completed the steps, the temporary account should go away, and you should now be able to access your documents, pictures, and videos from your original account.

How to recover files using Administrator account

If you're upgrading from Windows 7 to Windows 10, and you created a Microsoft account during the process, your files may end up in the Administrator account, which is now disabled.

To get back your missing personal files, you'll need to use the built-in local Administrator account using these steps:

  1. Open Start.
  2. Search for Computer Management, click the top result to open the experience.
  3. Browse the following path:

    Computer Management > Local Users and Groups > Users

  4. Double-click the Administrator account.

  5. Click the Account is disabled option.
  6. Click Apply.
  7. Click OK.

  8. Sign out of your current account.
  9. Sign in with the Administrator account.

After completing the steps, you should see your files again using the local Administrator account. Then the last thing left to do is to backup and restore all your files to the newly created account you configured using a Microsoft account.

How to recover files using search

You can also locate lost files using the search feature on Windows 10 with these steps:

  1. Open File Explorer (Windows key + E).
  2. On the left pane, click the This PC option.
  3. On the top-right, use the search box to locate your files.

If you're looking for a specific type of files, you can use the asterisk (*) as a wildcard. For instance, you can use the *.doc search query to list all of your Microsoft Word documents.

Also, you can use the File Explorer Search tab options to refine your search. For example, you can click the Advanced options drop-down menu and make sure to include non-indexed locations. In addition, you can use the Kind drop-down menu to do quick searches, including for documents, pictures, videos, music, and more.

When upgrading to a new version of Windows 10, sometimes your personal files will move to a different folder. If you're able to find your files using search, right-click one of the files and select Open file location, and then make sure to move your data to the folder you want.

Show hidden files

Depending on your system configuration, you may not be able to see your files because they're hidden. On Windows 10, you can see hidden files using these steps:

  1. Open File Explorer.
  2. Click the View tab.
  3. Under "Show/hide section," check the Hidden items options.

After completing the steps, try to use the search feature again to find your files.

How to recover files using Windows.old folder

If you installed Windows 10 using the upgrade process, or you went through a custom installation without deleting the main partition, then the setup will save a copy of your previous installation in the Windows.old folder, which you can use to recover your missing files.

To recover your files using the Windows.old folder, do the following:

  1. Open File Explorer.
  2. On the left pane, click the This PC option.
  3. Double-click the Local Disk (C:) drive.
  4. Double-click the Windows.old folder.

Once you've completed the steps, locate your personal files (likely to be stored in the "Users" folder), and move them to another location.

If you don't see the Windows.old folder, you may have upgraded using the clean installation process which erases everything on your computer. Something may have happened during the installation and copy of the previous installation was never saved. Or it's been more than 10 days since you upgraded to Windows 10, in which case the system deletes these files automatically.

How to recover files using backup

If none of the methods outlined above have worked to get back your lost files, then you'll need to use a previous backup to recover them. But bear in mind that the steps may vary depending on the backup method you used.

Below you'll find the steps to recover your files when using the built-in system tools and OneDrive. (If you used another tool, make sure to refer to your software vendor support site for specific instructions.)

Using System Image backup

If you used the System Image backup tool built into Windows 10, you won't be able to restore files individually, but you can connect the external drive with the backup files and then use this workaround:

  1. Open Start.
  2. Search for Computer Management, click the top result to open the experience.
  3. Browse the following path:

    Storage > Disk Management

  4. Click on Action.
  5. Select Attach VHD.

  6. Click the Browse button.

  7. Browse to the path where you saved the backup. Usually, it's in external drive within this folder path: WindowsImageBackup\<COMPUTER-NAME>\Backup xxxx-xx-xx xxxxxx\
  8. Select the largest VHDX file.

  9. Click Open.
  10. Click OK.
  11. Right-click the partition, and select the Change Drive Letter and Path option.

  12. Click the Add button.
  13. Select a drive letter. (Typically, you want to use the one that's already selected.)

  14. Click OK.

Once you've completed the steps, open the drive using File Explorer, locate and copy your files to your computer.

It's a good idea to right-click the virtual drive, select the Detach VHD option when you're done copying the files to properly remove the virtual hard drive.

Using Windows 10 backup feature

In the case that you're using the Windows 10 backup feature. You can quickly restore one or multiple files using these steps:

  1. Open Control Panel.
  2. Click on System and Security.
  3. Click on Backup and Restore (Windows 7).
  4. Under "Restore," click the Restore my files button.

  5. Click the Browse for files button.

  6. Browse the backup and select the files you want to restore.
  7. Click the Add files button.

  8. Click the Browse for folders button.
  9. Browse the backup and select the folders you want to restore.
  10. Click the Add folders button.
  11. Click Next.

  12. Select the original location option. Or if you want to restore files to an alternate path, use In the following location option.
  13. Specify the new location.

  14. Click Restore.
  15. Click Finish.

After completing the steps, your files will be available in the path you specified.

Using File History

Alternatively, if you were not able to recover your missing personal files after an upgrade using the instructions mentioned above, you may still be able to get them back using File History.

  1. Open Settings.
  2. Click on Update & Security.
  3. Click on Backup.
  4. Click the More options link.

  5. Click the Restore files from a current backup link.

  6. Select the files you want to restore.
  7. Click the Restore button.

Once you've completed the steps, your lost files will be available again on your device.

Using OneDrive

If you've been using OneDrive to backup your files, you'll need to re-configure the sync client on your device. If you're using Dropbox, Google Drive, or another storage service, make sure to visit their support website to find more specific instructions.

Wrapping things up

Although the upgrade process is capable of keeping your files, it's important to acknowledge that there's always a chance that something wrong may happen. This is why it's really important to regularly create a backup of your data (at least before proceeding with an upgrade) in cases such as this one.

In addition, a backup is not only good to get your files back after an upgrade, but it can also help you recover from a hard drive failure, or after a malware infection.

More Windows 10 resources

For more helpful articles, coverage, and answers to common questions about Windows 10, visit the following resources:

How to make a custom Xbox One controller

$
0
0

Xbox One controller

Make your controller stand out from the crowd by making it your own!

Customizing controllers is a way to not only express your own creativity and make something unique, it's also pretty easy to do and there's no real need to pay someone to do it for you. The Xbox Design Lab has some amazing options to design your own controller, but like other options, it involves also buying a new controller.

For not a lot of money, there's a whole bunch of things you can do to create your own custom Xbox One controller. Be that adding some visual flair or some additional hardware to improve your gaming experience and even perhaps, give you an edge in some of your favorite titles.

What you need

Before changing parts on your controller, there are some basic tools you'll need to acquire.

These two items are universal to any work you'll ever do on your Xbox One controller, so they're worth keeping in your arsenal. You can also get a toolkit with both for about $10.

How to change the appearance of your controller

There are a number of easy modifications you can make to your stock controller to change how it looks. You can change basically everything, but the easiest jobs are swapping out thumbsticks and the shell for something with a little more razzle-dazzle.

Custom shells

Xbox One controller

The most visually appealing changes are applied by changing the shell on the controller. Thankfully it's a very easy process that involves little more than prising off some plastic and undoing a few screws.

A new faceplate or full shell is only around $15 and there are a lot of different designs to choose from, even including soft-touch finishes.

How to add a custom shell to your Xbox One controller

Replacement thumbsticks

Xbox One controller

You might just need to replace some broken ones, or you might want to change the color or design, or maybe even swap out the plastic ones for some aluminum. Whatever the reason, a new set of thumbsticks can be had for around $10.

Much of the process is the same as changing the shell.

How to replace Xbox One controller thumbsticks

Colored home button

You don't need to get the tools out to change the color of the glowing Xbox logo on your controller. A very quick and very cheap alteration is to just add a transparent colored sticker to it. No, really!

For about $9 you can get a set of 16 different colors to choose from that will project a different finish when the controller is powered on.

Simple and effective.

More advanced - ABXY buttons

The standard colored ABXY buttons can be swapped out for a different look, or even a different style entirely and only cost about $10 for a new set. If you're feeling wild, there are buttons out there that look and feel like brass bullet casings, for example.

The only mild drawback is that changing these is a little more advanced and requires use of a soldering iron. For a full guide on how to do it, check out a comprehensive guide to not messing it up over at iFixit.

Adding performance parts

Besides changing how your controller looks, there are also some modifications you can make that will improve your gaming experience and performance while using it.

Things like trigger stops and paddles are included with the much more expensive Elite Wireless but you can add them to any regular Xbox One controller, too.

Grips

Xbox One controller

Having a good grip on your controller is important, and there's no shame in admitting your hands get a little clammy sometimes in the heat of competition. Plastic doesn't afford you the best grip in such times, so something you should consider is adding some quality grip panels to the back of your controller.

For around $12 you can get some new ones that simply snap onto the controller in place of the standard smooth plastic ones. There are different styles and colors out there, but ultimately all offer the same end performance: A better hold on your controller.

How to add new grips to your Xbox One controller

Trigger stops

Xbox One controller

Trigger stops are great for fans of FPS games because they shorten the travel of each trigger, giving you a quicker response time from the press to the shot in the game.

Products like the Bionik Quickshot are available to not only add trigger stops to a standard controller, but to also add some serious grip, too, killing two birds with the same stone. You'll only need to spend about $20, too, and you'll almost certainly feel an immediate impact on your favorite shooter.

How to add trigger stops to an Xbox One controller for only $20

Paddles

Paddles

A paddle kit from Collective Minds can do much more than the paddles you'll find on pre-configured pro-class controllers, and such mods aren't allowed in some competitive games. However, the fact remains you can add paddles and therefore extra control to your standard controller.

The kit is wired and replaces the standard battery door on the controller. You then connect to the micro USB port on the controller so the paddles will never suffer from lag or broken connections. They're around the $30 mark, too, so not overly expensive, and might be just the thing you've been looking for.


So, that's a quick guide on building your own custom controller from the one that came in the box with your Xbox One. The beauty of doing it yourself is that you can do as much or as little as you want, and you can spread out the cost over time if you wish.

If you have any great custom controller modifications to share, let us know in the comments below!

How to enable the new Gmail web interface

$
0
0

A fresh look for your inbox is just a few clicks away.

The new Gmail web interface that was announced just a couple weeks ago has launched, bringing both a refreshed design and also a handful of new features. The overall look is a bit cleaner, like what we saw in the Google Calendar refresh earlier this year, with lots of Material Design influences. There are new features like a "confidential mode," email snoozing, better integration with other Google apps, Smart Replies like in Inbox, an improved offline mode and more.

That's all great, but it's actually not enabled by default yet. Here's how you can skip the line and check out the new Gmail interface right away:

  1. Load Gmail on the web and sign in.
  2. In the top-right corner of the inbox, find the cog/gear icon and click it.
  3. If it's made available for your account, you'll see an option for "Try the new Gmail" at the very top — click it.
  4. After a page reload, you'll have to click Next on the pop-up and then choose a view for your inbox.
    • Most people will like "Default" because it shows the most information per message, but "Comfortable" is a good choice as well.
    • You can always change this view later at any time from the cog/gear icon.
  5. Click OK and you're using the new interface!
    • If you want to go back to the "old" interface, repeat the steps from the cog/gear icon to return to it.

enabling new Gmailenabling new Gmail

The option isn't available for everyone right away, and Google says it will be rolling it out to all users over the course of several weeks before finally enabling it by default. Most of the team here at Android Central has the option to enable the interface now, so there's a good chance you will too. One of the caveats here is that the "confidential mode" isn't available for a few more weeks — so don't be surprised when it isn't available after you make the switch. Google will likely be refining and improving small parts of the interface as it rolls out to everyone as well.

After enabling the new interface and giving it a try, what are your thoughts on the changes? Let us know in the comments!

Three tips and tricks for settling into the new Gmail

$
0
0

Gmail's recent redesign introduces a few new features you'll want to familiarize yourself with.

Google's Inbox might be in a state of limbo right now, but Gmail is alive and well, with a fresh new coat of paint and a handful of new features focused on productivity and security. While this may not be a big deal to those who use dedicated apps to manage their emails, there are still a ton of people who are happy to check their email straight from their web browser, and these changes could be a big deal to those people.

Some of Gmail's new features won't be rolling out for another few weeks (namely confidential mode), but if you're itching to test out the redesign, there's still plenty to enjoy right now. Here are some of the first things you might want to do.

Upgrade to the new Gmail

You can't enjoy Gmail's new features until you're using the new version! Luckily, making the switch only takes a few clicks, but again, the option to upgrade is still rolling out, so you may not be able to follow these steps just yet.

  1. From the main Gmail screen, click the gear icon in the upper right corner.
  2. In the dropdown menu, click Try the new Gmail.
  3. You'll be taken to the redesigned homepage. Click Next on the welcome splash screen.
  4. From here, you can choose your display density. If you manage a lot of emails, you may want to try the compact view. If, like me, you make liberal use of the archive and trash tools and try to keep a clean inbox, you'll get the most information at a glance from the default view.

Once that's all said and done, you should be looking at the fancy new Gmail interface! Don't worry if you change your mind on the display density or the redesign itself — both options sit in the same gear icon as before.

Customize your sidebar

One of the first things you might notice with the new Gmail interface is the addition of a column of apps on the righthand side. This is different from the grid icon at the top of screen, which houses shortcuts to Google's other services — instead, this sidebar is home to mini apps that extend out from the side for quick access.

By default, the sidebar holds miniaturized versions of Google Calendar, Keep, and the new Tasks, but you can add more apps by clicking the plus button beneath the other icons.

The best part about these apps is that you can still click and scroll through the rest of the Gmail interface without the column collapsing. This can be useful for anything from taking notes from certain emails and Hangouts conversations to checking your calendar for prior appointments before making plans.

Snooze now to remember later!

If you're like me, you forget to reply to important emails from time to time. Don't worry, I won't tell, but Gmail's new snooze feature can help minimize unhappy clients and missed appointments. Just hover your mouse over any email you might need to remember, then click the rightmost icon.

You'll see a popup window prompting you to choose how long to snooze the email. You can choose from presets like tomorrow or this weekend, or set the exact time and date yourself. Once that time comes, the email will move from your snoozed folder back to the top of your inbox as if it had just been sent out. If you can get yourself into the habit of snoozing important emails, you might never forget to pay a bill or respond to your boss again.

Hold out for new features

Most of Gmail's new privacy-focused features, including expiring emails and two-factor authentication on a per-email basis within confidential mode, still haven't rolled out just yet. You'll have to wait a few more weeks for those features, but it never hurts to get familiar with the new interface in the mean time.

Are you using Gmail's redesigned interface yet, or are you holding onto the classic view until Google has finished rolling out every new feature? Let us know in the comments below!


How to avoid motion sickness caused by VR headsets while gaming

$
0
0

How do I not get motion sickness when playing VR games?

With a price as steep as $399 for an Oculus Rift, or $499 for an HTC Vive, I could understand why you want to make sure you'll be able to enjoy your new toys. But, don't let nausea you felt while play-testing a VR headset change your mind about owning one for yourself.

Realizing you can't play for more than 30 seconds might make you tear your hair out when the dizziness abates. Also: throwing up all over the crowd of people watching you play VR is an ultimate buzz-kill. Fret not, we've got some helpful solutions to help you out with your VR motion sickness!

See Oculus Rift on AmazonSee HTC Vive on Amazon

Tips to avoid motion sickness

Check out the official tips here!

Why do I get motion sickness?

Motion sickness as a result of inserting your head into a VR rig is also known as cybersickness or simulator sickness. Sounds cool, right? It's not. What's your current favorite activity? Imagine starting that activity, but wanting to puke about three minutes after starting.

Cybersickness is different from motion sickness as it doesn't actually require your body to be in motion for you to get sick. Cybersickness is common among VR users, and it's incredibly frustrating.

Why does cybersickness occur? Although VR is relatively new and explanations aren't exactly concrete, a common belief is that discord between ocular input and vestibular stimulation is the cause — what your eyes see don't match up with what the balance-nerves in your ears are feeling. Your brain tries to figure out what's going on, and in the process you get sick. Nausea, headache, sweating, and dizziness are all common symptoms.

Other causes of cybersickness are believed to be poor refresh rates of VR lenses, low-resolution images, and balance disorders.

What's been done to combat motion sickness?

Those of you lucky enough to have used the Oculus Rift DK1 remember how nausea-inducing the LCD displays were. Oculus was smart enough to distribute the DK2 with OLED displays, effectively cutting down on a lot of motion sickness. The HTC Vive also employs OLED displays, and both the Vive and Rift CV1 have a 2160 x 1200 resolution. That's a big step up from some of the original VR rigs.

Speaking of a big step up from the original VR headsets, motion tracking has come a long way. In the Oculus Rift DK1, users would often experience a disconnect between their head's movement and what their eyes saw in the game. Whether caused by poor optimization by the game's developers or by poor tracking hardware, the result was the same: cybersickness.

To have an idea of how far motion tracking has come, imagine having the HTC Vive headset on while a friend holds the controllers; that friend can toss you the controllers (with you only seeing them in VR) and you'll be able to easily catch them. That's pretty impressive. Controllers aren't causing motion sickness, though. The Oculus Rift and the Vive both boast sub-millimeter head tracking, and PSVR, if not sub-millimeter, comes close enough to not notice a difference.

Framerate can also be a catalyst for motion sickness, but only if it's too low. The Vive and Rift have both set 90FPS as a benchmark for their headsets — this is so frames-per-second (FPS) can match the refresh rate of 90Hz. If FPS dips too low, say down to the 30-60FPS range, there's going to be a lot of jumping and stuttering that can make you sick.

Your PCs performance dictates framerates, which is why keeping hardware up to date is important. It's also the reason why VR PCs are so expensive; game developers want to constantly push the boundaries, and if you want to play the latest games without getting sick you're probably going to need the latest hardware (CPUs, GPUs, RAM).

Games are now being designed based on more motion sickness information than ever before — developers understand that acceleration, FOV, refresh rates and FPS, and even user's height can contribute to a sickening VR experience. This is especially important in the PSVR; you won't be able to upgrade hardware in your PS4 to achieve higher framerates. Performance is based on game developers and software tweaks directly from Sony, so it will be very interesting to see what they come up with.

What can you do to combat motion sickness?

Here is a list of tips you can employ immediately in order to hopefully solve your cybersickness — some might seem quite basic, while others might seem advanced. No one, and I mean no one, wants to be left out when it comes to playing games in VR.

Take regular breaks

Do you feel a little sick after that last battle? Did the flashing lights, quick turns, and slashing swords give your stomach a bit of a churn? Pause your game, remove the headset, have a sip of water. Heck, have a look out the window to see what time of day it is.

Ignore cutscenes

Closing your eyes when your head's movement isn't tracked (e.g. during a cutscene) can greatly reduce symptoms of cybersickness. This is directly related to the aforementioned sensory disconnect between eyes and ears. Cutscenes aren't that important anyway, are they?

Change your FOV

Low field of view (FOV) is less likely to cause sickness, but it also subtracts from your VR experience. Those knobs on the left and right sides of your Vive headset where the strap connects? Pull them away from the headset and rotate them to change your FOV while you game. Click them in (toward the headset) to lock the FOV in place when you've found a suitable distance.

The Rift DK1 and DK2 both had lenses that adjusted for FOV, but the Rift CV1 does not. There is only an adjustment knob for interpupillary distance.

Focus while you spin

Stand up, put your arms out, spin around five times. You're dizzy, right? Now do the same, but this time focus your eyes on one point in the room for as long as you can while you spin. Less dizzy, right?

The same is true while VR gaming. If you keep your eyes focused on one point while you turn your head or spin your body, you should cut down on cybersickness symptoms.

Use a fan

VR motion sickness is a lot like getting car sick. A lot of times in VR your character is moving around while you yourself are standing perfectly still. A way to trick your mind into thinking that you are moving right along with the picture is to put a fan in your room.

You wanna make sure you keep the fan a safe distance from you, so setting it up right next to your motion sensors (but not blocking them) would be the perfect spot. You can find fans on Amazon for as low as $26.29, and that's pretty cool.

See on Amazon

Sit down while you play

A lot of games are still capable of being played, even if your character is standing up in the game. For instance, games like Fallout 4 VR seem like you should be standing up while playing. But actually, for most gameplay, you can take a seat while playing.

Even taking a minor break by pausing, or removing yourself from a combat zone for un-pausable games, to give your body a minute to relax is a super good idea. Whether or not you feel the need to take off your headset is up to you, but make sure you don't try to power through feeling sick!

Breathing control

When I first started playing VR I was very suspectable to motion sickness, which is something I had never experienced before. If you catch it early on, before your symptoms get worse, a few simple breathing exercises while playing might be what saves you from up-chucking.

Basically, breath in deeply for 2-3 seconds, and then exhale until your lungs are empty. Do this for a short time and, in most cases, your body will relax enough to make the sickly sensation go away.

Build a tolerance

Subjecting yourself to extended VR gaming sessions sounds like a joke penance, but it can be painful if you suffer from cybersickness.

Many users have reported cybersickness lessening the more they experienced it. Who knows what deal your brain works out with your body, but we'll take it. Don't forget to take regular breaks when you're feeling sick (don't overdo it), and keep a positive attitude.

Developers are constantly aware of reducing cybersickness — more users = more sales — so even if one game makes you sick, another might not. Don't give up! Keep trying! VR is awesome!

Optimize your PC

Low frame-rates and stuttering is a definite contributor to cybersickness. If you have a Nvidia GPU, use the GeForce Experience app to optimize your PC for each individual game. AMD GPU users can use the AMD Gaming Evolved app to do the same thing.

Don't forget to keep your drivers updated, and, if absolutely necessary, upgrade your hardware. More RAM, a new CPU or a new GPU can go a long way in reducing cybersickness. Plus, what better reason is there to buy PC parts than to not be sick anymore? Who can refute that?

Check the intensity before you buy

Thankfully with the Oculus you can see the intensity levels of the game before you buy them. Right under the title in the Oculus Store will show you the comfort levels. If you're new to VR, chances are you want to try out a few low-level comfort games before jumping into the high intensity.

Unfortunately, with Steam VR games, they don't have these descriptions right in the title information. Fret not! Filter through the review section for what other people have to say about it first! Key things you want to look for are people saying it's one of their first VR games or how long they were able to play to give you a general idea of how intense it's going to be.

Some people might flat-out write it in their comments, and that's even better! On that note, when you're done playing your new VR games be sure to leave a review. This way other users can see some constructive feedback before they buy it as well.

Check the settings in your game

Most VR games have an option within the settings to adjust how your headset will show you the game. In most cases, they'll give you options to how the screen shows while you're in motion. Most games have a "back-out" area of the screen during movement. If you're more susceptible to motion sickness I recommend checking the "black-out" parts of the screen that hone in during movement.

Again, not all games will have these options. But, be sure to work with the in-game settings just to be sure!

Overlay your game

This is definitely the most advanced way on this list to avoid motion sickness. Based on a National Center for Biotechnology Information article, a Reddit user found that adding an overlay to the Rift display cured motion sickness.

Following Reddit user thelonglurkends's direction, several users also came to the same conclusion — their cybersickness was cured. There's only one way to find out if this method works for you: test it out!

Do you suffer from VR motion sickness?

What is your experience with motion sickness in VR? What lengths have you taken to avoid it? Are you a lucky gamer who doesn't get motion sickness? Let us know all about it in the comments section below.

How to trim Xbox One game clips using the guide

$
0
0

Recently, Microsoft introduced new sharing features for Xbox One, allowing you to share clips directly to Twitter. However, trimming was an issue ... until now.

The new Xbox guide feature allows you to trim and share clips without having to use external software or Microsoft's woefully outdated Upload Studio on the Xbox One. Using these new systems, you can easily prepare clips for sharing either on Xbox Live or other social networks, focusing on the action rather than the process.

Related: How to create, delete, and share Xbox game clips

How to trim game clips via the Xbox guide

Note: As of writing, the trimming feature is only available in the Xbox Alpha ring as part of the Xbox Insider Program. It should roll out more broadly sometime in May 2018.

  1. First, take a clip! Refer to this guide for more information.
  2. Open the Xbox guide by pressing the Xbox button on your controller.
  3. Navigate right using the joystick to the Broadcast & Capture menu.
  4. Select Recent Captures using the 'A' button.

  5. Select the clip you want to edit and share.
  6. Select trim using 'A' on your controller.

  7. Use the left and right joystick to select the region of the game clip you want to keep.
  8. You can preview your selection by hitting the 'A' button.

  9. When you're done, hit the 'Y' button to save your clip.

That's it. It will take a little time to trim the clip, and once it's done, you'll be able to share it across Xbox Live, Twitter, or upload it to OneDrive for storage and further editing.

Related: How to create, delete, and share Xbox game clips

That's a wrap!

While it's a shame we still haven't got a good update for the Upload Studio, it's cool to see Microsoft bring some of the more convenient features directly into the Guide to make sharing easier. Let us know in the comments if you plan to use it!

More: Xbox Help

Why you should opt-out of the Windows Insider Program after the April 2018 Update releases

$
0
0

You should remove your PC from the Windows Insider Program after the April 2018 Update releases — here's why, and the steps to do it.

As Microsoft finalizes the Windows 10 April 2018 Update (version 1803) for its official launch in spring 2018, now is a good time to consider opting out of the Windows Insider Program.

The program has been designed to allow developers and enthusiasts to test upcoming features and improvements to Windows 10. Although the most recent preview builds have introduced a lot of changes and have been getting more stable, as version 1803 gets finalized and Microsoft moves to the next big update, new builds usually don't include significant changes, and they can be buggy and unstable.

If you're not ready for that or want to enjoy the new version for a while, you can gracefully opt-out from the Insider Program without having to reinstall the OS or losing your settings, apps, and files. This is possible because at the end of a feature update development, both preview releases and public releases of Windows 10 are the same versions.

In this Windows 10 guide, we walk you through the steps to leave the Windows Insider Program without having to reinstall anything. Even if you forgot and end up installing a new build from a different version after the official release.

How to safely opt-out of the Windows Insider Program

Assuming that you're not using the Skip Ahead option, if you no longer want to participate in the program, do the following:

  1. Open Settings.
  2. Click on Update & Security.
  3. Click on Windows Insider Program.
  4. Click the Stop Insider Preview builds option.

  5. Select the Keep giving me builds until the next Windows release option.

  6. Click the Confirm button.
  7. Click the Restart Now button.

After completing these steps, previews will continue to download and install on your computer, but only until the new version of Windows 10 is finalized. Once the new feature update becomes available, your device will opt-out, and it'll continue to receive patches and security updates every month.

You can use these steps to opt-out at any time, as long as you do this before Microsoft releases a new preview build for the next version of Windows 10 (Redstone 5). If you keep your computer enrolled, and new builds become available, your computer will install them automatically, and you won't be able to use these instructions to stay in the stable version.

How to opt-out after installing a build from a different version

If you stayed enrolled in the program and a new build, part of the next development of Windows 10, installs on your computer, you can still opt-out without losing settings, apps, and files by going back to the previous version and then opting out of the program.

To roll back to the previous version of Windows 10 and remove your device from the Windows Insider Program, do the following:

  1. Open Settings.
  2. Click on Update & security.
  3. Click on Recovery.
  4. Under "Go back to the previous version of Windows 10," click the Get started button.

  5. Select a reason you're removing the current build and click the Next button.

  6. Click the No, thanks button.

  7. Click the Next button.

  8. Click the Next button again.

  9. Click the Go back to earlier build button.

  10. After rolling back, open Settings again.
  11. Click on Update & Security.
  12. Click the Stop Insider Preview Builds button.

  13. Select the Keep giving me builds until the next Windows release option.

  14. Click the Confirm button.
  15. Click the Restart Now button.

Once you complete these steps, your device will stop getting previews after the Windows 10 April 2018 Update becomes available, and it'll continue to receive quality updates every month to fix bugs, improve performance, and patch any security vulnerabilities.

The only caveat is that you can only use the following instructions during the first 10 days since the first build for the next version was applied to your PC. This is because after the first 10 days, Windows 10 automatically removes the Windows.old folder that contains your previous installation files, and when this happens, the option to roll back disappears.

In the rare case that you don't see the option to go back to the previous version, the only way to opt-out of the program is to do a clean installation of Windows 10 with the latest update.

After a few builds, when Microsoft starts incorporating new features and previews are more stable, you can always enroll your device into the Windows Insider Program again.

Are you planning to opt-out and enjoy the new feature update for a while or are you staying enrolled? Let us know in the comments.

More Windows 10 resources

For more helpful articles, coverage, and answers to common questions about Windows 10, visit the following resources:

Is your PC getting the Windows 10 April 2018 Update on April 30?

$
0
0

Microsoft's next major update of Windows 10 (version 1803) is expected to arrive on April 30, but it doesn't mean your PC will get it immediately. Here's how the rollout will happen and who is getting it first.

Windows 10 also continues the gradual implementation of Fluent Design, a new version of Microsoft Edge gets introduced, and much more.

It's yet another great release with tons of enhancements over the previous version, but Microsoft making it officially available on April 30 to millions of desktops, laptops, and tablets across the world, it doesn't mean that your device will get it on day one. Here's how a typical rollout of a new version of Windows 10 works.

What devices are initially getting the April Update?

Similar to previous rollouts, Microsoft will be releasing the Windows 10 April Update slowly and on stages. Starting on April 30, the company will be making the new feature update available for download manually, then on May 8, it'll be more broadly available through Windows Update for newer desktops, laptops, and tablets that have been tested to be compatible with the new feature update. These devices may include Surface and branded PCs (such as those from HP, DELL, Lenovo, ASUS, Acer, etc.) that came pre-installed with Windows 10.

During the initial rollout, Microsoft will be collecting telemetry data, feedback from consumers, device manufacturers, and early adopters. Then based on that data the rollout of version 1803 will expand to other devices.

Although your PC may be in the list of compatible devices, there are other factors that may block the upgrade, including incompatible software, device drivers, connected peripherals, or a particular piece of hardware. Your physical location and how you acquired Windows 10 will also be factors that will dictate when you'll be getting the update.

In addition, Microsoft is known to put a block on devices that have been identified to experience problems with new updates, and the restriction will stay in place until the company can ensure that the issue has been resolved.

Can anyone manually upgrade to the new version without waiting?

It's always recommended to wait until the new version is available to you automatically, but if you can't wait, or it's been a few weeks, there are many ways to upgrade manually.

Update Assistant

If your device meets the minimum hardware and software requirements, you can use the Update Assistant tool to skip the queue and install version 1803.

The Microsoft's Update Assistant is just an installer that allows you to force the update on a compatible system when Windows Update isn't working correctly. However, anyone can use the tool, even if the update mechanism on Windows 10 is working correctly.

Media Creation Tool

Alternatively, you can use the Media Creation Tool to upgrade your computer without waiting for Windows Update to offer the new version automatically.

Using the Media Creation Tool, it's possible to install the Windows 10 April Update preserving your files, settings, and applications.

Furthermore, if you're experiencing problems starting up, shutting down, or performance issues, you can use this tool to do a clean installation of Windows 10 with the April Update. The only caveat is that with this approach, after the installation, you'll have to restore your files from backup, reinstall your apps and re-apply your settings. (Check out this guide to learn the steps to create a full backup before proceeding.)

Wrapping things up

Although the Windows 10 April Update development is now complete and ready for deployment, it doesn't mean that it's compatible with every device. Microsoft is aware of this, and it's one of the reasons feature updates usually roll out in phases, and for the first several months they aren't considered ready for widespread use in organizations.

On April 30, hundreds of thousands of devices will start getting version 1803 automatically. If you're want to jump into the new version as soon as it's available, be patient, and if your device isn't getting the update, it's likely that there is a good reason. Also, bear in mind that it will take weeks, and even months, before every device is updated.

More Windows 10 resources

For more helpful articles, coverage, and answers to common questions about Windows 10, visit the following resources:

How to get the Windows 10 April 2018 Update as soon as possible

$
0
0

Windows 10's April 2018 Update is now generally available, and these are steps to get it as soon as possible.

Providing nothing goes wrong, Microsoft is officially beginning the rollout of the Windows 10 April 2018 Update (version 1803) on April 30, 2018. This is the fifth major release for compatible devices with new features and changes to improve security, privacy, performance, and productivity.

In version 1803, you'll find new features like Timeline, Nearby Sharing, and Graphics settings. Windows 10 continues the gradual rollout of Fluent Design in the Start menu, taskbar, Settings, and throughout the experience. Users get more control over their privacy, such as options to view and delete telemetry data and deny file access to apps. The Settings app receives a lot of tweaks, including a new section to manage fonts, Microsoft Edge gets updated, and a lot more.

As usual, Microsoft is expected to push the new version gradually, meaning that the feature update won't be available on every PC on day one. On April 30, the update will be available for those who want to get it manually, and then on May 8, it'll start rolling out through Windows Update. However, bear in mind that some devices may take up to several months before they get it automatically. However, if you don't want to wait, there's more than one way to force the April 2018 Update onto your computer.

In this Windows 10 guide, we'll walk you through three different methods to download and install the April 2018 Update on your desktop computer, laptop, or tablet.

How to get April 2018 Update with Windows Update

Although the recommended method to get the Windows 10 April 2018 Update is to wait until you receive the notification that it's ready for your device, you can force down the version using Windows Update immediately after it becomes generally available.

To download and install version 1803 using Windows Update, do the following:

  1. Open Settings.
  2. Click on Update & security.
  3. Click the Check for updates button.
  4. After the update finishes downloading, click the Restart Now button.

Once you've completed the steps, Windows 10 will proceed to install the update, just like a quality update, but with the difference that this time the update will take longer to apply.

How to get April 2018 Update with Update Assistant

Sometimes even if your device is compatible with the new version, the update won't download using Windows Update for a number of reasons. If you're sure that the hardware configuration on your machine and applications are fully compatible, you can use the Update Assistant tool to upgrade.

To install the newest version of Windows 10 when it becomes available, or if you're experiencing problems with Windows Update, do the following:

  1. Download the Update Assistant from the Microsoft support website clicking the Update now button.
  2. Double-click the Windows10Upgrade.exe file to launch the tool.
  3. Click the Update Now button.
  4. If your device is compatible, click the Next button to begin the upgrade.
  5. Click the Restart Now button.

After completing the steps, the Update Assistant tool will download the necessary files to upgrade your desktop, laptop, or tablet to the latest version keeping your files, apps, and settings.

Once the process completes, you'll need to follow the on-screen directions to finish the out-of-box-experience (OOBE).

The entire process using this tools should take less than an hour, but it also depends on the internet speed and system configuration.

How to get April 2018 Update with Media Creation Tool

Alternatively, it's possible to perform an in-place upgrade or clean installation of Windows 10 with the latest feature update manually using the Media Creation Tool.

Immediately after version 1803 becomes available through this tool, you can download and install the Windows 10 April 2018 Update using these steps:

  1. Download the Media Creation Tool from the Microsoft support website clicking the Download tool now button.
  2. Double-click the MediaCreationTool.exe file to start the process.
  3. Click the Accept button to agree to the terms.
  4. Select the Upgrade this PC now option.

  5. Click the Accept button again to agree to the applicable notice and license terms.

  6. Click the Next button.
  7. Confirm the Keep personal files and apps option is selected. (If it's not, click the Change what to keep link to select the option to prevent losing your files, apps, and settings during the process.)
  8. Click the Install button to begin.

Once you've completed the steps, the Media Creation Tool will take over and complete the installation of the Windows 10 April 2018 Update on your device preserving your settings, apps, and files.

If you come across any issues, you can also use the Media Creation Tool to create a bootable media to go through the upgrade or clean install of Windows 10.

Microsoft is always proactive in making available the new installation files using this tool, but sometimes, it could take a few days until a new version can be downloaded using the Media Creation Tool.

Wrapping things up

Although jumping to a new version of Windows 10 immediately after it's released has its advantages, it's always recommended not to rush and wait until the update becomes available automatically via Windows Update.

The reason is that, during the early days, new releases aren't fully compatible with every piece of hardware, and you may come across unknown issues that affect your experience. This is also one of the reasons, Microsoft rolls out updates gradually.

It's also always recommended to create a full backup of your computer before proceeding with the upgrade, in case something unexpected happens and you need to rollback to the previous version.

More Windows 10 resources

For more helpful articles, coverage, and answers to common questions about Windows 10, visit the following resources:

Viewing all 5861 articles
Browse latest View live


Latest Images