Quantcast
Channel: Help & How To
Viewing all 5861 articles
Browse latest View live

How to configure Cloudflare's 1.1.1.1 DNS service on Windows 10 or your router

$
0
0

Cloudflare has a new Domain Name System (DNS) service designed for security and performance, and here are the steps to start using it.

Every bit of your web traffic runs through a DNS — a Domain Name Service — usually managed by your ISP. A number of companies offer alternatives, allowing you to route your traffic through faster or more secure means, and web infrastructure giant Cloudflare has rolled out their own DNS for consumers: 1.1.1.1. Cloudflare promises its new DNS is not only faster than the competition, but it's also more secure and private too.

What is Cloudflare?

Cloudflare is a web infrastructure company, offering content delivery network (CDN), Distributed Denial of Service (DDoS) mitigation, Authoritative DNS services, and now a consumer DNS resolver service. Its network serves more than 6 million websites, including heavyweights like Uber, OkCupid, and Mobile Nations. Between all of its services, Cloudflare has a huge infrastructure spread out around the globe — the closer its CDN servers are to your computer, the faster it can serve content to you. The sheer size of the Cloudflare CDN also means it had potential to serve as a consumer-level DNS system.

What is DNS and what makes Cloudflare's service unique?

DNS is essentially the web's phonebook. Every website is located at an IP address — a string of digits that denote the exact web location of the server. Because remembering a bunch of IP addresses like 104.16.213.223 would be a pain, instead we have domain names like WindowsCentral.com, which is stored in a DNS database alongside the IP address. You type WindowsCentral.com into your browser, your computer sends that through the network to a DNS, which then returns the page located at 104.16.213.223.

Your ISP has its own DNS resolver, making it easy to just hook up service and get online. But they're not always the fastest or most secure services, so third-party options have been growing in popularity. Over the years, we've seen a lot of companies offering fast DNS services, including Cisco OpenDNS and Google Public DNS. While these services are known to be fast and reliable, Cloudflare's 1.1.1.1 is expected to be even faster and more secure.

Image credit: Cloudflare

According to Cloudflare, 1.1.1.1's average latency is around 14ms, making it the fastest DNS resolver everywhere (Google Public DNS latency average is 34ms). Alongside speed, Cloudflare is also touting greater privacy promising that users records will never be stored on disks, and it'll flush out logs every 24 hours.

In this Windows 10 guide, we'll walk you through the steps to configure your router or computer to use the new super-fast and secure 1.1.1.1 DNS resolver from Cloudflare.

Cloudflare free DNS resolver IP addresses

These are the IP addresses to set up Cloudflare's consumer DNS service on a computer or router.

IP version 4

  • 1.1.1.1
  • 1.0.0.1

IP version 6

  • 2606:4700:4700::1111
  • 2606:4700:4700::1001

How to configure Cloudflare DNS service on router

The best way to change your current DNS settings to start using Cloudflare's 1.1.1.1 is to reconfigure your router. Using this approach automatically configures every device in the house (such as desktop, laptop, tablet, phone, game console, and smart TV), instead of setting up each device individually.

To configure your router to use the Cloudflare DNS addresses, do the following:

Important: The instructions to configure may be different on your router before proceeding make sure to check your manufacturer support website for more specific details.

  1. Open your web browser.
  2. Enter the IP address of your router and press Enter.

    Quick Tip: You can find out this information using the Windows key + R keyboard shortcut, typing cmd, clicking OK, and on Command Prompt run the ipconfig command. The router IP address will be the one that is listed in the Default Gateway field.

  3. Log in using your router username and password as required. (Typically, you'll find this information on a sticker on your router.)
  4. Open the DNS server settings page. Refer to your router manufacturer support website to locate these settings. However, most of the time, these settings can be found in the advanced settings section. Here's the location to get to the DNS settings in some of the most popular home router brands:

    • Linksys: Setup> Basic Setup.
    • ASUS: WAN> Internet Connection.
    • Google Wifi: Settings> Networking & General> Advanced Network> DNS.
    • Netgear: Internet.
    • D-Link: Manual Internet Connection Setup.
  5. In the DNS settings section use these IPv4 addresses:

    • 1.1.1.1
    • 1.0.0.1

  6. Save your settings.
  7. Restart your browser.

Once you've completed the steps, restart your computer to start using the new settings.

Alternatively, you can open Command Prompt and run these two commands:

  • ipconfig /flushdns
  • ipconfig /renew

These commands will purge the DNS Resolver cache on your device and request a renewal of the IPv4 settings.

It's worth noting that you don't need to apply the IP version 6 addresses on your router if your network is already using IP version 4. However, if you're required to use the IPv6 addresses, you must enter them in the IPv6 DNS setting page on your router.

  • 2606:4700:4700::1111
  • 2606:4700:4700::1001

How to configure Cloudflare DNS service on Windows 10

Alternatively, if configuring your home router is a little challenging, or you want to use the Cloudflare DNS settings on every network you connect, including public networks (for example, coffee shop and airport), with your laptop or tablet, you can configure the DNS settings on Windows 10, instead of configuring your router.

To configure the Cloudflare DNS settings on Windows 10, do the following:

Important: It's not recommended to use these instructions if you're using a computer at work, because changing these settings could cause connectivity problems and other issues. If you want to change these settings on your work computer, always consult with your IT administrator first.

  1. Open Start.
  2. Search for Control Panel, and click the top result to open the experience.
  3. Click on Network and Internet.
  4. Click on Network and Sharing Center.
  5. Click on Change Adapter Settings.

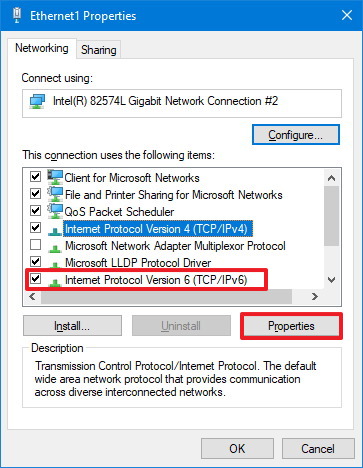
  6. Right-click the Wi-Fi or Ethernet adapter that you're using to connect to the internet, and select the Properties option.

  7. Select the Internet Protocol Version 4 (TCP/IPv4) option.
  8. Click the Properties button.

  9. Select the Use the following DNS server addresses option.
  10. In the "Preferred DNS server" field, enter this IPv4 address:

    • 1.1.1.1
  11. In the "Alternative DNS server" field, enter this IPv4 address:

    • 1.0.0.1
  12. Click OK.

  13. (Optional) If the Internet Protocol Version 6 (TCP/IPv6) stack is enabled in the network adapter properties, select the option.
  14. Click the Properties button.

  15. Select the Use the following DNS server addresses option.
  16. In the "Preferred DNS server" field, enter this IPv6 address:

    • 2606:4700:4700::1111
  17. In the "Alternative DNS server" field, enter this IPv6 address:

    • 2606:4700:4700::1001
  18. Click OK.

  19. Click Close.

After completing the steps, your device will contact the Cloudflare servers to resolve domain names (for example, Google.com or WindowsCentral.com).

The steps mentioned above are focused on Windows 10, but the instructions will also work on Windows 8.1 and Windows 7.

How to check if you're using the Cloudflare DNS settings

If you want to make sure that you're in fact using the Cloudflare DNS settings, you can use the nslookup tool to find out this information quickly:

  1. Open Start.
  2. Search for cmd, click the top result to open Command Prompt.
  3. Type the following command and press Enter:

    • nslookup

The output of the command should include this result:

  • Default Server: 1dot1dot1dot1.cloudflare-dns.com
  • Address: 1.1.1.1

If you're using the IPv6 addresses, then the output should look like this:

  • Default Server: 1dot1dot1dot1.cloudflare-dns.com
  • Address: 2606:4700:4700::1111

If you're configuring your router instead of your computer, the nslookup tool will show the IP address of your router. This is an expected result as it's your router the one that is making the DNS requests on behalf of all the devices connected in the network.

If this is the case, you can verify that the Cloudflare DNS settings are configured correctly using your router's network tools (if applicable), and using the nslookup method to test the settings.

Are you switching to the Cloudflare DNS service? Tell us in the comments.

More Windows 10 resources

For more helpful articles, coverage, and answers to common questions about Windows 10, visit the following resources:


How to get the Windows 10 Spring Creators Update final release before anyone else

$
0
0

If you want to be among the first users to install the final release of Windows 10 (version 1803), follow the steps outlined in this guide.

Microsoft is planning to begin the rollout of the Windows 10 "Spring Creators Update" in April, but if you're eager to upgrade, you can download the final version before it's available to everyone, using the Windows Insider Program.

The Insider program includes three levels of readiness known as "rings," including Fast, Slow, and Release Preview, to allow developers and enthusiasts to get early access to upcoming features and improvements, to provide feedback to help shape the future of Windows 10.

While the previews available through the Fast and Slow ring usually contain bugs and things not working correctly, the Release Preview offers stable versions of new feature updates.

The Release Preview ring was designed to only test fixes, drivers, and apps, but because every major update has to pass through every ring, as soon as the Spring Creators Update is considered complete, it'll also be available in this ring.

In this Windows 10 guide, we walk you through the steps to get the final version of the Spring Creators Update before the official launch.

How to get the Spring Creators Update using the Windows Insider Program

Technically, you're still getting a pre-release, but it's actually the final version of Windows 10 minus some quality updates, which Microsoft may have to push to patch minor issues during the preview release period, before unleashing the update to the masses.

If you want to be among the first people to get the Windows 10 version 1803, do the following:

Warning: This is a friendly reminder that during an upgrade things can always go wrong, no matter when you choose to install a new version of Windows 10. It's recommended to make a full backup of your PC before making significant changes to your installation.

  1. Open Settings.
  2. Click on Update & security.
  3. Click on Windows Insider program.
  4. Click the Get started button.

  5. Click the Link an account option.

  6. Select your Microsoft account, and click the Continue button.
  7. On the "What kind of content would you like to receive?" page, use the drop-down menu, and select the Just fixes, apps, and drivers option. (This is the Release Preview ring option.)

  8. Click the Confirm button.
  9. Click the Confirm button again to agree to the terms.

  10. Click the Restart Now button.

Using these settings, as soon as the Windows 10's Spring Creators Update is available on this channel, it'll download and install automatically on your device before anyone else gets it.

Alternatively, once you complete these steps, you can always go to Settings> Update & Security> Windows Update, and click the Check for Updates button to force the download.

Opting out of the Windows Insider Program

After the feature update is installed on your device, you can continue in this pre-release channel, or you can opt-out without having to reinstall Windows 10 on your computer and keeping the Spring Creators Update.

To remove your device from the Windows Insider Program, do the following:

  1. Open Settings.
  2. Click on Update & Security.
  3. Click on Windows Insider Program.
  4. Click the Stop Insider Preview builds button.

  5. Select the Keep giving me builds until the next Windows release option.

  6. Click the Confirm button.
  7. Click the Restart Now button.

After rebooting your device, you can continue using the new version of Windows 10 while still receiving follow-up quality updates.

Wrapping things up

Using the Release Preview ring you can get early access to the final version of the Spring Creators Update, but it's always a good idea to wait until it's generally available and downloads automatically through Windows Update.

That's because during the preview release period and the early days of the official release, the new version of Windows 10 isn't fully compatible with every device, and the chances of running into issues are much higher.

It's worth noting that once the new version of Windows 10 becomes available through the Release Preview, the code will be the same available in the Fast and Slow rings. At this point, if you're an Insider, you don't need to switch rings or reinstall Windows 10, you can simply use the steps mentioned above to opt-out of the program to stay in the stable version.

Important: Microsoft is slowly rolling out the update in the Release Preview ring starting April 4, but it's expected to be fully available in this ring on April 9, 2018.

When are you installing Windows 10 version 1803 on your PC? Let us know in the comments.

More Windows 10 resources

For more helpful articles, coverage, and answers to common questions about Windows 10, visit the following resources:

How to make quick gold in Sea of Thieves

$
0
0

Get rich quick with these gold-earning tips for Sea of Thieves pirates.

Money makes the world go around – and this is especially true for Microsoft's latest pirate adventure game, Sea of Thieves. Each of the game's activities ends with a gold reward used to unlock cosmetics. But with high prices for the most coveted items, you'll spend hours sailing towards that fresh look.

If you're looking to get quick gold, investing time in some activities is better than others. Spend less time grinding and more time buying with these tips for earning gold fast in Sea of Thieves.

Take on Skeleton Forts

One of the most rewarding aspects of Sea of Thieves is the game's Skeleton Forts, offering large payouts in return for relatively little time. These battles pit crews against countless waves of skeleton crews, with a final boss leading to epic loot.

Skeleton Forts can be seen while exploring the seas and are indicated by a skull-shaped cloud in the skies. Underneath this cloud lays a fort packed with hordes of skeletons to kill. After defeating the final boss, crews will receive a stronghold key, unlocking access to a keep packed with chests, skulls and other high-value treasure. These goods are often valued between 10,000 to 20,000 gold, varying based on the contents.

While Skeleton Forts bring high rewards, they also come with high risks. When engaging in a Skeleton Fort, all nearby pirates can see the cloud and can join the event. While often this means sharing gold with another crew, hostile pirates can leave others empty-handed.

Prioritize the right voyages

A majority of your time in Sea of Thieves is spent completing voyages from three trading companies, with different mission structures and rewards tied to each. While all are valid routes of income, some trading companies are easier to earn with than others.

The Order of Souls offers some of the quickest gold rewards, requiring players to kill high-value targets across nearby islands. Stocking up quests among your crew can be the source of dozens of skulls, many fetching high prices when sold. Gold Hoarders are also recommended, especially during later voyages with high payouts.

Voyages from the Merchant Alliance can provide steady income, but don't have a consistent time to gold ratio seen with other factions. Wondering islands in search of specific animals is rarely worth the coin in return.

Keep an eye out for shipwrecks

While completing formal quests, don't forget to keep an eye out for shipwrecks. Indicated by a swarm of birds flying overhead, these underwater ruins can house a collection of treasure for little effort.

Scavenging downed ships can be a small gamble – some hold low-level chests, while others hold several high-tier items waiting to be sold. Sometimes worth thousands, don't hesitate to veer off course.

Sail with high-level friends

As you improved your trading reputation levels, you'll also gain access to better voyages. Adding multiple objectives and valuable loot, you'll have to chance to earn faster the more you play.

Without multiplayer restrictions on levels and rewards, lower level players can join experienced crews without sacrificing the value of rewards. Allow the player with the highest reputation level to propose voyages while playing with friends, netting more for your group. This will also help others increase their reputation levels too.

Your pirate advice

What guidance do you have for fellow pirates on the seas? Drop into the comments section below with further tips for earning quick gold.

How to use an Xbox One controller as a mouse to control your Windows 10 PC

$
0
0

How to use Xbox One controller as a mouse to control your Windows 10 PC

Setup should only take a minute or two.

Windows 10 has built-in drivers that let you use an Xbox One controller within games, but what about using an Xbox One controller all the time? It's a great alternative to a mouse if you use your PC as an entertainment center in your living room, and while not as accurate, it does a good job.

There are several programs you can use that will give you the ability to use your Xbox One controller all the time, but we chose Gopher360. It's free, it's simple, and it's functional. Here's how to set it up.

How to use your Xbox One controller as a mouse on your Windows 10 PC

Gopher360 is a great app with a small footprint that lets you use your controller as a mouse. Before proceeding with these steps, ensure your Xbox controller is powered on and connected to your PC.

  1. Launch your web browser of choice from the desktop, Start menu, or taskbar.
  2. Navigate to the Gopher360 webpage.

    Launch your web browser. Navigate to the Gopher360 webpage.

  3. Click the Gopher360 link at the top of the page. It will contain the latest version.
  4. Scroll down.

    Click the Gopher360 link at the top of the page. Scroll down.

  5. Click the Gopher.exe download link. Gopher360 will download.
  6. Click Run when the download is finished.

    Click the Gopher.exe download link. Click Run when the download is finished.

Gopher360 will start automatically. You can now use your Xbox One controller as a mouse on your Windows 10 PC. Want to have Gopher360 start automatically each time you boot your PC? Add it to your PC's Startup folder!

How to add Gopher360 to your PC's Startup folder

These steps will make Gopher360 start each time you start your PC. That way you won't have to mess around with a mouse before using your controller.

  1. Launch File Explorer from your taskbar or desktop.
  2. Click Downloads.

    Launch File Explorer. Click Downloads.

  3. Right-click the Gopher file.
  4. Click Copy.

    Right-click the Gopher file. Click Copy.

  5. Hit Windows key and R simultaneously on your keyboard. The Run window will open.
  6. Type shell:startup.
  7. Click OK. The Startup folder will open.

    Type shell:startup. Click OK.

  8. Right-click on a blank area in the Startup folder.
  9. Click Paste.

    Right-click a blank area. Click Paste.

Gopher will now start up each time you turn on your computer. To stop Gopher360 from starting with Windows, just remove the shortcut from the Startup folder.

Gopher360 Xbox One controller button layout

The button layout is super simple and will take about a minute to get used to. Here's what it looks like:

Gopher360 Xbox One controller button layout

  • A is left click.
  • X is right click.
  • B is Enter.
  • Y hides the Gopher360 window.
  • Left analog stick is mouse movement.
  • Right analog stick is scroll wheel.
  • D-pad can also be used to scroll through windows.
  • Start is Windows key.
  • Left analog stick click is middle mouse button.

What about Controller Companion?

Controller Companion

If you don't mind handing over a few dollars, Controller Companion — available on Steam for about $3— is another great way to get your Xbox controller working as a mouse. It's fully customizable, it works seamlessly with Steam's Big Picture mode, and there's an option to have Controller Companion run when your PC starts, even if Steam doesn't launch as well.

See at Steam

More resources

Updated April 4, 2018: This guide has been refreshed with updated steps and screenshots to ensure you're still getting an accurate look at how to use your Xbox controller as a mouse.

How to install Windows 10 IoT Core on Raspberry Pi 3

$
0
0

Raspberry Pi 3

Getting Windows 10 IoT Core to run on the Raspberry Pi is easy. Here's what you need to know.

It's not Windows 10 as we know it from PCs, tablets or phones, but Windows 10 internet of things (IoT) Core is another branch of Microsoft's ubiquitous OS designed to be run on low-power devices.

One such device is the Raspberry Pi 3, the super-cheap little computer that has taken the world by storm. Embraced by coders and makers the world over, it's a perfect piece of equipment to use in a Windows 10 IoT project.

Here's how to install Windows 10 IoT Core on the Raspberry Pi 3.

What is Windows 10 IoT Core?

Microsoft's official description:

Windows 10 IoT Core is a version of Windows 10 that is optimized for smaller devices with or without a display, and that runs on the Raspberry Pi 2 and 3, Arrow DragonBoard 410c & MinnowBoard MAX. Windows 10 IoT Core utilizes the rich, extensible Universal Windows Platform (UWP) API for building great solutions.

Essentially it lets you use Windows technologies to build connected devices based on low-cost computing solutions such as the Raspberry Pi.

Microsoft showcased some examples of projects constructed using Windows 10 IoT Core.

What you need

Raspberry Pi 3

To get up and running you need a few bits and pieces:

At this point, the HDMI cable is only to plug the Raspberry Pi into a display so you can make sure your install worked. Some Raspberry Pi starter kits include everything you need, but the list above covers the power, display, and something to install Windows 10 IoT Core on.

How to install Windows 10 IoT on the Raspberry Pi 3

Raspberry Pi 3

For the first part, you don't need the Raspberry Pi at all, just the microSD card in its adapter and your PC. A prerequisite is that you're running Windows 10 version 10.0.10240 or higher.

  1. Go to the Windows 10 developer center.
  2. Click Get Windows 10 IoT Core Dashboard to download the necessary application.

    Windows 10 IoT on Raspberry Pi

  3. Install the application and open it.
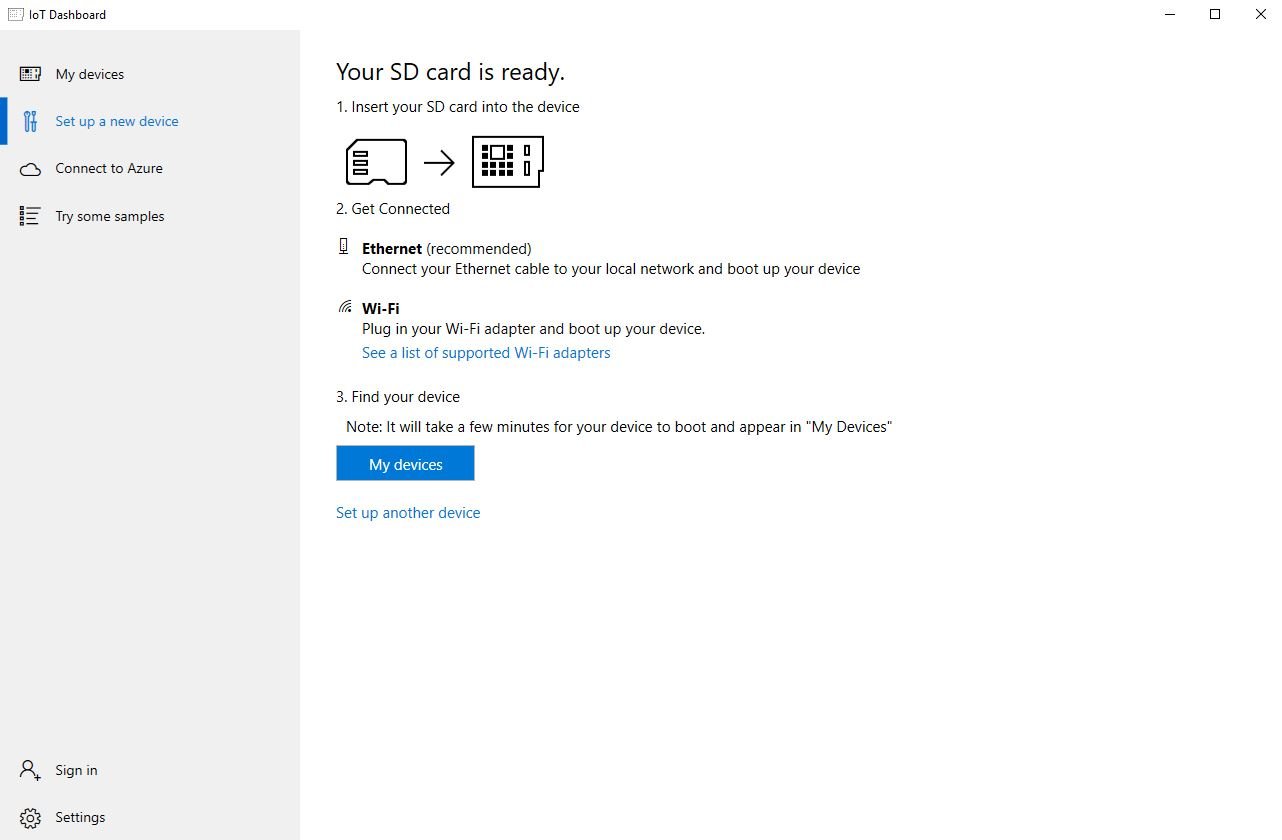
  4. Select set up a new device from the sidebar.
  5. Select the options as shown in the image below. Make sure you select the correct drive for your microSD card and give your device a name and admin password.

    Windows 10 IoT on Raspberry Pi

  6. Select the WiFi network connection you want your Raspberry Pi to connect to, if required. Only networks your PC connects to will be shown.
  7. Click download and install.

The application will now download the necessary files from Microsoft and flash them to your microSD card. It'll take a little while, but the dashboard will show you the progress.

Windows 10 IoT on Raspberry Pi

Once the image has been installed on the microSD card, it's time to eject it from your PC and go over to the Raspberry Pi. First connect up the micro USB cable and power supply, HDMI cable and USB WiFi adapter or Ethernet cable. Connect the HDMI cable to your chosen display, insert the microSD card into the Raspberry Pi and power it up.

Setup

Windows 10 IoT Core

Unlike "proper" Windows 10, there's not much of a setup process here. You'll be asked to choose a language and enter your WiFi password to connect to the web. That's about it. It'll take a couple of minutes, but when booted up you'll see the Windows 10 IoT Core splash screen.

It's deliberately light and you don't have access to much. The Windows 10 part is designed to disappear, as once you deploy an app to your Raspberry Pi, it becomes that app. There's no flipping in and out of Windows and launching apps like you would on a PC.

When booted, you can go back to the dashboard application on your PC, and you'll see your Raspberry Pi listed as one of your devices.

Windows 10 IoT Core

To get a feel for how things operate you can deploy a selection of sample applications to your Raspberry Pi to see how Windows disappears, and all you're left with is the application designed to run on the IoT Core. These include the classic Hello World, an Internet Radio app and something to network connect a 3D printer.

Developing is much more complex, but at least if you're interested in this new branch of Windows 10, it's easy and cheap to get up and running. To go further you'll need to download Visual Studio and start building code. Microsoft has a whole bundle of resources at your disposal, however, to help you get the most from your Windows 10 IoT Core experience.

A note on the Raspberry Pi 3 B+

If you're looking to use the newest revision of the Raspberry Pi 3 board, the B+, there may currently be some issues. There are threads on the Microsoft Developer Network site that can help with some workarounds.

But it seems right now like the best course of action is to continue using the regular Raspberry Pi 3 linked above.

Your projects

Have you built anything neat using Windows 10 IoT Core? Tell us all about it in the comments.

Updated April 5, 2018: Added a note on running Windows 10 IoT Core on the new Raspberry Pi 3 B+.

PC case buyer's guide

$
0
0

NZXT S340

Here's everything you need to know about buying a case for your PC build.

Choosing a case for your PC depends on what you wish to build and how much budget you can allocate to the chassis. It's possible to avoid giving much thought about a case and pick up a simple listing you like the look of, while others will take into account cooling performance, mounting support for water pumps and reservoirs, and more. There's no real wrong choice when it comes to cases, but there's the opportunity to get the most bang for your buck.

The majority of cases you will find at retailers today all offer the same basic functionality and features. Drive bays (or other mounting options in place of), front USB and audio connectivity, optional lighting effects, removable covers, and more. You can never really go wrong when it comes to choosing a PC case unless it's a small form factor and you're attempting to throw in a full ATX motherboard with a beast of a GPU that takes up 3 PCI slots. That's when things can go wrong.

Size matters

Fractal Design R3

Contrary to what you might hear elsewhere, size really does matter. Motherboards come in a variety of formats, and not all are compatible with every case on the market. Full ATX motherboards, which measure in at 305mm x 244mm, are ideal companions for a full tower case. However, depending on dimensions, you may have trouble fitting one inside a mid-tower or mini-PC chassis. This is where microATX or mini-ITX motherboards come in, measuring in at 244mm by 244mm and 170mm by 170mm, respectively.

Best PC motherboards

Depending on which motherboard you own or are looking to purchase, you'll need to adjust your case search filters accordingly. Generally speaking, the size of motherboard and case usually match up. For example, if you're going for a small mini-tower case, it may be worth looking at miniATX boards. For a more powerful gaming rig, opt for an ATX or Extended ATX (EATX) motherboard and a mid- or full-tower case. Be sure to check specifications and dimensions to see if the board (and accompanying components) will fit.

  • SFF/Mini-tower: Generally deployed as network attached storage units or media PCs for the home.
  • Mid-tower: The middle-ground when it comes to expansion, performance, and size.
  • Full-tower: Can accommodate even enthusiast setups. Huge scope for modification.

One must also consider future upgrades and builds. Components may not last a lifetime, but a case can. If you plan to upgrade at a future date with a more powerful component list, you'll need to ensure the case you invest in has room for more cooling and larger internals. Ideally, you don't want to choose a massive case for a small build, nor do you wish to be tight on space when it comes to putting everything together.

Features

Windows Central Office

The more advanced features, materials, and build processes utilized in a case, the more expensive it'll be. While it's possible to locate some killer cases on a tighter budget, if you wish to go tool-free, enjoy a plethora of connectivity, expansion and open up the insides with a premium-looking design, it's worth paying out a bit more. But again, it depends entirely on your needs.

Cheaper cases can range between $10 to $30 while larger, feature-packed beasts can really hog an available budget, costing $100 and above. And that's before you fill it with actual PC stuff. Here are some handy features cases can have to make your PC building experience that much better:

  • Integrated lighting.
  • 3.5-inch bays and mounting points.
  • Front panel audio and USB 3/USB Type-C.
  • Removable motherboard tray.
  • Dust filters.
  • Radiator mount points.
  • Support for water cooling.
  • Cable management.
  • Drive sleds.
  • Optimal airflow.
  • Adequate CPU and GPU clearance.
  • Spacing behind motherboard panel.
  • PSU mounting and orientation.
  • Soundproofing.

Imagination deployed

ZOTAC GTX 1070

Don't be afraid to think outside the box, too. There are some really cool-looking cases out there just waiting to have components installed within. At the end of the day, purchasing a PC case isn't as difficult as it may appear. It's all about getting it right with the components you plan to install. As well as making sure all the internals are compatible, it's important to be sure everything will actually fit inside.

If you wish to do a little DIY, especially in the form of water-cooling, you are likely going to need a full-tower case that can house the pumps, reservoirs, radiators, and piping you'll require. These massive boxes will offer ample amounts of space to hide unnecessary piping and cabling while offering a pleasant viewing experience for any visitor to the home.

For anyone else, a simple mid-tower case will do just fine.

Build your own PC

Updated April 05, 2018: We added some more information to bolster our guide.

How to change Xbox One DNS to boost network speed and privacy

$
0
0

Whether you're looking to improve network connectivity or simply use the web with a bit of extra privacy, you can set up a custom DNS server on your Xbox One directly.

Recently, Cloudflare announced that it is providing a free domain name service (DNS) product that's meant to put speed and privacy first. Google and a few other providers offer DNS services that are typically speedier than your ISP when it comes to resolving where domains are located. However, using Google's DNS, particularly in an age when privacy is being gradually eroded, probably isn't the smartest idea if you don't want your web usage to be tracked. ISPs in some countries are also allowed to harvest your information to sell to third-parties for marketing and ad targeting.

Cloudflare claims its new 1.1.1.1 DNS service is not only the fastest free-to-use system, but the company also says it will never forward your information to third-parties.

How to configure Xbox One DNS settings.

Whether you want to use Cloudflare or another service, here's how to set the default DNS on your Xbox One and (potentially) speed up your multiplayer connectivity.

  1. Open the guide by pressing the Xbox button on your controller.
  2. Move right to the System tab.
  3. Select Settings.

  4. Move down to Network.
  5. Select Network settings.
  6. Select Advanced settings.

  7. Make a note of your existing DNS servers on this screen, in case you need to re-enter them for some reason.
  8. Select DNS settings.
  9. Select Manual.
  10. Enter your new DNS servers. (For Cloudfare, it's 1.1.1.1 as the primary, and 1.0.0.1 as the secondary.)

  11. Once you have finished, press B to exit the menu, and the Xbox will check your connection to make sure everything is working correctly.

Now you should have speedier, more private DNS for accessing Xbox Live!

Related resources

How to disable Xbox One clip and screenshot sharing on Xbox Live

$
0
0

Microsoft is banning people for automatically sharing adult-rated game clips on Xbox Live. If you want to make sure you don't get banned for using Xbox's game DVR, you might want to disable automatic feed sharing. Here's how.

Microsoft will apparently ban you for taking screenshots of adult-rated games. It seems that the bans are primarily triggered when the clips are shared to your activity feed, which is turned on by default. Luckily, you can turn auto-sharing off, and as a result (hopefully) avoid being banned. Here's how.

How to hide game clips and screenshots on Xbox Live

Just follow this process:

  1. Press the Xbox button on your controller to open the guide.
  2. Move the joystick to the right to get to the System panel.

  3. Select the Settings menu with the 'A' button.
  4. Select Privacy & online safety under Account.

  5. Select Xbox Live privacy.
  6. Select Game content.
  7. Under "Others can see your game clips and screenshots" change the setting to Only me.

How to disable automatic clip sharing

If you don't want to hide everything, you can simply disable automatic sharing and SFW clips manually to avoid Microsoft's ban. Here's how to do that:

  1. Press the Xbox button on your controller to open the guide.
  2. Move the joystick to the right to get to the System panel.

  3. Select the Settings menu with the 'A' button.
  4. Move down to Preferences.
  5. Select Activity feed.

  6. Untick Share clips & screenshots automatically.

Xbox One audio: Dolby Atmos for Headphones vs. Windows Sonic for Headphones

$
0
0

Should you choose "Dolby Atmos for Headphones" or "Windows Sonic for Headphones" for use with your Xbox One? Read this.

Xbox One provides headphone users with the option of two technologies to enhance their audio: "Dolby Atmos for Headphones" and "Windows Sonic for Headphones." Hidden within the console's settings under the "Display & sound" tab, little information is provided on what these options really do. With some differences to consider, we've rounded up what you need to know.

Understanding Dolby Atmos and Windows Sonic

Spatial surround is one of the latest innovations in consumer audio technologies, allowing for increased precision in positioning, depth, and height. Utilizing an object-based approach to mapping, sounds can be output into a virtual three-dimensional space, with speaker outputs configured on the fly. Unlike traditional 5.1 and 7.1 systems, where sounds are restricted to fixed channels and positioning, spatial sound promises one of the most immersive experiences on the market.

While spatial sound is often best experienced with a dedicated theater setup, Xbox One headphone users can also take advantage of the technology. Solutions like Dolby Atmos for Headphones and Windows Sonic for Headphones deliver virtualized spatial sound to the console, with benefits even on low-end stereo headsets. Dedicated hardware is also hitting the market, designed specifically to deliver the best Dolby Atmos experiences on the ear.

While a growing list of Dolby Atmos titles is available on Xbox One, the benefits of both can be seen across the whole Xbox One library. By enabling Dolby Atmos or Windows Sonic, any applications that are capable of rendering to 7.1 channel formats will now treat your headphones as a virtual 7.1 device. While scaling high-channel formats previously combined them through a process known as "downmixing," Windows Sonic's virtualized approach should deliver major benefits, especially to stereo headphones.

The difference between Dolby Atmos and Windows Sonic

Windows Sonic is Microsoft's take on spatial sound, integrated on a system-level for Xbox One and other Windows 10 devices. Introduced with the Creator's Update released in early 2017, access to Windows Sonic for Headphones is free with any up-to-date console.

Dolby Atmos is Dolby's spatial sound technology, backed by a growing ecosystem of devices and applications. Xbox One supports Dolby Atmos technology for use with home theater setups, as well as for headphones. In contrast to the integrated nature of Windows Sonic, Dolby Atmos requires a paid license obtainable for $14.99 from the Microsoft Store.

Is Dolby Atmos or Windows Sonic better for you?

For the most part, the disparities between Dolby Atmos and Windows Sonic are relatively minor. Speaking among Windows Central staff, the differences between the two come down to personal preference. While both offer noticeable improvements to audio across games, one isn't necessarily better than the other. Some find Dolby Atmos feels shallow, while some find Windows Sonic overexaggerates sounds. Choosing a solution simply comes down to personal preference in how the solutions handle audio processing.

Although a free demo of Dolby Atmos for Headphones is available through the Dolby Access app for Xbox One, you'll be mostly diving into the technology blind. The best way to test Dolby Atmos is to buy the license – but this is a hefty price for something you may never use again.

The gains are limited, so sticking to Windows Sonic is recommended for those on a budget. For people looking to secure the best audio for your headphones, buying Dolby Atmos allows you to try it and then choose which is truly best for you.

Your choice

Do you use Dolby Atmos or Windows Sonic for Xbox One? Drop into the comments section below with your thoughts on the duo.

See Xbox One X at Microsoft StoreSee Xbox One X at Amazon

10 Xbox One games with easy-to-earn Gamerscore

$
0
0

Looking to earn Gamerscore? Here are 10 games that will net you 1,000 (or more) for relatively little effort.

Hunting for achievements is an activity many hardcore gamers enjoy. For Xbox One players, you can earn yourself Gamerscore. Players with a high Gamerscore are often admired, and due to this, a lot of people strive to unlock as many achievements as they can.

In this article, we're going to highlight 10 games you can play through fairly easily, each one offering plenty of Gamerscore to earn. Let's get to it.

NOTE: Unless stated otherwise, each of these games offers 1,000 Gamerscore.

Shred It!

Originally a mobile title, Shred It! is a snowboarding game that tasks you with grabbing collectibles and avoiding obstacles in order to get to the bottom of a mountain. Offering up a whopping 1,500 gamerscore, this game is definitely worth your time, and it won't be too hard to do the achievements either, as long as you don't mind grinding a few levels.

Shred It! is available for $9.99.

See on Microsoft Store

Fragments of Him

Fragments of Him tells the tale of a man named Will who ended up getting into a car accident during a drive to work, and how he and his family deal with the struggles that come with living as (and helping) a disabled person. The story is pretty dreary and the gameplay is average, but its achievements are a breeze and it'll only take two hours of your time to finish the title.

Fragments of Him is available for $9.99.

See on Microsoft Store

Beyond Eyes

The premise of Beyond Eyes is an intriguing one. Playing as a blind girl, you leave the safety of your home in order to try and find a lost cat. As the player, you can only see what is immediately near the girl, which makes navigating the environment a unique (and sometimes frustrating) challenge. However, you'll get the hang of it eventually, and the achievements are easy-peasy.

Beyond Eyes is available for $14.99.

See on Microsoft Store

6180 The Moon

There's very little complexity to this indie platformer. You play as the moon, and your ultimate goal is to jump your way through the universe in order to find the sun, which has gone missing. It's quite simple, but considering it only lasts an hour, that's OK. Even better, you'll be able to nab the achievements in no time.

6180 The Moon is available for $3.99.

See on Microsoft Store

Firewatch

Arguably the best game on this list from a quality perspective, Firewatch is a gripping narrative adventure that backs up its stellar writing with gorgeous visuals and beautiful music. Completing the three to four hour game will net you most of the Gamerscore available, and the rest can be easily obtained in the free-roam mode shortly after.

Firewatch is available for $19.99.

See on Microsoft Store

Refunct

Refunct is a peaceful platforming title about restoring a world that requires you to navigate its vibrant setting via jumps, slides, pipes, and more. With a length around just 30 minutes and relatively easy achievements, Refunct is the achievement hunter's dream game.

Refunct is available for $2.99.

See on Microsoft Store

ACA NEOGEO World Heroes

Fighting game fans looking to get in on the easy Gamerscore will find ACA NEOGEO World Heroes a perfect fit. All of the game's achievements are earned by reaching a certain score while playing and uploading to the leaderboards, but the fights are quick and not challenging. Before you know it, you'll find yourself 1,000 Gamerscore richer.

ACA NEOGEO World Heroes is available for $7.99.

See on Microsoft Store

Shovel Knight: Treasure Trove

While Shovel Knight is a bit lengthy and the mechanics will take a few minutes to get the hang of, the game becomes a lot easier once you learn the ins and outs. The game also offers 1,500 gamerscore instead of the usual 1,000, so the extra investment required to learn the game and be patient with it is definitely worth doing. The game itself is also fantastic, which is a bonus.

Shovel Knight: Treasure Trove is available for $24.99.

See on Microsoft Store

The Bunker

In The Bunker, you play as John, the only survivor within a nuclear bunker. Kept mentally in check by a daily routine, John begins to lose control of himself when an alarm sounds. Less of a game and more of an interactive movie, The Bunker's achievements come entirely from finding little collectibles in the environment and seeing both endings of the game, which you can do by continuing from your save right before the final sequence after beating the game once.

The Bunker is available for $19.99.

See on Microsoft Store

Cubot: The Complexity of Simplicity

Cubot introduces a simple concept used in creative ways: pushing colored cubes towards their corresponding tile. It's not as easy as it sounds since there are a few different ways that the game makes things tricky, but a dedicated player will be able to solve all the levels and get a full set of Gamerscore in just a few hours.

Cubot: The Complexity of Simplicity is available for $1.99.

See on Microsoft Store

Your thoughts

What games do you think have easy Gamerscore to earn? Let us know down below.

How to use the HTC Vive's camera to full effect

$
0
0

How to use the HTC Vive's camera to full effect

Get a virtual feed to the outside world.

An irritating issue in modern virtual reality is the strong disconnect with the outside world. While we aim for the greatest immersion possible, we're still obliged to tend to the people around us.

A lesser-known feature of the HTC Vive is the headset's inbuilt camera, which can be used to look at the real world while still wearing the headset. Whether talking to your significant other, answering the phone, or taking a sip of your favorite beverage, the low latency of the camera is a great way to interact with the surrounding world. Follow the steps below to enable the camera and tweak its properties to your liking!

See at Microsoft Store

How to enable the HTC Vive's camera

Enable the camera on the HTC Vive

By default, the HTC Vive's camera is disabled due to the potential loss of tracking on lower-end hardware. According to HTC, issues occur when using lower speed USB ports, which are unable to transmit tracking data and camera video at a fast enough rate.

Here's how to activate the camera through SteamVR:

  1. Launch SteamVR from your Start menu, desktop, or taskbar.
  2. Click the dropdown arrow next to SteamVR.
  3. Click Settings.

    Click the dropdown arrow. Click Settings.

  4. Click Camera.
  5. Click Enable Camera.

    Click Camera. Click Enable Camera.

  6. Click OK.
  7. Click Restart SteamVR.

    Click OK. Click Restart SteamVR.

How to change the refresh rate of the HTC Vive camera

Change the refresh rate of the camera

The HTC Vive's camera can be incremented between 30Hz and 60Hz, with the higher frequency delivering smoother video. Many users won't see a drop in tracking performance when using the camera at the highest refresh rate, but it can be altered if issues occur. The refresh rate can be altered by adjusting the Camera Rate slider found in the Camera section of SteamVR settings.

How to use the HTC Vive's camera

Using the HTC Vive's camera

The HTC Vive's camera can be used in three modes, each designed for use in different scenarios. These can be activated through the checkboxes found in the Camera section of SteamVR settings.

  • The Allow Camera for Dashboard option activates the camera when the SteamVR Dashboard is opened. Upon pressing the Home button, a small color feed of the camera will appear next to the right-hand controller.
  • The SteamVR camera can be activated automatically using the Allow Camera for Chaperone Bounds setting, which helps when approaching the edges of your play area. Instead of the direct camera feed, this is a simplified representation that highlights the edges of surrounding objects when exiting your VR boundaries.
  • The same simplified camera view can be manually activated by selecting the Allow Camera for Room View box. If selected, double-clicking the System button will activate the camera view. This is most convenient for briefly interacting with the real world, without the need to remove the headset.

How to record HTC Vive camera footage

The Vive's camera is really just like any other camera you plug in via USB, and with a bit of tinkering, you can record footage using third-party software. In this case, I used OBS Studio.

With the Vive plugged into your PC and OBS Studio installed, follow these steps to record the Vive camera's footage.

  1. Launch OBS Studio from your desktop, Start menu, or taskbar.
  2. Click the + button in the Sources section.

    Launch OBS Studio. Click the + button.

  3. Click Video Capture Device.
  4. Click OK.

    Click Video Capture Device. Click OK.

  5. Click the dropdown menu next to Device. If the Vive is the only video capture device plugged in, it should already be displayed here.
  6. Click HTC Vive.

    Click the dropdown menu. Click HTC Vive.

  7. Click OK.
  8. Click Start Recording.

    Click OK. Click Start Recording.

Without interrupting OBS Studio recording camera footage, I was able to launch Fallout 4 VR. I'm not exactly sure how to cross the two over — a secondary camera, capture card, and some green screens would no doubt get me started with some interesting mixed reality capture — but used on its own, you could no doubt experiment with some interesting POV footage.

Is the HTC Vive's camera a viable tool?

Is the HTC Vive's camera a viable tool?

For the most part, you'll get by with the HTC Vive's inbuilt camera for any occasional activities you might engage in while immersed in VR. Although the camera's resolution is far from perfect, a consistent framerate and unnoticeable latency make this a great addition to the headset's offerings.

With the aid of "Room View," the camera is great for quick engagements with people in the room, basic object interaction or simply reading the notifications on your phone. Although nothing ground-breaking, the camera has held up well in our previous experiences.

More resources

Updated April 5, 2018: This guide has been refreshed with steps for recording Vive camera footage.

311631
331417

How to become a Pirate Legend in Sea of Thieves

$
0
0

Take the crown on the Sea of Thieves with our guide to becoming a coveted Pirate Legend.

After spending some time with Sea of Thieves, you'll be on your way to becoming a Pirate Legend. Ruling the waters, you'll leave other in awe, flaunting your triumphs to passing crews. Here's what being a Pirate Legend means and the journey it entails.

See at AmazonSee at Microsoft Store

What is a Pirate Legend in Sea of Thieves?

Pirate Legend is the coveted prime status in Sea of Thieves, positioned as the ultimate goal for pirates. Implemented as the "end-game" for any eager player, earning this prestige unlocks access exclusive content to stand out on the seas.

However, unlocking the title of Pirate Legend doesn't come easy – to reach this level and reap its benefits, heavy work lies ahead. With hundreds of hours required to reach it, only a few deserving pirates currently boast this title.

How to become a Pirate Legend in Sea of Thieves

Becoming a Pirate Legend requires players to hit the maximum reputation level across all three of the game's trading companies. Accessible by pressing the "Menu" button while in-game, reputation with the Gold Hoarders, Order of Souls and Merchant Alliance must reach level 50. As existing Sea of Thieves players will know, increasing your level with each of these factions requires redemption of treasure. Whether through trading company voyages or randomly found loot, you'll need to build these three important figures.

After hitting level 50 across all three factions, players should return to the tavern at any of the game's outposts. When inside, access to an underground passage can be opened, leading to the Pirate Legend hideout.

Sea of Thieves Pirate Legend rewards

Becoming a pirate legend isn't just about the name – after hitting this status, you'll also receive exclusive in-game content and rewards. Access to this can be found through the Pirate Legend hideout, between various NPCs. This is what you'll get for your trouble.

  • Access to a new underground Pirate Legend hideout, with a unique ghostly design and docked wrecked ship.
  • Access to the "Athena's Fortune" faction, granting new quests and rewards. These quests are essentially a blend of the game's three main factions.
  • New "Ghost" cosmetics for your pirate.
  • A new Pirate Legend title for your pirate.
  • Rare has also teased upcoming Pirate Legend content, including Legendary ships for use during your adventures.

After becoming a Pirate Legend, you'll still have access to all previous game content. All three factions can still be found around traditional outposts, with their associated rewards.

Your Pirate Legend journey

How close are you to Pirate Legend in Sea of Thieves? Drop into the comments section below and share your adventure so far.

See at AmazonSee at Microsoft Store

Upgrade your Xbox One Seagate Game Drive with improved speed and storage

$
0
0

Boost the speed or capacity of a Seagate Game Drive for Xbox One, without compromising in style.

Microsoft now offers an extensive range of special edition external storage for gamers, merging Seagate's hard drive technologies with the Xbox One's iconic brands. With each of Microsoft's biggest franchises receiving a line of accessories at launch, special edition hard drives are available for Halo, Gears of War, Sea of Thieves and more.

While special edition Seagate Game Drives offer unmatched styling, what lies under the hood could be improved. We'll be showing how to upgrade the speed or capacity of your drive, without losing its distinct design.

What you'll need to upgrade your Seagate Game Drive

The following steps are compatible with any of Microsoft's 2TB Seagate Game Drives for Xbox released over recent years. This includes official special edition drives manufactured after mid-2015, including those released alongside Gears of War 4, Halo Wars 2, and Sea of Thieves. Each of the below drives has identical internals to the drive used in this guide.

Alongside the Seagate Game Drive to upgrade, a replacement drive with improved specifications is also required. Any modern 2.5-inch internal hard drive with a SATA connector can be used, provided its capacity is equal to or exceeds 256GB. A solid-state drive (SSD) is recommended for the best speeds, reducing load times across a majority of Xbox One games. A higher capacity traditional hard disk drive (HDD) can also be used for a boost in capacity. This guide can be used to add a stylish special edition casing to any of your existing drives too.

For this guide, we used a Samsung 850 EVO SSD, which is among our top picks for internal SSDs.

See Samsung 850 EVO SSD at Amazon

Upgrading your Seagate Game Drive for Xbox One

To open up a Seagate Game Drive, you'll first need to break open the plastic external casing. Each drive's casing is comprised of two halves, held together by 14 plastic clips instead of adhesive. These clips protrude from the inside of the top half of the casing and latch onto corresponding tabs along the bottom.

To begin disassembly, insert a plastic prying tool into the seam, working your way across and breaking apart the two halves. Be wary of the extremely fragile clips, flexing the plastic to prevent them from snapping in the process. Don't worry about potentially breaking a few clips along the way – just make sure enough clips remain to keep the two halves together. If you break a few clips, glue can always be used to firmly seal the casing.

Pull the hard drive away from the bottom casing, lifting the four anti-vibration rubber spacers out from their dedicated slots. Making sure not to damage the USB Micro-B port on the side, the drive will smoothly break away from the casing.

Remove the four anti-vibration rubber spacers from the side of the drive, setting these aside in a safe location. Remove the four Phillips screws as well, placing them next to the spacers.

Peel off the anti-static foil sticker, starting on the front of the drive. Follow this sticker around the drive, exposing a printed circuit board (PCB) and removing it entirely.

Remove the exposed PCB – an adapter used to convert a traditional SATA connector to a USB Micro-B port seen on the drive's side. Apply pressure to the gray plastic rather than the board, prying the adapter away from the hard drive. Be careful when applying pressure to prevent damage to the fragile components.

Your drive may also have a small drop of adhesive keeping the adapter fixed against the hard drive. This will break apart with only a small amount of pressure but make sure to clean up residue that may remain.

After removing the drive entirely, set this aside and prepare your replacement drive. Connect the adapter to the new drive, gently pressing on the PCB until firmly connected to the SATA ports.

Reattach the anti-static foil, similarly to how previously attached to the original drive. This foil should have enough adhesive to stick back onto a new drive, although if not, a small amount of new adhesive can be applied. While not all drives need this foil to be reattached, it's still recommended in case of potential use in the future.

Likewise, fix the four screws back into the next drive while also adding the same four rubber spacers.

Finally, place the hard drive back into the bottom half of the casing. The drive should fall into place, with the four rubber spaces sitting in their corresponding slots. Before closing up the drive entirely, we recommend briefly plugging the drive into a PC to check the drive and adapter are correctly connected.

To seal up the drive, place the top half of the casing onto the bottom, ensuring any artwork or logos are correctly oriented. Press around the edges, with audible clicking sounds as clips lock into place. If the top half of the casing is loose or fails to hold in place, a small amount of adhesive will also hold these together.

Using your upgraded drive on Xbox One

After replacing the internal drive, it's now almost ready for use. While PC users can just plug in a go, Xbox One users will need to complete a brief setup process. After connecting the drive to your console, follow the on-screen steps to set it up as a new external drive.

  1. Connect the drive to a vacant USB port on your Xbox One.
  2. Select Yes when asked how the drive should be configured.
  3. Enter a drive name.
  4. When prompted, select Yes to install games on it by default going forward.

Your new hard drive is now ready for use with your new Xbox One.

Have you upgraded you Seagate Game Drive for Xbox One? Drop into the comments section below and share your experience.

7 easy ways to save money on PC games

$
0
0

There's no need to pay full price for PC games if you take the time to shop around a little.

A few specific places mostly have the monopoly on PC game distribution these days, but that doesn't mean you can't get a good deal elsewhere. Steam, for example, might be the official place to actually get a game, but you can often find cheaper prices on its games outside of its store. You just have to know where to look.

Here are a few of the best places to look to save money on PC games.

Green Man Gaming

Green Man Gaming

UK-based Green Man Gaming (GMG) is a popular, well-stocked reseller of PC games from various different online services. It offers frequent deals, and for folks who sign up to be a VIP, exclusive additional discount codes are frequent.

GMG also offers loot boxes sometimes, a lucky dip of game codes for a very low price. You don't know what you'll get but it's nice to be surprised sometimes.

See at Green Man Gaming

CDKeys

CDkeys

CDKeys is an excellent source of game codes. It's not only for PCs, but its largest offering is for just that. In its wide catalog of codes, you'll usually find some solid discounts on popular and current titles, as well as for preorders for upcoming games.

CDKeys is a respectable store used by gamers all over the world. When you use it, you're still buying keys directly from official stores, just at a (usually) lower price.

See at CDKeys

Humble Store and Humble Monthly

Humble Store

You've probably heard of the Humble Bundle and how its charity-supporting game bundles can net you some top titles for a low price. Beyond these one-time only offers, Humble also has a full store and a monthly subscription service that will always give you some hot PC games for $12 every month.

Recent monthly bundles have included titles such as Total War: Warhammer and The Witness, which on their own are worth more than $12. The Humble Store also has frequent sales with big discounts, and if you sign up for it you get a newsletter letting you know when the deals are going down.

See at Humble Store

Amazon

Amazon

Amazon isn't just for physical goods, and you can buy digital game codes there, as well. As is often the case with Amazon, you'll find great deals from time to time.

They are a little more difficult to highlight, with Amazon being a huge store for much more than PC games, but if you know what you're looking for you can usually find yourself a saving. We suggest taking your time on Amazon and kicking around to compare prices.

See at Amazon

G2A

G2A has had a reputation for being a little, well ... shady in the past. But there's no denying it's a great place to get PC games. Part of the beauty is that you can often buy vastly discounted codes from G2A vendors.

When you're buying from someone other than the actual site you're on, you want to use caution. G2A Shield is worth implementing, and it's only a couple of bucks a month if you're going to be shopping there regularly. Essentially it protects you and your money in the event of a purchase going wrong.

You can also now use PayPal as a form of payment, alongside G2A's payment service and a number of other methods. PayPal always gets our vote, though.

See at G2A

Razer Game Store

Razer Game Store

Razer's new storefront for PC games is an evolution of the company's Cortex deal service where you'd be served up the best deals on games from across the web. Now, Razer is selling games to you directly and naturally, buying from there will get you Razer flavored rewards.

It's still very new, but there are curated deals (which look pretty strong) on some of the latest titles and you'll earn rewards including zSilver, discount vouchers for the Razer Game Store and discount vouchers for the Razer hardware store.

It also covers multiple services, including Steam and uPlay, and while it's still technically a beta, it could already save you a good bit on buying your new PC games.

See at Razer

Xbox Play Anywhere

Strictly speaking this isn't a way of saving money on games, at least not if you only play on PC. But, if you like to dabble in both Xbox and PC, then buying digital copies of some games from the Microsoft Store will give you the game on both platforms for one purchase.

Games like Forza 7 and Gears of War 4, Halo Wars 2, and Cuphead are all Xbox Play Anywhere. The list grows every month. It's not for everyone, but if you are in the position to game on both Xbox and PC, it's definitely worth a look.

Complete Xbox Play Anywhere games list

Your tips

These are some of the places we get discounts on our PC games, but what about you? Drop your suggestions in the comments and share the savings.

Updated April 9, 2018: The new Razer Game Store gets a mention for its great deals on new titles.

How to tell if Facebook shared your personal data with Cambridge Analytica

$
0
0

Were you among the millions affected by Cambridge Analytica's Facebook data harvest? Here's how to find out.

The controversy surrounding Cambridge Analytica has been building over recent weeks, following an investigation that uncovered how Facebook data of millions was leveraged to target political advertisements.

As reported by The New York Times, the core of Cambridge Analytica's research was conducted via a personality survey tied to a Facebook log-in. After logging in with your credentials, the app could collect your profile information to aid research. This alone rounded up the data of over 270,000 reported users, all in accordance with Facebook's policies.

Although the survey used to fuel Cambridge Analytica's targeting was completed by only a fraction of affected individuals, data harvesting was seen on a much wider scale. Taking advantage of default privacy settings, the app was able to expand its reach to unknowing Facebook friends. This leads to the situation we find ourselves in today – millions of affected users, many unknowing such a survey or firm existed.

Were you affected by Facebook and Cambridge Analytica's data debacle?

Facebook has now rolled out an official tool for its users, providing insight into whether Cambridge Analytica improperly collected their data. By visiting the tool on Facebook's Help Center page, the company will confirm whether your information was shared by the "This Is Your Digital Life" survey or through Facebook friends. (You must be logged in to the site.)

For those affected, Facebook will break down an estimate of shared information. Among the commonly shared details are your public profile, page likes and other personal information tied to your account. Friends who shared access to their News Feed, timeline, and messages may have also provided access to data posted by you.

To take a look at Facebook's official tool, head over to its page titled "How can I tell if my info was shared with Cambridge Analytica?" on its Help Center.

Were you affected by the Cambridge Analytica fiasco? Drop into the comments section below and share your findings.


Complete list of PlayerUnknown's Battlegrounds (PUBG) Xbox One crates and cosmetics

$
0
0

Looking to get stylish on the harsh battlefields of PlayerUnknown's Battlegrounds? These are all the crates and their cosmetic contents.

PlayerUnknown's Battlegrounds (PUBG), one of the biggest games of 2017, has made its Xbox One debut following a wave of a success on PC. With tense 1 vs 100 "Battle Royale" gameplay, players will fight to the death in a shrinking area, until a single player emerges victorious. Delivering a majority of content seen on its flagship platform, Xbox One owners gain access to everything needed for the true PUBG experience.

PUBG might not offer an overwhelming among of content, but to make for this, its gameplay is remarkably replayable. Building on its core gameplay loop, the game also features an accompanying progression system. After spending time in-game you'll get the chance to unlock cosmetic items, helping your character stand out on the battlefield.

More: PUBG for Xbox One is unique and intense, but rough around the edges

See at Microsoft (Digital)See at Microsoft (Physical)See at Amazon

How PUBG's cosmetics system works

When playing PUBG across any of its modes, after completing a match, players are rewarded with an in-game currency, Battle Points (BP). Various factors affect how much BP is earned per match, including your end-of-match ranking, total kills, and player hits.

In the game's menu, players can redeem BP in exchange for randomized crates. By purchasing a randomized crate, you'll be provided with one random crate type, providing access to an item from the crate's set collection. Multiple crate types are currently offered in-game, with more expected to debut going forward.

The price of crates starts at 700 BP, however, after purchasing each crate, the price raises. Players are also limited to only six crate purchases a week. This price resets on a weekly basis but throttles the number of crates that can be earned over a short period of time. Microsoft has also released a set of limited-time crates to promote the game's Xbox One debut, purchased with real-world money.

List of crates in PUBG for Xbox One

As of launch, two crate types are available with in-game credits in PUBG for Xbox One. Early adopters also had the chance to purchase three limited-time crates, using real-world money.

List of all cosmetic items in PUBG for Xbox One

Wanderer Crate contents

As first seen in PC version of PUBG, the Wanderer Crate is a standard crate purchased using BP. With the purchase of this crate, you'll be getting one randomized item, from the crate's set potential contents. This crate contains items found on the floor around the game's map and one of the game's rarest items, the blue pleated mini-skirt.

  • Ballistic Mask
  • Bloody Combat Pants
  • Blue Hi-top Trainers
  • Boots (Punk)
  • Cargo Pants (Beige)
  • Cargo Pants (Blue)
  • Cargo Pants (Khaki)
  • Dirty Tank-top (White)
  • Floral Shirt
  • Gas Mask (Full)
  • Glasses (Punk)
  • Hotpants (Blue)
  • Long Sleeved T-shirt (Striped)
  • Long-sleeved T-shirt (Black)
  • Long-sleeved T-shirt (Light Blue)
  • Mandarin Jacket (Blue)
  • Padded Jacket (Urban)
  • Pleated Mini-skirt (Blue)
  • Protective Sunglasses
  • School Shirt (Open)
  • School Shoes
  • Slacks (Blue)
  • T-shirt (Red)
  • T-shirt (Striped)
  • Tank-top (Charcoal)
  • Working Boots

Survivor Crate contents

The Survivor Crate is another standard crate, obtained using BP. This crate contains one randomized item upon purchase, including combat pants, trench coats, and other cosmetic items. Players also have to chance to obtain the purple pleated mini-skirt, which is the rarest item in this crate.

  • Baseball Cap
  • Beanie
  • Brown Hi-top Trainers
  • Checkered Shirt (Red)
  • Checkered Shirt (White)
  • Combat Pants (Black)
  • Combat Pants (Blue)
  • Combat Pants (Camo)
  • Combat Pants (White)
  • Fingerless Gloves (Camo)
  • Fingerless Gloves (Tan)
  • Grey Boots
  • Matched Grey Shirt
  • Mini-skirt (Purple)
  • Padded Jacket (Beige)
  • Padded Jacket (Camo)
  • Padded Jacket (Khaki)
  • Shirt (White)
  • Slacks (Purple)
  • Trench Coat (Black)
  • Trench Coat (Camel)
  • Trench Coat (Grey)
  • Trench Coat (Red)
  • Vintage Baseball Hat (Black)
  • Vintage Baseball Hat (White)
  • Women's Tuxedo Jacket (Purple)

Biker Crate contents

The Biker Crate is the third standard crate available in PUBG, once again obtained using BP. This crate contains cosmetics based around a biker theme, including padded jackets, combat pants, and various other stylized gear. Players also have the chance to obtain a checkered cloth mask in this crate, as its rarest item.

  • Aviator Goggles
  • Beanie (Gray)
  • Biker Pants (Black)
  • Biker Pants (Gray)
  • Cloth Mask (Checkered)
  • Dirty Long-sleeved T-shirt
  • Floral Shirt (Black)
  • Floral Shirt (White)
  • Gas Mask (Half)
  • Long-sleeved T-shirt (Red)
  • Padded Jacket (Purple)
  • Patrol Cap (Brown)
  • Patrol Cap (Gray)
  • Polka Dot T-shirt
  • Princess Power Tank-top
  • Raglan Shirt
  • School Shoes (Black)
  • School Shoes (Brown)
  • Skinny Jeans (Khaki)
  • Skinny Jeans (Pink)
  • Sleeveless Biker Jacket (Black)
  • Sleeveless Biker Jacket (Brown)
  • Sleeveless Turtleneck (Gray Striped)
  • Sleeveless Turtleneck (Red)
  • Sneakers (Black)
  • T-shirt (Pink striped)

Western Military Crate contents

Introduced during April 2018, the Western Military Crate debuts a new collection of cosmetics under a cowboy theme. Players have the chance to obtain a black military skirt and white cowboy hat in this crate.

  • Tank Top (Gray)
  • Raglan T-shirt (Red/White)
  • Polo Shirt (Pink)
  • Vintage Polo Shirt
  • Military Shirt (Gray)
  • Military Trousers (Black)
  • Long Sleeved Turtleneck (Black)
  • Utility Belt (Brown)
  • Camo Tank Top (Red)
  • Military Boots (Black)
  • Battle Belt
  • Vintage Gas Mask
  • Leather Bootcut Pants
  • Military Jacket (Black)
  • Military Cap (Black)
  • Cowboy Hat (Brown)
  • Faux Leather Jacket
  • Cowboy Hat (White)
  • Military Skirt (Black)

Warrior Crate contents

To mark the launch of PUBG on Xbox One, the "Warrior Crate" was the first of three limited-time crates, containing exclusive items. Priced at $9.99 from December 7 to December 10, buyers would get four pieces of aptly-themed green clothing, for use in the Xbox One version.

  • Green Pattern Balaclava
  • Green Pattern T-shirt
  • Green Pattern Pants
  • Green Pattern Hi-top Trainers

Accessory Crate contents

Following the release of PUBG on Xbox One, Microsoft introduced the "Accessory Crate," from December 14 to December 17. Priced at $4.99, this pack contained two exclusive cosmetic accessories, once again themed around the iconic Xbox green.

  • Green Pattern Cap
  • Green Pattern Fingerless Gloves

Tracksuit Crate contents

From December 21 to December 22, Microsoft sold the third and final exclusive crate for PUBG on Xbox One. Priced at $4.99, buyers received two items, making a full tracksuit piece. These came in a stylish clean white, although weren't the best for camouflage.

  • Xbox Tracksuit Top
  • Xbox Tracksuit Pants

See at Microsoft (Digital)See at Microsoft (Physical)See at Amazon

Updated April 10, 2018: Updated with the latest crate to hit PUBG for Xbox One, named the Western Military Crate.

How to replace Xbox One controller thumbsticks

$
0
0

Xbox One Controller

Need to put some fresh thumbsticks on your controller? It's easier than you might think.

Xbox One controllers wear out a lot quicker than you'd like, especially if you're a heavy gamer. But, before you go running to buy a new one, think about repairing the one you have. If it still fundamentally works as it should but something is broken or worn, you can save a bundle by doing a home repair job.

In the case of the thumbsticks, they're prone to wearing out, or worse, since they're only plastic. If you need to replace them, it's not actually that difficult.

Here's everything you need to know.

What you need

The latter two items are useful for other things, too, and they'll be universal for any repair or customization work you do on your Xbox One Controller. You can get a toolkit with both in for about $10.

A pair of regular black thumbsticks is about $10, but in swapping them out you could also go for some different colors or styles. As long as they're compatible with the Xbox One controller, the method remains the same.

How to replace Xbox One controller thumbsticks

Because the thumbsticks are on the front and all the screws to hold the controller together are on the back, you'll need to do a complete teardown by following these steps.

  1. Remove the battery door.
  2. Remove the batteries from the controller.

    Xbox One Controller

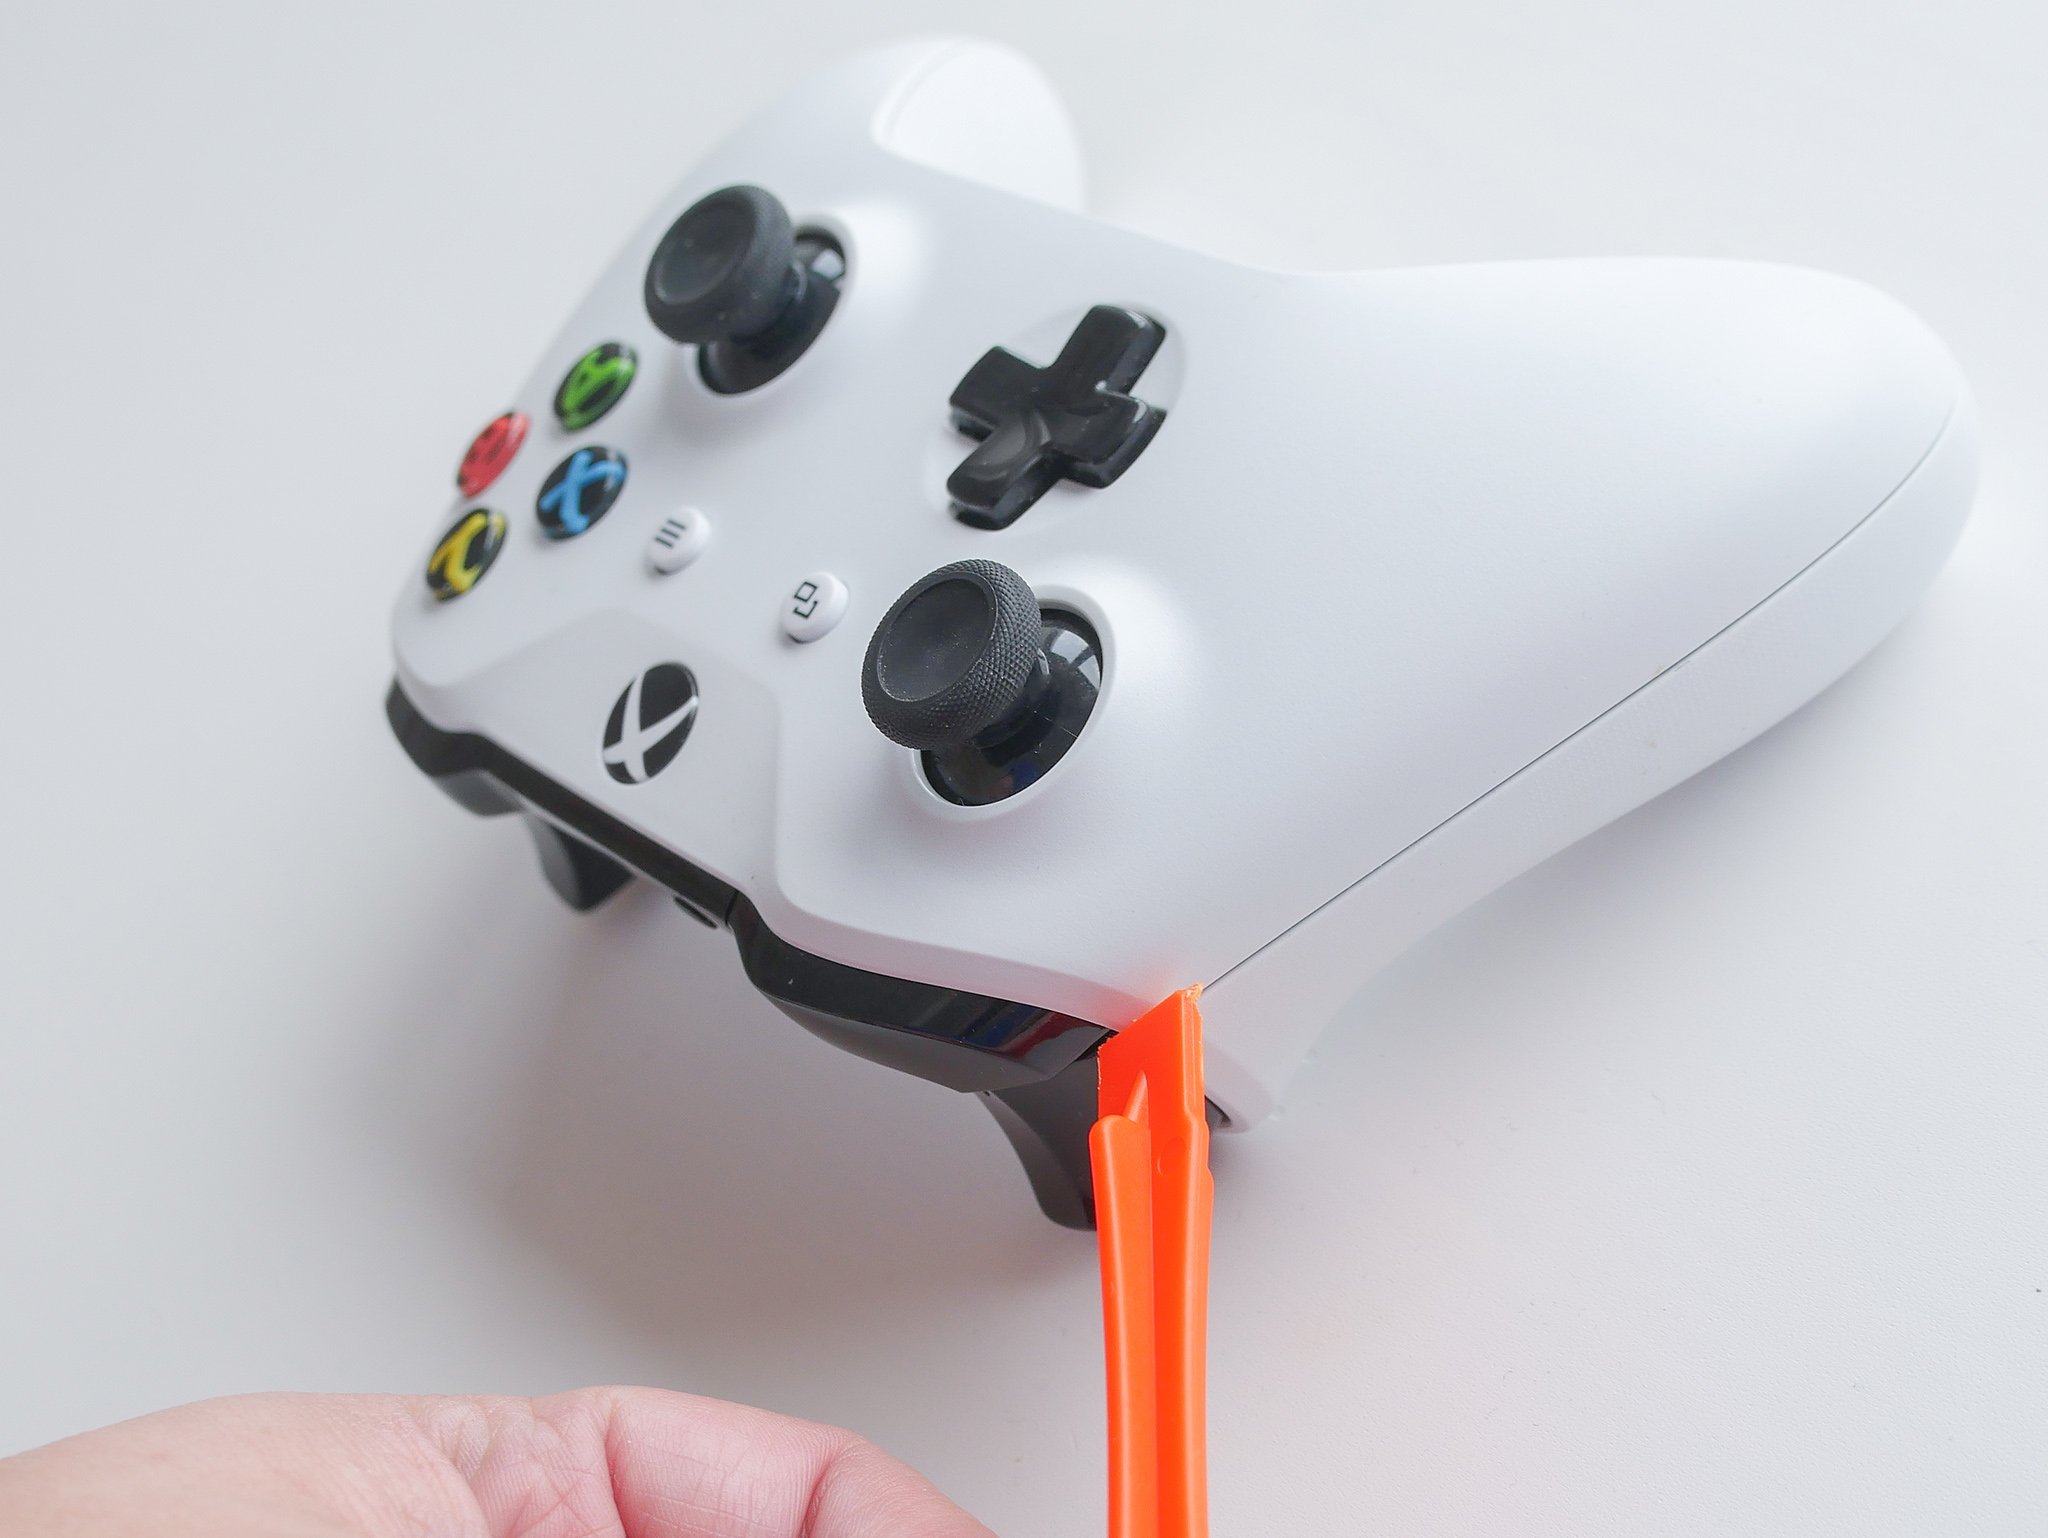
  3. Use the plastic pry tool to detach the rear grips from the controller body. (Once you've separated them, pull firmly to remove them from the body.)

    Xbox One Controller

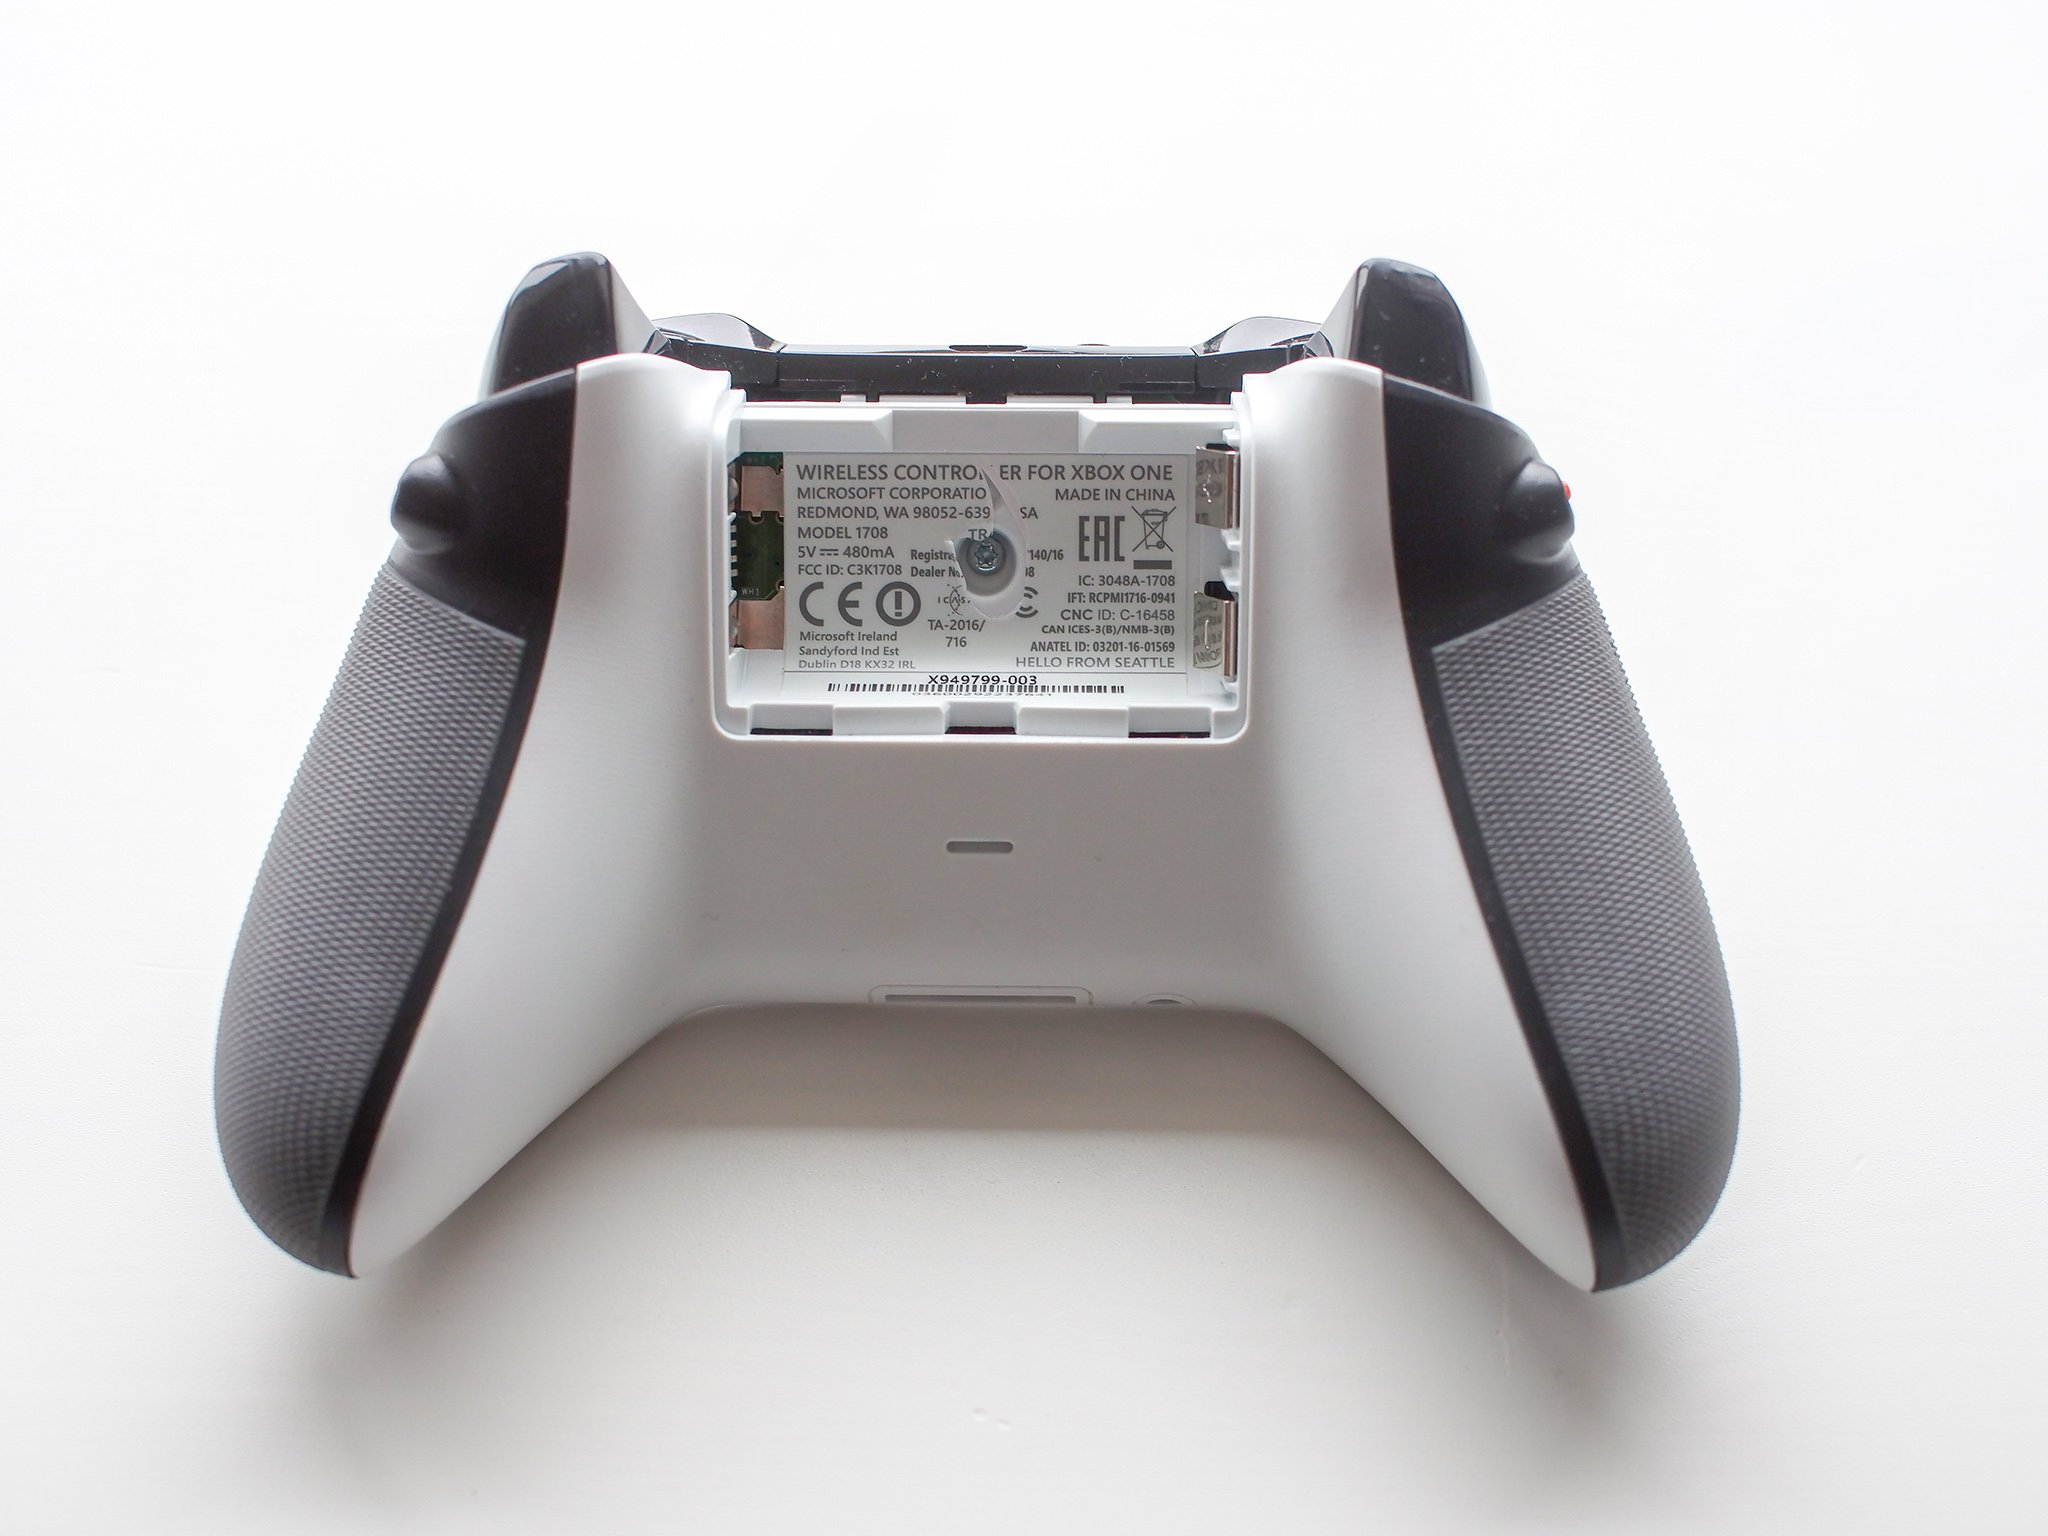
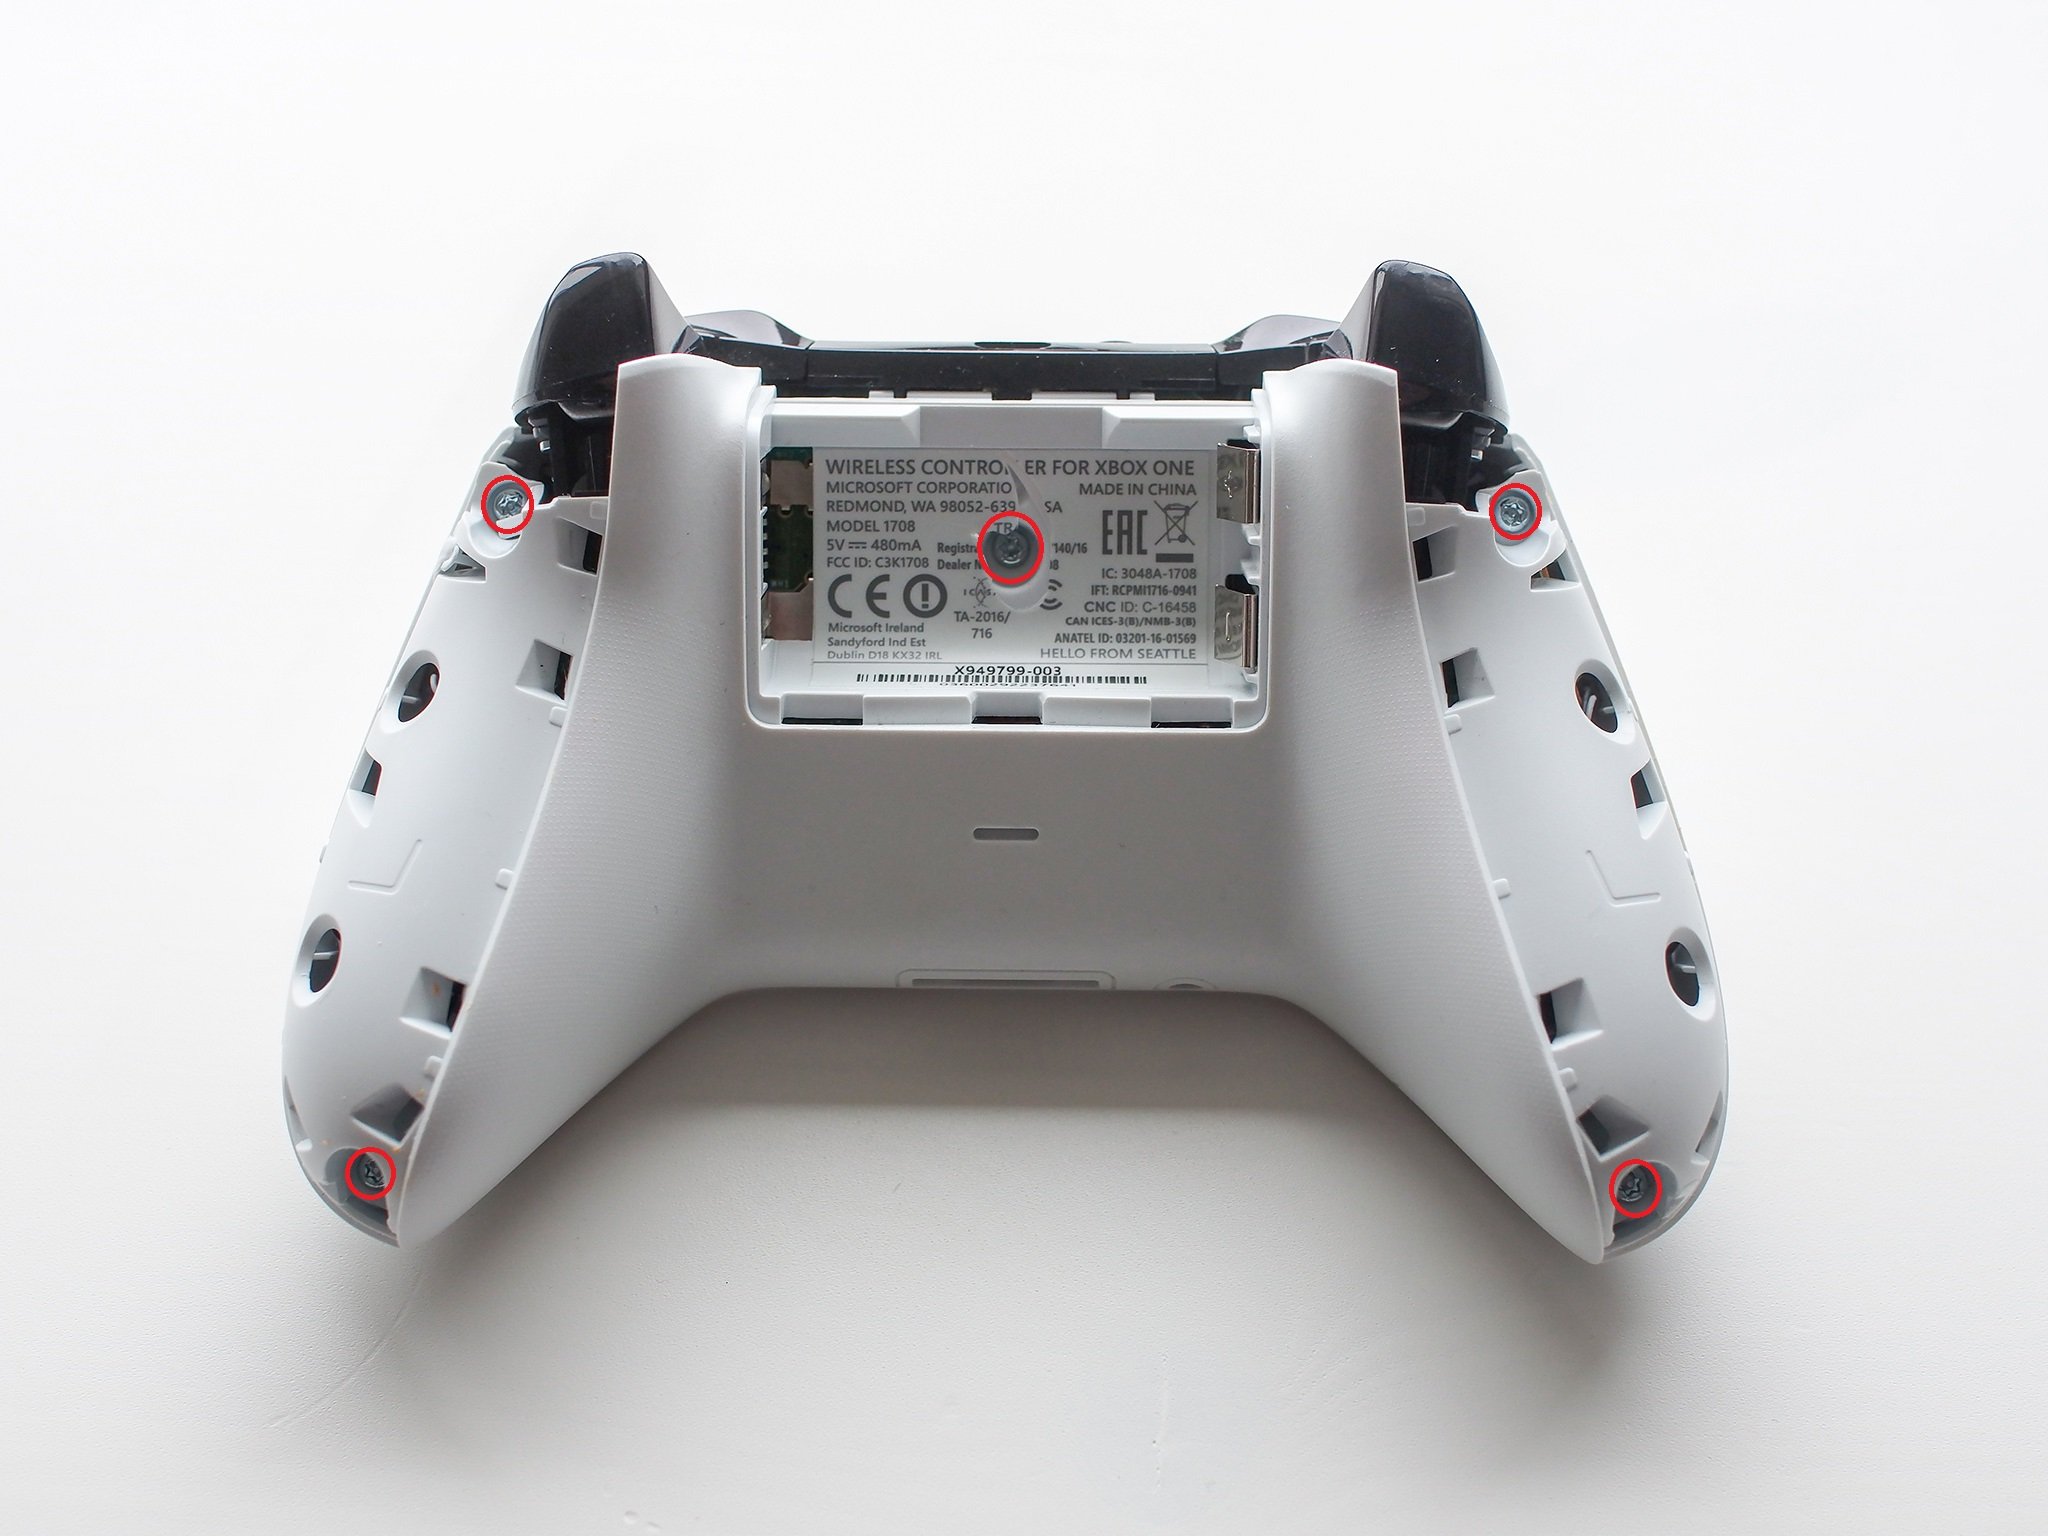
  4. You now have five screws to remove as shown in the image with the T8 screwdriver. (The fifth is located beneath the battery label so you'll have to pierce it or remove it entirely.)

    Xbox One Controller

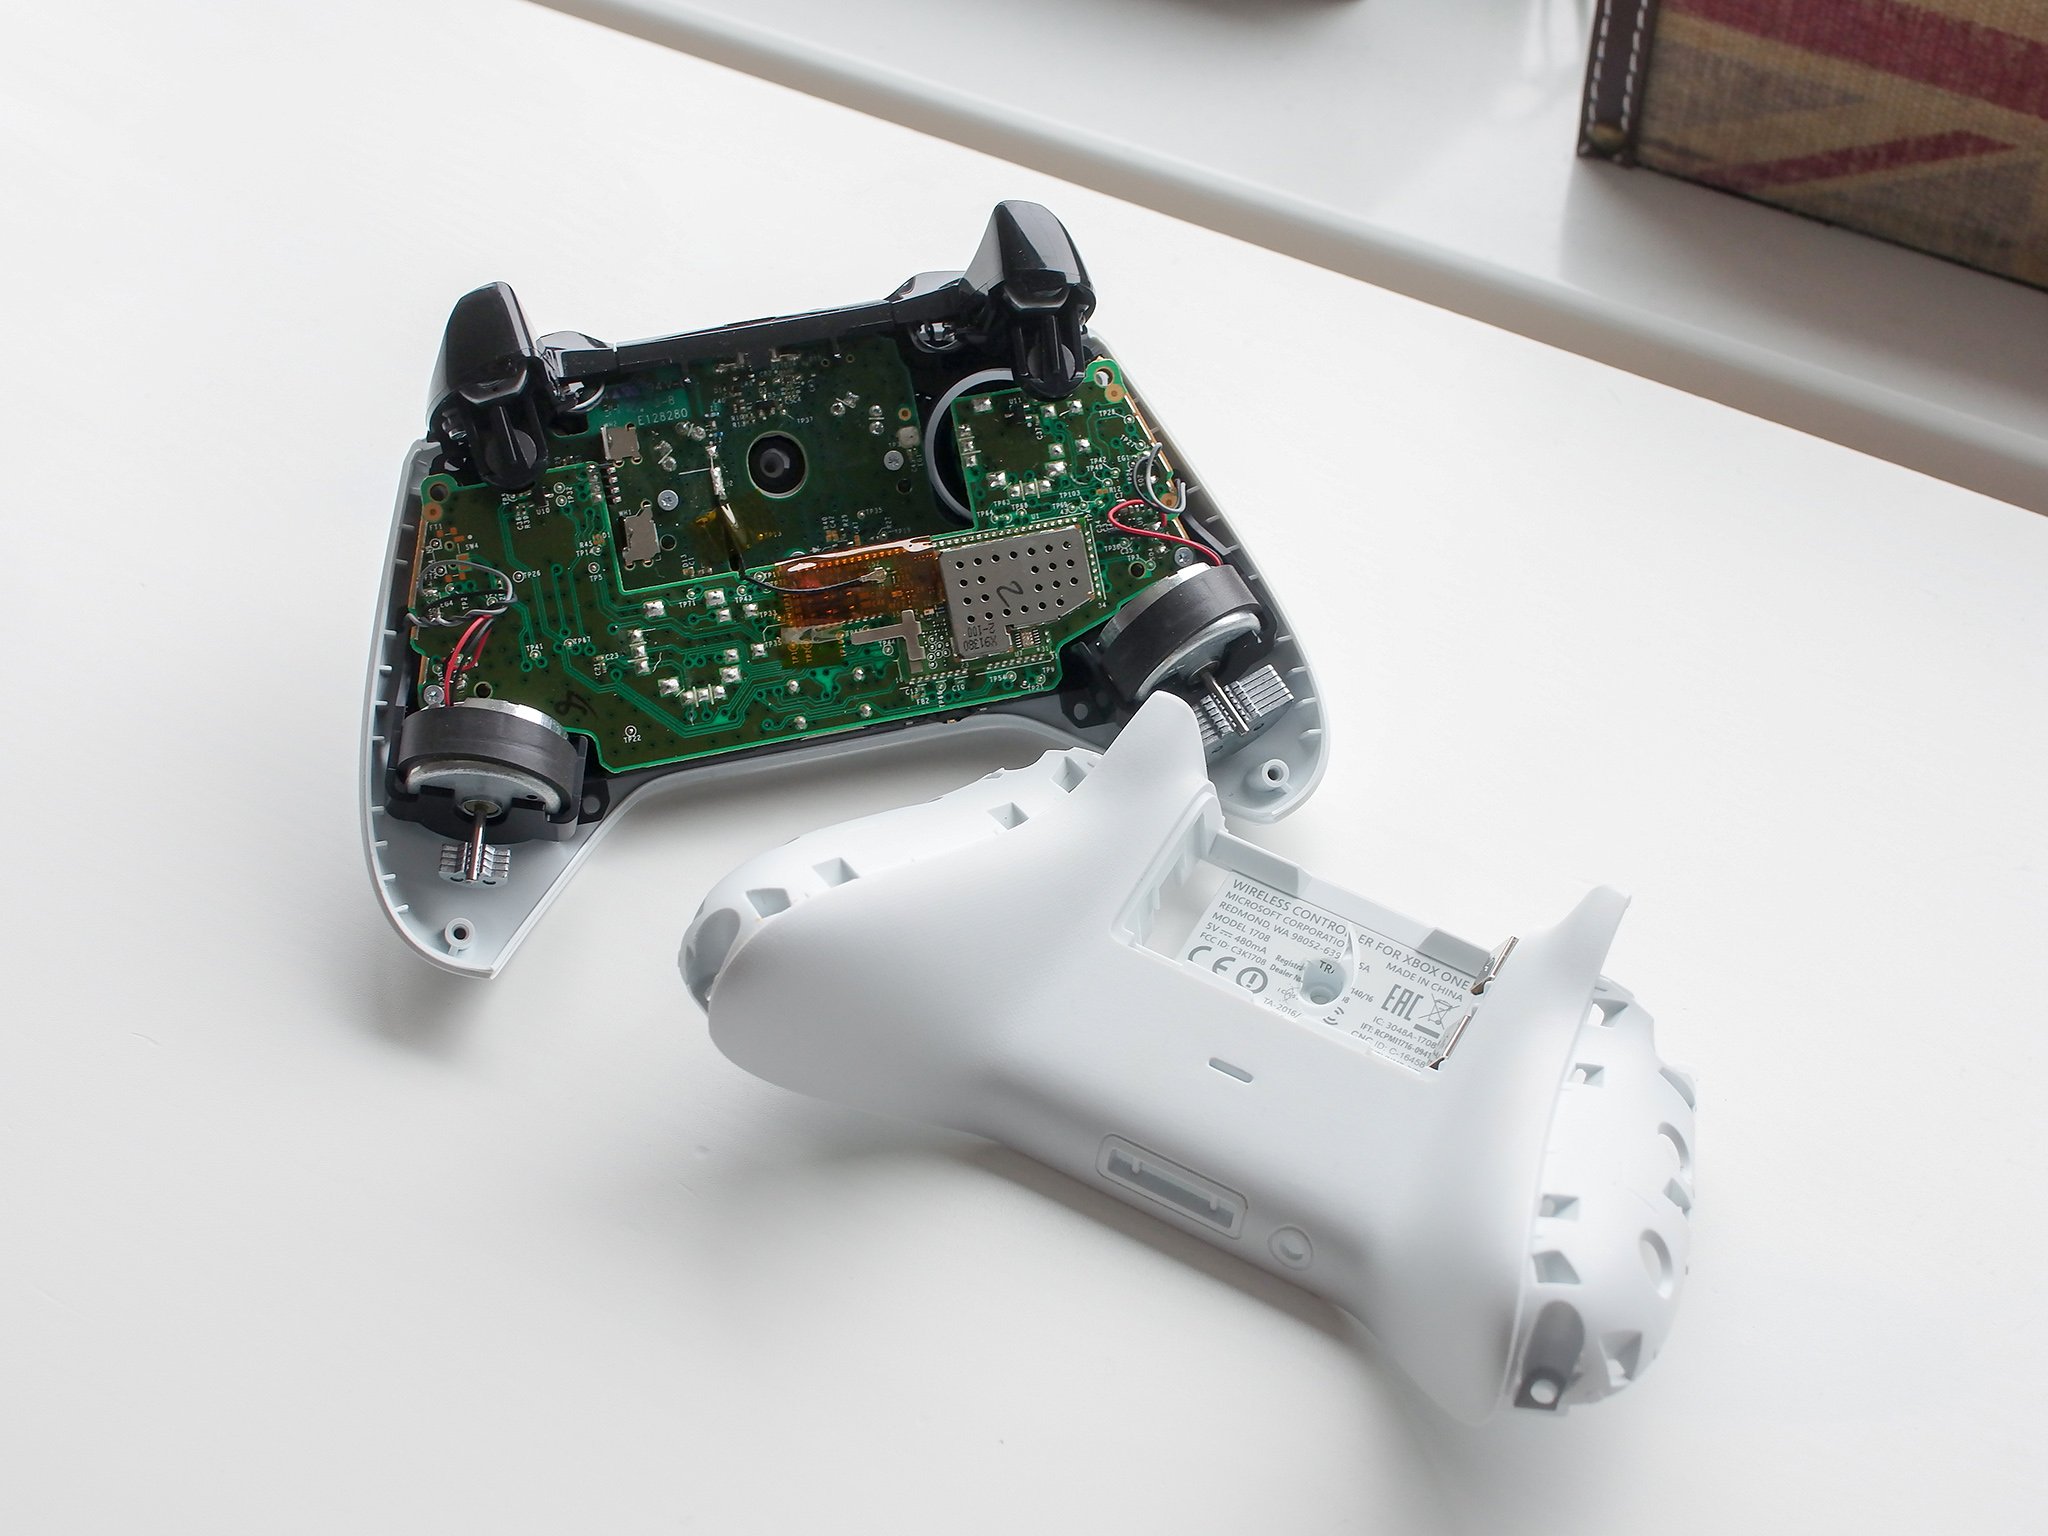
  5. Pull the backplate away from the controller body.

    Xbox One Controller

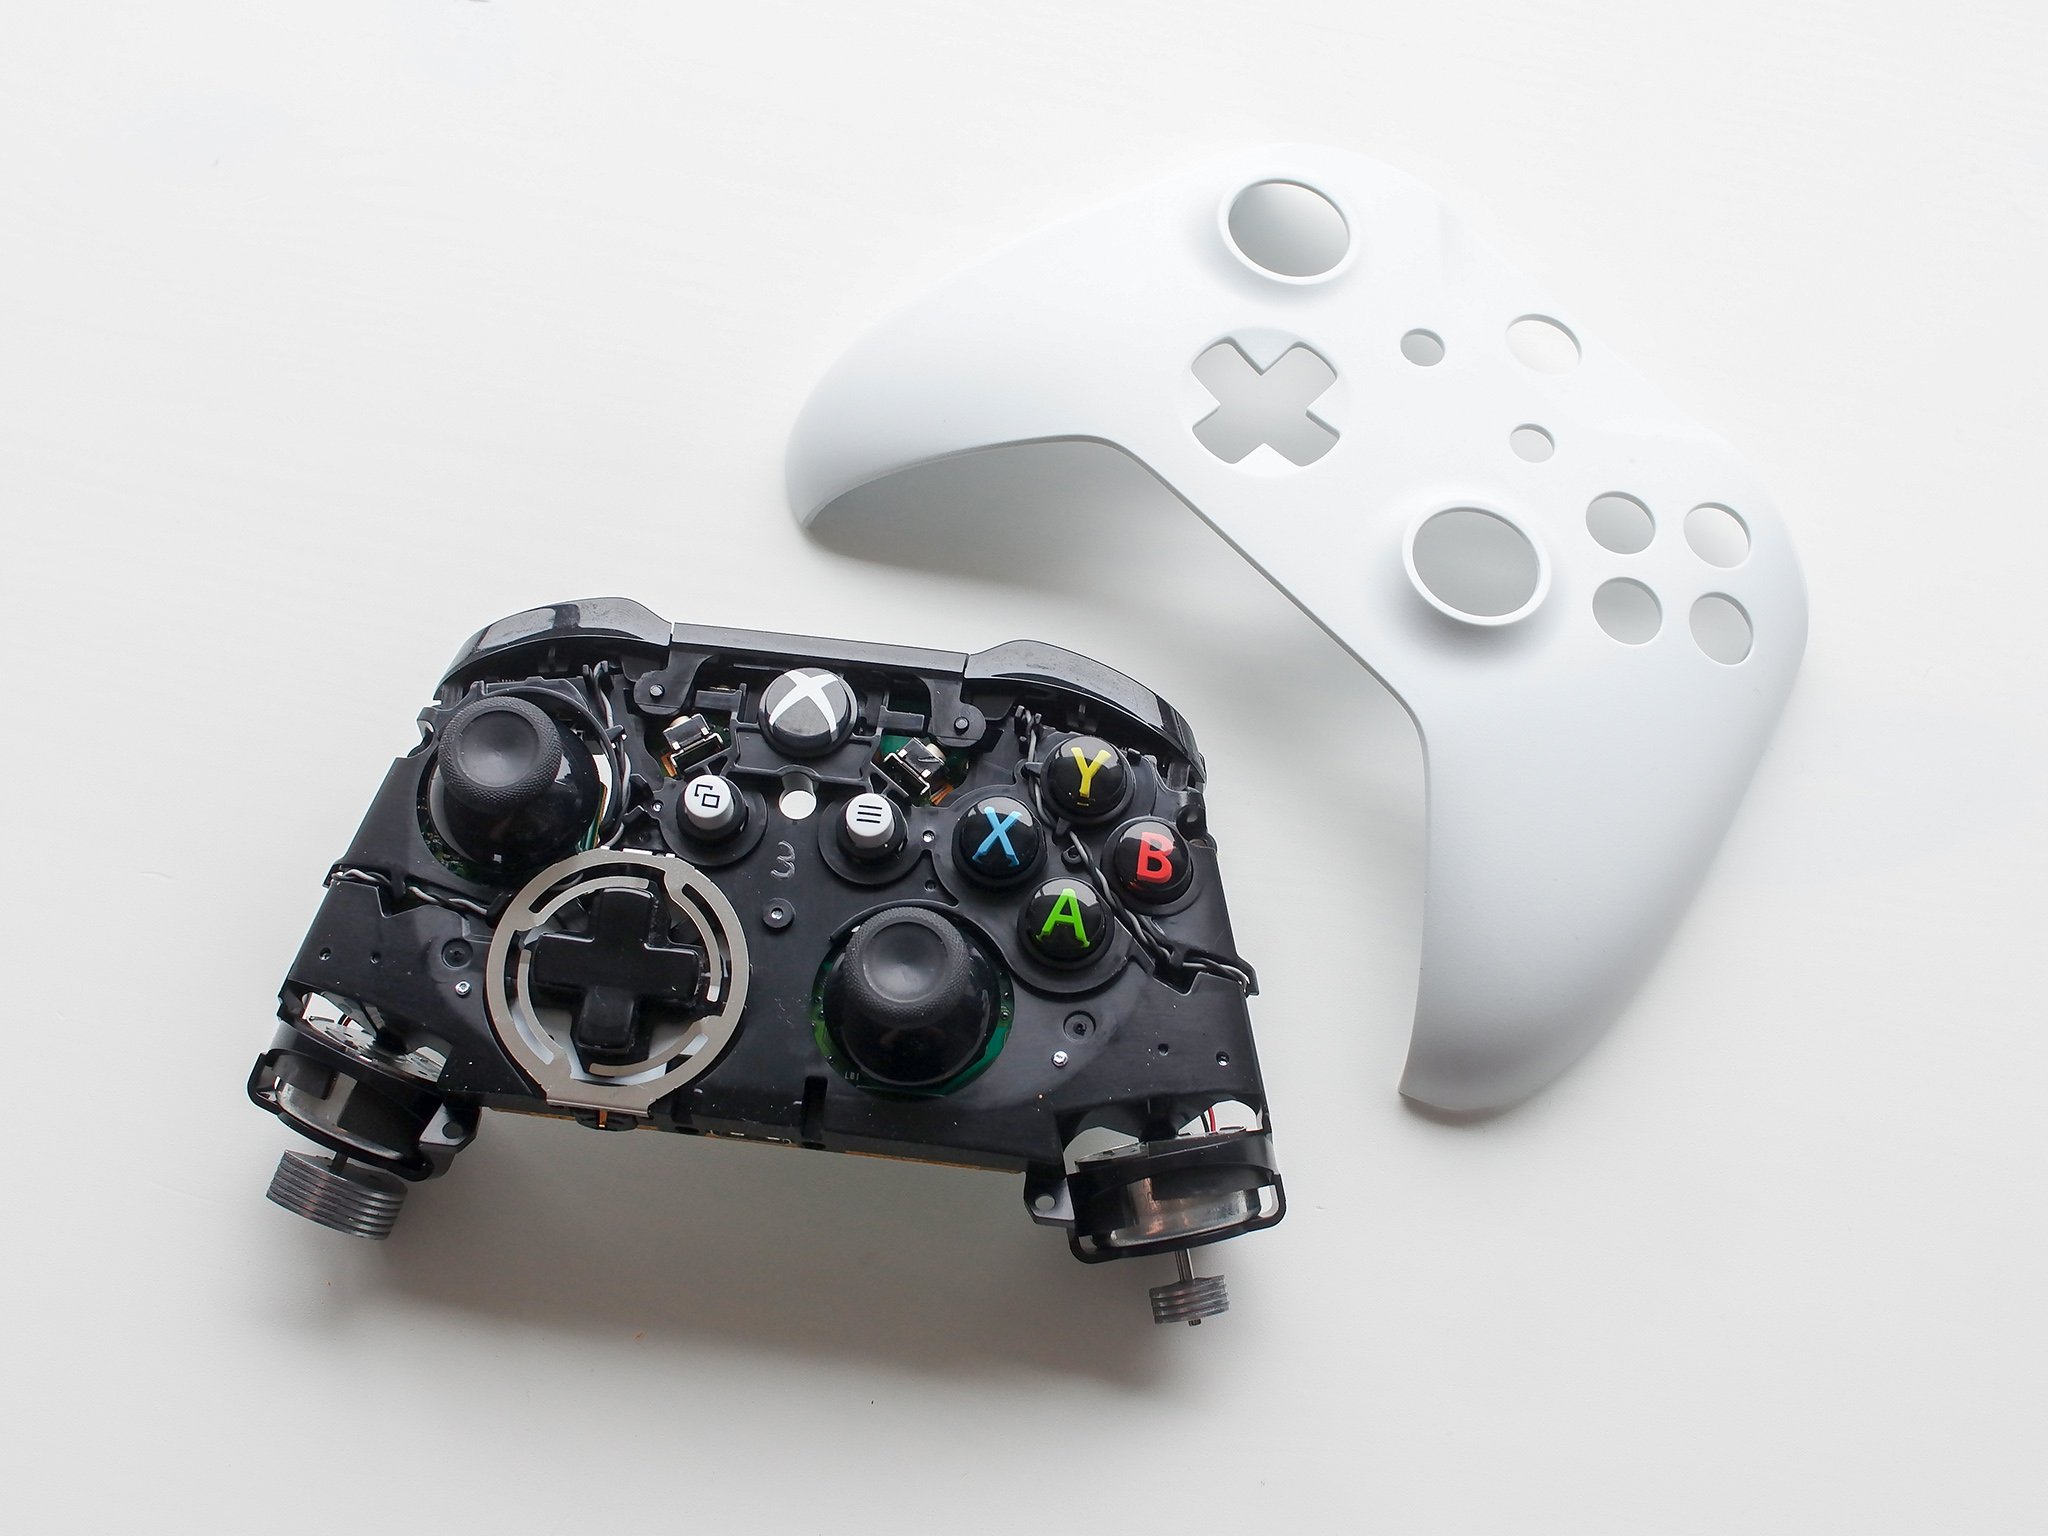
  6. Flip the controller around and pull the faceplate away from the controller body.

    Xbox One Controller

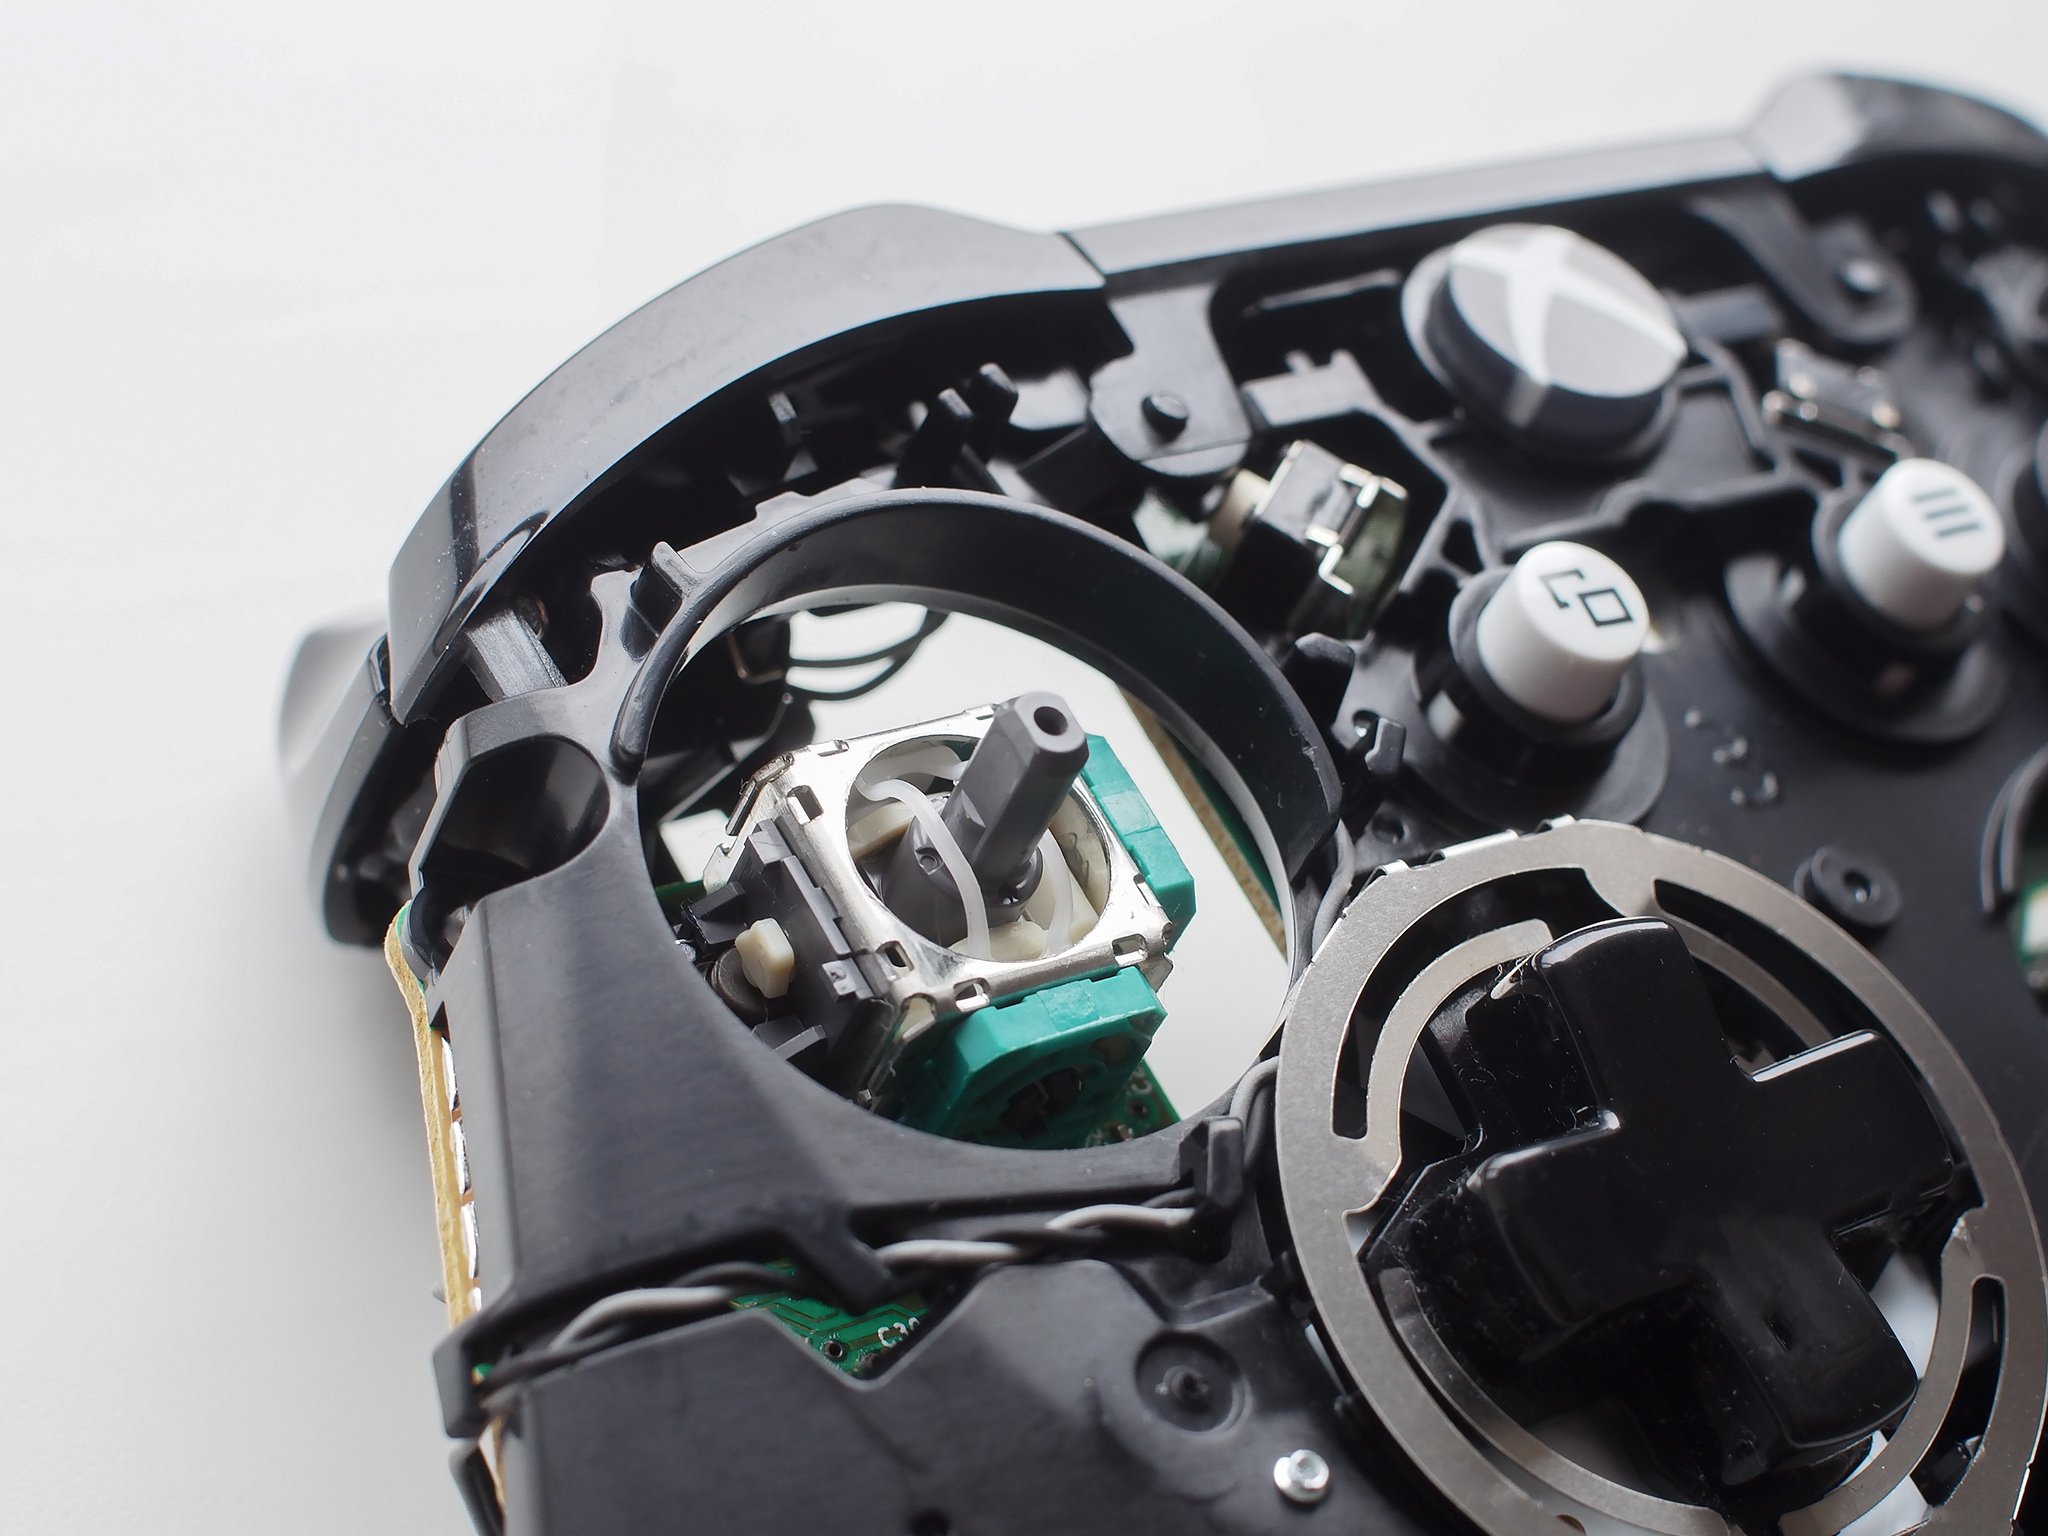
  7. Pull the thumbsticks straight up to detach from their poles.

    Xbox One Controller

  8. Push your new thumbsticks down on the poles.

  9. Repeat the steps above in reverse to reassemble your controller.

Note, if you have an actual issue with the thumbstick mechanism, such as drift or misalignment, replacing the thumbsticks won't fix this. But if you've got some nasty looking worn sticks, for a few dollars and 15 minutes of your time, you'll be fixed up quickly.

How to add trigger stops to a regular Xbox One controller for just $20

Sea of Thieves on Xbox: How to sink a galleon with a sloop

$
0
0

In Sea of Thieves, the odds are stacked against you if you try to fight a galleon in a sloop. There's a good strategy you can use to sink galleons, though.

In Sea of Thieves, galleons are the undisputed kings of the sea. With eight cannons, a high health pool, and three sets of sails, they outclass the smaller sloops in every way other than maneuverability. That means a two-man sloop crew will almost surely get obliterated should they dare challenge one of these mighty vessels.

However, with some favorable wind conditions, some explosive power, and a fearless heart, a sloop is capable of being used to sink a galleon. Here's how to do just that.

See on Microsoft StoreSee on Amazon

Obtain an explosive barrel

Since your sloop lacks enough cannons on-board to give you a chance in a direct naval battle with a galleon, you'll need to employ a different tactic: using gunpowder barrels. Colored bright red with an image of crossed bones on the side, gunpowder barrels can be found anywhere in the game world.

The most common locations they spawn at are skeleton forts (inactive and active), though you can often find them on normal islands. Once I even found one underwater inside a shipwreck.

Find and pursue a galleon

Thanks to their large size, spotting a galleon should be easy. Have one player sail the sloop while the other goes up to the crow's nest and goes on lookout duty. You're bound to find one eventually, and when you do, immediately begin sailing towards it.

Catching up to a galleon is tricky, though. Due to it having three sails, a galleon will be able to outpace a sloop if the wind is blowing in its favor. However, when the sails are not catching wind, the bulky hull of the ship significantly reduces its speed of movement. The smaller, lighter sloop avoids this problem, and is capable of still moving at a decent speed even without wind assistance. This window of opportunity is your chance to close the distance.

Show them what you're made of

Once you are able to catch up to the galleon, whoever is sailing your sloop must directly ram the ship. Not only does this do some solid damage (albeit to both boats), it distracts the enemy crew and gives you a chance to hop from your vessel to theirs, gunpowder barrel in hand.

If you see any members of the other crew on the deck, immediately take the barrel to them, set it down, back up several feet and blast it with a firearm. The explosion will not only instantly kill any foe near it, but it will also put four holes into the enemy ship hull, causing water to flow in incredibly quickly. While this is happening, you should try and kill any remaining players alive and keep them from making repairs. The ship will sink before you know it.

If you're playing as the sloop helmsman, you should make repairs to the damage your own ship sustained in the ramming. Once that's taken care of, sail near the galleon and take potshots at enemy crew members who survived the gunpowder bombing. You might even be able to hit them with a few cannon rounds to reduce their repair efficiency and increase the chance that they'll meet a watery grave.

Your thoughts

Have you sunken a galleon with a sloop before? If so, how? Let me know in the comments.

Sea of Thieves is available now for $59.99 on Xbox One and Windows 10. You can also obtain it for $9.99 a month through Xbox Game Pass.

Read: Sea of Thieves buyer's guide

See on Microsoft StoreSee on Amazon

How to add new grips to your Xbox One controller

$
0
0

Xbox One controller

Add a little extra grip to your standard Xbox One controller for little over $10.

We've all been there. In the heat of the battle, your palms get a little clammy and suddenly the slick plastic of your Xbox One controller isn't your friend.

What you need is some actual grip. Some controllers come with it built in, like the Elite Wireless, Razer's Wolverine controllers and custom options from Scuf Gaming. But you don't need a new controller to get some grip.

It's really easy to add some yourself for just a few dollars. I'm not talking about silicon skins or anything, instead I'll be showing you how to replace the grip panels on the controller with something much better. Here's what you need and how you do it.

What you need

How to change the grips on your Xbox One controller

  1. Use the plastic pry tool to prise one of the rear grips away from the controller. It's best to start at the top by the triggers as you have an easier edge to get into.

    Bionik Quickshot

  2. Once the grip has popped away, firmly pull away from the controller body. It's connected by plastic lugs, but they're pretty sturdy and you'll have to be firm.
  3. Repeat steps one and two on the other side.

    Xbox One controller

  4. Firmly push down on each new grip to attach them to the controller. They should be a seamless fit, assuming you bought good quality parts.

    Xbox One controller

That's all there is to it. I've purposely gone for this style because it's similar to that which Scuf uses on its custom controllers and find that it offers a better feeling than soft-touch grips like you find on the Elite Wireless or Razer controllers. There are plenty out there, so ultimately the choice is yours, but the process remains the same.

And if you're feeling a little more adventurous, you can combine new grips with some trigger stops like the Bionik Quickshot. These will improve your FPS games in particular while also giving you a great grip on your controller.

How to change your Xbox One Gamertag

$
0
0

Change your Gamertag and get a fresh start on Xbox Live with these simple steps.

Gamertags are the unique display names dished out across Xbox Live, representing players across Xbox One, Windows 10 and a growing range of additional devices. Spanning all corners of Microsoft's gaming network, it's best to find a name suits you.

But everyone deserves a second chance – and if you're not happy with your Xbox Live Gamertag, you're in luck. Microsoft allows Xbox Live users to change their name on the service, although sometimes with a small fee. Change up your Gamertag and start fresh by following the steps below.

Changing your Gamertag: Free or paid?

After creating an Xbox Live profile, players are permitted to one free Gamertag change. This provides the opportunity to change the automatically generated name assigned by Microsoft during the account creation process.

For those already with a custom Gamertag, changing it requires a small fee to be paid. At $9.99, or an equivalent value in your local currency, you'll be granted one Gamertag change.

How to change your Xbox Gamertag on Xbox.com

The easiest way to change your Xbox Live Gamertag is directly through Xbox.com. Alongside a simple interface to quickly check availability, any changes will be soon reflected on other consoles and devices. After signing into your Xbox Live account, follow the steps below.

  1. Navigate to account.xbox.com/changegamertag
  2. Sign into your Microsoft account.
  3. Enter your preferred Gamertag.
  4. Click Claim It! if your chosen Gamertag is available. If taken, try a new Gamertag.
  5. Click Confirm to complete the transaction.

How to change your Xbox Gamertag on Xbox One

To avoid booting up a web browser, Microsoft also allows Gamertags to be changed on your Xbox One. Accessed through your profile's settings, this allows your console's existing payment methods to be used. Follow the steps below to change your Gamertag on your Xbox One.

  1. Press the Xbox button on your Xbox One controller.
  2. Press the LB button four times.
  3. Select your profile from the list of profiles.
  4. Choose My profile.
  5. Choose Customize profile.
  6. Select the tile with your Gamertag.
  7. Enter your preferred Gamertag.
  8. Click Yes to claim your chosen Gamertag if it's available. If taken, try a new Gamertag.

Recently made a Gamertag change to your Xbox Live profile? Drop into the comments section below and let us know what you got.

See Xbox One X at Microsoft StoreSee Xbox One X at Amazon

More: Xbox Help

Viewing all 5861 articles
Browse latest View live


Latest Images