Quantcast
Channel: Help & How To
Viewing all 5861 articles
Browse latest View live

How to enable Xbox One 1440p support for Xbox One X and Xbox One S

$
0
0

Enable 1440p support on your Xbox One console with these quick steps.

The Xbox One X flaunts support for 4K resolutions, delivering cutting-edge visuals across "enhanced" games. Alongside its processor, the Xbox One S, the console also serves up 4K video, with the added help of technologies such as High Dynamic Range (HDR).

While 4K is recommended to get the most out of Xbox One consoles, Microsoft also offers support for a variety of lower resolutions. The most recent addition is support for native 1440p, providing a middle ground between 4K and standard 1080p. Allowing console to take full advantage of a new range of monitors, some users are in for a significant resolution bump. Here's how to enable 1440p on your Xbox One X or Xbox One S console.

How to enable Xbox One 1440p support

Before enabling 1440p support on your Xbox One, ensure your console is connected to a display that supports a "2560x1440" resolution. If not supported, the option to switch to a 1440p resolution won't be presented.

Note: 1440p support is currently limited to consoles enrolled in the Alpha ring of the Xbox Insider Program. A public release is expected in the months ahead.

  1. Connect your Xbox One to a display that supports 1440p resolutions. Ensure the port used supports a 1440p signal at 60 Hz, especially when using a PC monitor.
  2. Open the Settings app on your Xbox One.
  3. Navigate to the Display & sound tab.
  4. Select TV resolution.
  5. Select 1440p from the drop-down menu.

Going forward, your Xbox One console will automatically output at a native 1440p resolution. 4K games will be downsampled to take advantage of supersampling, while videos will display at a maximum resolution of 1440p.

What do you think of the Xbox One's 1440p support? Make sure to drop your thoughts in the comments section.

Xbox One Spring Update outlined, adding 1440p support, Mixer controller sharing

See at Microsoft StoreSee at Amazon


How to ensure the best VR performance from your PC

$
0
0

Low frames per second (FPS) while PC gaming is your worst enemy. In VR, whether with Windows Mixed Reality (WMR), HTC Vive, or Oculus Rift, it can also be literally sickening. What better reason to give your old hardware some care and keep it performing up-to-snuff for another few months?

Choppy graphics, lagging audio, slow load times all contribute to a bad time, and right now the budget doesn't allow for new hardware. Starting with some easier tips and moving onto some more complicated stuff, here's how to eke the most performance out of your existing hardware.

Clean out your case

Removing the cover to your PC's case can sometimes be a very frightening ordeal, especially if you're a pet owner. All the dust and hair that collects in corners also collects near your PC and gets blown in when your fans are running.

Dust and hair in your PC case aren't just unwanted — it leads to increased temperatures in all your hardware, and it will thus slow things down. Your PC isn't like your car's engine; it doesn't run better when hot.

Using a can of compressed air is generally the best way of removing loose dust and hair from the case. Ensure you're not too aggressive with the air as you don't want to knock anything loose — a better method of removing caked-on dust (e.g. on your fan blades) is to use a cotton swab.

Update your operating system

Using an outdated version of, say, Windows, can lead to decreased PC performance. Applications designed for a certain build won't work their best, and malware can find its way through easier on an OS that isn't updated with the latest security measures.

Here's how to search for available updates in Windows 10:

  1. Click the Search Windows field in your taskbar.
  2. Type update.

    Click the Search Windows field. Type update.

  3. Click Check for updates.
  4. Click the Check for updates button in the Settings window.

    Click Check for updates. Click the Check for updates button.

Any available updates for Windows 10 will begin to download automatically.

Graphics card drivers are generally designed for the latest build of Windows, so if you update one you'll want to update the other.

Update your graphics card drivers

Drivers are what allow your hardware to speak to your operating system. Imagine your graphics card (GPU) is speaking Mandarin while your OS is speaking English; there is a chance for confusion if an able translator — the driver — isn't around.

Nvidia and AMD, the two big GPU makers, update their drivers regularly, and especially when new games are released. If you're experiencing some sub-optimal graphics, definitely check out Nvidia's GeForce Experience app or AMD's Gaming Evolved app.

To update drivers in GeForce Experience, follow these steps:

  1. Click the Search Windows field in your taskbar.
  2. Type GeForce.
  3. Click GeForce Experience.

    Type GeForce. Click GeForce Experience.

  4. Click the Drivers tab at the top of the window.
  5. Click either Express installation or Custom installation depending on your preference.

    Click the Drivers tab. Click either Express Installation or Custom installation.

Nvidia will take things over from here if you choose Express installation — you will be able to choose your own settings if you choose Custom installation. AMD's Gaming Evolved app works very much the same and is equally easy to use.

Purge and defragment your hard drive

Having a PC full of old, unused apps, temporary internet files, cookies, and cached images can slow things to a grind.

Using the Programs and Features tool in Windows 10 is an easy way to remove unwanted apps:

  1. Right-click the Start button.
  2. Click Apps and Features.

    Right-click the Start button. Click Programs and Features.

  3. Click any app you want to remove.
  4. Click Uninstall near the top of the window.

    Click any app you want to remove. Click Uninstall.

The app will be uninstalled cleanly. If you want to remove temporary internet files, cached files, and other junk, use Disk Cleanup:

  1. Click the Search Windows field in your taskbar.
  2. Type disk.

    Click the Search Windows field. Type disk.

  3. Click Disk Cleanup.
  4. Click the dropdown arrow to choose which disk to clean.

    Click Disk Cleanup. Click the dropdown arrow.

  5. Click OK.
  6. Check off any items you want to delete.

    Click OK. Check off any items you want to delete.

  7. Click OK.
  8. Click Delete Files to permanently remove the files from your computer.

    Click OK. Click Delete Files.

When files are written to a hard disk drive (HDD), they sometimes get partially written in a bunch of different spots. Your OS has to search different places to access a whole file, slowing things down. If you have an HDD rather than a solid state drive (SSD), you can use the Windows 10 defragment tool to put files back together and thus access them much faster.

  1. Click the Search Windows field in your taskbar.
  2. Type defrag.
  3. Click Defragment and Optimize Drives.

    Type defrag. Click Defragment and Optimize Drives.

  4. Click the drive you want to defrag.
  5. Click Optimize.

    Click the drive you want to defrag. Click Optimize.

The defrag tool will take over from this point. Note that you may experience decreased performance while the tool is running.

Enable TRIM on your SSD

TRIM is the garbage collector of your solid-state drive and is a good alternative to a hard-disk drive defrag. Here's how to enable TRIM:

  1. Click the Search Windows field.
  2. Type cmd.
  3. Right-click Command Prompt.
  4. Click Run as administrator.

    Type cmd. Right-click Command Prompt. Click Run as Administrator.

  5. Type fsutil behavior query DisableDeleteNotify and hit Enter on your keyboard. If the result is DisableDeleteNotify = 0 you already have TRIM enabled. If the result is DisableDeleteNotify = 1, you don't have TRIM enabled. Proceed to the next step.
  6. Type fsutil behavior set DisableDeleteNotify 0 and hit Enter on your keyboard to enable TRIM.

    Type the code to determine if you have TRIM enabled. Type the code to enable TRIM if necessary.

Optimize your graphics with GeForce or AMD software

Nvidia and AMD come with some great apps that let you optimize settings for optimal in-game performance. They also take some of the guesswork out of the sometimes intimidating settings menus found in blockbuster titles.

Here's how to optimize settings in the Nvidia GeForce app:

  1. Click the Search Windows field in your taskbar.
  2. Type GeForce Experience and hit Enter on your keyboard.

    Click the Search Windows field. Type GeForce Experience.

  3. Click the More button near the top-right corner of the window.
  4. Click Optimize all games.

    Click the More button. Click Optimize all games.

Nvidia will automatically change the in-game settings to best suit your hardware. AMD's Gaming Evolved app works very much the same way and is equally easy to use.

Change your power plan

Windows 10 has some built-in power options that help balance your PC against energy use and performance. If you don't mind burning a bit more energy, you can set your power plan to high performance:

  1. Click the Search Windows field next to the Start button.
  2. Type power options.
  3. Click Power Options.

    Type power options. Click Power Options.

  4. Click the drop-down arrow next to Show additional plans.
  5. Click High performance.

    Click the drop-down arrow next to Show additional plans. Click High performance.

Change your virtual memory page file

Enlarging page files frees up space to use as RAM when your PC runs low. Page files should not be set to more than 1.5 times more than the total amount of RAM in your PC.

  1. Click the Search Windows field.
  2. Type Control Panel and hit Enter on your keyboard.
  3. Click System.

    Type Control Panel. Click System.

  4. Click Advanced system settings.
  5. Click Settings in the Performance field.

    Click Advanced system settings. Click Settings.

  6. Click the Advanced tab.
  7. Click Change.

    Click the Advanced tab. Click Change.

  8. Click the checkmark beside Automatically manage paging file size for all drives.
  9. Click Custom size.

    Click the checkmark. Click Custom size.

  10. Click the Initial size (MB) field.
  11. Type 4096 on your keyboard.

    Click the Initial size field. Type 4096 on your keyboard.

  12. Click the Maximum size (MB) field.
  13. Type 4096 on your keyboard.

    Click the Maximum size field. Type 4096 on your keyboard.

  14. Click Set.
  15. Click OK.

    Click Set. Click OK.

You want to make sure you set all other drives in your PC to No paging file unless you want to record Error info. In this case, leave your C: drive (if this isn't your main paging file drive) with about 300MB.

Make some changes in your registry

Warning: Performing registry edits can cause serious problems with your PC. Proceed at your own risk. Always make a backup of your PC before editing the registry.

How to make a full backup of your Windows 10 PC

The multimedia class scheduler is used by some games to ensure background processes can have enough processing power to keep running efficiently, but you want full power toward gaming! Here's how to change the class scheduler to give games the most processing power possible:

  1. Hit Windows key + R on your keyboard to bring up the Run window.
  2. Type regedit and hit Enter on your keyboard.
  3. Double-click HKEY_LOCAL_MACHINE.

    Type regedit and hit Enter. Double-click HKEY_LOCAL_MACHINE.

  4. Double-click SOFTWARE.
  5. Double-click Microsoft.

    Double-click SOFTWARE. Double-click Microsoft.

  6. Double-click Windows NT.
  7. Double-click CurrentVersion.

    Double-click Windows NT. Double-click CurrentVersion.

  8. Double-click Multimedia.
  9. Click SystemProfile.

    Double-click Multimedia. Click SystemProfile.

  10. Right-click SystemResponsiveness.
  11. Click Modify.

    Right-click SystemResponsiveness. Click Modify.

  12. Type 0 on your keyboard.
  13. Click OK.

    Type 0 on your keyboard. Click OK.

You can also set the priority of games above other processes in your PC to ensure your games are running as good as possible. Here's how to do it:

  1. Hit Windows key + R on your keyboard to bring up the Run window.
  2. Type regedit and hit Enter on your keyboard.
  3. Double-click HKEY_LOCAL_MACHINE.

    Type regedit and hit Enter. Double-click HKEY_LOCAL_MACHINE.

  4. Double-click SOFTWARE.
  5. Double-click Microsoft.

    Double-click SOFTWARE. Double-click Microsoft.

  6. Double-click Windows NT.
  7. Double-click CurrentVersion.

    Double-click Windows NT. Double-click CurrentVersion.

  8. Double-click Multimedia.
  9. Double-click SystemProfile.

    Double-click Multimedia. Click SystemProfile.

  10. Double-click Tasks.
  11. Click Games.

    Double-click Tasks. Click Games.

  12. Right-click GPU Priority.
  13. Click Modify.

    Right-click GPU priority. Click Modify.

  14. Type 8 on your keyboard.
  15. Click OK.

    Type 8 on your keyboard. Click OK.

  16. Right-click Priority.
  17. Click Modify.

    Right-click Priority. Click Modify.

  18. Type 6 on your keyboard.
  19. Click OK.

    Type 6 on your keyboard. Click OK.

  20. Right-click Scheduling Category.
  21. Click Modify.

    Right-click Scheduling Category. Click Modify.

  22. Type High on your keyboard.
  23. Click OK.

    Type High. Click OK.

Solid-state drive users: disable hibernate

Hibernate allows hard-disk drives to load apps faster and is unneeded if you use a solid-state drive. Here's how to disable it:

  1. Click the Search Windows field.
  2. Type cmd.

    Click the Search Windows field. Type cmd.

  3. Right-click Command Prompt.
  4. Click Run as administrator.
  5. Type powercfg -h off and hit Enter on your keyboard.

    Right-click Command Prompt. Type the code and hit Enter.

Get rid of unnecessary Windows animations

Moving windows, opening the Start menu, and many other motions have visual effects that can slow down your computer's performance. Here's how to disable animations:

  1. Click the Search Windows field.
  2. Type performance.

    Click the Search Windows field. Type performance.

  3. Click Adjust the appearance and performance of Windows.
  4. Click any animations you'd like to disable. The check disappears when it's disabled.

    Click Adjust the appearance and performance of Windows. Click any animations you want to disable.

  5. Click Apply.
  6. Click OK.

    Click Apply. Click OK.

Ensure asynchronous reprojection and interleaved reprojection are enabled

If you're using a Vive or WMR on an older machine, you want to make sure you're taking advantage of these technologies — they will provide better framerates in the event that your hardware can't quite keep up.

  1. Launch SteamVR from your desktop, Start menu, or taskbar.
  2. Click the dropdown arrow next to SteamVR.

    Launch SteamVR. Click the dropdown arrow.

  3. Click Settings.
  4. Click Performance.

    Click Settings. Click Performance.

  5. Click the checkbox next to Allow asynchronous reprojection so that a checkmark appears.
  6. Click the checkbox next to Allow interleaved reprojection so that a checkmark appears.

    Ensure both checkboxes have checks in them.

How to use the Oculus framerate tray tool

Reddit-user ApollyonVR created a tool that can be used to monitor framerates while in Oculus Rift. This can help you determine how well your PC is performing, and it can confirm that ASW is kicking in when it should be. Here's how to get the Oculus framerate tray tool working.

  1. Navigate to the Reddit page containing the tool.
  2. Click the download link. This will take you to a Dropbox page.

    Navigate to the Reddit page. Click the download link.

  3. Click Download.
  4. Click Direct download.

    Click Download. Click Direct Download.

  5. Click Save.
  6. Click Open folder.

    Click Save. Click Open folder.

  7. Right-click the compressed OculusTrayTool file.
  8. Click Extract All.

    Right-click OculusTrayTool. Click Extract All.

  9. Click Extract.
  10. Double-click Oculus Tray Tool.

    Click Extract. Double-click Oculus Tray Tool.

  11. Double-click Oculus Tray Tool.
  12. Click More > >.

    Double-click Oculus Tray Tool. Click More.

  13. Click the dropdown menu in the Visual HUD Overlay section.
  14. Click Performance or any other display option. Performance will show you the FPS of the current app.

    Click dropdown menu. Click Performance.

You can now place the Rift on your head and you'll see a graph that monitors your performance.

Disable f.lux

f.lux settings

Anyone who has used f.lux knows how great it is — no more blinding light, no more eye strain, and no more blue light keeping you up at night. The problem is that a bunch of VR users who have f.lux enabled on their PC find that it can interfere with performance.

Before you head into VR, make sure you either close the program completely or enable safe mode in the Settings menu.

Enable Aero on Windows 7

We were tipped off by reader ymo1965 to enable Aero if you're still using Windows 7. Why? Without it, any overlapping windows will cause performance issues. Something something blame it on Microsoft. Thanks for the tip ymo1965!

Consider overclocking your graphics card and processor

Overclocking, if you don't know, is the process of increasing your hardware's clock speed so that it performs better. It's a great way of getting a few more months out of an aging GPU or CPU, but there are risks involved.

Hardware like your CPU and GPU come with cooling systems in place based on the heat they create while performing at stock speed. Raising that speed with overclocking will also raise the heat, and, if not properly cooled, your hardware can become damaged or even experience a full failure (more common on old hardware than newer hardware). Overclocking will also quite often void the warranty on your hardware.

Each piece of hardware has different overclocking thresholds (if it's even possible), so creating a one-fits-all guide is almost impossible. There are, however, plenty of existing discussions populating the internet — overclock.net is a great place to ask questions and receive informed answers.

Overclocking your CPU and GPU is arguably the best way to eke the most performance out of your hardware, but there is no free lunch. Heed the risks, and proceed at your own caution.

More resources

Be sure to check out our WMR ultimate guide and our WMR troubleshooting guide for more information about the emerging VR platform.

Updated February 28, 2018: This article has been refreshed to ensure you're still getting the absolute best ways to eke the most performance out of your PC.

Why does battery life get worse over time?

$
0
0

The chemistry that can provide power from metals makes those metals degrade over time and there's not much we can do about it.

I'm sure you've noticed that you see a noticeable difference in how well a phone battery holds a charge after a year or so. If you keep a phone long enough, its battery may not even have enough charge to survive a whole day. Have you ever wondered why?

Batteries: How do they work?

Electricity isn't magical. In fact, it's a pretty boring subject for most of us and we only want it to be there when we need to use it. But to understand why your phone needs charged more now than it did when you first got it, you need to know a little bit about how a battery works. Don't worry, we're going to stick with the basics here.

Electricity, like any sort of energy, isn't a thing you can create. All the things we think of as "making" electricity are really only converting one form of energy into another, and a battery uses a chemical reaction (energy) to build an electrical charge that can be metered out over time. Different materials can be used to build this charge and they will produce different results. In our phones, we use lithium-based batteries because they provide a decent level of output for a reasonable cost.

The estimated life of a phone battery is just that — an estimate.

Inside a phone battery, you'll find three components that are important for what we're talking about: a negative electrode (called an anode and typically made of graphite), a positive electrode (called a cathode and made from a mix of lithium and other metals), and an electrolyte solution. The chemistry between these three things is simple at its base and is why they can be used to store energy. When you apply a charge to the electrodes (from your charger) lithium ions are positively charged and are attracted to the negative electrode. When you pull a charge away from the battery these lithium ions lose their positive charge and are no longer attracted to the negative electrode. The longer you pull the stored energy away from a charged battery, the number of lithium ions that are no longer charged increases until there just isn't enough of them left to produce any output and the battery is dead. Plugging it into a charger resets this cycle.

"Cycle" is an important word here. Because batteries are designed to store a charge it's difficult to measure their usable life as a unit of time. A battery that lasts two years for you may only last six months for someone else because they are being used differently. So that we can have an estimate of how long to expect them to last, battery longevity is measured by charging cycles. A phone battery is typically designed to last around 500 to 600 cycles, and a cycle is defined as charging a completely dead battery to 100% then draining it to zero again. Charging a battery that has 50% charge left on it, then draining it back to 50% is a partial cycle, which is why you'll hear it recommended to charge your battery before it gets low and also hear that you shouldn't as ways to game the system and stave off that 500th cycle. Of course, it doesn't work that way because the battery doesn't actually count the number of charge cycles. Five hundred is just an estimate.

But longevity can be measured in cycles because of what happens when you charge a battery and how it affects future charging cycles, the among of energy that can be stored and the potential (think the number of volts) of the stored charge.

Oxidation and efficiency hate each other

Because electric vehicles are a real thing and the batteries they use are insanely expensive, plenty of studies have been done about why lithium-ion batteries degrade during their lifetime. Thankfully, this also applies to the less-expensive (but still expensive!) batteries inside our phones, and it's because of chemical changes that happen during charging the batteries.

We know that charging a battery positively charges lithium ions which are then magnetically (electricity is magnetism) attracted to the negative electrode. As more and more charged ions are attracted, the difference of potential between the negative electrode and positive electrode increases. That's how you measure voltage — the difference of potential energy between two electrodes. Once it reaches a specific reading the battery is considered fully charged. The opposite is true while discharging a battery and the difference of potential decreases until it reaches zero because no more positively charged ions are present at the negative electrode. But that doesn't mean the negative electrode is clean and the same way it was before you started.

Electrodes oxidize. The same way water and air can cause iron to rust (which is where the word oxidization comes from), lithium, graphite and electrolyte salts will cause an electrode to oxidize. When every positively charged ion is stripped away from the anode in a battery a microscopic layer of particles is left behind and has been chemically bonded to the graphite anode. These particles are made from lithium oxide (lithium bonded with oxygen) atoms and lithium carbonate (lithium bonded with carbon) atoms, neither of which has the same chemical or electrical properties as graphite. This layer interferes with the charge/discharge cycle and both the difference of potential (voltage) and the number of charged ions that can be attracted changes, and eventually, the changes are enough to notice. If you continue to use the battery and charge it as you normally would, a point happens where there isn't enough electrical energy being stored to power your phone.

Charging a battery essentially changes the composition of the electrodes and affects the way it will charge in the future.

Different types of lithium-compositions, as well as different salts used in the electrolyte solution, have an effect on how much of these deposits are left behind on the electrode, but the materials that make for a cleaner cycle aren't necessarily the best because they can't provide as much stored power. We want high-capacity, low-power batteries in our phones because they are safer than high-power batteries and cost less and we want them to provide power to our phone as long as they can. An electric vehicle can use high-capacity, high-power batteries because they are protected by a solid frame and aren't as likely to be damaged. A car also needs to be able to go long distances between charges. But the cost of a replacement battery for a Tesla Model S is $12,000, too. Part of that cost comes from the expensive materials used to build a lithium-nickel-cobalt-aluminum-oxide battery as opposed to the basic lithium-cobalt batteries used in a phone that don't last nearly as many cycles before they degrade.

Voltage matters

One of the biggest factors that can influence how many cycles a lithium-ion battery will last is its voltage. Because phones and cars aren't the only things designed to run on rechargeable lithium batteries, in 2015 the U.S. Department of Energy spent a lot of money and time to see exactly what causes problems and how to mitigate them because satellites use lithium-based batteries and solar chargers. After the composition of the battery itself, the next biggest culprit that can affect battery longevity is the charging voltage and the voltage of the held charge.

The chemistry that makes a lithium battery work naturally degrades the anode, and that's what we talked about above. But if you charge a battery with more than 3.9 volts, or store a charge with a difference of potential higher than 3.9 volts the same sort of degradation happens to the cathode (positive electrode) which cuts the longevity of a battery in half. Charging voltage and held voltage are essentially the same thing because you're exciting all the components of a battery except that charging also introduces heat, and the higher the charging voltage the hotter it will be. Heat applied when a battery is excited higher than 3.9 volts worsens the degradation of the cathode.

There is no secret cabal of battery makers who are trying to fleece us; it's all chemistry.

In other words, the voltages necessary to power a modern phone and quickly charge its battery mean it's almost impossible to "fix" things. Anyone with a battery-powered drill has seen this in action. The 12 or 14-volt batteries used in a tool don't last nearly as many cycles as the ones in our phones. They store and operate at a higher voltage, charge at a higher voltage and much hotter, and can be noticeably affected after just a few charging cycles. They use the same basic lithium-based batteries as a phone because using the sorts of materials we see in a Tesla S battery would make them more expensive, and they just don't have a very long lifetime. Thank goodness we can recycle most of the materials in them and we're not drowning in a sea of discarded Makita and Porter-Cable batteries with lithium being more expensive than gold.

The good news is that all the companies who make lithium batteries are working on making things better. Whoever can come up with the first battery that lasts significantly longer will make a lot of money from it. All we can do is charge our phones when they need to be charged, and know that there isn't some conspiracy between battery manufacturers to get us to buy new products more often.

These phones have the best battery life

Should you buy or rent a cable modem?

$
0
0

We'll need some math.

This is one of those things you've probably never though about but most likely should. Because standing between your computer and all your connected stuff is a little blinking vampire that most likely is costing you money.

Presenting: The cable modem.

That's the little thing with three or four lights that sends the GBs to your Wifis and lets you do all the things. And there's a pretty good chance that you're shelling out money for it every month. Money that could be used to, say, buy a cable modem instead.

The decision is easy. Mostly.

First, find out how much your internet service provider is charging to rent a cable modem every month. The easiest way to do that is to look on your bill. Or maybe you'll need to give 'em a call.

Comcast — America's largest ISP — by example, charges $10 a month — plus taxes and fees — to rent a modem. The No. 2 ISP, Charter's Spectrum service, gives out a modem for free. So it'll definitely vary by service.

This is basic math, folks. If renting costs more than purchasing, then you should probably buy outright.

But let's go back to the Comcast example, since the math is nice and neat. We'll assume an extra $2 a month in taxes and fees, for a nice round $12 a month for the privilege of having the hardware necessary to use the internet that you're paying for in the first place. That's $144 a year.

If you want a purchase a modem outright, though, it's easy enough to do. You may be able to just buy one from your ISP and save a trip. Or if you prefer the online route, the Netgear CM500 cable modem — one of the higher rated ones out there, but there most certainly are others — is just $53 on Amazon. (Just be sure to check your ISP's website to make sure you're buying a compatible modem.)

That math is pretty darn simple. In our example you're spending almost three times as much to rent a modem than if you were to buy one yourself. And that's if you were to only keep your purchased modem for one year. The longer it works, the more you'll save.

Are there any reason to rent? Sure. Mostly, laziness.

Caring for a cable modem isn't exactly difficult. Ninety-nine percent of the time it just sits there, dutifully blinking away. But when things go wrong is where renting might actually be advantageous.

For one, renting a cable modem means your ISP is on the hook to replace it should it die, or update it should that need arise. Basically, you're paying extra to avoid the hassle of worrying about it. On the other hand, if something does go wrong you're going to be inconvenienced whether or not you bought the modem yourself.

So the questions you have to ask yourself are:

  1. Do you like wasting money on renting things you could purchase instead?
  2. Do you want to deal with replacing or updating your modem yourself?

Just do a little homework, and do a little math, and save yourself a little dough.

Why your internet is slow (and what you can do about it)

$
0
0

Why your internet is slow (and what you can do about it)

It might not be 56K slow, but it's still causing a problem.

It's easy to take for granted your high-speed internet connection and router that allows most — if not all — of your devices an easy wireless hookup. The minute there's a drop in performance, though, all bets are off and you scramble to find a solution; no one likes internet that's slower than what they're used to. Let's take a look at some of the common causes for a slow internet connection and what you can do about it.

See the best Wi-Fi routers in 2018

Why your internet is slow

Why your internet is slow

There are many more unforeseen reasons your internet might be slowing down than what I have listed here, but this is a good start.

  • Device is connected over Wi-Fi. A wireless connection to your router is, in most cases, going to cut the speed that you're paying for from your internet service provider (ISP). Signal interference can come from other electronics (particularly microwaves), walls, and furniture, and simply moving to the outer reach of the antenna will cause issues. If you want the best speed possible, stick with a wired connection using an Ethernet cable.
  • Device is outdated. You won't likely see a sudden drop in internet speed as your device has its third birthday, but trying to run modern web browsers — especially loaded down with extensions and add-ons — on aging hardware will make it seem like your internet speed is the problem.
  • Router needs a reset. Just like a PC, powering down your router (usually by unplugging the power cable) can do wonders for your internet. It's easy for your router to get out of sync with the myriad wireless devices connected to it, and a reset usually gets everything back the way it should be.
  • PC might be infected with malware. One of the most common causes of a noticeable change in network speed is a malicious program communicating with the open internet, using up your bandwidth before you even begin. Let your antivirus do a full scan and see what it dredges up.
  • Too many people using the same band. Unless your router and devices have multi-user, multiple-input, multiple-output (MU-MIMO) capabilities, data is delivered in a rotating manner to any connected devices. The more devices, the longer it takes the router to arrive back at the first.
  • You're connected to an extender.Wi-Fi extenders are a low-cost way to extend the reach of a wireless signal, perfect if a back corner of your home can't be reached by your router alone. However, extenders generally cut bandwidth in half due to wireless backhaul traffic. You have data delivered to your device, and your device must deliver data back to the router.
  • ISP has you throttled. Did you recently re-download your entire Steam library onto a new hard drive? Did you recently binge an entire eight seasons of a TV show? Depending on the plan you have with your ISP, they might be throttling your connection.
  • ISP is having technical issues. Your slow internet might be completely out of your hands. The network beyond the modem in your home is extensive, and there are plenty of opportunities for it to fail. A quick search in a web browser (as long as your internet isn't completely down) will usually bring up a website where you can verify whether or not the problems are network-wide.

Even with all these potential problems, there are still plenty more things that could be affecting your overall speed. If you're downloading a file, the server on the other end might be getting slammed, and likewise, a website that's experiencing unusually high traffic will take longer to load. Depending on the density of your neighborhood, everyone trying to connect at once might be causing speeds to take a hit.

What you can do about slow internet

What you can do about slow internet

If you suspect your internet woes are coming from inside, there are a few things you can do to test and fix the issues. As always, it's never a bad idea to give your router a power cycle — unplug it and plug it back in — before trying anything else.

Test your internet's speed

Watching a web page slowly load doesn't always have to do with your internet speed. Your RAM might be busy dealing with thirty browser tabs (or some other equally-strenuous task), and your processor (CPU) might likewise be busy with something other than displaying your favorite website.

To ensure it is your internet speed that's causing a problem, it's not a bad idea to run a speed test. This will also let you know whether or not you've outgrown your current ISP plan — if you're seeing download and upload numbers that match what you're paying for and still don't find it fast enough, it's probably time to upgrade.

Speedtest.net seems to be the go-to place for checking internet speeds. Just click the big "Go" button in the middle of the page and let it do its thing. To get a true reading, always try to test using a wired connection.

Test your internet speed at Speedtest.net

Use an Ethernet cable

Especially for those super important tasks — online gaming, TV show streaming, file-sharing — an Ethernet cable can make a huge difference. Wireless signals at best get a lot of interference and usually cut speeds (unless you have a big, beefy router), and sticking with wired should immediately make a noticeable difference.

Try changing router band or channel

If your router is relatively new, it probably operates with one or two 2.4GHz bands as well as a 5GHz band. It might steer your devices toward the appropriate band based on usage, but more commonly, you'll be the one choosing. To put it simply, the 2.4GHz band can reach further but can't offer the same speeds as the 5GHz band. If you're into something that requires speed, give the 5GHz band a go, but don't travel too far from the router.

Most routers should also allow you to choose the channel on which it operates, ranging from numbers 1 through 11. A lot of routers, by default, will be set to a certain channel, which means that the neighbors downstairs and above you are likely using the same one. Try out channels 1, 6, and 11 (non-overlapping) for best results. Changing channels varies from router to router, but steps should be included in the documentation.

Linksys Velop mesh

Buy a new router or mesh system

Whether or not your ISP includes a router in their subscription plan, you might want to upgrade to something that can handle your needs. Whether that's a router with MU-MIMO capabilities, dual bands, or the 802.11ac standard, investing in new hardware can often alleviate your slow internet issues. No matter what you're buying, ensure you aren't buying too much. It doesn't make sense to buy a new router that far exceeds the speeds delivered by your ISP if you don't intend on upgrading.

If your internet problem is more to do with not having enough coverage in your home, a mesh Wi-Fi system might be your best bet. These systems are designed to blanket an area in an uninterrupted wireless signal without some of the speed sacrifices found with wireless extenders.

Subscribe to a new ISP plan

Sometimes your needs will exceed what your ISP plan has to offer. Just a year ago I was enjoying a 25Mbps connection, but since upgrading to 150Mbps, I can't imagine going back. If you're constantly noticing how slow your internet is while it's operating normally, it's probably time to up your plan.

Contact your ISP

You've exhausted your resources, and your internet still seems slower than usual. The network beyond your modem is complex, and it's easy for something to go wrong. It never hurts to contact your ISP's tech support department, as they have the resources needed to diagnose most big issues and will let you know if they detect an issue that you can fix right at home.

More resources

Rainbow Six Siege Outbreak Packs: Pricing, skins list, contents and more

$
0
0

Catch up on all the details for Rainbow Six Siege's new loot crate system, called "Outbreak Packs."

Tom Clancy's Rainbow Six Siege is set to kick off its third year of post-launch content, with an upcoming expansion titled "Operation Chimera." Diverging from the game's competitive nature, Chimera delivers a fantasy cooperative event, "Outbreak," themed around a zombie epidemic.

While the focus lies on Outbreak, the mode is also accompanied by "Outbreak Packs." Opening a new way to secure rewards, these packs house an exclusive collection of themed cosmetics. Here's everything we know about Outbreak Packs so far.

Rainbow Six Siege Operation Chimera: Everything we know

See at MicrosoftSee at Amazon

What are Outbreak Packs?

Ubisoft implemented Rainbow Six Siege's "Alpha Packs" last year, which were randomized loot drops for cosmetic content. Building on the existing roster of weapon skins, collectible charms, and armor variants, the system provided a regular way to earn through gameplay.

Operation Chimera will introduce a successor to Alpha Packs, "Outbreak Packs," which take advantage of similar randomized drops. Tying directly into Outbreak, these will provide access to exclusive gear based on its biohazard theme.

The biggest change with Outbreak Packs is their tie to real-world money, requiring the game's premium currency, R6 Credits. This means there will be no way to obtain Outbreak Packs for free, aside from four complementary packs distributed to mark their release. Luckily, no duplicates can be received from Outbreak Packs, so you won't be wasting money on previously-unlocked gear.

What items are included in Outbreak Packs?

There are 50 unique cosmetic items in the Outbreak Pack content pool, with no crossover with Alpha Pack offerings. Each pack contains one Outbreak event item, and with no duplicates, buying 50 guarantees the complete Outbreak collection. Inside these packs are weapon skins, headgear, uniforms, and charms, including Hazmat suits and an Elite skin for Ash. All content included in the Outbreak pool varies in rarity, falling between rare and legendary.

Ahead of the the expansion's upcoming release, we've obtained a list of all Outbreak Pack content, via the game's Technical Test Server.

Weapon Skins

  • Universal – Retro Steel Weapon Skin (Legendary)
  • Spear .308 for Finka – Hemorrhage Weapon Skin (Legendary)
  • V308 for Lion – Hemorrhage Weapon Skin (Legendary)
  • Universal – Outbreak Code Red Weapon Skin (Epic)
  • 556xi for Thermite – Septicemia Weapon Skin (Epic)
  • 9x19VSN for Kapkan, Tachanka – Septicemia Weapon Skin (Epic)
  • SG-CQB for Lion, Doc, Rock, Twitch – Septicemia Weapon Skin (Epic)
  • SK 4-12 for Buck – Septicemia Weapon Skin (Epic)
  • AK-12 for Fuze – Hazmat Yellow Weapon Skin (Rare)
  • Bearing 9 for Echo, Hibana – Toxic Grip Weapon Skin (Rare)
  • LMG-E for Zofia – Hazmat Yellow Weapon Skin (Rare)
  • OTs-03 for Glaz – Toxic Grip Weapon Skin (Rare)
  • R4-C for Ash – Toxic Grip Weapon Skin (Rare)
  • SMG-11 for Sledge, Smoke – Hazmat Yellow Weapon Skin (Rare)
  • T-95 LSW for Ying – Hazmat Yellow Weapon Skin (Rare)

Weapon Charms

  • Universal – Parasite Six Charm (Epic)
  • Universal – Infected Longhorn Charm (Rare)
  • Universal – Parasite Breach Charm (Rare)
  • Universal – R6 CBRN Charm (Rare)
  • Universal – Spoopy Charm (Rare)

Uniforms

  • Ash – Elite Uniform (Legendary)
  • Lion – Decontamination Uniform (Legendary)
  • Finka – Decontamination Uniform (Legendary)
  • Buck – Decontamination Uniform (Epic)
  • Smoke – Decontamination Uniform (Epic)
  • Ying – Decontamination Uniform (Epic)
  • Kapkan – Decontamination Uniform (Epic)
  • Ash – Decontamination Uniform (Rare)
  • Doc – Decontamination Uniform (Rare)
  • Fuze – Decontamination Uniform (Rare)
  • Glaz – Decontamination Uniform (Rare)
  • Hibana – Decontamination Uniform (Rare)
  • Tachanka – Decontamination Uniform (Rare)
  • Thermite – Decontamination Uniform (Rare)
  • Zofia – Decontamination Uniform (Rare)

Headgear

  • Doc – Isolation Headgear (Legendary)
  • Smoke – Isolation Headgear (Legendary)
  • Ash – Isolation Headgear (Epic)
  • Glaz – Isolation Headgear (Epic)
  • Tachanka – Isolation Headgear (Epic)
  • Thermite – Isolation Headgear (Epic)
  • Buck – Isolation Headgear (Rare)
  • Finka – Isolation Headgear (Rare)
  • Fuze – Isolation Headgear (Rare)
  • Hibana – Isolation Headgear (Rare)
  • Kapkan – Isolation Headgear (Rare)
  • Lion – Isolation Headgear (Rare)
  • Ying – Isolation Headgear (Rare)
  • Zofia – Isolation Headgear (Rare)

While opening Outbreak Packs, all of the above content can be dropped in a randomized order.

How do you get Outbreak Packs?

The Outbreak event is set to run from March 6, 2018, until April 3, 2018. Ubisoft plans to distribute four Outbreak Packs to all users logging in over this period, meaning you won't have to buy all 50 Outbreak Packs. New players who purchase the game's "Advanced Edition" will be rewarded 10 further Outbreak Packs.

During this four-week period, Outbreak Packs will also be available for purchase. Outbreak Packs will cost 300 R6 Credits each, which depending on the number of credits purchased, roughly varies between $1 and $3. Factoring in the four free packs for most players, you'll pay a minimum of 13,800 R6 credits (around $90) for the complete collection. Owners of the game's Year 3 Season Pass will recieve a further 10 percent discount.

Outbreak Packs will be found under the "Packs" section of the main menu, in the same location where Alpha Packs are located. From here, packs can be purchased and opened.

After the event concludes, both the Outbreak game mode and Outbreak Packs will be inaccessible. Unlocked Outbreak items will remain usable and may end up as a rarity on the battlefield.

Your thoughts

What do you think of Outbreak Packs so far? Are you planning to buy the complete collection? Make sure to drop your thoughts in the comments.

See at MicrosoftSee at Amazon

Updated March 6, 2018: We've revised this guide for the Outbreak Pack launch.

How to properly set up a used Windows 10 PC

$
0
0

Did you get a used PC? In this guide, we'll help you to set it up the right way to have a piece of mind and keep your information secure.

When you buy a used or refurbished desktop, laptop, or tablet from someone you know, Craigslist, or from retailers like Best Buy, Amazon, Newegg, or eBay, it's crucial to set it up correctly because you can't trust what's on it, and your information could end up falling into the wrong hands using the default setup.

If starting the new device and the Out-of-box experience (OOBE) appears, it's usually a good sign, as it's an indication that the previous owner or retailer followed the steps to prepare and sale the device properly. However, if the computer boots straight to the desktop, this isn't a good sign, and you shouldn't use it because you don't know its configuration or what's installed on it.

The company or the person you bought it from could have installed applications that you may not use, some of which might not be legitimate software, and you don't know if the device is infected with any malware like virus, Trojan, spyware, adware, keylogger, or other malicious programs.

Usually, getting a pre-owned PC from a well-known company, it's likely that they followed the proper procedures to reset it. However, you can never know for sure. Sometimes, even big companies can have problems — do you remember the Lenovo's Superfish adware controversy?

In this Windows 10 guide, we'll go through the steps to safely set up a used computer to keep your system and data secure from possible malicious software and hackers.

How to create a USB bootable media

The best way to safely set up your used or refurbished computer is to perform a clean installation using a USB bootable media to start from scratch with a safe copy of Windows 10.

To create a bootable drive with the installation files of Windows 10, you'll need to connect a USB flash drive with at least 8GB of free storage, and preferably, you want to go through the following steps using a different computer:

If you don't have one, you can get a cheap 16GB USB drive on Amazon.

  1. Download the Media Creation Tool from the Microsoft support website clicking the Download tool now button.
  2. Double-click the MediaCreationTool.exe file to launch the experience.
  3. Click the Accept button to agree to the legal terms.
  4. Select the Create installation media (USB flash drive, DVD, or ISO file) for another PC option.

  5. Click the Next button.
  6. Uncheck the Use the recommended options for this PC option.
  7. Select the correct language, architecture, and edition as required.

  8. Click the Next button.
  9. Select the USB flash drive option.

  10. Click the Next button.
  11. Select the USB drive from the list. (This process will erase everything on the flash drive, as such make sure to backup any files to another location as necessary before you continue.)

  12. Click the Next button.
  13. Click the Finish button.

The Media Creation Tool should create a bootable media that works on both Basic Input/Output System (BIOS) or Unified Extensible Firmware Interface (UEFI) firmware, but if you're having problems, you can use these steps to create an installation drive with UEFI support.

How to configure your PC to boot from a USB flash drive

After creating an installation media, you want to make sure your device can boot from the USB flash drive, which means that you'll need to access the BIOS or UEFI firmware on your motherboard to change the boot order.

This process typically requires hitting one of the function keys (F1, F2, F3, F10, or F12), the ESC, or Delete key as soon as you start your device. However, these settings will be different per manufacturer and even per device model. (Always check your PC manufacturer's support website for more specific instructions.)

After getting access to the BIOS interface, look for the Boot menu, change the boot order to start your device with the USB flash drive, and save the settings (usually using the F10 key).

If your device has a UEFI firmware, then the steps to change the boot order will be different as well.

On Windows 10 go to Settings> Update & Security> Recovery, and under "Advanced Startup," click the Restart now button.

Then select Troubleshoot> Advanced options> UEFI Firmware Settings, and click the Restart button.

Once you're in the UEFI firmware interface, look for the Boot menu, change the boot order to start with the USB flash drive you created, and save the settings.

How to do a clean installation of Windows 10

Although you could just use the reset feature included in the Settings app to clean up your device and reinstall Windows 10, the chances are that it'll not work if someone already has tempered with the installation.

Using the steps to do a clean installation will ensure everything that the previous owner had on the computer will be erased, and an untouched copy of Windows 10 will be installed without extra or suspicious software.

To perform a clean installation of Windows 10, do the following:

  1. Start your device with the USB flash drive with the installation files.
  2. On "Windows Setup," click Next to begin the process.

  3. Click the Install Now button.

  4. Click the I don't have a product key link to continue (if applicable). Of course, this is assuming you've received a properly activated device.

  5. Select the edition of Windows 10 (if applicable). This selection must match the edition your product key activates.
  6. Click the Next button.
  7. Check the I accept the license terms to agree. Otherwise, you can't continue.

  8. Click the Next button.
  9. Click on the Custom: Install Windows only (Advanced) option.

  10. Select the partition with the current installation of Windows (usually "Drive 0"), and click the Delete button to remove the partition from the hard drive.

    Quick Tip: If you have multiple partitions, on the primary hard drive (Drive 0), you want to select and delete each one. Windows 10 will re-create additional partitions as needed automatically.

  11. Select the empty drive (Drive 0 Unallocated Space).

  12. Click the Next button.

Once you've completed the steps, the setup will takeover, the hard drive will be erased, and a safe copy of Windows 10 will be installed.

How to configure the Out-of-box experience (OOBE) of Windows 10

After the installation, you'll need to go through the OOBE setup to finish the configuration of Windows 10 with your settings and information.

  1. Select your region.
  2. Click the Yes button.

  3. Select your keyboard layout.
  4. Click the Yes button.

  5. Click the Skip button.

  6. If you're using a Wi-Fi connection, you'll be prompted to enter the wireless credentials to connect. However, if you're using an Ethernet connection, your device will connect online automatically.
  7. Click the Set up for personal use option.
  8. Click the Next button.

  9. Type your Microsoft account information.

    Quick Tip: If you don't have a Microsoft account, click the Create account link and follow the on-screen directions.

  10. Click the Next button.

  11. Type your Microsoft account password.
  12. Click the Next button.
  13. Click the Set a PIN button.

  14. Create your new PIN to sign into Windows 10 without having to use a password.

  15. Click the OK button.
  16. Optionally, you can link your phone to your PC. For the purpose of this guide, click the Do it later link in the bottom-left corner.

  17. If you want to use Cortana, click Yes to continue. Also, note that you can enable the "Hey Cortana" feature by checking the Respond when I say "Hey Cortana" option.

  18. Choose the privacy settings for your device.
  19. Click the Accept button.

After configuring the Out-of-box experience, and you're in the desktop, you want to verify that your copy of Windows 10 has been activated by going to Settings> Update & Security> Activation. If the machine was using a properly activated copy of Windows 10, after the clean installation process, it should re-activate automatically.

In the case that it's not re-activating, you can use these troubleshooting steps or try to activate at a later time. However, if the computer had a non-genuine copy installed, it'll not reactivate, and in this case, you'll need to get a product key, which you can obtain by purchasing a genuine copy of Windows 10 on Amazon or the Microsoft Store.

Then you want to make sure to finish setting up your machine doing the following:

  • Check for updates going to Settings> Update & Security> Windows Update, and click the Check for updates button.
  • Install the apps you need. (Preferably only those available from the Microsoft Store.)
  • Set up OneDrive to sync your files across all your devices and keep them backed up in the cloud.
  • Windows 10 should automatically install and configure any device driver, but you can also use Device Manager to check and update any device driver as necessary.

It should be noted that the OOBE steps may be slightly different depending on the version of Windows 10 that you're installing, but the concept is always the same.

Wrapping things up

Typically, when buying a used PC pre-installed with Windows 10, the chances are that everything will be configured properly and there will be no problems. However, because you can never know for sure, you shouldn't take the chance of getting your personal information (such as email, personal files, pictures, online banking and shopping data, etc.) compromised.

With the clean installation process using a bootable media, it will help you to delete everything, including partitions and any file stored on the machine, and ensures that you're installing a safe copy of Windows 10.

While the cleanup process might seem a little intimidating and overwhelming for some people, it's a relatively simple task to tackle that shouldn't take more than two hours of your time.

More Windows 10 resources

For more helpful articles, coverage, and answers to common questions about Windows 10, visit the following resources:

How to disable adaptive contrast on the Surface Pro and Surface Book

$
0
0

If your Surface Pro or Book display suddenly shifts brightness at night time this simple registry trick will solve it.

For those who own a Surface Pro (4 or 2017) or Surface Book (1 or 2), you may notice an occasional and subtle flickering of the display, especially at night with a dimmed screen. Some of that may be attributable to "adaptive contrast," which auto-adjusts aspects of the screen based on light or dark scenes.

In this quick guide, we explain the difference between adaptive contrast and adaptive brightness, and more specifically, how to disable it.

What is adaptive contrast?

Adaptive contrast is very different than auto-brightness (or adaptive brightness) found under Settings > System > Display, which ramps up and down the display backlight on ambient lighting conditions.

Adaptive contrast differs because it adjusts based on the current image on your display rather than the ambient light in your room. It's like edge-lit local dimming of specific zones due to what is on the screen. (This is also different than High Dynamic Range (HDR), which is much more sophisticated and precise with more color-depth).

The feature is standard on modern TVs and high-end gaming monitors, but it can also be a source of frustration for some. The effect is most noticeable at night when you tend to have a lower display brightness because you're in a dark room.

To simulate the effect, go into a dark room, and open Microsoft Word (or anything with a white background) then switch to an app that is all black like Settings (if dark mode is enabled). You should see the screen slowly and smoothly dim and shift contrast.

Unfortunately, while you can easily disable adaptive brightness under Settings > System > Display > Change brightness automatically when lighting changes there is no easy way to disable adaptive contrast. While many users conflate the two, disabling auto-brightness won't solve this behavior if it bothers you.

Note:Some users install Intel's graphics drivers manually to enable the Intel graphics panel settings. While that will give you the option to disable adaptive contrast, the associated drivers – which are not approved for Surface – can have detrimental effects including BSODs, system crashes, and other instability.

How to disable adaptive contrast using the registry

Since Microsoft does not offer a way to disable adaptive contrast through the Windows 10 OS, the most direct way to do it is through the registry.

Warning: Modifying the system registry can have dire repercussions if not followed precisely, including driver failures, system instability, or not being able to boot into Windows. Users are always encouraged to run a system backup before making any changes to the registry.

Luckily, the registry change to disable adaptive brightness is just one key with a number change. The trick, however, is finding it. Here's how:

  1. From the Start screen search for regedit.

  2. Right-click it, and then and click or tap Run as administrator from the app command.

  3. Navigate to

    Computer\HKEY_LOCAL_MACHINE\SYSTEM\ControlSet001\Control\Class\{4d36e968-e325-11ce-bfc1-08002be10318}\0001

  4. Scroll down to mid-page, and then find FeatureTestControl and double-click to edit the DWORD Value.
  5. Change Value data from 9240 (default) to 9250 (leave in base hexadecimal).
  6. Hit OK to save the changes.

  7. Restart the Surface Pro or Surface Book to enable the change.

This registry change efficiently kills adaptive contrast with, as far as we know, no negative repercussions. To re-enable the feature, just retrace the above steps and change 9250 back to 9240, save, and restart.

Some users have noted that any time there is a significant Windows update this setting is reset to default (9240), so you may need to redo this edit once or twice a year.

More Windows 10 resources

For more help articles, coverage, and answers related to Windows 10, you can visit the following resources:


How to take a screenshot on Oculus Rift (after the 2.0 update)

$
0
0

How to take a screenshot on Oculus Rift

Keep a record of your VR experiences and achievements.

Rift Core 2.0, the in-progress software overhaul for Oculus Rift, has made it much easier to navigate the system using only Touch controllers, and it has added some personality to your Home area. There are a bunch more neat features — like a quality built-in desktop viewer — but there still isn't an obvious way to snap a screenshot. Until Rift Core 2.0 gets a true screenshot button, there's a workaround that will let you capture what you're seeing.

See at Amazon

How to take a screenshot with Oculus Rift

How to take a screenshot on Oculus Rift

In order to see on your standard monitor what's being displayed inside the Oculus Rift, you can use an Oculus Mirror tool that's included with the Rift install.

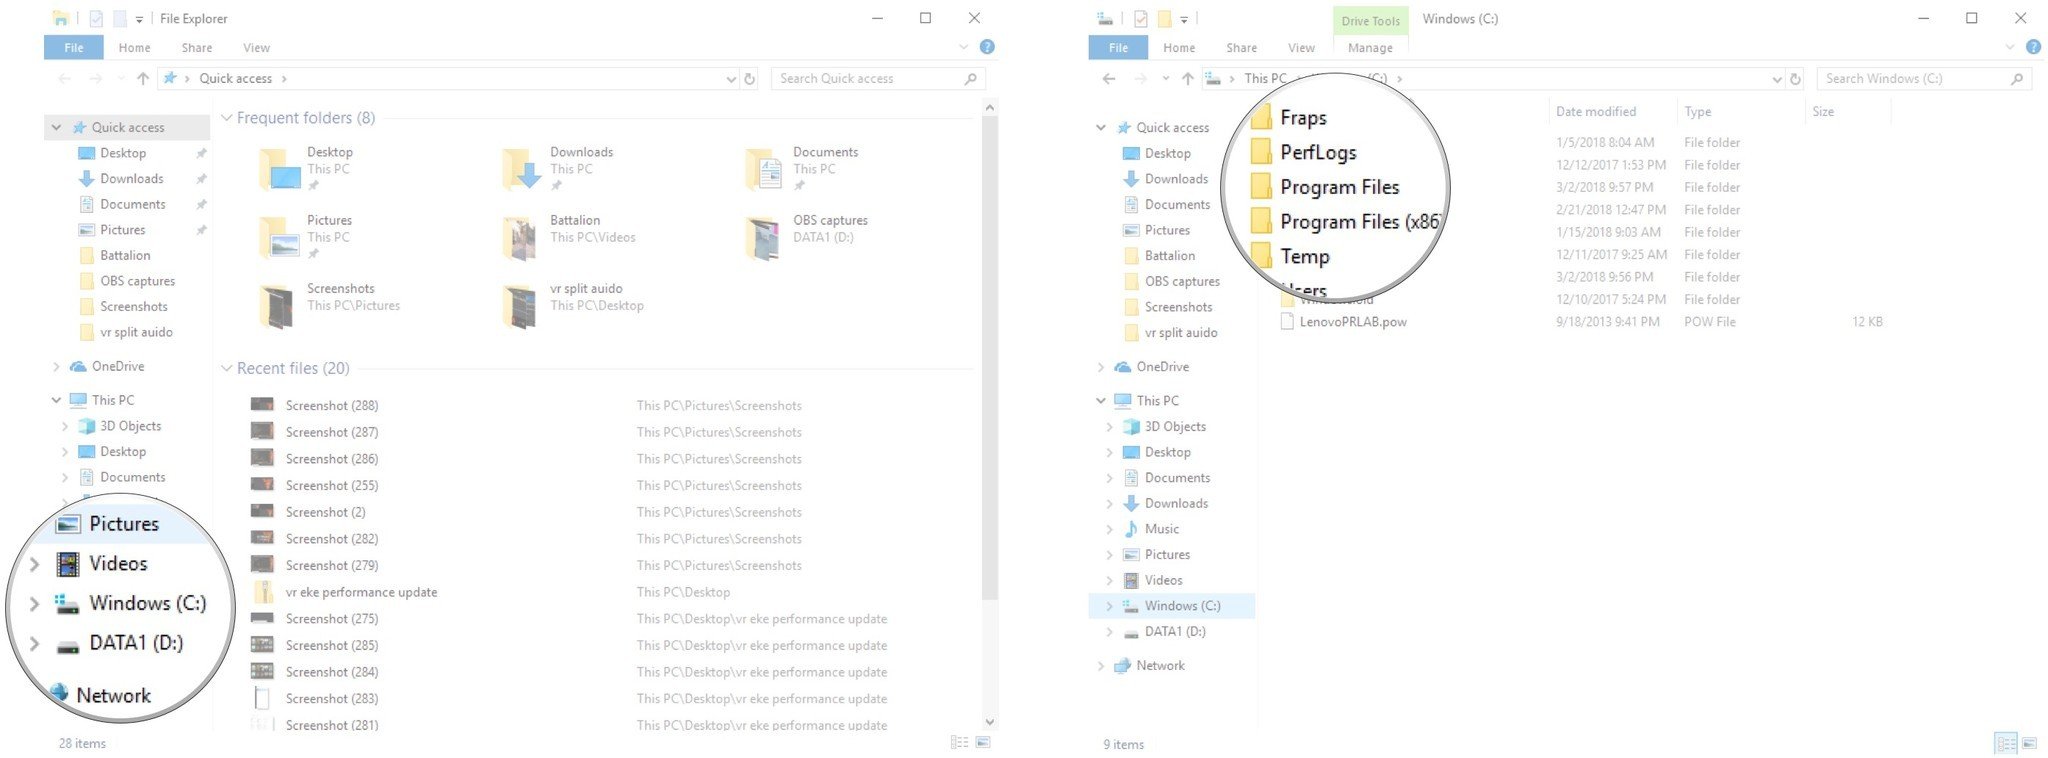
  1. Launch File Explorer from your Start menu, desktop, or taskbar.
  2. Click Windows (C:). If the primary install is on a different drive, click that drive instead.
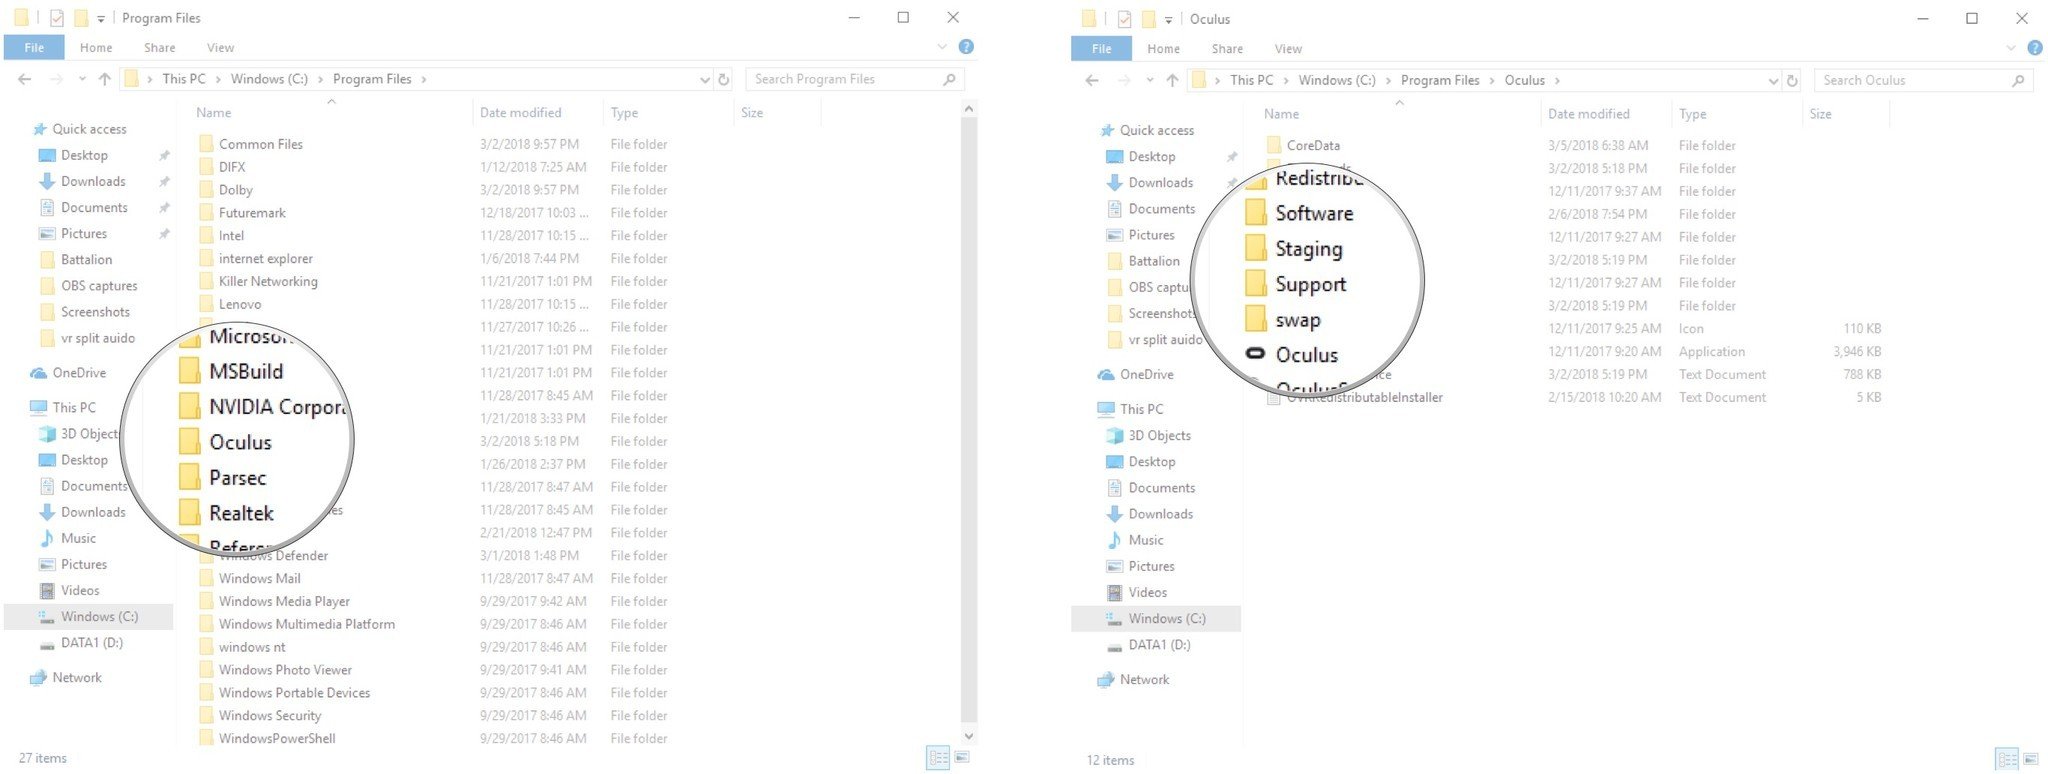
  3. Double-click Program Files.

    Click Windows (C:). Double-click Program Files.

  4. Double-click Oculus.
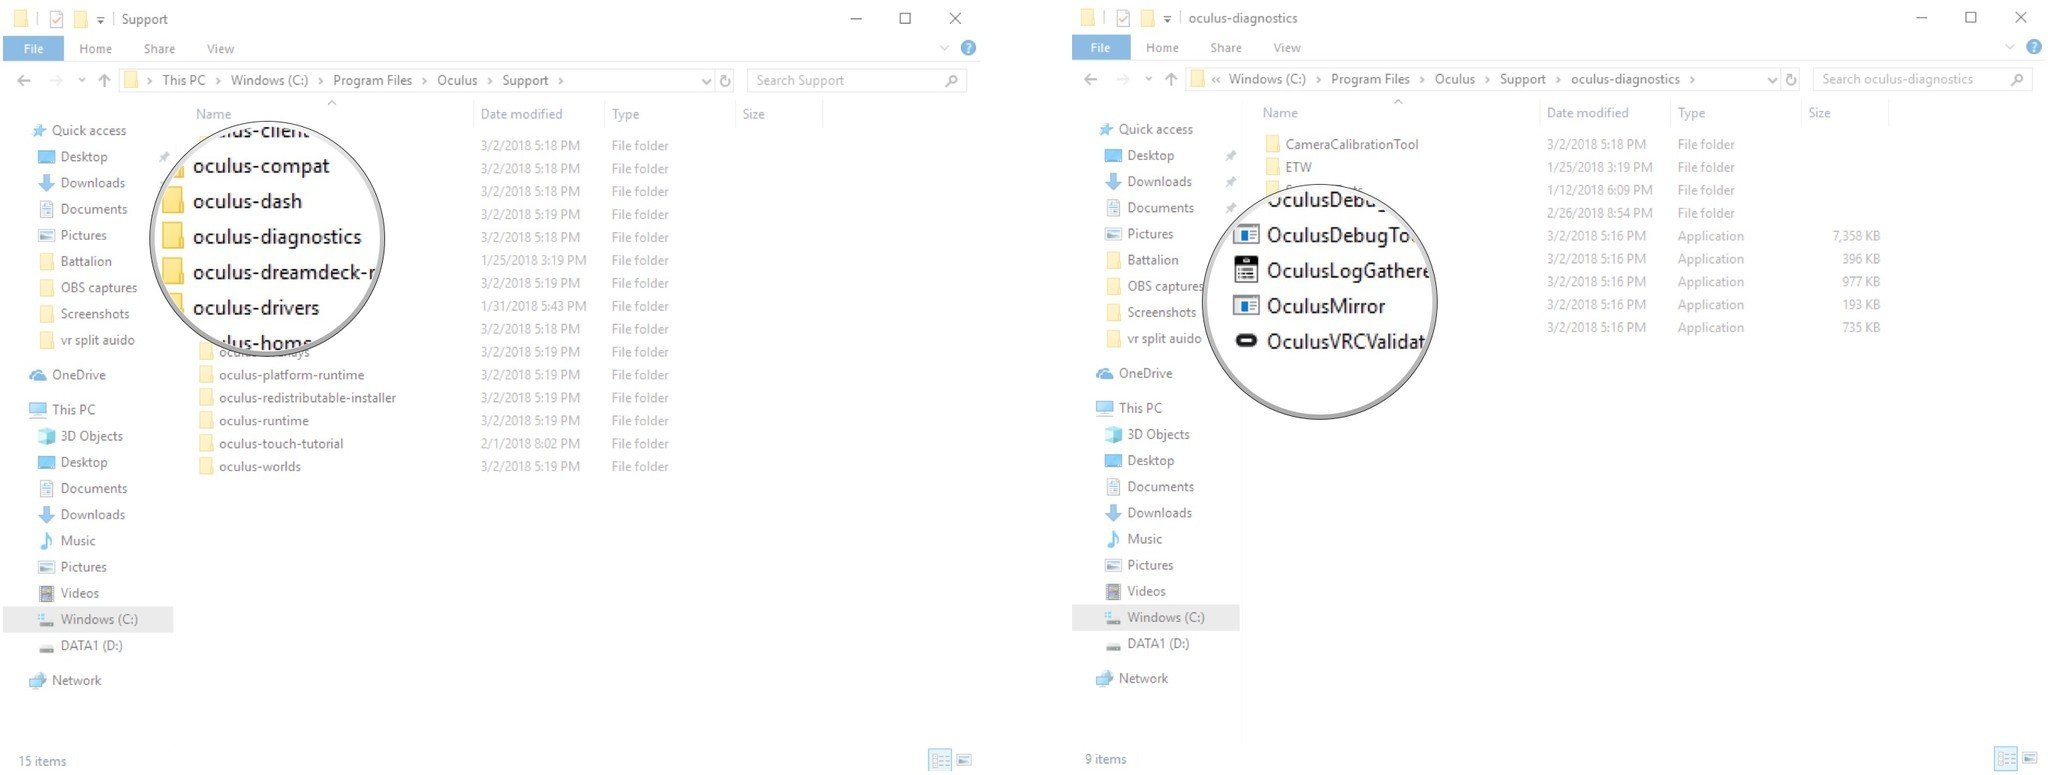
  5. Double-click Support.

    Double-click Oculus. Double-click Support.

  6. Double-click oculus-diagnostics.
  7. Double-click OculusMirror.

    Double-click oculus-diagnostics. Double-click OculusMirror.

Rather than showing both eyes at once, the Oculus Mirror now shows a complete view, just as you'd be seeing inside the headset. You can click and drag this window to make it larger, but remember that it might not look as crisp as you change the dimensions.

With Mirror open and showing the view inside the Rift, you can now nab a screenshot as you normally would, using the Windows key + Prt Scr shortcut on your keyboard. If the window isn't fullscreen you'll have some cropping to do, but if you record footage with something like OBS, you'll be able to specifically choose the Mirror window.

How to modify the Oculus mirror

The 16:9 default Mirror view works wonders for grabbing screenshots or recording video, but you might want to instead show both eyes separately or just the view of one eye. Here's how to make those changes.

  1. Launch File Explorer from your Start menu, desktop, or taskbar.
  2. Click Windows (C:). If the primary install is on a different drive, click that drive instead.
  3. Double-click Program Files.

    Click Windows (C:). Double-click Program Files.

  4. Double-click Oculus.
  5. Double-click Support.

    Double-click Oculus. Double-click Support.

  6. Double-click oculus-diagnostics.
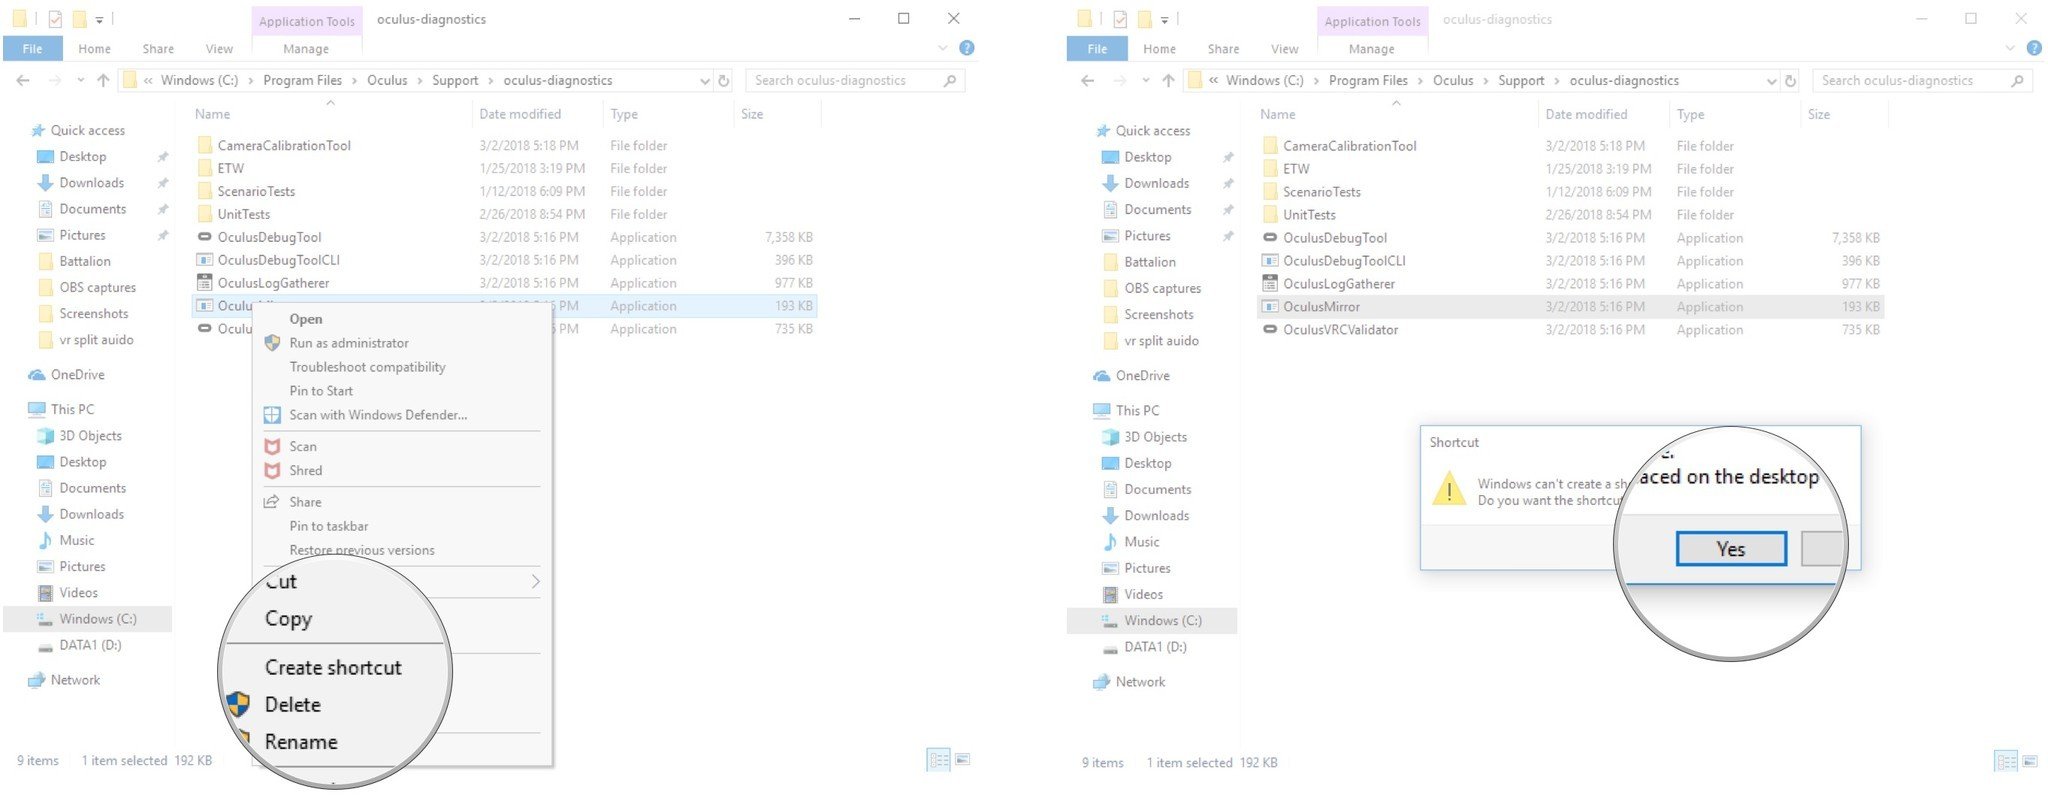
  7. Right-click OculusMirror.

    Double-click oculus-diagnostics. Right-click OculusMirror.

  8. Click Create shortcut.
  9. Click Yes.

    Click Create shortcut. Click Yes.

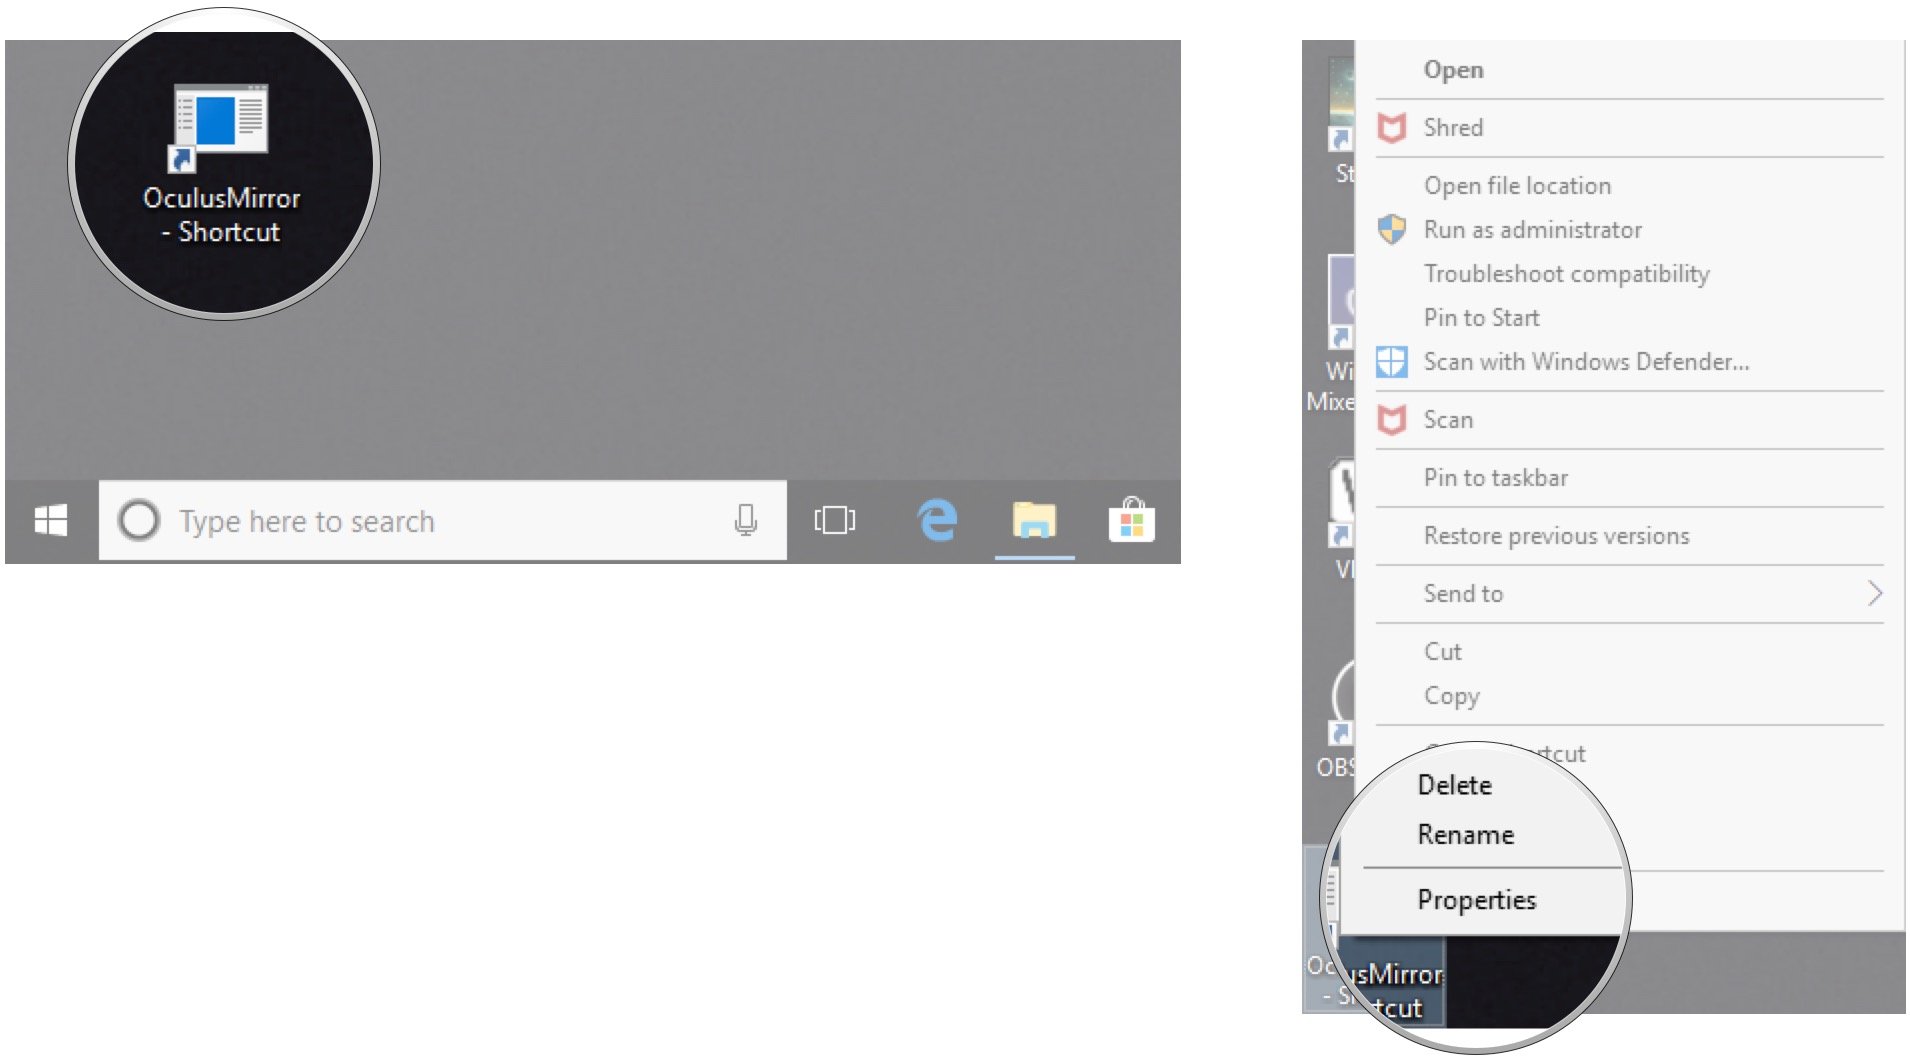
  10. Right-click OculusMirror - Shortcut on your desktop.
  11. Click Properties.

    Right-click the shortcut. Click Properties.

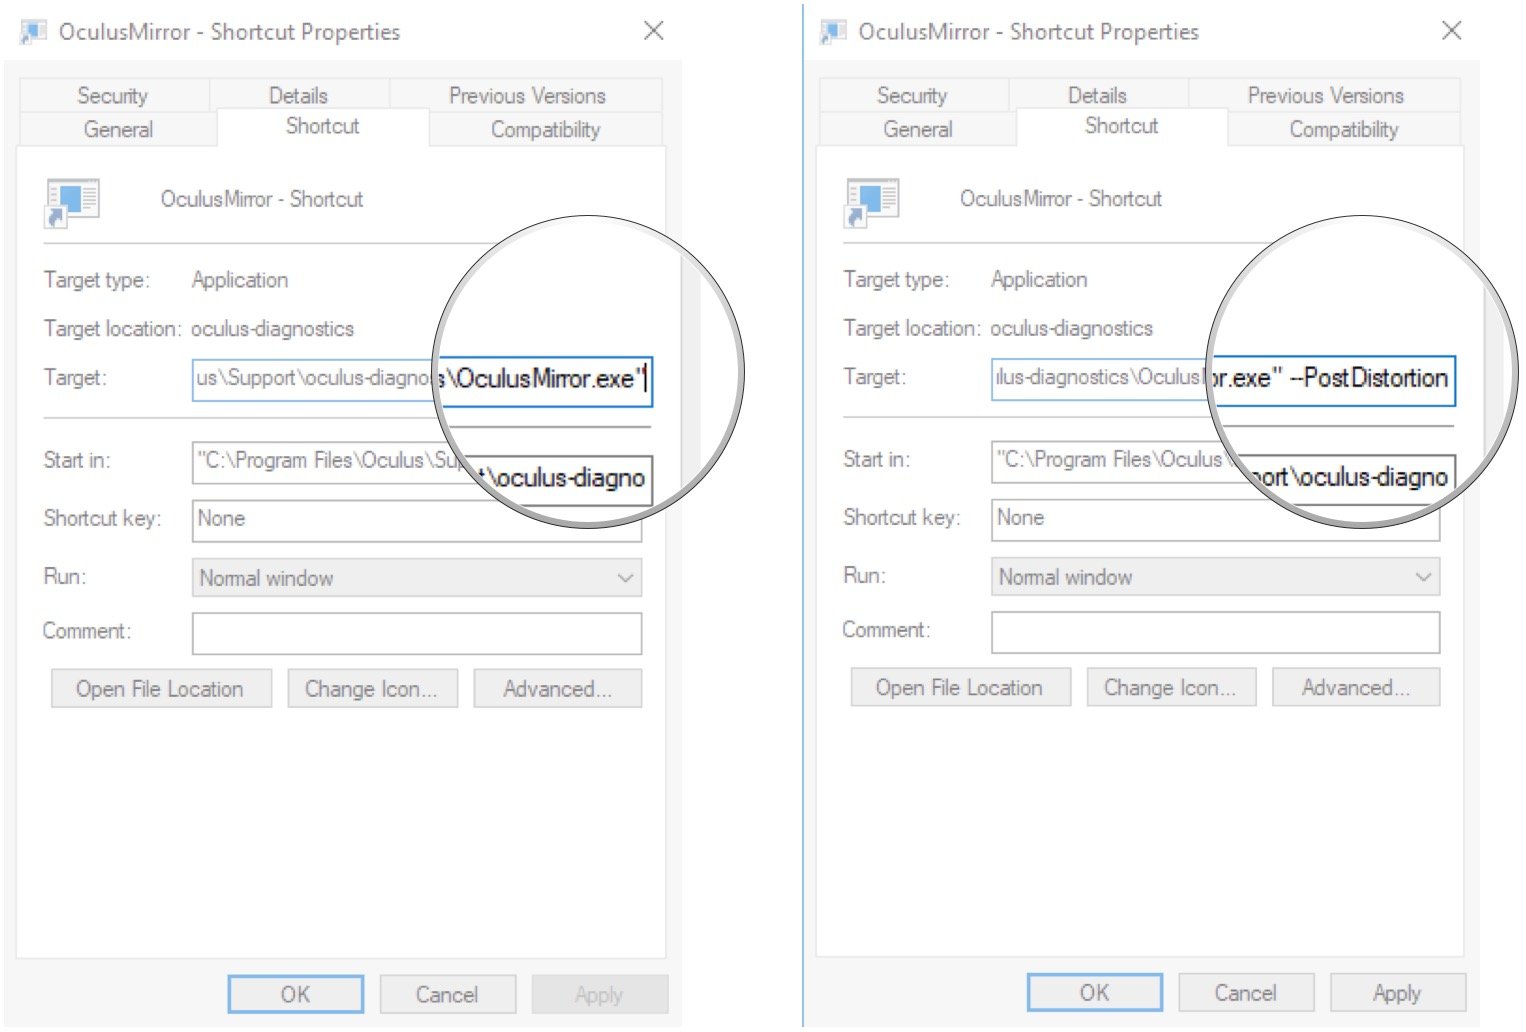
  12. Click the Target field so that your cursor is at the end of the string.
  13. Type a command.

    Click the Target field. Type a command.

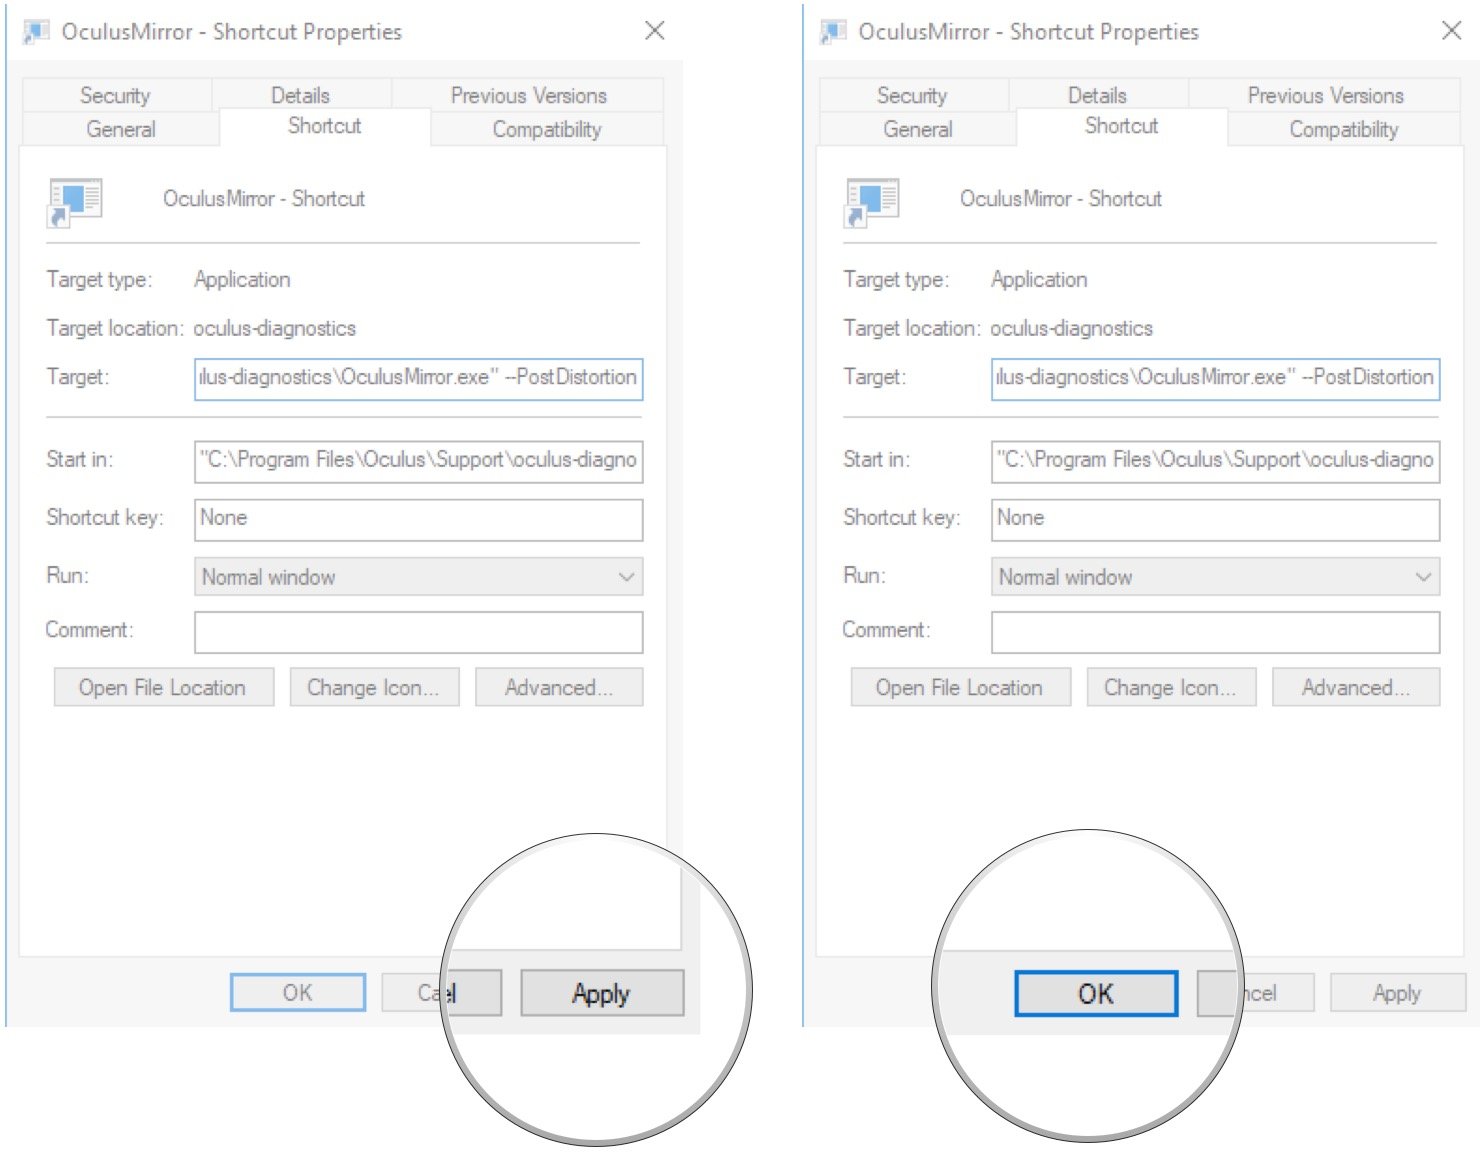
  14. Click Apply.
  15. Click OK.

    Click Apply. Click OK.

For step 13, there are a few commands you can try:

  • --RectilinearBothEyes— Both eyes are shown separate from each other.

Rectilinear both eyes view

  • --PostDistortion— Both eyes are shown separate from each other but without lens distortion and chromatic aberration.

PostDistortion view

  • --RightEyeOnly— You see only the right eye's view.
  • --LeftEyeOnly— You see only the left eye's view.

Always launch the Oculus Mirror with the desktop shortcut you created and modified in order to see the changes. At any time, you can remove the command from the Target field in order to return to normal.

More resources

How to use Cortana to search for Spotify songs by their lyrics

$
0
0

On Windows 10, you can now use Cortana to search and play songs on Spotify without knowing the name of the music, as long as you know the lyrics.

Cortana used to be able to listen for music and tell you the name of it, thanks to integration with Groove Music. As Groove died, though, so too did her ability to listen to music. However, she recently picked up integration with Spotify on Windows PC, and new features are coming in thick and fast.

One of the more interesting abilities Cortana has on Spotify is the ability to find music by its lyrical content. Here's how to do that.

Note: These features (of course) only work if Cortana's language is set to US at the moment.

How to use Cortana on Windows 10

Download Spotify on the Microsoft Store

Make sure Spotify is integrated with Cortana

  1. First, make sure Cortana is connected to Spotify. To do this, open Cortana by clicking on her icon in the taskbar.
  2. Next, select her Notebook icon on the left side.
  3. Select Music.

  4. Turn on Spotify.

Search by lyrics

First, you'll need to make sure Cortana is set up to respond to voice, head over here for information on how to do that.

  1. Say, "Hey Cortana, play the song with the lyrics...", including the lyrics from the song you wish to play at the end into your PC microphone.

  2. Enjoy!

Spotify isn't as cool as Groove Music, but it's a good alternative for a Grooveless world. These features are helping Cortana slowly catch up to Amazon's Alexa, which has been able to perform Spotify interactions for quite a while at this point.

Spotify is an all-you-can-eat music service, and industry leader, serving up millions upon millions of songs for streaming. You can grab it for around $10.99 per month, or free with ads. You can nab 3 months from Amazon for $30.

See at Amazon

How to edit music metadata info on Windows 10

$
0
0

If a song or album is showing the wrong info, you can use this guide to update its metadata on Windows 10 without having to use third-party apps.

On Windows 10, music files include album art and metadata information that media player applications use to display details like song name, artist name, or genre.

Usually, when you rip music you own or buy from a music service, this information updates automatically or comes embedded in the files. However, there will be times when this data may show up wrong or appear missing for a song or an entire album.

If you ever need to edit these details on music stored locally on your device, there are at least two different ways you can do so without having to resort to third-party apps.

In this Windows 10 guide, we walk you through two easy ways to update song or album metadata using the built-in Groove music app and File Explorer.

How to edit music file metadata using Groove

Perhaps the quickest way to update songs' metadata information and album art is to use the built-in Groove music app.

Update album info

To edit album information, use the following steps:

  1. Open Groove.
  2. Click on My Music.
  3. Under "My Music," use the "Filter" menu, and select Only on this device option.

  4. Right-click the album with the tracks you want to update and click Edit info option.

  5. In the "Edit Album Info" tab there's a lot of information you can edit, including basic information like album title, artist, and genre. You can even click the pencil button to update the album thumbnail image.

    Additionally, within this experience, you can edit song titles and artist information and reorganize tracks if they're in the wrong order.

    Quick Tip: Turning on the Show advanced options allows you to change the song soft title.

  6. Click the Save button.

In addition to updating the album information manually, if most or all the information is missing, you can click the Find album info button to allow Groove to download the correct information for all the songs automatically.

Update song info

To edit song information, use the following steps:

  1. Open Groove.
  2. Click on My Music.
  3. Under "My Music," use the "Filter" menu, and select Only on this device option.

  4. Click on the album with the songs you want to update.
  5. Right-click the track, and click Edit info option.

  6. In the "Edit Song Info" tab, you can update the metadata information of a particular song, including title, artist, track, disk, album title, artist, genre, year, and sort title (if the Show advanced options toggle switch is turned on).

  7. After updating the metadata information, click the Save button.

Once you complete these steps, you'll need to repeat the instructions to edit the metadata information for another song or album.

How to edit music file metadata using File Explorer

Alternatively, you can edit metadata information in virtually any file format, including music files, using File Explorer:

  1. Open File Explorer (Windows key + E).
  2. Browse the location of the songs you want to edit.
  3. Right-click a song, and select Properties.

  4. Click the Details tab.
  5. Everything you see in the "Details" tab is part of the metadata information, and you can quickly edit most of it by clicking the value field next to the property. Some of the information that you can update includes song title (not the file name), album name, artist, genre, publisher, mood, and much more.

    Quick Tip: Under the "Content" section, you can figure out if the song is using Digital Rights Management (DRM). Just look at the "Protected" field. If the value is set to No, it isn't a protected song. If the value is set to Yes, then the file is protected and you may not be able to update its information.

  6. After updating the metadata information, click the Apply button.
  7. Click the OK button.

If you have to edit the same information of an album (such as year, album name, and artist), you can select all the files, right-click the selection, click Properties, and on the "Details" tab, you can edit this info as a group, instead of having to modify the same data on each file separately.

Wrapping things up

While you have more than one way to update metadata on songs and albums, if you're unable to change any information the files are either not DRM-free or you may be trying to update a song that isn't stored locally on your device.

If you're using Groove, you can edit most audio formats, including .mp3, .aac, .m4a, .wav, .wma, .ac3, .3gp, .3g2, and .arm, but you can't update information on tracks encoded using a FLAC format. However, you can use File Explorer to edit metadata in .flac file format. Also, using Groove, it is not possible to edit music stored on OneDrive.

More Windows 10 resources

For more helpful articles, coverage, and answers to common questions about Windows 10, visit the following resources:

How to claim free Twitch Prime loot in Fortnite Battle Royale

$
0
0

Fortnite Battle Royale

Wondering how to get that sweet, sweet loot with your Twitch Prime subscription? Read this.

Amazon-owned Twitch currently has a cross-promotion going on with Epic Games where Amazon Prime subscribers can get some free in-game loot. You get two outfits, one back bling, one glider, two in-game emotes, and four Twitch emotes. There are two operators for the Save the World game mode as well. All for free!

If you want it (and why wouldn't you?) but aren't sure if you have Twitch Prime or how to get your loot, read on and I'll walk you through it.

See at MicrosoftSee at Epic Games

What's Twitch Prime, and how do you get it?

Twitch Prime

Simply put, if you're an Amazon Prime subscriber, you also have Twitch Prime. Twitch Prime is, however, available everywhere globally except for China, India and "embargoed territories." In countries where Amazon Prime is supported (U.S., Mexico, Canada, Italy, France, Germany, Belgium, Austria, Spain, Japan, Netherlands, Luxembourg, Singapore or the United Kingdom) you have to have Amazon Prime to have Twitch Prime.

If you're not in one of the countries listed above, you can sign up for Twitch Prime with a Prime Video subscription. Whichever way you play it, though, you have to have Amazon Prime something to get the free loot.

If you haven't yet linked your Amazon account and your Twitch account, you need to do that first. Head on over to the Twitch Prime homepage linked below, log in to Amazon, then log in to Twitch, and let the magic happen.

More: Link your Amazon account and Twitch Account

And if you don't yet have Amazon Prime, remember you can get a 30-day free trial.

How to get your Fortnite Twitch Prime loot

Fortnite Battle Royale

Now that you're all set up with Twitch Prime, the rest is a case of linking your Twitch account with an Epic Games account (which you will have if you're playing Fortnite anyway). Here's how to do it:

  1. In your web browser, visit this link.
  2. Click on the Have Twitch Prime? button.
  3. If you have an Epic Games account, click yes or signup if you don't yet have one.
    • Note that if you're playing on Xbox One, your Xbox Live login should suffice as you should have already linked this to an Epic account in the game.
  4. Log in with either your Xbox Live account (or PlayStation 4) or your PC-bound Epic Games login details.
  5. Log in to your Twitch account.

The two will now be linked, and the next time you go to play Fortnite the new stuff will be waiting in your inventory. It's important to point out that you can only claim the Twitch Prime Pack once, so if you're playing on both Xbox and PC, make sure you choose the one you play the most.

See you in Tilted Towers!

See at MicrosoftSee at Epic Games

How to stop Oculus Service from preventing PC sleep

$
0
0

How to stop Oculus Service from preventing PC sleep

Ever notice that your monitor is still on late into the night? Oculus Service might be keeping your PC awake.

The Oculus Rift is one of the leading PC-based VR systems on the market today, but that doesn't mean it's bug-free. One issue that many users have reported involves your PC being unable to enter a sleep state, or, if it does, it constantly wakes. This is not only a problem from an energy standpoint, it's also no doubt wearing down your hardware faster than necessary. Even if the Oculus app is closed, it seems like the Oculus VR Service is the problem. Let's take a look at what's required to fix this problem.

See at Amazon

How to stop OVRService from preventing PC sleep

How to stop OVRService from preventing PC sleep

OVRService seems to be the culprit when it comes to preventing your PC from sleeping, but it's also necessary if you want to use your Rift. You can manually start and stop the service by opening the Services windows each time, but you can also create a batch file that, when run, will start and stop the service. Let's take a look at both methods.

How to manually start and stop OVRService

Just follow these steps:

  1. Click the Windows Search field in your taskbar.
  2. Type services and hit Enter on your keyboard.

    Click Windows Search. Type services and hit Enter.

  3. Right-click Oculus VR Runtime Service. You might have to scroll down a bit to find it.
  4. Click Stop.

    Right-click Oculus VR Runtime Service. Click Stop.

If you'd like to start the service again, repeat the four steps but click Start instead of Stop.

You can also set the service to only start manually, which will prevent it from running after a PC restart. Here's how:

  1. Right-click Oculus VR Runtime Service.
  2. Click Properties.

    Right-click Oculus VR Runtime Service. Click Properties.

  3. Click the dropdown menu in the "Startup type" section.
  4. Click Manual.

    Click the dropdown menu. Click Manual.

  5. Click Apply.
  6. Click OK.

    Click Apply. Click OK.

Don't forget to manually start the OVRService when you go to fire up your Oculus Rift.

How to create a batch file to stop OVRService

If you'd rather not go through those steps each time you want to start and stop the service, you can create a batch file right on your desktop. Once created, all it takes is a couple of clicks to start and stop the service. Just follow these steps:

  1. Launch Notepad from your Start menu, desktop, or taskbar.
  2. Type sc config OVRService start=demand and hit Enter on your keyboard.
  3. Type net start "OVRService" and hit Enter on your keyboard.

    Type the first two lines.

  4. Type if %errorlevel% == 2 net stop "OVRService".
  5. Click File.

    Type the last line and click File.

  6. Click Save As.
  7. Click Desktop.

    Click Save As. Click Desktop.

  8. Name the file and append it with .bat.
  9. Click Save.

    Name the file and append it with .bat. Click Save.

  10. Right-click the batch file on your desktop.
  11. Click Run as administrator.

    Right-click the batch file. Click Run as administrator.

If OVRService isn't running, it will start when you run the file. If it is running, it will stop.

More resources

How to check if a drive has failed in your PC's BIOS or UEFI

$
0
0

Hard Drive

If you suspect that a drive in your PC has called it quits, an easy way to find out for sure is to look at the BIOS or UEFI.

If you didn't build your PC yourself, chances are you've never been into its BIOS. It isn't something you go nosing around in willy-nilly — if you're not sure what you're doing you could mess something up. The idea of a BIOS is being phased out as Intel replaces it with UEFI over the next few years, delivering essentially the same functionality.

Besides being crucial to the PC operating, it can be helpful in times of crisis, as I recently found out first hand. Suspecting a drive failure was the cause of my PCs sudden boot issues, there was no way to tell without going into the BIOS whether it was alive or not.

Here's what to look for.

More: Best SSDs for Windows PCs

Entering the BIOS or UEFI

UEFI

An example of a UEFI setup from ASUS.

Getting into the BIOS or UEFI on your PC may vary mildly, but in most cases, you can do it in a couple of ways.

To get into a UEFI system you'll either have a hotkey labelled at the first boot of your PC as setup or something similar. What you're looking for if you don't go straight to your UEFI is something for boot options. Then you can boot into UEFI from the Windows Boot Manager.

Booting into BIOS will require a key press at first boot of the PC. This will usually be one of the function keys but will differ across PCs. On my two Dell PCs, one is a press of F2 (Alienware) and one is a press of F12.

What to look for

BIOS

An older BIOS system on a Lenovo PC.

Again, the specifics will vary, and if you're on a UEFI system the interface will be a lot nicer and easier to navigate. The first place to check is in your main system summary. What you're looking for is any reference to SATA drive or m.2 SSD.

SATA drives will also include any optical drives you have attached to the PC, but essentially anything that is connected will show up here. It's a little easier to identify if the problem is an m.2 drive because you probably only have one of these.

If the drive in question has failed but is connected to the PC (so don't pull any cables out before you check) then you'll see a none message next to it here. In my case, the system menu in my BIOS showed m.2 SSD: None.

You should always be able to boot into BIOS or UEFI because it's independent of your drives and your Windows install. And if it's your Windows boot drive that failed, this will be the only part of the PC you can boot into.

Your tips

This is how I managed to identify the point of failure in my own PC when my Windows boot drive gave up. If you have any other tips or tricks to share be sure to drop them into the comments below.

Your Sea of Thieves items explained: Tools, weapons, consumables and more

$
0
0

Get prepared for your Sea of Thieves adventures with a beginner's breakdown of tools and items.

Sea of Thieves offers a true pirate experience on Xbox One, with each player given all the tools to conquer the seas with your crew. You'll be ready to take on any challenge that lies ahead, with items to help with treasure hunting, combat, and having fun along the way.

If you're just getting started with Sea of Thieves, new pirates may be overwhelmed by their pre-stocked inventory. Here's everything you should know about your starting gadgets and when to use them.

Note: This guide is currently for pre-release beta builds of the game.

See at AmazonSee at Microsoft Store

Tools

These tools will never leave your side and help in completing quests in Sea of Thieves. While some may be used more than others, each has a distinct role somewhere throughout your pirate journey.

Bucket

Your trusty bucket is easy to grab, helping you out when times get tough. If your ship is taking on water, the bucket can be used to scoop it up and throw it overboard. If your boat takes on too much water you'll eventually sink, so be swift in getting it out. If you're so inclined, the bucket can also be used to catch vomit and temporary obscure enemy vision. Real nice.

Spade

The spade is used for digging up treasure hidden throughout across seas. After finding the location of buried treasure via a quest, you'll need to dig away to take it back to an outpost. When treasure is found using a spade, an audible cue is sounded, indicating your spade has hit a chest. To speed up the digging process, have multiple players dig away at your findings too.

Compass

Your compass is used to help orient yourself in relation to the game world. Paired with a map, the compass will help you find islands and hunt down precisely where to find treasure. A fixed compass is also found at the helm of every ship, keeping the captain's hands free at the wheel. Just don't rely on this gadget while venturing into a storm.

Spyglass

The spyglass is used for a better view of your surroundings, providing a strong zoom to catch objects at a distance. This tool is best used for spotting ships in the distance, identifying landmarks and finding nearby points of interests. For the best sights, take to the ship's crow's nest when scouting.

Lantern

This lantern will guide you through the dark, whether exploring the deepest caves or treasure hunting in the moonlight. Producing a portable light source, your lantern helps in finding your way, however, can alert nearby passers-by with its radiating glow. Some puzzles require a lantern to be raised, activated by pressing "LT" on an Xbox One controller or right-click on a mouse.

Pocket watch

When you're busy searching for treasure, your pocket watch will keep track of the day for you. Aside from its ability to provide an estimate of time until sundown, the watch also helps solve time-based riddles.

Consumable items

These items help you survive the seas, with supplies to keep your crew safe on your journeys. Be careful though – when they're gone, you'll need to forage nearby islands for more.

Banana

Bananas are a consumable item, used to regain 25 percent of player health. When equipped, players can eat bananas by pressing "RT" on their Xbox One controller or left-click on their mouse. Bananas can be found in barrels on islands and shipwrecks and stored in a dedicated barrel on your ship. Five bananas can be stored on a player at one time.

Cannonball

To use your ship's cannons, you need cannonballs – and with only a limited supply, you should be on the lookout for more. Players can carry up to 10 cannonballs at one time, while spares are stored in your ship's dedicated barrels. To use cannons, you'll need to load cannonballs individually by following on-screen prompts.

Wooden planks

Once your ship inevitably takes damage, wooden planks will keep it afloat. If water is filling up your ship, these planks should be used to plug holes while on the move. After sealing up any hull breaches, don't forget to scoop out collected water with the bucket. You'll find wooden planks across the world of Sea of Thieves, inside randomly placed barrels.

Tankard

Drink to your heart's content with this handy tankard. While drinking grog all day may not be productive, stumbling around drunk passes the time during those longer journeys. Grog refills can be found on the lower deck of your ship.

Weapons

Get armed and ready for action with these weapons currently available in Sea of Thieves. With only two weapon slots free, you'll need to consider the challenges that lay ahead.

Cutlass

When combat gets up close and personal, nothing beats the classic cutlass. While heavy firearms might outperform this classic blade, this is the only weapon ideal for longer journeys, without the need for ammunition.

Pistol

The pistol is a pirate's classic sidearm, best serving in gunfights from close to medium range. Although accurate, you'll need to fire sparingly.

Blunderbuss

With similarities to a shotgun, the blunderbuss fires a high-damage spread over short ranges. When up close, a single shot of the blunderbuss can kill pirates effortlessly.

Eye of Reach

The "Eye of Reach" is an ideal companion for a sharp marksman, as the best weapon currently available at longer ranges. Equipped with a high-zoom scope, the Eye of Reach is perfect for picking off targets at a distance. This is also the only viable player-held weapon for killing hostiles between ships.

See at AmazonSee at Microsoft Store


How to enable two-factor authentication (2FA) on your Fortnite account

$
0
0

Fortnite

As Fortnite's popularity booms, Epic Games accounts are being compromised. Here's how to protect yourself.

Usually, if something looks too good to be true, it is. And this is exactly what's happening right now with Fortnite, Epic Games' smash-hit with its free-to-play Battle Royale mode. The Fortnite in-game currency, Vbucks, is the only way to buy the cosmetic items, such as outfits, gliders, pickaxes and emotes. But Vbucks cost real money for the most part. What you earn in the game doesn't go that far.

Enter the unscrupulous people of the internet and multiple "free-Vbucks, click-here" scams.

Here's the thing: There are no free Vbucks. Epic Games has confirmed this. Unless you're winning some in a competition from, say, a well-known streamer, the freebies don't exist. It's all a scam to get your Epic Games account login.

The first thing to do to protect yourself is don't click on any of these links. Never, ever. But the other thing you can, and definitely should do, is to add two-factor authentication, a.k.a, 2FA. Also, if you have any payment information stored in your Epic account, maybe remove that, and just enter it every time. However much protection you apply, don't leave these thieving scoundrels any breadcrumbs.

Adding 2FA to your Fortnite account

Here's how to add some extra security to your Epic Games account, using 2FA:

  1. Go to epicgames.com and log into your account.
  2. Open account settings by hovering over your username in the top right corner.
  3. Select password and security.
  4. At the bottom, click on the button labeled enable two-factor sign in.

    Epic Account security

Now, whenever you log in to a new device with your Epic Games account, you'll be emailed a unique code which you will need to enter before you're allowed access. While you're in your account settings, it's also a good idea to make sure you have a unique, hard-to-guess password. A password manager is a great way to generate these, and Windows 10 users should definitely check out Enpass.

If you play Fortnite on Xbox One and your Epic Games account is produced from your Xbox Live login, the same rules apply. Do not click on any free Vbucks links. In this scenario, you could be handing over much more than just your Epic account information. There's no real suggestion at this point that any Microsoft accounts have been compromised thanks to Fortnite, but don't take the risk.

It's also a good time to remind you to add 2FA to your Microsoft Account if you didn't already. The guide linked below will walk you through that process.

How to set up two-step verification on your Outlook and Microsoft Accounts

The best course of action is always to be as secure as possible. Fortnite is popular with adults and kids, so be sure to check-in on friends and family to make sure they're all being safe.

Pros and cons of pre-built desktop PCs (and why you might want to build your own)

$
0
0

Pros and cons of pre-built desktop PCs (and why you might want to build your own)

Here's what you should know about using a pre-built desktop PC.

There's an ongoing debate between those who build their own PCs and those who buy them pre-built. There's really nothing wrong with either option — both methods can and do deliver a satisfactory product — but they are not exactly the same. I've had plenty of time with custom and pre-built PCs, and I'm ready to offer some insight into both sides of the argument.

Benefits of buying a pre-built desktop PC

To clarify, I'm not talking about all-in-one (AiO) PCs here; I'm strictly sticking to towers and the hardware inside, which requires a separate display plugged in. If you are interested in AiO PCs, check out these links.

Pre-built PCs can be easy and cheap to buy

HP Pavilion Wave

Most major laptop manufacturers — ASUS, Dell, HP, Lenovo, etc. — also have a focus on pre-built desktop PCs for those who don't have time to shop around for parts or those who just don't need to be hitting any benchmarks. Many people just need a budget desktop PC that can browse the internet or handle word processing, and many need it now.

Instead of waiting for sales on parts or for everything to finally arrive from different vendors, you can grab a pre-built budget PC from one place and promptly have it working for you. These budget PCs usually come in a few configurations and price points, making it somewhat possible to get close to what you want.

See the best pre-built desktop PCs

Pre-built PCs come with a warranty

Pre-built PCs come with a warranty

Most pre-built desktop PCs you buy new will come with a warranty, which means in the case of a faulty piece of hardware inside you can ship the entire thing away and not have to worry about diagnosing the problem yourself. This provides a bit of peace-of-mind for those who have no interest in tinkering with their PC, but there is a downside.

If you indeed do have to send your PC away for repair, you're without that PC for the duration. If you depend on that machine to get your work done, what might only have been a thirty-minute fix can turn into a week away being repaired. If you are inclined to attempt a fix yourself, you might not even be able to get inside the case lest you void the warranty.

Pre-built PCs come with technical support

There are thousands of legitimate online resources when it comes to getting help with your PC — including our own Windows Central forum— but dedicated technical support from a manufacturer can be the difference between a false diagnosis and getting back to work.

Sure, if there's a problem with hardware you'll likely be without a PC for a while as it's being repaired, but pretty much any other problems you have can be solved with the help of a support staff member, often in only a matter of minutes. If the idea of traversing the world of PC troubleshooting raises the hair on the back of your neck, the support that comes with a pre-built might be the deciding factor.

Downsides of buying a pre-built desktop PC

Now that I've explored the benefits of a pre-built desktop, let's take a look at why you might want to build a PC yourself the next time you're in the market for something new.

You often can't get the exact configuration you need

You often can't get the exact configuration you need

Having an idea in mind of what you're going to be using your PC for is a great way of sticking to your budget when shopping for something new. If you're going to be multi-tasking, you might need a bunch of RAM, but the desktop PC you're interested in only has a high-RAM configuration that also comes with a beefy graphics card (GPU) that you really won't utilize.

Sure, this is a single scenario, but overall you'll find it much harder to get exactly what you need if you decide to buy a pre-built PC. There are exceptions; Origin is known to offer some extensive configuration options, but then again you're paying a premium for the convenience.

Pre-built PCs are often harder to upgrade

Installing new RAM

When buying a pre-built PC, it's never a bad idea to look to the future. How long do you want the PC to remain relevant? Are you prepared to buy something new when it becomes underpowered or no longer suits your needs?

Unfortunately, a lot of pre-built PCs are difficult — if not impossible — to upgrade down the road. Sure, you might be able to slip in another stick of RAM or a faster solid-state drive (SSD) depending on the PC, but overall you won't have the freedom to do as much as with something you build yourself. Likewise, due to the compact size of many pre-built PC towers, adding extra parts, like a bigger GPU or a secondary storage drive, is not possible.

Why upgrading a budget PC yourself might not be worth it

One faulty part can bring down an entire pre-built PC

Those darn PSUs!

Those who build their own PCs usually have a pretty good idea of what a faulty part looks or sounds like. They might be able to diagnose an HDD that's on its way out just by the clicking it makes, or they might be able to pick up on symptoms of a faulty power supply unit (PSU) before it has a chance to do any serious damage to other hardware.

PSUs seem to have a bit of a bad reputation in pre-built PCs, and dealing with them often means you're sending away the entire unit to be repaired instead of just buying a new PSU and swapping it out. The same holds true for other hardware as well; it can be extremely frustrating knowing the source of your problem and wanting to fix it, only you can't because it would void a warranty.

What about gaming?

Phanteks p400

Gaming PCs, both custom- and pre-built, are a bit of a different animal, though all the benefits and downsides mostly still apply. While budget and medium-range pre-built PCs can be had for a reasonable and often competitive price, once you start looking at performance hardware, prices can get a bit silly.

Windows Central Staff Reviewer (and gaming PC guru) Rich Edmonds has built plenty of custom gaming PCs, and has this to say on the subject:

When it comes to gaming PCs, it's all about performance. Performance is key to the overall system and is always at the forefront of any gamer's mind. While a new owner of a pre-built PC may not push an unlocked Intel Core-i3 processor to its limit, running intense games would, causing quite the bottleneck when paired with a capable GPU.

This is where custom PCs are generally considered to be the better choice for PC gaming, allowing you to not only save money — though prices of pre-built systems have come down — but also retain the ability to choose exactly what parts you need and easily upgrade in future.

While Rich primarily uses a PC he built from the ground up, I've been using a pre-built gaming PC for about a year, which is a big change from my usual collection of towers and parts lying around. The pre-built desktop in question is the ASUS ROG G20, designed as an Oculus-ready PC right out of the box. In my experience, there have been minimal issues with the machine, other than some random PSU issues that likely have to do with powering its own hardware as well as the stuff required for VR.

ASUS ROG G20

While it's been a mostly worry-free experience, the size of the case doesn't allow for the upgrades needed to keep it relevant, and cooling seems to be a bit of an issue, with no option to add any extra fans. The price is also pretty high; this PC sits at about $1,800, whereas you could no doubt build something similar or superior for hundreds less.

You can indeed find pre-built gaming PCs that have plenty of customization options and lots of room for upgrades — Alienware's Aurora is a perfect example — but again you run into an issue of spending more money for the same hardware.

What does all this mean? Pre-built PCs are a suitable option if you don't need anything that will blow the roof off performance-wise, whereas building your own PC can save you money in the long run when it comes to gaming. If you'd like to tackle building your own PC, we have an extensive guide that can help you every step of the way.

More resources

Still looking for some great pre-built PCs or more information on the topic? These links have what you need.

Updated March 6, 2018: I've updated this article to ensure you're still getting relevant information when shopping for a new PC.

How to opt out of Facebook data sharing

$
0
0

How to opt out of Facebook data sharing

Facebook and other companies often buy data from data brokers in order to sell advertisers more targeted ad space on their platforms. Here's how to keep your data safe.

Facebook knows a lot about you. I mean, a lot. If you've ever been creeped out by a scarily on-point ad while visiting Facebook, that's why. But some of you might wonder where Facebook gets its data. The answer is simple: data brokers.

A data broker collects your information from various sources and depending on the broker in question, this information could come from online, offline, or both. Whenever you make a purchase online or utilize your grocery store's loyalty card, the data on your purchases is collected by at least one company. Facebook buys this data and, letting advertisers use it to more specifically target ads towards you. Though Facebook says that the data brokers anonymize what they collect, the details can still be matched against your Facebook profile, building for Facebook and its advertisers a complete picture of who you are.

Creepy, right?

There's some good news here, though. You can opt-out of this sort of data collection at a lot of data brokers including the companies with which Facebook has partnered. And you can do this on top of using security features such as limiting ad tracking on devices like your iPhone and iPad.

How to limit ad tracking on your iPhone and iPad

Who has your data

Right now, Facebook lists seven companies as "Audience Data Providers" on its Marketing Partners Program. These are the companies that currently provide data to Facebook from around the world:

  • Acxiom
  • Epsilon
  • Experian
  • Oracle Data Cloud
  • Quantium
  • KBM Group
  • CCC Marketing

The bad news is that these companies are Facebook's partners for now. The social network sometimes rotates between different data providers, meaning that if another company starts providing its data to Facebook, you'll probably want to opt-out of them, as well.

How to remove your data from or stop tracking by Facebook's data providers

In your quest to wrench your data from the grips of these data brokers, know that it will take awhile. One thing in common with all of these companies is that you'll need to specify exactly what you want to be left out of any data collection, including your name, phone number, and any email addresses.

Here's how to suppress your data or prevent tracking at the Facebook data partners that provide such tools.

Acxiom

In addition to options for opting out of data collection by phone or mail, Acxiom provides an online form that you can fill out in order to prevent your data from being collected. Note that this opt-out form covers only one identity at a time.

  1. Head to https://isapps.acxiom.com/optout/optout.aspx in your browser or choice.
  2. Click the checkboxes under the type of information that you want to remove (mailing addresses, phone numbers, and email addresses) from Acxiom's data tracking under Acxiom Corporations's Online Opt-Out.
  3. Choose who is the subject of this data removal: yourself, someone over whom you have guardianship or a deceased family member.
  4. Click the green + sign on the box that says Full Names.
  5. Add your name to the fields presented to you that you want to be removed from Acxiom's data tracking.
  6. Click Add to complete adding the name to the opt-out list.
  7. Repeat steps 4-6 to add more names to the list, including nicknames, former names, and married names. This list, like the other three, accepts up to 10 entries.
  8. Click the green + sign on the box that says Phone numbers.
  9. Add a phone number that you want to be removed from tracking.
  10. Click Add to add the phone number to your opt-out list.
  11. Repeat steps 8-10 to add more numbers to your list.
  12. Click the green + sign on the box that says Email Addresses.
  13. Add an email address that you want to be removed from tracking.
  14. Click Add to add the email address to your opt-out list.
  15. Repeat steps 12-14 to add more email addresses to your list
  16. Click the green + sign on the box that says Mailing Addresses.
  17. Add a mailing address that you want to be removed from tracking.
  18. Click Add to add the mailing address to your opt-out list.
  19. Repeat steps 15-17 to add more mailing addresses to your list.
  20. Click Submit.
  21. Enter the email address to which you'd like Acxiom to send your opt-out confirmation.
  22. Click Submit. Acxiom will send you an email with a link you need to complete your opt-out request.
  23. Click the link in the email from Acxiom.
  24. Click Submit on the confirmation page.

The data you submitted on Axiom's forms should now be removed from Acxiom's marketing packages.

Epsilon

Contacting Epsilon to opt-out of its databases is all about direct mail. Epsilon doesn't actually own anything like email data, so all it can do is stop providing your name and mailing address to clients. In order to opt-out of mail from Epsilon clients, you'll need to send an opt-out request to optout@epsilon.com and provide your full name and address for the opt-out procedure.

Experian

Ugh, Experian. This company offers its databases to clients for several different purposes and, as a result, has seven different products from which you might want your information removed. Some of these can be opted-out of by a link, while others require you to email, mail, or call in your opt-out request. You can opt out of Experian's databases via link for the following services:

On each of these pages, there will be a link labeled "Click here" that you can click to opt-out of the tracking performed for these services. Unfortunately, all this opt-out process does is embed a cookie in your browser so that Experian's trackers around the web knows not to track you. This means that the opt-out is only for activity performed in your current browser on your current computer.

If you want Experian to suppress the information that it has collected on you and continues to collect across its direct mail, telemarketing, and online targeted advertising services, you'll need to send an email containing all of the relevant information that you want suppressed to optout@experian.com. If you're looking to opt out of Experian's email marketing databases, you'll need to send an email from the address you want to opt out to unsubscribeall@experian.com, which will remove you from the company's permission-based email database used by Experian and its partners.

Finally, opt out of pre-approved offers like credit cards and insurance mailing lists by calling 1-888-567-8688.

Oracle Data Cloud

Like Experian, Oracle offers an opt-out cookie for its Internet Based Advertising product. This will prevent Oracle tools from tracking your activity in your current browser on your current machine. Here's how to use it.

  1. Head to Oracle's Opt-Out Tool website.
  2. Click the big, orange Opt-Out button.

You can also opt-out of Oracle's offline marketing information collection. Follow these steps:

  1. Head to Oracle's offline opt-out website.
  2. Fill out the available form with your name, address, and email address.
  3. Click Submit.

Quantium

Quantium, compared to the rest of these companies, makes it fairly easy to opt-out of having your information shared with the company's partners, including Facebook. It provides a number of links that let you opt-out of being targeted by a Quantium partner's advertisers using Quantium-provided data.

For instance, opt out of Facebook ad targeting with these steps:

  1. Head to Quantium's Opt Out website
  2. Click Confirm under Facebook Targeted Advertising.

Like other services, this opt-out only applies to your current browser and computer, so you'll need to opt out again if and when you get a new machine or start using a new browser.

You can also click on the following links and follow the quick instructions to limit tracking in your browser on Quantium's partner sites:

KBM Group

Like some of the others, KBM offers a cookie-based opt-out solution for your current web browser. Follow these steps to activate it.

  1. Head over to the KBM Group Interactive Opt-Out website.
  2. Click the click here button on the line that begins. "To complete the opt-out process,".

If the opt-out it successful, you'll be taken to a screen that says so.

A quick note

These are by no means the only data brokers out there. Data collection and brokerage is a massive industry. If you'd like to try and opt out of data collection by more brokers, check out this list of companies, which also features links to their opt-out tools or instructions. Keep in mind that this list is a few years old, so some of its information might be out of date. But it's a good resource for getting started.

If all of this seems a bit confusing, that's probably because it's supposed to. These companies really don't want you opting out of their data collection because that's how they make money. The important thing is to keep slogging through it.

Something to be aware of as you complete these processes is that your data won't actually be removed from the databases these companies keep. They'll suppress it, and not send it to their marketing partners like Facebook, but they'll hang on to it to make sure that it a piece of your data hits their database again, it stays out of their marketing services.

Also yes, it does seem counterintuitive that getting these companies to suppress information they collect about you often involves sending them a lot of information about you.

Questions

If you have any other questions about stopping data brokers from selling the data that they've collected on you, let us know in the comments.

How to create an Xbox Live account on Windows 10

$
0
0

Here's how to get started with Xbox Live on Windows 10 for gaming, social features and more.

While Xbox One might be home to Microsoft's gaming efforts, some of its biggest services are now available on PC too. Windows 10 is a major component of the Xbox brand today, tying directly into Xbox Live– its network of tens of millions of gamers. Some of Xbox One's top games and features are now accessible away from the console, all under the same account.

To get started with Xbox on Windows 10, you'll need an Xbox Live profile linked to your Microsoft account. This will provide access to the entire Xbox Live network, including multiplayer, social features and much more.

How to create an Xbox Live account on Windows 10

Before creating an Xbox Live profile, you'll first need to have an existing Microsoft account linked to your copy of Windows 10. Steps on linking a Microsoft account to your Windows 10 product key can be found through our in-depth guide. This will make for a quicker setup of your Xbox Live profile.

After forming the link, you'll be ready to join Xbox Live. Using Windows 10's integrated Xbox app, setting up a profile is simple.

  1. Press the Windows key on your keyboard.
  2. Type Xbox.
  3. Open the Xbox app for Windows 10. After a brief period of loading, an Xbox Live introductory screen will be displayed. If a "Welcome back!" page is displayed, an Xbox Live profile is already linked to your Microsoft account.
  4. Click Next to start the setup process.
  5. Enter your preferred Xbox Live "gamertag." This is a unique username to represent you on Xbox Live. Alternatively, you can choose your automatically assigned Gamertag and change it for free over the next 30 days.
  6. Choose a "gamerpic" for you profile. This is the profile picture that represents you on Xbox Live. After your account has been created you can change your gamerpic freely and even upload your own image files.
  7. Click Next to continue the setup process.
  8. Click Let's play to complete the setup process. An Xbox Live profile is now associated with your Microsoft account.

How to sign into an existing Xbox Live account on Windows 10

If you've owned an Xbox, you likely have an Xbox Live profile. Before attempting to recover your Xbox Live profile, ensure your Microsoft account is linked to your copy of Windows 10. We recommend using the same account linked to your Xbox Live profile to keep everything under a single set of credentials. Once your set up, just follow the steps below to sign in with your existing profile.

  1. Press the Windows key on your keyboard.
  2. Type Xbox.
  3. Open the Xbox app for Windows 10. After a brief period of loading, a "Welcome back!" page is displayed.
  4. Click Lets play to complete the setup process.

After setting up the Xbox app with an Xbox Live account, you'll now be ready for Windows 10 gaming. Going forward, Xbox Live-enabled games will automatically lift your account information from the Xbox app, making for a seamless sign-in process across all titles.

Oculus Touch troubleshooting guide

$
0
0

Oculus Touch troubleshooting guide

Get your Touch controllers back on track.

Oculus and its amazing Touch controllers don't quite have all the wrinkles ironed out, but that doesn't stop them from being a boatload of fun. To get you back to Rifting with your hands, here's how to fix common issues you might encounter when using Oculus Touch.

See at Amazon

If you've exhausted all fixes and are at the point of exasperation, you can always contact Oculus support.

Touch not detected during sensor reset

When resetting sensor tracking within the Oculus app, you might be presented with an error that says "We couldn't save your position"— this is especially common when setting up room-scale Rifting with three sensors. The cause of this problem might be that not all of your sensors can see your Touch controllers.

First, try moving your Touch controllers around and reposition your body so that all three sensors can see the controllers. If this doesn't work, you'll want to run a full setup again instead of just the "Sensor Setup" option.

  1. Launch the Oculus app from your Start menu, desktop, or taskbar.
  2. Click Devices.
  3. Click Configure Rift.

    Click Devices. Click Configure Rift.

  4. Click Full Setup.
  5. Click Next.

    Click Full Setup. Click Next.

  6. Click Next.
  7. Click Touch.

    Click Next. Click Touch.

  8. Click Next.
  9. Click Next again and follow the on-screen instructions to complete the setup.

    Click Next. Click Next and proceed.

Now that you've run through the full setup, your Touch controllers should have no problem being detected.

Touch controller tracking issues

A few Oculus Touch users have noticed that the controllers are sometimes plagued by a tracking issue above and beyond the sensors losing sight of it for a few seconds. If you think you're experiencing something like this, try holding the controller about three feet from a sensor and moving it around. If the tracking still isn't right, you'll need to go deeper.

The next step is to pull the battery out of your Touch controller for a few seconds before re-inserting it. For whatever reason, giving it a power reset can fix the tracking problem.

If, after pulling out and re-inserting the battery, your right-hand controller is still having a tracking problem, your best bet is to unplug your sensors and plug them back in. Unfortunately, there's no way to tell which sensor is potentially giving you the problem, so all might have to be unplugged before you get back to normal

How to replace Touch batteries

Securing your head-mounted display and grabbing your Touch controllers only to find that one of them (or both! Gasp!) is dead is a pain. Here's how to replace them when they've gone cold.

  1. Place your thumb firmly against the down arrow on the grip of the controller. If you've been using your controllers for awhile, putting a cloth between your thumb and the controller can give you better traction on the now-slick surface.

    Place your thumb firmly against the down arrow.

  2. Pull or push down, away from the trigger. You'll notice there is a bit of spring to the clasp.

    Pull or push down.

  3. Pull the bottom (+) of the battery out first or it will get stuck — tight spaces!

    Pull on the bottom of the battery.

  4. Place a new battery in the compartment.
  5. Replace the cover by sliding it up toward the trigger.

Playing 360-degree room-scale games with two sensors

Oculus sensor

Now that your Touch controllers have arrived, you probably want to get to gaming in every corner of your room. If you've tried it with only the original sensor and the extra sensor included with the Touch controllers, you probably noticed some seriously buggy tracking.

With two sensors, you're only set up for 180-degree gaming. For true 360-degree room-scale gaming, Oculus recommends grabbing a third sensor (about $60), and I don't disagree.

See at Amazon

However, you can set up your two sensors in a way that will almost emulate having a third sensor. You will no doubt experience some buggy tracking, but it's better than nothing.

If you're able, attempt to mount your sensors somewhere higher than your desk. Not only will they not be bumped around as much, they can see more of the room. You also want to space the two sensors as far apart as possible — about fifteen feet is as far as you want to go. If they're more than six feet apart, you will be notified when you run the Touch setup, but you can choose to proceed anyway.

For more information about setting up room-scale Rifting with the recommended three sensors, VRHeads has a great guide with everything you need. You can also check out its guide to using Desk Scene if you'd like to see exactly what your sensors are seeing.

How to fix Rift USB issues

Some Rift users have had problems in the past with the USB ports on their PC being incompatible. You might have been OK with just the one sensor and headset USB, but now that you have one or two extra sensors, this problem might have crept up.

As a fix, you can grab a PCIe to USB 3.0 expansion card for about $30. This is likely the best scenario for anyone who already has a PC built or who doesn't want to pick up a new motherboard.

See at Amazon

How to fix a moving Guardian system

Have you ever removed your Rift after a play session, let it sit for awhile, and noticed that the Guardian parameters were off when you returned at a later time? You're not alone.

While there isn't a concrete cause for this problem, there are a few measures you can take to get your Guardian system back where it should be.

First, if your PC went to sleep while you set your Rift aside, your sensors might not turn back on or sync properly when you pull your PC from its slumber. Try closing the Oculus app completely. Once you restart it, your sensors will sync back up and you might find your Guardian system to be back where it should be.

If restarting the Oculus app doesn't work, you can try going into the Settings menu to reconfigure the Guardian system.

  1. Launch the Oculus app from your Start menu, desktop, or taskbar.
  2. Click Devices.
  3. Click Configure Rift.

    Click Devices. Click Configure Rift.

  4. Click Guardian System.
  5. Click Next and follow the on-screen instructions to complete the Guardian setup.

    Click Guardian System. Click Next.

For more information on how to configure your virtual walls properly, check out the VRHeads guide to getting the most from Guardian.

How to fix Oculus Touch thumb and index gestures not working

How to fix Oculus Touch thumb and index gestures not working

Using gestures — in other words, lifting fingers and pointing or making signs with them — with your Oculus Touch controllers is a big part of the VR fun. Unfortunately, for some people, gestures stop working. When lifting, say, a real thumb from the controller, your virtual thumb doesn't move in the Rift.

  1. Launch File Explorer from your Start menu, desktop, or taskbar.
  2. Navigate to your C: drive.

    Launch File Explorer. Navigate to your C: drive.

  3. Double-click Users.
  4. Double-click your username.

    Double-click Users. Double-click your username.

  5. Double-click AppData.
  6. Double-click Local.

    Double-click AppData. Double-click Local.

  7. Double-click Oculus.
  8. Double-click TouchCalibration.

    Double-click Oculus. Double-click TouchCalibration.

  9. Right-click the LTOUCH file. If your right controller is giving you problems, right-click the RTOUCH file.
  10. Click Open with.

    Right-click LTOUCH or RTOUCH. Click Open with.

  11. Click Notepad.
  12. Click OK. You'll see a Notepad file open with a bunch of numbers.

    Click Notepad. Click OK.

You now want to locate CapSenseMin. It will have a set of eight numbers in brackets next to it. At this point, you can adjust the second or third number in the sequence. The second number applies to the thumb, while the third number applies to the index. In this case, my settings are [36901, 31182, 44376, 29547, 0, 0, 0, 36172].

CapSenseMin and CapSenseTouch

If I'm having trouble with thumb gestures, I would tweak the second number in the sequence. You don't need to make a big change. Here, I'll go from 31182 to 31382.

Now, locate CapSenseTouch. It will also have a set of eight numbers next to it. Likewise, the second number applies to the thumb, while the third number applies to the index. In this case, my settings are [39798, 33651, 47667, 32101, 0, 0, 0, 39018].

Adjusting numbers

I'm having trouble with thumb gestures, so I'll tweak the second number in the sequence. In this case, I go from 33651 to 33951. Before closing the Notepad window, save the file.

  1. Click File.
  2. Click Save.

    Click File. Click Save.

All Touch controllers have different hardware settings, so you'll almost certainly see a different set of numbers. You can experiment with the numbers all you want in order to get gestures working again. Before testing in the Oculus Rift, however, you must restart the Oculus VR service.

More Rift troubleshooting

If more than just the Touch controllers are giving you issues, be sure to have a look at the VRHeads Oculus Rift troubleshooting guide for plenty more fixes.

See the Oculus Rift troubleshooting guide

Updated March 8, 2018: This guide has been refreshed to ensure you're still getting current information about fixing any problems you encounter with your Touch controllers.

Viewing all 5861 articles
Browse latest View live


Latest Images