Quantcast
Channel: Help & How To
Viewing all 5861 articles
Browse latest View live

How to fix common USB problems on Windows 10

$
0
0

If you're having issues with a USB drive, audio, or printer, use this guide to quickly troubleshoot and fix common problems on Windows 10.

On Windows 10, we use many peripherals with a USB connection, as it's a widely adopted technology, offers fast data transfer speeds, and it's super-easy to set up. However, nothing is ever perfect, and eventually your peripheral may stop working correctly, or Windows 10 may simply not be able to recognize that new device you're trying to use.

When this happens, instead of taking the long route to try to fix the problem, you can use the "Windows USB Troubleshooter" tool to automatically diagnose and repair many common problems with external storage, audio, and printers using a USB interface.

In this Windows 10 guide, we'll walk you through the steps to quickly troubleshoot and fix common problems you may encounter with a USB device connected to your computer.

How to repair USB problems using Troubleshooter

If you're experiencing issues with a USB device connected to your laptop, tablet, or desktop PC, use these steps to quickly fix the problem:

  1. Download the Windows USB Troubleshooter from Microsoft.
  2. Double-click the WinUSB.diagcab to launch the experience.
  3. Click the Next button.

  4. The utility will detect and prompt you to select the device you want to fix. In this case, a USB drive, but it can fix other peripherals, such as USB audio and USB printer.
  5. Click the Next button.

    Important: The troubleshooter requires .NET Framework 3.5 to work correctly, if it's not already on your device, you'll be prompted to download and install the feature automatically.

  6. Click the Close button.

After completing the steps, the Windows USB Troubleshooter will check and attempt to fix any issues, including:

  • USB class filter was not recognized.
  • USB device is not recognized.
  • USB printer device is not printing.
  • USB storage device cannot be ejected.
  • Windows Update is configured to never update drivers.

You can find out more details by clicking the "View information" link in the bottom-left corner of the troubleshooter.

While we're focusing this guide on Windows 10, this utility is also compatible with Windows 8.1 and Windows 10.

More Windows 10 resources

For more helpful articles, coverage, and answers to common questions about Windows 10, visit the following resources:


How to use Kodi on Xbox One

$
0
0

Kodi can now be used directly on the Xbox One. But it's not quite ready for prime time yet.

There was a time when using Kodi on the Xbox One required a workaround; Installing it on a device like a Fire TV Stick and using the HDMI passthrough on the console. Thankfully, that's no longer necessary.

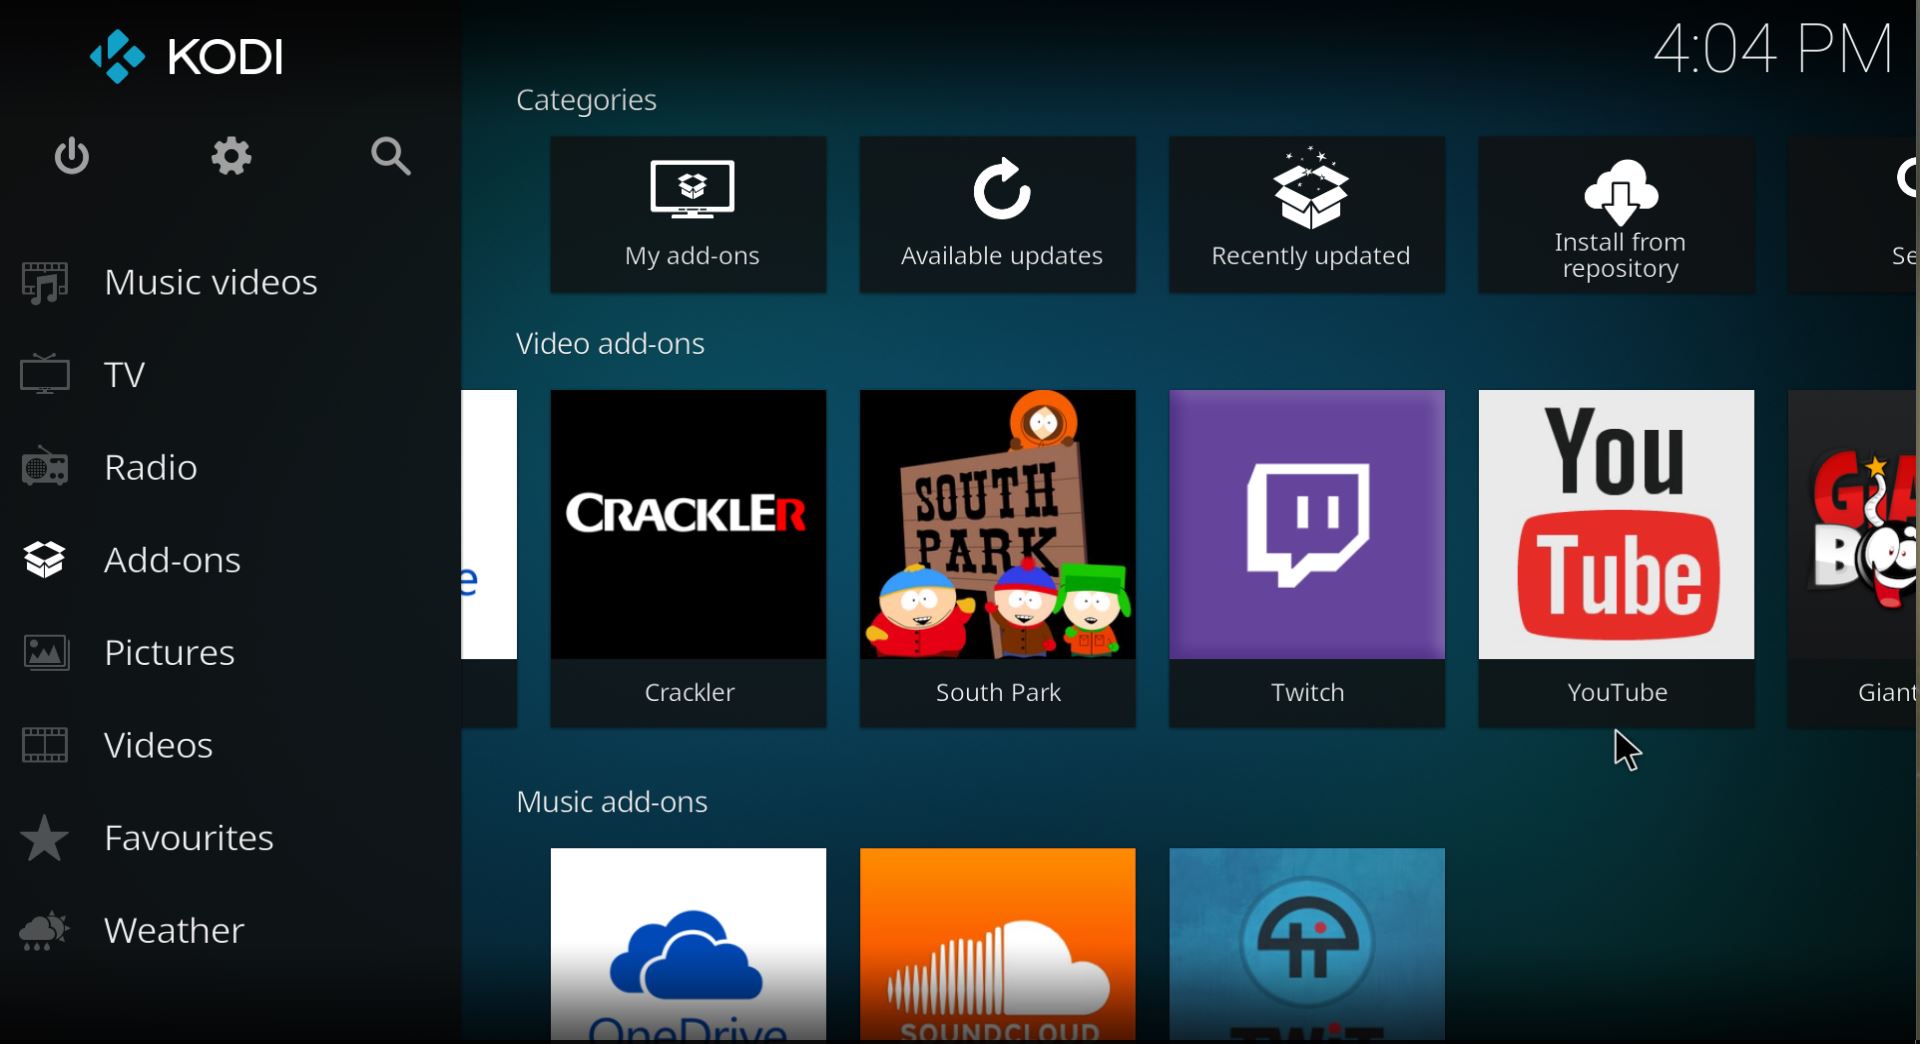
Kodi is now officially available on the Xbox One thanks to the developers rebuilding the app in UWP for Windows 10-based devices. It's still an early alpha of version 18, Leia, so while it's here and usable, there are things which are buggy and some that just don't work at all.

Kodi 18 Leia: Everything you need to know

The first thing to do is to download it from the Store. If you have ever installed it on a Windows 10 PC from the Store, you'll find it in your ready to install section on your console. If not, either search for it in the Store on the Xbox One or hit the link below to install it from your PC.

Download Kodi for Xbox from the Microsoft Store

IP Vanish

Advertisement


What you can do

Much of the core functionality of Kodi is available to play around with. There are currently known issues related to the development of the UWP version, though. For example, right now you can't connect Kodi to a USB drive that's attached to the console.

You'll need to use a controller for navigation right now as well, it seems. I've tried using an Xbox One media remote and it doesn't behave at all. Hopefully, something else that'll be remedied when it comes to a final launch.

Most of the add-ons available through the official Kodi repository work, though, albeit with varying degrees of success. You can also set it up to accept a live TV signal from something like a HDHomeRun. I've encountered problems using the built-in NextPVR front-end, though, so I wasn't able to hook up my DVR, but using the HDHomeRun PVR add-on successfully delivers live TV (but doesn't allow access to HDHomeRun DVR).

The same can be said for audio add-ons, you'll generally have a good time installing and using them, but always remember this is a work-in-progress build of Kodi and it's likely to go wrong at some point.

Kodi: What it is, how and why you want it

Speaking of Kodi add-ons

When you first setup Kodi it will be completely empty. You have to add sources of media, and there are a bunch of legal add-ons available right out of the box in the official Kodi repository.

These include YouTube, Twitch, and OneDrive, as well as some services provided by cable TV networks, news channels, and the Smithsonian Museum. It's not limited to video, either, so you can also pull in music and photos to your Kodi setup.

Best legal add-ons for Kodi

Bottom line

Right now you can install and use a proper version of Kodi on your Xbox One. And that's tremendous. But it's also an incredibly early look at the finished article with much that doesn't work properly, or at all.

The best way to get involved is to jump in and play around with it, but equally, you won't want to rely on it as your main Kodi setup right now. The developers are working hard and the best place to check progress and feedback bugs is in the Kodi forums.

As Kodi becomes more refined on the Xbox One we'll be sure to update this guide with everything you can do to get the most from it.

Download Kodi for Xbox from the Microsoft Store

Updated January 26, 2018: Guide rewritten now Kodi is available on Xbox One officially.

How to listen to your own music in Spotify

$
0
0

Spotify

If you moved your streaming to Spotify it's easy to use the app to also listen to your own local music, too.

Unless you're still using OneDrive to stream your own music from the cloud, the reasons to keep using Groove Music on Windows 10 got a lot less compelling with the death of the streaming service. If you moved your streaming over to Spotify and still have local music on your PC you want to enjoy, you can do both in the Spotify app on Windows 10.

Here's what you need to do.

  1. In the edit menu, select preferences.

    Spotify

  2. Scroll down until you come to the section labeled local files.

    Spotify

  3. By default you can enable the default music folder on your PC, music files in your downloads folder or anything you currently have in Windows Media Player.
  4. To add a different folder, first click add a source.

    Spotify

  5. Navigate to the folder on your PC where you keep the music you want to import.

    Spotify

  6. Click OK.

    Spotify

The location you just selected will now be added with a toggle switch like the standard options for you to enable and disable as you see fit.

There are some limitations, though, over what files can be played in the Spotify app.

Spotify supports .mp3, .mp4, and .m4p files. It doesn't support .mp4 files that contain video, or the iTunes lossless format (M4A), but we'll do our best to match any unsupported local files with songs from the Spotify catalog.

If you have lossless audio files such as FLAC you'll still need to use a different app for the time being. But if your music is in the formats listed above then you can listen to it alongside your Spotify streaming library.

Download Spotify from the Microsoft Store

Best practices for managing Windows 10 in the enterprise

$
0
0

Here are a few ways to help you manage your company's Windows 10 computers!

Windows and the enterprise market have gone together like peas and carrots since computers were brought into the mainstream, and that relationship has continued since then. Managing a fleet of Windows 10 computers in an enterprise setting is easier than ever, but there are still some things to consider when setting up your environment.

A small bit of backstory on me: my day job involves configuring, tracking and managing Windows laptops and desktops for a ~500 person non-profit. The tips I'm sharing below are what I've picked up since starting the job seven months ago.

Use SCCM

System Center Configuration Manager — or SCCM — is Microsoft's own suite for managing Windows deployments in an enterprise setting. Administrators can use SCCM to remotely control client machines, manage updates and patches and even manage iOS and Android devices. SCCM does have a licensing cost per device, which keeps my company from using it. But, do some research and find out if SCCM is worth the cost for your company.

Have one installation image

In the past, a Windows installation image would need to be customized with specific drivers for each machine. One of my favorite parts of Windows 10 is that the base image has generic drivers for networking, display output, audio and other key components. This means I need to have one single installation image for all of my machines, making it easier to ensure each machine is set up and patched in a uniform way.

Rely on Windows Update

The other piece that lets me just use one installation image is how great Windows Update has become over the years. Starting with Windows 10, Update can now detect which components your computer is using and if those components need an update. This includes networking, display, audio, trackpads, firmware updates (for Surface devices) and more.

Windows Update isn't entirely fool proof, though it does work 90% of the time. For some components, you may need to check for updates in Device Manager or download an update utility from the computer's manufacturer.

Speaking of Windows Update, it's worth taking the time to set up an update server for your company. This will let you test updates before rolling them out to client computers. Almost as important, it will let you reduce Internet costs and bandwidth use. If everything is configured correctly, your client computers will pull the update files from your internal Windows Update server, rather than dozens or hundreds of computers all pulling the update from Microsoft's servers.

Install as few programs as possible

Until every program is available in the Windows Store, each program you install is going to rely on its own update service and connection to the Internet. Each of those update services represents a potential attack vector for the machine and your network, so only install the essentials for each user. For us, that's Google Chrome (more on that later), Chrome Remote Desktop, ESET Anti-Virus, Forticlient VPN, Parallels Client, and 8X8 Virtual Office. Within Chrome, we only allow a few extensions — Chrome Remote Desktop, LastPass, Adblock Plus — because browser extensions are also an attack vector.

Document everything and have a plan when things go bad

This is something I need to get better at. Even though I have my initial setup process for desktops and laptops down to a T, I still need to actually write it down. There will be a day when I'm on vacation or no longer working for my company, and someone else will need to set up a Windows computer. If you're an IT admin, just write down the processes for everything you do. Even if the end product isn't pretty, it's better than nothing.

Also, know that you're going to have bad days. You're going to have times when your bosses demand a fix for that thing they heard about on the news, and the only answer you can give them is, "We have to wait for updates." It happens. Know it's going to happen, so you're not blindsided.

Consider other operating systems

Truth be told, most people don't need everything that Windows does. I mentioned Google Chrome earlier because a vast majority of our users are on Chromebooks and Chromeboxes. This may sound counterintuitive, but if your users don't need anything more than a web browser, a Chromebook is a good option. Chromebooks are criticized for not being able to run the same software that Windows computers are, but that has a big benefit: malware designed for Windows computers just doesn't work on a Chromebook.

What say you?

Do you manage Windows computers for your company? What advice do you have? Let us know down below!

How to redeem Microsoft Store codes and gift cards

$
0
0

Here's how to redeem codes and gift cards for use with your Windows 10 PC.

The Microsoft Store is home to everything available from Microsoft, from physical devices, accessories, movies, apps, and more. And while all content can be purchased directly from the store, redeemable codes play a major role in obtaining specific items, credit, and subscriptions from outside of the online storefront.

If you purchase Microsoft digital goods from outside of the online store, 25-character redeemable codes are provided to access those items online. Here's how to redeem a code on a Windows 10 PC and access its related contents.

How to redeem a code on a Windows 10 PC

If redeeming a code on a Windows 10 PC, we recommend navigating to the integrated Microsoft Store app. As an app tightly integrated into Windows 10, redeeming codes for Windows apps and games automatically triggers downloads upon redemption. Likewise, credit and subscriptions will be automatically applied.

  1. Open the Microsoft Store app on your Windows 10 PC
  2. Click the ellipsis icon in the top-right corner.
  3. Select Redeem a code.
  4. Enter your 25-character code.
  5. Click Next.
  6. Click Confirm to complete your redemption.

How to redeem a code online

Microsoft codes can also be redeemed outside of the dedicated store app, through the official website. Upon signing in, any codes will be automatically tied to your account for use on supported devices.

  1. Go to microsoft.com/redeem.
  2. Enter your Microsoft account credentials when prompted, unless already signed in.
  3. Enter your 25-character code.
  4. Click Next.
  5. Click Confirm to add the product to your account.

Accessing your redeemed goods

After redeeming your code, you should be ready to jump into your purchase. Credit will automatically be associated with your Microsoft account, while subscriptions will unlock access to their related services. For apps, games, films, and similar digital goods, find the store page for the item and you'll be able to install it for free.

Related reading

How to set OneDrive as your default save location on Windows 10

$
0
0

Are you browsing to your OneDrive folder every time you want to save a file on Windows 10? If so, use these steps to change the default save location.

Although you can always browse and select the location to save files you create using an application, Windows 10 also has a default configuration to save your newly-created files that points to your profile folders (Desktop, Documents, Pictures, and videos, for example).

If you use OneDrive, starting with the Windows 10 Fall Creators Update, it's possible to change the default configuration so you can save files directly to the cloud storage service instead of having to browse to the path every time.

In this Windows 10 guide, we walk you through the simple steps to use OneDrive as your default save location.

How to save your files directly to OneDrive

To set OneDrive as your default location to save your documents and files, follow these steps:

  1. Click the OneDrive icon in the notification area.
  2. Click the menu button (three-dots) in the top-right corner.
  3. Select the Settings option.

  4. Click the Auto Save tab.
  5. Using the drop-down menus select OneDrive for "Desktop,""Documents," and "Pictures."

  6. Click OK.

Once you completed these steps, any files you place on the Desktop will automatically save to OneDrive, and when saving files you'll be offered to save them to the Documents or Pictures folders inside OneDrive by default.

Just remember that using this option won't redirect the content inside default Documents and Pictures folders. If you want these files to sync to the cloud, you'll need to move them manually to the Documents and Pictures folders inside OneDrive. However, it's possible to move your default user folders to OneDrive to keep all your files in the cloud using this workaround.

More Windows 10 resources

For more helpful articles, coverage, and answers to common questions about Windows 10, visit the following resources:

5 must-know Monster Hunter: World for Xbox One tips and tricks

$
0
0

New to Monster Hunter's beast-riddled world? Here's what you should know.

Monster Hunter has made its arrival on Xbox One X with its latest installment, Monster Hunter: World. Following success on both Sony and Nintendo platforms, the game marks the series debut on Xbox One, with a variety of changes to take advantage of the new hardware.

As a franchise renowned for its steep learning curve, Monster Hunter: World isn't easy to get started with. Although efforts have been made to create an entry-point for newcomers, there are still things to keep in mind. Here are five beginner's tips you should know before getting started with the game.

See at Microsoft StoreSee at Amazon

Prepare to grind

Before jumping into Monster Hunter: World, prepare yourself to grind away at the same content. This latest entry is one of the most ambitious games in the franchise, but its legacy of requiring heavy investment is still there. While replayability factors into its mission and world design, the core mechanics mean you still carry out repetitive tasks in the long term.

Many of Monster Hunter: World's channels for progression demand certain materials and require players to hunt for them. Prerequisites for crafting weapons, armor, and items need to be earned, and this plays a major role in the Monster Hunter gameplay loop.

Experiment with play styles

After completing Monster Hunter: World's opening sequences, players will be given the choice of more than a dozen weapons to pick. This is the first of many decisions you'll make about your play style, however, it doesn't necessarily dictate your approach.

While the main objective of Monster Hunter is relatively universal, how these tasks are approached can hugely vary. With gameplay that accommodates a range of player types, there are countless ways to complete missions. It might be worth sticking to a similar loadout during early hours, but don't be hesitant to explore as you get more comfortable.

While experimenting with different weapons, make sure to take full advantage of any integrated tutorials and prompts that may appear. The "Training Ground" introduced in the game's early hours also helps by providing a space to test your weapons and combos.

Don't ignore 'Scoutflies'

"Scoutflies" are one of the new additions in Monster Hunter: World, introduced to help usher in a new generation of players. Unlike previous games, where players were given much less guidance, Scoutflies help outline objectives and items nearby.

Due to their discreet nature, it's easy to miss these glowing creatures. Nevertheless, paying attention to Scoutflies helps hugely in locating monsters and outlining where you need to go. When searching for any activity, such as tracks, scratches, and mucus, pay attention to the Scoutflies' trail for a better understanding of where to look next.

Stay prepared for battle

Monster Hunter: World's battles establish its most rewarding gameplay, especially when paired with a team using cooperative play. But to get the most out of these quests, you'll want to be prepared.

Pick weapons and armor that suit the type of combat you'll be entering. Slower, larger monsters are best fought with heavy-damage weapons, while quick, agile foes are best countered with fast or ranged attacks.

Before entering combat, make sure to prepare additional items to aid in combat too. Always pick up a meal beforehand, providing a temporary stat boost to health, attack damage and other listed traits. And provided you have the materials, crafting also plays an important role in obtaining potions, antidotes and other buffing items.

More friends, more fun

Cooperative play is one of Monster Hunter: World's flagship new features, providing a different take on the existing formula. With a mission structure built to accommodate this, up to four friends to band together to complete quests and expeditions. Best of all, the game offers seamless drop-in, meaning friends can join and leave the game whenever they choose.

Monster Hunter World's cooperative mode commends strong teamwork, where a strong synergy of differing roles helps in battle. Assembling a team of varied roles ensures a balanced set of abilities and allows your attacks to adapt around a monster.

Keep in mind that when playing co-op, monster difficulty scales according to the number of players. This means monsters will be harder with more players, and executing a well-planned strategy puts your team at an advantage. But be aware that once players leave, difficulty seemingly doesn't scale down, meaning battles can be much harder if teammates leave mid-battle.

Your tips for Monster Hunter: World

Have you been playing Monster Hunter: World on Xbox One? Make sure to drop into the comments with your tips for new players.

See at Microsoft StoreSee at Amazon

How to stream Super Bowl LII live

$
0
0

Hopefully you've already sorted how you're going to watch the game, but if you're looking for a way to watch it on the go, or just need a backup plan in case something goes wrong, you can view this year's Super Bowl through the NBC Sports app or just visit NBCSports.com.

Live-streaming the Super Bowl

The app itself is free but in order to view content you need to have a subscription to a cable or satellite service that includes NBCSN. The app's listing in the Microsoft Store has a full list.

The benefit of using the NBC Sports app is that you can view the game anywhere in the US where you have an internet connection. The app is available on Windows 10, Windows 10 Mobile, and Xbox One.

See in Microsoft Store

Touchdown!

Kickoff for Super Bowl LII is a at 6:30 p.m. ET on Sunday February 4th, so make sure to get out and prep for the big game. Let us know in the comments how you're getting ready for the event and who you think is going to win.


How to use the Windows 10 Microsoft Store if you're a gamer

$
0
0

The Windows 10 app store continues to be rather bad you're a gamer, but with Xbox Game Pass it's becoming a necessity for some quality titles.

The Windows 10 app store, officially branded the "Microsoft Store," comes as standard with Windows 10, offering a handful of great apps and games based on the Universal Windows Platform (UWP). UWP has a raft of benefits (as well as downsides), but the idea is to help developers create games and programs with a single codebase for several different endpoints. For example, Sea of Thieves for PC uses the same code as it does for Xbox One and Xbox One X.

For those who might be interested in picking up Microsoft Store-exclusive PC games, such as Gears of War 4 and beyond, the store can be a bit convoluted to navigate. Here's what you need to know to survive Xbox gaming on PC.

Managing your game library

Unfortunately, there's no easy way to simply manage and view your installed games. The game library on the Xbox app does bring in all the games installed on your PC, but you can't uninstall, update, or manage the installations from that location, which is frankly bad design. You also can't view your purchased titles from this location either. You'll need to use a combination of the Start Menu, the Xbox app and the Microsoft Store app to manage your games and invite friends into multiplayer parties.

Buying games

  1. Open the Microsoft Store by typing "Microsoft Store" into the Start Menu. (Note: You can also right click it and pin it to the Taskbar or Start Menu for easy access).
  2. Use the search box at the top left to find a game you want to buy, or browse the store by clicking Games.
  3. Select buy on the store listing for the game you want to purchase.

  4. After the purchase is complete, you can then select install to download the game.

Finding your previously purchased games

  1. To find your owned titles, first, open the Microsoft Store by typing "Microsoft Store" into the Start Menu.
  2. Select the dots in the top right-hand corner to open the menu.

  3. Click on My library.

Here, you can view a full list of your games and queue them for download. You can also filter the list to hide any owned Xbox One titles.

Viewing downloads and updating games

  1. To update currently installed titles, first, open the Microsoft Store by typing the same into the Start Menu.
  2. Select the dots in the top right-hand corner to open the menu.

  3. Select Downloads and updates to view your download queue.
  4. Click Get updates to scan if any apps or games are due an update.

Finding, launching, and uninstalling games

You can launch titles from the Start menu, and also pin them to your start screen, taskbar, or desktop for easy access.

  1. Simply type the name of the game you're looking for into the Start Menu.

  2. Right click to pull up a context menu for pinning for easy access, or uninstalling.
  3. Simply left click to open the game.

Managing co-operative Xbox parties on PC

Some titles on UWP have in-game party systems, but many of them have Xbox-integration for co-operative multiplayer management and voice chat.

  1. Open the Xbox app by typing "Xbox" into the Start Menu. (Note: You can also right click to pin the app to your Start Menu or task bar for easy access.)
  2. On the right side is a list of your friends. Select the friend you want to join with a left click.
  3. If your friend has a party already open with a joinable game, you can simply select Join party or Join game in the middle to instantly start co-op play.

  4. You can create your own party by selecting the party icon in the top right-hand corner, and hitting Start a party.


There are other nuances involved with getting parties going and managing UWP games on your Windows 10 PC, but these are the basics you need to know to get started. If you have any more questions, drop them in the comments below and we'll try to solve your problems!

More: How to redeem a purchase code on the Microsoft Store

How to use voice dictation on Windows 10

$
0
0

Windows 10 includes a new voice-to-text feature, and in this guide, we'll help you to get started with the experience.

The Fall Creators Update to Windows 10 brought a new dictation feature that allows you to translate spoken words into text a lot easier than before — and in any app and across the desktop experience.

Dictation joins the touch keyboard and handwriting as input options, and is very similar to Speech Recognition that's also part of Windows 10. Dictation focuses exclusively on converting voice into text, so you can't you can't use it to navigate the desktop and apps using your voice as you can with Speech Recognition.

In this Windows 10 guide, we'll walk you through the easy steps to start using voice dictation on your device.

How to get started with dictation on Windows 10

If you have a microphone connected to your device, dictation will be enabled by default, and you'll be able to access it using the Windows key + H keyboard shortcut or clicking the microphone button in the touch keyboard experience.

In order to properly invoke the dictation panel, make sure to place the mouse cursor on any text field, and then use the Windows key + H shortcut.

When the voice dictation panel appears, and you see the microphone icon in blue, you can immediately start dictating. However, bear in mind that using this experience, you'll also need to speak the punctuation and to dictate a symbol or letter, you'll need to use the "start spelling" command, and then speak the symbol or letter.

For example, if you want to say "Microsoft sells software, hardware, and accessories." with the quotation marks, you'll need to say open quote microsoft sells software comma hardware comma and accessories period close quote.

In the same way, to input a letter using uppercase, you must use the "uppercase" command, followed by the letter. For example, uppercase m will give you an M.

Once you're done, say "stop dictating," or after five seconds of inactivity, dictation will turn off automatically.

If the panel gets in the way, you can always drag it around the desktop. When you're done dictating, you can dismiss it pressing any key in the keyboard, clicking anywhere outside of the experience, or clicking the close (X) button on the right.

The up arrow button allows you to open the touch keyboard or handwriting experience, whichever you were using last.

Windows 10 dictation commands

Here's a list of the most common dictation commands that you can use. The words using "quotation marks" are just examples. You'll need to replace them with different words to perform your task.

Voice commandsActions
Select "word"Selects specific word or phrase
Select thatSelects recent dictation result
Select the "next three words"
Select the "previous two paragraphs"
Selects multiple blocks of text
Start spelling
Stop spelling
Enables and disables spelling mode
Clear selection
Unselect that
Clear current selection
Delete that
Strike that
Deletes recent dication result or selected text
Delete "word"Deletes current word
Go after that
Move after "word"
Go to the end of "paragraph"
Move to the end of that
Moves cursor to the first character after specified word or phrase
Go after "word"
Move after "word"
Go to the end of that
Move to the end of "paragraph"
Moves cursor to the end of the text
Go up to the previous "paragraph"
Move back to the previous "word"
Moves cursor backwards to the beginning of the previous block of text
Go to the start of the "word"Moves cursor to the first character before a specified word or phrase
Go before that
Move to the start of that
Moves cursor to the start of a text block
Go down to the next "paragraph"
Move forward to the next "word"
Moves cursor forward to the beginning of the next block of text
Go to the end of the "paragraph"
Move to the end of the "word"
Moves cursor to the end of a text block
Press "key"
Tap "key"
Supported keys: Tab, Enter, End, Home, Page up, Page down, Backspace, Delete

If you want to learn more about the punctuation and symbol commands you can use, check out this Microsoft support page.

Wrapping things up

Overall the experience using dictation on Windows 10 is good, but not perfect, as you may find it not very reliable all the time. For example, during my test, repeatedly saying "uppercase w" would keep on writing the words "uppercase" and "W."

In addition, it's not capable of recognizing punctuations automatically. It's limited to users running the US English version of Windows 10. And despite the fact that you can use some of the Speech Recognition commands, you'll notice the absence of the commands to navigate the desktop or app using your voice.

However, improvements and changes to dictation, such as an updated interface and customization options in the Settings app are expected to arrive in the next version of Windows 10.

More Windows 10 resources

For more helpful articles, coverage, and answers to common questions about Windows 10, visit the following resources:

How to remove Windows 10's Settings app tips

$
0
0

If you don't find the tips embedded in Windows 10's Settings app helpful, you can use this guide to remove them.

On Windows 10 version 1709 and later, the Settings app includes tips with embedded videos to highlight different ways you can use related features within the pages you view.

Although these tips can be helpful, the tips available are limited, and chances ar, if you're an average or advanced user you already know them.

If you don't find the Settings tips useful, Windows 10 includes at least two ways to remove them using the Local Group Policy Editor and Registry.

In this Windows 10 guide, we walk you through the steps to remove tips, including those embedded videos located on the right side of a page in the Settings app.

How to remove Settings tips using Group Policy

If you're running Windows 10 Pro (or Enterprise), the easiest way to remove tips on the right side of the Settings pages is to use the Local Group Policy Editor. Follow these steps:

  1. Use the Windows key + R keyboard shortcut to open the Run command.
  2. Type gpedit.msc and click OK to open the Local Group Policy Editor.
  3. Browse the following path:

    Computer Configuration > Administrative Templates > Control Panel

  4. On the right side, double-click the Allow Policy Tips policy.

  5. Select the Disable option.

  6. Click Apply.
  7. Click OK.

After you complete these steps, just re-open the Settings app, and throughout the experience, you should no longer see any tips, including text or video.

Settings with tips (left), Settings without tips (right).

If you change your mind, you can roll back the previous settings using the same instructions, but on step No. 5, select the Not Configured option.

How to remove Settings tips using Registry

On Windows 10 Home, you won't have access to the Local Group Policy Editor, but you can still disable tips in the Settings app by modifying the Registry.

Warning: This is a friendly reminder that editing the Registry is risky, and it can cause irreversible damage to your installation if you don't do it correctly. We recommend making a full backup of your PC before proceeding.

  1. Use the Windows key + R keyboard shortcut to open the Run command.
  2. Type regedit, and click OK to open the Registry.
  3. Browse the following path:

    HKEY_LOCAL_MACHINE\SOFTWARE\Microsoft\Windows\CurrentVersion\Policies\Explorer

    • Quick Tip: Starting with Windows 10 version 1703 (Creators Update), you can copy and paste the path in the new Registry's address bar to quickly jump to the key destination.
  4. Right-click the Explorer key, select New, and click on DWORD (32-bit) Value.

  5. Name the key AllowOnlineTips and press Enter.
  6. Double-click the newly created DWORD and make sure its value is set to 0.

  7. Click OK.

Once you complete these steps, open the Settings app, and in pages like Multitasking, you should no longer see tips, including embedded videos.

At any time, you can revert the changes and show tips in the Settings app with the same instructions, but on step No. 6, make sure to set the DWORD value to 1, or just right-click the AllowOnlineTips key and select the Delete option to remove it.

More Windows 10 resources

For more helpful articles, coverage, and answers to common questions about Windows 10, visit the following resources:

Should you upgrade the RAM in your Acer Aspire E 15?

$
0
0

Should you upgrade the RAM in your Acer Aspire E 15?

Is it worth buying the budget Acer Aspire E 15 and then upgrading the RAM yourself?

The Acer Aspire E 15 is a budget laptop that's a bit of a throwback to laptops of days gone by. It's thick, it has an optical drive, and it has plenty of legacy ports for connecting your aging hardware. Although it has many features that are going extinct, it also has an eighth-generation Intel Core processor (CPU), 8GB of DDR3 RAM, a 256GB solid-state drive (SSD), and an NVIDIA GeForce MX150 graphics card (GPU).

Part of this laptop's charm is how easy it is to upgrade the RAM and storage. You undo three screws, pull off the cover, and slip in some new hardware. Despite the simplicity, is it really worth buying more RAM?

See the Aspire E 15 at Amazon

What will you do with your Acer Aspire E 15?

Inside the Aspire E 15

The biggest factor when thinking about upgrading RAM is for what purpose you'll be using the laptop. Remember that the Aspire E 15 comes with 8GB of RAM, which is already a decent amount.

For productivity purposes — word processing, video watching, and light web browsing — you can go as low as 4GB, though if you like to multitask or have tons of browser tabs open at a time, the included 8GB will likely be appreciated. If you're a master of multitasking and find that the laptop is always a step behind you, going up to 12GB or even 16GB might not be a bad idea.

Keeping up with the NVIDIA GeForce MX150 GPU

Inside the Aspire E 15

NVIDIA's GeForce MX150 discrete GPU is an update to the aging GeForce 940MX, bringing slightly better performance. Still, the MX150 sits considerably lower than an NVIDIA GTX 1050 when comparing performance.

It isn't going to set any records, and it certainly will not power a solid VR experience, but the MX150 can still keep up with a lot of popular modern games, if not allowing you to play them at max settings.

While a lot of high-end gaming PCs employ 16GB or more RAM, adding to the 8GB in the Aspire E 15 isn't going to turn it into a killer gaming rig. Its gaming performance is tied more heavily to the MX150 than anything else. Likewise, if you're interested in video or photo editing, adding RAM will only get you so far. The GPU will be the biggest problem.

Should you upgrade the RAM in your Acer Aspire E 15?

Kingston RAM

The Aspire E 15 has space for two sticks of DDR3L SODIMM RAM, with one 8GB stick coming already installed from the factory. If you have an extra bit of compatible RAM lying around, adding to the Aspire E 15 is at least worth a try. The entire process shouldn't take more than five minutes, and if performance doesn't noticeably improve, you can always remove it.

Buying new RAM to go in the Aspire E 15 is, however, a different story. There are certainly people who can't live without 16GB of RAM in their modern PC no matter what other hardware it has inside, and that's just fine. You can get a single 8GB stick of DDR3L-1600MHz Kingston RAM for about $75. It's not the cheapest, but it has a five-star rating on Amazon with more than 1,800 reviews.

See at Amazon

Considering the Core i5 configuration of the laptop can be had for about $600, that additional cost might not seem worth it, especially if you plan on using the laptop for productivity purposes only.

See the Aspire E 15 at Amazon

More resources

For more information about how much RAM your PC really needs and how to install it, be sure to check out our other guides. Also, read our review of the Acer Aspire E 15 to find out exactly what it features.

How to play Oculus Rift games on the HTC Vive

$
0
0

How do I get Rift games working on my Vive?

PC gamers have long been proud of their peacefulness (other than a few mild dust-ups with the console armies). There hasn't been a war between PC gamers in years!

Keeping with the trend of sharing and caring, LibreVR created Revive, software that lets HTC Vive owners play Oculus Rift games. Why can't Rift games by default be played on Vive? We'll get into that.

Let's take a look at how Revive works, a little history about Oculus games, and finally a list of all the Rift games that work with Vive.

What is Revive and why does it exist?

Simply put, Revive was created by LibreVR in order to solve a crisis; Rift games exclusive to Oculus Home (the Rift's platform) couldn't be played on the Vive. Gamers were loving Revive and the ability to play Rift games on Vive, at least until an ill-fated Oculus update.

Back in May 2016, Oculus updated their Home app and introduced digital-rights-management (DRM) software, effectively shutting down Revive just as they were getting off the ground. The amount of feedback from the community was overwhelming, and Oculus reversed their decision about a month later. The DRM software was removed, and Revive became fully functional again!

Oculus has stated that they will never implement DRM again, but will go ahead with platform exclusive titles — hard to vilify them for the latter statement. Judging from the amount of flack they received the first time they implemented DRM, it's hard to believe Oculus would do the same thing again.

Why use Revive?

Thanks to Oculus shoveling a ton of money to developers in exchange for exclusive rights, some of the best VR games we've seen so far are only available on the Rift. Games like Lone Echo, Echo Arena, and Robo Recall have pushed what we knew as the boundaries of VR.

Steam also has a huge selection of VR games, but a lot of them are not much more than tech demos. We aren't vilifying either platform; it's simply a result of the different methods of promoting content creation.

For much more information, check out our look at how Oculus has helped put an end to the argument that there are no games for VR.

Oculus has put an end to the 'no games for VR' argument

How does Revive work?

To really dumb things down, Revive essentially grabs function calls on their way to the Vive headset and detours them to the Rift. When you're in your Vive looking at the SteamVR dashboard, you'll notice a Revive button near the bottom. If you click on it, you can bring up your games in the Oculus Home library.

It's incredibly easy to use, and it's also painless to set up. First things first: you need to download the Oculus app on your PC.

How to download and install the Oculus app

Before doing anything else, you need to download and install the Oculus app. There is an important process to follow so that you don't get stuck in a setup loop that requires you to actually have a Rift available — if you have an Oculus Rift, you don't have to worry as much.

  1. Navigate to the Oculus app download page.
  2. Click Start Download.
  3. Click Save.

  4. Click Run.
  5. Click Let's Go.

  6. Click Agree.
  7. Click I Understand.

  8. Click Next.
  9. Click Install Now. The required files will now be downloaded.

  10. Click Next.
  11. Click Rift.

  12. Click Next.
  13. Click Next.

  14. Click Skip Setup.
  15. Click Skip Setup.

How to download a game in the Oculus app

Now that you have the Oculus app installed and set up properly, you need a game or two in your Oculus library.

  1. Launch the Oculus app from your Start menu, desktop, or taskbar.
  2. Click a game you want to purchase and download.

  3. Click the blue button with a price tag on it.
  4. Click Add a credit or debit card or click Add your PayPal account. In this case I will add a credit card.

  5. Type in your information.
  6. Click Save.

  7. Type your PIN.
  8. Click Purchase.

  9. Click Install. Your game will begin downloading.
  10. Click Library when the download is complete.

  11. Click Finish Install.
  12. Click Install to complete the installation process.

Ensure you go to your library and complete the final two steps once the game has downloaded — if you don't, the game won't work with Revive.

How to set up Revive

Now that you have a game in the Oculus app that you want to play on Vive, it's time to download and set up Revive.

  1. Navigate to the Revive installer page on GitHub.
  2. Click ReviveInstaller.exe.

  3. Click Save.
  4. Click I Agree.

  5. Click Next.
  6. Click Install.

  7. Click Close.
  8. Launch SteamVR from the Start menu, desktop, or taskbar. Revive will launch automatically alongside it.

  9. Put on your Vive head-mounted display.
  10. Click the system button on the Vive controller. It is located just beneath the trackpad.
  11. Click Revive.
  12. Click an Oculus game you want to play on Vive.

The Rift game will open and you can use your Vive to play.

How to enable the Revive button in the Vive dashboard

If you can't see the Revive button below your Vive dashboard when you're wearing your Vive, take off the headset and follow these steps on your PC.

  1. Click the dropdown arrow next to SteamVR.
  2. Click Settings.

  3. Click Applications.
  4. Click Revive Dashboard so that a checkmark appears.

How to inject Revive into a standalone game

Some games that you haven't downloaded through the Oculus app or through Steam, like the VR-compatible ARK: Survival Evolved, can still be used with Revive.

  1. Right-click the Revive tray icon in the bottom-right corner of your taskbar.
  2. Click Inject.

  3. Click a standalone game. In this case, I don't have any installed. Remember, this is only for VR games that were downloaded outside of Steam and the Oculus app.
  4. Click Open.

How to patch Rift games downloaded through Steam

Steam has a few games that are only available for Oculus Rift. If you want to play one of these games on your Vive after downloading, follow these steps.

  1. Right-click the Revive tray icon in the bottom-right corner of your taskbar.
  2. Click Patch.

  3. Click a Steam game you want to play on Vive. In this case, I don't have any installed. Remember, this is only for Oculus-exclusive games downloaded through Steam.
  4. Click Open.

How to restart the Oculus Runtime service

When you download a new game through the Oculus app and attempt to launch it through Revive, you might see an error pop up that says Entitlement check failed. In this case, you must restart the Oculus Runtime service.

  1. Right-click the Start button.
  2. Click Search.

    Right-click the Start button. Click Search.

  3. Type services.
  4. Click Services.

    Type services. Click Services.

  5. Right-click Oculus VR Runtime Service.
  6. Click Restart.

    Right-click Oculus VR Runtime Service. Click Restart.

Which Oculus games work with Revive?

The LibreVR GitHub page contains a long compatibility list of Oculus games that is updated quite frequently. When attempting to get an Oculus Rift game working on your Vive, remember that Revive is a work in progress and won't always provide a flawless result.

The following Rift games have known compatibility issues with Revive:

  • ADR1FT— Works well most of the time. Some users have reported performance issues.
  • Dead and Buried— Broken due to performance issues.
  • Edge of Nowhere— Can be completed by disabling Asynchronous Reprojection.
  • Giant Cop— Broken, but there is a Steam version available.
  • Minecraft VR— Broken due to performance issues. Check out Vivecraft.
  • The Climb— Can be completed by disabling Asynchronous Reprojection and enabling Interleaved Reprojection.
  • The Unspoken— Playable, but has some performance issues.

The devs behind Revive work hard to keep the most possible Rift games compatible, so even if your favorite game is currently experiencing issues, check back often to see if it's been fixed.

Your Rift and Vive

Do you use your Vive to play Rift games? How does it work? Let us know all about it in the comments section below.

Updated February, 2018: We've refreshed this list to ensure you're still getting up-to-date information about Revive.

331417

Everything we know about Rainbow Six Siege Operation Chimera: Outbreak Packs, new Operators and more

$
0
0

Rainbow Six Siege is set to receive a cooperative zombies mode in early 2018, with the release of "Operation Chimera." Here's what we know so far.

Rainbow Six Siege has grown to be one of Ubisoft's biggest successes of the generation, delivering a shooter experience that while competitive, delivers unrivaled tension and atmosphere. Despite its rocky beginnings in 2015, the game has grown to be one of the biggest titles of today – now entering its third year of post-launch content.

Kicking off 2018, Rainbow Six Siege is on track to receive its ninth major content drop, "Operation Chimera." Deviating from the formula of previous expansions, Chimera brings significant shift in tone, with a new "fantasy" setting. And although a full reveal is still some time away, Ubisoft hasn't held back in teasing what's to come.

See at Microsoft StoreSee at Amazon

Mission Outbreak

The centerpiece of Operator Chimera is an all-new game mode, known as "Mission Outbreak." While details are scarce, Outbreak will be a three-player cooperative experience, assumedly with similarities to the existing "Terrorist Hunt" mode. However, Ubisoft has stressed this is fantasy take on the Rainbow Six formula, with a "new flavor" compared to previous expansions.

In line with the name of the expansion and the mission itself, Mission Outbreak will pit players against a biohazard threat, after a dangerous pathogen kickstarts a widespread pandemic. Backed up by various teasers both in-game and on social channels, the pathogen is likened to a "parasite," that targets the adrenal glands and skews hormones.

Ubisoft is also sharing vague teasers for Outbreak through a "leaks" site for the expansion, "rainbowleaks.org." After logging in with a Uplay account, the site shows the early stages of an alternate reality game (ARG), detailing the spread of a pathogen across Truth or Consequences, New Mexico.

The parasite's bonding with the adrenal gland of the patients, supercharging it and improving their pain management. It's lacing around the major bones and reinforcing everything from the clavicle to the ulna. If it wasn't for dulling their pain, this thing would kill the patients out of sheer torture. It's also tapping into the nervous system, nobody knows why yet.

From these snippets, it's safe to assume Outbreak will be a type of zombies-based mode, where players need to fight back the infected. Files contained within the third "leak" point toward several tiers of infection forms, which will likely add variation to Outbreak's gameplay. The pathogen appears to cause some type of crystalline structure to protrude from the body, which grows as the infected change forms.

Ubisoft will be limiting Outbreak to 11 Operators, to ensure the best balance of abilities that fit the mode. Among these is a new attacking Operator debuting this season, alongside Ying, Buck, Ash, and Glaz. The new defending Operator will also be playable in Outbreak, as well as Smoke, Kapkan, Doc, Tachanka, and the default Recruit.

Mission Outbreak will available to the public on March 6 and run for four weeks, before concluding on April 3. This will follow an early access PC release for those on the Technical Test Server (TTS), starting on February 20. The mode will be available to all owners of Rainbow Six Siege as a free update.

Two new Operators

Like previous seasons, Operation Chimera will also debut two new playable Operators, for both the new cooperative mode and competitive multiplayer. Tying into the theme established with Mission Outbreak, both operators will be experts in biohazard threats and containment under the fictional "Chemical, Biological, Radiological, Nuclear (CBRN) Threat Unit." Although details are currently scarce, they still provide an image of what to expect.

The first Operator comes from France, using a "drone to maintain quarantine perimeters." This is expected to be a high-armor, low-speed character using their ability to gather intelligence. Breaking down the above teaser image, the Operator with a French flag on their shoulder appears to be holding a Vector .45 ACP submachine gun, fed by a drum magazine.

The second, hailing from Russia, uses "self-dissolving nanobots" to "benefit" allies. This Operator can be expected to deliver some type of performance buff to teammates through their gadget. Some type of tube can also be seen on the Operator's left leg, which potentially links to this gadget.

For those with Rainbow Six Siege's Year 3 Pass, two weeks of early access will be provided to both these Operators. While firm dates are yet to be established, these Operators will be available with the game's Renown currency, or R6 Credits, two weeks after Year 3 Pass holders.

Outbreak Packs and cosmetics

The release of Operation Chimera will also be paired with new skins and other cosmetic content, tying into in the expansion's zombie theme. The biggest addition is new randomized reward system, "Outbreak Packs," with a similar concept to the existing Alpha Packs. These are randomized drops containing a collection of 50 cosmetics, available exclusively over the four-week period Mission Outbreak is live. For those who log during the Outbreak event, four packs will also be awarded for free.

Outbreak Packs do sport some major differences to Alpha Packs – the biggest of these being ties to real-world money. Unlike Alpha Packs, which are earned through in-game "Renown," Outbreak Packs are only sold via the game's premium currency, for 300 R6 credits. Due to the paid nature of these packs, no duplicates can be obtained through them. This means that after spending 13,800 R6 credits (around $80), you're guaranteed to have the complete Outbreak collection.

Included in these packs are weapon skins, headgear, uniforms and charms, including HazMat suits and an Ash "Sidewinder" Elite skin. And following a brief outrage over the monetization of Outbreak Packs, anyone who plays Rainbow Six Siege before March 6, 2018 will receive the Ash Elite skin for free.

Ubisoft has promised further cosmetic content outside of Outbreak Packs, "awarded based on other criteria." However, details on the content and how it will be obtained is yet to be announced. After the event concludes, all Outbreak items are expected to be unobtainable.

The outbreak looms ahead

For now, information on Operation Chimera is relatively limited, though, in the coming months, more details are set to surface. A full reveal of Operation Chimera and Mission Outbreak is scheduled for the "Six Invitational 2018" in Montreal, between February 13 and February 18. Once more details surface, we'll be sure to update this article. For now, we can just look forward to its Xbox One, PlayStation 4 and PC release in early 2018.

Are you still playing Rainbow Six Siege? What do you think of a cooperative zombies mode? Make sure to let us know your thoughts in the comments section.

See at Microsoft StoreSee at Amazon

Updated, February 2, 2017: Added details on the latest Operation Chimera news, teasing Mission Outbreak.

How to find the right aftermarket CPU cooler for your PC

$
0
0

Phanteks P400S

Here's how to choose the right CPU cooler for your PC.

Your PC's processor and other components produce a lot of heat when in use, and all this thermal activity needs to be transferred outside the case. There are a few ways this can be achieved with the CPU. Traditional air cooling uses a clamp to attach a heatsink block, which draws heat away from the processor. A fan then blows air through metal fins to dissipate the heat inside the chassis, which is then taken outside by an exhaust case fan.

Water-cooling is a whole other ball game, using a radiator, a pump and a block to achieve similar results but using liquid to take heat away from the processor. It's similar to how the radiator works on your vehicle. Water-cooling can produce better results by keeping the CPU cooler than air solutions, but prices can quickly get out of control. Some processors come with a bundled cooler, but even if you have one, it can be a good idea to swap it out for an aftermarket solution.

Picking a CPU cooler

The main decision you need to make when it comes to CPU coolers is what you want to do with your PC. Overclocking generally requires water-based solutions, while tower coolers with massive fans are perfectly fine for keeping temperatures down if you don't push components too far beyond factory settings. When looking at coolers, the more surface area you have, the more levels of cooling capacity.

If you cannot provide adequate cooling for the PCU, the component will begin to thermal throttle itself by reducing voltage and frequency, meaning the system will run slower. When taking CPU sockets into account, most coolers — air or water — are compatible with all sockets on Intel and AMD platforms. Older products will not be compatible with AMD's new AM4 socket without an optional bracket, but some coolers have been released with out-of-the-box support.

Best CPU coolers

Blowing on the CPU

Cooler Master Hyper 212

Air cooling is incredibly common thanks to the price and performance of these options. Most coolers are incredibly affordable, starting at under $10, but the more you spend the better the cooling you'll generally get. The reason it's better to go with an aftermarket cooler is they usually have more surface area than those provided by AMD and Intel, not to mention larger fans for forced convection.

While you need to make sure you have adequate space and airflow inside the case regardless of whether or not you rely on air or water, some air coolers can be bulky beasts that take up a fair amount of room. If you're not wanting to mess around with water around electronics, I always recommend a single blower setup, which should work perfectly fine, even with some overclocking.

The Cooler Master Hyper 212 is a fantastic cooler. On a system with an overclocked Intel Core i5-6600K at 4.6GHz, the temperature barely rises above about 120 degrees F (50 degrees C), well within the safe operating range. The best part is this cooler only costs around $30. That's excellent performance per dollar.

See at Amazon

Best CPU air coolers

Mixing water with electronics

CPU Water-cooling

Water. Electronics. What on earth are you thinking?

We all know you shouldn't mix liquids with electronics — hence why you should never drop your phone in the bathtub — but when it comes to cooling a CPU and other components, water can trump the rest. There are a few options when it comes to water-cooling, even if you've never used water before and have no idea when it comes to building your own loop. In fact, you don't even need to go with a DIY job.

All-in-one (AIO) liquid coolers come ready to use without any input from yourself. The pump, radiator, CPU block and fan are assembled, leaving you only with the task of installing it. It's sealed, tested and good to go and can provide a little piece of mind for anyone just starting out with liquid. These AIO coolers are generally more expensive than air coolers since there are more parts included. You'll be spending $100 and above.

Just like air coolers, these units are generally compatible with most sockets and CPUs, but be sure to double check before buying. Hit the link below for our recommended products there.

Best all-in-one liquid coolers

For custom water-cooling loops, this is where things get really expensive. It's easy to spend anywhere up to $500 and above on a setup that not only performs way beyond what you need for overclocking but looks awesome. I've done a full guide on water-cooling you should totally check out if you want to do your own liquid loop for your PC.

What cooler do you use?

Have a favorite you simply could not build systems without? Sound off your favorite coolers in the comments.


How to use a green screen in OBS and XSplit

$
0
0

Green Screen

A green screen is a great way to add a little extra production value to your streams. Here's how to get started.

If you're a frequent viewer on Mixer or Twitch and wonder how your favorite streamers have managed to make their backgrounds disappear from around them on camera, chances are they're using a green screen.

There are cameras out there that will do it through software (Logitech's C922) or by using Intel RealSense (Razer Stargazer), but to do it with any camera and with minimal impact on your PC a green screen is a great way to do it if you have room.

Allow me to walk you through the steps of setting up a green screen for use in both OBS Studio and XSplit.

What you need

ELgato green screen

Obviously, you'll need a green screen. There are plenty out there at places like Amazon, though the Windows Central recommendation easily goes to the Elgato Green Screen. It's about $160 but you really can't do any better, especially if you're tight on space.

The Elgato Green Screen is also the exact shade of green for chroma key functions to automatically recognize it.

You'll also need your choice of broadcasting software. OBS Studio is popular and free to use (though if you like it you ought to throw the developer a few bucks), or you might use the other popular platform XSplit. This does cost for a premium subscription to XSplit Broadcaster, but many find it a little easier to use. Grab both of them from the links below:

Download OBS Studio for Windows

Download XSplit Broadcaster for Windows

There are other applications out there that will help you stream to Twitch or Mixer, but for this guide, I'm going to concentrate on the two most popular suites.

How to set up your green screen in OBS Studio

OBS chroma key

In the latest version of OBS Studio the feature you need to enable, chroma key, is a little more hidden than you might think. But setting everything up is still straightforward.

Once you've added your webcam as a video capture source, follow these steps:

  1. Right-click on your camera under sources.
  2. Click on filters.

    OBS chroma key

  3. Click the + button beneath the effect filters box
  4. Select chroma key.

    OBS Chroma key

There are then a number of options you can tweak to get the best quality output. You can affect the smoothness and key color spill along with more basic features like brightness and contrast. The only way to get the perfect result is to play around with it to balance your camera and lighting.

How to set up your green screen in XSplit

XSplit chroma key

Activating the chroma key in XSplit is equally straightforward, though lacks a couple of the ultimate end features you can get in OBS. That sounds odd for a paid product over a free one, but one of XSplit's best value propositions is its ease of use.

Here's how you set up with your green screen once you've added your webcam as a video source.

  1. Right-click on your webcam in the sources box.
  2. Select the color tab.
  3. Enable the chroma key option.

    XSplit chroma key

If you're using a color other than green (red or blue) then select those from the drop-down box. The default is green. Unlike OBS, there isn't much else you can do specifically with the green screen effect, instead you'll have to tweak the camera settings to manage color and exposure, limiting the noise you may see as best you can. Good lighting is always important, though.

Bottom line

After the initial cost of acquiring your green screen, implementing it into your stream is a really simple process. Besides the software setup, also consider lighting, in particular, as should the webcam be unable to see the screen then you won't get a good chroma key effect.

Otherwise, it's a really simple way to add some extra production value to your stream. You aren't limited to just making your background disappear, either, it's a great tool to put your webcam video on a custom background image if you want to be extra fancy.

More: Best webcams for Windows

How to create a full backup of a Windows 10 S PC

$
0
0

If you're running Windows 10 S, here's one way you can protect your installation and personal files from malware, software issues, and hardware failure.

Although using Windows 10 S can lower the risks of malware taking over your system, it doesn't mean that your PC is immune to software problems and hardware failure. You won't know when, but one day, the hard drive may fail, a critical error may corrupt your files, or a very nasty malware may find its way into your device, and if you don't have a backup, you could lose important documents, pictures, and custom settings.

If you're using the unlocked version of Windows 10, you have a lot of options to backup your computer, but on Windows 10 S, because you can't install traditional (win32) programs, setting up a third-party backup solution is out of the question. However, it's still possible to protect your installation and files using the built-in system image tool.

A system image makes a copy of everything stored on your device, including installation and personal files, settings, apps, and additional drives. If your PC fails, you can use this backup to rollback to a previous working state in minutes on the same or different hard drive.

In this guide, we'll walk you through the steps to create a backup of your Surface Laptop or any other PC running Windows 10 S with the same tool available for the regular version of the OS.

How to backup Windows 10 S

To create a backup of a device running Windows 10 S, you'll need to connect a USB external hard drive (it can't be a USB flash drive) with enough space, and then follow these steps:

  1. Open Control Panel.
  2. Click on System and Security.
  3. Click on Backup and Restore (Windows 7).

  4. Click the Create a system image link from the left pane.

  5. Under "Where do you want to save the backup?" select the On a hard disk option.
  6. Using the "On a hard disk" drop-down menu, select the storage to save the backup.

  7. Click the Start backup button.

Once you completed the steps, the wizard will proceed to create a full backup of your device with everything that is stored on the main drive.

After the backup is done, you'll be asked to create a system repair disc, but because your Windows 10 S PC is likely not to include a disc drive, you can simply click No and then Close. You can always access the recovery options using a bootable USB drive with the installation files of any release of Windows 10.

How to restore a Windows 10 S backup

If your device doesn't start, you want to roll back to Windows 10 S from Windows 10 Pro, or you're replacing the hard drive, use these steps to restore a backup:

  1. Connect a USB bootable drive with the Windows 10 installation files.
  2. Connect the external hard drive with the system image backup.
  3. Start your device.

    • Quick tip: If your device isn't booting into the Windows Setup wizard, you'll need to change your system's firmware settings to make sure it can boot from USB. Usually, you can access the firmware by starting your device and hitting one of the functions or ESC keys, but make sure to check your manufacturer's support website for more information.
  4. On the "Windows Setup" page, click the Next button.

  5. Click the Repair your computer link located at the bottom-left corner.

  6. Click the Troubleshoot option.

  7. Click the System Image Recovery option.

  8. Choose the target OS.

  9. On the "Re-image your computer" page, select the Use the latest available system image option.
  10. Click Next.

  11. If you're restoring a full backup to a new drive, you can also select the Format and repartition disks option. (Use this option carefully, as it will erase any existing partitions and disks on your computer.)
  12. Click Next.

  13. Click Finish.

  14. Click Yes to confirm that the backup will replace the data on the drive.

Once you've completed the steps, the recovery process will begin, and the time of completion will depend upon the amount of data to be recovered and hardware configuration.

After the recovery is completed, it's recommended to use the Windows Update service in the Settings app to apply new patches.

Wrapping things up

While there are a lot of scenarios where a system image backup can come in handy, this tool is particularly useful to create a backup before installing a new version of Windows 10 in case something goes wrong, when you want to rollback after the previous installation files are no longer available on your PC, or if you decide to upgrade to Windows 10 Pro and then you want to go back to Windows 10 S.

One important thing about using this feature is that you need to remember to create backups regularly, as you can only recover everything since the last backup created. Additional settings, apps, files, and changes after the backup won't be available during recovery.

Also, this tool is meant to recover an entire system, not to restore files individually. If you want an always updated copy of your files, you should also be using other solutions including OneDrive and/or File History.

Although we're focusing this guide on Windows 10 S, these instructions will also work to backup a computer running Windows 10 Pro, Windows 10 Home, Windows 8.1, and even Windows 7.

It's worth noting that Microsoft is expected to stop offering Windows 10 S as standalone variant. However, the experience will continue to exist as an additional mode in other editions of Windows 10, and it'll be known as "S Mode".

More Windows 10 resources

For more helpful articles, coverage, and answers to common questions about Windows 10, visit the following resources:

How to add a Spotify now playing overlay to your Twitch or Mixer Stream

$
0
0

Mixer

If you're playing music on stream with a Spotify soundtrack, it's really simple to share what you're listening to with your audience.

Music can be an integral part of not only your own enjoyment while gaming, but also provide some additional entertainment to your audience when you're streaming. You may have noticed some of your favorite streamers with a little overlay on their broadcasts telling everyone what track they're currently listening to and thinking you'd like some of that yourself.

Fortunately, it's not complicated. I'm focusing on Spotify here because it's the most popular music streaming service and the one I use personally. But the program used here to do produce the overlay is compatible with other music apps, too.

Here's how to get set up in both XSplit and OBS.

Download Snip

Snip

To get the now playing information into a format that streaming software like OBS and XSplit can understand you need to use an additional program. One of the most popular and reliable is known as Snip.

It works in the background so you never really need to interact with it, but it'll pull the information from your music apps. Then it creates a text file that is constantly updated, and this is what you'll use to display the information in your stream.

Currently Snip works with Spotify, iTunes, Winamp, foobar2000, VLC, and Google Play Music Desktop Player. Download it at the link below.

Download Snip for Windows

Once you've extracted the contents and run Snip for the first time, a text file will be generated in the same folder (snip.txt, pictured above). You'll need to know the exact location of this file before you go any further.

Setting up Snip with XSplit

XSplit

Adding your now playing information to streams powered by XSplit is pretty straightforward.

  1. From the plugin store, make sure title (legacy) is installed in XSplit.

    XSplit

  2. Select add in the sources list.
  3. Click widgets.
  4. Select title (legacy).
  5. In the box that appears, paste the file location for the Snip text file generated earlier.

    XSplit

  6. Ensure the remote text update box is checked.
  7. Click OK.

You'll now see a box that, when you're playing a song, will give you the track title and artist. There are some things you can do by going back and configuring, such as enable or disable scrolling, change the font and a good tip is to reduce the refresh interval to 5 seconds. That way you get fairly immediate updates when the track changes.

The box itself can be moved and resized just as any other item you might insert into your stream in XSplit.

Setting up Snip with OBS

OBS

Setting up in OBS is as straightforward as it is in XSplit. Just follow these steps.

  1. Select the + button under sources to add new.
  2. Choose text (GDI+).

    OBS

  3. In the next window, next to the text file box click on the browse button.
  4. Navigate to the Snip text file generated earlier.

    OBS

  5. Click OK.

As with XSplit, you can move and resize the resultant box as any other item you'd add to your stream in OBS. In the configuration options for the text box, you can change a bunch of things like color, font, even whether you want it horizontal or vertical.

That's all there is to it. If you want a little extra visual flair, you could always add the Spotify logo (just find a PNG version online) just to make it pop a little bit against your stream. But as long as you have Snip running in the background, this little box on your stream will always update with your currently playing track.

How to fix common problems with Outlook .pst and .ost data files

$
0
0

If your data files in Outlook won't open or get corrupted, or items appear to be missing in your inbox, you can use these steps to resolve the issues.

The desktop Outlook app uses two types of data files to store local copies of your emails, calendars, contacts, and other items, to allow you access to your information without an internet connection.

If you're using an Outlook.com, Outlook 365, or Exchange account, this information is stored in an Offline Outlook Data File using a .ost format. However, if you're using a POP or IMAP account like those you get from an Internet Service Provider (ISP), your information will be stored in an Outlook Data File using a .pst format instead.

Typically, you can go for a long time without any problems, but sooner or later, these files may stop working, and they can get damaged, which is why Outlook includes the Inbox Repair tool to diagnose and repair common errors with .pst files, as well as a mechanism to recreate .ost files automatically.

In this Windows 10 guide, we walk you through the steps to repair the data files when they're damaged, items are missing in your inbox, or when a data file just won't open in Outlook 2016 or previous versions.

How to fix an Offline Outlook Data File (.ost)

If you have an Outlook.com, Outlook 365, or Exchange account, you can follow these steps to fix problems with a .ost data file in Outlook:

  1. Close Outlook.
  2. Open Control Panel.

    • Quick Tip: If you're only using the default profile named "Outlook," you can use the path %LOCALAPPDATA%\Microsoft\Outlook to go directly to the location of the .ost file, and then jump to step No. 13. Otherwise, continue with the steps below.
  3. Click on User Accounts.
  4. Click on Mail.

  5. Using the Mail Setup experience, click the Show Profiles button.

  6. Select the profile with the account you want to fix. (In Outlook 2016 the default profile is called "Outlook.")
  7. Click the Properties button.

  8. Click the Email Accounts button.

  9. Click on the Data Files tab.
  10. Select the account to be repaired.
  11. Click the Open File Location button.

  12. Before you continue, make sure to close the "Accounts Settings,""Mail Setup," and "Mail" windows.
  13. Right-click the .ost file for the account with problems, and select Delete.

Once you complete these steps, open Outlook again to automatically create a new .ost files for that particular account.

How to fix an Outlook Data File (.pst)

If you have an account connected using POP or IMAP settings, you can use the following steps to fix problems with a .pst data file:

  1. Close Outlook.
  2. Open File Explorer (Windows key + E).
  3. Browse the following path:

    C:\Program Files (x86)\Microsoft Office\root\Office16

    • Important: If you're using Outlook 2013, use the path C:\Program Files (x86)\Microsoft Office\Office15. If you have an older version of the app, change "Office15" in the path to "Office14" for Outlook 2010, or to "Office13" for Outlook 2007.
  4. Inside the folder, find and double-click the SCANPST.EXE file.

  5. Click the Browse button and locate the .pst file you want to repair.
  6. Click the Start button.

  7. Click the Repair button.

Once you complete these steps, the wizard will create a backup, proceed with the repair and create a log file with information about the repair process.

After the repair is complete, you can start the Outlook app associated with the data file.

Additional recovery instructions

While Microsoft's tool can diagnose and repair many problems with a .pst file, the recovery process may require additional steps to get all your items.

For example, after the process, you may find that some of the recreated folders in your inbox are empty. If this is the case, you may also see a Recovered Personal Folders or Lost and Found folder in the left pane. These folders will contain the items that have been repaired but couldn't be restored.

To get these items back, do the following:

  1. Open the Recovered Personal Folders or Lost and Found folder.
  2. Select the items you want to recover.
  3. Drag and drop those items into the correct folders.
  4. Delete the now empty folders.

If there are still items missing, you can use the .pst backup file to recover those additional items using the built-in Import/Export tool:

  1. Select the .bak file located in the same folder that contains the .pst file.
  2. Press the F2 key and rename the file to .bak.pst and press Enter.

  3. Open Outlook.
  4. Click on File.
  5. Click on Open & Export.
  6. Click the Import/Export button.

  7. Select the Import from another program or file option.
  8. Click Next.

  9. Select the Outlook Data File (.pst) option.

  10. Click Next.
  11. Specify the location of the .pst file.
  12. Select the import option.
  13. Click Next.

  14. Select the items you want to import.
  15. Click Finish.

After completing these steps, you should be able to use Outlook with all your data normally.

While this guide focuses on Outlook 2016, you can refer to these instructions to fix the data files on Outlook 2013, 2010, and 2007.

More Windows 10 resources

For more helpful articles, coverage, and answers to common questions about Windows 10, visit the following resources:

Xbox One 1802 update: The complete changelog

$
0
0

Microsoft has brought a wave of new features to Xbox One in its latest update, including Scheduled Themes, Do Not Disturb and more.

Microsoft has released the next big update for Xbox One consoles, delivering a range of improvements upon the last year's major feature update. While the update doesn't debut any major enhancements, some welcome changes have still made an arrival.

While an official name isn't paired with this update, it goes by the version number "1802." Early builds on the next branch, "Redstone 4," are expected to roll out sometime in the coming months with a larger batch of features. We've wrapped up everything changing with the update and what to expect when it hits your console.

Scheduled Themes

While a simple concept, "Scheduled Themes" is a welcome addition to the Xbox One OS. Complementing the "light" and "dark" themes implemented last year, the feature aims to deliver a dynamic color scheme to the console.

Although the dark theme is generally easier on the eyes in dimmer environments, light themes offer improved visibility in brighter locations. Using Scheduled Themes, the console automatically shifts between the two themes at set times of day, securing the benefits of both themes around the day and night cycles. For more information on Scheduled Themes, and a step-by-step guide to its implementation, make sure to check our extensive post on the subject.

How to use Xbox One Scheduled Themes

Do Not Disturb status

Xbox Live packs some impressive social features, serving as the binding network for Microsoft's gaming platforms. Communication, matchmaking and content features are engrained into the console but can distract you from the Xbox One's main attraction: games.

"Do Not Disturb" allows gamers to cut out Xbox Live's clutter, by blocking incoming notifications for social activities. System-level notifications, such as Achievement unlocks are still visible, meaning you won't miss the activity important to you.

How to enable Do Not Disturb status on Xbox One

Next Achievements

Achievement hunters are in for a treat, with a new feature that helps pinpoint easy achievements on the horizon. "Next Achievements" gathers achievements into an individual feed, allowing you to sort upcoming unlocks based on various factors. Using the filtering tools, achievements can be categorized by completion, rarity, highest value and more.

Next Achievements can be found in the "Achievements" tab of the Guide menu, as a pop-out window. This also means the feature can be quickly accessed without leaving the game, alongside existing Achievement tracking features.

Xbox One Achievement tips to maximize your Gamerscore

Mini Game Hubs

Game Hubs serve as a single location for Xbox One games, condensing announcements, social posts, and other content into a single source. While in the previous version of the OS Game Hubs were isolated sections to visit, "Mini Game Hubs" deliver highlights directly to the Guide menu.

Mini Game Hubs may lack the depth and functionality of full Game Hubs, though they serve top posts in a more digestible manner. This allows you to catch up on Game Hub activity, without leaving your current gaming session.

More features

Outside of the biggest changes with this update, smaller tweaks have been implemented across the OS, including:

  • A new Game Pass tab has been added to My Games & apps, which compiles all current titles into a single location.
  • A new download progress tile can be seen on the Xbox Guide menu, allowing users to view install percentages and manage their download queue.
  • A new Xbox Game Pass Discovery tile has been added to the bottom of the Guide menu, hooking directly into Microsoft's Netflix-style subscription service, Xbox Game Pass. Providing a way to explore the full spectrum of Xbox Game Pass titles, the Discovery tile opens the list for a random title from the library when selected.
  • This update brings the ability to finely tune the console's automatic shut down timer, allowing for two-, three-, four- and five-hour periods, alongside the existing one- and six-hour options.
  • Comment sorting has been reworked to place most recent comments at the top.
  • The most recent comment on a post is visible directly from the Activity Feed, encouraging more users to jump into the conversation.
  • Comment likes are viewable to see which users have interacted with a specific comment.

Your thoughts

What new features would you like to see on Xbox One? What do you think of these changes? Let us know in the comments.

Viewing all 5861 articles
Browse latest View live


Latest Images