Quantcast
Channel: Help & How To
Viewing all 5861 articles
Browse latest View live

How to sell your old Windows Phone

$
0
0

While Microsoft hasn't been doing well on the phone market, it doesn't mean that the platform isn't any good. Windows phones are great devices with very capable software -- perhaps the platform just need the right push to get more developers and customers actually using the handsets.

And this "right push" might come sooner than we think as things may start to change on October 6th, during the company's huge hardware event in New York City. Microsoft is expected to launch some new handsets running Windows 10 Mobile.

After numerous rumors and information leaks, we know the software giant will be introducing new Lumia phones, including the Lumia 950, Lumia 950 XL, and a new low-end Lumia 550. From what we have seen this far, these new devices will look gorgeous.

Lumia 950

These new devices not only will feature great hardware, but will also support Windows Hello through iris scanner. Also, the Lumia 950 and Lumia 950 XL will include support for Continuum for Windows 10 Mobile, which basically turns a traditional smartphone into a desktop PC.

With a new operating system on the horizon packing a bunch of new features and new great hardware, perhaps you may want to upgrade your old phone.

We'll show the steps you can follow to prepare your Windows Phone for sale and help you get some money back after buying your brand new Windows 10 Mobile handset. We'll help you make sure you're not giving away any personal information.

What you need to do to get your Windows Phone ready for sale

Backing up your data is your priority number one

No matter what device you use – phone, tablet, laptop, or desktop --, the first thing you want to do is to make sure you have a backup of all your data.

When you're using a phone, the backup is a little different, as you can't do a system image backup like you can on pretty much any computer running Windows. You can sync your pictures, videos, music, and a few other files to your PC, but for apps, settings, contacts, SMS, etc., you need to use the cloud backup options within the operating system to upload all that content to your Microsoft account.

Ideally, you'll want to back up your data, apps, and settings to your Microsoft account as it's a more secure and convenient environment.

Creating a full backup of your Windows Phone 8.1

Just like other platforms, the Windows Phone operating system doesn't include a main button to create a full backup of your handset. You need to go throughout the settings and make sure to back up all the necessary data.

If you're on Windows Phone 8.1, do the following: Go to Settings > Backup, tap on Apps + settings, and make sure to turn on Settings backup and App backup.

To backup your SMS and MMS to OneDrive do the following: Go to Settings > Backup, tap on Text messages, and turn on Text message backup.

Make sure to backup your pictures and videos to your OneDrive account: Go to Settings > Backup, tap on Photos + videos, and select the upload quality. (You may want to consider using the best quality possible.)

Creating a full backup of your Windows 10 Mobile

If you're running Windows 10 Mobile, do the following: Go to Settings > Update & security > Backup, and make sure "Back up content from participating apps" and "Back up settings like my Start screen layout, accounts, and passwords" options are turned On.

Once you configure the backup, your phone will backup automatically. If you want the backup to happen immediately, click the More options link, and click the Back up now button.

Make sure to backup your pictures and videos to your OneDrive account: Open OneDrive, tap the hamburger (menu) button on the top-left corner of the app, and tap the gear button on the top-right to access Settings. Then tap on Camera upload, and make sure to turn On the backup settings and you include your videos in the process as well.

To keep a copy of your texts to your OneDrive account do the following: Settings > System > Messaging and make sure to enable Text backup.

Reset your old Windows Phone to the default factory settings

If you have stopped using your phone because you bought a new handset, you probably already went through the backup and restore process. However, you still need to go through an important step.

Now you need to make sure that when you're selling your old phone, you're not giving away personal information. As such, it's the time to reset your handset.

There are two ways to reset your phone to the factory default settings. The first option is by using the reset feature within the phone and the second option is by using "Windows Device Recovery Tool" to erase everything and reinstall the operating system.

Note: It's important to note that at the time of the writing, Windows 10 Mobile continues in its preview stage, and currently doesn't offer a recovery feature through the Settings app. Because the new operating system is not publicly available yet, make sure you restore the original operating system instead of selling it with a pre-release version of Windows 10.

Reseting your handset running Windows Phone 8.1

If you're running Windows Phone 8.1, you can reset your phone by doing the following: Go to Settings > about, scroll down and tap the reset your phone option.

Then tap yes to confirm that resetting your phone will delete all your personal content, apps, games, pictures, music, and videos.

If you have an SD card, you'll have the option to erase its content as well.

Resetting your old phone by restoring the original image

In addition to the reset feature within Windows Phone 8.1, you can use the "Windows Device Recovery Tool" to restore the original operating system. It brings your phone to the factory default settings and erases your personal data, apps, games, pictures, music, and videos. As I mentioned above, if you're running Windows 10 Mobile Preview, you can use this method to roll back your phone to the factory defaults.

Below are all the steps you need to follow to accomplish this task:

  1. Download and install the latest version of the Windows Device Recovery Tool to your PC.
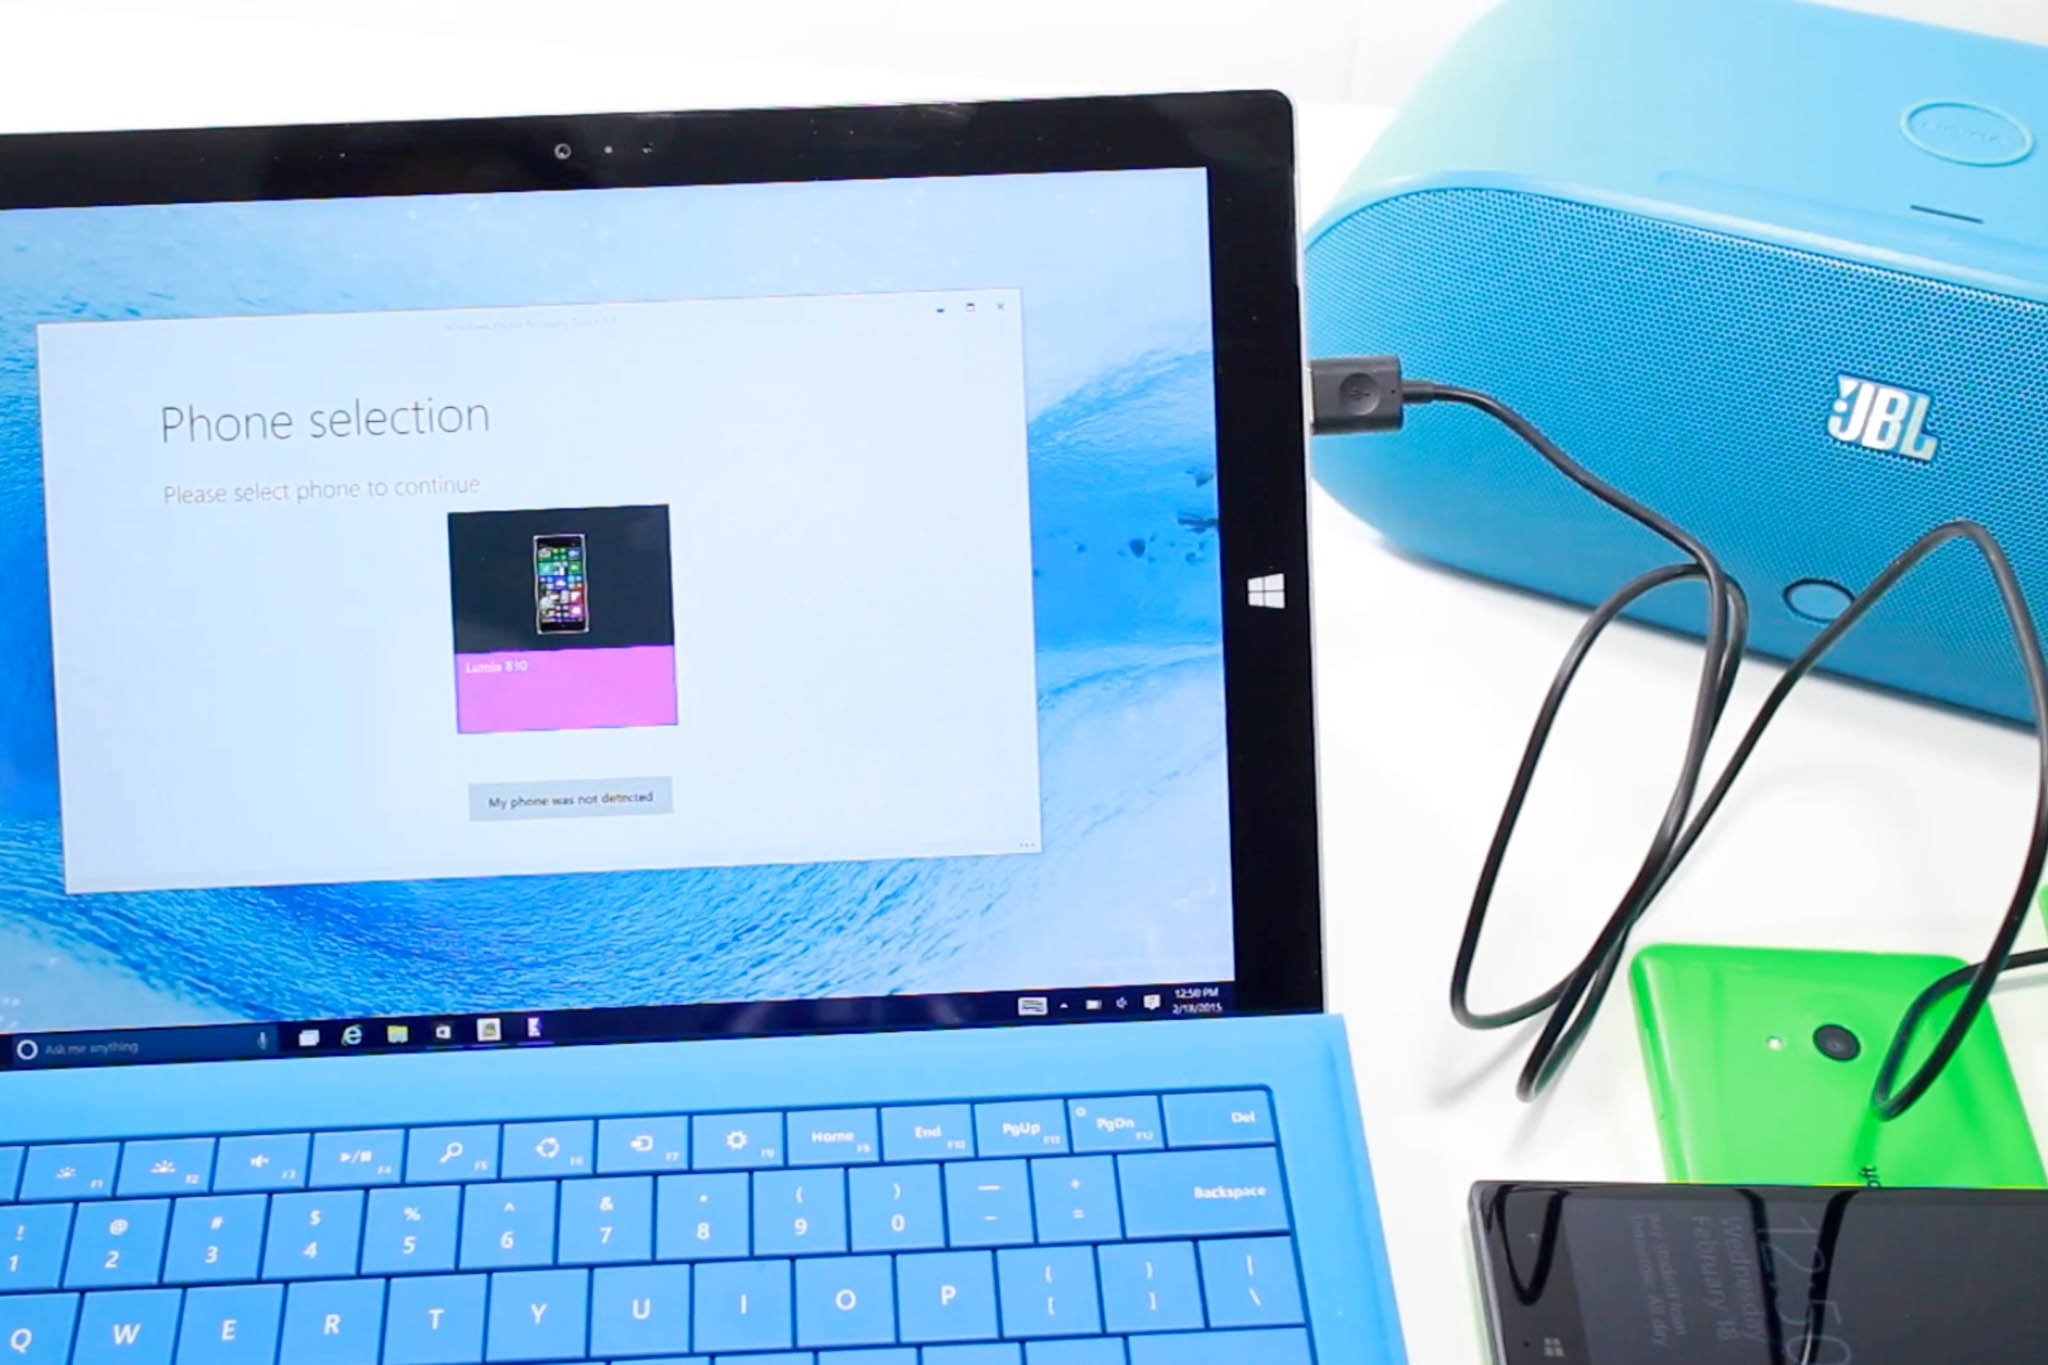
  2. Open the recovery tool and connect your Windows Phone using a USB cable. If your phone is not being detected, it could be that you're not using a data cable, also click My phone was not detected to force the tool to try detecting your phone.
  3. On the next screen, click your phone, and after several seconds, you'll see your handset information and the image available for download to go back to the original operating system. Click Reinstall software to continue.
  4. The software will warn you that you need to make a backup of all your data, but we have already done that, so you can now safely click Continue to complete the rollback.

The time to complete the process will depend on your phone, but it shouldn't take long. During the process, the recovery tool will download the original image from Microsoft's servers, and it will replace any existing version of the operating system.

Once the rollback completes, you'll see the "Operation successfully completed" message on the recovery tool, and now your phone is ready to go up for sale.

Now it's the time to sell your old Windows Phone

So far, we went through the steps and scenarios to make a backup of your device. You have also securely erased your personal data and reset your phone to the default factory settings.

Now, if you're not planning to keep your phone for testing purposes or just to have an additional phone in case your new phone stops working, then you can make some money by finding a new owner.

Just like you would do with any other product, one of the first things you want to do before putting your old Windows Phone up for sale is to figure out how much the same or similar phone is selling for. Of course, pricing will always vary depending on the condition and demand for that particular device.

If you don't know where to start, check out the market for the phone you want to sell -- visit the Microsoft Store online, Amazon, cellular network stores, and other online retailers, and see how much your old phone costs brand new (if it's still available).

Next, you want to visit eBay and Amazon.com to understand how much the same used phone costs. If they offer pictures of the device, see its condition to compare with your device.

Now, you have a pretty good idea on the price. The next step is to actually decide the price you want to sell your smartphone – take your time a decide wisely.

There are many services you can use to sell your old Windows Phone. You can try Swappa, Craigslist, eBay, Gazelle, Nextworth, and more. However, before you put up your item for sale, you may also want to consider to offer your used phone to someone you already know, as this can save you time and possible hassles.

It doesn't matter if you use Craigslist, eBay, or any other online service to sell your device. You want to make sure you describe the product as much as possible and emphasize on detailing its condition, and be as crystal clear.

Another important information you want to include in your description is to clarify if the phone you are selling is locked or unlocked. In addition, you want to mention in which cellular network (e.g., Verizon, AT&T, T-Mobile, etc.) you've used the phone and if it supports any other network. (Keep this in mind: One thing that people find very frustrating when buying a phone from a third party is not to be able to identify if the phone will work in their network. As such, if you're very clear, you will have a good chance of selling your old phone quickly.)

If you're not familiar with this information, you want to carefully see if you can get this info from online stores, cellular network stores, or even from the phone manufacturer's support web page.

Depending when you decide to sell your Windows Phone, make sure to note if the phone is upgradable to Windows 10 Mobile. Also, take good pictures of the handset and the accessories you are including (if any). Max out the amount of pictures you're allowed to post and be sure those pictures are very clear, showing the condition of the phone.

If you choose an online company such as eBay to sell your old smartphone, it's a good practice to offer fast and free shipping.

At the time of sending your old phone away, you want to ensure not to forget to remove the SIM card and battery (if applicable). If you don't know how to do this, check your phone user manual or check your phone's manufacturer support web page for more information.

Use good packaging to avoid damages and use a shipping method that offers tracking and signature require on arrival.

Removing your phone from your Microsoft account and disable Reset Protection

One additional step you want to do is to go to your Microsoft account and from the list of devices is to remove your phone. Simply click Remove phone, and on the next page check I'm ready to remove this device: Windows Phone and confirm the deletion. This is another important step as you are only allowed to install apps on up to 10 devices. Furthermore, you want to allow the person who buys your phone to be able to enable the "Find my phone" feature. (Thanks pmhgeneral for the tip!)

Finally, you want to double-check your handset doesn't have the Reset Protection enabled by going to your Microsoft account. If you do, you will want to disable this feature so the new owner can reset the phone without problems. (Thanks micallan_17 for the tip!)

Wrapping things up

Although there are many users who will opt to keep their phone to continue testing the Windows 10 Mobile preview builds, new phones come and go very quickly. If you're already getting a new phone, you can always make a few extra bucks before the old device becomes obsolete.

Also note that we're not focusing on a single brand of phones in this guide, so you can use the steps mentioned above for other handsets as well.

During the Windows 10 devices event on October 6th, Microsoft is also expected to introduce the new Surface Pro 4. If you're a Surface Pro 3 owner and you're planning to get the new tablet, we go through the steps to sell your Surface Pro 3.

Are you planning to upgrade your Windows Phone anytime soon? Let us know in the comments below.


How to manage Windows 10 devices from your Microsoft account

$
0
0

Windows 10 isn't just an operating system that works locally in your computer. It's also an operating system that works in combination with Microsoft online services such as with Bing and OneDrive. Furthermore, in Windows 8, the software giant introduced the Microsoft account, leaving the old time local account as a secondary option.

A Microsoft account is a fairly new account type designed to allow users to connect across devices with a single username and password. When you sign in with a Microsoft account, all of your settings, passwords, people, documents, photos and videos, and music will roam with you everywhere to any device connected to a Microsoft service.

We are no longer tied to a single device. We have multiple hardware, and every time we connect new devices with our Microsoft account, they get registered into our account. While it's great to know that we can view how many devices we are using with our Microsoft account, it's important to keep the lists under control for various reasons:

  • If you have a Windows Phone connected to your Microsoft account, and you sell it, the other person won't be able to setup the Find my phone feature until you remove the device from your account.
  • In Windows 10, Microsoft is reducing the number of devices you can install an app or game you have purchased to only ten devices.
  • On every new install of a Windows 10 device, you have been prompted to enable sync, which creates a backup of all your settings for each computer, phone, or tablet. This "backup" also gets stored in the cloud. If you ever reinstall Windows 10, you will be asked if you want to restore the settings from a previous install. After a while, these device backups will keep piling up, using valuable OneDrive space.

In this Windows 10 guide, we're going through the steps to keep the list of devices under control.

Removing devices you no longer use

If you used to own a Windows Phone, Surface Pro 3, or any other computer, you could remove these devices by going to "Your devices" in your Microsoft account online. Simply click the Remove link, check the box confirming the device you're removing, and click Remove.

Tip: If you're removing your old phone, you may also want to check your devices doesn't have Reset Protection enable. Check out our previous how-to learn more.

Avoid reaching the ten devices app and game install limit

Windows 10 limits the install of an app or a game to 10 devices. To avoid reaching the limit, you can remove devices you no longer use. Simply go to Apps & games devices, and carefully remove the devices you want by clicking the Remove link, then check the box to confirm the device you're removing, and click Remove.

Note: It's worth pointing out that you can do the same for Music, Movies & TV devices.

Deleting old device backups from OneDrive

If you want to free up some of the storage space in OneDrive, keep your device backups organized, or you no longer have one of your devices, you can go to OneDrive > Device backups, and remove old backups by clicking the Delete button.

There you have it. These tips you see today will help you to keep your Windows 10 devices under control and keep enjoying apps and games.

Additional Resources

Do you need to more Windows 10 help? Use these resources.

Windows 10 on Windows Central – All you need to know

Windows 10 help, tips, and tricks

Windows 10: Help and discussion forum at Windows Central

How to reduce the Windows 10 footprint on your computer

$
0
0

Many people when they see Windows 10, they only see the new features and visual changes. For sure, they notice the new Start menu, Cortana, the Action Center, apps, including the new Settings app. However, many users fail to see that Windows 10 brings a lot of changes and improvements under-the-hood as well.

If you ever noticed, Microsoft made a lot of changes in Windows 10, and now the operating system uses even less space than its predecessor, Windows 8.x. In part, the changes were made to allow Windows 10 to run on devices with limited space, such as tablets and laptops with small size solid-state drives.

Also, the software maker was able to reduce the footprint of Windows 10 thanks to that the operating system no longer requires nor uses a recovery image. In fact, just by eliminating the recovery image, users get close to 4GB of storage back.

For recovery, the operating system now uses the files already in the system – more specifically the files found in C:\Windows\winsxs. However, there is one more component -- Windows 10 also includes a new compression mechanism known as Compact OS. Using the new tool takes the Windows 10 files and puts them into a hidden container where they are compressed freeing up more space (keep in mind that this method also compresses pre-loaded desktop applications).

This new method is what technically replaces WIMBoot from Windows 8.1 that offered similar advantages. You can still use this tool in Windows 8.1, but compact OS is easier to configure and deploy, and the best part is that you can even use it after you have installed Windows 10.

Now, there are a number of ways in which you can configure your compact OS (check this TechNet article). However, in this guide we're only going to focus on how you can use the tool to reduce the footprint of Windows 10, after you have installed the operating system.

Warning:While the compression tool works very well, you will be modifying your operating system installation. As such proceed at your own risk. Furthermore, it's highly recommended to create a full backup before making any changes to your PC.

  1. Compact OS is a command line tool, so you need to open the Start menu, do a search Command Prompt, right-click it, and select Run as administrator.
  2. Type COMPACT.EXE /CompactOS:always and hit Enter.

The tool will begin the process, which it will take anywhere from 10-20 minutes. Even better, you don't even need to restart your computer.

Here's a before and after image:

If you want to turn compression off, on step number 2, use the never switch, like this: COMPACT.EXE /CompactOS:never and hit Enter.

With the Windows 10 compression tool, you will be saving around a solid 2GB of storage space, but the amount of space will vary from system to system. While this might not seem like a lot of space for some users, if you are running the operating system on a device with limited storage, this could be a good amount of saved space.

In terms of performance, during my test I have not experienced any performance issues. Windows 10 and apps worked quite well as always.

Additional Resources

Do you need to more Windows 10 help? Use these guides and forums for more!

Windows 10 on Windows Central – All you need to know

Windows 10 help, tips, and tricks

Windows 10: Help and discussion forum at Windows Central

Extreme Exorcism: Achievement Guide for Xbox One, Steam, and more

$
0
0

Extreme Exorcism: Achievement Guide for Xbox One, Steam, and PlayStation 3 and 4

Extreme Exorcism from Golden Ruby Games and Ripstone is an action-platformer with a twist. Whenever the player defeats a ghost, a new ghost will spawn that mimics the player's previous actions. This ghost-hunting game offers local 4-player campaign co-op and deathmatch modes, but it can still be enjoyed solo. That's how you make a proper party game!

The Xbox One and Steam versions of Extreme Exorcism possess thirteen spooky Achievements. At first glance, these Achievements might seem difficult or impossible to unlock. Our detailed Achievement Guide tells you exactly how to get each one with a minimum of fuss – check it out!

Roadmap

I've divided Extreme Exorcism's Achievements up into categories based on the optimum order that you should pursue them. The total completion time should be about 6-8 hours. Only the primary player can earn Achievements, not co-op partners (boo!).

Extreme Exorcism Cellar Gameplay

Here's a brief roadmap:

  • Complete Arcade Mode
  • Head to the Altar for kill- and final boss-related Achievements
  • Complete Challenge Mode
  • Grind for the final Achievement, 'Necromancer'

Also, note that this guide applies to Xbox One, Steam, and PlayStation 3 and 4. The Wii U version doesn't offer Achievements.

Arcade mode

Grand Tour (50): Unlock all rooms.

Extreme Exorcism Arcade Mode

Extreme Exorcism's Arcade mode takes place in a massive haunted house. The house contains 10 locations, most of which have 5 levels each, for a total of 42 levels to complete:

  • Intro: 1 Level
  • Graveyard: 5 Levels
  • Foyer: 5 Levels
  • Library: 5 Levels
  • Conservatory: 5 Levels
  • Bedroom: 5 Levels
  • Kitchen: 5 Levels
  • Attic: 5 Levels
  • Cellar: 5 Levels
  • Altar: 1 Level

To unlock new locations, you must generally unlock every level within an existing location and reach an overall kill count for that location. You can view this overall kill count by highlighting the location you wish to unlock on the map screen.

To unlock individual levels within a location, you'll have to reach target kill counts within that location's levels. Note that kill count progress is not shared between solo and co-op play, but levels unlocked in solo or co-op remain unlocked in both modes.

Full Arsenal (50): Unlock all weapons.

Extreme Exorcism Fat Gun

Extreme Exorcism has a total of 20 weapons, not counting the Exorcism weapon. As you progress through Arcade mode, you'll unlock new weapons upon reaching certain kill counts. The final weapon, the Fat Gun, unlocks at 900 kills. Just play normally and you'll get this one fairly early on.

Ghostblaster (200): Kill 1000 ghosts!

Extreme Exorcism Game Over

This will unlock through normal progression, 100 kills after you unlock the Fat Gun. You can see your total kill count on the Game Over screen.

Dead Eye (50): Finish five rounds without missing a shot.

Extreme Exorcism The Foyer

You could potentially earn this one before everything else, as early as reaching the Graveyard. To complete a round during Arcade mode, simply kill the ghost with a crown on its head. What 'Dead Eye' doesn't tell you is that killing any other ghosts that round counts as missing a shot.

Pick an easy level with no hazards or moving platforms, such as Foyer 1. Only pick up weapons that are easy to aim and fire directly ahead, such as the Pistol, Shotgun, or Fat Gun.

If you don't like the selection of weapons that have spawned, simply wait a while for new weapons to spawn. Just grab one weapon at a time for simplicity and safety. Take your time, aim carefully, and don't miss – you should get it within a few tries.

Take that, Physics! (10): Jump on five bullets in one round.

Extreme Exorcism Fat Gun Bullets

The Fat Gun fires bullets that can be jumped on, not unlike the Banzai Bill enemies in the Super Mario series. The gun itself looks like a large Magnum pistol, not to be confused with the smaller standard Pistol.

This Achievement description is misleading. You actually need to jump on five Fat Gun bullets without touching the ground. After jumping on a bullet, you gain another double jump, allowing you to stay in the air longer.

After unlocking the Fat Gun, choose an easy level with no hazards or moving platforms, such as Foyer 1. Wait around for the Fat Gun to spawn, which can sometimes take a while. Once it does, go to one end of the screen and fire several rounds continuously. Don't kill the crown-wearing ghost until you've fired off at least 10 rounds – that should give you some breathing room.

During the following round, start hopping on the ghost's bullets. Don't allow yourself to land until you hit five and the Achievement unlocks.

Alternately, set up a Deathmatch game with Custom rules. Turn off all weapons but the Fat Gun. Have the second player fire shots repeatedly while the first player jumps on them for the Achievement.

Head to the Altar

Extreme Exorcism The Altar

Exorcist (100): Complete Arcade mode.

Extreme Exorcism Selfie Ending

See 'Extreme Exorcist' below.

Extreme Exorcist (200): Defeat the final boss without losing a life!

The Altar is the final location of Arcade mode. It consists of a single battle against the only boss in the game, a large flying ghost. Pay attention to the strategy for beating the boss, as we'll use much of it to get the game's remaining weapon kill-based Achievements.

When fighting the boss, enemies spawn in continuously as long as the final boss lives. The boss can only be hurt with the Exorcism weapon, which looks like a pair of angel wings. Every few smaller ghosts you kill will cause an Exorcism to spawn. The boss becomes enraged after three Exorcism hits, and the fourth hit will defeat him.

The trick to defeating the boss without dying is preventing the regular enemies from attacking and making sure you have enough enemies to kill in order to quickly spawn an Exorcism when the boss becomes enraged.

Extreme Exorcism The Altar Final Boss

When the battle starts, immediately hop to the right side of the Altar. As long as you don't fire any shots, neither will the enemies. They won't be able to hurt you at all unless they crush you against a wall, which rarely happens if you're careful.

Jump around between the steps and ground on the right side of the altar, keeping the enemies as close to the steps as possible. While you're doing this, watch for a safe weapon that can kill multiple enemies at once to spawn: the Rocket Launcher, the Harpoon Gun, or the Fat Gun. Grab one (and no other weapons) and continue hopping until plenty of enemies have built up on every right-side step.

When you're ready to start attacking, stay close to the altar and fire a single shot at one of the steps. This should kill enough enemies to spawn the Exorcism weapon. Grab it, head to the left side of the altar, and hit the boss with it. Immediately head back to the right, kill another batch of enemies, and repeat.

Once you've hit the boss twice, prepare for him to become enraged when you hit him the third time. After he becomes enraged, move quickly to kill another batch of enemies so you can get another Exorcism. Now grab it and hit the boss to win!

It's a Party! (30): Manage to amass thirty ghosts on-screen!

The strategy here is much the same as the one I described for 'Extreme Exorcist.' In fact, you can build up 30 enemies while you're waiting to launch your first attack as you try to beat the boss without dying. Just let the enemies continue to build up while you avoid firing, and the Achievement will unlock once 30 have spawned.

Bull's Eye (10): Kill five ghosts with one harpoon.

Extreme Exorcism Harpoon Gun

The Harpoon Gun looks like a black and orange rifle with a spear sticking out of it. It fires harpoons that stick into walls and can then be used as platforms.

Wait for a harpoon gun to spawn while allowing small ghosts to build up along the right side of the altar. Once you have the gun and 10-20 enemies built up in the same spot, fire a harpoon and let them have it.

Demolition Man (50): Kill ten ghosts with one explosion.

Extreme Exorcism Rocket Launcher

The rocket launcher looks like a green rifle. It shoots rockets that explode on impact with enemies or walls. Anything caught in the explosion will be killed by splash damage.

Wait for a rocket launcher to spawn while allowing small ghosts to build up along the right side of the altar. Once you have the launcher and 20 or so enemies built up in the same spot, fire a rocket at the altar. With any luck, you'll hit ten and the Achievement will pop.

This House is Clean! (50): Exorcise ten ghosts at once.

Extreme Exorcism The Altar Final Boss

Remember, the Exorcism weapon looks like a pair of angel wings. Every few smaller ghosts you kill will cause an Exorcism to spawn.

Build up 25-30 ghosts along the right side of the altar. Using any weapon you like, kill enough of them to make an Exorcism appear. Then just grab it, head into the crowd, and unleash the power. You can float around a little while using the Exorcism, so try to steer into more enemies after the first batch of enemies gets hit.

Challenge Mode

Unchallenged (100): Complete all challenges.

Extreme Exorcism Challenge Mode

Challenge Mode is a single-player mode available from the main menu. It contains five tiers of increasingly difficult challenges. To unlock the next tier, simply complete enough challenges in the tier before it.

It will take a few hours to knock out all 50 challenges, depending on your skill and luck. Remember to kill enemies in locations that will minimize the danger to you when they respawn, and avoid weapons like the knife and shurikens that can hit you unexpectedly. Keep at the challenges and eventually you should be able to complete them.

Grind for deaths

Necromancer (100): Die 1000 times!

Extreme Exorcism Conservatory 5 Necromancer

After completing every other Achievement (including Challenge Mode), I had died about 500 times. You can track your death count using the Xbox One's built-in Achievement app. Double-tap the Home/Guide button, press right on the d-pad to Snap an app, and snap the Achievement app. Leave it snapped while you grind for this final Achievement so that you can track your progress.

Unfortunately, Extreme Exorcism doesn't have a mode with unlimited lives. No matter what you play (other than a few specific Challenges), you'll only have three lives before you have to exit and reselect the level. Isn't the lack of a Continue option annoying? Yes it is. Also, Deathmatch mode definitely doesn't contribute towards the death count. I don't think co-op partners' deaths count either, but I'm not completely sure.

The best level for quick deaths is Conservatory-5 because of the large spiked pit in its center. Simply fall directly into it every time you spawn. When you run out of lives, press the B button to exit, then select the level again and repeat the process. It takes about 20 seconds to use up your lives and continue using this process. That's 9 deaths per minute, which amounts to 540 deaths per hour. Keep your mind occupied by listening to videos or music and you'll hit 1,000 deaths before you know it.

After putting in your grinding dues, you'll at last have the final Achievement (or Trophy)!

Extreme Exorcism Necromancer Achievement

If you've found this Achievement Guide useful, please leave a comment to let us know.

  • Extreme Exorcism – Xbox One – 380 MB – $12.99 – Xbox Link
  • Extreme Exorcism – Windows PC and Mac – $12.99 – Steam Link

How the iris scanner on the Lumia 950 and 950 XL works

$
0
0

On October 6, Microsoft unveiled a number of new devices running Windows 10, including the new Lumia 950 and Lumia 950 XL– if you missed anything, don't forget to check out Windows Central's #Windows10devices coverage --. Both of these phones are premium devices optimized to deliver the best Windows 10 experience on mobile devices.

The Lumia 950 XL features a 5.7-inch Quad HD display, Snapdragon 810 processor, 3GB of RAM, 32GB of storage, a 3340mAh battery, and of course it comes pre-loaded with Windows 10 Mobile. The Lumia 950 is still a premium phone, but the tech specs are a little lower. For example, this handset features a 5.2-inch display, the same 3GB of RAM and 32GB of storage, but only a 3000mAh battery and a Qualcomm Snapdragon 808.

However, one important feature these two phones have in common is the iris scanner that enable users to unlock their phone without a password using Windows Hello, which was first introduced on Windows 10 for PCs. But Microsoft is now bringing it to mobile devices, and today we're going to have a closer look at how this new functionality works in the new handsets.

Before we dive into how the iris scanner works with Windows Hello, let's make a count of how many cameras you'll find in the Lumia 950 and Lumia 950 XL. In these new phones, you have the traditional higher-resolution rear-facing camera and the lower resolution front-facing camera, which you use to take pictures, selfies, and make Skype calls. Then you have an infrared camera and another camera that specifically designed to take pictures of your eyes.

Now that we know the components, let's go through the steps on how everything works:

You need first to set up a PIN for the device, which acts as a backup system. Then, when you need to unlock your phone, the infrared camera is first used to light up your eyes. At the same moment, the second camera takes a picture of your eyes, which works in different lighting conditions (the darker the environment, the better it works).

With your biometric information captured a mathematical calculation is performed to create a hash that is checked against the hash stored on your device. If everything checks out, then you will be allowed to get into your phone. While the internal process to make it all happen is rather more complex, it's a very fast process that should never take more than 2 seconds.

The feature is built on a technology called "asymmetric key cryptography" that has been around for years. You'll find asymmetric-key cryptography on other solutions, such as smart cards, and it's also based on the Microsoft's Kinect sensor.

According to Microsoft, Windows Hello is designed with privacy in mind, no image of your face or iris is ever stored on your device. Instead, the authentication happens locally, and your biometric information is never transmitted outside of your device to any server. There would be no photos of you unless you did a selfie with the regular camera!

Using your biometric information to unlock Windows 10 makes your device more secure and easier to use at the same time. And don't worry, no one will be able to pass through the lock screen with a photo of your face and it also works with twins. If you wear normal glasses the system also works. As such only you are the only one that can unlock your phone using Windows Hello.

Will you be enabling Windows Hello on supported Windows phones? Let's us know your thoughts in the comments below.

How to configure the System Restore feature in Windows 10

$
0
0

We can safely customize many features and options in Windows without having to worry about if the next time you boot your computer will start correctly. Then there are those times when you need to modify the operating system in such a way that if you don't do it correctly, you might end up with serious problems. These problems could include not being able to boot, system stability problems, and many other issues.

This reason is why we always recommend you to protect your computer by doing a full backup of your system (or we tell you the risks involved doing a particular change). However, for years Microsoft's operating system has come with the System Restore feature, which can also help you fix your computer when things go wrong.

System Restore allows you to revert the state of your computer to a previous point in time to undo changes that might have harmed your computer. These changes in the system files and settings, registry, and on installed applications. It's just like a time machine.

When enabled and configured correctly, Windows generates restore points when you install a new app, device driver, or Windows update, but, of course, you can always create a restore point manually. For example, when you want to change some of the Registry settings or install a big application.

This feature is like a backup, but not exactly, as going back in time with this feature won't affect your documents or settings prior the creation of a particular restore point. However, it will remove apps, drivers, system updates, and registry changes after the restore point was made.

Configuring System Restore hasn't been a difficult task to accomplish, but it's been a feature somewhat hidden from most users, even in Windows 10. Today we're going to go through the steps you need to follow to enable, create, and restore a system restore point in your computer.

Enable System Restore

1- Go to the Start menu, or click the search box and type Create a restore point and hit Enter to open the legacy "System Protection" settings page to configure the feature.

2- While in "System Properties" under the "System Protection" tab, make sure to check your Windows drive (typically C) has Protection turned On.

3- If Protection it's turned Off the Create button won't be available. The next step is to select the drive you have installed Windows (system) and click on the Configure button.

4- Once inside of "Restore Settings" make sure to select "Turn on system protection" to enable the feature.

Note: System Restore can only be enabled per supported drive, no per computer. If you have additional drives, you may not be able to configure them.

Under "Disk Space Usage," you can adjust the maximum storage space dedicated to storing restore points. By default, Windows only uses a small percentage of the total available storage of a particular drive, and as the reserved space fills up, older restore points will get deleted to make room for future ones.

You will also notice the a Delete button that will erase all the current saved restore points. You may want to use this option when you need to create a manual restore point, and you can't allocate more space.

5- After configuring your preferences, click Apply and then OK. Now, you'll see that under the system drive now has Protection turned On.

Create System Restore Point

Now that you have enabled Restore Point in your system, the operating system will create a restore point automatically every time a significant change happens. However, sometimes you might want to create a system restore point manually before modifying anything that you might think could cause a problem.

To configure a restore point manually, simply click the Create button, and type a description to help you identify the restore point (e.g., System Restore Point before installing X app). Then click the Create button to complete the process. (Restore points creation are fast, it shouldn't take longer than a minute.)

Using System Restore

If at any point in time, you run into issues, before using a backup or the "Reset this PC" feature in Windows 10, you can use a system restore point, which will be quicker and easier.

To undo unwanted system changes to fix your computer by going back to a previous point in time do the following:

1- Go to the Start menu, or click the search box and type Create a restore point and hit Enter to open the legacy "System Protection" settings page to configure the feature.

2- Click the System Restore button and click Next.

3- You will be shown all the available restore point available with date, description, and more importantly, you'll also see the type, which specifies if it was created manually or by the system.

As you select a restore point, you can click the "Scan for affected programs" to view the applications installed since the last restore point, which will be deleted during the restore process. Then click Cancel to go back to the wizard.

Then click Next and then Finish to begin the restore process.

Once the process complete, you will back to that point in time your system was working correctly.

Extra

Thus far, we have seen how to use a restore point when things go wrong in your system, but only when you can still operate the PC and OS. However, there will be a time when you have created a manual restore point, but your computer won't boot because a certain specific error after you have modified Windows.

In these cases, you use the system advanced options during boot to access the "System Restore". Simply, try to boot your computer three times to trigger the automatic repair environment in Windows 10, and then:

  1. Click on Advanced startup.
  2. Click on Troubleshoot, Advanced options, System Restore.
  3. System Restore will load, and you can use the previous steps from Using System Restore to restore your system.

Alternatively, you can use a bootable installation media of Windows 10 to start your system and then:

  1. Click Next, and click Repair your computer.
  2. Click on Troubleshoot, Advanced options, System Restore.
  3. System Restore will load, and you can use the previous steps from Using System Restore to restore your system.

That's all there is to it.

Wrapping things up

For years, System Restore has been a well-known feature, and it also comes as part of Windows 10. Like in previous versions, it's easy to use, but it could be somewhat difficult to find for regular users. As such, today we remind you of the feature for those times when you're eager to test a new configuration, but you don't know if it will work.

Keep in mind that this feature is not a replacement for a full backup or reset functionality. If your computer's hard drive fails, you won't be able to restore the previous version of the operating system, and you are likely to lose all your files. Also, the reset functionality built-in Windows 10 will only help when you need to reset all of your settings, apps, and operating system to the factory defaults.

More Resources

If you want to see more how-to for Windows 10, make sure you check these resources:

Windows 10 on Windows Central – All you need to know

Windows 10 help, tips, and tricks

Windows 10: Help and discussion forum at Windows Central

What's your preferred method to avoid running into issues when modifying your Windows installation? Let us know in the comments below.

How to reset Microsoft Edge in Windows 10 when things are broken

$
0
0

In Windows 10, Microsoft is introducing many new features to make users more productive, such as a new Start menu, Cortana, new universal apps, Settings, which is the central place to configure the operating system, ultimately designed to replace Control Panel, and much more. The software giant is also introducing Microsoft Edge, the new default web browser built for the future web and to replace Internet Explorer (which it's still present for compatibility purposes).

Microsoft Edge is a completely new web browser with a minimal design that focus on web content, and like Chrome and Firefox, the software maker plans to match and surpass the features available from its competitors with extensions, web notes, tab preview, Cortana, and more.

While the web browser works quite alright without major problems, it's still in the early days. Some users may run into some issues, such as sudden crashes, slow performance, or simply it won't launch.

If you were running Chrome or Firefox, and you're having similar issues, you should try to uninstall and reinstall the web browser to try to resolve the problem. However, like Internet Explorer, Microsoft Edge is part of Windows 10. It's nearly impossible to uninstall the app, and even if you could, you might run into different issues.

If you are having problems with the new web browser, you can try resetting the instance of Microsoft Edge in your account to try to fix the issue you're having.

Of course, we would only recommend you do this as a last resort process, where you have tried everything else and nothing worked.

Warning: Using this guide might cause you lose your favorites, history, and settings. Before, you move forward, it's recommended that you perform a full backup or create a system restore point in case something goes wrong and to need to restore your last good known state of Windows 10.

Fixing Microsoft Edge

1- If you're running Microsoft Edge, close it.

2- Open File Explorer and type the following path into the address: C:\Users\UseYourUsername\AppData\Local\Packages and hit Enter. (Remember to replace "UseYourUsername" with your user account name.)

3- Select and try to delete the Microsoft.MicrosoftEdge_8wekyb3d8bbwe folder as you would with any other folder. If you get a "Folder Access Denied" prompt, simply click Continue. Also, there might be some content that you won't be able to delete. If this is the case, in the dialog box, select to skip the files.

You should be able to delete most of the content inside the folder, but if you can't right-click Microsoft.MicrosoftEdge_8wekyb3d8bbwe, select Properties, remove the check from the Read-only option, and click Apply and OK.

4- Once you've tried deleting all the content, go inside the Microsoft.MicrosoftEdge_8wekyb3d8bbwe folder and try deleting the remaining folders by selecting all the folders, right-clicking them, selecting Delete, and clicking Yes to confirm the deletion. You may notice that you can't delete AC folder, but that's alright.

5- Restart your computer.

6- Now, were going to re-register Microsoft Edge in your account. Open the Start menu, search for Windows PowerShell, right-click it from the result, and select Run as administrator.

7- Type the following command and hit Enter:

cd C:\Users\UseYourUsername. (Remember to replace "UseYourUsername" with your user account name.)

Then, type the following command exactly and hit Enter:

Get-AppXPackage -AllUsers -Name Microsoft.MicrosoftEdge | Foreach {Add-AppxPackage -DisableDevelopmentMode -Register "$($_.InstallLocation)\AppXManifest.xml" -Verbose}

If the process was completed successfully, you would see a message similar to this one:

That's all there is to it. If you want to be cautious, restart your computer one more time, and then you should be able to run Microsoft Edge again and hopefully without any issues.

More Resources

If you want to see more how-to for Windows 10, make sure you check these resources:

Windows 10 on Windows Central – All you need to know

Windows 10 help, tips, and tricks

Windows 10: Help and discussion forum at Windows Central

Based on solution posted at IntoWindows

Crimsonland: Achievement Guide for Xbox One, Steam, and more

$
0
0

Crimsonland: Achievement Guide for Xbox One, Steam, and more

Crimsonland is a twin-stick shooter from 10tons with local co-op and loads of weapons, perks, and modes to unlock. The recently released Xbox One version offers 22 Achievements, whereas the Steam and PlayStation versions have 21 Achievements or Trophies to their name. Some of these Achievements can be quite difficult, but our in-depth Achievement Guide has lots of advice to help you unlock them all!

Roadmap and platform notes

Crimsonland: Achievement Guide

The total completion time for Crimsonland's Achievements should be about 15-20 hours. Only the primary player can earn Achievements, not co-op partners (weak!).

Although players have some freedom in the order they pursue this game's Achievements, Quests mode must be played through on Normal difficulty first in order to unlock the various Survival Modes, weapons, and perks. Clearing Normal unlocks Hardcore difficulty, and beating Hardcore unlocks Grim difficulty.

Recommended order:

  • Quests (Normal)
  • Survival Modes
  • Quests (Hardcore)
  • Quests (Grim)
  • Gembine ('Perky' Achievement)

This guide applies to Xbox One, Steam, and PlayStation 3, 4, and Vita. However, the Quest modes are significantly harder to complete on PlayStation platforms due to Perks not being available in Quests mode in those versions.

Quests (Normal) Playthrough

Crimsonland: Achievement Guide

Quests mode is Crimsonland's campaign mode. The Xbox One version offers seven chapters while other versions only have six. Each chapter consists of ten levels. Beating all ten levels unlocks the next chapter.

The goal in every level is to defeat all enemies. The green meter at the top of the screen will flash when the final enemy has spawned, and it flashes again when the last enemy dies.

Most levels are significantly easier with at least one co-op partner, but not all. Remember to enable Perks in the Settings if playing on Xbox One or Steam!

Chapter 1 Complete (30): Complete all Quests in Chapter 1.

Anybody can get this one.

Chapter 2 Complete (30): Complete all Quests in Chapter 2.

Level 2-10 is one of the two hardest levels in the game. The spider enemies split into two smaller spiders when killed. The smaller the spider, the faster it moves. Try to focus on whittling down on one spider and its offspring while leaving the other spider intact. Too many medium-small sized spiders and you'll be surrounded.

Rocket weapons are far and away the most effective against splitting spiders, although some ion weapons and the HR Flamethrower can work if luck holds up. Your best bet is to pause and choose Replay if the first weapon drop is not a rocket launcher.

Impaler (30): Get 100 percent hit accuracy in Chapter 2 Quest 5.

Crimsonland: Achievement Guide

You start with a Gauss gun (railgun) in this level. Each wave of enemies appears in a straight line, making it possible to kill the whole wave with one well-aimed shot. Even if you don't wipe out the entire wave at once, you can still get this Achievement as long as each shot hits an enemy. It shouldn't take very many tries.

Chapter 3 Complete (30): Complete all Quests in Chapter 3.

You've got this.

Chapter 4 Complete (30): Complete all Quests in Chapter 4.

I believe in you!

Chapter 5 Complete (30): Complete all Quests in Chapter 5.

Ain't nothing but a thang.

Chapter 6 Complete (30): Complete all Quests in Chapter 6.

6-10 is probably a little easier than 2-10 on Normal, but it gets much harder on Hardcore and Grim difficulties. See 'Club Grim' Achievement section for tips.

Chapter 7 Complete (30): Complete all Quests in Chapter 7.

Crimsonland: Achievement Guide

This chapter is exclusive to Xbox One. It introduces a new enemy – a purple crustacean that spawns tiny green babies. Move quickly to take out the purple guys, just as you'd do with any monster generator. Chapter 7 is easier than Chapter 6 – you can do it!

Not a Scratch (30): Complete all Normal Quest levels with full health remaining.

Crimsonland: Achievement Guide

Whenever you complete a level with full health remaining, the message "Not a scratch!" will appear at the top of the screen just below "Well done, Trooper." This also causes a star to appear above that level number on the level select menu. To unlock this Achievement, you'll have to get all 70 stars on Xbox One and 60 stars on other platforms.

The best way to get a level's Star is of course not to take any damage, but you actually can take hits as long as your health gets restored to full by the time the level ends. Health can be restored either by collecting Health powerups (which spawn infrequently) or by selecting the Regeneration perk upon leveling up.

If you have a hard time getting a level's star but haven't unlocked Regeneration yet, it might be best to return when you finally unlock it later in Quests mode. For particularly challenging levels, you might need to keep trying until you finally do get Regeneration.

Once you have Regeneration, you can usually get your health back to full fairly easily. Kill all but one enemy and then run around the level until your wounds fully heal.

2-10 is the hardest level to star, followed by 6-10. See 'Chapter 2 Complete' and ''Club Grim' Achievement sections for specific strategies.

Many levels will be easier to star with a co-op partner, but not all of them. If either player takes damage, you won't get the star.

Miscellaneous Achievements

Bloody Good Time (30): Explode 50 creatures to gibs within the first 30 seconds of a level.

Tough to tell exactly which weapons qualify for this one, but rockets, Gauss weapons, and the Fire Bullets powerup should be fine. When you find yourself with a powerful starting weapon, simply blast away while grabbing all the powerups you can. The Achievement will pop if you kill enough enemies in time. I got this one somewhere between 2-1 and 2-4, but you could get it anywhere during your Normal playthrough.

Home Wrecker (30): Destroy over 500 nests.

Crimsonland: Achievement Guide

Nests come in various forms, all of which spawn monsters. You're guaranteed to get this naturally as you play through the game. If you end up wanting to grind for it, levels 5-8 and 6-3 have tons of nests.

Master of Chains (30): Bounce Shock Chain powerup over 30 times.

Crimsonland: Achievement Guide

The Shock Chain powerup looks like a black orb with a blue 'X' made out of lightning. Pick it up and the lightning will bounce unpredictably from enemy to enemy until it finally hits nothing and leaves the screen.

The best levels to try for this one have high densities of weak monsters. I got it on 4-7, but several later levels and Survival would work as well. When you think the screen is crowded enough, grab the Shock Chain and try not to shoot anything until the powerup runs its course. Hopefully it bags 30 baddies before leaving.

Smart Pack Rat (30): Collect 50 Blowtorches.

Crimsonland: Achievement Guide

The Blowtorch is arguably the worst weapon in the game, although it can be surprisingly effective against splitting spiders. And yet you'll want to pick up each one you run across, because it takes a long time to get 50 of them!

Crimsonland: Achievement Guide

You can't track progress through the Xbox One Achievement app, but the game itself does track the stat. From the main menu, pick Extras/Achievements and then select Stats. Scroll down and you'll find counters for every weapon, including the blowtorch.

I got this one late in my final 'Grim' playthrough. If you haven't grabbed 50 blowtorches by then, grind Survival or the level of your choosing and hope some torches drop.

Perky (50): Unlock all Perks.

Crimsonland: Achievement Guide

After completing Quests mode on Normal, you'll have unlocked 54 out of 55 perks. The last one 'Lifeline 50-50' is locked away within an obnoxious minigame called Gembine.

To access Gembine, view the Credits from the Extras menu. Then input the following code on your controller:

  • Xbox One: Y, Y, Y, X, X, X, Y.
  • PlayStation: Triangle, Triangle, Triangle, Square, Square, Square, Triangle
  • Steam: Type the word GEMBINE on the keyboard.

Gembine is a clone of 2048, the numeric puzzle game that inspired Threes. Unfortunately, players will have to achieve a high score over 53,717 points in order to unlock the final perk.

Unlike Threes, there are no online 2048 solvers. You'll have to reach the target score on your own. Still, I can give you a few tips!

Crimsonland: Achievement Guide

The general strategy is to pick a corner and try to move all of your high-value gems into it. I used the top-right corner. Try not to ever move the highest-value gem(s) out of that corner; just keep building around them. Also try to avoid allowing low value pieces (such as small red circles) to get stuck in the middle of the board.

Some 2048 guides suggest that you start the game by alternating between pressing up and right. I wouldn't do that for very long, because you'll arrange a better board by thinking about your moves.

I struggled with this minigame for an hour or so – I thought it was hopeless. My breakthrough came when I learned to look at the "Next' piece before making moves. Whichever direction you press to move the gems, the piece will enter from the opposite direction. Press right and it comes from left, etc.

Always check what the next piece will be and consider how it will affect the pieces on the side where it will appear. For instance, you might have a triangle on the left side of the board and a triangle as the next piece. Press right so that the piece will enter from the left and you'll be able to match the two triangles, creating a more valuable piece.

Once the game clicked with me, it probably took about 8-10 more tries to score 53K. Good luck!

Quests: Hardcore and Grim Playthroughs

Club Hardcore (80): Complete the game in Hardcore difficulty.

Crimsonland: Achievement Guide

To unlock Hardcore difficulty in Quests mode, clear Normal mode. Beating Hardcore unlocks the Blade Gun and Grim difficulty. The Blade Gun's lengthy reload time makes it a poor weapon to use.

For strategies, see 'Grim Reaper' below.

Grim Reaper (200): Beat the game in Grim difficulty.

Crimsonland: Achievement Guide

Hardcore and Grim are both tougher than normal, although you no longer need to worry about getting a star on each level. Many levels will be easier to clear with a co-op partner, but not all of them. The real problem levels are 2-10 and 6-10. If you can beat them, you'll have Grim difficulty in the bag.

6-10 (picture below) is like an amped up version of 2-10. It starts with five green beetles at the top of the screen, but soon splitting spiders begin to spawn. Eventually deadlier brown and red beetles will appear as well, not to mention tough zombies that create smaller zombies.

Rockets are your only hope of keeping the splitting spiders under control. You'll need to pause and Restart the level repeatedly until you get some form of rocket as your first weapon drop (I succeeded with mini Rocket Swarmers). Restarting over and over isn't fun, but it saves a lot of wasted attempts, believe me.

Once you have a rocket launcher, start thinning out one or more batches of spiders. You also need to kill off the beetles while you're at it, as they can easily kill you on contact. Save the zombie makers for last.

Crimsonland: Achievement Guide

The most useful perks include: Telekinetic, Long Distance Runner, Fastloader, Poison Bullets, and Ammo Maniac. After those, Bonus Economist, Lucky, Out of Thin Air, Uranium Bullets, Perk Expert, Doctor, and Lean Mean Exp Machine are good choices. Only pick Regeneration if none of the above appear.

Blasting the baddies with rockets isn't enough to win. You really need to carve your way to the powerups the monsters drop. Take advantage of your level-ups to do this – enemies will be pushed back and you get a free (but short-lived) shield after selecting each perk.

Use your shield to scramble into the items and use them to kill hordes of enemies. With any luck, you'll level up again as the powerups run out, allowing you to reach the next batch safely. Just keep grabbing everything and pounding away at the tougher beetles until they die. After that, finishing off the stragglers should be easy.

I don't recommend attempting 6-10 in Grim with any more than two players due to weapon scarcity and increased enemy count.

Chapter 7 will go by quickly compared to 6-10! Beat 7-10 to complete Grim and unlock the Splitter weapon.

Survival Modes

Crimsonland: Achievement Guide

The Survival menu consists of six game types, all with single-player and co-op leaderboards. Only the actual Survival mode is available at the start of the game; the others will unlock as you proceed through Quests mode. Although you can jump into Survival right away, you really should wait until completing 6-10 in Quests mode so that you'll have unlocked all important perks and weapons.

All Survival modes are easier with at least two decent co-op players, so be sure to bring in a friend or two if you have trouble reaching the target high scores. The only really challenging Achievement is tied to the actual Survival mode, so we won't provide guides for the other modes. If you can handle Survival, the rest will be a cakewalk!

Little Survivor (30): Get over 250k points in Survival game mode.

See 'Mr Survivor' below.

Mr Survivor (50): Get over 500k points in Survival game mode.

Crimsonland: Achievement Guide

The most useful perks include: Telekinetic, Long Distance Runner, Fastloader, Poison Bullets, Ammo Maniac, Bonus Economist, Lucky, Out of Thin Air, Uranium Bullets, Perk Expert, Lean Mean Exp Machine, Doctor, Reflex Boosted, and Regeneration. Get My Favorite Weapon if wielding a useful weapon.

Good weapons include: Shotguns, rockets, and anything with spread. Avoid weapons with long reload times.

Success in Survival comes down to not only weapon and perk selection, but also good powerup usage. The Fire Bullets powerup is very important because of the additional damage it provides. When combined with a weapon with sufficient spread (especially shotguns), Fire Bullets can nearly clear the screen of monsters.

The Freeze and Shield powerups also prove essential to survival. Note that while a Freeze powerup is active, additional Freezes will not spawn. The same applies to Shields. So try to have only one or the other active at any given time. That way you can jump from a Freeze to a Shield and hopefully another Freeze will appear by the time the Shield wears off, and so on.

Be sure to grab Double XP powerups whenever they appear, but don't go out of your way for 500 and 1000 score bonuses.

Reaching 500,000 points requires mastery of these and all previously described techniques. It won't be easy – I had to get it in 3-player co-op. Keep practicing, recruit friends if needed, and eventually you'll get there!

Arms Race (50): Get over 100k points in Weapon Picker game mode.

See 'Survival Modes' above.

Feel the Rush (50): Get over 50k points in Rush game mode.

See 'Survival Modes' above.

Quickly! (50) Get over 250k points in Blitz game mode.

Crimsonland: Achievement Guide

See 'Survival Modes' above.

Booom (50): Get over 75k points in Nukefism game mode.

Crimsonland: Achievement Guide

See 'Survival Modes' above.

Be sure to read our Crimsonland Xbox One review and Crimsonland Windows/Steam review if you haven't already. If you've found this Achievement Guide useful, please leave a comment to let us know!

  • Crimsonland – Xbox one – 185 MB – $13.99 – Xbox Link
  • Crimsonland – Windows PC and Mac – $13.99 – Steam Link

How to roll back from Windows 10 Mobile preview to Windows Phone 8.1

$
0
0

Roll Back Windows Phone

Today's forthcoming Windows 10 Mobile Insider update requires users to rollback to Windows Phone 8.1 first. Here is how to do that to get you prepped!

Windows Phone recovery tool

Below you'll find all the steps to help you go back safely to your previous version of the mobile operating system:

How to roll back from Windows 10

  1. Download and install the latest version of the Windows Device Recovery Tool to your PC.
  2. Launch the recovery tool and connect your phone using a USB cable. If your handset isn't detected, click My phone was not detected to force the application to rescan for and detect the phone.
  3. In the next screen, click your phone, wait a few seconds, and you'll see your phone information and the software available for download to roll back to a previous operating system. To continue, click Reinstall software.
  4. Next, the recovery tool will warn you to backup all your data, settings, and apps before continuing, as the rolling back process will delete all the previous data in your phone. Click Continue to proceed.
  5. Now, the recovery tool will download the image from Microsoft's servers and replace Windows 10 Mobile that is currently on your phone. The process will take some time depending on your internet connection and the hardware in question.

After the tool completes the process, you will receive a message saying "Operation successfully completed". At this point, the phone will reboot and you will have to go through the Out-of-Box-Experience, like on any version of Windows. Then, you'll need to sign-in with your Microsoft account, select to restore your phone from backup (if this is something you prefer), and after a few additional questions, you'll be back to Windows Phone 8.1.

As you can see, Microsoft is making it very convenient to roll back to Windows Phone 8.1 from Windows 10 Mobile preview, and the company is starting to add support for non-Lumia devices, which is a big plus. So you don't have to spend time searching on the internet for different tools to go back to the previous operating system.

However, you have to remember that the operating system is far from complete. Not only will you find issues, but you might also stumble upon problems trying to roll back, as I hear many users reporting issues restoring Windows Phone 8.1 on their Lumia 930. As such, you should avoid using Windows 10 Mobile preview as your primary mobile operating system, at least until it hits RTM.

Did you have to roll back from Windows 10 Mobile to Windows Phone 8.1? If so, what was the reason? Let us know your experience in the comments below.

Originally published April 2015, updated May 2015

How to resize text, apps, and other items in Windows 10 Mobile

$
0
0

Size settings

Just like in Windows 10 for PC, you can also resize text, apps, and other items in Windows 10 Mobile. Perhaps you have a phablet and want to fit more items on the screen, or you simply want everything to appear bigger. It's really simple. We'll show you how to do it.

  1. Go to Settings (Swipe down from the top of the screen and tap All Settings)
  2. Go to System> Display
  3. Drag the slider under Size of text, apps, and items on this display to your preferred size
  4. Tap Restart now when your phone asks to restart
  5. That's it!

Settings

By default, 200% is selected on the slider. Dragging it to the left makes things smaller, while dragging it to the right makes things bigger.

Depending on the size of the screen of your Windows 10 Mobile device, some elements of the UI change in addition to just resizing. For example, the Lumia 1520 moves the address bar on Microsoft Edge from the bottom to the top if the slider is dragged all the way to the left. Outlook Mail and Calendar also display the left tab by default in the same setting.

Size Settings

I'll be keeping the zoom level to the default value, but I can see how this setting can be useful to many others. Users who feel their vision is getting worse might prefer bigger items on their screen, and advanced users might prefer to fit more items on the screen by making things smaller.

Are you changing the size of the text, apps, and other items on your Windows 10 Mobile device? Bigger or smaller? Let us know in the comments!

How to sell your old Surface, laptop, or desktop without giving away your personal information

$
0
0

Windows 10 is the next version of the most popular operating system on the planet, it's been out only for a few months, and the adoption of the operating system hasn't been anything short than amazing. In October, the company has reported over 110 million installs in just a few weeks. Of course, these numbers represent activations from upgrades and new computers.

We're now seeing that the new operating system is also slowly stimulating the market, as computer manufacturers more than ever are building new faster and sleeker devices. However, it's also helping the innovation in processors. For example, Intel now has out its sixth-generation Skylake processors, which brings better support for 4K displays, improves power efficiency, graphics, and obviously they are much faster.

Now, with Windows 10 already out on the market and new devices with much-improved hardware, you're probably ready for an upgrade. Perhaps, you are currently thinking to upgrade your computer to a new Surface Pro 4 or Surface Book, or you might be thinking of buying a new Dell XPS 13, or a Lenovo Yoga 900, or any other PC.

Today we'll go through the steps you need to follow to get your old Surface, laptop, or desktop ready for sell while avoiding making it easier for someone else to get any of your personal information and to get the most money for your next device upgrade.

What to do before selling your computer

Always backup first!

At the top of your to-do list on getting your device ready for sell is to make a full backup of your system. This step is always a good thing to do, as this might be the only way to recover if something were to go wrong, or you change your mind and you want to keep your computer for a little longer.

Nowadays, backing up has become something pretty straightforward. You can use third-party software solutions, but it's good to know that Windows 10, Windows 8.1, and even Windows 7 come with the System Image Backup utility to make a full backup of your device, which then you can use as part of your recovery plan.

If you decide to go with System Image Backup feature in Windows, you will get an exact copy of everything there is on your computer, including operating system, programs, settings, and your personal files. This type of backup will restore everything on your computer even after a hard drive failure. You can refer to my previous guide to make a backup.

In case, you're planning to get a new computer, you will also want to make a copy of all your files to an external hard drive, which will make it much easier to move them to your new PC. Of course, you can always mount your System Image Backup and extract the files too.

Also, if you use OneDrive, you're pretty much all set, as you personal files already backed up in the cloud and ready to sync to any device you sign-in with your Microsoft account.

Getting ready to reset your computer to the factory default settings

Depending on the device you own, resetting your computer will be slightly different, as most computer companies provide their own recovery solution.

In the past, many computer manufacturers used to ship their PCs with the recovery discs, but later on, perhaps to save cost, most devices started bundled a recovery partition that users could use to reset their system back to the factory defaults.

Of course, users who have done a clean installation of the operating system are likely not to be able to use the recovery partition for obvious reasons.

In the case of Microsoft, technically you should be able to use the recovery option to remove everything and reinstall Windows 8.1, as it's the most secure way the operating system offers to reset your Surface and get it ready for sale.

However, many users will receive a message about missing required system files, and users will be prompted you to provide the Windows installation files to perform the task.

If you find yourself in this situation, you'll need to download the installation media. You can go to this Microsoft support web page to download the recovery image for your Surface RT, Surface 2, Surface 3, Surface Pro, Surface Pro 2, and Surface Pro 3.

As I mentioned previously most computer manufacturers have their own recovery strategy and for on each version of Windows, as such in the next section I will list some resources you can use to reset your system to the factory default settings for different brands and versions of Windows.

Deleting all your personal files and reinstalling Windows

After creating a full backup, and everything is ready, now it's the time to reset your device to the factory defaults.

If you have a branded computer, you can use the following resources to wipe your system and reinstall the operating system, programs, and settings that came originally with the device.

Note: If you're using your PC manufacturer recovery solution, remember to choose the option to delete your programs and personal files during the recovery process. Also, if your computer brand doesn't appear on this list, you can also go to your PC manufacturer's support web page to find the specific instructions.

Although, companies used to have different reset solutions with Windows 10 things are changing. Now, Microsoft has made a lot of improvements on its recovery feature that allows users to reset safely their computers without needing to supply the installation media, and the process to accomplish this task is virtually the same on most computers running the latest version of the operating system.

If you have a custom installation of Windows, you'll have to perform a manual reset, and depending on the operating system the procedure will be different. Below, I will outline the steps to remove everything in your device and reinstalling different versions of Windows. You can also use the same steps to reset your Surface tablet running Windows 8.1 or Windows 10.

Removing everything and reinstalling Windows 7

If you're running the good old Windows 7, and you don't have the recovery discs or partition, you will need a bootable media with the installation files, and then follow the steps below:

1- Insert the bootable media and make sure your computer can boot from it.

2- Boot your computer with installation media to begin with the setup.

3- In the wizard, click Next, Install Now, choose the correct version of Windows, and accept the licensing agreement.

4- Click the Custom (advanced) option to continue.

5- In the next page, click Drive options (advanced) to bring up the drive tools.

6- Select a partition, and click Delete and OK. You want to do the same for all other partitions until you only see one huge unallocated disk.

7- Select the only drive available and click New. Use the full disk size and click Apply and OK.

8- Now the wizard has created the necessary partitions to install Windows correctly. Click Next to begin the installation of Windows 7.

Once the reset completes, you will get into the out-of-box experience for Windows 7. At this point, you can simply power off the device and package it nicely for selling.

Important: If you don't complete the out-of-box experience, remember to supply the product key when you sell your computer as necessary.

Removing everything and reinstalling Windows 8.x

If your device runs Windows 8.x do the follow these steps:

1- Use the Windows key + I keyboard shortcut to bring the flyout menu and click Change PC settings.

2- Navigate to Update & security, and then go to Recovery.

3- Click on Remove everything and reinstall Windows. Remember that you may need to connect a bootable media with the installation file.

4- On "Reset your PC", click Next.

5- Next, you're getting rid of your computer, as such you want to use the Fully clean the drive option. This is the option that Microsoft recommends to recycle a PC and remember that it could take a few hours for the process to complete.

6- Next, click Reset to begin the process.

Your computer will reboot and the reset process will begin.

Once the reset completes, you will get into the out-of-box experience for Windows 8.x. At this point, you can simply power off the device and package it nicely for selling.

Remove everything and reinstall Windows 10

In you have upgraded your device to Windows 10, the steps to complete the reset should be easier, as Microsoft has made various advances in the operating system, and users no longer need to supply the Windows 10 installation files.

Use the following steps to reset your device running Windows 10:

1- Open the Settings app using the Windows + I keyboard shortcut.

2- Navigate to Update & security, and go to Recovery.

3- On "Reset this PC", click the Get started button.

4- Next, click on "Remove everything" to ensure all of your files, apps, and settings will be deleted.

5- Click Remove files and clean drive.

6- Finally, click the Reset button to begin the process. Your computer will now reboot to complete the reset process.

Once the reset completes, you will get into the out-of-box experience for Windows 10. At this point, you can simply power off the device and package it nicely for selling.

Selling your Surface, laptop, or desktop

So far, you have created a full backup, you copied all your personal files to a secure location, and you have securely reset your device to the factory defaults. Next, it's time to sell.

Before you put your device up for sale, you need to figure out how much cash can you make out of it. The price will vary per device, demand, and condition.

Research, you should be the first thing you want to do. You could go to the online Microsoft Store, Best Buy, Amazon.com, and other online retailers, to see the current price for of the product when it's brand new.

Then, you can go to Amazon.com and eBay to see the price of the same or similar product in used condition. Pay attention to the condition of the product and if they're offering free shipping as well.

At this point, you will have a pretty good idea on the price to sell your device. Once you have figured out the pricing, you'll need to decide where you want to sell your Surface, laptop, desktop, or anything else in between.

As always, most people will end up with one of these two: Craigslist or eBay. But of course, there are other services you could use, such as NextWorth.com, GdgetSalvation.com, and others.

Also, remember that you can try selling your tablet, laptop, or computer to someone you know, you might not get the same amount of money, but it could save you a lot of online hassles.

Depending on the service you use to sell your computer, always make sure to compose a well-written description of the product with all the details of its condition and be as clear as possible to avoid misunderstanding.

When creating the listing, upload pictures that are clear and reflect the actual condition of the device, and don't forget to include in the images the accessories and extras you will be shipping with the product.

Use a headline that makes sense and describes the product you are selling, offer free shipping, and don't forget to use proper packaging to send the item to the new owner to avoid damage while shipping.

If you use eBay, it's a good practice to ship the item with tracking number and signature required to ensure the device gets into the hands of the proper person.

Wrapping things up

With a great new operating system and PC makers now offering new and elegant computing devices, certainly many people will be considering to upgrade their old systems. And with today's guide, you will be able to make some money out of your old computer, which you can use toward the purchase of your new Surface Pro 4, Surface Book, Dell XPS 12, or any other device you might choose.

Also, keep in mind that this guide will help you to get almost any device ready for sale. Just remember always to make a backup first, reset the device to the factory default settings deleting your personal files, and to make a decision on how to sell your device.

If your computer is running Windows 7 or Windows 8.1, you can always upgrade to the latest version of Microsoft's operating system, and sell it as a Windows 10 device.

Finally, if you own a Surface, there is a small chance that you have the tablet registered under your name, as such make sure to remove the registration before selling it. Here are more details on how to sell your Surface tablet.

Do you usually sell your old gadgets? Let us know in comments below.

How to change the default search engine in Microsoft Edge for Windows 10 Mobile

$
0
0

Google search

If you enter a word in the Microsoft Edge address bar on Windows 10 Mobile, the browser shows search results from Bing. If you prefer a different search engine, you can change it in the settings. For example, we'll show you how to change the default search engine to Google.

Microsoft Edge settings

  1. Open Microsoft Edge and go to the search engine's website. For example, go to google.com
  2. Tap the three dots on the lower right corner > Settings> View advanced settings
  3. Tap the change button under Search in the address bar with
  4. Choose Google and tap Set as default

Microsoft Edge default search

That's it! Now, Microsoft Edge shows results from Google instead of Bing whenever you search using the address bar. You can add other search engines as well, but Microsoft says only search providers that support the OpenSearch standard will appear in the list. If you are having issues with a search engine appearing in the list, try changing the Website preference to the desktop version.

Need to change the default search engine on Microsoft Edge for your Windows 10 PC or tablets? The steps are almost the same:

How to change Microsoft Edge's default search engine in Windows 10

Are you keeping Bing as your default search engine, or will you be changing it to something else? Let us know in the comments!

Here's how to fix trackpad lag when scrolling on the Surface Book and Surface Pro 4

$
0
0

The Surface Book and Surface Pro 4 features a new glass-finished trackpad that is easily the best feeling one to date for a Windows PC. However, there is one issue that many users notice when using Firefox or Chrome for web browsing: lag.

Specifically, when you drag your finger, there is a half second delay before the web page moves. It is a rather frustrating and seemingly random experience and while doing browser tricks helps it does not solve the problem.

Tonight, there looks to be a way to get smooth scrolling throughout the OS, and it is a simple fix. The culprit? The two-finger pinch to zoom from the precision touchpad.

The fix was suggested by giftedmd in our forums. They speculate that the OS is taking a half second to see if you are trying to pinch to zoom or scroll and that creates the lag.

I have tried this fix on both the Surface Pro 4 and Surface Book and saw an immediate change in scrolling behavior across the OS but specifically in Chrome and Firefox. Needless to say, it is a breath of fresh air especially for those who are experiencing this behavior. Here is how to fix it.

Disable two-finger pinch to zoom

1. Search

Type in Mouse & Touchpad into the Cortana search bar (Also, for Pro 4 users, make sure your Type cover is attached first)

2. Find

Scroll down until you locate Use a two finger pinch to zoom

3. Disable

Simply toggle this feature from On to Off

That's it. You do not even need to reboot the computer as the effect is immediate. Unfortunately, if you want to pinch to zoom now, you will need to use the touchscreen. However, this feature did not work so well on the touchpad to begin with, so I won't miss it.

How does something like this get by Microsoft? It is a good question. Hopefully, they will address this problem with an update to the touchpad. Sound off in comments if this helped your or let us know if you had no change at all.

How to enable smooth scrolling in Google Chrome for your Surface and Surface Book

Via: Windows Central Forums

Halo 5 Guide: How to create and join a Spartan Company

$
0
0

Halo 5 Spartan Companies guide

Halo 5: Guardians, the latest entry in Microsoft and 343's long-running sci-fi first-person shooter series has finally arrived on Xbox One. The new Halo features a campaign with 4-player online co-op (though sadly no split-screen) and two extensive online multiplayer modes: Arena and Warzone. The large-scale Warzone and new REQ pack unlocking system will keep competitive Halo fans busy for years to come.

You'd expect a large-scale competitive game like Halo 5 to offer clan support, and Halo 5 does just that in the form of Spartan Companies. Unfortunately, Spartan Companies aren't very well integrated into the game itself – you might not have even figured out how to create or join one. Luckily your pals at Windows Central not only have a Spartan Company, but we'll also tell you how to join or create your own.

Halo 5 Spartan Companies guide

Welcome to Halo Waypoint

Now of course, the best way to create or join a Spartan Company would be if we could just do so directly through Halo 5 itself. But sometimes games have deadlines to meet, and what should be an in-game feature ends up shoved off on some web developer. Bummer.

Still, getting into a Spartan Company just require a visit to the Halo Waypoint website. Once there, sign in with your Gamertag and then you'll be able to either Create a Spartan Company or Browse Companies.

When creating a company, you'll be able to name the company, input its motto and description, edit its emblem (using only stock emblem pieces, unfortunately), and link to its official website, Twitch channel, Twitter and Facebook pages, and more.

Next you can invite individual players by Gamertag and maybe tweet out the URL for your Company so that others can request to join. Invites must be accepted through the Halo Waypoint website, unfortunately.

A Spartan Company only becomes "active" once four or players join up, so don't bother making one if you don't have friends to invite.

Halo 5 Spartan Companies guide Windows Central

Join the Windows Central Spartan Company

If you're reading this, there's no need to make your own Spartan Company. Just join ours! The Windows Central Spartan Company is already populated by several members of our writing staff and active members of our website and Twitch communities. Why not make our Company cooler with your presence?

To join, just visit the Windows Central Company homepage, sign in, and pick the Request to Join button. Spartan Companies are limited to 100 members, so only ask to join if you're an active Halo 5 player! Be sure to enter a message indicating why you'd like to join (and preferably your Windows Central and/or Twitch username) and we'll get you in.

Once our Spartan Company fills up, we'll try to clear room periodically as needed.

Halo 5 Spartan Companies guide Intermediate Supply REQ pack

Benefits of Joining a Company

There are a few benefits to joining a Spartan Company, but one matters more than the others: a free REQ Pack!

After creating or joining a Company like ours, you'll receive a message in your Halo Waypoint inbox notifying you that a REQ Pack has been rewarded. If you were already playing Halo 5 when you joined, you might need to close and relaunch the game in order for the REQ Pack to appear in your inventory.

The Intermediate Supply Pack awarded for joining a Spartan Company contains three random items. One has a very high chance of being a permanent cosmetic unlock. With so many unique items to unlock through the REQ Pack system, every little bit helps.

Besides the REQ Pack, joining up also gets you access to the Spartan Company's individual Forum at the Halo Waypoint website. We have a forum there right now, so you'll be able to engage in Halo and Company-related discussions with your fellow readers.

A Spartan Company can have one leader and four Lieutenants. These officers can send messages to all members of the company, which should help with organizing group play sessions and activities. Members must enable email notifications in their profiles to actually be notified of those messages – otherwise they'll only see them when visiting the Halo Waypoint website.

Halo 5 Spartan Companies guide Intermediate Supply REQ pack

Room to grow

The availability of Spartan Companies (clans) and the free REQ Pack players get from joining them is a welcome feature for Halo 5.

The problem is the feature is almost completely divorced from Halo 5. As far as I know, Spartan Companies don't integrate with the game in any way (beyond the free REQ Pack) at this time. At the bare minimum, a player's Spartan Company name and logo should appear on his or her in-game profile. And the ability to message or otherwise interact with fellow Company members within the game would be even more useful.

Hopefully, Microsoft and 343 have greater plans for Spartan Companies in the months to come. Let's hope they properly integrated the feature into the game soon, so that Spartan Companies can become the fun social experience they were meant to be.

Halo 5 Warzone

More Halo 5 coverage

Don't miss our other big Halo 5 stories!

How to pair the Microsoft Band 2 with Windows 10 Mobile

$
0
0

Microsoft Band 2 Pairing

Just got the Microsoft Band 2 and need help pairing it with your phone? We'll show the process of how to pair it with Windows 10 Mobile. As a reminder, while we are Windows Phone and Windows 10 Mobile fans here, the Microsoft Band 2 also works with Android and iOS. Ready to go? Follow the steps to pair the new Band 2 with Windows 10 Mobile.

1. Download the Microsoft Health app on your phone from the Windows Store.

2. On your Band 2, press the power button and choose your language.

3. When it asks for your phone's operating system, swipe left and select Windows Phone.

Microsoft Band 2

4. Swipe left and tap Pair now.

5. Open the Microsoft Health app on your phone and create/sign in with your Microsoft account if it doesn't automatically sign you in.

6. If the app doesn't automatically try to add your Band, go to the hamburger menu on the top left corner and tap Add a Band.

7. Choose the Microsoft Band 2 in the selection screen.

Microsoft Band 2 pairing

8. Tap the name of your Band, which is likely some variation of "MSFT Band."

Microsoft Band 2 Pairing

9. Hit OK on your phone and Accept on the Microsoft Band 2 to pair the devices.

Microsoft Band 2 Pairing

10. The Microsoft Health app will check if there are any updates available for the Band 2 and then you can tap the Finish button.

11. On your Band, press the action button to finish the process.

Microsoft Band 2 Pairing

That's it! Now you're all paired up. You can start using it right away, but we recommend personalizing your Microsoft Band 2 next. We'll talk more about that in an upcoming post.

Did you have any issues pairing the Microsoft Band 2 with Windows 10 Mobile? Let us know in the comments below!

Download Microsoft Health from Windows Store

Buy the Microsoft Band 2


The 6 things you should do first with the Microsoft Band 2

$
0
0

Microsoft Band 2

So we've just shown you how to pair the Microsoft Band 2 with Windows 10 Mobile. You can use it right away after pairing, but we recommend doing a few things first for a better experience. You should do these six things with the Microsoft Band 2 immediately.

1.Enable Watch mode when you hold up your Microsoft Band 2. On your Band, go to Settings (gear icon), then Watch mode (clock icon). Tap the off button and change it to Rotate On. The Band 2 will ask how you wear it. For example, I've selected left arm and inside the wrist.

Microsoft Band Rotate

2. Enable Autobrightness. On your Band, go to Settings (gear icon), then Tools (another gear icon). Change the Brightness from the default Medium to Auto Set.

Microsoft Band 2 Auto brightness

3. Change the color and wallpaper. On your phone, open the Microsoft Health app, tap the hamburger menu, and select Personalize Band. You can change the theme color and wallpaper from this page. There are currently 180 combinations to choose from.

Microsoft Band 2 Colors

4. Enable or disable tiles. On your phone, open the Microsoft Health app, tap the hamburger menu, and select Manage Tiles. Use the sliders to enable or disable tiles for your Band 2. It looks like you're allowed to have a maximum of 13 tiles. For example, I've disabled Golf and Guided Workouts, while enabling Twitter, Facebook Messenger, and Notification Center.

5.Rearrange tiles. Now that you've enabled and disabled tiles on your Band 2, you should rearrange them to your preference. On your phone, open the Microsoft Health app, tap the hamburger button, and select Manage Tiles. Tap Rearrange the tiles on Band's Start strip. Drag the tiles to change the order. Drag the tiles you use more frequently towards the left for quicker access.

Microsoft Band 2 Rearrange

6.Placethe charger in the bathroom. I've found the best time to charge the Microsoft Band 2 is when I shower, so having the charger in the bathroom made sense. I don't want to charge it at night since I want to track my sleep. Let us know if you like this idea, too.

So these are the six things we recommend you should do with the Microsoft Band 2. Do you agree with the list? Are there additional things we should've mentioned too? Let us know in the comments!

How to configure LastPass to work with the Surface Fingerprint ID Type Cover

$
0
0

If you own a Surface Pro 3 or new [Surface Pro 4]((/surface-pro-4) you may have your eye on the new $159 Fingerprint ID Type Cover from Microsoft. The cover not only brings the new keyboard design and larger glass trackpad but a nifty fingerprint ID module to unlock your device. Those with a Surface Pro 4 get facial recognition built in making this tablet a little redundant and of more value to those with a Surface Pro 3.

One neat trick we just learned about is that the fingerprint ID works with LastPass for Windows and your browser extensions for Chrome, Opera and Firefox. We first heard about it on Reddit, but it was not that obvious how to get it working. So here is how to set up LastPass to work with the fingerprint ID Type Cover.

Before you start make sure you check out our Fingerprint ID Type Cover hands-on and setup if you have never seen it in action:

How to setup and use the new Surface Fingerprint ID Type Cover

LastPass + Fingerprint ID Type Cover setup

Install LastPass for Windows

This step may seem obvious, but you do need the full LastPass app installed. This app is not the Windows Store version but rather a full desktop executable (you can find it here from LastPass).

The reason we point this out is you can use LastPass in Chrome or Firefox without this app installed. So like us, you may have never installed it. However, for fingerprint ID you do need it as it serves as the connector between your browser, the OS, and the drivers for the fingerprint scanner.

You may also need to give permission to link the browser extension to the native app, which you can see in the above image.

Once you have LastPass set up in Windows and your extensions installed, you need to turn on Multifactor authentication.

1. Open Settings

Under the browser extension open My LastPass Vault

2. Account

Next, head to Account Settings

3. Multifactor

Choose the second tab named Multifactor Options

4. Enable (or re-enable)

Choose Fingerprint / Smart Card from the options. Note: You need to be a Premium User (aka subscriber) to enable fingerprint ID. If you have setup fingerprint for LastPass, previously you will need to disable it and re-enable it to associate it with the new Windows framework. Once you enter in your master password, you will be asked to use the fingerprint scanner to set it up.

That's it!

Remember, none of the above works unless you have installed the full LastPass desktop app, so do that first.

Now, each time you need to log into LastPass – even in Chrome or Firefox – you will see the new login prompt to use the fingerprint ID. Overall, it works very well and is much faster than typing in your master password each time. You can also always turn it off too. Alternatively, you can hit Cancel at the prompt for your fingerprint at which point you can then enter the Master Password. In other words, the fingerprint ID is not the only way you can log into LastPass.

Finally, for now Windows Hello and facial recognition do not work with LastPass. We're hoping that Windows Passport and LastPass play together nicely when Microsoft's service begins to roll out in the future.

Also, for unknown reasons the Fingerprint ID Type Cover is only available in the U.S. for now and in only in black. It also won't be restocked until November 20 (your local Microsoft Store may have them in stock, however).

Order the Fingerprint ID Type Cover from Microsoft - $159 (US)

How to set up and use the new Surface Fingerprint ID Type Cover

$
0
0

Surface Fingerprint ID Type Cover

Besides the Surface Book and Surface Pro 4 Microsoft also announced a new Type Cover including one with a built-in fingerprint ID sensor. It is oddly only available in the U.S. at this time and retails for $159 – or $30 more than the standard Type Cover.

We have one in the office and are going to show you how to set it up and use it.

Who is it for?

Even though you can easily use the fingerprint ID on the new Surface Pro 4 this Type Cover is the perfect buy for current Surface Pro 3 owners. For one, the Surface Pro 4 already had facial recognition built in for Windows Hello making a fingerprint reader convenient but redundant (facial recognition also works without a keyboard attached making it more ideal in tablet mode).

Indeed, instead of forking out nearly a grand for a the lowest-priced Surface Pro 4 you could get the new typing experience, larger glass trackpad and fingerprint ID for just $159. That investment would make your Surface Pro 3 feel like a new device.

Where can you use it?

Besides the obvious login screen for Windows 10 you can use fingerprint ID in at least two other situations:

  • Windows Store purchases for apps, games, movies and music
  • LastPass for Windows desktop and browser extensions for Chrome, Firefox, or Opera

You can read about how to setup LastPass and the fingerprint ID in our new how-to.

How to setup LastPass to work with the Surface Fingerprint ID Type Cover

Microsoft is also likely to utilize their new Windows Passport feature and Windows Hello in the future for websites and more, so this is just the beginning.

Setting it up

Before snapping in the new Type keyboard with fingerprint ID make sure you have all the updates on your Surface Pro 3 or Surface Pro 4. A firmware patch went out with the 10/23 hardware update that installs and enables the drivers for the fingerprint ID and Windows Hello in Windows 10.

Next, just go to settings to setup up Windows Hello:

  1. Open All Settings
  2. Accounts
  3. Sign-in options
  4. Windows Hello > Fingerprint > Set up

The setup just takes a few seconds as you repeatedly place your finger on the sensor. It can be a bit finicky at first, but it works. You can also set up multiple fingers in case you want more than just your primary index finger.

Remember:Windows Hello and Windows 10 does not record your fingerprint. Instead, the information is turned into a hash, is encrypted and only stored locally (it does not go to the cloud or OneDrive).

Once setup you can just test it by hitting [Win + L] to lock the computer. Just press on the fingerprint scanner and the computer should unlock. You do not need to swipe your finger, just press. You can also do this at the password prompt and do not need the fingerprint ID login method selected on the lock screen.

So how is it?

Overall, we had very little issue with the fingerprint reader. It works well, is super-fast and makes using Windows 10 much easier. Being able to use it with LastPass is also a bonus along with Store purchases.

Surface Fingerprint ID Type Cover

If you are keeping your Surface Pro 3 this new Type Cover seems like a no-brainer. Unfortunately, Microsoft won't have more in stock for online orders until November 20. Your local Microsoft Store though may have them on the shelves. Also, sales are limited to the U.S. for now and you can only get it in black, which is shame for those who prefer the bright-blue color.

Are you planning on getting a fingerprint ID Type Cover? If you already have one how to you like it? Let us know in comments!

Order the Fingerprint ID Type Cover from Microsoft - $159 (US)

Order the Fingerprint ID Type Cover from Best Buy - $159 (US)

8 tips to extend the battery life on your Microsoft Band 2

$
0
0

Microsoft Band 2

The Microsoft Band 2 has an advertised battery life of 48 hours, but that can vary depending on your settings, usage, and other factors. For example, using the GPS during exercise can significantly drain the battery. If you want to extend the battery life on your Microsoft Band 2, we have some tips that can help you out. These tips include turning off some features, so read carefully.

1. Turn off GPS when it's not necessary

When you start a run or a bike ride, you can enable or disable the GPS. If you turn off the GPS, the Microsoft Health app can't show you a map of your run or ride, but it will save battery life. It is recommended to disable the GPS for activities such as stationary biking, running on a treadmill, dancing, and racquetball.

Microsoft Band 2

2. Turn on Airplane Mode or turn off Bluetooth to stop auto-sync

While your phone is connected to the Internet and connected to your Microsoft Band 2 via Bluetooth, data is synchronized about every thirty minutes. You can turn off Bluetooth when you don't want your Band to sync automatically. On your Band, go to Settings (gear icon) > Airplane to turn Airplane mode on. Alternatively, you can go to Settings (gear icon) > Bluetooth to turn off the Bluetooth. (Note: I can't figure out the difference between these two settings. They both turn off Bluetooth.)

3. Lower the screen brightness

You can change the screen brightness of your Microsoft Band 2. On your Band, go to Settings(gear icon) > Tools (gear icon) > Brightness. The default is Medium, but I've changed it to Auto. You can change this to low for more battery life.

Microsoft Band 2

4. Choose a lower vibration level

Your Microsoft Band vibrates when you receive notifications. It's on Medium by default. You can change it to Low. Go to Settings >Tools > Haptic Alert Levels and change to Low. It vibrates after selecting an option so you can feel if it might be too weak.

5. Turn off Watch Mode

We recommend setting Watch mode to Rotate On as one of the first things you should do with the Microsoft Band. If you already wear another watch or rather check the time on your phone, you can leave it to Off. This is the default option. You can also still check the time by pressing the power button on your Band 2. You can change the settings in Settings > Watch (clock icon).

6. Turn on Do Not Disturb

If you're too busy to care about notifications, turn on Do Not Disturb. Calls, messages, and other data are still downloaded to your Band, but you won't receive notifications when they arrive. Go to Settings > Do Not Disturb.

7. Turn off Daily Heart Rate

This is a major feature that we recommend leaving on, but you can turn off Daily Heart Rate measurements to extend the battery life on the Microsoft Band 2. The Band 2 monitors your heart rate day and night to measure your calories burned. Estimates of your calories burned will be less precise while the Daily Heart Rate monitor is turned off, but it automatically turns back on when you're tracking a run, a bike ride, a workout, or your sleep. Go to Settings > Tools > Daily Heart Rate to change the setting.

Microsoft Band 2

8. Turn off the display during a run, bike ride, or workout

When tracking a run, bike ride, or workout, the display on the Microsoft Band 2 stays on to show your stats. You can save battery life by pressing the power button to turn off the display. Press the power button again when you want to check the stats.

Battery life vs. features

These 8 tips will extend the battery life on your Microsoft Band 2, but you'll lose out on some features. Will you be following all or some of these tips? Do you have more to add? Sound off in the comments!

Microsoft Band 2 Review

Buy the Microsoft Band 2

How to use multiple accounts with Windows Hello in Windows 10

$
0
0

We recently took a closer look at the new Fingerprint ID Type Cover for the Surface Pro 3 and Surface Pro 4. Along with fingerprint IDs, the Surface Pro 4 and Surface Book both use an infrared scanner for facial recognition. All of these technologies (and iris scanning) fall under the biometric Windows Hello technology in Windows 10.

One question we have seen pop up is whether friends and family members can also use Windows Hello to log into your new Windows 10 machine?

The answer is absolutely, but only under their user accounts. This requirement is likely obvious, but for many people considering a new Surface or Surface Book knowing a definite answer is satisfying.

Check out our new video to see it all in action and a few usage scenarios as well.

Multiple accounts, yes, but shared accounts no

You cannot, however, have more than one person associated with Windows Hello on a single account, so there is no sharing. This rule means your child cannot log into your account using Windows Hello only theirs.

Simply put, there is no option to add another user's face or fingerprint to Windows Hello on a single account. That is just good security. However, it does mean you can not use Windows Hello for multiple people to sign into a single account. If you want to share an account, you need to share the password too.

Update: As noted in comments, you could have family members register different fingerprints under the same account. We have confirmed that this is doable.

Setting up multiple accounts

To add more users to any Windows PC just go into settings. They do not need a Microsoft Account either.

Before you begin, just make sure you are signed into the master account to add a new account to the PC profile.

  1. All Settings
  2. Accounts
  3. Family & other users

Now add people using the Your family or Other users options. The only difference between the two is with 'family' you get access to child controls for monitoring and blocking content.

Once they are logged into their own accounts, they can now set up their own Windows Hello log in.

  1. Open All Settings
  2. Accounts
  3. Sign-in options
  4. Windows Hello > Facial recognition or Fingerprint > Set up

Remember:Windows Hello and Windows 10 does not record your fingerprint or facial image. Instead, the information is turned into a hash, is encrypted and only stored locally (it does not go to the cloud or OneDrive).

Various scenarios

Once you have two or more people with their own accounts on your PC and they have setup Windows Hello you can begin to use the service.

Here are a few things to note:

  • Simply using [Win + L] lets you lock the PC and either person can log in; you do not need to switch the account and then use Windows Hello
  • You can use both or either Fingerprint and Facial recognition e.g. if you remove the keyboard, facial recognition still works if enabled
  • One person could just use fingerprint, another facial recognition or any combo
  • If two people stand in front of the camera, it is whoever gets scanned first that logs in, but it will log in someone; the rule of thumb is whoever is closer wins!
  • You can use the fingerprint reader when the Type Cover is folded back onto the Surface

As you can see, Windows Hello is a fairly robust system and is ideal for friends and family who share a PC with you. Users have multiple ways to take advantage of the technology, and it should make passwords a thing of the past.

Did we miss any odd usage cases for Windows Hello? Let us know and we'll see about following up with more answers to your questions.

Order the Fingerprint ID Type Cover from Microsoft - $159 (US)

Order the Fingerprint ID Type Cover from Best Buy - $159 (US)

Viewing all 5861 articles
Browse latest View live


Latest Images