Quantcast
Channel: Help & How To
Viewing all 5861 articles
Browse latest View live

Getting set up with iCloud on Windows 10

$
0
0

iCloud for Windows 10

It's perfectly reasonable to expect a large number of iPhone and iPad owners to also use a Windows computer. The same was true back in the early days of the iPod and led to the development of iTunes for Windows. It's never been the greatest piece of software ever, but Apple, albeit less so than Microsoft, does recognize the necessity to make services cross-platform.

It's also perfectly reasonable that you may have never been aware that you could use iCloud on your Windows PC. It's not exactly shouted about since Apple would prefer you use its own hardware and software together. But, if you're using a mix of iOS and Windows, here's the very basics on how to get set up with iCloud on Windows 10.

1. Know where to download

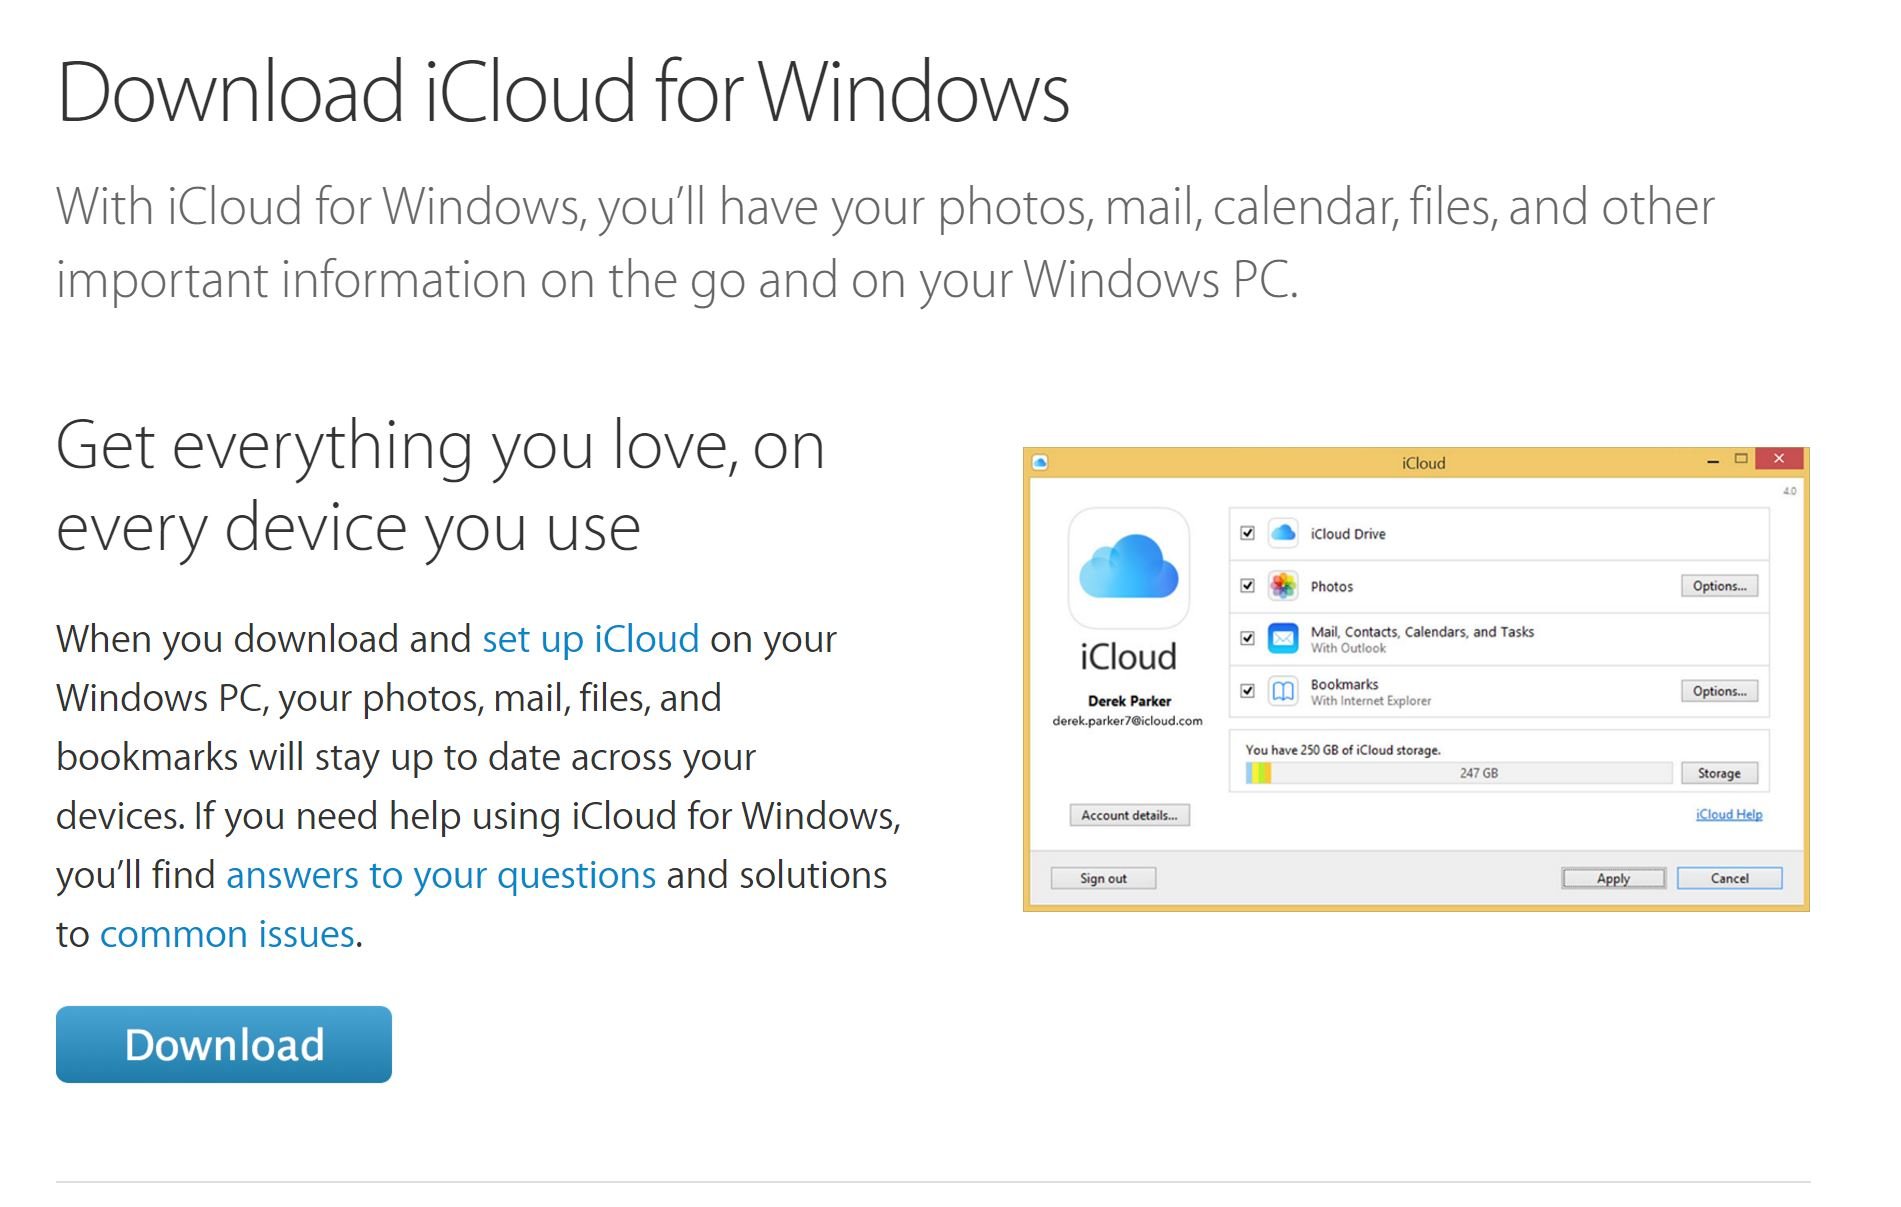
iCloud for Windows

It sounds silly to some, but Apple doesn't exactly shout about iCloud for Windows on its homepage. If you didn't know it even existed, you may also not know where to find it.

All you need to do is visit the link below and download the iCloud for Windows installer.

Download iCloud for Windows

2. Signing-in

iCloud for Windows

Once you've followed the instructions to install the package, the very first thing you have to do is sign-in. Use the same Apple ID username and password that you're signed in to on your Apple devices.

3. Choose what you want to sync

iCloud for Windows

iCloud covers a few different bases and you might not want to sync all of them to your PC. Select the ones you want my checking the relevant boxes and then click "Apply."

The program you've installed support iCloud Photos, iCloud Drive and bookmark syncing from Safari to Internet Explorer. It can also integrate your calendars, contacts and more with Outlook on Windows.

4. File Explorer

iCloud Drive in Windows 10

Unlike Dropbox when you install that, iCloud Drive will not automatically add to your Quick Access panel in File Explorer. But it's easy enough to do yourself.

  1. By default, your iCloud Drive folder will be in your main User folder. For example, in C:/Users/Richard/iCloud Drive, as it is on my PC.
  2. Navigate to the location in point one.
  3. Find the folder "iCloud Drive" and right click on it.
  4. Select "Pin to Quick Access" to have a shortcut permanently in the left-hand pane in File Explorer as seen in the image above.

iCloud Drive in Windows 10

That covers off the very basics. We'll be looking in more detail at each feature offered by iCloud for Windows in specific guides.

For more Windows 10 tips be sure to visit our dedicated page here


How to schedule Windows Update installations in Windows 10 Pro

$
0
0

Yesterday, I showed you how to turn off Windows Update Delivery Optimization (WUDO) in case you were on a metered connection.

Today, I am going to show you how to schedule the automatic download and installation of Windows Updates based on your timetable. Indeed, there are three options, including just being notified of an update without download or installation. The trick is using a hidden tool called Local Group Policy Editor.

Note, this only works on Windows 10 Pro releases and not for Home licenses. Sorry! Need to upgrade? Read our how to upgrade to Pro tutorial!

Prelude

Before we get started let me break down what this tool enables. There are three very specific scenarios that differ from the default automatic download and installation of Windows Updates. These options are good for those with unique circumstances. For instance, 'jamearl' in comments explained why he wanted scheduled updates:

"…what I really need is the ability to set a time of day (0200-0500 am) as time for the system to update. During this time, I have unlimited data with much higher speeds. As I live in a rural area and limited to satellite internet, this is the only option I currently have. Otherwise, I would use LTE with a higher data plan if I could be a solid LTE signal."

Although a rare situation, there are likely other people with similar conditions. If you fall into your camp, here are the three options you can choose from when using the Local Group Policy Editor. They are starting at number 2 because the default method on all Windows 10 PCs is technically number 1.

Local Group Policy Editor Options

2. Notify before downloading and installing any updates.

"When Windows finds updates that apply to this computer, users will be notified that updates are ready to be downloaded. After going to Windows Update, users can download and install any available updates."

3. Download the updates automatically and notify when they are ready to be installed

"Windows finds updates that apply to the computer and downloads them in the background (the user is not notified or interrupted during this process). When the downloads are complete, users will be notified that they are ready to install. After going to Windows Update, users can install them."

4. Automatically download updates and install them on the schedule specified below.

"Specify the schedule using the options in the Group Policy Setting. If no schedule is specified, the default schedule for all installations will be every day at 3:00 AM. If any updates require a restart to complete the installation, Windows will restart the computer automatically. (If a user is signed into the computer when Windows is ready to restart, the user will be notified and given the option to delay the restart.)"

The number 2 option – notify before downloading and installing updates – is ideal for those on a metered connection or who just do not trust Windows Update, for whatever intention. This option could also solve the user above's problem who is on a satellite connection.

Number 4 though is the most interesting as this will download the updates but only install them on a specific schedule. In other words, the PC will grab the updates but won't install them until the time specified. This option is ideal for admins, obviously, who want to have updates installed in off-hours when employees are not using the computers. Indeed, there is a 5th option too that cedes all power to a local admin.

Of course, the real power here is that you can think of your unique situation where these options may be useful. Feel free to share your circumstances in comments for others.

Note, we have not actually tested these options ourselves due to the difficulty in waiting for an update. However, we see no reason this tool no longer works (they carry-overs from previous Windows releases are not in any way new ).

Let's go!

How to schedule Windows Updates

1. Launch Local Group Policy Editor

Type (or copy/paste) gpedit.msc into the Cortana/search bar or use Win + R and paste in gpedit.msc into the Run entry box

2. Navigate

Using the Local Group Policy Editor navigate to Computer Configuration\Administrative Templates\Windows Components\Windows Update

3. Double-Click

Double-Click Configure Automatic Updates to open the configuration window

4. Choose your destiny

The console is quite clear on what are your choices. These were detailed above in the prelude section. First you need to choose Enabled in the upper left corner as it is Not Configured by default. Once Enabled the Options section becomes active. You can now choose which policy you want to enable.

5. Date Time

If you are using option #4, you can also select the day and exact time you want the updates installed. Note that the time and day options are only applicable to option #4 as the other options are just notifications for installations. Once completed you can hit Apply to make sure the setting takes and then hit OK to exit the window.

That's it!

As mentioned earlier, I have not personally tried these scenarios so hopefully it works out for you. Obviously the majority of users on a dedicated connection do not need these alternatives, but they are good to know for rare situations like the one mentioned earlier.

Let us know in comments how you would use these and if they work for you!

Big thanks to Daniel Gilbert M. for the tip!

More Resources

Remember that we have many other articles on Windows 10, if you need help you always check these other resources:

Our definitive review of Windows 10

Windows 10 on Windows Central – All you need to know

Windows 10 help, tips, and tricks

Windows 10: Help and discussion forum at Windows Central

How to set up and use iCloud Photos on Windows 10

$
0
0

iCloud Photos

Apple would like people to use its devices and platforms exclusively, but it does at least acknowledge the sheer number of Windows users around the world. Using an iPhone or iPad and a Windows machine isn't at all uncommon, and as such iTunes and the core iCloud services are available on Windows 10.

One specific service is iCloud Photos. It's a relatively easy way to share your iPhone or iPad photos with your Windows 10 PC once you've got it set up. Here's what you need to know.

1. Download, install and set up iCloud for Windows

iCloud on Windows 10

Before you do anything you need to have iCloud for Windows installed and set up. The good news is it's an easy enough process. The even better news is we've got a complete guide to walk you through it, step-by-step. Find it at the link below.

2. Enabling on your iPhone or iPad

iCloud Photo Library

It goes without saying, but before you can share anything to your Windows 10 PC you need to make sure you've enabled everything on your iOS device. If you need a helping hand with that, check out the guide linked below courtesy of our pals over at iMore.

3. Enable sync on Windows 10

iCloud

If you didn't take care of it already in the first step, the next thing you need to do is to enable iCloud Photos in iCloud for Windows.

  1. Open the Start Menu and navigate to the "iCloud" folder.
  2. In there you need to open the "iCloud" application.
  3. In the box that pops up, check the box next to "Photos."

That's all you need to do to turn it on.

4. Choose what to sync

iCloud Photos

In the box you enable Photos in during the previous step, you'll also see a button labelled "Options" next to Photos. This is where you choose what it is you wish to sync to your PC.

Click on Options and you'll be presented with what you see in the image above. Here's what you can do:

  • Photostream: This is a pretty simple way to share your iPhone and iPad photos with all of your iCloud enabled devices. It'll share everything you take and sync it to your Windows 10 PC. It'll also work in reverse and allow you to add photos from your computer that will then sync to iCloud and any iPhone, iPad, Mac or Apple TV that's set up for it.
  • iCloud Photo Sharing: Choose the people you want to share photos with and allow them to add photos, videos and comments. Comments will show up right in the folder when you open it in Windows 10.

You can also change the folder that synced photos go into. By default it'll be set to go into Pictures\iCloud Photos, but you can change that to any other that you wish.

5. Quick Access

iCloud Photos

The steps above will leave you in a position where iCloud will sync your photos to your computer. The photos themselves will reside in the folder specified in the previous step, but iCloud for Windows installs a 'desktop app' for quicker, easier management.

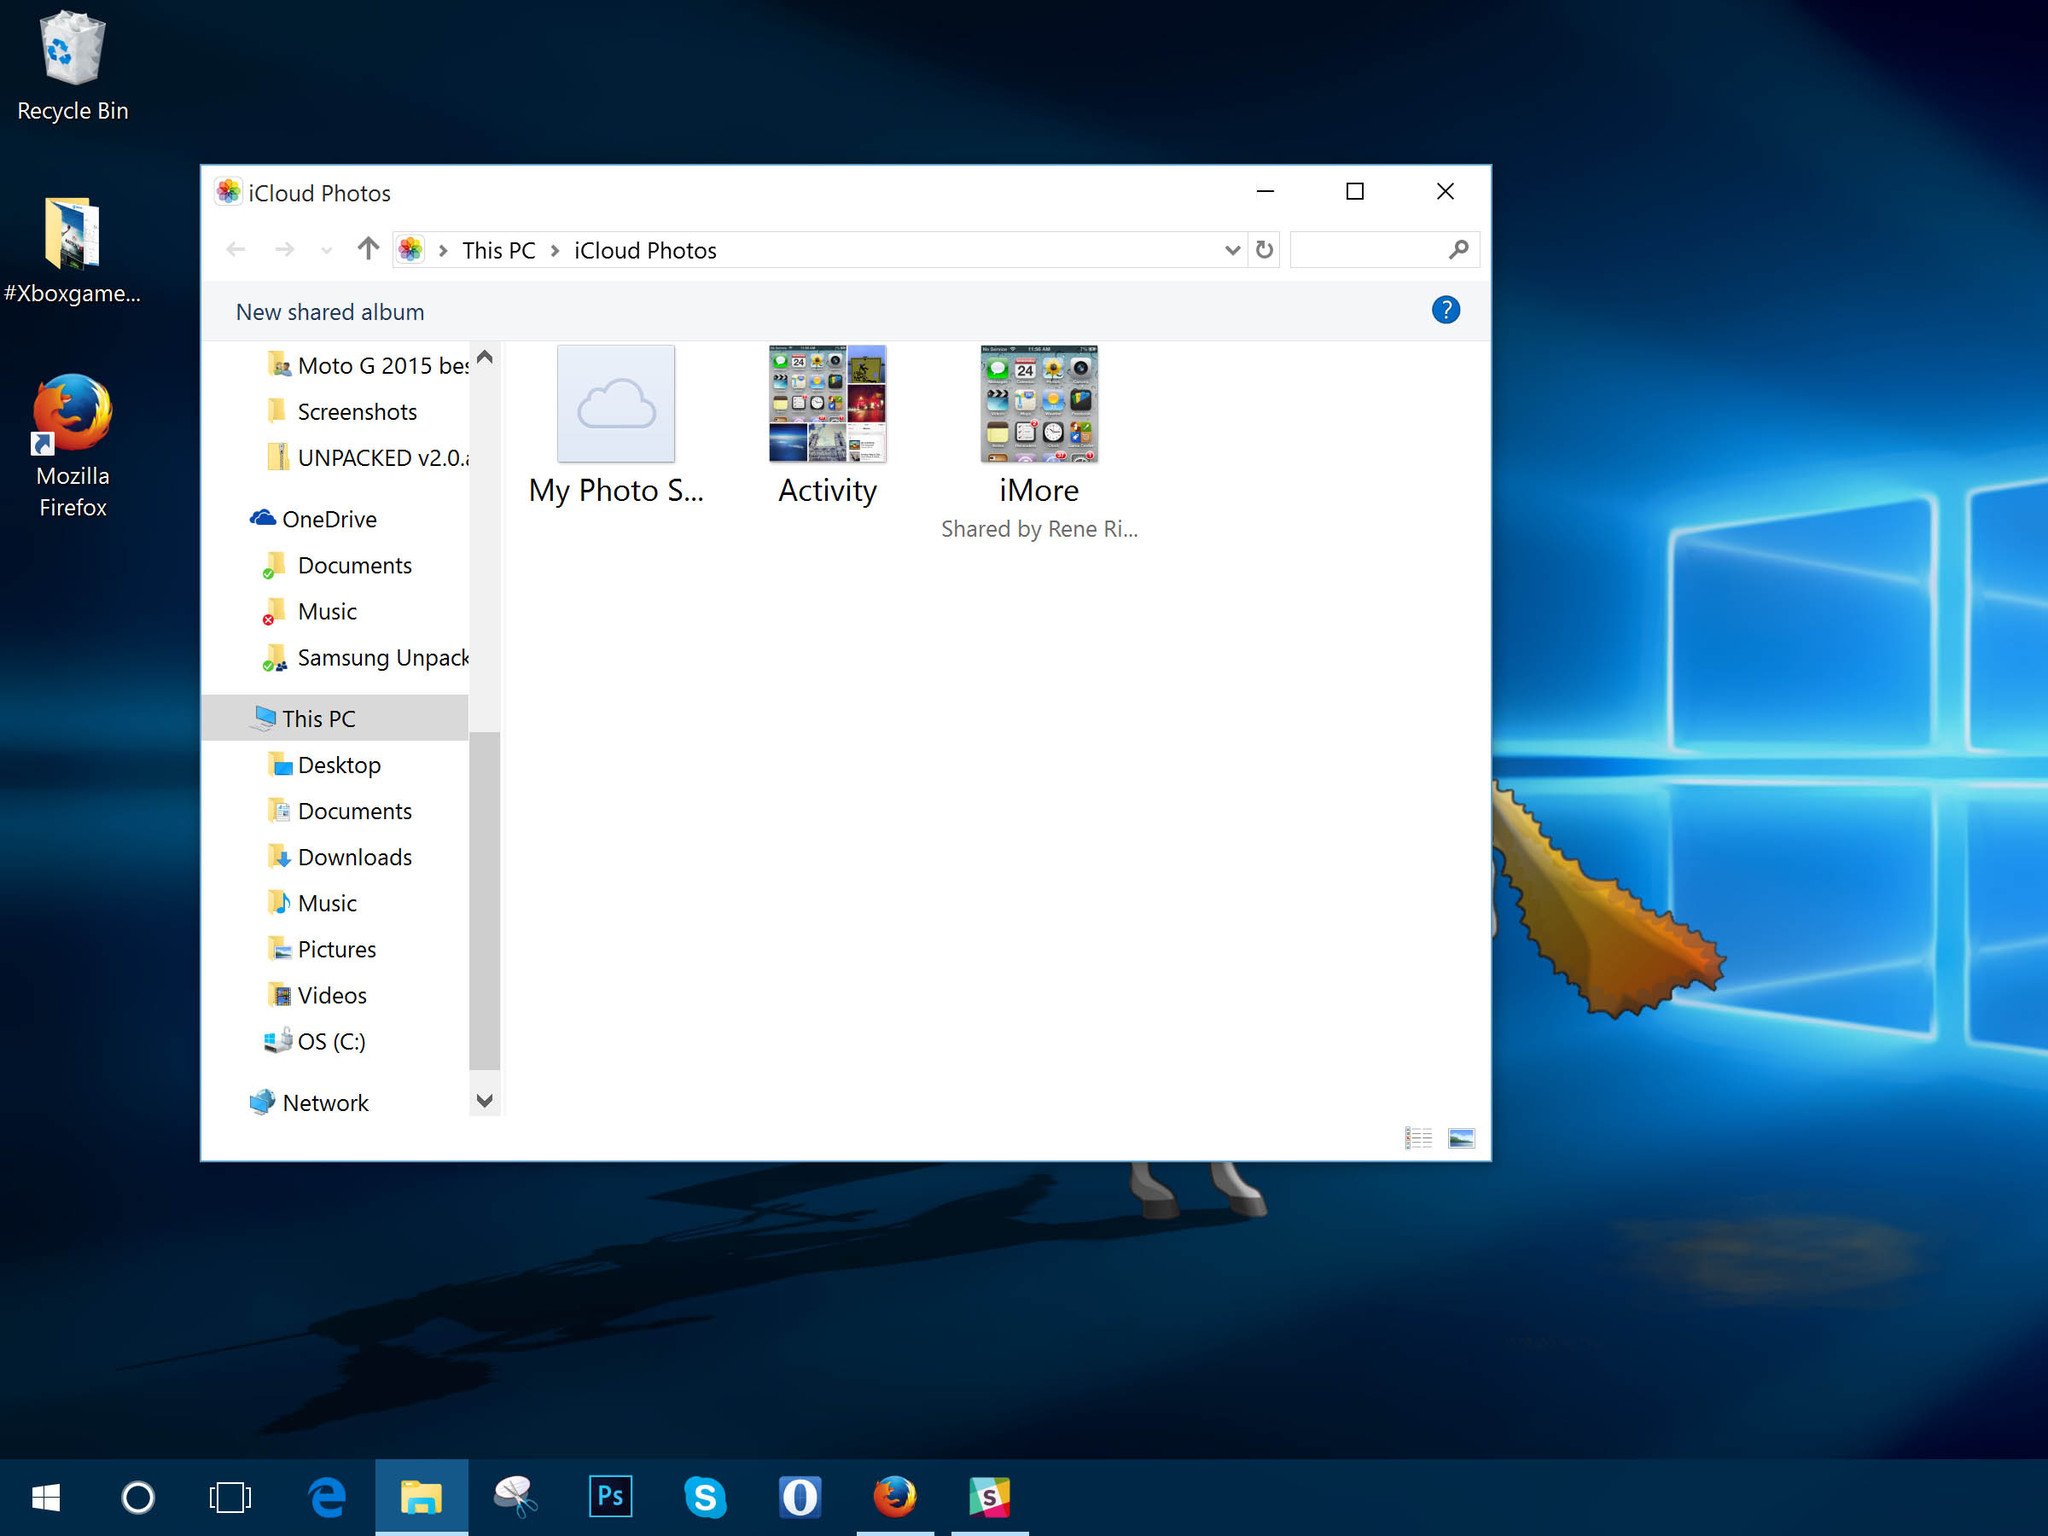
Only it's not a desktop app as you might imagine. To locate it you can either go into the "iCloud" folder in the Start Menu and find "iCloud Photos," or just open File Explorer. iCloud Photos will be added here under "Devices and drives" in "This PC."

  • To add to Quick Access in File Explorer, right click on "iCloud Photos" and select "Pin to Quick Access."
  • To pin to the Start Menu, right click on "iCloud Photos" and select "Pin to Start."

6. Add Photos to a folder or Photostream

iCloud Photos

Once you open up iCloud Photos and you're viewing either your folders or Photostream you can add new photos right from your computer.

  1. Open the location you wish to share new photos to.
  2. Above the main window look for "Add photos or videos" (illustrated in the image above.)
  3. Choose the photos from your computer.
  4. Once you're ready, hit "Done."

The photos you've just selected will soon be available on the devices and to the other people you've allowed access to.

7. Create a new shared album

iCloud Photos

If you want to share a specific set of photos with friends or family who also use iCloud, there's a really easy way to do it.

  1. Open the location you wish to share new photos to.
  2. Above the main window look for "New shared album."
  3. Add the email addresses of the people you want to share with.
  4. Give the album a name.
  5. Click "Next."
  6. Select all the photos you want to add from your computer.
  7. Click "Done."

Now, all the photos you added to the folder will be synced to the devices of everyone you shared to. It's important to remember that you need to add their iCloud email address which may well be different to their regular email address, so always make sure to check if in doubt.

8. Unsubscribe from shared folders

iCloud Photos

If someone has shared a folder with you through iCloud but you're done with it and want to unsubscribe, you can do that too from iCloud for Windows.

  1. Select the folder you want to unsubscribe from.
  2. Click "Info."
  3. In the box that appears click "Unsubscribe" in the bottom left corner.

You'll now no longer see any photos from these folders.

You may not get as wide a range of features as perhaps on Mac OS X, but Apple does at least provide a comprehensive, if a little rudimentary, way to keep your iCloud Photo Library in order on Windows 10.

For more on iCloud Photo Library as a service, be sure to visit our pals at iMore and check out their ultimate guide.

For more Windows 10 tips be sure to visit our dedicated page here

How to transfer your iPhone and iPad photos to Windows 10

$
0
0

iPhone and Windows 10

Windows is the most popular desktop operating system in the world, which means that there are no doubts lots and lots of people who use both Windows 10 on a PC and an iPhone or iPad. Today's Microsoft is accommodating to most platforms, so regardless of your preference, they've got solutions for you.

In this guide we're specifically looking at how to get your photos from your iPhone or iPad over to your Windows 10 computer. Sounds simple, but there are a few different ways you can do things.

1. Import all photos using the Phone Companion app

Phone Companion

The Phone Companion app is new from Microsoft for Windows 10. Much of it is geared at helping Windows users on iPhone, iPad or Android find their way with Microsoft services on each respective platform. What the Phone Companion app can also do is help you to quickly import your entire photo library from your phone to your computer.

Plug your iPhone or iPad in to your Windows 10 machine using the regular microUSB cable. If the Phone Companion app doesn't launch, go into the Start Menu and select it. When it opens you'll see the screen above, with some Microsoft apps and services above some information about your phone. For what we want here you'll need to seek out the "Import photos and videos into the Photos app" option highlighted.

Phone Companion

After you've clicked on that the stock Photos app for Windows 10 will open and you'll see the message shown here. By default it'll import all your photos and videos to the Pictures file on your computer. So this is a perfect method if you just want to dump everything at once.

2. Using File Explorer

iPhone photo import

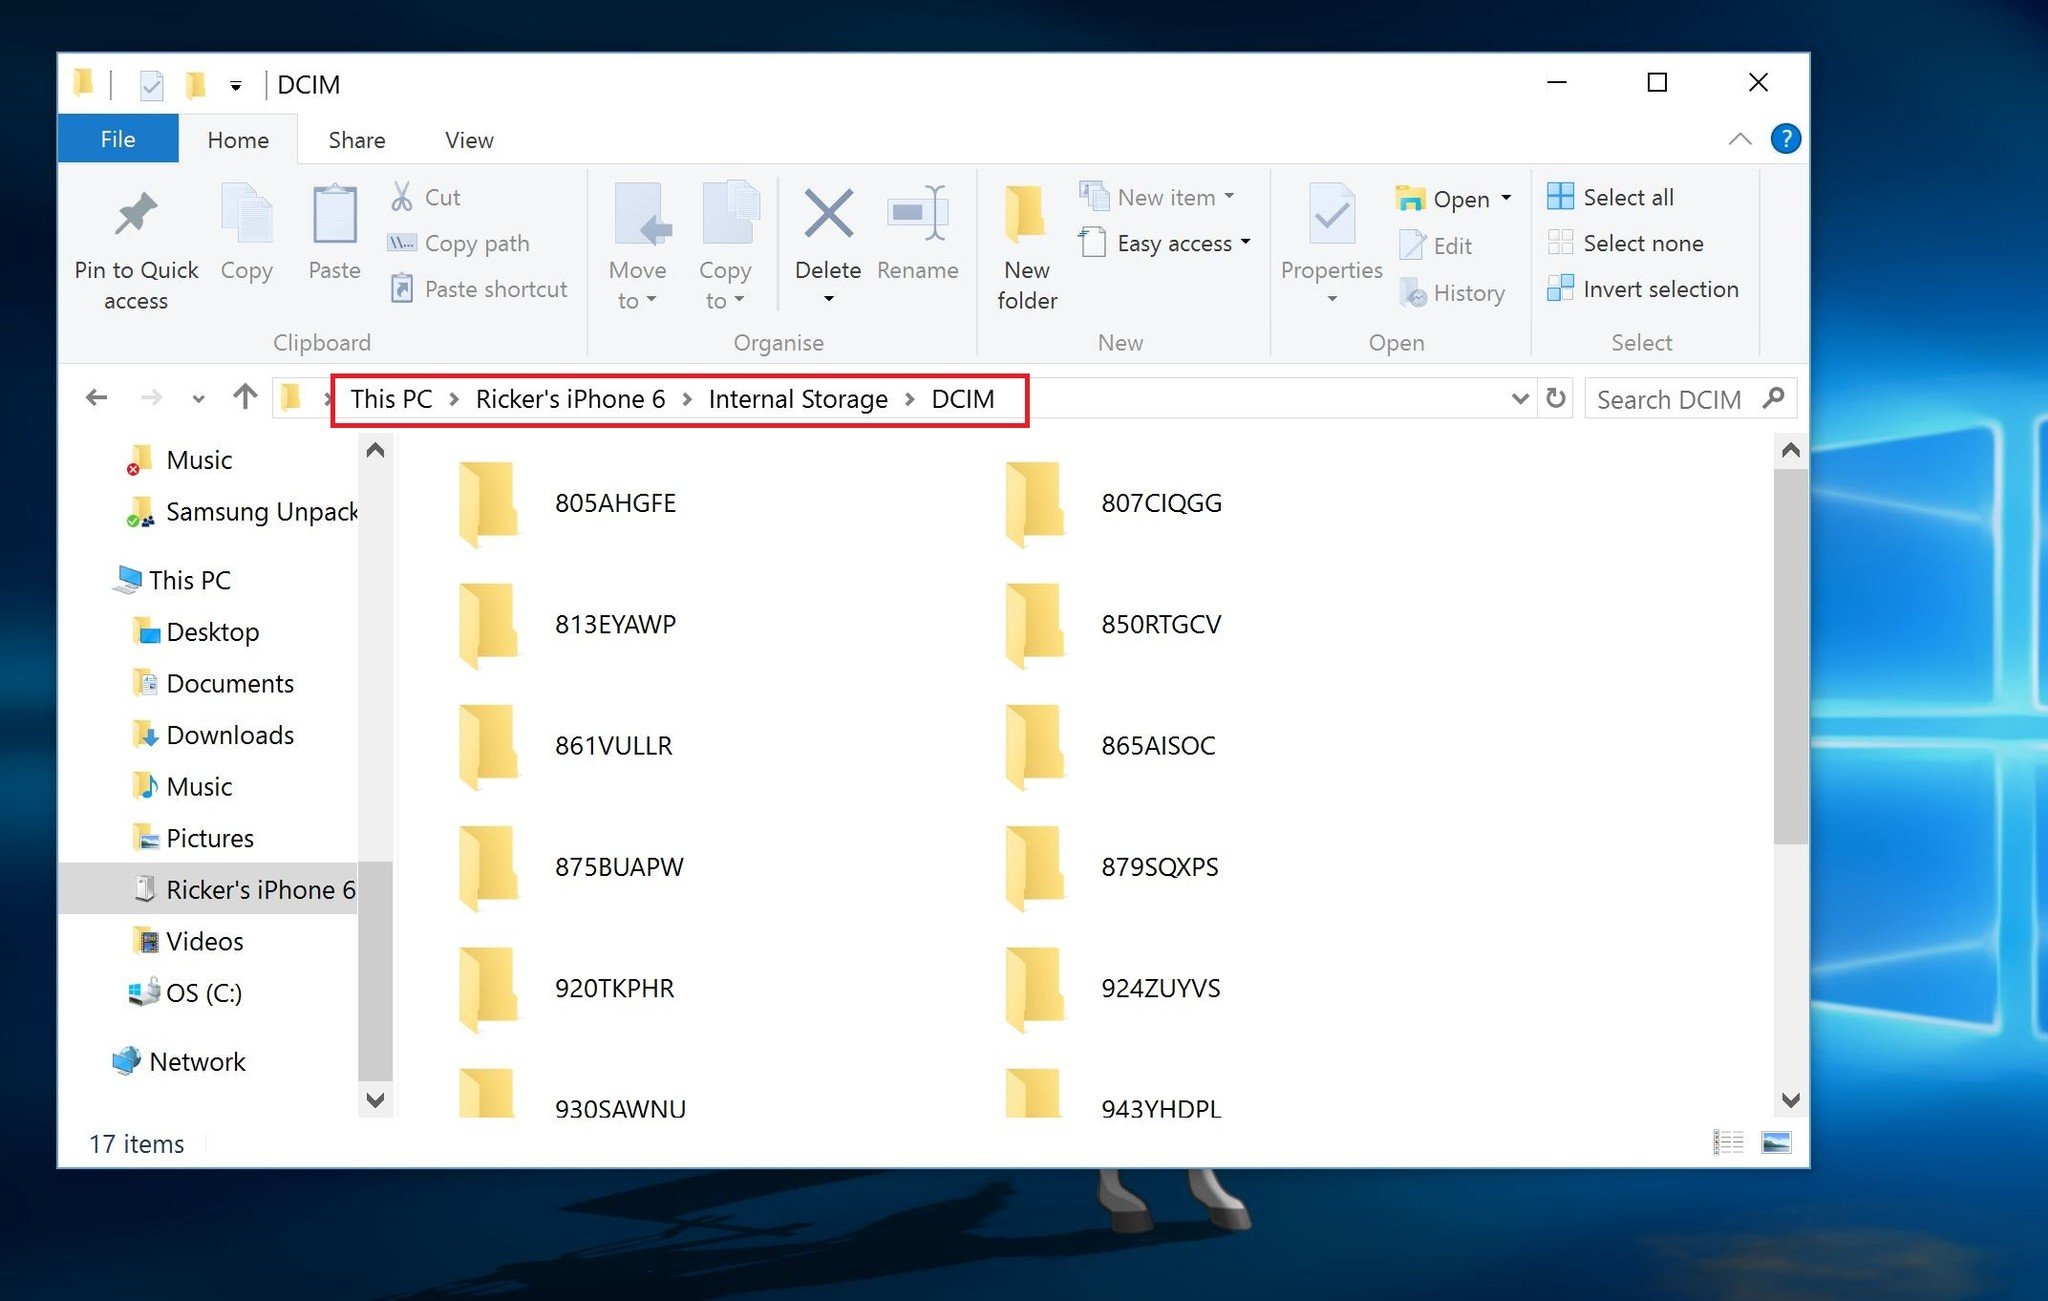
If you don't want to do a blanket import (or, even if you do) there's File Explorer at your disposal. Unlike with Android phones, for example, the iPhone doesn't allow you to access anything but your photos through File Explorer. As such finding what you want is incredibly easy.

You can either open File Explorer and find your iPhone listed under "Devices and drives" or by clicking "Transfer other files" in the Phone Companion app. In this case, there are no other files. Once you've clicked on your iPhone you'll see the "DCIM" folder that houses all your photos.

From here it's a simple case of drag and drop to move the files onto your PC.

3. Using the cloud

iCloud on Windows 10

The great thing about Windows 10 is that there will be a solution for most people even if Microsoft isn't the direct supplier of it. The cloud is one of these situations. OneDrive is baked into Windows 10 but you can just as easily use other alternatives, like Dropbox, or Apple's own iCloud, for example. All of these can be used to sync your photos to your computer without the need for cables. We'll focus on these for the purposes of this guide, but many of the same steps may apply to your chosen cloud service.

What's also great about each of these services is that your photos can upload to the cloud in the background and then, providing you're syncing those folders to your PC, they'll just appear. Like magic.

For Dropbox and OneDrive, first go into the Settings in the iOS apps and ensure you have camera backup turned on to take advantage of this. If you don't want to do it this way you can manually upload your photos to your cloud accounts and still get them on your computer with these easy steps. With iCloud, just make sure you're using iCloud Photo Library.

iCloud Photo Library

iCloud Photos

iCloud Photo Library is perhaps the simplest cloud based method for iPhone and iPad owners to use. Much like OneDrive is built into Windows 10, iCloud is built into iOS, so it requires very little effort on the mobile device.

For the full details on how to use iCloud Photos on Windows 10, check out our comprehensive guide at the link below.

OneDrive

OneDrive for Windows 10

To get your photos from OneDrive onto your Windows 10 device you'll first need to tell it to sync the right folder. How to sync OneDrive folders in Windows 10 isn't immediately obvious, but fortunately we've got a full guide on how to do just that. Check it out at the link below.

Dropbox

Dropbox sync in Windows 10

Unlike OneDrive and like iCloud, Dropbox needs to be installed onto your Windows 10 device. We're not talking about the Store app, either, but the desktop sync app that you can download directly from Dropbox.

For a full guide on how to get set up and syncing your Dropbox folders check out the link below.

Those are a few of the more common methods to get your treasured snaps from your iPhone or iPad to your Windows 10 PC. If you've got any tips or tricks we didn't mention be sure to jump into the comments below and share them with everyone!

For more Windows 10 tips be sure to drop by our dedicated page here

How to add or delete a payment method from the Store in Windows 10

$
0
0

Windows Store Payment

While there are several free apps and games at the Windows Store, eventually you're going to want to buy something. When you buy an app, game, movie, music, or TV show from the Windows Store, you'll need to add a payment method to your account. We'll show you how.

1. Open the Store and tap the user icon on top. Tap or click payment options. This opens the web browser where you can add or remove payment options.

Store payment options

2. To get started, tap or click Add payment option. Enter your credit card or PayPal information, and then click or tap Next.

Windows Store payment

3. To remove a payment option, tap or click an existing card and then select remove. A confirmation message pops up, so you can double-check if you really want to remove it.

Windows Store Payment options

That's it! Next time you try to buy something from the Store in Windows 10, you can use your preferred method of payment. You can also change or add a payment method from the purchase screen, but you can't remove. Tap or click change under the payment method and then select a different card or add a new payment method.

Windows Store Buy

For more tips, we have many more posts like this one in our Windows 10 help, tips, and tricks page.

How to get better restaurant recommendations from Cortana in Windows 10

$
0
0

Cortana Restaurants

Cortana, the personal assistant in Windows 10, can help you find things on your PC, manage your calendar, track packages, tell jokes, and more. She can also recommend restaurants in the area. You can get better recommendations if you let her know some of your preferences. We'll show you how.

1. Open Cortana by tapping or clicking the search form in the Taskbar. You can also use the keyboard shortcut, Windows key + S. Tap or click the Notebook icon and select Eat & Drink

Cortana Restaurants

2. From here, you can add your preferences for cuisine, price range, distance, ambience, and how frequently you eat out. For example, I've added that I like Indian, Italian, Delicatessen, Barbeque, and Thai food. I've also added to narrow the results to restaurants within 2 miles.

Cortana restaurants

Whenever you open Cortana, she displays three restaurant recommendations in a card. Tap or click See more restaurants for the rest of the list. Tapping or clicking on a restaurant opens up the web browser with more information including hours, description, reviews, menu, and more.

Cortana Restaurants

Do you use Cortana for restaurant recommendations? Have you told her your preferences yet?

For more tips, we have many more posts like this one in our Windows 10 help, tips, and tricks page.

How to use the Sticky Notes app in Windows 10 to remind you all the things

$
0
0

There's a little app built into Windows 10 that you might not know is there, or have just skipped over without more than a passing glance: Sticky Notes. But, this simple app can be a powerful reminder tool to help you plan your day.

Imagine your monitor filled with Post-It notes and you're about understanding Sticky Notes.

It doesn't do a lot, but what it does it does well. It lets you make notes that are so clearly visible on your screen that you'll not be able to ignore them. Here's what you need to know.

1. Launching the app

The first part of using Sticky Notes is knowing where to find it. The quickest way to do this is to use Cortana and just type "Sticky Notes" into the search box or to use voice commands to launch it by saying "Hey Cortana, launch Sticky Notes."

If you want to find it in the Start Menu, open it up, hit "All Apps" then scroll down to "Windows Accessories." Sticky Notes lives within this folder.

2. Adding new notes

When you launch the app for the first time it'll present you with a yellow square resembling the popular sticky notes. These aren't designed for detailed note taking, you're better of with something like OneNote for that still. These are for quick reminders you need throughout out the day, so keep them concise.

Once you've left one note, adding another is easy. Hit the small "+" in the top left and another yellow square will appear. Just keep repeating until you've got enough. Or you can right click on the icon in the taskbar and then "new note," or use the keyboard shortcut "Ctrl + N."

You need to keep the app open for your notes to remain on the screen.

3. Placement

As with traditional sticky notes you can put these little guys all over the place. You can pick them up and move them around the full expanse of your display. Just drag, and drop. Click on the slightly darker yellow strip and the top and go sticking them wherever you want them.

4. Customize

You're given yellow by default. But you don't have to stick to that. Right click on any of your notes and you can change the color to a variety of presets. This is particularly handy if you want to make certain notes stand out or just group like topics by color.

5. Cleaning up the mess

Once you're done with a note, getting rid of it is easy. You can either just click the small "x" or use the keyboard shortcut "Ctrl + D." You'll get a dialog message to check you're sure you want to delete, but otherwise your screen will start to empty.

Sticky Notes is a very simple application that is easily overlooked. But if you just want to keep a quick reminder close at hand, why not give it a try.

How to disable auto-correct and highlighted misspelled words in Windows 10

$
0
0

Windows 10 is the new operating system from Microsoft that brings Cortana to the desktop, universal apps, and a super easy to use Settings app to find and configure different options in the operating system, and many other features. Like in Windows 8.x, the new version of the operating system includes an automatic spell checker that will autocorrect and highlight misspelled words in apps designed to take advantage of the functionality.

You will find such feature inside the Microsoft Edge web browser and Internet Explorer, Facebook, Readit, Xbox app, and on countless of other apps. Autocorrect and highlighted misspelled words are excellent productivity tools inside Windows 10, but there could be times when you will not require assistant correct your grammar.

Fortunately, Windows 10 comes with the necessary settings to individually enable or disable the spelling options. If you want to change the grammar settings follow these super easy steps:

  1. Use the Windows + I keyboard shortcut to open the Settings app
  2. Navigate to Devices and go to Typing
  3. Under Spelling, switch the Autocorrect misspelled words and Highlight misspelled words to the Off position.

Quick Note: If you're disabling the spelling options while the apps are still running, you'll need to restart the app you want to use without the autocorrect in order the changes to take effect.

That's all you have to do to disable the spell checker in Windows 10. You can always enable the settings back by coming back to the Typing Settings section.

It's worth pointing out that surprisingly, even though the spell checker is a global feature, many apps work independently. For example, if you want to disable spell checking on the new Windows 10 Mail app, you'll need to open Mail, click on New Mail, navigate to Options, and change the Spelling options. OneNote also doesn't respond to the Windows 10 Spelling feature. However, OneNote doesn't even have options to control spelling.

Disabling spelling feature in Office

The suite of Office apps, including Word, Excel, PowerPoint, and the others, also have an independent spell checker, which you can easily disable. Here is how to do it:

  1. Going to File > Options.
  2. Then go to Proofing and under When correcting spelling and grammar in Word (or from another Office app), make sure you uncheck Check spelling as you type and Check grammar with spelling. And click the AutoCorrect options button to control how Office apps, in this case, Word, corrects and formats your content.

Editing your custom dictionary in Windows 10

If you happen to want to disable spell checker in Windows 10 because, by mistake, you added some misspelled words to your personal dictionary, you can do that too. There are two ways to remove added words to the dictionary.

Method one

  1. Open the run command and type the following command with your account name: **C:\Users\yourAccountName\AppData\Roaming\Microsoft\Spelling**
  2. Go inside the language folder – in my case es-US.
  3. Open the default.dic file with Notepad. Now remove the misspelled words and save the file.

Method two

  1. Open Word and go to File > Proofing and click the Custom Dictionary button.
  2. Select RoamingCustom.dic from the list and click Edit Word List
  3. Then add or remove the words you want and click OK
  4. Click OK, OK again, and close Word.

That's all there is to it!

Do you let Windows 10 help you out with grammar? Let us know your configuration options in the comments below.

More Resources

Remember that we have many other articles on Windows 10, if you need help you always check these other resources:

Our definitive review of Windows 10

Windows 10 on Windows Central – All you need to know

Windows 10 help, tips, and tricks

Windows 10: Help and discussion forum at Windows Central


How to install apps from the Windows Store in Windows 10

$
0
0

Windows Store

Windows 10 comes with built-in apps that can help you socialize, stay in touch, share and view documents, organize photos, listen to music, and more, but you can find even more apps in the Windows Store. There are also many great apps that are free, so you don't have to spend any money if you don't want to. If you're new to Windows 10, we'll show you how to install apps from the Windows Store.

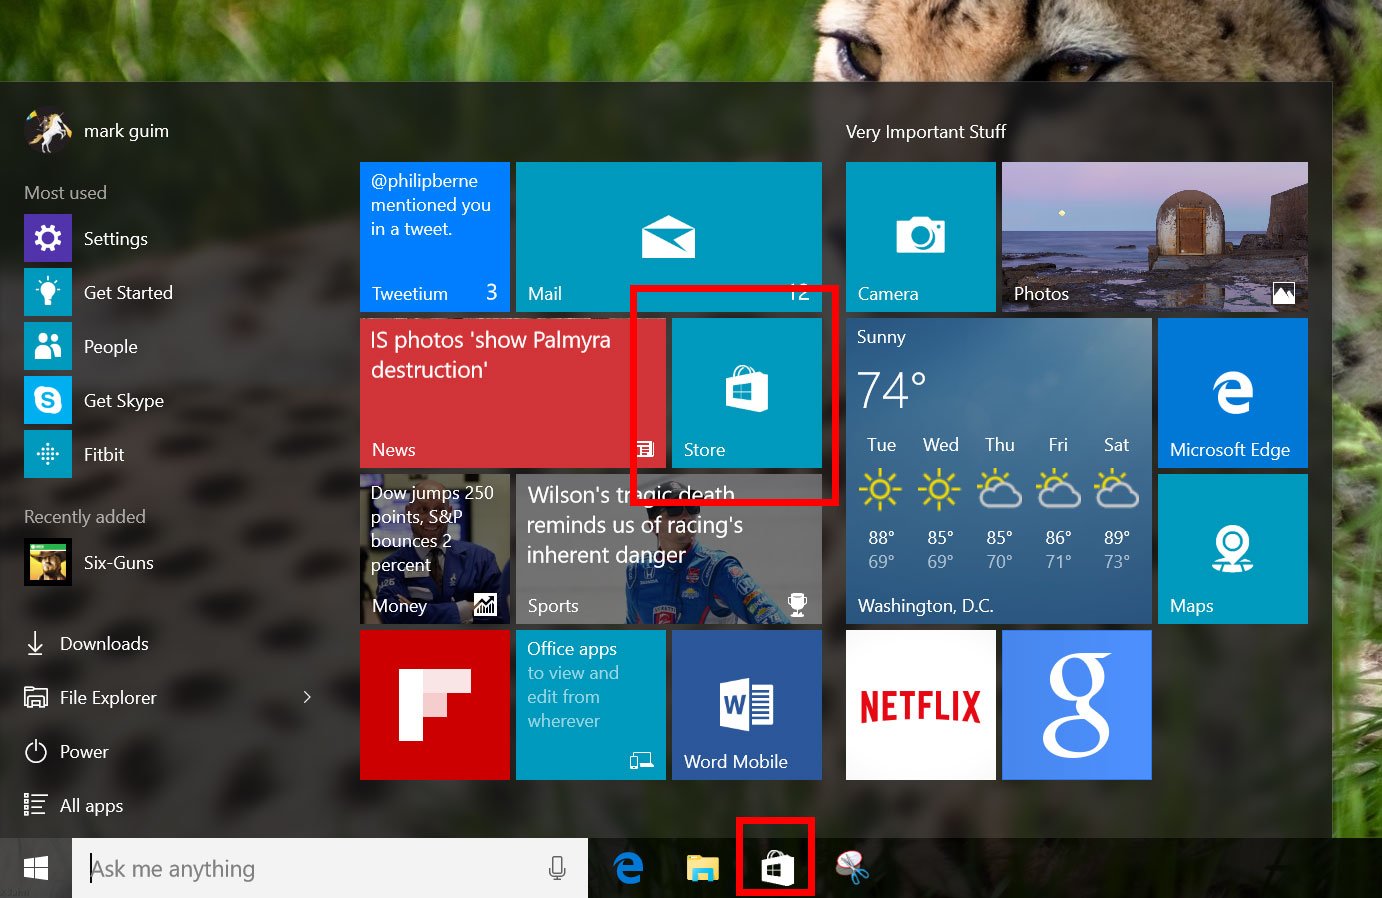
First, open the Store. There are two ways to do this. You can go to the Start menu, and select the Store tile (the one with the shopping bag). You can also tap or click the Store tile in the taskbar.

Windows Store

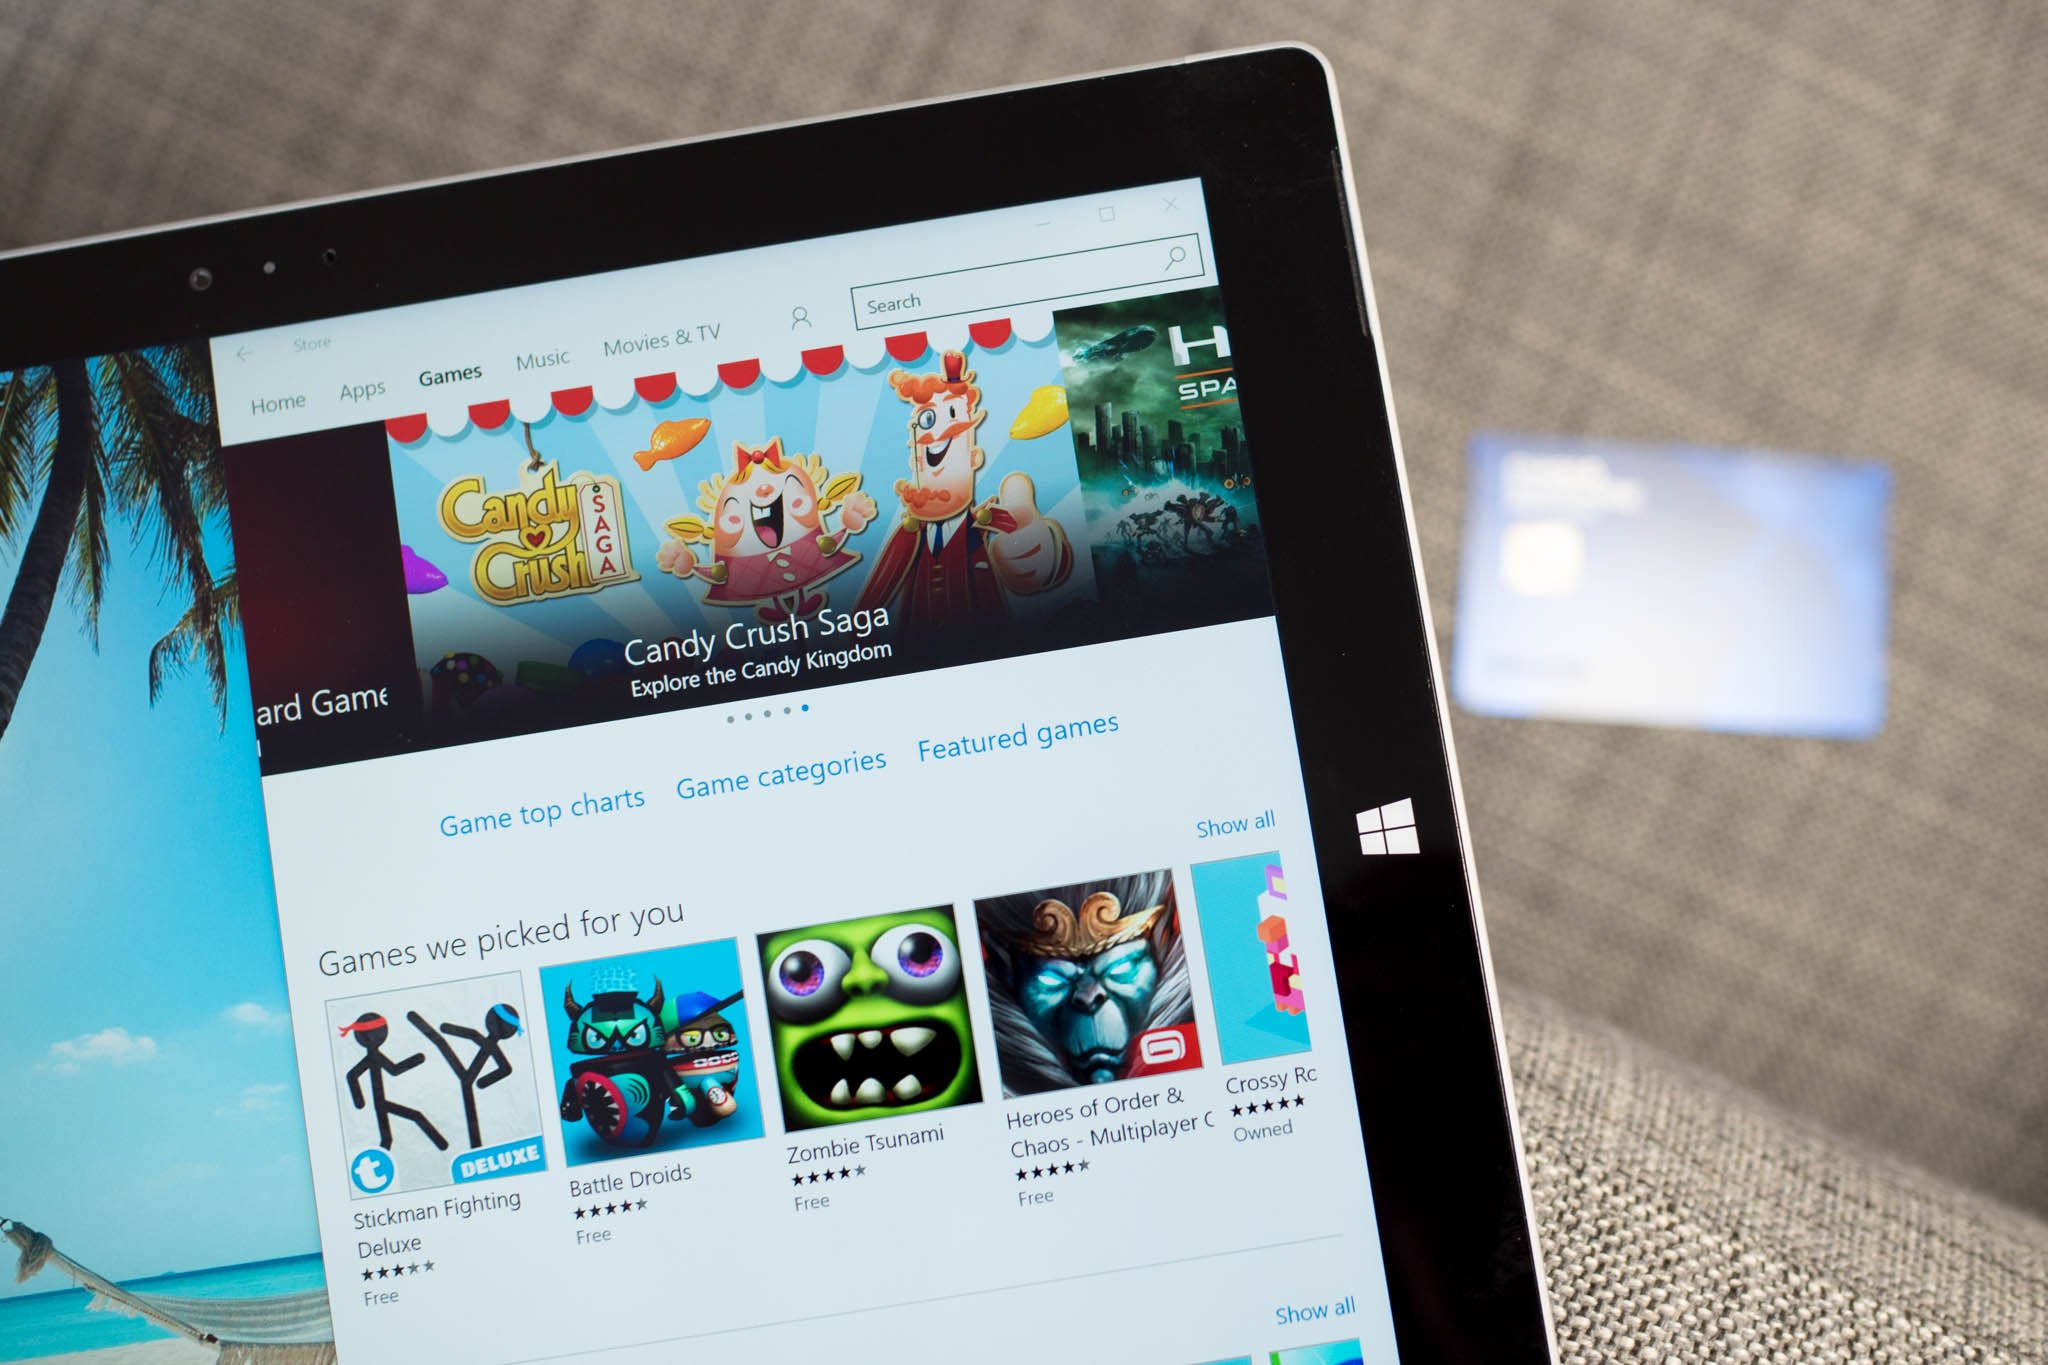
Once in the store, there are several ways to look for apps. You can browse the charts and categories if you're not sure what kind of app that you want. A good place to start would be the Top free apps list. We also recommend checking the Featured list.

Windows Store

Windows Store

If you know the name of the app you want, enter the name into the search box in the upper-right corner of the Store. You'll see results for apps that match your search. The results also show possible matching Games, Music, Movies, and TV Shows because you can get all of these things under in the same Store.

Selecting an app listing displays its description, screenshots, and reviews. Tap or click the install button that displays the app's price. If the app that you want to buy isn't free, you'll need to purchase it. You might have to add a payment method if it's your first time buying a paid app.

Windows Store Allrecipes

After the app is installed, the install button changes to Open. Tap or click the button to start using the app. You can find the app in the Start's app list next time you want to use it. You can also pin it to Start or pin to taskbar for quicker access.

For more tips, we have many more posts like this one in our Windows 10 help, tips, and tricks page.

How to stop getting Insider builds of Windows 10 Mobile

$
0
0

If you are currently a user of the Insider Program for Windows Phone, you may wonder how to disenroll. Likewise, if you are considering jumping into the Insider Program for Windows 10 Mobile you may want reassurance that you can leave at any time.

Much like the Insider program for PCs you can enroll and leave the program at any time. This ability means that you can sign up, grab the latest "stable" release, and then leave the program. Your phone stays on that build, and you do not have to risk getting unstable beta releases.

How Insiders can stop receiving new PC builds after Windows 10 launches

Microsoft's Windows 10 Mobile is expected to be officially released sometime in October or November. Those on the Insider Fast track are very likely to get it much sooner. However, once you get that build, you may want to sit out from the program. If so, you can elect to do so in a few easy steps.

How to stop getting Insider builds for Windows Phone

1. Launch the app

From your Start menu launch the Windows Insider App. If you need to re-install it just use this link for the Store.

2. Disenroll

From the ellipsis menu near the bottom open the menu and choose Leave the program

3. Sign in

To confirm your account you need to sign in again

4. Leave Program

On the Leave program screen select Continue to confirm

You are now disenrolled in the Windows Insider Programs for phones. You will not get any more OS updates through the service.

If you wish to change your mind at any point, just launch the Windows Insider App and re-enroll through the original steps.

Why you shouldn't worry if your phone is not on the official Windows 10 upgrade list

Microsoft has made it exceptionally simple to enroll and leave the Insider program. For those who's phone is not Windows 10 Mobile eligible through the official update, the Insider program is the way to do it. Once you get the final build later this year through the Insider program, you can leave the service and enjoy that build. The choice is yours!

More Resources

Need more information about the Windows Insider Program for Phone? We have you covered:

Windows Insider for Phone – All you need to know

How to install Windows 10 Preview to your Lumia Windows Phone

Windows 10 preview builds for phone are 'roughly' every month

How to roll back from Windows 10 Mobile preview to Windows Phone 8.1

How to view and delete browser history in Microsoft Edge

$
0
0

Microsoft Edge clear history

Forgot the site you were looking at yesterday? Don't worry; Microsoft Edge remembers your browsing history. We'll show you how to view your history and how to delete them after visiting some questionable sites.

How to view browser history in Microsoft Edge

  1. Tap or click the Hub. It's the icon on top with three horizontal lines.
  2. Tap or click History. It's the clock icon.

Microsoft Edge Hub

How to delete certain pages in browser history

Don't want other people with access to your PC or tablet to see your browser history? There are several ways to delete them. If you don't want to delete everything, there's a way to delete just some pages. To delete a specific page, right-click the item in the history list (see above) and choose Delete. You can also choose Delete all visits to the site.

Microsoft Edge Delete

How to delete everything in browser history

It's possible to delete everything in the browser history. From the History list, tap or click Clear all history on top. A list of all types of data appears. You can choose to check them all, or just select the items you want to delete. You can read more about the items in the table below before tapping or clicking the Clear button.

Microsoft Edge Delete History

DataWhat gets deleted
Browsing historyThe list of sites you've visited including your frequently visited sites.
Cookies and saved website dataInfo that sites store on your PC to remember your preferences, such as sign-in info or your location.
Cached data and filesCopies of pages, images, and other media content stored on your PC. The browser uses these copies to load content faster the next time you visit those sites.
Download historyThe list of files you've downloaded from the web. This only deletes the list, not the actual files that you've downloaded.
Form dataInfo that you've entered into forms, such as your email or a shipping address.
PasswordsPasswords that you've saved for sites.
Media licensesPlayReady/Digital Rights Management content licenses.
Pop-up exceptionsA list of websites that you have explicitly allowed to display pop-ups.
Location permissionsA list of websites that you have explicitly allowed to grab their location.
Full screen permissionsA list of websites that you have explicitly allowed to automatically open in full-screen mode.
Compatibility permissionsA list of websites that you have explicitly allowed to automatically open in Internet Explorer.

Whether you want to delete just some pages, or every single thing from your Browser history, Microsoft Edge has you covered. Don't forget that you can also temporarily browse in InPrivate mode if you don't want the sites to show up in your history. You can do this by tapping or clicking the three dots on the top right corner, and selecting New InPrivate window.

For more tips, we have many more posts like this one in our Windows 10 help, tips, and tricks page.

How to automatically post your Instagram photos as Twitter photos

$
0
0

Instagram Image Preview

I love sharing photos on Instagram, and 300 million other users feel the same, but I don't like the fact that my Twitter followers can't preview the images directly from my timeline. They need to click the Instagram link to view the photo. It used to work a couple of years ago, but Instagram has disabled photo integration with Twitter. The good news is that there's a workaround.

Instagram image preview

While tweeting links to Instagram photos is still possible, you can no longer view the photos on Twitter. The workaround is to use an IFTTT (ifttt.com) recipe that automatically posts your Instagrams as Twitter photos.

When you post on Instagram using any app like 6tag or the official Instagram app on Windows Phone, the photos will show up in your Twitter feed as full images rather than just links.

How to set up IFTTT to post your Instagrams as Twitter photos.

1. Sign in or sign up to IFTTT (ifttt.com) and then go to this IFTTT recipe page

2. Use the connect buttons to connect IFTTT with your Instagram and Twitter accounts.

Connect Twitter Instagram

3. Tap or click the Add button.

Add IFTTT recipe

4. After the recipe has been added, tap your IFTTT username on the top right corner and go to Preferences. Alternatively, you can use this link. Uncheck the option Auto shorten URLs. This makes sure that your tweets show instagram.com URLs instead of ift.tt.

IFTTT shorten

That's it! Next time you post a photo on Instagram, make sure to uncheck the Twitter option in the app because IFTTT will already automatically tweet it for you. Now your Twitter followers can both see a link to your Instagram link and a preview of the actual photo within their timeline. You are done. High five!

Will you be using this IFTTT recipe to show image previews or are you happy with just showing the Instagram URL in your tweets? Let us know in the comments!

How to search for files in Windows 10 with Cortana

$
0
0

Cortana Show photos

A quick way to get to your files in your Windows 10 PC is by using Cortana's search feature. Sure, you can use File Explorer and go browse through multiple folders, but searching will probably be faster. Cortana can search your PC and the web from the taskbar to find help, apps, files, and settings. We'll show you how.

1. Select the search box on the taskbar, and type what you're looking for. You can also tap or click the microphone icon if you'd rather say it.

Cortana Search

2. After you enter a search term, tap or click My stuff to find results for files, apps, settings, photos, videos, and music across your PC and even OneDrive.

Search receipts

Search results

That's it! It's that simple. There are also few neat tricks that Cortana can do when searching for files. She understands phrases in natural language. For example, try asking Cortana:

  • Show photos from last week
  • Show me photos from Philippines
  • Show documents from last Monday
  • PDF files from July

Sortana show photos

The search results are listed within Cortana above the Taskbar. Tap or click the photo, document, or file to open it in its corresponding app.

How do you like the search feature in Windows 10? Has it been working well for you? Let us know in the comments!

Note: Cortana is only available in certain countries/regions, and some Cortana features might not be available everywhere. If Cortana isn't available or is turned off, you can still use search. For more tips, we have many more posts like this one in our Windows 10 help, tips, and tricks page.

3 Tips to help you get the most out of OneDrive in Windows 10

$
0
0

There is no doubt that OneDrive is perhaps the best cloud storage service for a Windows 10 PC. Yes, there are many different cloud storage services out there, such as Google Drive, Dropbox, Apple's iCloud, Box, and others. However, if we can move past the placeholder dilemma for some users, you'll see that OneDrive offers the best integration with Windows 10.

On a previous article, Richard gave us a number of very good reasons why you should OneDrive. Today, we're going to go through a few tips you can use to get the most out of the cloud storage service from Microsoft.

Tip #1 - Remote access to your files at home

Of course, the purpose of OneDrive is to offer online storage, a place where we can safely sync files between devices – computers, tablets, or smartphones. However, what happens when you forget to upload the presentation you have created at home and you need it for the next meeting at work? Or you happen to need an application on another computer and the only installation files are located on your computer at home?

If you don't like to upload every file to OneDrive, or you simply forgot to upload specific files to the service, Microsoft has your back with the Fetch feature in OneDrive. When you enable Fetch, you can have access to all your computer files on the OneDrive website. Even more interesting, you can also access network locations, such as those included in the libraries and mapped drives.

The Fetch feature is very impressive, as it allows you to download a copy of any files from anywhere, and you can also stream videos and view pictures remotely right from the web browser. But remember, it all works as long you have your computer turned on and connected to the internet.

If you like the idea of accessing your private files from the internet, you also need to make sure the feature is enabled:

  1. From the notification area right-click the OneDrive icon and click Settings.
  2. Then make sure to check Let me use OneDrive to fetch any of my files on this PC.
  3. Click OK to finish.

That all you have to do, you don't have to configure your router or firewall -- it just works.

Now, open your web browser sign-in to your Microsoft Account, and under PCs, click the name of your computer. Then, you should be able to see the location available to you, including Favorites, Libraries, and This PC. These allow you to have access to the **C:**, internal and external connected drives.

Quick Tip: Make sure you enable Fetch and test the feature by trying to access the files. If it doesn't work, right-click the OneDrive icon in the notification area, click Exit, and launch the app again from the Start menu.

It's a great feature that can save your day at any moment, but there are a few things to keep in mind. For example, Fetch is not supported on PCs running Windows 8.1, and you can use access files from Mac computer, but you can't access files on a Mac computer using OneDrive. Also, you may also be asked to enter a verification code. So, fetching works best on PCs running Windows 10.

Tip #2 - Accessing OneDrive files from a different account in Windows 10

If you don't have an Office 365 subscription, or you're not paying to get more storage in OneDrive, or you don't want to keep all your files in one account, you probably have multiple OneDrive accounts. However, because you're likely using your main Microsoft Account to sign-in to Windows 10, you only have access one OneDrive account at a time through File Explorer.

What you probably did not know is that the OneDrive app allows you to connect to a different account while staying logged in with your main Microsoft Account in the operating system.

Connecting a different OneDrive account to your computer without changing your current Microsoft Account in Windows 10 is very straight forward process:

1- From the notification area right-click the OneDrive icon and click Settings.

2- On the Unlink OneDrive section, click the Unlink OneDrive button.

3- Then you'll be presented with OneDrive setup wizard, click Get started.

4- Sign-in with new Microsoft Account you want to access to OneDrive. Keep in mind that this process won't change your current profile settings, you'll be able to sign-in with your old credentials.

5- Next, change the location to store the new OneDrive files or keep the same path, and click Next. Make also sure you understand that if you don't change the folder location, and the folder already exists, files will merge with OneDrive.

*6- Click Next, choose the folders you want to sync, and don't forget to enable the fetch feature if you want to access the files remotely.

7- Click Done to finish.

This useful OneDrive feature allows users to keep things separate. Or perhaps, you're main Microsoft Account doesn't have enough space, and then you can use that secondary account with more storage.

While this is a good feature, in my opinion, it would be nice if Microsoft had the option to access multiple OneDrive accounts without having to log out from your primary OneDrive account.

Tip #3 - Restoring files and emptying your Recycle Bin

If you're using OneDrive to sync files between computers, you typically create, access, and delete your files through File Explorer. But what happen when you accidentally delete a file and empty the Recycle Bin? If you didn't have a backup, you probably think that your files are gone forever.

Well, here is something that not too many people know. If you delete a file from your OneDrive folder, a copy of the file goes to the Recycle Bin in Windows, and another copy goes to the OneDrive's Recycle bin. Emptying your computer's bin, doesn't delete the bin on OneDrive. As such, you can always restore files you have deleted on OneDrive, and it's as easy as:

  1. Signing into your OneDrive account using your web browser.
  2. From the left OneDrive menu, click the Recycle binlink.
  3. Find and select the file you want, and click Restore from the menu on the top.

Now according to Microsoft the files in the Recycle bin do not count as part of your storage. However, if your Recycle bin hits the 10% of your allowed storage, then files will begin to get deleted from the oldest to the newest. The company also warns that files will get permanently deleted after a minimum of 3 days and max of 60 days.

If you want files to get permanently deleted right away, you will need to delete the file or files in questions. Next, head over the OneDrive Recycle bin on the web, and empty the trash can.

Wrapping thing up

OneDrive isn't just about storing your files in the cloud. The service also provides some features to have access to your files no matter where they are located, even when they're not stored online. And if you happen to delete a file accidentally, no worries, you can always get it back.

Do you have a favorite feature of OneDrive? Let us know in the comments below.

More Resources

Remember that we have many other articles on Windows 10, if you need help you always check these other resources:

Our definitive review of Windows 10

Windows 10 on Windows Central – All you need to know

Windows 10 help, tips, and tricks

Windows 10: Help and discussion forum at Windows Central
How to use Task Manager to optimize your Windows 10 experience

$
0
0

We're continuing our series of Windows 10 "How To" guides with a look at the Task Manager.

It's likely that many of you are already well acquainted with the Task Manager. However, if you're still learning how to get the most out of Windows 10 then look no further!

The Task Manager has been a Windows staple for many years. It's important because it offers data on how your PC is performing, in addition to showing what tasks and processes are currently being performed. Since W8.1, it became even more powerful, offering further data and tools to help optimize your PC or tablet experience.

Let's take a look!

CTRL+ALT+DEL - Accessing the Task Manager

First, you're going to want to open the Task Manager. There're a few ways you can do this.

  • Probably the most widely-used method is by pressing CTRL+ALT+DEL (also known as the "three-finger-salute") on your keyboard simultaneously. It opens the Windows Security Screen, which offers quick access to various functions, including the Task Manager.
  • You can also use the key combination CTRL+SHIFT+ESC to open the Task Manager directly.
  • You can simply type "Task Manager" into the Start Menu or Cortana search box.
  • You can also access it by right-clicking the Start button and selecting it from the quick menu there.
  • If you want to be really fancy, you can just ask Cortana, "Hey Cortana, open Task Manager."

Once you're in, you'll be presented with either the compact Task Manager or full Task Manager, as seen below. If you're in compact view, simply hit "More Details" at the bottom to access the full Task Manager. It should open to the Processes tab by default.

Understanding Processes

As a former PC support guy, Task Manager's Processes tab was often the first point of call to assess system stability problems. Be sure you're running in full view by clicking "More details" at the bottom of the window.

  • Clicking the "Name" column header will sort every process using system resources alphabetically. It also splits the processes by type.
  • "Apps" at the top signify programs that are open on the desktop.
  • "Background processes" gives you an overview of what software is running behind the scenes.
  • "Windows processes" at the bottom is similar to background processes. However, these tasks relate specifically to running Windows itself and altering them may induce system instability.

If you right click on the columns, you can snap in further information. Adding a "publisher" column can help you identify processes that seem unfamiliar, this is particularly useful if you've gotten stuck with malware programs delivering ads and hijacking your browser. The most important columns are probably the resource usage columns, however, as they show which programs are hogging memory or processor usage.

  • Clicking on the resource column header will sort what programs or services are utilizing your hardware the most.
  • You can see in the screenshot here that Microsoft Edge is using a fairly significant amount of resources, likely because I have a ton of tabs open.

  • You can kill the process by right clicking and selecting "End Task", this forces apps to close.
  • Be careful though, tasks listed as a "Windows process" under the "Type" column should not be ended in most cases. Closing them could cause system instability.
  • If a process is unfamiliar, you can always right click and "search online". Doing so on the Windows service called "Antimalware Service Executable" offered tips to reduce its CPU usage, for example.
  • The right click menu has other useful tools. "Open file location" allows you to find the .exe file associated with a process. This method can be useful for creating shortcuts from original files or finding .exe file paths for use in other programs.

If you want even more detail on the services running on your PC, right-clicking on a process and selecting "Go to details" will take you to the Details tab. Here you can view in-depth statistics about the processes and services currently running or suspended. From this tab, you can also view the Windows Services associated with a program. Most of the time it won't be necessary to view this tab, particularly as the services running there often pertain to essential Windows functions.

Familiarizing yourself with the processes that run on your system is essential for maintaining a healthy PC. Let's look at how you can use the Task Manager to optimize your experience.

Using Task Manager to optimize your PC's start-up time

As PCs have grown more powerful, programs have also become more complex. If you use a lot of desktop apps that didn't come from the Windows Store, you may find that they boot up along with Windows, slowing down your computer at start-up. Programs that can run at start-up usually allow you to disable this behavior, but finding that option can be cumbersome. Luckily, Microsoft introduced the "Start Up" tab into the Task Manager in Windows 8, and it's carried over into Windows 10.

Using this tab, you can view which programs can run on a system start and disable them at will. To do this, simply right click and select enable or disable. The tab will even tell you how many seconds each program adds to the boot time of your device.

The above is true for older desktop-based x86 .exe programs, but Universal Windows 10 apps from the store work a little differently.

Using Task Manager to optimize Universal Windows 10 app usage

Windows 10 Universal apps can run in a suspended state while still delivering notifications and live tile updates. If you're currently on a metered connection or want to do everything you can to streamline your battery life, Task Manager's "App History" section can help you to do just that.

It shows you which apps are generating the most amounts of data and CPU usage over periods of time, even while the apps are closed. Windows 10 is optimized well when it comes to suspending apps and dynamically lowering resources to save on battery power, but the information is there if you want it.

You can alter which apps can perform tasks in the background by going to Settings > Privacy > Background apps. Regular x86 .exe programs generally won't run in the background unless they're open or minimized to the system tray. To prevent those from using resources simply block them from the Start-up tab as outlined in the above section.

Get acquainted with your PC's hardware using the Performance tab

The Performance tab doesn't give you a huge amount of information, but it's a useful reference point for understanding the nature of your hardware. The graphs provide a continuous stream of data, which can help diagnose irregular spikes in resource usage.

  • Each segment provides information on that particular type of hardware, including the amount of resources available, resources in use and even the model name.
  • You can copy information to the clipboard easily by right-clicking and hitting "copy" on each graph. It can come in handy if you're trying to diagnose a PC problem with your device's technical support team and need to send them an email.
  • If you want to monitor your PC hardware continuously, right-clicking on the left side bar allows you to condense the Performance tab into a "Summary view".

If you want more detailed information, such as battery life or heat monitoring, you might want to pick up an app like HWMonitor or Open Hardware Monitor.

Task Manager is your friend

When programs freeze up or go rogue, Task Manager is on hand like a personal computer sidekick. I'm sure at least a few of you reading this can find some unnecessary programs to disable from the Start-up tab. I know I did while writing this.

Do you lovely people use Task Manager? Do you have any handy tips and tricks? Stick them in the comments!


How to overcome the placeholder limitation of OneDrive in Windows 10

$
0
0

Windows 10 has been out for over a month now, and thus far the operating system is hit with more than 75 million computers already upgraded. While the new operating system brings a lot of new features and changes, Microsoft is also removing what it feels isn't working or moving features in a different direction.

I've been following the Windows 10 changes since the first public preview, and among other things, one feature that has changed is OneDrive.

In the new operating system, Microsoft is removing the OneDrive modern app, and it's integrating the cloud storage service deep into Windows 10 with the desktop. But the problem is that everyone didn't exactly welcome all of the new changes.

When the company launched Windows 8.x, OneDrive included a feature known as "placeholder", which is a file that locally represents a file stored in the cloud. A placeholder is a very small file that only includes a thumbnail and metadata information that points to the original file and most of the time it uses a fraction of the local storage on your computer.

Thanks to placeholders users were able to access hundreds of gigabytes of data quickly and easily without using a lot of their local drive, which was also very beneficial for devices with limited storage.

However, the feature became a problem for Microsoft, as many users didn't realize placeholders weren't the actual files. To open the file, the end-user had to double-click a file to trigger the download, which consequently opened the file with its corresponding application. As a result, if the user didn't make the files available offline, without an internet connection they couldn't open any file.

To resolve the issue, Microsoft removed placeholders and introduced selective sync, which forces users to select what folders to sync locally. But, this means that if you have 100GB worth of data in OneDrive, those 100GB will download to your local machine as well.

While we can't technically bring the exact feature back to Windows 10, we can still mimic the same functionality by mapping OneDrive to your computer.

Mapping your OneDrive storage to your PC will allow you to browse all your files instantly. There is no syncing process, and you can create, rename, and delete files at any time.

However, keep in mind that none of the files will be available offline, and moving large files can result in a slow experience.

Here is the process:

  1. Open your web browser and sign-in to your OneDrive account, navigate to Files, and access any of the folders.
  2. Next, you'll need your unique CID ID from the address bar link, which looks something like this: "https://onedrive.live.com/?cid=777abc888dd9aaa89%1234". The ID is what comes after ?cid=. From my example, the cid is: 777abc888dd9aaa89. (Ignore anything that separates the ID such as %, &, etc.)
  3. Go to This PC and from the menu, go to Computer, and click Map Network Drive.
  4. In Folder enter this URL: https://d.docs.live.net/ and append the CID ID. The URL should now look like this: https://d.docs.live.net/777abc888dd9aaa89.
  5. Check the Reconnect at sign-in and Connect using different credentials, then click Finish and enter your OneDrive credentials and you're good to go.

You're now done. You should see the mapped drive on This PC, and you should now be able to access your files in a similar way, you used to do with placeholders.

It's worth pointing out that this solution may or may not work for everyone in the same way. Also, you can only mount one OneDrive account at a time -- you'll run into issues trying to mount a second account. I have tested the workaround, and it has worked for me.

More Resources

Remember that we have many other articles on Windows 10, if you need help you always check these other resources:

Our definitive review of Windows 10

Windows 10 on Windows Central – All you need to know

Windows 10 help, tips, and tricks

Windows 10: Help and discussion forum at Windows Central

Here is how to install Media Center on Windows 10

$
0
0

Windows Media Center hack now available to run on Windows 10!

Microsoft's Windows 10 is a big hit with many users, but not all PC users are happy with the upgrade. The depreciation of Windows Media Center began way back in 2009, but fans of the media add-on have been clinging on to it ever since. Indeed, if you were lucky enough to have Media Center on your PC, the app would uninstall with the Windows 10 upgrade. Instead, users were given a free DVD player as a consolation prize, which hardly makes up for the loss of functionality.

Now, users at the MDL forums have managed to create an all-in-one package to reinstall Windows Media Center on current Windows 10 builds (including 10240 and 10532). The project had been in the works for a few weeks now, but starting a few days ago users could successfully install the center to their PCs. The site Windows Blog Italia wrote up on how easy it is to accomplish and indeed, we were able to successfully install it on our PC with ease.

Install Windows Media Center on Windows 10

Note:Before we start, we should caution you are download files from an unofficial source. As such, you should heed with the utmost caution when installing as this constitutes a security concern. Although there are no known side effects make sure you have your PC backed up just in case.

1. Download

Download and extract WindowsMediaCenter_10.0.10134.0.zip from this address.

2. Run

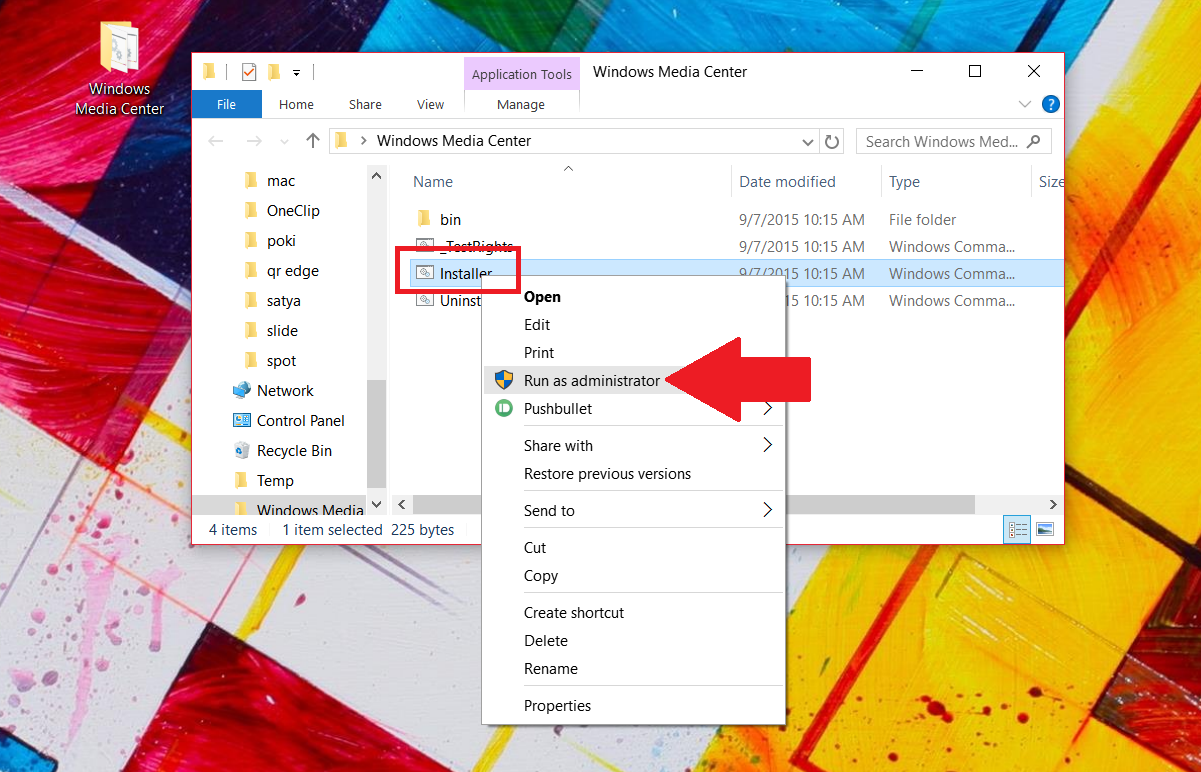
Right-click on _TestRights.cmd and click Run as administrator

3. Reboot your PC

4. Run 2

Right-click on Installer.cm and click Run as administrator

5. Exit

After the installer runs, click any key to exit

Now, doing a simple search for Media Center reveals the app installed on your PC. You can then pin it to your Start menu or taskbar for quick access. Due to our configuration we have not confirmed how well it runs with a TV signal setup, so your mileage may vary. Otherwise, despite looking like a throwback to Vista, the app runs just fine on our new 2015 Windows 10 machine.

Let us know in comments if Media Center is something you still you use and whether you will be using this workaround!

Source: MDL Forums (registration required); via Windows Blog Italia

How to remove the Evaluation Copy watermark from Windows 10 for Insiders

$
0
0

When you sign up to be a Windows Insider not only do you get the latest version of the Windows 10 OS before the general public you are also a part of a larger experiment. As such, more data is collected to improve the OS and the version you are running is merely one of many builds.

Perhaps one issue that bothers people is the Evaluation Copy watermark that sits in the lower right-hand corner of the desktop. This watermark looks like this:

In the scheme of things this is a rather small "sacrifice" we make to get the new features. Still, a watermark is a watermark, and it effectively blemishes your desktop appearance. Today, we will talk about how to remove it.

Word of caution

Unlike some easy registry tweaks, for simplicity today we are relying on an external application called Universal Watermark Disabler. This app does all the work for you, but it does not come without risk. What this app does is more than just change a 1 to a 0 in the registry. Instead, it is altering system files, specifically basebrd.dll.mui and shell32.dll.mui.

Such changes to the OS should raise a flag of caution, and I advise being thoughtful when installing and using some 'hack' apps. Having said that, there is nothing devious about Universal Watermark Disabler, but I do not recommend making it habit to modify constantly aspects of your system files. Sooner or later you are likely to break something, and the result could range from disastrous to simple instability.

Because of this I always recommend you do a full system backup and take the time to learn what the trick in question is doing. The good news about today's trick is that there is an "uninstall" button that lets you reverse the action. Just remember, these kinds of apps are not future-proofed, may not work in all situations, and could break something later on.

So long as you are aware of all of that, we can now move forward.

Universal Watermark Disabler

To remove the watermark from Windows Insider we are just going to run a simple app and agree to the file changes. The process here actually takes less than 30 seconds, but we'll walk you through the procedure.

Note to complete the process you do need to log off and back on the system, so make sure you save any work before you begin.

1. Download

Grab Universal Watermark Disabler from the author's site found here. We are using version 1.0.0.6 of the app, which was last updated in January of this year. We tested it on Windows 10 build 10532 with no ill consequences. The app is freeware although you can make a donation to the author PaintR if you enjoy it. Here are some of its functions:

  • Supports all builds from Windows 8 7850 to Windows 10 10240 (and newer).
  • Supports any UI language.
  • Does not delete branding strings (i.e. does not modify system files!).
  • Removes any watermarks including BootSecure, Test Mode, Build string in evaluation and pre-release builds, "Confidential" warning text and even the build hash.

2. Run (and or extract)

Download uwd_[winaero.com]_617.zip to your computer. You can open it natively in Windows and (a) run the .exe file directly or (b) extract and run the app.

Inside the .zip is a 610 KB file called uwd.exe. You can double-click to run the file and you are presented with a warning screen to a User Access Control warning screen. If you agree, hit Yes.

3. Install

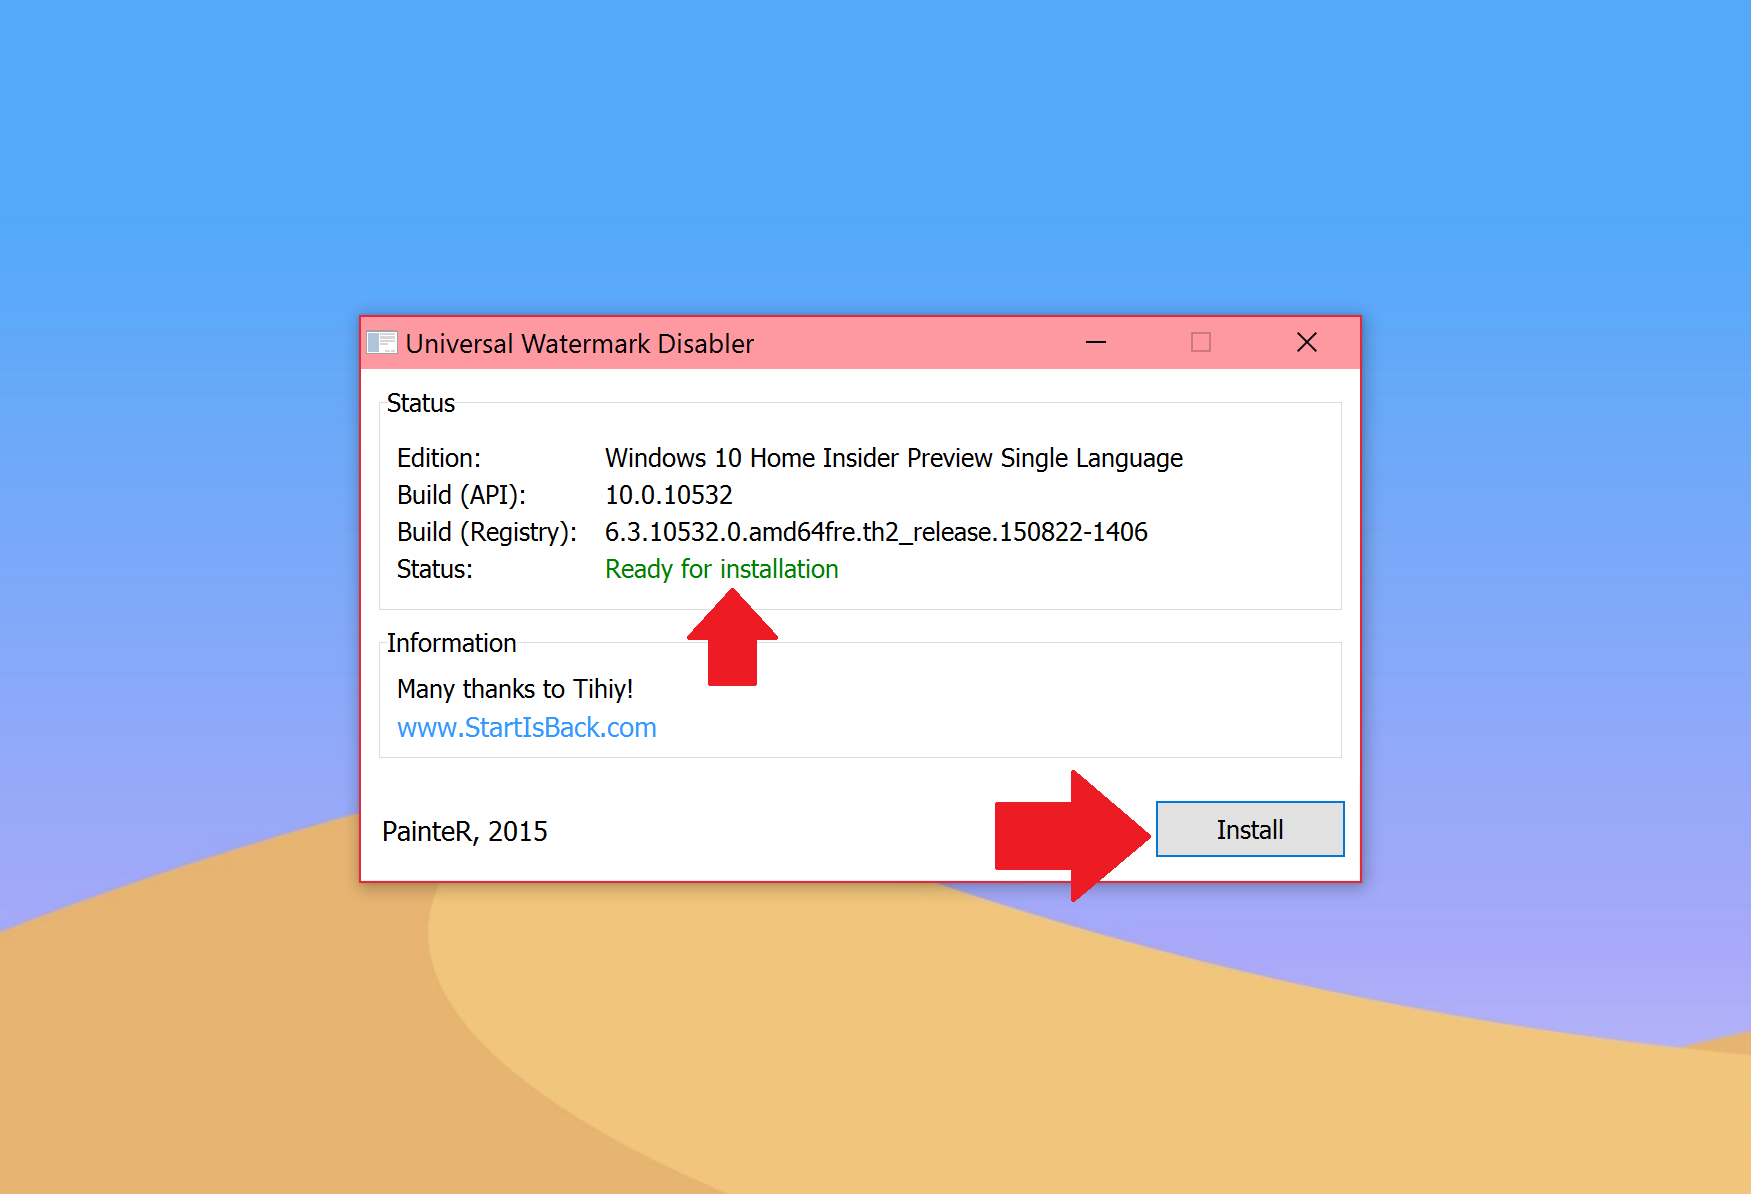
Assuming your status is green and stating Ready for Installation just hit the Install button. You should see a warning affirming You are going to install on the untested build. Continue? Hit Yes.

4. Sign out

The application kills explorer.exe process during the procedure. You will experience this as a "crashing" of part of the OS including the Start and Taskbar disappearing. Do not worry as this is normal. The application notes You will be signed out automatically. Save all your work and click OK at which point it is advised to hit OK.

That is all there is to do. Once you log back on you should notice that the watermark is now removed, leaving you a pristine desktop.

However, if you wish to put things back just re-run uwd.exe and now, instead of Install in the lower right corner you should see Uninstall. The process works in reverse and returns basebrd.dll.mui and shell32.dll.mui to their normal state .

Overall, the process is rather simple, but due to the higher risk level we have taken the time to show you what to expect.

Remember, you should do a proper backup just in case, and personally, I would advise returning to the watermark status before taking the next Insider Build. Regardless, if the watermark irks you, there is at least one solution to the problem. It is also worth noting you do need to repeat this after installing a newer build of Windows 10, so make sure to bookmark this page for future reference.

Let us know if you're going to take the plunge or just live with the badge of being an Insider in comments!

Source: Winaero

More Resources

Remember that we have many other articles on Windows 10, if you need help you always check these other resources:

Our definitive review of Windows 10

Windows 10 on Windows Central – All you need to know

Windows 10 help, tips, and tricks

Windows 10: Help and discussion forum at Windows Central

How to change the PIN in Windows 10

$
0
0

Set up PIN

You can use a PIN code in Windows 10 to sign-in to your PC, Store, and other services. If, for some reason, you need to change your PIN, it is really simple. We'll show you how. Follow these simple steps.

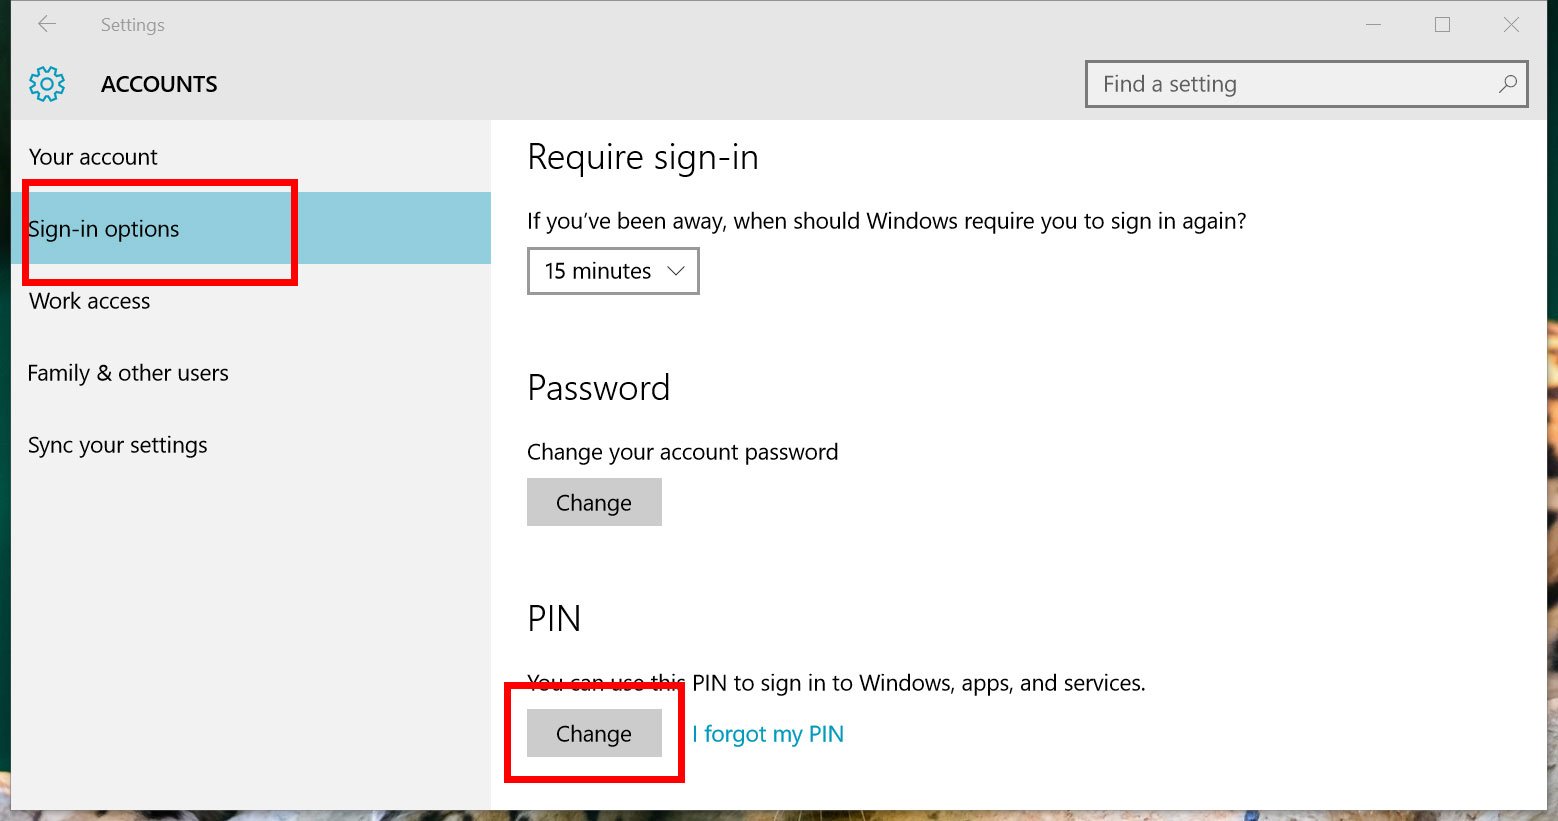
1. Open Settings (keyboard shortcut: Windows + I) > Accounts> Sign-in options

Settings Windows 10

2. Tap or click the Change button under PIN

Settings PIN

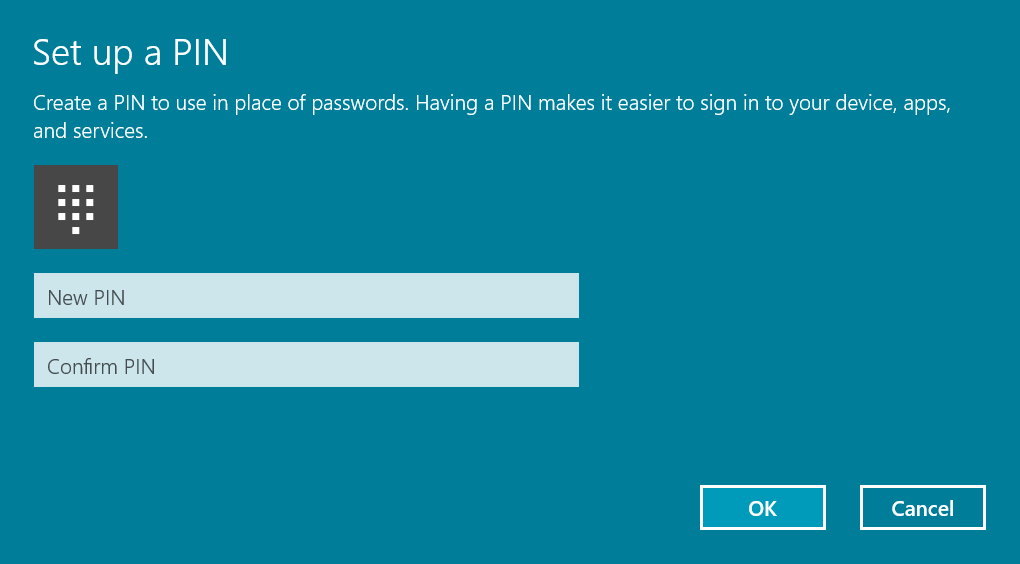
3. Enter your current PIN, then enter and confirm the new PIN underneath

Windows 10 PIN

That's it! We told you it was easy. But what if you forgot your pin?

How to reset the Windows 10 PIN

Follow these steps if you need to reset your pin:

1. Open Settings (keyboard shortcut: Windows + I) > Accounts > Sign-in options

2. Tap or click I forgot my PIN.

Forgot PIN

3. You'll get a warning that you'll need to log in from scratch to access games, social networking, and more. Tap or click Continue.

Are You Sure

4. Enter your Microsoft account password and then set up the new Pin.

Setup pin

And that's all you need to do. If this guide was helpful, we have more posts like this in our Windows 10 help, tips and tricks page.

How to get an animated desktop in Windows 10 with DeskScapes 8

$
0
0

Microsoft's Windows 10 offers users many ways to customize the OS. Indeed, we have a rather large article detailing all the methods by which you can make Windows 10 yours. One throwback style has an animated desktop. Indeed, yesterday you may have seen my Instagram video showing one in action featuring the famous Windows 10 logo from the new login screen.

Today, I'll show you how you can do the same using a third-party app called DeskScapes 8 from Stardock!

The 'duh' moment

Before we get started, I should point out the obvious. Using an animated desktop on a laptop, older computer, or even a newer one with lower-end specs is probably not the best idea if you are concerned with battery life and graphics performance. There is no doubt that in using such a setup you could tax your system just to make it look fancy.

Of course, if you are running a high-end rig with CPU and GPU cycles to spare, there is nothing wrong with doing this trick. Indeed, I am running it on two Core i5 desktop systems (Intel Skylake) with plenty of RAM and two rather high-end GPUs (an NVIDIA GeForce GTX 960 and 970, to be precise).

If you want a more accurate estimate having an animated desktop will consume between 6-9% of CPU with an average of around 7 percent. Although that is not terrible, it could constrain your setup if on an older rig. The good news is not only can you pause your animated desktop you can quickly just switch to a static image at any time saving your precious CPU for when you need it.

Why the tutorial?

Besides just explaining the basics there is one other issue. DeskScapes 8 gets its name because it is made for Windows 8 systems. It can run on Windows 10 however if you just try to install it you are going to get an error message.

This impediment is very easy to get around, and I'll show you how to get it going. That said, the reason this is not meant for Windows 10 is the app is not optimized for the newer OS and, as such, Stardock cannot guarantee performance or any issues. So do this at your own risk.

Let's get started!

Animated desktops in Windows 10

Before we being, you need to download the DeskScapes 8 installer. The app has a free 30-day trial and costs $9.99 for a single license. Having 30 days to try this app is more than enough for you to decide if you want to justify the $10 price tag.

Besides the preinstalled animated desktops within the app, you can also create your own or navigate to the site WinCustomize to download ones the community has made. There are quite a few, so you should find something to pique your interest.

1. Download

Head to Stardocks' site and grab the installer. Agree to use the 30-day trial and download.

2. Compatibility Mode

The trick to running the app on Windows 10 is to use compatibility mode. This feature is an old function from previous releases, and it works well here for the installer. Right-click on DeskScapes8_cnet-setup.exe and choose Troubleshoot Compatibility.

3. Troubleshoot Program

You should be presented with two options. Select the second one Troubleshoot program.

4. Earlier version

Next, choose the first option The program worked in earlier versions of Windows but won't install or run now from the menu. Hit Next to proceed.

5. Version choice

On the next menu, select Windows 8 and hit Next.

6. Test it

Next, choose Test the program… This part is where it gets tricky. Normally, the program just launches, and you can then proceed with Next. However, this is an installer we are running so you should see a blinking Windows shield ( User Account Control ) icon appear in the taskbar.

Note that it won't be an active window so you could miss it if you are not looking for it. Click on it and agree to let the installer run.

7. Install

Now you can finally install the program to your computer. During the process, you will be asked if you optionally would like to install Decor8 , another Stardock app. I advise against this only because the app is to customize the old Start Screen in Windows 8 and is not very relevant for Windows 10. Make sure you have the box unticked, and the proceed.

8. 30-day Trial

Stardock lets you try DeskScapes 8 for 30 days. However, you still need to register and let the app verify the trial to begin. The process is simple only requiring an email and a verification link. This action starts the trial period. Although not as convenient as just using a non-phone-home program Stardock likely does this to cut down on piracy, so cut them some slack.

Exit Compatibility

It should be noted that once you hit Test the program… you ran the full app installer. As such, at any point you could just hit Cancel on the compatibility mode window as we already got what we wanted. Still, if you did not do so, you can now hit Cancel. There is no need to re-run using Next.

That's it! You now have DeskScapes 8 installed on Windows 10. Here are a couple of other tidbits:

  • You can pause DeskScapes 8 at any time by right-clicking on the desktop and selecting Pause DeskScapes
  • For multi-monitor setups , you can run DeskScapes on all windows or choose one for each display. For instance, you could have an animated main display with a secondary (and tertiary) monitor running a static image. Likewise, you could put a different animated wallpaper on each monitor. The choice is yours!
  • Grab new backgrounds from the site WinCustomize. Just find the image/animation you want and download to your computer. Double clicking on the download enables it through the app, and you can create a directory to add more
  • While DeskScapes is running, you may have trouble moving files or folders on the desktop. You can always choose a regular wallpaper through Windows Settings > Personalization and then re-arrange your files or folders, then re-enable DeskScapes. Those files or folders are accessible so you can launch apps and open the folders you just cannot re-arrange them when the app is running. Logging off and on again seems to fix the issue.
  • Deskscapes has quite a few options in it including transparency for your desktop icons , which is an added neat effect that I recommend
  • If you have a Windows Insider watermark on your desktop, you can read our other tutorial on how to get rid of that for a cleaner look
  • If the app does not enable an animated wallpaper, and you have just a black background, try to log off and back on again then re-launch DeskScapes 8
  • If running multiple Windows 10 computers , you may want to head into Settings > Accounts > Individual sync settings and disable Theme. This action prevents Windows 10 from trying to sync your DeskScapes to your other Windows 10 computers, which obviously does not work.
  • DeskScapes 8 can auto-pause when AC power is disconnected meaning you can use this on a laptop with little impact

For those who want the new Windows 10 login screen with the fancy Windows logo and lasers, you can find it on WinCustomize (link below). The theme is made by AzDude, who is one of the most prolific creators on that site. The version I use is Windows 10 v1 (link) although he has a few variations out there, so try them all and use what you think looks best.

Overall, DeskScapes is running rather well on my PC, and I have no issues or complaints. This program is a rather high-end way to customize your PC, but there is little denying that it has a certain wow appeal to it. Whether you will like it and want to pay the $10 is up to you, but at least you now know how to get it on your PC.

There is no word if a Windows 10 version is on the way, but we'll keep you posted if we hear anything.

More Resources

Remember that we have many other articles on Windows 10, if you need help you always check these other resources:

How to customize your Windows 10 experience

Our definitive review of Windows 10

Windows 10 on Windows Central – All you need to know

Windows 10 help, tips, and tricks

Windows 10: Help and discussion forum at Windows Central

Viewing all 5861 articles
Browse latest View live


Latest Images