Quantcast
Channel: Help & How To
Viewing all 5861 articles
Browse latest View live

2 must-know Windows 10 keyboard shortcuts for PC gamers

$
0
0

Window management on PC can be a pain for games, but there are some handy Windows 10 keyboard shortcuts that make it easier.

Recently I was playing a Windows 10 game for the Microsoft Store, which typically run in Universal Windows Platform (UWP) windowed-mode containers, but I wanted a way to easily switch the game between a borderless fullscreen mode and a regular resizable window. Thankfully, there are a couple of keyboard shortcuts that can make the process a lot easier.

Note: These keyboard shortcuts work across any UWP game from the Microsoft Store, but various Win32 classic games from distributors like Steam won't always support them, particularly when it comes to dynamic display resolution scaling.

How to move a Windows game window between monitors

You can easily move a UWP game from one monitor to the other using the following key combination:

  • Hold down the Windows key and Shift, then press the Arrow keys.

Using these keys you can direct your window across to a second connected monitor, and if it's UWP, it will automatically scale to match the new display resolution. Sometimes you might have to use this key combo to circumvent issues that can arise when using a mouse to drag a game window to a second monitor.

Bear in mind that you might need to run the game in windowed mode to switch over to a second monitor using this method, which brings us to the next shortcut ...

How to switch between fullscreen and Window mode for games

Switching between fullscreen for a UWP game is useful for capturing footage using the Windows 10 Game DVR. Otherwise, the capture system will also capture the title bar and the borders of the window. Use the following command to easily switch between fullscreen and window mode.

  • Hold down the Windows key and Shift, then press the Enter key.

This method is handy when the game itself doesn't provide window sizing options, as seen with some UWP games. It works with some Win32 games, but not all.

More on Windows 10

If you have any more handy keyboard shortcut tips for gaming, let us know in the comments!

For more tips, coverage, and answers on Windows 10, you can visit the following resources.


Rainbow Six Siege Operation Para Bellum: Tips to master Alibi and Maestro

$
0
0

Whether mastering illusions or overseeing attackers, there's a lot to learn in Rainbow Six Siege's Operation Para Bellum update.

Tom Clancy's Rainbow Six Siege is about to receive its latest post-launch expansion, with the release of Operation Para Bellum. Introducing some of the game's biggest changes yet, the update adds two new playable Operators, a new Italian multiplayer map, and various other content.

In the wake of Operation Para Bellum, new defenders Alibi and Maestro take the spotlight. With new abilities to harness and tactics to counter, you'll need to be prepared to stay on top of the game. Here you'll find breakdowns of what these Operators can do, tips for using them, and our recommended loadouts.

Rainbow Six Siege Operation Para Bellum: Everything we know

See at AmazonSee at Microsoft

Alibi tips and tricks

One half of this season's duo is Alibi, an Operator touting three speed and one armor, and leveraging holograms to deceive foes. As an expert in illusions, Alibi utilizes throwable "prismas" to display holographic decoys of herself. Up to three projectors can be placed per round, which each summon a stationary bait for attackers. However, if enemies shoot or walk through these holograms, they'll be marked for the whole defending team. This establishes a new factor to gameplay, where attackers should think before pulling the trigger.

Tips for playing as Alibi

The visual similarity between Alibi and her decoys is one of her greatest strengths. It's hard to distinguish the two at first glance, making her ability most effective when enemies are under pressure. The positioning of these holographic figures plays a significant role in guiding hostiles into elaborate traps.

In general, these projections are most effective for locking down key angles from peeking attackers. Luring foes into close encounters with decoys can cause them to shoot by reflex, especially when used in tandem with other defensive tools. Once teams begin to adapt to Alibi's presence, this tactic should remain effective even against skilled players.

Holograms can also be used in creative ways, by placing them in key chokepoints and closing them with a makeshift proximity sensor. If an enemy or their drone chooses to pass through a hologram, their position will be flagged for a brief period. Placing holograms as cover will punish enemies who miss their shots, shifting engagements in your favor.

Alibi's presence triggers a global gameplay change that prevents defender identities from being revealed if they step outside. Although roamers will still be marked and tracked, a question mark will replace their Operator icon.

Prima decoys are also flagged up when thrown outside, in a similar style to real players. Although they'll only be marked for 10 seconds, this short period can still draw attackers searching for eager roams. Use this smartly to draw enemies into certain angles, without leaving the safety of defender territory.

Tips for countering Alibi

Disrupting Alibi's stationary decoys never ends well, making this gadget hard to deal with in some situations. Shooting, touching, or droning through the decoy will reveal your position to the entire enemy team. Skilled players will attempt to protect these holograms through their positioning but there are techniques to consider.

Damage to the base of Alibi's holograms will destroy them permanently, without alerting enemies of your presence. And if the base of the hologram isn't visible from your position, a well-placed explosive also does the trick. Conversely, if the hologram is well placed, consider whether it actually needs to be destroyed. It's often wiser to make note, relay its position to teammates, and move along.

Those with a sharp eye may be able to easily identify holograms, with the same skin used regardless of the real Alibi's customization. All three holograms bear Alibi's default uniform, headgear and MX4 Storm with no attachments or skins and the projector on the floor. If you can't identify these discrepancies, it's an easy way to ensure you've found the real deal.

A wide variety of attacking Operators offer counters to Alibi. The simplest way to destroy a hologram is via its base or breaking the ground below it. Thatcher's EMP grenades can also disable them temporarily, while Twitch's Shock Drone delivers a destructive blow with just a single charge.

Many Operators are better equipped to simply identify holograms using their respective gadgets. Projectors are flagged with IQ's electronics detector, while Glaz's thermal scope will only highlight the real Alibi. And when Dokkaebi's Logic Bomb calls all defensive phones, the holograms will remain silent even when Mute isn't in play.

Our recommended loadout for Alibi

Alibi has access to an impressive arsenal, which allows for a variety of playstyles when paired with her gadget. Although it's best to experiment and find the best loadout for you, this is our recommended kit for both newcomers and seasoned defenders:

  • Primary weapon - Mx4 Storm (Reflex sight, compensator, vertical grip).
  • Secondary weapon - Keratos .357.
  • Gadget - Impact grenades.

When composing Alibi's loadout, we recommend the new Mx4 Storm submachine gun, which boasts a high fire rate to compensate for its low damage per round. This is often best paired with a compensator and vertical grip, to reduce both horizontal and vertical recoil when rapid firing. While sight choice is largely determined by personal preference, the reflex sight obscures less of your peripheral vision.

The Keratos .357 is an ideal high-damage, low-fire-rate revolver which balances well with a submachine gun primary. Although you'll need to keep your shots on target, the sidearm offers impressive stopping power even at range. The Baliff 410 is ideal for creating peek holes. However, the Keratos .357 is generally more versatile with Alibi's dynamic playstyle.

Maestro tips and tricks

Maestro is an Operator focused on heavy firepower, with level three armor and level one speed. Two "Evil Eye" bulletproof cameras are Maestro's primary gadgets, which can be deployed on any surface, like Jäger's ADS units. These devices conceal a remote-controlled laser, which fires after opening its bulletproof glass sliders. Each shot only deals five damage, but attackers will have to take them out to stay focused.

Tips for playing as Maestro

Positioning is key for Maestro's Evil Eye, to guarantee a good line of sight while hiding from attackers. Like an ADS unit, experiment with different heights and surfaces to see what's best for you. Ensuring the best view is ideal, with good placements locking down multiple angles and chokepoints.

When engaging enemies, Maestro players should avoid being too aggressive with the Evil Eye's laser turret. Its bulletproof shutters resist most weapons but its exposed internals are vulnerable to any type of damage. Anticipate future enemy actions to avoid exposing the turret to gunfire. And while its automatic fire is ideal for delivering repeat damage, keep track of the indicator to prevent overheating.

Evil Eye turrets may be unique due to their offensive capabilities, but don't forget their role as cameras. Like Valkyrie's Black Eyes with higher durability, these can be valuable intel sources outside of stationary cameras. When you or teammates use the gadget, you'll also be able to spot and identify foes, even after being killed during the round.

Evil Eyes also have unlimited range, with their lasers able to reach any distance in sight. The turrets are even effective when deployed outside and cause havoc for approaching attackers. Paired with the new ACS 12 shotgun, Maestro can quickly clear holes between rooms for further coverage.

Maestro can use his turrets to counter many opposing Operators, too, with gadget-destruction capabilities comparable to Twitch's Shock Drone. Its laser can quickly take out most enemy gadgets, including drones, breaching charges, Kairos pellets, and candelas. And while the turret won't terminate a defuser plant, landing all shots will send them into a down-but-not-out (DBNO) state before it completes.

Tips for countering Maestro

Keep an eye out when facing Maestro, due to the versatility of his turrets. Make sure to approach cautiously and keep them in sight, while avoiding engagement if not properly equipped. And if a turret blocks your path, find a different route to the objective or call upon an appropriate Operator. Don't hesitate to run past in tight situations, with a relatively low damage per shot.

While usually bulletproof, cameras can still be destroyed when the shutters are closed. Evil Eye turrets can be easily destroyed with explosives, including grenades and breaching charges. If deployed on a destructible surface, breaking it will also remove the gadget from play. A heavy blow from Sledge's hammer can break the cameras in a single swing too.

Some Operators also provide soft counters to Evil Eye cameras, interfering with how Maestro can use them. A well-placed EMP from Thatcher disrupts the feed, cutting off access for 10 seconds. Twitch's Shock Drone similarly disables the camera or destroys it completely when shutters are drawn.

Dokkaebi's camera-hacking abilities also grant access to these cameras, which proves especially useful when near objectives. Although she's unable to use the turrets, it can offer great angles in defender territory.

Our recommended loadout for Maestro

Maestro focuses on delivering heavy firepower and protecting the perimeter of the objective. This is our top pick for the Operator's loadout, however, we once again suggest experimenting for yourself:

  • Primary weapon - ALDA 5.56 (ACOG, compensator, vertical grip).
  • Secondary weapon - Keratos .357.
  • Gadget - Barbed wire.

We recommend taking advantage of Maestro's ALDA 5.56, which is the only non-mounted LMG available to defending Operators. Considering this weapon also offers the highest fire rate of any LMG, has predictable recoil and supports an ACOG sight, it's easily among the best firearms in the game. Although the ACS 12 is viable with Maestro's play style, we're big fans of this bullet-hungry beast.

Both the Keratos .357 and Baliff 410 are suitable picks for Maestro and pair well with his anchor role. Although the Keratos .357 is our top pick for its flexibility, the Baliff 410's short range can still deliver deadly shots at close range.

Your thoughts

Operation Para Bellum should be available as a free update to all Rainbow Six Siege players on Thursday, June 7, 2018. For those with Rainbow Six Siege's Year 3 Pass, both Operators should be available at no additional cost on June 7. Seven days later on June 14, these Operators will be available to the public using Renown or R6 Credits.

What do you think of Alibi and Maestro? Make sure to drop into the comments section below and share your tips for the new update.

Rainbow Six Siege Operation Para Bellum: Everything we know

See at AmazonSee at Microsoft

How to play classic SEGA games in VR

$
0
0

How to play classic SEGA games in VR

Enjoy your favorite SEGA games on a huge screen!

One of the coolest little game sets you can find on Steam is the SEGA Mega Drive & Genesis Classic collection. It contains 59 of the SEGA games that many of us grew up with, complete with online two-person multiplayer and an interactive menu system that lets you pick games off a bedroom shelf and plug them into the console.

There are new challenges for these games and there are Steam achievements to strive for, and as of May 29, 2018, there's now VR support. That's right, you can play all these games on an enormous screen in your VR headset through SteamVR. Whether you're using Windows Mixed Reality (WMR), Oculus Rift, or HTC Vive, here's how to play SEGA games in VR.

See WMR at Microsoft Store

Purchase and install SEGA Mega Drive & Genesis Classics

Before getting into VR, let's take a look at this collection of games. It's available through the Steam Store and costs about $30.

See at Steam

It contains 59 Mega Drive and Genesis games, including:

  • Alex Kidd in the Enchanted Castle
  • Alien Soldier
  • Alien Storm
  • Altered Beast
  • Beyond Oasis
  • Bio-Hazard Battle
  • Bonanza Bros.
  • Columns
  • Columns III
  • Comix Zone
  • Crack Down
  • Decap Attack
  • Dr. Robotnik's Mean Bean Machine
  • Dynamite Headdy
  • Ecco the Dolphin
  • Ecco Jr.
  • Ecco: The Tides of Time
  • ESWAT: City Under Siege
  • Eternal Champions
  • Fatal Labyrinth
  • Flicky
  • Gain Ground
  • Galaxy Force II
  • Golden Axe
  • Golden Axe II
  • Golden Axe III
  • Gunstar Heroes
  • Kid Chameleon
  • Landstalker: The Treasures of King Nole
  • Light Crusader
  • Phantasy Star II
  • Phantasy Star III: Generations of Doom
  • Phantasy Star IV: The End of the Millenium
  • Ristar
  • Shadow Dancer
  • Shining Force
  • Shining Force II
  • Shining in the Darkness
  • Shinobi III: Return of the Ninja Master
  • Sonic 3 & Knuckles
  • Sonic 3D Blast
  • Sonic CD
  • Sonic Spinball
  • Sonic the Hedgehog
  • Sonic the Hedgehog 2
  • Space Harrier II
  • Streets of Rage
  • Streets of Rage 2
  • Streets of Rage 3
  • Super Thunder Blade
  • Sword of Vermilion,
  • The Revenge of Shinobi
  • ToeJam & Earl
  • ToeJam & Earl in Panic of Funkotron
  • VectorMan 2
  • VectorMan
  • Virtua Fighter 2
  • Wonder Boy III: Monster Lair
  • Wonder Boy in Monster World

How to play classic SEGA games in VR

Now that you've purchased the SEGA Mega Drive and Genesis Classics collection, you can test out what it looks like in VR. Be sure to have SteamVR installed and a VR headset connected before continuing. Then follow these steps:

  1. Launch Steam from your desktop, Start menu, or taskbar.
  2. Click Library.

    Launch Steam. Click Library.

  3. Click SEGA Mega Drive & Genesis Classics.
  4. Click PLAY.

    Click SEGA Mega Drive and Genesis Classis. Click PLAY.

  5. Click Launch Game hub (VR) in Steam VR Mode.
  6. Click Play.

    Click Launch Game hub (VR) in Steam VR Mode. Click Play.

SteamVR will now launch, and if you're using WMR the Portal will also open. Put on your headset and get down to business. It's the same 2D screen as you'd see with a standard monitor, but it's enormous.

How to use a gamepad with VR

While you can use a standard keyboard and mouse while playing without a VR headset and you can use motion controllers while in VR, SEGA games were meant to be played on a gamepad.

How to use an Xbox One controllers with Windows Mixed Reality

In my case, I connected an Xbox One controller using a wireless dongle. No extra steps were needed to get it working; the first time I launched the SEGA collection I was treated to an enormous screen and a familiar controller in my hands.

If you'd like to customize the buttons on your controller, be sure to check out our guide on how to use the new SteamVR custom keybindings feature.

How to create custom keybindings in SteamVR

More resources

Looking for more VR and WMR tips and tricks? Our ultimate guide likely has what you're looking for!

See our Windows Mixed Reality ultimate guide

How to create an unattended installation of Windows 10

$
0
0

You can perform a clean installation of Windows 10 without any user interaction, and in this guide we show you how.

When you need to install a fresh copy of Windows 10, you typically start your computer with a bootable media and go through the setup process to manually configure various settings, including region and language, product key, and partitions. Then after the installation completes, you're presented with the out-of-box experience (OOBE) to finish the setup, configuring personal settings like keyboard, account, and privacy settings.

Although it's not a difficult process to handle for most tech-savvy users, you still have to sit through the installation and answer questions which can take a very long time, even more when you need to install Windows 10 on multiple devices.

If you want to speed up and automate the installation process, you can create a special file with the answers to every question, which you can save in the bootable media and the setup can read automatically to perform an unattended installation of Windows 10.

In this Windows 10 guide, we walk you through the steps to create an autounattend.xml answer file containing all the necessary settings to perform a basic unattended installation of the OS.

How to create unattended Windows 10 installation media

There are many ways to create and set up an answer file to install Windows 10 hands-free. In this guide, we show you the steps to get started to create an answer file to install the 64-bit version of Windows 10 Pro on a device using Basic Input-Output System (BIOS) or Unified Extensible Firmware Interface (UEFI) with a single drive.

The answer file that we'll be creating erases everything on the hard drive, it creates and configures the required partitions, and installs Windows 10 using the most common settings.

Warning: This is a friendly reminder that the installation process will completely erase the hard drive of your computer. If you have anything important on this device, it's recommended to make a full backup of your PC before proceeding.

Before proceeding

Before diving into this project, you'll need a few things:

  • Windows Assessment and Development Kit (ADK).
  • Windows 10 installation media.
  • Windows 10 account with administrator privileges.
  • USB flash drive with 8GB of space.
  • Spare computer to test the installation.

How to install Windows System Image Manager

If you have the skills, you can create an answer file manually, but most people will need to use the Windows System Image Manager (SIM) feature from the Windows Assessment and Development Kit (ADK) to create the file that the setup will use to install Windows 10 without user interaction. So follow these steps:

  1. Download the Windows ADK installer for Windows 10 version 1803.
  2. Double-click the adksetup.exe file to begin the installation.
  3. Select the Install the Windows Assessment and Deployment Kit - Windows 10 to this computer option. (You're not installing every component, as such the installation will only take a few megabytes.)

  4. Click the Next button.
  5. Select your privacy option.
  6. Click the Next button.
  7. Click the Accept button to agree to the license agreement.
  8. Clear all preselected items.
  9. Check the Deployment Tools package, which contains the Windows System Image Manager component.

  10. Click the Install button.
  11. Click the Close button.

Once you create the answer file, you can adjust the settings and reuse it for other installations, instead of having to use the Windows System Image Manager tool.

How to create a new answer file project

After installing the Windows System Image Manager, you can import the installation files to your device, and set up the environment to create an answer file.

Importing Windows 10 image files to your PC

In order to create an answer file, you need to open a Windows 10 image and create a catalog of all the components to automate an installation, but to do that you must first import the installation files onto your device. Here's how:

  1. Open File Explorer.
  2. Browse to the folder where you saved the Windows 10 ISO file.
  3. Right-click the ISO file, select Open with, and click File Explorer to mount it. (Alternatively, you can also connect the USB flash drive with the installation files.)
  4. Open the drive with the Windows 10 installation files.
  5. Select all the files (Ctrl + A).
  6. Right-click the selection, and select copy (Ctrl + C).

  7. Browse to the folder that you want to use to store this project files.
  8. Right-click inside the folder and select Paste (Ctrl + V).

In order to continue, you need an ISO file that contains an install.wim image file. If you have an ISO that you built using the Media Creation Tool, you're likely to have an install.esd, which you won't be able to open because it's encrypted.

If you don't have an .wim image file, you can get the required image format by downloading the latest Windows 10 ISO file from the Windows Insider Program or MSDN with a subscription.

Creating an install.wim file

Alternatively, after importing the installation files onto your device, you can use the DISM command tool to export the image files and create an .wim image from an .esd file using these steps:

  1. Open Start.
  2. Search for PowerShell, right-click the top result, select Run as administrator.
  3. Type the following command to identify the index number of the edition you want to use and press Enter:

    dism /Get-WimInfo /WimFile:C:\path\to\folder\sources\install.esd

    In the command make sure to change the path to the sources folder with the install.esd file on your device.

  4. Identify the Index number for the edition you want. For example, we're extracting Windows 10 Pro, which in this case has an index number of 6.
  5. Type the following command to create an install.wim file and press Enter:

    dism /Export-Image /SourceImageFile:C:\path\to\folder\sources\install.esd /SourceIndex:6 /DestinationImageFile:C:\path\to\folder\sources\install.wim /Compress:Max /CheckIntegrity

    In the command make sure to change the path to the sources folder with the install.esd file on your device. The destination path should be the same as the source.

Setting up an answer file environment

In order to prepare the environment to create a new answer file project, do the following:

  1. Open Start.
  2. Search for Windows System Image Manager, click the top result to open the experience.
  3. Click the File menu, and select the Select Windows Image option.

  4. Navigate to the folder you exported the Windows 10 installation files.
  5. Inside the "sources" folder, select the install.wim image file, and click the Open button.

    Important: Make sure that image is an install.wim file. Otherwise, if you have an install.esd image, this will not work.

  6. Select an edition of Windows 10 you want to use. (Usually, you want to select the edition that you're planning to install.)

  7. Click the OK button.

  8. If you get a message, click the Yes button to create a new catalog file. (This process will take some time, but it's a one-time process. The .clg file will be saved in the same location where the install.wim is stored, and you can reuse it later on other projects.)

  9. Click the File menu, and select the Select Distribution Share option.

  10. Navigate to the folder that you're using to store the project folders and files.
  11. On "Folder name," type a name (such as Distribution) to create a folder to store additional project files.
  12. Click the Open button.
  13. Click the File menu, and select the New Answer File option.

After completing the steps, you now have the environment set up to create an answer file. You'll also know that a new answer file has been created with the various stages you can configure to automate the installation of Windows 10.

How to create a Windows 10 answer file

An answer file contains seven different stages (passes), and the passes that you need to configure will depend on the type of automation you want to create.

In this guide, we'll be configuring an autounattend.xml answer file with the minimum requirements to automate the entire installation of Windows 10 Pro, as such we will be configuring passes 1 windowsPE, 4 specialize, and 7 oobeSystem.

Pass 1 windowsPE

Configuring the pass "1 windowsPE," you'll be able to setup region and language, hard drive configuration, installation location, and product key.

Important: Depending on the image you have, you may see the components name starting with amd64_Microsoft-Windows for the 64-bit version of Windows 10, or the x86_Microsoft-Windows name for the 32-bit version. For the purpose of this guide, we'll be using the amd64_Microsoft-Windows name format.

Configuring language and region settings

In order to configure the region and language settings during an installation, do the following:

  1. Under "Windows Image," expand the Components folder.
  2. Expand the amd64_Microsoft-Windows-International-Core-WinPE component.
  3. Right-click the SetupUILanguage component, and select the Add Setting to Pass 1 windowsPE option.

  4. On the right side, under "Answer File," select the amd64_Microsoft-Windows-International-Core-WinPE component.
  5. On the right side, under "Settings," define your keyboard, region, primary and fall back language, and device location. For instance, if you're located in the U.S., you can configure these settings:

    • InputLocale: en-US.
    • SystemLocale: en-US.
    • UILanguage: en-US.
    • UserLocale: en-US.

    Only users outside the U.S. should configure ULLanguageFallback using the en-US value as the fallback language.

    To identify the corrent input profile name, you can check out this Microsoft support page.

  6. Select the SetupUILanguage sub-component.
  7. On the right side, under "Settings," set UILanguage with the correct language. For example, because we're doing an install in English, we're using en-US.

Configuring installation settings

In order to perform an unattended installation of Windows 10, you must configure an answer file that specifies the settings to properly configure the hard drive.

  1. Under "Windows Image," expand the Components folders.
  2. Expand the amd64_Microsoft-Windows-Setup component.
  3. Expand the DiskConfiguration component.
  4. Right-click the Disk component, and select the Add Setting to Pass 1 windowsPE option.

  5. On the right side, under "Answer File," select the DiskConfiguration component.
  6. On the right side, under "Settings," set the WillShowUI value to OnError. (If you leave this setting empty, the installation will stop during the hard drive setup process.)

  7. Select the Disk component.
  8. On the right side, under "Settings," use these values:

    • DiskID: 0
    • WillWipeDisk: true

    Configuring the WillWipeDik setting to true will make sure to erase everything on the first hard drive before setting up the partitions. (If you have anything important on this drive, you should backup its content before proceeding.)

Once you've configured the DiskConfiguration settings, you'll need to set up the partition layout depending on whether your device is using a legacy BIOS or UEFI.

The reason is because BIOS-based devices only require two partitions (System Reserved and Windows), and UEFI-based devices requires four partitions (WinRE, EFI, MSR, and Windows).

Quick Tip: You can check if you're using BIOS or UEFI by opening System Information from the Start menu, and checking the "System Summary." If "BIOS Mode" reads Legacy, then you're using BIOS; if it reads UEFI, then you're using UEFI.

BIOS only: Creating and modifying partitions

If you've a computer using legacy BIOS, continue with these steps. Otherwise, skip this part, and follow the UEFI instructions below.

To configure the partition layout for a device using BIOS, use these steps:

  1. On "DiskConfiguration," under "Disk," right-click CreatePartitions, and select the Insert New CreatePartition option to create the first partition.

  2. Right-click CreatePartitions again, and select the Insert New CreatePartition option to create a second partition.
  3. Select the first CreatePartition.
  4. On the right side, under "Settings," use these values to create a system reserved partition:

    • Extend: false.
    • Order: 1.
    • Size: 500.
    • Type: Primary.

    Using the above settings, you're indicating the setup to create the system reserved partition of 500MB, which is a partition required for Windows to boot.

  5. Select the second CreatePartition.
  6. On the right side, under "Settings," use these values to create a partition to install Windows 10:

    • Extend: true.
    • Order: 2.
    • Type: Primary.

    Using the above settings, you're indicating the setup to create a partition to install Windows 10. Also, you'll notice that we didn't specify the Size value, and we set Extend to true. This is because we want the setup to create a partition with all the available space left on the drive after creating the system reserved partition.

    If you want to create multiple partitions, you need to set the value of Extend to false, and enter a value in megabytes in the Size setting. Then the last partition should have Extend set to true without specifying the Size value to indicate the setup to use the remaining available space to create the partition.

Using the above steps, we carved the partitions. The next step is to specify the required file format and partition properties.

  1. On "DiskConfiguration," under "Disk," right-click ModifyPartition, and select the Insert ModifyPartition option to modify the first partition.

  2. Right-click ModifyPartition again, and select the Insert ModifyPartition option to modify the second partition.
  3. Select the first ModifyPartition.
  4. On the right side, under "Settings," use these values to configure a system reserved partition:

    • Active: true.
    • Format: NTFS.
    • Label: System.
    • Order: 1.
    • PartitionID: 1.

  5. Select the second ModifyPartition.
  6. On the right side, under "Settings," use these values to configure a partition to install Windows 10:

    • Format: NTFS.
    • Label: Windows.
    • Letter: C.
    • Order: 2.
    • ProductID: 2.

In the steps, using the Order and PartitionID, we're specifying how the setup should configure on each of the two raw partitions we created earlier.

You can learn more about the partition layout required for a BIOS system in this Microsoft support page.

The last thing left to do in this part is to indicate the set up where to install Windows 10:

  1. Under "Windows Image," expand the Components folders.
  2. Expand the amd64_Microsoft-Windows-Setup component.
  3. Expand the ImageInstall component.
  4. Expand the OSImage.
  5. Right-click the InstalTo component, and select Add Setting to Pass 1 windowsPE.

  6. On the right side, under "Answer File," select InstallTo.
  7. On the right side, under "Settings," use these values:

    • DiskID: 0.
    • PartitionID: 2.

The above settings tell the setup to install Windows 10 on the first drive inside the second partition.

Once you complete these steps continue with the Defining the product key instructions.

UEFI only: Creating and modifying partitions

If you have a computer using UEFI, continue with these steps. Otherwise, skip this part, and follow the BIOS instructions outlined above.

  1. On "DiskConfiguration," under "Disk," right-click CreatePartitions, and select the Insert New CreatePartition option to create the first partition.

  2. Right-click CreatePartitions again, and select the Insert New CreatePartition option to create a second partition.
  3. Right-click CreatePartitions again, and select the Insert New CreatePartition option to create a third partition.
  4. Right-click CreatePartitions again, and select the Insert New CreatePartition option to create a fourth partition.
  5. Select the first CreatePartition.
  6. On the right side, under "Settings," use these values to create the Windows Recovery (WinRE) partition:

    • Extend: false.
    • Order: 1.
    • Size: 500.
    • Type: Primary.

  7. Select the second CreatePartition.
  8. On the right side, under "Settings," use these values to create an EFI partition:

    • Extend: false.
    • Order: 2.
    • Size: 100.
    • Type: EFI.

  9. Select the third CreatePartition.
  10. On the right side, under "Settings," use these values to create a Microsoft reserved partition (MSR) partition:

    • Extend: false.
    • Order: 3.
    • Size: 16.
    • Type: MSR.

  11. Select the third CreatePartition.
  12. On the right side, under "Settings," use these values to create the Windows partition:

    • Extend: true.
    • Order: 4.
    • Type: Primary.

Using the above steps, we carved the partition. The next step is to specify the require file format and partition properties. Here's how:

  1. On "DiskConfiguration," under "Disk," right-click ModifyPartition, and select the Insert ModifyPartition option to modify the first partition.

  2. Right-click ModifyPartition again, and select the Insert ModifyPartition option to modify the second partition.
  3. Right-click ModifyPartition again, and select the Insert ModifyPartition option to modify the third partition.
  4. Right-click ModifyPartition again, and select the Insert ModifyPartition option to modify the fourth partition.
  5. Select the first ModifyPartition.
  6. On the right side, under "Settings," use these values to configure the Windows Recovery (WinRE) partition:

    • Format: NTFS.
    • Label: WinRE.
    • Order: 1.
    • PartitionID: 1.
    • TypeID: DE94BBA4-06D1-4D40-A16A-BFD50179D6AC.

  7. Select the second ModifyPartition.
  8. On the right side, under "Settings," use these values to configure an EFI partition:

    • Format: FAT32.
    • Label: System.
    • Order: 2.
    • PartitionID: 2.

  9. Select the third ModifyPartition.
  10. On the right side, under "Settings," use only these two values to configure a Microsoft reserved partition (MSR) partition:

    • Order: 3.
    • PartitionID: 3.

  11. Select the third ModifyPartition.
  12. On the right side, under "Settings," use these values to configure a partition to install Windows 10:

    • Format: NTFS.
    • Label: Windows.
    • Letter: C.
    • Order: 4.
    • PartitionID: 4.

In the steps, using the Order and PartitionID, we're specifying how the set up should configure each of the four raw partitions we created earlier.

You can learn more about the partition layout required for an UEFI system in this Microsoft support page.

The last thing left to do in this part is to indicate the setup where Windows 10 should be installed. Here is how:

  1. Under "Windows Image," expand the Components folders.
  2. Expand the amd64_Microsoft-Windows-Setup component.
  3. Expand the ImageInstall component.
  4. Expand the OSImage component.
  5. Right-click the InstalTo component, and select Add Setting to Pass 1 windowsPE.
  6. On the right side, under "Answer File," select InstallTo.
  7. On the right side, under "Settings," use these values:

    • DiskID: 0.
    • PartitionID: 4.

The above settings will indicate for the set up to install Windows 10 on the first drive inside the fourth partition.

Once you complete these steps continue with the Defining the product key instructions below.

Defining the product key

During the first pass, you can also specify the product key for the version of Windows 10 that you want to install. If you're creating an answer file that you'll use in multiple devices, you should be using a volume or generic product key.

To specify a product key, do the following:

  1. Under "Windows Image," expand the Components folders.
  2. Expand the amd64_Microsoft-Windows-Setup component.
  3. Expand the UserData component.
  4. Right-click the ProductKey component, and select Add Setting to Pass 1 windowsPE.

  5. On the right side, select the UserData component.
  6. On the right side, "under Settings," use the following settings:

    • AcceptEula: true.
    • Organization: WC.

    In the above settings, you can use any name for the Organization value. For example, home users could simply use "Family."

  7. Select the ProductKey.
  8. On the right side, under "Settings," make sure to update the Key value using the product key for the edition of Windows 10 you want to install.

You can also use a generic product key to create an answer file:

  • Windows 10 Pro: VK7JG-NPHTM-C97JM-9MPGT-3V66T.
  • Windows 10 Home: TX9XD-98N7V-6WMQ6-BX7FG-H8Q99.
  • Windows 10 Enterprise: NPPR9-FWDCX-D2C8J-H872K-2YT43.

You can always check this Microsoft support website to find the appropriate generic key for your installation.

Pass 4 specialize

If you want to configure additional settings, such as model, manufacturer, computer name, device owner, timezone, and more during the installation, you can use these steps:

  1. Under "Windows Image," expand the Components folders.
  2. Expand the amd64_Microsoft-Shell-Setup component.
  3. Right-click the OEMInformation component, and select the Add Setting to Pass 4 specialize option.

  4. On the right-side, under "Answer File," select the amd64_Microsoft-Shell-Setup component.
  5. On the right side, under "Settings," use the following values (specifying your custom information):

    • ComputerName: WorkPC.
    • CopyProfile: true.
    • RegisteredOrganization: Windows Central.
    • RegisteredOwner: WC.
    • TimeZone: Eastern Standard Time.

    If you don't configure the TimeZone setting, Windows 10 will set the zone based on the language you're installing. You can check the Microsoft support website to find out the exact name for your time zone.

  6. Under "amd64_Microsoft-Shell-Setup," select the OEMInformation component.

  7. On the right side, under "Settings," you can specify some computer specific properties (optional), including:

    • Manufacturer: Dell.
    • Model: XPS 13.

Pass 7 oobeSystem

Using an answer file, you can also define the options you want to configure during the out-of-box experience (OOBE) to finish setting up the installation without user interaction, including additional language settings, accept the licensing agreement, create an user account, and a lot more.

  1. Under "Windows Image," expand the Components folders.
  2. Right-click the amd64_Microsoft-Windows-International-Core component, and select the Add Setting to Pass 7 oobeSystem option.

  3. Under "Windows Image," expand the amd64_Microsoft-Shell-Setup component.
  4. Right-click the OOBE component, and select the Add Setting to Pass 7 oobeSystem option.

  5. Expand the UserAccounts component.
  6. Expand the LocalAccounts component.
  7. Right-click the LocalAccount component, and select the Add Setting to Pass 7 oobeSystem option.

  8. Select amd64_Microsoft-Windows-International-Core.
  9. On the right-side, under "Settings," specify your language settings:

    • InputLocale: en-US.
    • SystemLocale: en-US.
    • UILanguage: en-US.
    • UserLocale: en-US.

    Only users outside the U.S. should configure ULLanguageFallback using the en-US value as the fallback language.

    To identify the corrent input profile name, you can check out this Microsoft support page.

  10. Expand the amd64_Microsoft-Shell-Setup component.
  11. Select the OOBE component.
  12. On the right-side, under "Settings," use the following values:

    • HideEULAPage: true.
    • HideOENRegistrationScreen: true.
    • HideOnlineAccountScreens: true.
    • HideWirelessSetupinOOBE: true.
    • ProtectYourPC: 1.

    While most settings are self-explanatory, you'll notice that we're also configuring the ProtectYourPC setting, which defines how the express settings (such as speech, inking, typing, error reporting, and suggestions) should be handled. Using the value of 1, we're telling the setup to turn on the express settings using the default options.

  13. Expand UserAccounts.
  14. Select LocalAccount.
  15. On the right-side, under "Settings," use the following configuration to create a primary local account:

    • Description: My primary local account.
    • DisplayName: admin.
    • Group: Administrators.
    • Name: John.

    Using the above settings, you'll be creating an account called "admin" for user "John," and we're adding the account to the "Administrators" group that gives the user unrestricted access to the device. Of course, you can always define your custom preferences, including for "Description,""DisplayName,""Group," and "Name."

  16. Expand LocalAccount.
  17. Select Password (optional).
  18. On the right-side, under "Settings," type a password in the Value field.

While you'll see the password in plain text, after saving the autounattend.xml file, the value you entered will be encrypted.

How to save a Windows 10 answer file project

Once you've completed setting up all the configurations to install Windows 10 automatically, you need to remove all the unmodified components, validate the answer file, and save changes as an .xml file.

Removing unmodified components

  1. Select the component that you didn't configure. (These are those with light purple color.)
  2. Right-click the components, and select Delete.

  3. Repeat steps No. 1 and No. 2 until you remove all the components that you didn't modify.

Validating answer files

  1. Click on Tools.
  2. Select the Validate option.
  3. Under "Messages," check the Validation tab, if you don't see any warning errors the file is good to go.

Saving the answer file

  1. Click on File.
  2. Select the Save Answer File As option.
  3. Navigate to the folder you want to save the file.
  4. Under "File name," use the autounattend.xml file name.

  5. Click the Save button.

If you're configuring multiple answer files, it'll be best to save the files on a different folder with a descriptive name.

Adding the answer file to a USB installation media

  1. Open File Explorer.
  2. Browse to the autounattend.xml file location.
  3. Right-click the file, and select Copy.

  4. Open the USB media with the Windows 10 installation files.
  5. In the root of the drive, right-click the Paste to copy the autounattend.xml to the Windows 10 installation media.

In the case that you don't have a Windows 10 USB installation media, you can create one using the Media Creation Tool or using a third-party tool, such as Rufus.

How to install Windows 10 using an answer file

Once you have the USB bootable media with the answer files, you can perform an unattended installation of Windows 10 using an answer file using these steps:

Warning: This process will delete everything on your computer and install Windows 10 without the user interaction, as such make sure to connect the USB flash drive to the correct device. Otherwise, you may end up wiping out the incorrect computer.

  1. Turn off the computer you want to install Windows 10.
  2. Connect the USB flash bootable media with the autounattend.xml file.
  3. Power on the computer and then Windows 10 should install automatically.

In order for the media to boot you have to make sure that the device is configured to boot from the correct drive. This means you'll need to access the BIOS or UEFI firmware on your motherboard to change the boot order.

This process typically requires hitting one of the function keys (F1, F2, F3, F10, or F12), the ESC, or Delete key as soon as you start your device. However, these settings will vary by manufacturer, and even by model. Make sure to check your PC manufacturer's support website for more specific instructions.

After getting access to the BIOS interface, look for the Boot menu, and make sure to change the boot order to start with the USB drive that includes the installation files, and save the settings (usually using the F10 key).

If your device has a UEFI firmware, then the steps to change the boot order will be different as well.

On a Windows 10 device, you need to go to Settings> Update & Security> Recovery, and under "Advanced Startup," click the Restart now button.

Then click on Troubleshoot> Advanced options> UEFI Firmware Settings, and click Restart.

Once you're in the UEFI firmware interface, look for the Boot options, and change the boot order to start with the USB drive that includes the installation files, and then save the settings.

If the drive is empty, check your manufacturer support website for details to access the UEFI firmware.

How to troubleshoot a Windows 10 answer file

Although an answer file can simplify and completely automate the process to install Windows 10, if you don't configure the settings perfectly, you may encounter errors and other problems that will cause the installation to stop and wait for the user input to continue.

If you're having problems validating the answer file, double-check the components you configured and make sure to delete any unmodified component.

In the case that you made a mistake configuring a setting value, don't empty the field, instead right-click the setting, and select the Revert Change option.

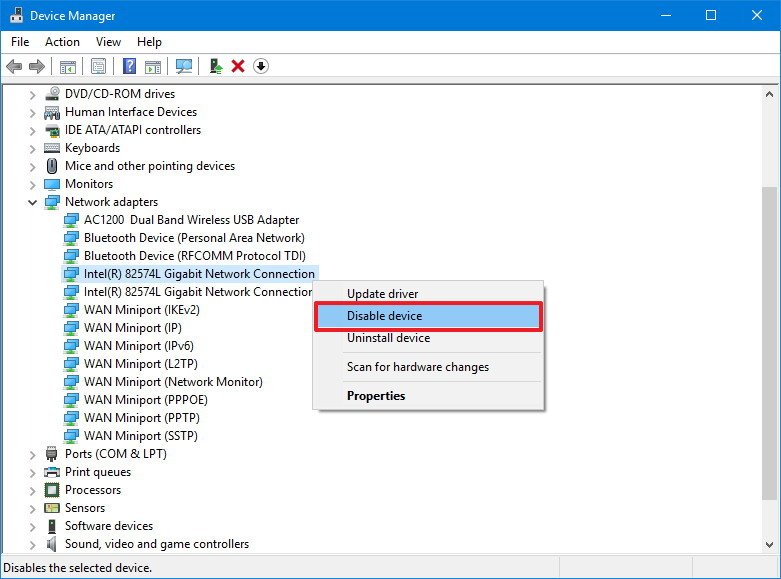
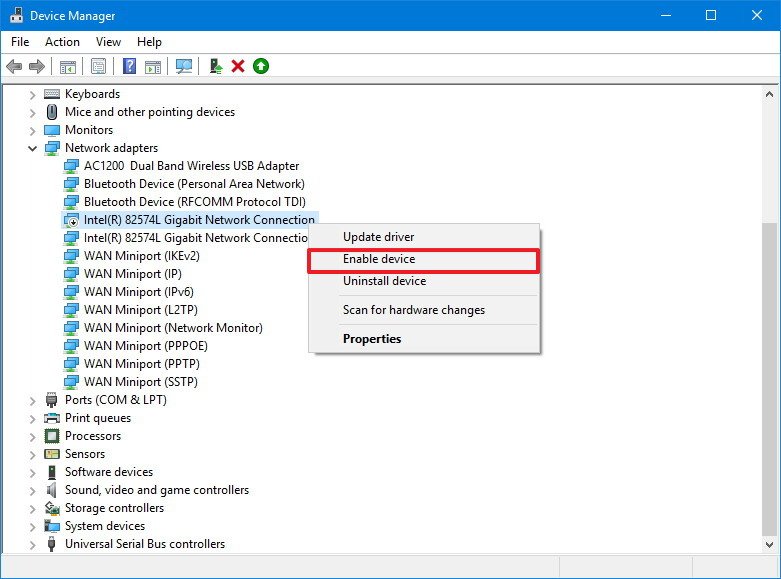
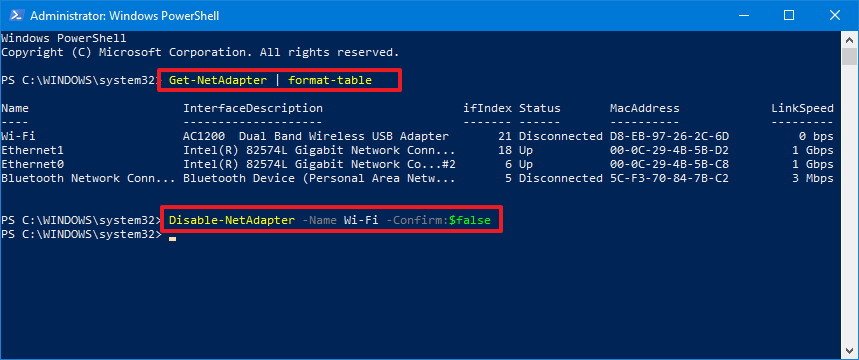
Before proceeding with the installation, disconnect the device from the network, because sometimes you may come across problems while Windows 10 tries to download updates. You can always reconnect to the network after the installation.

If you use an answer file with BIOS settings on an UEFI-based device, you may come across problems. Always make sure to use the correct settings for the device that you want to automate the installation of Windows 10.

If after triple-checking the settings using the Windows System Image Manager, you're still unable to get the answer file to work, then you'll need to open the autounattend.xml file with a text editor (such as Notepad) and correct any error.

For instance, in my case, the autounattend.xml file didn't work the first time, but after looking into the file, I found that the TypeID setting inside "ModifyPartition" was an empty option, so I removed it, and then Windows 10 installed automatically.

You can also check out this Microsoft support website to learn more about each and everyone of the settings, which you can configure to create an answer file to perform an automated installation of Windows 10.

Wrapping things up

Although setting up an automated installation of Windows 10 may seem like a complicated process, it can end up being more difficult and time consuming trying to go through the installation and configuration manually, even more if you have to repeat the same steps on multiple computers.

In this guide, we looked at the steps to perform an unattended installation of Windows 10 using an autounattend.xml answer file that contains the minimum set of configurations to get you familiar with this process. It's virtually impossible to create an answer file that will fit every scenario, and you'll have to dig through the settings and figure out the components you need. Also, depending on your installation requirements, you may need to create multiple answer files.

While anyone can create and use an answer file, Microsoft designed this feature for organizations, as such you won't find an option to perform an installation using a Microsoft account. However, you can always create an installation with a Windows 10 local account and then link it to your Microsoft account. You can do this on Settings> Accounts> Your info, and clicking the Sign in with your Microsoft account instead link.

More Windows 10 resources

For more helpful articles, coverage, and answers to common questions about Windows 10, visit the following resources:

Where (and how) to watch the BlackBerry KEY2 launch livestream

$
0
0

The KEY2 event will begin on June 7 at 10:00 AM ET.

The BlackBerry KEYone stood out as one of 2017's most interesting and unique phones, especially for Windows phone users who finally decided to make the jump to Android and who wanted a best-in-class keyboard experience. This year, BlackBerry's going to follow it up with the KEY2. We've already come across quite a few leaks and rumors speculating about what the phone will come equipped with, but soon we'll be able to lay the rumor mill to rest.

BlackBerry's holding an event in New York today to announce the KEY2, and while our Executive Editor Daniel Rubino and Managing Editor Al Sacco will be there, you can watch the entire thing without having to leave your home or office. The company is hosting a livestream on YouTube, and you can tune in by simply clicking on the video above.

The livestream will begin at 10:00 AM ET on Thursday, June 7.

Are you a current or former BlackBerry user? Are you still using a Windows phone but are ready for greener pastures? What are you hoping to see from the KEY2?

Related reading

How to fix Microsoft Office 365 subscription and license problems

$
0
0

Office

Being hit with a license error when you try to use Microsoft Office 365? There's an easy fix.

I have an Office 365 license, and it's still definitely valid and very much paid for, but Excel didn't seem to think that was the case when I went to open the app.

Fortunately, there's a really easy fix to the problem that doesn't involve contacting Microsoft and yelling at anyone on the phone.

How to fix Microsoft Office 365 subscription problems

Here's what you should do to resolve the issue:

  1. Right-click on the Start button.
  2. Select apps and features.

    Office fix

  3. Find the application from the list that you had the error in. (If you're using Office 365 the app will be labeled as the package and not the individual app name).
  4. Click modify.

    Office fix

  5. Select online repair.
  6. Click repair.

    Office fix

In some cases, errors can be fixed with the quick repair option, but when a license comes into play you need to go online to ensure everything syncs back up correctly.

Office will now download whatever files and data it needs to repair itself. Once the process is complete, fire up the misbehaving application again. You should no longer see an error message stopping you from being productive like a boss!

More Windows 10 resources

For more helpful articles, coverage, and answers to common questions about Windows 10, visit the following resources:

How to buy and read ebooks in Windows 10

$
0
0

How to buy and read ebooks in Windows 10

Appreciate the joy of reading on your Windows 10 PC!

The Creators Update for Windows 10 added an e-reader function that lets you purchase and read ebooks, and it has since received some new features in the more recent April 2018 Update. You can still buy books from the Microsoft Store and read them in Edge thanks to a built-in reader feature, but the process has changed slightly.

Ready to start reading? Here's how to buy and read ebooks using Edge in Windows 10.

See Books at the Microsoft Store

How to buy and download ebooks

Books from the Microsoft Store can be accessed in a few different ways, though they all ultimately lead to the same place. You can visit the Books section of the Microsoft Store in your web browser, you can launch the Store app straight from your desktop and click the Books tab, or you can navigate there through Edge, signing in with the appropriate accounts along the way. Let's take a look at the final, most thorough route.

Here's how to buy and download an ebook when launching through Edge.

  1. Launch Edge from your Start menu, desktop, or taskbar.
  2. Click the Hub button. It looks like three horizontal lines overlaying a star.
  3. Click Books.

    Click Hub. Click Books.

  4. Click Sign in.
  5. Click your account if you've already signed in on this PC with a Microsoft account. Otherwise, sign is with your username and password.

    Click Sign in. Click your account.

  6. Click Continue. You should now see any ebooks associated with your Microsoft account show up. You can download any of them by simply clicking the cover.
  7. Click See more to launch the Store app.

    Click Continue. Click See more.

  8. Click the Search field.
  9. Type the name of a book or author you're looking for, and hit Enter on your keyboard. You can also browse pre-made lists.

    Click the Search field. Type the name of a book or author.

  10. Click a book you'd like to purchase and download.
  11. Click Buy.

    Click a book. Click Buy.

  12. Type your password.
  13. Click Sign in.

    Type your password. Click Sign in.

  14. Click a payment method if you already have one on record. If this is the case, skip ahead to step 17.
  15. Click Add a new payment method if you don't already have one connected with your account.

    Click a payment method. Click Add a new payment method.

  16. Click a payment method and add your corresponding payment information.
  17. Click Buy.

    Click a payment method. Click Buy.

  18. Click Read. This should bring Edge back to the forefront in which you'll see your book in the Books frame.
  19. Click your book. It will open and you can begin reading.

    Click Read. Click your book.

How to use Edge's reading features

What began in the Windows 10 Creators Update as a relatively barebones ereader — for the likes of PDF and EPUB files — has received some significant updates in the April 2018 Update. The interface uses some Fluent Design elements, and it has had some tools added for deeper control over your content.

For an extensive explanation of what Edge's reader feature has to offer, have a look at Windows Central Writer Mauro Huculak's impressive guide.

How to use Microsoft Edge's reading features in Windows 10 April 2018 Update

More information about the Windows 10 April 2018 Update

Updated June 6, 2018: I've refreshed this guide to ensure it remains relevant following the Windows 10 April 2018 Update.

Guide Default Menu: 
menu-creators-update-guide

How to transfer your data from an old PC to a new PC

$
0
0

How to transfer your data from an old PC to a new PC

Take advantage of one of these five ways to move your data from an old PC.

Moving to a new Windows 10 PC is an exciting time — shiny new hardware and a snappy system are sitting there waiting to be used. The problem is that your familiar files are sitting on the old PC, and you don't want to start over entirely anew. To ease your transition between PCs, here are six ways you can transfer your data.

Use OneDrive to transfer your data

Use OneDrive

One of the easiest ways to back up and transfer your data is to use the cloud storage service OneDrive. If you have a Microsoft account, you automatically get 5GB of storage for free.

This isn't a lot of space for a backup, especially if your old PC has been around for a long time, but there are affordable options with much more storage. 50GB of space will cost you about $2 per month, while 1TB of space will cost you about $7 per month and will also get you a Personal subscription to Office 365.

Transferring your files and folders between PCs is easy as long as you have an internet connection, and you can enjoy knowing that your data is protected from hard drive failure. The only downside here is that your applications and settings won't make the trip over to your new PC.

See at Microsoft Store

Use an external hard drive to transfer your data

Use an external hard drive

Using an external hard drive to transfer your data from an old PC to a new PC also gives you a backup of your data in case things go wrong. This mostly manual process might take a bit longer, but if you already have an external drive laying around, you can transfer your files without spending more money.

All you have to do is plug your hard drive into your old PC, move your files and folders from your old PC onto the drive, then plug it into your new PC and reverse the transfer process. Note that using an external hard drive does not let you transfer your Windows settings or applications — this is a method for moving your files and folders only.

If you're interested in using an external drive to back up and transfer your data, check out our roundup of the best external hard drives available now.

Use a transfer cable to transfer your data

Use a transfer cable

If you don't want to subscribe to cloud storage services or spend the money on an external hard drive, there is a relatively cheap option that lets you transfer your data between Windows XP all the way up to Windows 10.

This Windows transfer cable from Plugable is about $30 and uses two USB 3.0 male connectors to plug into each PC. Once the PCs are connected, the included software will move you through the process of transferring your files, settings, user accounts, and folders. If both PCs don't have USB 3.0 ports, there is also a USB 2.0 option available from UGREEN.

If you're looking to move entire applications, however, you'll have to go with something like PCmover Professional. Also, note that using a transfer cable does not create a backup of your files when they are transferred.

See at Amazon

Use PCmover to transfer your data

Use PCmover

Back in the days of Windows 7 and Windows 8, Microsoft had a service called Easy Transfer that allowed users to move their files and settings between PCs using either a physical USB transfer cable, a set of DVDs, an external hard drive, or a network.

Unfortunately, Easy Transfer was scrapped in Windows 10, but you've not been abandoned completely — Microsoft's partnered up with Laplink PCmover to duplicate that functionality, except now it's no longer free.

PCmover Express

Microsoft offers Windows 10 users a half-price deal on PCmover Express — it will cost you about $15 for a single-move license. The Express version lets you select folders, user profiles, files, and settings you want transferred over to your new PC. All you have to do then is connect the two PCs to the internet and let everything transfer. PCmover will do its best to make your new PC seem like your old PC, but, depending on how old of an OS you're moving from, you will likely see some changes. In the case of anything going wrong, there is 24/7 assistance to get you through the problem.

This version of PCmover does not allow for full application transfer between PCs. It is compatible with Windows operating systems between and including Windows XP and Windows 10. Keep in mind that PCmover does not create a backup of your files when they are transferred.

See at Microsoft

PCmover Professional

PCmover Professional will cost you more — about $50 for a single-move license — but if you want to also transfer your applications, you'll want to go with this option. It works essentially the same as PCmover Express, except you can choose which applications to transfer as well as your folders, user profiles, files, and settings. It also has 24/7 assistance in case anything goes wrong.

This works on Windows operating systems between and including Windows XP and Windows 10. Keep in mind that PCmover does not create a backup of your files when they are transferred.

See at Amazon

Use Macrium Reflect to clone your hard drive

Use Macrium Reflect to clone your hard drive

Cloning a hard drive allows you to create an exact replica of your old drive on a new drive, whether external or internal. As soon as a clone is created, it's ready to boot just as if nothing had happened.

There are several cloning tools you can choose from, but we found success with Macrium Reflect. There is a free version that works well for casual users, and there's also a business version with varying prices.

If you're interested in creating a direct clone of your old drive to use in a new PC, check out these guides that will walk you through the entire process.

Sharing files without HomeGroup

With the Windows 10 April 2018 Update, HomeGroup has been retired. This means that anyone who used to use it to transfer files between PCs will now have to go a different route. Microsoft hasn't completely killed the ability to share data over your network; it's just been tweaked and renamed.

If you're scratching your head at this point, wondering how to get by without HomeGroup, have a look at our comprehensive guide to sharing files now that HomeGroup is gone.

How to share files and printers without HomeGroup on Windows 10

More resources

Updated June 7, 2018: I've refreshed this guide to ensure you're still getting an accurate look at what it takes to transfer your data.


How to play Unravel Two for Xbox One right now

$
0
0

While Unravel Two was only just announced, here's how to play right now on Xbox One.

Electronic Arts recently unveiled Unravel Two, a successor to its 2016 indie puzzle-based platforming game, as a part of its E3 2018 showcase. This latest entry revives the adorable "Yarny" for a new set of adventures, with new locations, puzzles, and a seamless local co-op mode.

One of the biggest surprises of the show was Unravel Two's availability, with the game already up for download on Xbox One, PlayStation 4, and PC. Players can now dive in Yarny's latest adventure, with the game retailing for $19.99 across digital storefronts.

Xbox One players can now download the game via the Microsoft Store, with a price cut to $17.99 offered to EA Access subscribers. The game also offers Xbox One X enhancements which bump the game the 4K resolution, although High Dynamic Range (HDR) support appears to be absent.

To download and play Unravel Two today, head to the game's Xbox One listing on the web or your console.

See at Microsoft Store

How to customize ships in Sea of Thieves

$
0
0

Here's how to deck out your ship in Sea of Thieves with hulls, figureheads, sails and flags.

Sea of Thieves starts players on equal footing, yet there's still a variety of way to stand out on the seas. With few upgrades and progression beyond your initial skill set, unique cosmetics are the main drive keep climbing to the ranks of Pirate Legend. A vast collection of ship cosmetics is also up for grabs, providing a fresh flair to your galleon or sloop.

We've wrapped up how to obtain and equip Sea of Thieves' ships cosmetics, following its latest update.

See at AmazonSee at Microsoft Store

Purchasing ship cosmetics in Sea of Thieves

Like most of Sea of Thieves cosmetic items, a majority of cosmetic ship items are accessed from the appropriate outpost vendor. Shipwrights stock new figureheads, hulls, sails, and flags, all in exchange for a sum of gold. However beware – with a majority of items priced into five digits, you'll need to work to unlock them. Here's where and how to purchase new ship cosmetics in Sea of Thieves.

  1. Visit any outpost.
  2. Locate the shipwright, located on the outpost's main pier.
  3. Press X to initiate conversation with the merchant when prompted.
  4. Press A to begin browsing merchant stock.
  5. Initiate a purchase by pressing A over an item. Ensure your gold balance is equal to, or higher, than the item's value.

After completing the transaction, this item is now yours to keep.

Equipping ship cosmetics in Sea of Thieves

After purchasing new ship cosmetics, you'll need to equip them before setting sail. Ship customization takes place exclusively within outposts, using a dedicated chest on the pier. Equipped items will be instantly reflected on your ship, providing the opportunity to preview customization before getting onboard. Here's how to quick most cosmetics in Sea of Thieves:

  1. Locate the Ship Customization Chest next to the shipwright.
  2. Press X to open the chest when prompted.
  3. Choose an item from your current inventory. Use LB and RB to filter by customization type.
  4. Press A to equip this customization item. Repeat these steps to fully equip your ship.

Items can be freely equipped and unequipped for no additional cost gold. All unequipped items will be retired your ship's customization chest and available for later use.

Equipping flags

Flags are the latest addition in Sea of Thieves' ship customization, allowing pirates to fly a variety of designs on top of their sails. Unlike most ship customization, flags can be changed on the fly, using a specialist box located at the top of the crow's nest. This is accessible after installing Sea of Thieves' mandatory "The Hungering Deep" update.

  1. Locate the Flag Customization Chest, located at your ship's crow's nest.
  2. Press X to open the chest when prompted.
  3. Choose a flag from your current inventory.
  4. Press A to equip your flag.

Following the feature's rollout, all players are given a variety of flags from the outset. Seven flags are up for grabs form the start, ranging from colors and patterns to the iconic jolly roger. Unlike like other ship cosmetics, the ability to change on move makes this a viable communication method with other players.

Complete list of ship cosmetics

They might be hard to obtain, though there's an expansive list of ship cosmetics available in Sea of Thieves. These are all the items currently available, following the release of The Hungering Deep.

Every flag in Sea of Thieves

  • White Flag
  • Checkered Flag
  • Black Flag
  • Blue Flag
  • Yellow Flag Red Flag
  • Jolly Roger Flag
  • Shark Hunter Flag

Every hull in Sea of Thieves

  • Bilge Rat Hull
  • Scurvy Bilge Rat Hull
  • Castaway Bilge Rat Hull
  • Sea Dog Hull
  • Rogue Sea Dog Hull
  • Ruffian Sea Dog Hull
  • Admiral Hull
  • Ceremonial Admiral Hull
  • Grand Admiral Hull
  • Sovereign Hull
  • Royal Sovereign Hull
  • Shark Hunter Hull
  • Legendary Hull

Every sail in Sea of Thieves

  • Black Sailor Sail
  • Grass Green Sailor Sail
  • Red Sailor Sail
  • Royal Blue Sailor Sail
  • Yellow Sailor Sail
  • Bilge Rat Sail
  • Scurvy Bilge Rat Sail
  • Castaway Bilge Rat Sail
  • Sea Dog Sail
  • Rogue Sea Dog Sail
  • Ruffian Sea Dog Sail
  • Admiral Sail
  • Ceremonial Admiral Sail
  • Grand Admiral Sail
  • Sovereign Sail
  • Royal Sovereign Sail
  • Shark Hunter Sail
  • Vanguard Sail
  • Legendary Sail

Every figurehead in Sea of Thieves

  • Bilge Rat Figurehead
  • Scurvy Bilge Rat Figurehead
  • Castaway Bilge Rat Figurehead
  • Sea Dog Figurehead
  • Rogue Sea Dog Figurehead
  • Ruffian Sea Dog Figurehead
  • Admiral Figurehead
  • Ceremonial Admiral Figurehead
  • Grand Admiral Figurehead
  • Sovereign Figurehead
  • Royal Sovereign Figurehead
  • Shark Hunter Figurehead
  • Legendary Figurehead

Over to you

Which are your favorite ship cosmetics in Sea of Thieves? Drop into the comments below with your top picks.

Sea of Thieves Interview: Adding a fourth content team, future updates, and The Hungering Deep

See at AmazonSee at Microsoft Store

How to connect your wireless printer in Windows 10

$
0
0

Wireless Printer

Don't you just despise those times when you need to quickly print something but your printer is packed away somewhere, or you need to keep plugging in a pesky USB cable? Picking up a wireless printer will allow for remote access to the peripheral, enabling Windows 10 to print, fax and scan without being physically attached to the unit. Let's take a look at how to set up your wireless printer in Windows 10.

For this guide, I'll be using my trusty HP 4500, but any wireless printer or all-in-one should work just fine — there's a newer model to my one if you're interested. Note that we'll be looking at direct connections. Should you be interested in learning more about HomeGroup in Windows 10, be sure to check out our in-depth guide, which will enable you to set up and configure the sharing of printers and content.

Connecting your printer

Windows 10 Printer

Let's take a quick look at how to add your wireless printer in Windows 10.

  1. Open Cortana by pressing Windows Key + Q.
  2. Type in "printer."

    Windows 10 Printer

  3. Select Printers & Scanners.
  4. Turn on the printer.
  5. Refer to the manual to connect it to your Wi-Fi network. Unfortunately, this process varies not just from manufacturer to manufacturer, but often from printer to printer.
  6. Hit Add a printer or scanner.
  7. Select the printer from the results.

    Windows 10 Printer

  8. Click Add device.

You should be now good to go. This process will also work with wired printers, simply plug in the unit and follow the steps above.

Can't find your printer?

Windows 10 Printer

There's a chance that for some reason Windows may be unable to locate your printer. It's not the end of the world and the issue could be easily rectified by attempting to connect the printer to Windows 10 manually. To do this, we'll need to run through a wizard. Here's how:

  1. Open Cortana by pressing Windows Key + Q.
  2. Type in "printer."
  3. Select Printers & Scanners.
  4. Hit Add a printer or scanner.

    Windows 10 Printer

  5. Choose The printer that I want isn't listed.
  6. Select Add a Bluetooth, wireless or network discoverable printer.
  7. Choose the connected printer.

If you're still unable to see your printer, ensure it's switched on and both the printer and your Windows 10 PC are on the same local network.

Change the default printer

Windows 10 Printer

Windows will attempt to set the default printer by selecting the one used most recently on the connected network. This is toggled on by default and will mean that the OS can remember which printer to use when switching between networks. Not everyone needs or wants this functionality, and luckily it's really easy to turn it off.

  1. Open Cortana by pressing Windows Key + Q.
  2. Type in "printer."
  3. Select Printers & Scanners.
  4. Turn "Let Windows manage my default printer" to off.

    Windows 10 Printer

  5. Select the printer you wish to set as default from the list of devices.
  6. Select Manage.

    Windows 10 Printer

  7. Hit Set as default.

More on printers

Updated on June 08, 2018: This guide was refreshed to ensure we get your printer hooked up to a Windows 10 PC without issue.

How to disable the lock screen in Windows 10

$
0
0

How to disable the Windows 10 lock screen

The lock screen, which appears just before the Windows 10 sign-in screen, can be disabled.

The Windows 10 lock screen divides many users. Some don't mind seeing a nice picture along with a news blurb, some notifications, and the time of day. Others find it to be a waste. Why click or drag just to get to the actual sign-in screen?

Disabling the lock screen is entirely possible as long as you're running the Creators Update or anything newer, including the Windows 10 April 2018 Update. The steps required are a bit different for Home and Pro versions, but we'll explore them both here.

How to disable the lock screen in the Home edition of Windows 10

If you have Windows 10 Home edition, to disable the lock screen you need to make some changes in your registry.

Note: As always when editing your registry, there is a chance that your OS can fail if the exact steps are not followed. Before beginning, make sure you create a full backup of your PC.

  1. Right-click the Start button.
  2. Click Search.

    Right-click the Start button. Click Search.

  3. Type regedit and hit Enter on your keyboard.
  4. Double-click HKEY_LOCAL_MACHINE.

    Type regedit and hit Enter. Double-click HKEY_LOCAL_MACHINE.

  5. Double-click SOFTWARE.
  6. Double-click Policies.

    Double-click SOFTWARE. Double-click Policies.

  7. Double-click Microsoft.
  8. Right-click Windows.

    Double-click Microsoft. Right-click Windows.

  9. Click New.
  10. Click Key.

    Click New. Click Key.

  11. Type Personalization and hit Enter on your keyboard.
  12. Right-click the Personalization key you just created.

    Type Personalization and hit Enter. Right-click the Personalization key you just created.

  13. Click New.
  14. Click DWORD (32-bit) Value.

    Click New. Click DWORD.

  15. Type NoLockScreen and hit Enter on your keyboard.
  16. Double-click the NoLockScreen DWORD you just created.

    Type NoLockScreen and hit Enter. Double-click the NoLockScreen DWORD you just created.

  17. Type 1 in the Value data field.
  18. Click OK.

    Type 1 in the Value Data field. Click OK.

To re-enable the lock screen, change the DWORD value back to 0.

How to disable the lock screen in the Pro edition of Windows 10

If you're running a Pro edition (including Enterprise and Education) of Windows 10, you can use the Group Policy editor to remove the lock screen.

  1. Right-click the Start button.
  2. Click Search.

    Right-click the Start button. Click Search.

  3. Type gpedit and hit Enter on your keyboard.
  4. Double-click Administrative Templates.

    Type gpedit and hit Enter on your keyboard. Double-click Administrative Templates.

  5. Double-click Control Panel.
  6. Click Personalization.

    Double-click Control Panel. Click Personalization.

  7. Double-click Do not display the lock screen.
  8. Click Enabled.

    Double-click Do not display the lock screen. Click Enabled.

  9. Click Apply.
  10. Click OK.

    Click Apply. Click OK.

More resources

Updated June 7, 2018: I've refreshed this guide to ensure it still works after the Windows 10 April 2018 Update.

Guide Default Menu: 
menu-creators-update-guide

How to connect to a Wi-Fi network on Windows 10

$
0
0

If you need to set up a new Wi-Fi connection on your Windows 10 device, there are multiple ways to do it.

These days, wireless networks are virtually everywhere, giving us a way to get online without cables.

Thankfully, Windows 10 offers more than one way to quickly connect to the internet using a Wi-Fi connection, whether you're setting up a new device, bringing your computer to a new place, or looking for an efficient way to connect multiple devices to the same network.

In this Windows 10 guide, we walk you through the steps to connect to a Wi-Fi network using the Taskbar, Settings app, Control Panel, and Command Prompt.

How to connect to a Wi-Fi network using Taskbar

Using the network flyout in the Taskbar is the most straightforward way to connect to a new Wi-Fi network. Here's how:

  1. Click on the wireless icon in the bottom-right corner of the taskbar. (If you don't see the button, click the up arrow button on the left.)

    Note: Alternatively, you can open Action Center (Windows key + A), and then click the Network button in the Quick actions section to access the network flyout.

  2. Select the wireless network you want to connect to.
  3. Check the Connect automatically option (optional).
  4. Click the Connect button.

    Quick Tip: If you don't see any network listed, click the Wi-Fi button to turn on the adapter.

  5. Enter the network security key (password).
  6. Click the Next button.

Once you complete these steps, you will be connected to the network using a wireless connection.

Reconnecting to a Wi-Fi network automatically

If you need to disable your wireless adapter to save battery, prevent connecting to a network in certain places, or for any other reason, Windows 10 also offers an option to re-enable and re-connect your device automatically.

  1. Click on the wireless icon in the bottom-right corner of the taskbar. (If you don't see the icon, click the app arrow button on the left.)

    Note: Alternatively, you can open Action Center (Windows key + A), and then click the Network button in the Quick actions section to access the network flyout.

  2. Click the Wi-Fi button.

  3. Use the drop-down menu and select when you want to re-enable and re-connect to the network. Option available include:

    • Manually.
    • In one hour.
    • In four hours.
    • In one day.

After completing the steps, the network adapter will re-enable automatically depending on the schedule you have configured. However, your computer will only auto-connect to those networks that you've previously configured to connect automatically.

How to connect to a Wi-Fi network using Settings

Using the "Network & Security" settings page, you can set up Wi-Fi connections manually, and then when your device is in range, it'll connect automatically. Here's how:

  1. Open Settings.
  2. Click on Network & Security.
  3. Click on Wi-Fi.
  4. Click the Manage known networks link.

  5. Click the Add a new network button.

  6. Enter the network name.
  7. Use the drop-down menu to select the Security type. (Usually, the security type is WPA2-Personal AES.)
  8. Enter the network security key (password).
  9. Check the Connect automatically option.
  10. Check the Connect even if this network is not broadcasting option (optional).
  11. Click the Save button.

After completing these steps, your computer will connect automatically to the Wi-Fi network you specified.

How to connect to a Wi-Fi network using Control Panel

It's also possible to connect to a wireless network manually using the network settings in Control Panel. Just follow these steps:

  1. Open Control Panel.
  2. Click on Network and Internet.
  3. Click on Network and Sharing Center.
  4. Click the Set up a new connection or network link.

  5. Select the Manually connect to a wireless network option.

  6. Click the Next button.
  7. Enter the network SSID name.
  8. Use the drop-down menu to select the Security type. (Usually, the security type is WPA2-Personal.)
  9. Enter the network security key (password).
  10. Check the Start this connection automatically option.

  11. Click the Next button.
  12. Click the Close button.

Once you complete these steps, your device will now connect automatically to the network you specified.

How to connect to a Wi-Fi network using Command Prompt

Alternatively, you can connect to a Wi-Fi network using the netsh command line tool using Command Prompt. Here's how:

  1. Open Start.
  2. Search for Command Prompt, right-click the top result, and select Run as administrator.
  3. Type the following command to view the available network profiles and press Enter:

    netsh wlan show profile

  4. Make a note of the wireless network profile with the settings you want to use.
  5. Type the following command to connect to the Wi-Fi network and press Enter:

    netsh wlan connect ssid=YOUR_WIFI_SSID name=PROFILE_NAME

    In the command remember to specify the SSID of the network and profile name with the network settings you're trying to connect.

    Quick Tip: If you have more than one wireless adapter, you must also the specify in the command which adapter you want to use. For example, netsh wlan connect ssid=YOUR_WIFI_SSID name=PROFILE_NAME interface=Wi-Fi

After running the command, your computer will connect to the wireless network.

Connecting to a new Wi-Fi network

On Windows 10, you can use the netsh tool to manage wireless adapters and networks, but for some odd reason, it only lets you connect to networks you've connected in the past. The reason is that you must specify a network profile, which you can't create using the netsh.

However, if you must use Command Prompt to quickly connect one or multiple computers to the same Wi-Fi network, there's a workaround you can use. You can export the profile with the settings of the network that was created automatically when you connected the first time, which you can then import using netsh to connect to the wireless network. Here's how:

  1. Open Start.
  2. Search for Command Prompt, right-click the top result, and select Run as administrator.
  3. Type the following command to view the available network profiles and press Enter:

    netsh wlan show profile

  4. Type the following command to export a profile and press Enter:

    netsh wlan export profile tsunami key=clear folder=c:\your\custom\path\to\export\folder

Once you completed these steps, you can import the same XML file to connect other computers to the same network or reconnect your device if the profile is no longer available.

Importing Wi-Fi profiles

In order to import a profile to use netsh to connect to Wi-Fi network, do the following:

  1. Open Start.
  2. Search for Command Prompt, right-click the top result, and select Run as administrator.
  3. Type the following command to find out the name of the network adapter and press Enter:

    netsh wlan show interfaces

  4. Make a note of the name of the adapter you want to use to connect to the wireless network. (On Windows 10 with a single adapter, usually, the name is Wi-Fi.)
  5. Type the following command to import the network profile and press Enter:

    netsh wlan add profile filename="c:\your\custom\path\to\export\folder\wi-fi-tsunami.xml" Interface="YOUR_WIFI_ADAPTER_NAME" user=current

  6. Type the following command to connect to the wireless network and press Enter:

    netsh wlan connect ssid=YOUR_WIFI_SSID name=PROFILE_NAME

    Quick Tip: If you have more than one wireless adapter, you must also specify in the command which adapter you want to use. For example, netsh wlan connect ssid=YOUR_WIFI_SSID name=PROFILE_NAME interface=Wi-Fi

After adding the profile, your computer should connect to the network automatically.

More Windows 10 resources

For more helpful articles, coverage, and answers to common questions about Windows 10, visit the following resources:

How to fix disabled AMD Ryzen processor cores

$
0
0

Ryzen 7

If your Ryzen processor is suddenly reporting disabled cores, there's an easy fix.

PCs are funny old beasts, and in the process of setting up my new Ryzen 7 2700X build I encountered a few ... hiccups. One of the more troublesome ones was the PC reporting that four of the eight cores were disabled, which I verified in several places and ran some benchmarks just to be sure.

I searched the web, trying anything and everything, including resetting the CMOS (aka the small onboard memory) on the motherboard by removing the battery and reflashing the BIOS. Nothing worked. But eventually I found a very simple thing did. All you need is AMD Ryzen Master.

Ryzen MasterIf you have cores disabled, Ryzen Master or Windows 10 Task Manager will show you.

I'll preface this by saying that this is by no means a guaranteed fix for your system. In my case, one very specific set of events triggers the cores to be disabled and this method has, so far, always brought them back.

Update: As folks have been asking in the comments, the set of events that triggered it in this example was applying XMP profiles and manual speed increases to the system's RAM in the BIOS. The issue is (in my case anyway) in no way linked to Windows 10 or the Ryzen Master application, which wasn't used for anything but the steps below.

If you don't have AMD Ryzen Master installed on your PC, you can grab it here.

How to enable disabled AMD Ryzen cores

Just follow these steps:

  1. Open Ryzen Master.
  2. Locate and click the reset button in the top right corner.

    Ryzen Master

  3. Click OK when the dialog box pops up.

    Ryzen Master

  4. Allow the PC to reboot and open up Ryzen Master again.

Ryzen Master

Assuming all went as planned, you should now see no disabled cores, as in the image above. Ryzen Master allows you to disable cores manually, and everything you do is at your own risk. But, thankfully, the big old reset button seems to do its job.

Ryzen Master is a piece of software that many will not use, and there's definitely a strong case to avoid it for purposes of overclocking, where you'll almost always be better off sticking to the BIOS. But, it definitely has a use, even if it's just to quickly set things straight if you're having a problem.

How to back up Sticky Notes on Windows 10

$
0
0

If you use Sticky Notes on Windows 10, in this guide we show you the steps to back up and restore your notes to the same or different computer.

Sticky Notes is an application that has been around for many years, but it became a modern app with Windows 10, and it's a software approach to the physical paper sticky notes you usually post around your monitor.

The only caveat to using Sticky Notes is that your notes don't sync to the cloud (although the app integrates with Cortana), and there's no way to save them outside your device. As a result, when you reinstall Windows 10, or if your machine breaks, your notes are gone for good.

Related: How to use the Windows Sticky Notes to remind you all the things

However, using the right set of instructions, you can make a copy of the database, which you can then restore on any device to get your notes back.

In this Windows 10 guide, we show you the steps to create a backup of your notes and the process to restore them.

How to create a backup of your Sticky Notes

To backup your Sticky Notes on Windows 10, do the following:

  1. Open the Run command using the Windows key + R keyboard shortcut.
  2. Type the following path and click the OK button:

    %LocalAppData%\Packages\Microsoft.MicrosoftStickyNotes_8wekyb3d8bbwe\LocalState

  3. Right-click the plum.sqlite file, and select Copy.

  4. Using File Explorer (Windows key + E), open a folder location that you want to use to export the backup.

    • For example, you can use a USB flash drive, or you can save the file in your OneDrive folder, which makes it easier to move your Sticky Notes to other devices or to restore them after reinstalling Windows 10.
  5. Right-click in the folder location, and select Paste (Ctrl + V).

Once you complete these steps, you can restore your notes on the same computer, or you can move them to another device.

How to restore a backup of your Sticky Notes

To restore your Sticky Notes to the same or different Windows 10 machine, do the following:

  1. Open File Explorer (Windows key + E).
  2. Navigate to the folder location with the backup file.
  3. Right-click the plum.sqlite file, and select Copy (Ctrl + C).

  4. Open the Run command using the Windows key + R keyboard shortcut.
  5. Type the following path and click the OK button:

    %LocalAppData%\Packages\Microsoft.MicrosoftStickyNotes_8wekyb3d8bbwe\LocalState

  6. Right-click the folder, and select Paste (Ctrl + V).

    Important: You can replace an existing plum.sqlite, but if you do you'll delete any previous notes already stored on the device.

After completing these steps, open Sticky Notes, and all your notes should now appear on your desktop exactly in the same location where you left them.

More Windows 10 resources

For more helpful articles, coverage, and answers to common questions about Windows 10, visit the following resources:


How to enable or disable Wi-Fi and Ethernet network adapters on Windows 10

$
0
0

If you have to disable a network adapter you don't use, or one that doesn't work, in this guide, we'll show you the steps on how to do this on Windows 10.

Although a network adapter is an important part of your computer — it connects your PC to your local network, and thus the internet — sometimes you may need to disable it. Regardless of if you need to turn it off to just shut down things you're not using, or to save battery life, or to keep your computer off a network, you have your reasons.

The only problem is that while you can use the Settings app on Windows 10 to manage network settings, Settings doesn't include an option to enable or disable network adapters. Here's how to do it.

In this Windows 10 guide, we'll walk you through the steps to disable and enable a network adapter using GUI and command line tools.

How to enable or disable network adapters using Control Panel

On Windows 10, you can use Control Panel to quickly disable and then enable your network adapters as necessary.

Disabling adapter

To disable a network adapter using Control Panel, use these steps:

  1. Open Settings.
  2. Click on Network & Security.
  3. Click on Status.

    Quick Tip: You can also quickly access these settings by right-clicking the network icon in the taskbar and selecting the Network & Internet settings option.

  4. Click on Change adapter options.

  5. Right-click the network adapter, and select the Disable option.

Enabling adapter

To enable a network adapter using Control Panel, use these steps:

  1. Open Settings.
  2. Click on Network & Security.
  3. Click on Status.
  4. Click on Change adapter options.
  5. Right-click the network adapter, and select the Enable option.

How to enable or disable network adapters using Device Manager

It's also possible to use Device Manager to enable or disable network adapters that you don't need.

Disabling adapter

To disable a network adapter using Device Manager, use these steps:

  1. Open Start.
  2. Search for Device Manager, and click the top result.
  3. Expand the Network adapters category.
  4. Right-click the adapter you want, and select the Disable device option.

Enabling adapter

To enable a network adapter using Device Manager, use these steps:

  1. Open Start.
  2. Search for Device Manager, and click the top result.
  3. Expand the Network adapters category.
  4. Right-click the adapter you want, and select the Enable device option.

How to enable or disable network adapters using Command Prompt

On Windows 10, you can use the netsh command tool to disable or re-enable network adapters on your device.

Disabling adapter

To disable a network adapter using netsh in Command Prompt, use these steps:

  1. Open Start.
  2. Search for Command Prompt, right-click the top result, and select Run as administrator.
  3. Type the following command to identify the name of the adapter you want to disable and press Enter:

    netsh interface show interface

  4. Type the following command to disable the Wi-Fi or Ethernet adapter and press Enter:

    netsh interface set interface "YOUR-ADAPTER-NAME" disable

    In the command remember to specify the name of the adapter you want to disable. The quotation marks are only required if there are spaces within the name.

Enabling adapter

To enable a network adapter using netsh in Command Prompt, use these steps:

  1. Open Start.
  2. Search for Command Prompt, right-click the top result, and select Run as administrator.
  3. Type the following command to identify the name of the adapter you want to enable and press Enter:

    netsh interface show interface

  4. Type the following command to disable the Wi-Fi or Ethernet adapter and press Enter:

    netsh interface set interface "YOUR-ADAPTER-NAME" enable

    In the command remember to specify the name of the adapter you want to enable. The quotation marks are only required if there are spaces within the name.

How to enable or disable network adapters using PowerShell

Alternatively, you can even use the PowerShell command line shell to disable or enable any network adapters that you don't use on your PC.

Disabling adapter

To disable a Wi-Fi or Ethernet network adapter on Windows 10 using PowerShell, use these steps:

  1. Open Start.
  2. Search for Windows PowerShell, right-click the top result, and select Run as administrator.
  3. Type the following command to identify the name of the adapter you want to disable and press Enter:

    Get-NetAdapter | format-table

  4. Type the following command to disable the Wi-Fi or Ethernet adapter and press Enter:

    Disable-NetAdapter -Name "YOUR-ADAPTER-NAME" -Confirm:$false

    In the command remember to specify the name of the adapter you want to disable. The quotation marks are only required if there are spaces within the name.

Enabling adapter

To enable a network adapter on Windows 10 using PowerShell, use these steps:

  1. Open Start.
  2. Search for Windows PowerShell, right-click the top result, and select Run as administrator.
  3. Type the following command to identify the name of the adapter you want to enable and press Enter:

    Get-NetAdapter | format-table

  4. Type the following command to disable the Wi-Fi or Ethernet adapter and press Enter:

    Enable-NetAdapter -Name "YOUR-ADAPTER-NAME" -Confirm:$false

    In the command remember to specify the name of the adapter you want to enable. The quotation marks are only required if there are spaces within the name.

Wrapping things up

Even though the modern experience of Windows 10 doesn't offer a complete set of network settings, there are still many ways to enable or disable network adapters when necessary.

Remember that using the network flyout to turn on or off wireless connections doesn't disable your Wi-Fi adapter, it only disconnects the device from the network.

We're focusing this guide on wireless and wired adapters, but remember that Bluetooth is also a networking device, as such you can use the same instructions to enable or disable the adapter.

What method do you prefer to manage network cards on Windows 10? Tell us in the comments.

More Windows 10 resources

For more helpful articles, coverage, and answers to common questions about Windows 10, visit the following resources:

How to change Wi-Fi network connections priority order on Windows 10

$
0
0

If your PC keeps connecting to the wrong Wi-Fi network automatically, in this guide, we'll show you the steps to change their priority to always try to connect to the preferred network first.

On Windows 10, when the Wi-Fi adapter is enabled on your device, it'll connect to only one particular network automatically, even if you have multiple connections saved on your computer, and those networks are in range. The selection process to which wireless network you'll be connected is based on the priority system, which is assigned to each connection.

However, if your device keeps connecting to the least preferable wireless network automatically, on Windows 10, you can change the priority order of each connection to make sure that your device always hooks to the preferred access point first.

In this Windows 10 guide, we'll walk you through the steps to change the priority order of Wi-Fi network connections using the modern user interface and command line allowing your device to always connect to the network you prefer.

How to change wireless connections priority using Network flyout

The quickest way to make a Wi-Fi connection a priority is to use the Network flyout available in the taskbar.

  1. Click the wireless icon on the bottom-right corner of the taskbar.
  2. Select the wireless network you want to prioritize.
  3. Check the Connect automatically option.

  4. Click the Connect button.

Although the connection process doesn't specify any details, when you check the "Connect automatically" option, you're also configuring the connection as the new priority.

If you want to prevent making a particular Wi-Fi network a priority, you must leave the Connect automatically option clear as you configure a new connection. If you're already connected to the network, simply disconnect, and as you reconnect, make sure to clear the Connect automatically option.

How to change wireless connections priority using Command Prompt

Alternatively, you can use the netsh on Command Prompt to change the priority of Wi-Fi networks. However, unlike the Network flyout process, using netsh, you can check connection priorities whether you're connected or disconnected from the network, and you can change the priority for every connection stored on your device.

  1. Open Start.
  2. Search for Command Prompt, right-click the top result, and select Run as administrator.
  3. Type the following command to list all the wireless networks you have connected in the past and press Enter:

    netsh wlan show profiles

  4. Make a note of the wireless network you want to prioritize.
  5. Type the following command to identify the name of your wireless adapter and press Enter:

    netsh wlan show interfaces

  6. Make a note of the adapter name you use to connect to a Wi-Fi network. (If your device only has one wireless adapter, then its default name will be Wi-Fi.)
  7. Type the following command to change the connection priority and press Enter:

    netsh wlan set profileorder name="NETWORK-PROFILE-NAME" interface="YOUR-INTERFACE-NAME" priority=1

    In the command remember to include the network profile name for the connection you want to prioritize, and the name of the network adapter.

After completing the steps, your computer will always connect to the Wi-Fi network you prioritize. If the network isn't available, it'll then try to connect to the next priority on the list.

If you have a long list of networks, you can change the priority of all of them. The only thing you need to do is to change the priority value in the command outlined on step No. 7 to a higher number. For example, if you want to make a particular network your second best option, the command should include a priority value of 2.

We're focusing this guide on Windows 10 devices, but you can use the same netsh instructions to change the wireless connection priority on Windows 8.1 and Windows 7.

More Windows 10 resources

For more helpful articles, coverage, and answers to common questions about Windows 10, visit the following resources:

Sea of Thieves guide: How to find all of the Skeleton Thrones

$
0
0

Riches and loot await, for those with a keen eye and steady aim...

The 1.1.2 patch for Xbox's popular pirate adventure game Sea of Thieves recently went live, and with it came a collection of new items and features. You can check out the full patch notes in our summary here, but in this article we're going to focus on the limited time event that came with the patch: Skeleton Thrones.

Skeleton Thrones are large wooden chairs hidden through the game world that award you with commendations and the new currency, Bilge Rat doubloons, when you sit on them. There are 10 in total — five small, and five large. The small ones only require you, but for the larger ones, you'll need to have a pirate from another crew sit with you. If you "unlock" all of the thrones, you'll receive two titles for your in-game profile that give you bragging rights. Here's how to find the thrones, and some tips for using your cannon to reach them.

See at AmazonSee at Microsoft

Getting started

While you could begin your search without some form of hint, that would be a long and tedious endeavor. Luckily, the Bilge Rat NPC Doug, located in the various Inn structures at Outposts, will nudge you in the right direction. Simply walk up and speak to him, and you'll know where to look.

If you're feeling social (and brave), it may be worth approaching other players and asking them if they'd like to team up to find all the Skeleton Thrones. Half of them require pirates from two groups anyway, and since ships are sitting ducks when their crews are trying to cannon themselves to the throne locations, the second vessel can patrol the area should another crew decide they want to go in for the kill.

Reaching the thrones

Once you spot a Skeleton Throne, you'll need to blast yourself to where it is. Depending on the elevation of the throne in relation to your ship's location, you'll need to aim accordingly. If your vessel is level with or above the throne, then you'll want to aim directly at the feet of it. Since projectiles come out of cannons slightly higher then where you directly aim, you should fly right into the throne's backboard and land right on the seat.

Things get trickier when you're below the throne. Aiming directly at the backboard will send you careening over it, and at this elevation, the feet are covered by the platform the throne is sitting on, shooting low will most likely cause you to smash into the side of whatever is holding it. Therefore, your best bet is to put some distance between your ship and the throne, which reduces the sharpness of the height angle and gives you a better shot at the feet of the throne. Shooting here from this range will arc you right into the backboard.

Where ARE the thrones? (Spoilers)

It's far more fun to actually find the thrones yourself, but we understand, maybe you don't have the time nor the inclination to go around looking for them. Thankfully, an awesome reddit user has compiled a list of all the known thrones locations, which should help save you a bunch of time. Note that large thrones require two players from separate crews, while small thrones only require a single player.

  • Shipwreck Bay - Large - On a small island to the north.
  • Plunder Outpost - Large - To the east, up high on a cliff's edge.
  • Marauder's Arch - Large - At the southern tip of the arch.
  • Cannon Cove - Large - At the top of the highest rock in a large hole.
  • Smuggler's Bay (offshore) - Large - As you move West towards map grid D2, there's a throne on the third offshore rock.
  • Thieves' Haven - Small - On a rock on the east side.
  • Devil's Ridge - Small - Underneath a ridge on the northern end of the island.
  • Hidden Spring Keep - Small - Use the south west cannon to fire yourself to the very top of the keep.
  • Map N10 - Small - Under the water in a small uncharted island.
  • Mermaid's Hideaway - Small - Adjacent to the southern peak.

Your thoughts

What do you think of the Skeleton Thrones event? Let me know.

Read: Sea of Thieves review

The Skeleton Thrones will be in Sea of Thieves for two weeks only, so set sail and get to sitting while you can. Sea of Thieves is available on Xbox One for $29.99 on Amazon, and $47.99 on the Microsoft Store.

See at AmazonSee at Microsoft

372695
72521

How to create a Windows 10 with S mode installation media

$
0
0

If you want to run Windows 10 in S mode, in this guide, we'll show you the steps on how to do this.

Originally, Windows 10 S was a separate edition streamlined for performance, security, and limited to the apps available in the Microsoft Store, which required its own installation media.

However, starting with Windows 10 version 1803 (April 2018 Update), Microsoft is removing the "S" edition in favor of "S mode," which offers the same locked down experience, but it's now a feature that can be enabled on Windows 10 Home, Windows 10 Pro and Enterprise.

If you want to run Windows 10 in S mode, you can create your very own USB bootable media that includes the required settings to activate S mode during the installation.

In this Windows 10 guide, we'll walk you through the steps to enable S mode in a new installation.

How to enable S mode on Windows 10

If you want to run Windows 10 in S mode, you'll need to create an unattend.xml file that must be applied to an image, which you can then use to do a clean installation of Windows 10.

How to import the installation files to your device

In order to create an installation media with Windows 10 S mode enabled, you need to open and modify an image of Windows 10, and to do that you must first import the installation files onto your device. The steps below will show you how:

  1. Open File Explorer.
  2. Navigate to the folder where you saved the Windows 10 ISO file.
  3. Right-click the ISO file, select Open with, and click File Explorer to mount it. (Alternatively, you can also connect the USB flash drive with the installation files.)
  4. Open the drive with the Windows 10 files.
  5. Select all the files using the Ctrl + A keyboard shortcut.
  6. Right-click the selection, and select Copy.

  7. Navigate to the folder that you want to use to store this project files.
  8. Right-click inside the folder and select Paste.

In order to open and modify the image, you need an install.wim file. If you have an ISO that you created using the Media Creation Tool, you're likely to have an install.esd file, which you won't be able to open.

Creating an install.wim file

If you don't have an install.wim file, you can use the DISM command tool to export the image files and create a .wim image from a .esd file using these steps:

  1. Open Start.
  2. Search for PowerShell, right-click the top result, select Run as administrator.
  3. Type the following command to identify the index number of the edition you want to use and press Enter:

    dism /Get-WimInfo /WimFile:C:\path\to\folder\sources\install.esd

    In the command make sure to change the path to the sources folder with the install.esd file on your device.

  4. Identify the index number for the edition you want. For example, we're extracting Windows 10 Pro, which in this case has an index number of 6.
  5. Type the following command to create an install.wim file and press Enter:

    dism /Export-Image /SourceImageFile:C:\path\to\folder\sources\install.esd /SourceIndex:6 /DestinationImageFile:C:\path\to\folder\sources\install.wim /Compress:Max /CheckIntegrity

    In the command make sure to change the path to the sources folder with the install.esd file on your device. The destination path should be the same as the source.

How to create an unattend.xml file to enable S mode on Windows 10

In order to create an answer file to enable S mode, you'll need to use the Windows System Image Manager (SIM) feature from the Windows Assessment and Deployment Kit (ADK).

Installing Windows System Image Manager

You can follow these steps to install Windows SIM on your computer:

  1. Download the Windows ADK installer for Windows 10 version 1803.
  2. Double-click the adksetup.exe file to begin the installation.
  3. Select the Install the Windows Assessment and Deployment Kit - Windows 10 to this computer option.

  4. Click the Next button.
  5. Select your privacy option.
  6. Click the Next button.
  7. Click the Accept button to agree to the license agreement.
  8. Clear all preselected items.
  9. Check the Deployment Tools package, which contains the Windows System Image Manager component.

  10. Click the Install button.
  11. Click the Close button.

Once you've completed the installation, you can continue setting up the environment to create an unattend.xml file using the Windows System Image Manager tool.

Setting up an answer file environment

In order to prepare the environment to create a new answer file project, do the following:

  1. Open Start.
  2. Search for Windows System Image Manager, click the top result to open the experience.
  3. Click the File menu, and select the Select Windows Image option.

  4. Navigate to the folder you exported the Windows 10 files.
  5. In the "sources" folder, select the install.wim image file, and click the Open button.
  6. Select an edition of Windows 10 you want to use. (It's always recommended to select the edition that you're planning to install.)
  7. Click the OK button.

  8. If you get a message, click the Yes button to create a new catalog file. (This process will take some time, but it's a one-time process. The .clg file will be saved in the same location where the install.wim is stored, and you can reuse it later on other projects.)

  9. Click the File menu, and select the Select Distribution Share option.

  10. Navigate to the folder that you're using to store the project folders and files.
  11. On "Folder name," type a name (such as Distribution) to create a folder to store additional project files.
  12. Click the Open button.
  13. Click the File menu, and select the New Answer File option.

After completing the steps, you will now have the required environment to create an answer file.

Creating a Windows 10 answer file to enable S mode

Using an answer file you can completely customize the installation of Windows 10. However, we're just configuring Windows 10 with S mode, as such will be setting up the offline servicing stage of the automation process.

In order to create the answer file to enable S mode, use these steps:

  1. Under "Windows Image," expand the Components folder.
  2. Right-click the amd64_Microsoft_Windows_CodeIntegrity component, and select the Add Setting to Pass 2 offlineServicing option.

  3. On the right side, under "Answer File," select the amd64_Microsoft_Windows_CodeIntegrity component.
  4. On the right side, under "Settings," change the SkuPolicyRequired value to 1.

  5. Click the Tools menu, and select the Validate Answer File option.
  6. If there are no errors, click the File menu, and select the Save Answer File As option.

  7. Navigate to the folder you want to save the file.
  8. Under "File name," use the unattend.xml file name.
  9. Click the Save button.

Once you've completed the steps, the unattend.xml file will be created, which you can now use to integrate into the Windows 10 image to enable S mode.

Inside the unattend.xml file the settings portion for offlineServicing should look like in the example below:

<settings pass="offlineServicing">
        <component name="Microsoft-Windows-CodeIntegrity" 
    processorArchitecture="amd64" 
    publicKeyToken="31bf3856ad364e35" 
    language="neutral" 
    versionScope="nonSxS" 
    xmlns:wcm="http://schemas.microsoft.com/WMIConfig/2002/State" 
    xmlns:xsi="http://www.w3.org/2001/XMLSchema-instance">
            <SkuPolicyRequired>1</SkuPolicyRequired>
        </component>
    </settings>

How to modify image to enable S mode on Windows 10

In this part of the process, you'll be using the DISM command line tool in PowerShell to open and apply the unattend.xml file to an install.wim image, which will enable S mode during a normal installation of Windows 10.

To modify a Windows 10 image, use these steps:

  1. Open Start.
  2. Search for Windows PowerShell, right-click the top result, and select Run as administrator.
  3. Type the following command to create a mounting point in the root of the drive and press Enter:

    md c:\mount\windows

  4. Type the following command to mount the install.wim image file and press Enter:

    dism /Mount-Wim /WimFile:c:\path\to\sources\install.wim /index:1 /MountDir:C:\mount\windows

    In the command make sure to change the path to the sources folder with the install.wim file on your PC.

  5. Type the following command to create a folder called "Panther" inside the mounted image and press Enter:

    md c:\mount\windows\Windows\Panther

  6. Type the following command to import the unattend.xml file to the Panther folder and press Enter:

    copy c:\path\to\folder\unattend.xml c:\mount\windows\Windows\Panther\unattend.xml

    In the command make sure to change the location of the unattend.xml file you want to copy to the Panther's folder.

  7. Type the following command to apply the unattend.xml file to the mounted image and press Enter:

    dism /Image=c:\mount\windows /Apply-Unattend=c:\mount\windows\Windows\Panther\unattend.xml

  8. Close any application that may be accessing files in the mounted image. Otherwise, you'll get errors.
  9. Type the following command to save the changes and unmount the Windows 10 image and press Enter:

    dism /Unmount-Image /MountDir:"c:\mount\windows" /commit

If you get an error indicating that the image couldn't be unmounted, use the dism /cleanup-wim command to resolve the issue.

Quick Tip: Although Windows 10 in S mode will detect and install device drivers, sometimes, you may want to add drivers to the offline image manually if you have a particular piece of hardware as you won't be able to install it after the installation.

How to create a bootable media of Windows 10 with S mode

In order to complete the installation media you must replace the install.wim or install.esd file with the modified install.wim image on the USB bootable media using these steps:

  1. Open File Explorer (Windows key + E).
  2. Navigate to the USB location with the Windows 10 installation files.
  3. Double-click the sources folder.
  4. Right-click the install.wim file, and select the Delete option.

  5. Open File Explorer again (Windows key + E).
  6. Navigate to the modified Windows 10 image (install.wim) location.
  7. Right-click the install.wim file, and select the Copy option.

  8. Right-click and select Paste in the sources folder in the USB flash drive with the installation files.

Using Media Creation Tool to create an install media

Alternatively, if you don't have a USB bootable media already created, you can use the Media Creation Tool to create one with the steps below. You'll only need to connect a USB flash drive of at least 8GB of space to your computer.

  1. Download the Windows 10 Media Creation Tool from this Microsoft Support website.
  2. Double-click the file to launch the tool.
  3. Click the Create installation media for another PC option.

  4. Click the Next button.
  5. Select the language, architecture, and edition as required. (When selecting the architecture it's recommended to use Both.)
  6. Click the Next button.
  7. Select the USB flash drive option.

  8. Select the flash drive you want to use making sure that you understand that everything will be deleted on that drive.

  9. Click the Next button.
  10. Click the Finish button.

After the installation media is created, remember to use the above steps to replace the install.esd (or install.wim) with the modified install.wim image in the USB bootable media

How to install Windows 10 with S mode enabled

Once you have the installation media created with the modified image, you can proceed to install Windows 10 as you would typically do, but the installation will now be configured with S mode enabled.

If you need assistance to perform a clean installation of Windows 10, we got you covered with this guide.

This guide outlines the steps to create a bootable media that enables S mode during the installation of Windows 10 Pro 64-bit, but the instructions should also work for Windows 10 Home and the Enterprise edition.

More Windows 10 resources

For more helpful articles, coverage, and answers to common questions about Windows 10, visit the following resources:

Ryzen owners, get your chipset drivers directly from AMD

$
0
0

Ryzen

AMD will almost certainly have something more up to date than your motherboard manufacturer.

It seems a bit silly including a DVD full of drivers in the box with a motherboard these days, but the idea is still the same. Once you've built your PC you want to make sure you've got the latest drivers since (usually) that's where improvements come from.

In particular, if you're building a new Ryzen PC on an X470 motherboard, AMD will almost 100 percent have more up to date chipset drivers than the ones your motherboard manufacturer is offering up.

Where to download AMD chipset drivers

Ryzen 7

Not only will AMD have the latest drivers, downloading directly will also add a dedicated Ryzen power plan to your PC. The AMD Ryzen Balanced power plan isn't offered directly through Windows 10 when you first boot up, but downloading the latest chipset drivers will add this to your PC.

To get the latest for your motherboard visit this link. Right now it's a single download to cover all the various new chipsets released on the AM4 platform.

AMD balanced power plan The AMD Balanced Power Plan can be activated in Power Options in Windows 10.

The download will be a regular .exe file you just need to open and follow the on-screen instructions to install.

As an example, Gigabyte's latest offered X470 chipset for my motherboard was released in May. At the time of building my new PC, AMD's was dated June 7, almost a full month newer. AMD offers a bunch of other drivers directly, including for RAID, and they're all on the same download page.

So if you have or are building a new AMD Ryzen PC, be sure to swing by and make sure you've got the latest bits.

Viewing all 5861 articles
Browse latest View live


Latest Images